 Crop Image Tool
Tool Location and Cursor Appearance
The Crop Image tool included in Rasterino appears in Illustrator’s main toolbar (which must be in Advanced mode: View > Toolbars > Advanced), stacked under the native Eraser, Scissors, and Knife tools. As with other stacked tools, click and hold on the top tool icon to display the tools stacked under it.
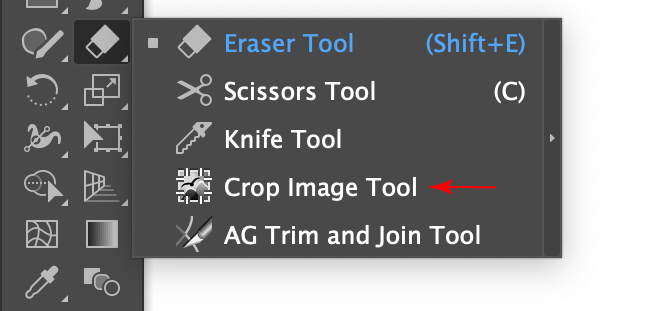
Crop Image Tool Location
The Crop Image tool’s primary cursor is an arrow with a small crop badge; when the tool is dragging an annotation control, it displays as a circle with small arrows:

Crop Image Cursors
Crop Image Tool Operations
The Crop Image tool is simple to operate. If one or more embedded images are selected when the tool is selected, then the tool’s annotated controls are immediately displayed for the topmost image, starting at its original (uncropped) bounds. Otherwise, an image may be clicked or marqueed with the tool to make it the active image (Crop Image only crops a single image at a time). By default, the cropping controls are accompanied at their lower right by a small red annotated panel which displays the image’s original size (in pixels) and its current cropped size; it also has a Close button, a Reset button, and an Apply button. The annotated panel may be repositioned by dragging on either its top bar or its informational area.
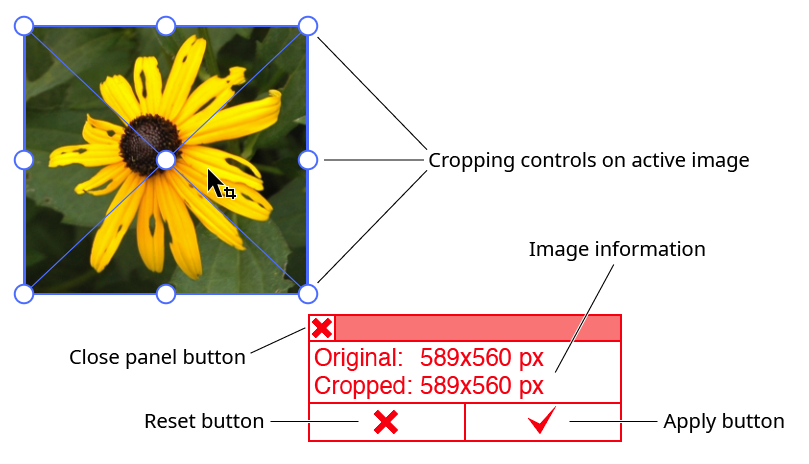
Rasterino Crop Image Controls
The cropping controls consist of nine small hollow circles, which specify the corners, mid-edges, and center of the crop box. Dragging any of the outer circles resizes the crop box, with the opposite circle as the anchor. Dragging the central circle repositions the entire crop box. Holding down Shift while dragging one of the outer circles will resize the crop box in a proportional manner. Holding down Shift while dragging the center circles constrains movement to the horizontal or vertical direction. Holding down Option/Alt while dragging an outer circle will resize the crop box from the center.
By default, the portions of the image which will be cropped off are darkened, to make the retained area easier to visualize. Cropping can only be done inwards (making the image smaller).

Rasterino Crop Image in Action
Images which have rotational and/or shear transformations applied may still be cropped with the tool:

Rasterino Crop Image with Sheared Image
If a cropping operation is started but not applied, and a different image selected or the tool deselected, then the next time the tool and the image are selected, the previous crop data will be restored.
The Reset button on the annotated panel resets the crop box to the original image’s bounds. The Apply button (or pressing the Enter key) finalizes the crop.
Crop Image Preferences
Using the flyout menu of the Rasterino panel will bring up the Crop Image tool preferences dialog. You can also doubleclick the Crop Image tool in the toolbox or press the Enter key when the tool is selected, but in either case an embedded image cannot be selected as this finalized the crop instead.

Crop Image Preferences
1. Show Annotation
When enabled (the default), an annotated panel is displayed during cropping operations, showing the image’s before and after pixel dimensions and allowing the crop area to be reset or finalized. When the annotated panel is not shown, the crop may still be finalized by pressing the Enter key. Clicking the Close button on the annotated panel is the same as disabling this preference.
2. Constrain Crop to Image’s Pixel Grid
As with the Crop Image function on the Rasterino panel, disabling this preference allows the edge of the crop box to fall in between the image’s pixels. But be aware that since an image must contain an integral number of pixels in both dimensions, the tool will actually honor such a crop location by scaling the image non-proportionally.
3. Disable Smart Guides
When enabled, Smart Guides will, if they are on, be temporarily turned off while dragging the crop box.
4. Preview Cropped Area
When enabled (the default), parts of the image which are outside the crop box will be darkened, to better visualize the final crop area.
5. Help Button
Opens the help documentation in the Astute Manager. If this does not automatically appear, please ensure your Astute Manager is running first.