 VectorFirstAid Panel
Menu items to show and hide the VectorFirstAid panel can be found in the main menu under Window > Astute Graphics > VectorFirstAid.
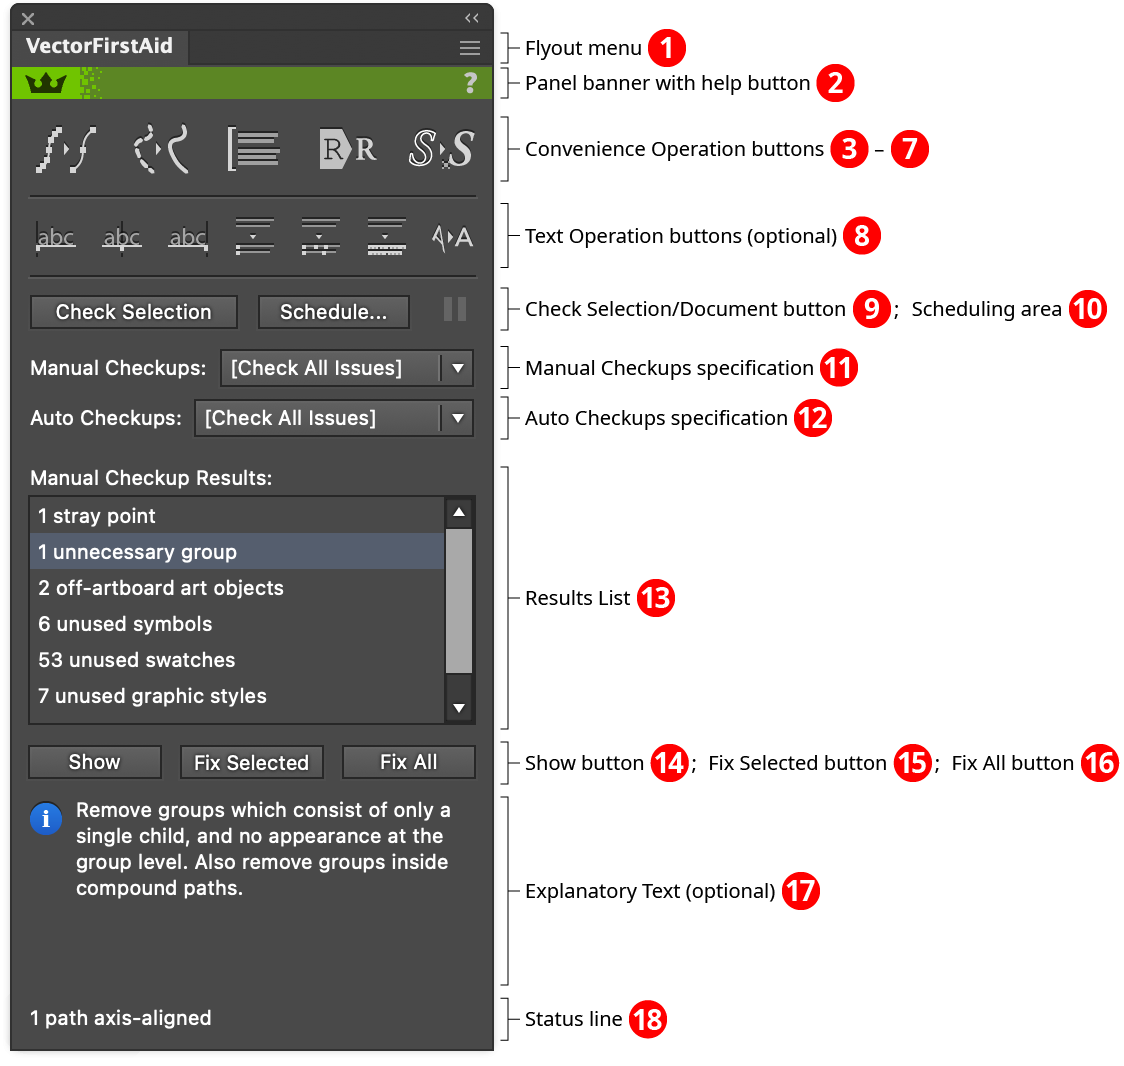
VectorFirstAid Panel
1. Flyout menu
See VectorFirstAid Panel: Flyout Menu.
2. Panel banner
The help button on the right opens the help documentation in the Astute Manager. If this does not automatically appear, please ensure your Astute Manager is running first.
3.4.5.6.7. Convenience Operation Buttons
See VectorFirstAid Panel: Convenience Operation Buttons.
8. Text Operation Buttons
See VectorFirstAid Panel: Text Operation Buttons.
9.10.11.12.13. Checkup Buttons
See VectorFirstAid Panel: Checkup Buttons.
14.15.16. Show and Fix Buttons
See VectorFirstAid Panel: Show and Fix Buttons.
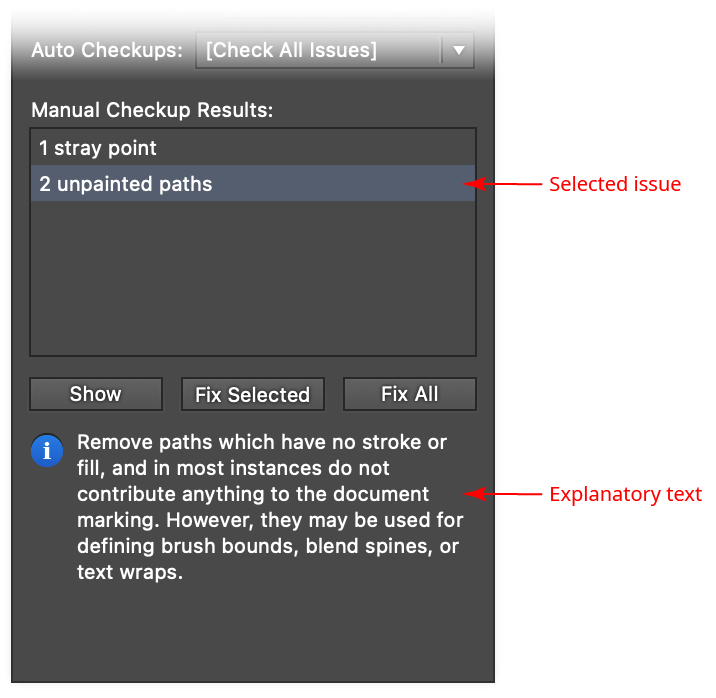
17. Explanatory Text
This section of the panel (which is shown by default but can be hidden if desired using the panel’s flyout menu) gives a short description of the single issue that is selected (highlighted) in the results list section of the panel, as well as the steps that VectorFirstAid would take to fix it.
VectorFirstAid Explanatory Text
18. Status Line
Displays status information after issues are fixed, or after any of the convenience operation or text operation buttons are used. For example, it might show “1 redundant point removed” after fixing a redundant point issue, or “No rejoinable paths found in selection” if the Rejoin Paths button was used.
Convenience Operation Buttons
Each convenience operation has various parameters, which are specified in the preferences dialog (see VectorFirstAid: Preferences). By holding down the Option/Alt key while clicking a convenience operation button, a small dialog will come up allowing those parameters to be changed before the operation is made. These new parameters apply to that single use of the operation only.
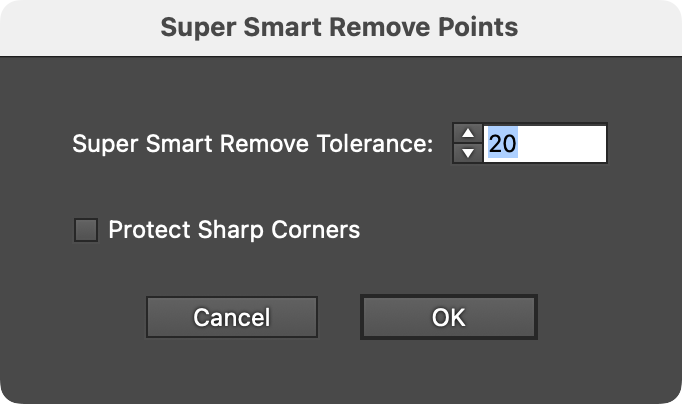
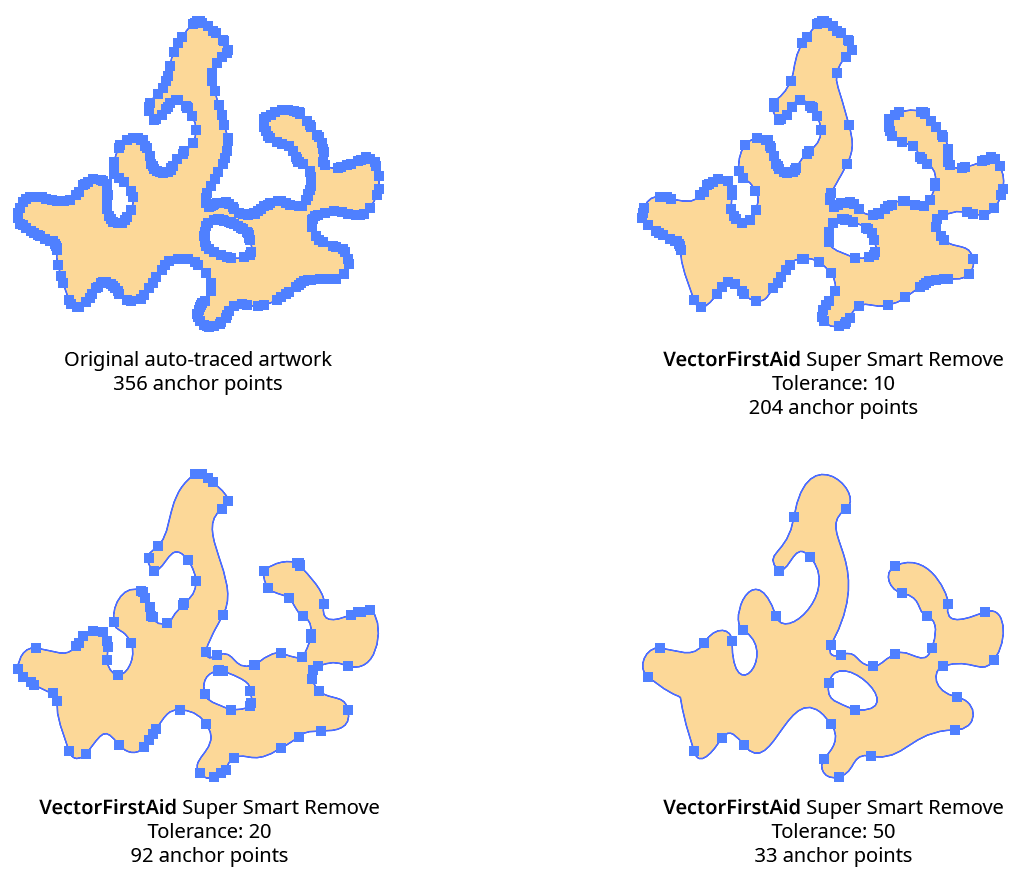
3. Super Smart Remove Points Button
Reduces the number of anchor points in the selected paths while attempting to maintain their shapes. There are two parameters.
VectorFirstAid Super Smart Remove Points Parameters
a. Super Smart Remove Tolerance: Ranges from 1 to 100. The higher the tolerance, the more anchor points are removed, but the more the geometry of the path may change.
VectorFirstAid Super Smart Remove Example
b. Protect Sharp Corners: Determines whether corner type anchor points where the path has a sharp change in direction will be considered for removal. Enabling this setting lets you use a high tolerance to remove many anchor points without disturbing sharp corners, where the geometry of the path is usually more critical:
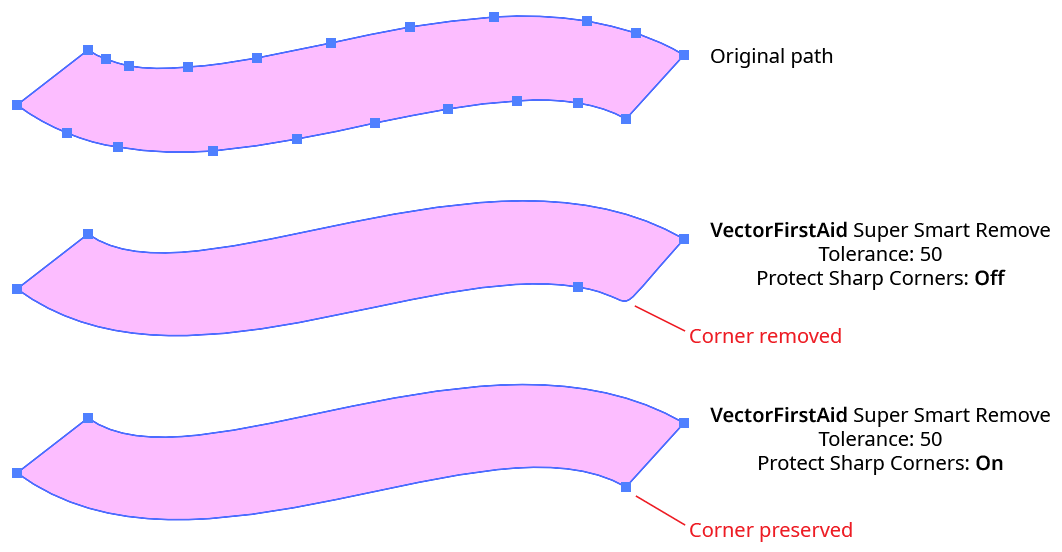
VectorFirstAid Super Smart Removal Protect Sharp Corners
4. Rejoin Paths Button
Rejoins paths which have been split apart into multiple segments back into a single path (or, if discontiguous, into multiple paths).
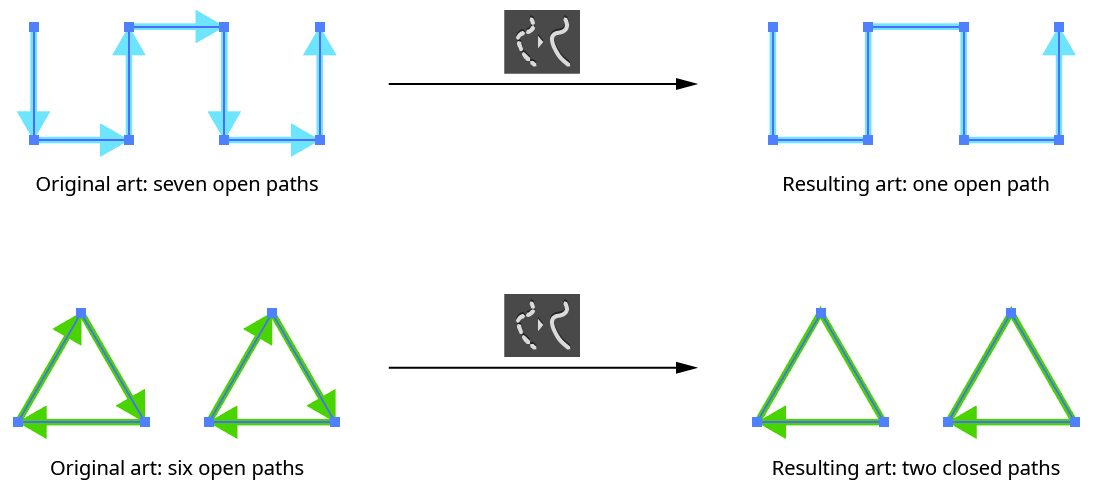
VectorFirstAid Rejoin Paths Example
The Rejoin Paths operation takes several parameters:
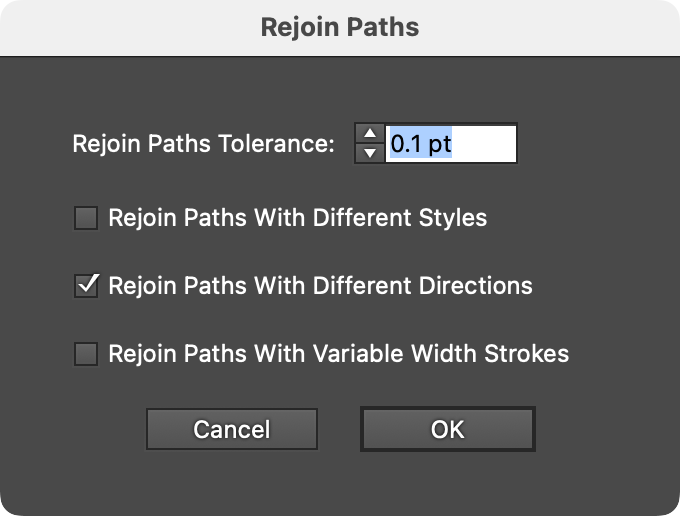
VectorFirstAid Rejoin Paths Parameters
a. Tolerance: The maximum distance that the endpoints of each segment can be from each other and still be joined, ranging from 0 to 6 pt. The default is 0.1 pt.
b. Rejoin Paths With Different Styles: Whether paths with different styles are allowed to be rejoined. When enabled, the style of the final path is taken from the section which is highest in the stacking order.

VectorFirstAid Rejoin Paths with Different Styles
c. Rejoin Paths With Different Directions: Whether paths that touch head-to-head or tail-to-tail are allowed to be rejoined. When enabled, the direction of the final path is taken from the section which is highest in the stacking order.
d. Rejoin Paths With Variable Width Strokes: Whether paths stroked with a variable width stroke are allowed to be rejoined. When enabled, the variable width profile for the final path is taken from the section which is highest in the stacking order.
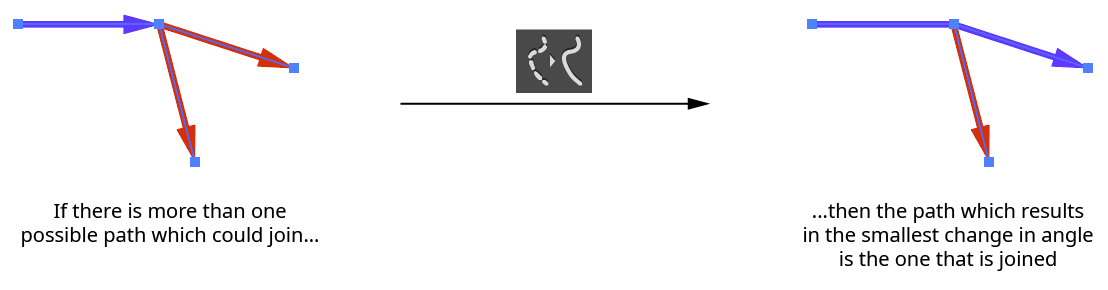
If multiple sections are eligible to be joined, VectorFirstAid uses the one that results in a path with the smallest change in angle:
VectorFirstAid Rejoin Paths Angle Selection
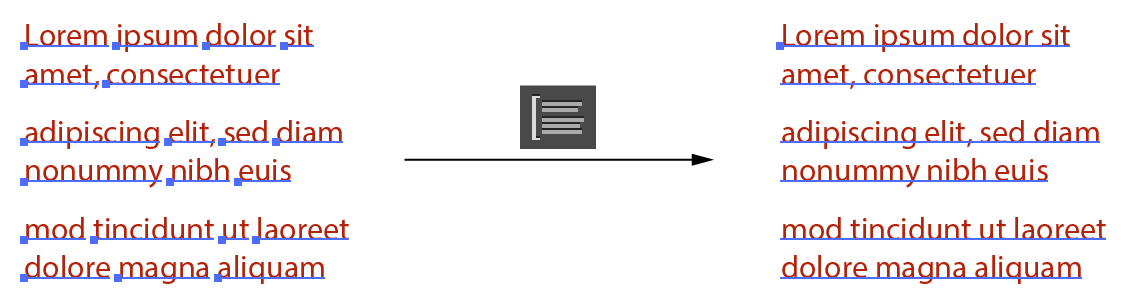
5. Combine Point Text Objects Button
Combines the selected point text objects into as few point text object as possible while maintaining the position of all characters. Text can be combined both horizontally and vertically, but must be at the same angle.
VectorFirstAid Combine Point Text Example
VectorFirstAid Combine Point Type Parameters
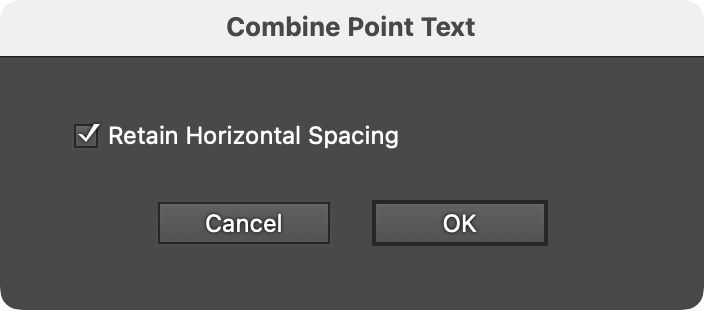
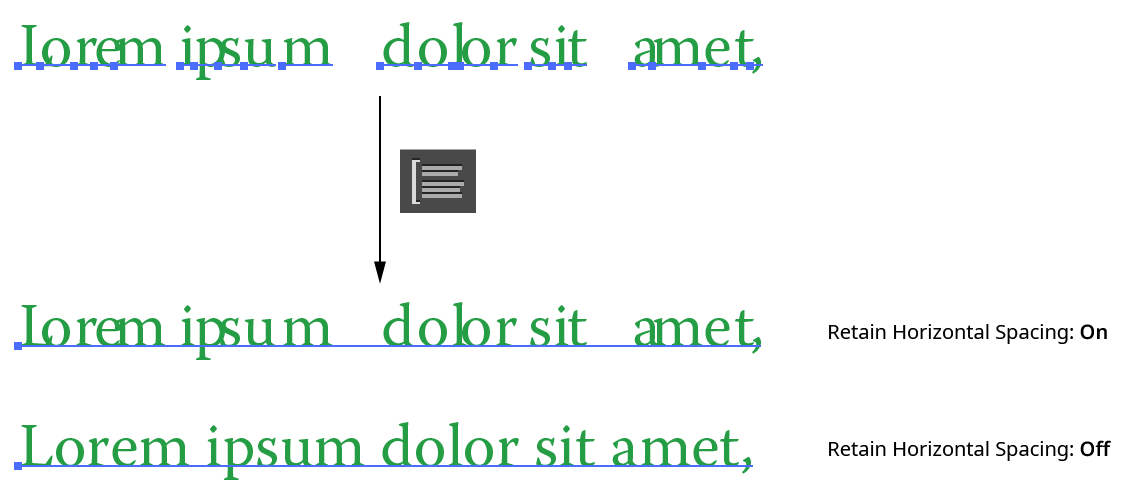
A single parameter, Retain Horizontal Spacing, controls how horizontal gaps between characters and words are handled. When enabled (the default), kerning is modified and/or space characters are added to precisely duplicate the original spacing of the text. When disabled, the spacing is normalized when possible, to give the text the look it would have if it were not tracked or kerned. Gaps wider than a single space character will still be retained as a single space. This setting can be useful when opening certain PDF files where the text has been broken into individual characters with corrupted spacing:
VectorFirstAid Combine Point Text - Retain Horizontal Spacing
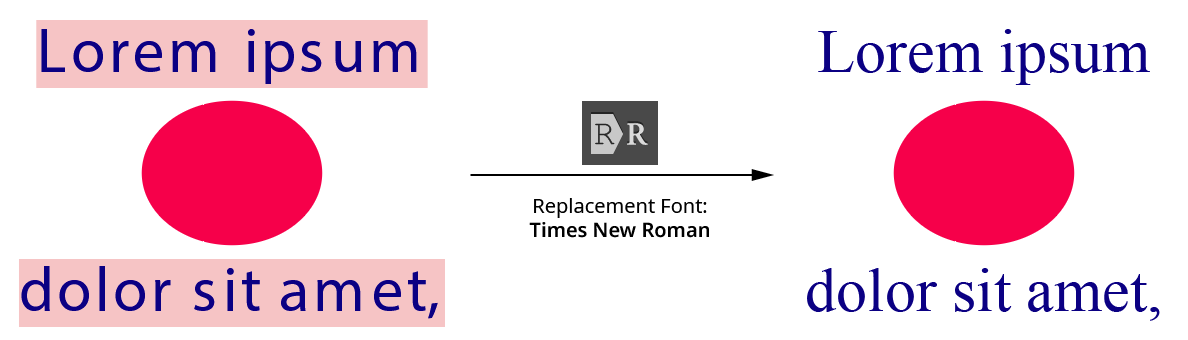
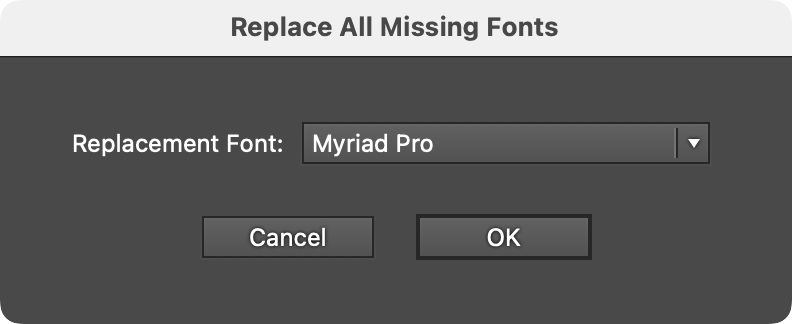
6. Replace All Missing Fonts Button
Replaces all missing fonts in the document with a specified font. Whether replacing a single missing font, or because the exact font is not critical because it will be changed later, this is much faster than going through the Find/Replace Font dialog.
VectorFirstAid Replace All Missing Fonts
The one parameter is the replacement font.
VectorFirstAid Replace Missing Fonts Parameters
7. Unoutline Text Button
Converts the selected type that has been outlined (converted to paths) back into editable text, if possible. VectorFirstAid refers to this process as “Unoutlining.” The first time this operation is used after installing the plugin, VectorFirstAid will open a new, temporary document and scan the currently installed fonts to build an internal database of their glyphs. This may take 5 to 20 minutes or even longer, depending on how many fonts are installed and their types. In particular, the SF Pro font family contains very high numbers of glyphs and will slow down the operation. However, the data is saved out to files, so this process only needs to be done once.

VectorFirstAid Unoutline Text Example
The Unoutline Text operation can handle most linear transformations of the outlines, including scaling (except that which reverses path direction), rotation, and shearing.
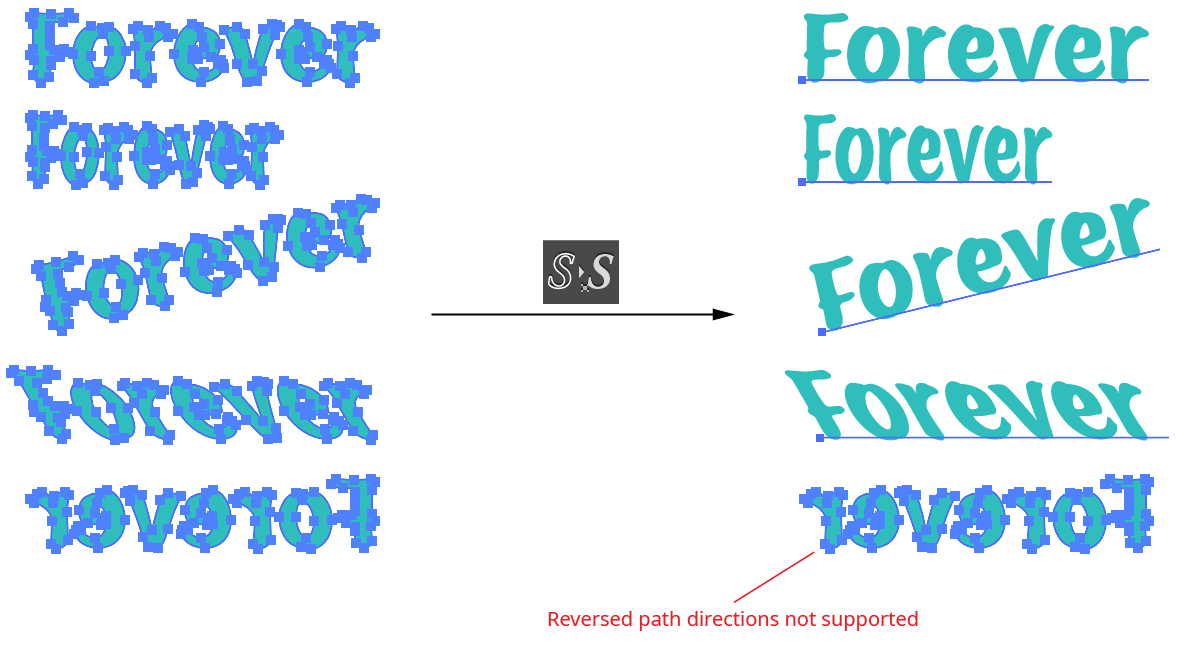
VectorFirstAid Unoutline Text Example 2
If type cannot be unoutlined, it may be due to several reasons. First, the correct font may not be present on the system. Second, the path outlines may have been altered in some way, making them different from the original outlines. For example, the starting point of the paths may have changed, or individual points may have been deleted or moved slightly. Finally, the Unoutline Text operation is not supported for fonts which contain more than 7,500 glyphs, with the exception of the SF Pro family. However, support for the SF Pro family is limited to the first 14,000 glyphs for each font.
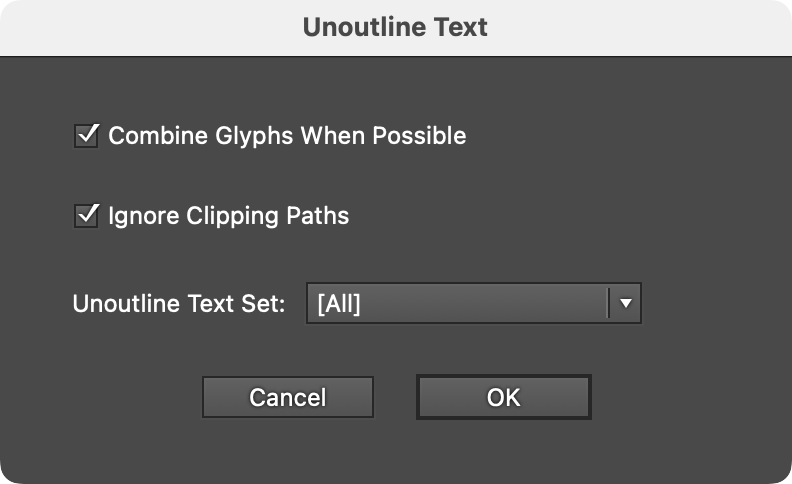
The Unoutline Text operation takes several parameters:
VectorFirstAid Unoutline Text Parameters
a. Combine Glyphs When Possible: Enabled by default, this option combines the individual glyphs which have been recognized into as few point text objects as possible. Otherwise, each glyph is left as a separate point text object.
b. Ignore Clipping Paths: Ignores paths which are set as clipping paths for the purposes of conversion.
c. Unoutline Text Set: Specifies a pre-configured set of fonts to use when recognizing the outlined paths. Checking these outlines against every possible font can take some time, and might result in the conversion to a different font than expected (due to the fact that some simple glyphs, such as lower case l’s, are identical across many sans serif fonts when linear transformations are allowed). For this reason, if the font of the outlined text is already known, VectorFirstAid can use this information to ignore other fonts and recognize the text more quickly and reliably. Unoutline Text Sets are configured through the Preferences dialog (see VectorFirstAid: Preferences). A quicker method is to simply some select live text along with the outlined text before using Unoutline Text. In this case, VectorFirstAid will only consider the fonts present in the selected live text, ignoring any specified Unoutline Text Set.
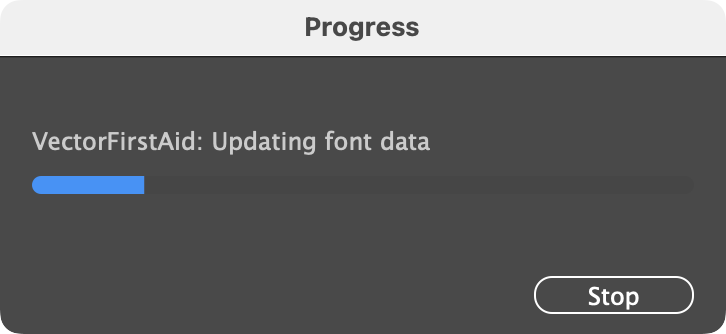
If new fonts are installed after VectorFirstAid has created its font database, the database will be updated after the button is clicked. A progress dialog will be shown.
VectorFirstAid Font Database Update
If artwork other than outlined text is selected when performing an Unoutline Text operation, it generally causes no harm, because most artwork paths are unlikely to match the shape of a glyph. However, this is not true for basic shapes such as rectangles and circles, which are used in hundreds of fonts for glyphs such as hyphens, dashes, bullets, and so on. Since text, when outlined, always results in compound paths, VectorFirstAid will display a warning if a non-compound simple shape exists in the selection:
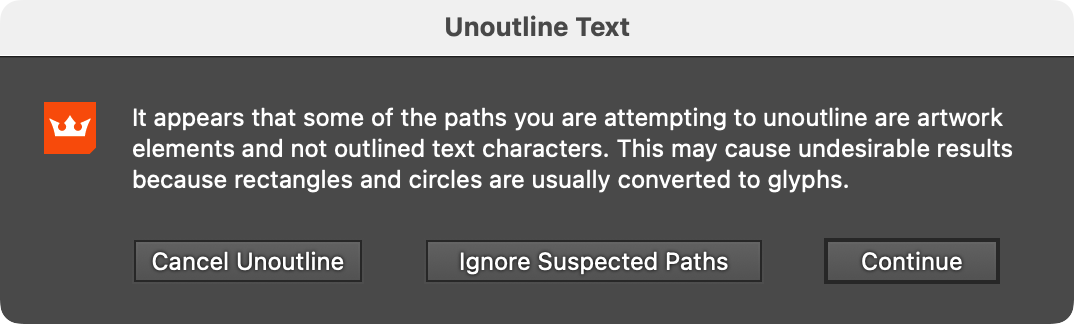
VectorFirstAid Unoutline Warning
Text Operation Buttons
8. Text Operations Buttons
This section is visible by default but may be hidden using the panel flyout menu item Hide Text Operation Buttons.
a. Align Left/Align Center/Align Right Buttons: Each changes the alignment of the selected point text objects while attempting to keep the text in the same position. When applied to single-line point text objects this is always possible; when applied to multi-line point text objects, it generally can only be done for the longest line.

VectorFirstAid Align Point Text Example
b. Break Into Lines/Break Into Words/Break Into Glyphs Buttons: Each breaks the selected text objects into multiple point text objects consisting of either the lines, words, or glyphs from the original text. The text is kept in the same position.

VectorFirstAid Break Text Example
If the Shift key is held down when clicking the Break Into Lines button, the text is broken into paragraphs rather than into lines:
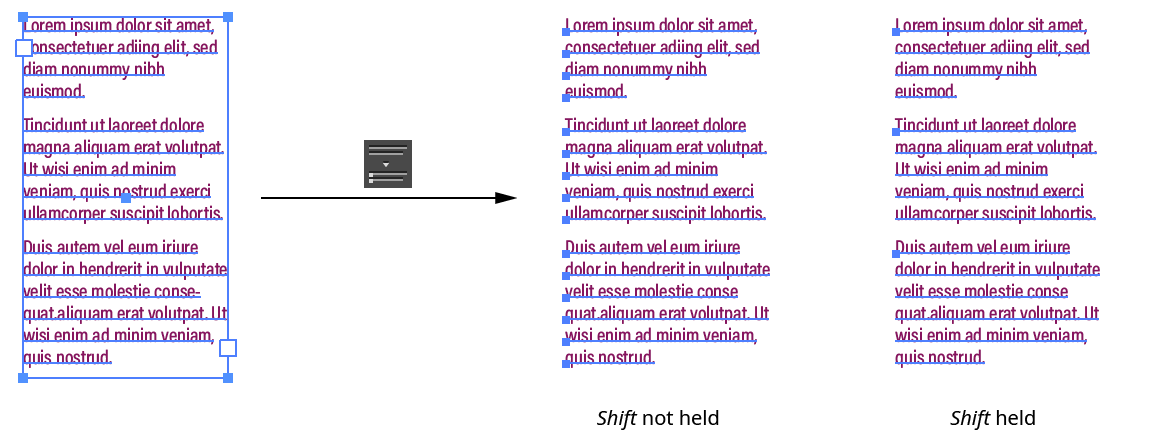
VectorFirstAid Break Text Example 2
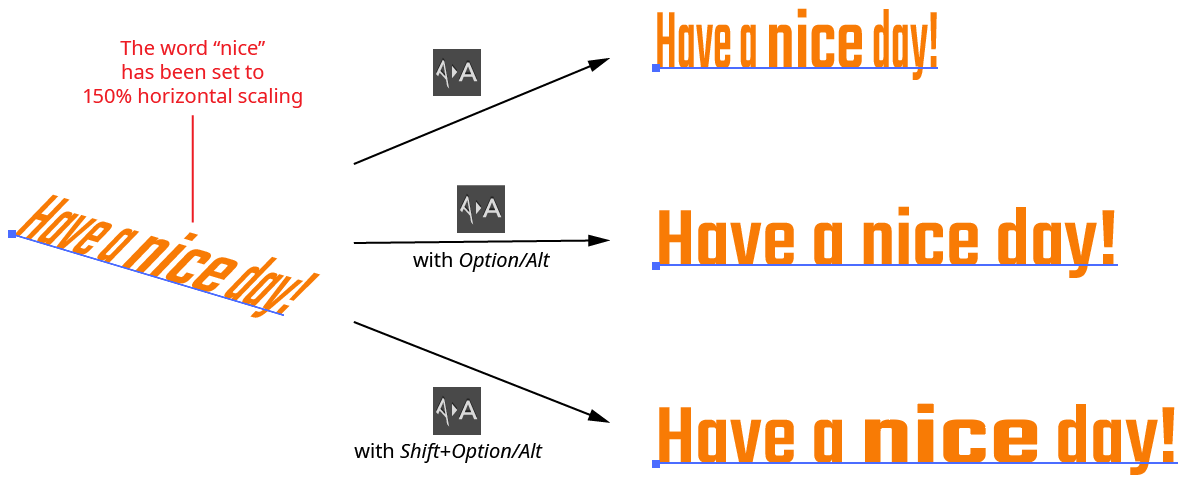
c. Remove Text Transforms Button: Removes any rotation and shear transforms from the selected text objects. If the Option/Alt key is held down when clicking the button, horizontal scaling is also removed. As this will remove any horizontal scaling that was manually added to individual characters in the text, a third method is offered. If Shift+Option/Alt is held down when clicking the button, horizontal scaling is “normalized.” That is, the scale value that is used on the majority of the text characters is set to be 100%, and other values are changed in proportion, thereby preserving multiple scaling values in the text.
VectorFirstAid Remove Text Transforms
Checkup Buttons
9. Check Selection/Document Button
Manually checks the current selection (if at least one art object is selected) or the entire document (if nothing is selected) for issues, using the checkup profile specified in the dropdown menu of the Manual Checkups section. Any detected issues are listed in the results list, and may then be fixed using either the Fix Selected or Fix All buttons.
10. Scheduling Area
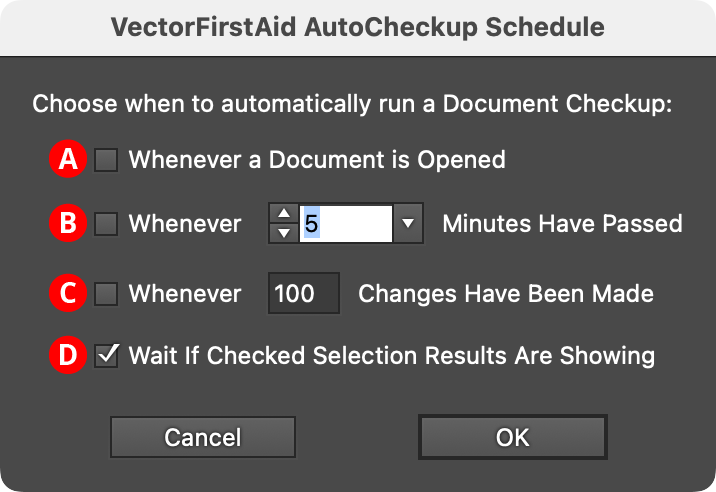
VectorFirstAid can check for issues in the current document automatically when certain conditions have been met. To specify these conditions, click the Schedule... button, which brings up the AutoCheckup Schedule dialog:
VectorFirstAid AutoCheckup Schedule Dialog
A. Whenever a Document is Opened: A document checkup will automatically be run whenever a new document is opened.
B. Whenever __ Minutes Have Passed: A document checkup will automatically be run whenever the specified number of minutes (from one-quarter to 60) have passed.
C. Whenever __ Changes Have Been Made: A document checkup will automatically be run whenever the specified number of changes have been made to it. A change is generally counted as anything that creates an Undo step or changes the selection.
D. Wait If Checked Selection Results Are Showing: If the results of a manual checkup are being displayed in the results list, the AutoCheckup will be delayed until it is gone.
The Pause/Play button in the scheduling area can be used to pause or resume automatic checking of the document.
11. Manual Checkups Specification
The dropdown menu specifies the checkup profile that will be used whenever the Check Selection/Document button is clicked. A checkup profile is a preconfigured list of things that VectorFirstAid should check in the document, such as stray points, unnecessary groups, and so on. By default, all issues are checked using the permanent internal profile “[Check All Issues]”. The plugin comes with a number of premade profiles which can be chosen from the dropdown menu, and any number of new ones can be configured by choosing the Configure... menu item (see VectorFirstAid: Profile Configuration).
12. Auto Checkups Specification
The dropdown menu specifies the checkup profile that will be used whenever an automatic checkup is run.
13. Manual Results List
Contains the results of the previously-run checkup, either manual or automatic. Issues in the list can be selected (using Shift or Command/Ctrl to select multiple issues, as normal). When a single issue is selected, the Explanatory Text section (if enabled) will display information about what fixing the issue would do.
Checkup Operations
Checkup operations are the basic searches that VectorFirstAid uses to uncover issues. Each operation looks for one type of “problem,” which can subsequently be fixed. Each operation can be added to a checkup profile or can simply fixed immediately by using the corresponding panel flyout menu item. Most of the operations have one or more parameters which can be used to fine-tune the results. When applying these operations through the flyout menu, the parameters can be adjusted before the operation is run by holding down Option/Alt while opening the menu.
1. Remove Stray Points
Removes single-point paths, which are usually inadvertent and unwanted because they cannot be stroked or filled (and are therefore invisible, except when selected or when in Outline Mode). However, stray points still affect the bounding box of the artwork and can cause issues when using functions like PathFinder. Single-point paths used with the AG Transform live effect to specify the center of rotation or scaling will be ignored.
Parameters: None.
2. Remove Unneeded Points
Removes anchor points which lie along a straight section of a path and do not change the path’s direction. However, occasionally these points may be important to force a blend into a certain configuration, or to be passed to a live effect, such as Astute Graphics’ Perturb.

VectorFirstAid Remove Unneeded Points
Parameters:
a. Ignore Unneeded Points in Blend Art: Because the positions of anchor points can affect the way a blend is made, it generally is desirable to ignore unneeded points inside blend objects. The default setting is enabled.
b. Tolerance: A dimensionless number (from 0 to 0.1) which relates to the angle with which a path changes at an anchor point. Higher tolerances mean points can be removed even if they change the path’s angle slightly. The default value is 0.005.
3. Remove Redundant Points
Removes anchor points which are adjacent to one another along a path but have the same position and can be replaced with a single anchor point. Redundant points can cause certain path operations, such as offsetting, to give erroneous results.
Parameters:
a. Tolerance: The largest distance that an anchor point can be from adjacent points and still be considered redundant (from 0 to 1 pt). The default value is 0.01 pt.
4. Remove Empty Text Paths
Removes text objects which have no text or which consist solely of unpainted characters, like spaces or tabs (unless, for text-on-a-path or text-in-a-path objects, the associated path has a stroke or fill).
Parameters: None.
5. Remove Unnecessary Clip Groups
Removes clip groups which are unnecessary because its clipping path has no stroke or fill, and: either they are invisible because they clip nothing or clip art which is entirely outside the clip area; or they clip art which is all completely inside a rectangular clip area, so the clipping path doesn’t actually do anything; or the clipping path is a simple axis-aligned rectangle and the clip group contents can be edited to appear identical without the clipping path.
Parameters:
a. Get Bounds of Text Objects Using Text Outlines: When enabled (the default), the bounds of text objects, for the purposes of determining whether a clipping path is necessary, are calculated using the outlines of the text rather than the usual ascender to descender height.
6. Remove Unnecessary Groups
Removes groups which only consist of a single child and have no appearance at the group level, such as can be produced when importing PDF files. Also removes groups inside compound paths.
Parameters: None.
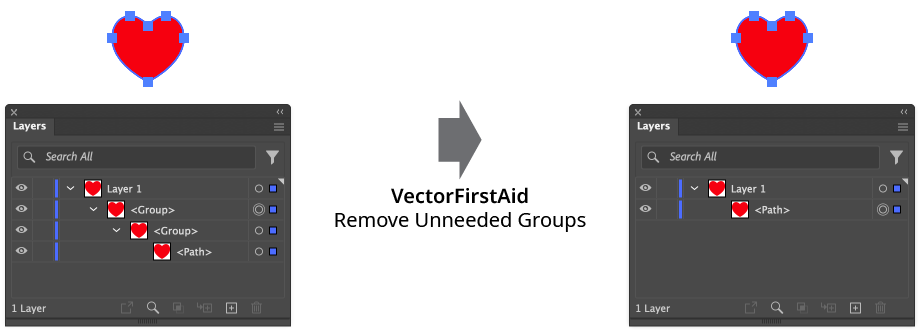
VectorFirstAid Remove Unnecessary Groups
7. Remove Unnecessary Compound Paths
Removes compound paths which consists of a single subpath, and can therefore be changed to regular paths.
Parameters: None.
8. Remove Unpainted Paths
Removes non-clipping paths which have no stroke or fill, and generally do not contribute anything to the document’s look. However, they may be used for defining brush bounds, blend spines, or text wraps. Unpainted paths used with the AG Transform live effect to specify the center of rotation or scaling will be ignored.
Parameters:
a. Ignore Unpainted Paths in Blend Art: When enabled (the default), VectorFirstAid will not remove any unpainted paths inside blend art, as these are often used to define the blend spine.
9. Remove Duplicate Art
Removes art consisting of two identical objects with the same simple appearance and no transparency that are directly adjacent in the stacking order, and can be replaced with a single object without affecting the look of the document.
Parameters:
a. Consider Path Geometry Only: When enabled, two paths are considered duplicates if they have the same geometry (sequence of anchor points and handles, ignoring path direction), regardless of style or whether there are other objects in between them in the stacking order. Use this option with caution, as it may end up changing the look of the document if, for example, the paths do have different styles.
10. Remove Off-Artboard Art
Removes art that is not on any artboard (not even partially), and therefore will not export or print despite using resources and making the file bigger. However, keeping such art may be important to certain workflows.
Parameters:
a. Get Bounds of Text Objects Using Text Outlines: When enabled (the default), the bounds of text objects, for the purposes of determining whether a text object is at least partially on an artboard, are calculated using the outlines of the text rather than the usual ascender to descender height.
11. Remove Unused Symbols
Removes symbols that are not in use in the document. This is the same as using the native Symbol panel flyout menu item Select All Unused and then clicking the trash can icon.
Parameters: None.
12. Remove Unused Swatches
Removes swatches that are not in use in the document. This is the same as using the native Swatches panel flyout menu item Select All Unused and then clicking the trash can icon.
Parameters: None.
13. Remove Unused Graphic Styles
Removes graphic styles that are not in use in the document. This is the same as using the native Graphic Styles panel flyout menu item Select All Unused and then clicking the trash can icon.
Parameters: None.
14. Remove Unused Artboards
Removes artboards that have no art on them. The is generally the same as to using the native Artboards panel flyout menu item Delete Empty Artboards, except the VectorFirstAid operation supports two options.
Parameters:
a. Get Bounds of Text Objects Using Text Outlines: When enabled (the default), the bounds of text objects, for the purposes of determining whether a text object is at least partially on an artboard, are calculated using the outlines of the text rather than the usual ascender to descender height.
b. Include Duplicate Artboards: When enabled, artboards with the same exact position and dimension as another artboard are considered unused and will also be removed, regardless of whether there is art on them or not.
15. Retract Short Handles
Removes handles with lengths shorter than the tolerance value. Extremely short handles can cause issues when trying to add corners or when offsetting paths. They are often inadvertently created when using PathFinder or ShapeBuilder operations.
Parameters:
a. Short Handle Tolerance: The length below which a handle is considered “short” for the purposes of removal, from 0 to 6 pt. The default value is 0.01 pt.
16. Close Barely-Open Paths
Closes open paths whose endpoints are closer together than the tolerance value. Paths like this may appear closed but give different results when subjected to PathFinder operations or various live effects.
Parameters:
a. Open Path Tolerance: The furthest distance apart an open path’s endpoints can be to be automatically closed, from 0 to 6 pt. The default value is 0.01 pt.
17. Close Filled Unstroked Paths
Closes open paths which have a fill color but no strokes.
Parameters: None.
18. Align Close Points
Aligns anchor points that are closer together than the tolerance distance, moving them to be exactly on top of each other (“coincident”). Points which are a slight distance apart may cause gaps in the artwork.
Parameters:
a. Coincident Point Tolerance: The furthest distance apart two anchor points can be to be aligned, from 0 to 6 pt. The default value is 0.01 pt.
19. Axis Align Paths
Aligns the segments of paths which are very close to horizontal or vertical. The general constrain angle is ignored. When aligning a segment, if an anchor point from a different path is very close to one of the segment’s endpoints, it will be moved as well, to avoid creating gaps. When fixing mis-aligned rectangles, it may take two applications of the operation to square up all four sides.
Parameters:
a. Axis Alignment Angle Tolerance: The maximum angle a path’s segment can be from horizontal or vertical to be aligned, from 0 to 5°. The default value is 0.5°.
b. Axis Alignment Point Tolerance: The furthest distance an anchor point can be from an alignable segment’s endpoint to also be moved, from 0 to 6 pt. The default value is 0.01 pt.
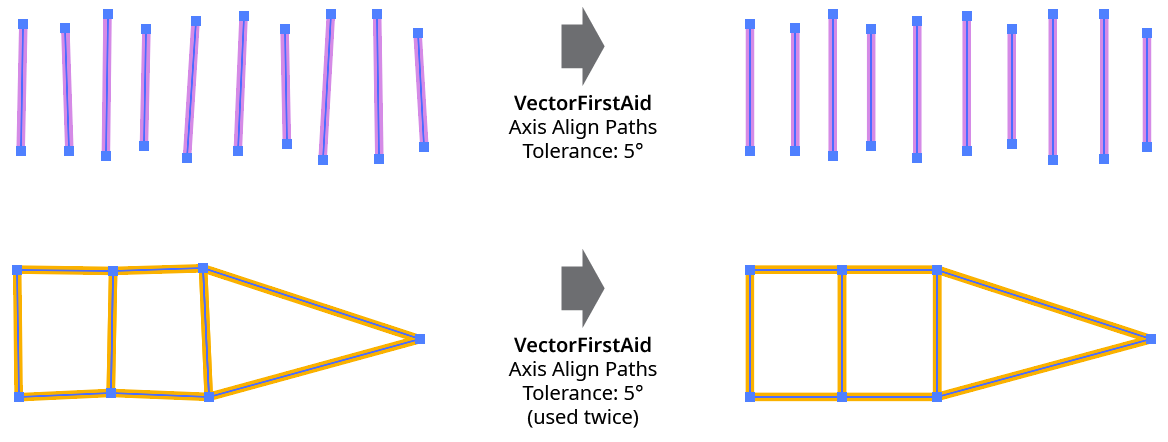
VectorFirstAid Axis Align Paths
20. Remove Zero Opacities
Removes art objects that are set to completely transparent (i.e., 0% opacity), or removes strokes and fills that are set to completely transparent. Guides, paths used as text wraps, and clipping paths are ignored.
Parameters: None.
21. Modify Point Types
Changes anchor points to corner type or smooth type so they are consistent with their appearance. In other words, points with two handles that are 180° opposed (plus or minus a tolerance) will be made smooth, and all other points will be made corner (with the exception of open path endpoints, which are always ignored). Smooth points which have handles with opposition angles which are not exactly 180° but have a difference less than the tolerance will be adjusted to be 180° opposed.
Parameters:
a. Smooth Point Angle Tolerance: Points with handles more than this value away from 180° will not be changed to smooth. The tolerance can be set from 0 to 15°, with a default of 3°.
22. Remove Unnecessary Handles
Removes handles which are directly over a straight section of path leading from the handle’s anchor point, and therefore do not change the path’s appearance (but may, for example, change the placement of points added along the segment if Bezier spacing is used).
Parameters:
a. Unnecessary Handle Angle Tolerance: Handles more than this angle away from the straight segment will not be removed. The tolerance can be set from 0 to 1°, with a default of 0.1°.

VectorFirstAid Remove Unnecessary Handles
Profile Configuration
Checkup profiles are preconfigured lists of operations that VectorFirstAid should check in the document. They are useful because often checking and fixing every possible issue that VectorFirstAid can identify may not be desirable. For example, while off-artboard art can be identified and removed (since it will not print or export yet increases the file’s size and complexity), you may regularly utilize this area to store alternate versions or source art. Similarly, you may want to retain unused swatches, even though they add very slightly to the file’s size. For these reasons, the checkup profile that is used in either manual or automatic checkups can be customized through the profile configuration dialog, which can be opened by choosing Configure... from either the manual checkup dropdown menu or the automatic checkup dropdown menu.
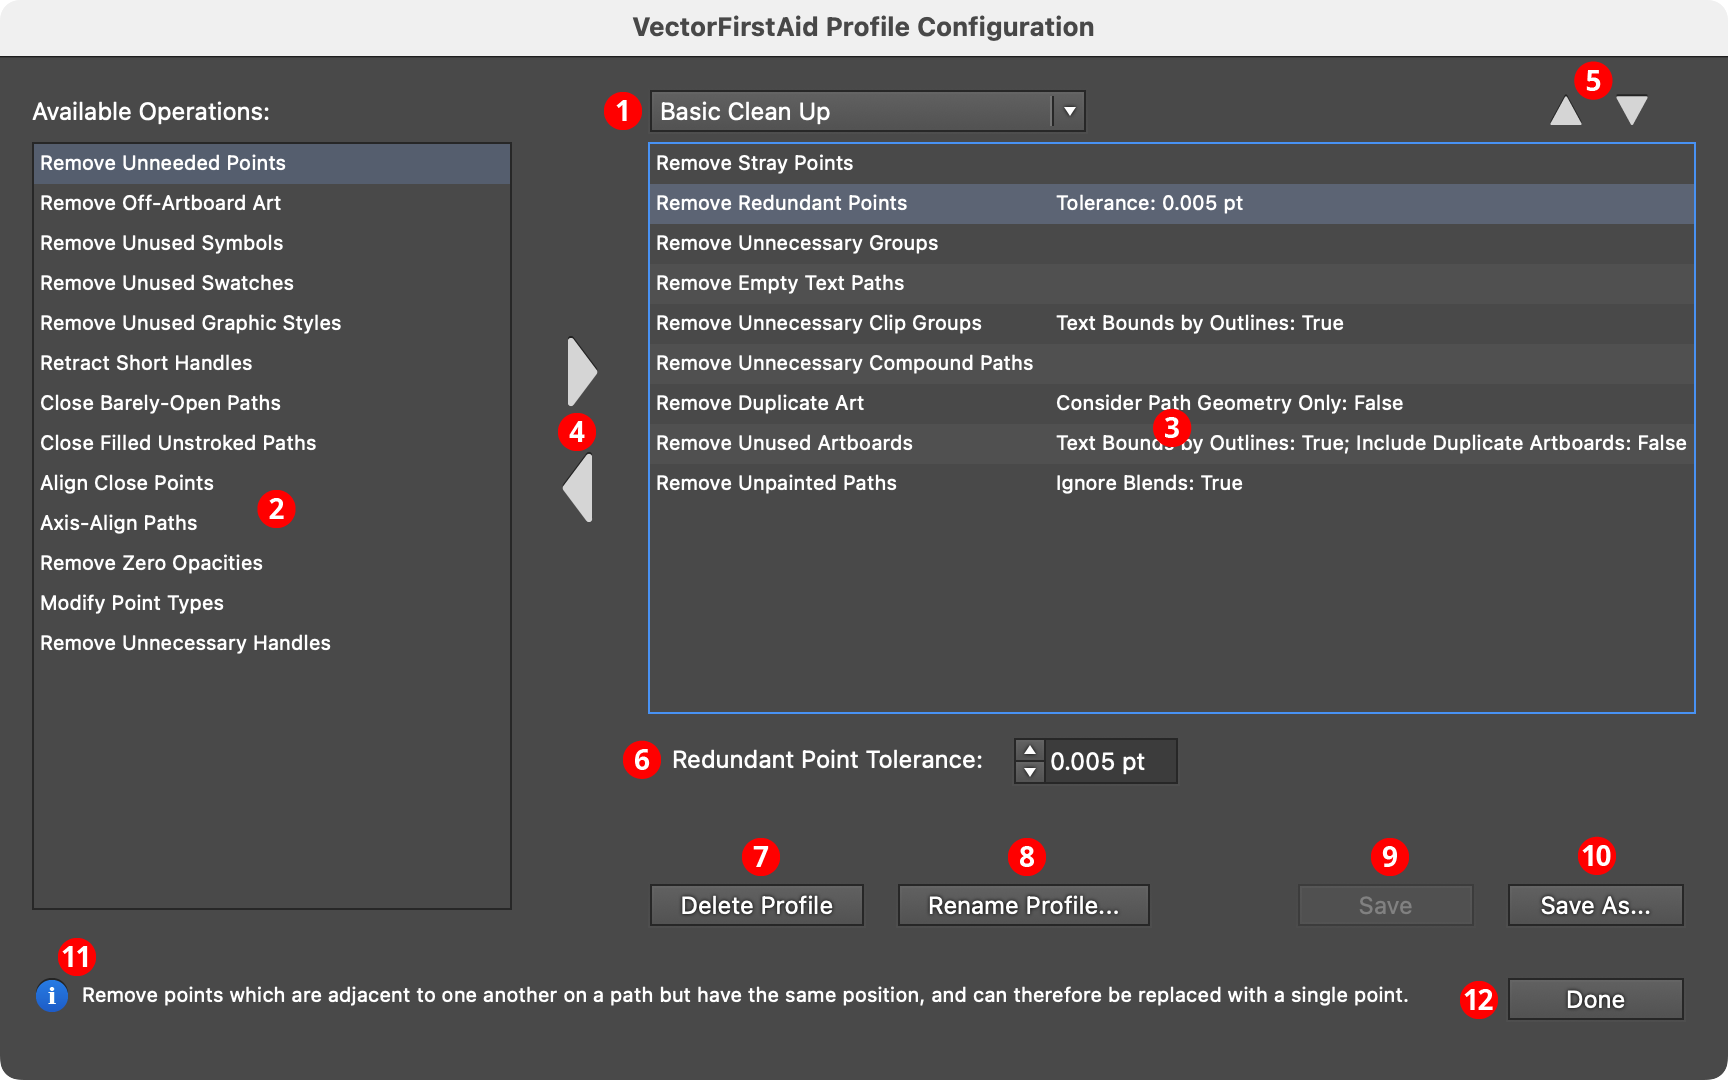
VectorFirstAid Profile Configuration Dialog
1. Profile Dropdown Menu
Specifies the current checkup profile being edited. To create a new profile, choose [New Profile].
2. Available Operations List
Shows a list of operations that can be added to the current profile, from among all possible operations (see VectorFirstAid: Checkup Operations).
3. Current Operations List
Shows a list of the operations that have been added to the current profile, along with their parameters. The operations are executed from top to bottom.
4. Add/Remove Buttons
Move one or more selected operations into or out of the current profile.
5. Move Up/Move Down Buttons
Move the selected operations upwards or downwards in the current operation list, changing their execution order.
6. Current Operation Parameters
When a single operation is selected in the current operation list, this area will show controls through which the operation’s parameters (if any) can be modified. These parameters then appear next to the operation in the current operations list. They are applicable to the current profile only.
7. Delete Profile Button
Removes the current profile. A dialog will appear asking for confirmation.
8. Rename Profile Button
Brings up a dialog in which the current profile may be renamed.
9. Save Button
Available once the current profile has already been saved, but has been modified.
10. Save As... Button
Saves the current profile, allowing you to give it a name.
11. Informational Area
Displays information about each operation, whether selected in the available operation list or the current operations list.
12. Done Button
Exits the configuration dialog. If the current profile has unsaved changes, a warning dialog will be displayed.
Show and Fix Buttons
14. Show Button
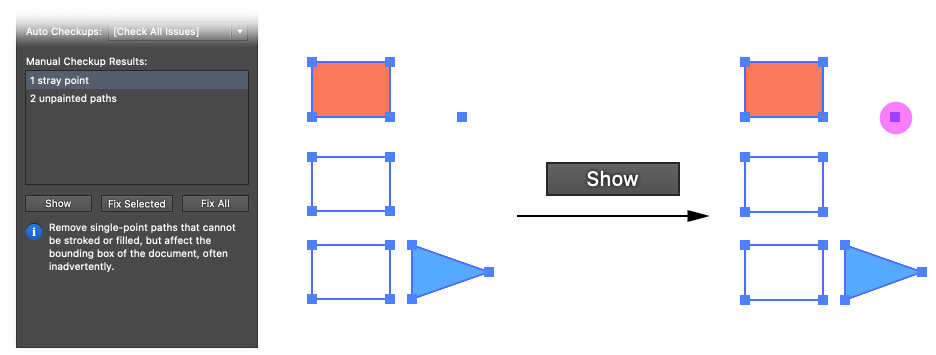
Available when a single issue affecting art objects is selected in the results list. Clicking the button will highlight the first problem object using a rectangle of partially-transparent magenta color; by default, the document will be auto-scrolled to place that object at the center. If there are multiple such objects, each additional click of the button will show the next object (the button will display Show Next).
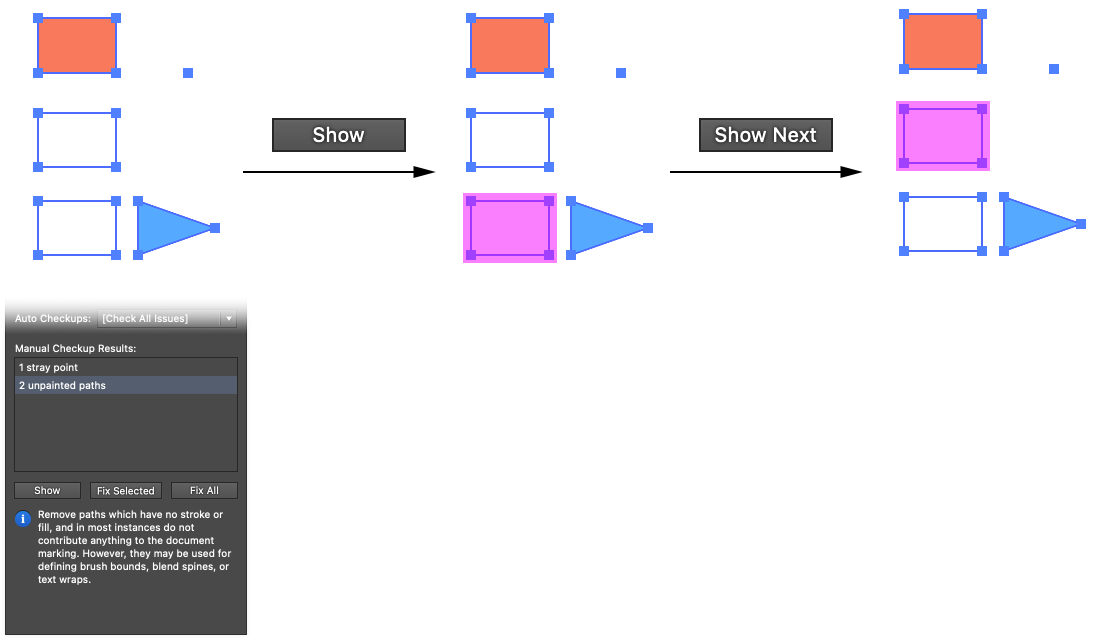
VectorFirstAid Show Button Example
If the issue involves individual anchor points or handles of a path, the highlighting will consist of a small circle over the anchor point or handle in question:
VectorFirstAid Show Button Example 2
If the Shift key is held down when clicking the Show button, all of the issues will be highlighted at once. If the Option/Alt key is held down when clicking the Show button, the previous object will be shown rather than the next object.
Sometimes fixing one issue may affect the remaining issues. For example, if there is a stray point that is also off-artboard, then fixing stray points would cause the number of off-artboard objects to change. In this case if the Show or Show All buttons are used after one or more issues have been fixed, and these fixes affected the remaining issues, then attempting to show one of the remaining issues may display an annotated warning message: “Some of the issues cannot be displayed, because they are no longer valid. Please re-run the checkup.”
15. Fix Selected Button
Available when one or more of the issues in the results list are selected. Clicking the buttons fixes those issues. For example, stray points are deleted, unnecessary groups are removed, and so on. The fixed issue is then removed from the list.
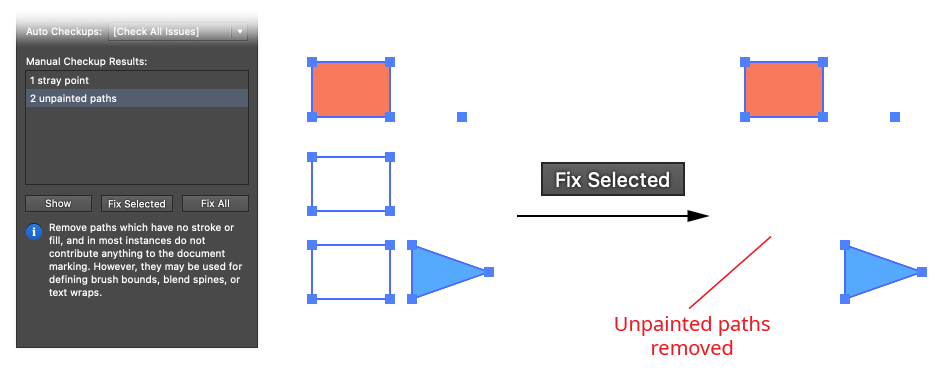
VectorFirstAid Fix Selected Example
16. Fix All Button
Fixes all issues in the results list, regardless of its current selection.

VectorFirstAid Fix All Example
VectorFirstAid Panel Flyout Menu
The VectorFirstAid panel flyout menu items are contextually sensitive and all items may not be available, depending on the current selection.
VectorFirstAid Panel Flyout Menu
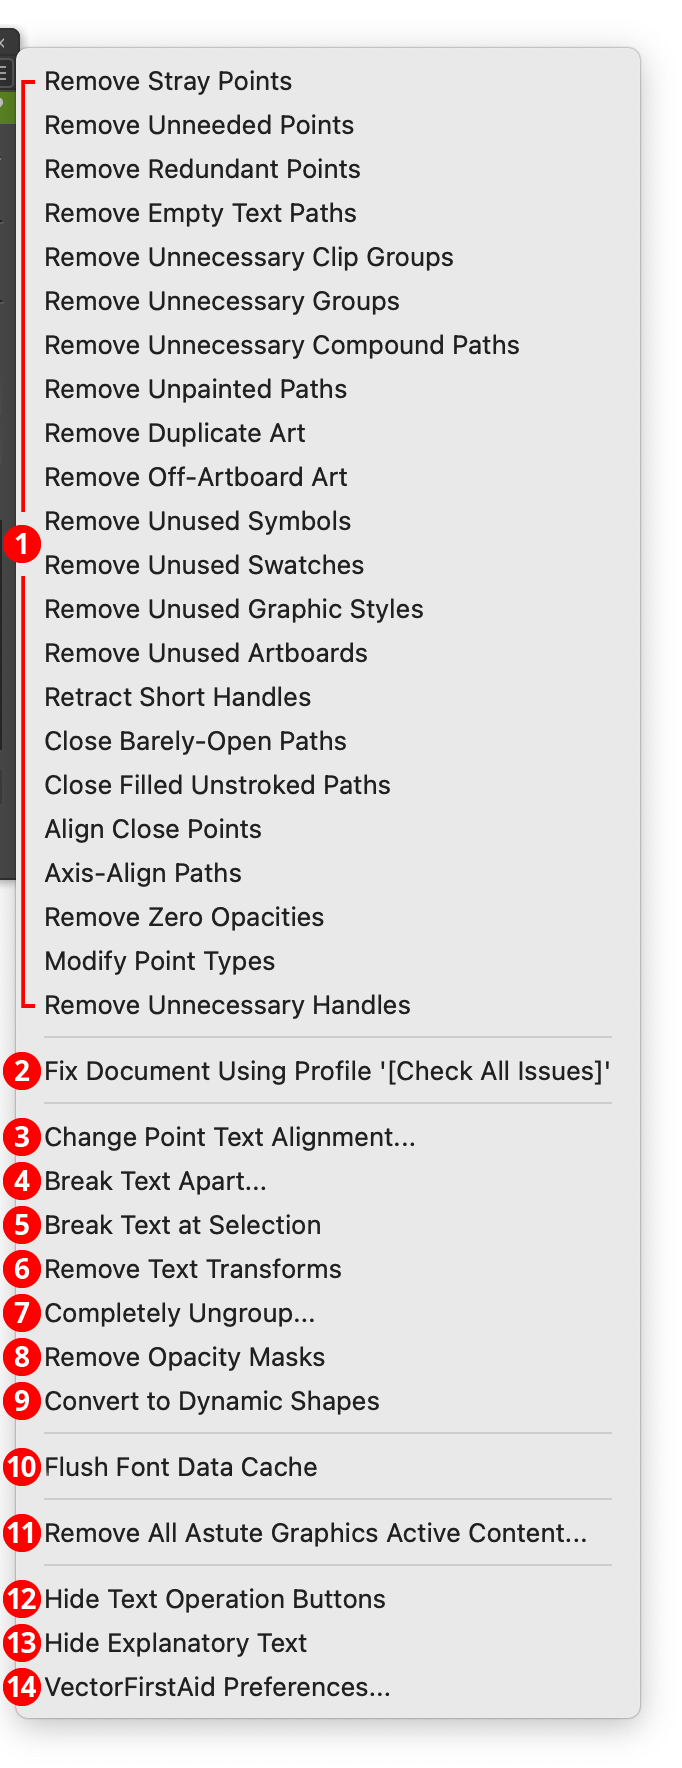
1. Operations Section
The 22 menu items in the upper section of the flyout menu each perform one of the checkup operations detailed in VectorFirstAid: Checkup Operations and immediate fix the issue, if one exists. If the menu item is chosen without any modifier keys pressed, each checkup’s parameters (if any) will be taken from the values specified in the general VectorFirstAid Preferences dialog. If the Option/Alt key is held down when choosing one of these menu items, and the operation has one or more parameters, a small dialog will appear allowing you to adjust the parameters for that single use of the menu item. The status line at the bottom of the VectorFirstAid panel will display the results of the operation.
2. Fix Document/Selection Using Profile ‘[Check All Issues]’
If nothing is selected, the Check All Issues profile is applied to the entire document, otherwise it only applies to the current selection. Choosing the menu item is the same as clicking the manual checkup button (with the Check All Issues profile selected in the dropdown menu) and then clicking the Fix All button. Since this does not give you a chance to view the issues before they are fixed, it is generally advisable that this only be used in a repetitive workflow where it is known that fixing all issues is desired.
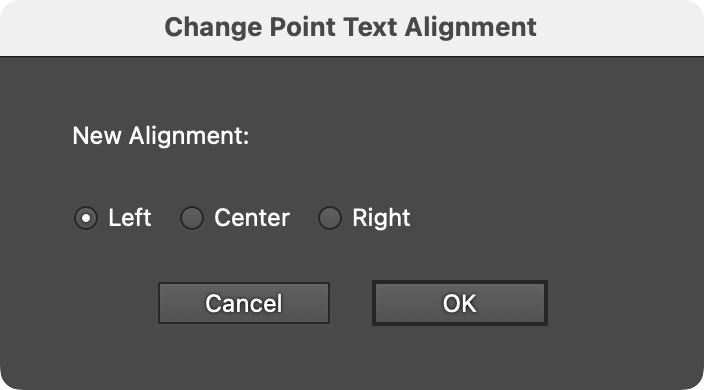
3. Change Point Text Alignment...
Available when there are one or more point text objects selected. The menu item brings up a dialog which lets you specify the alignment. It is equivalent to using the first, second or third text operations buttons (see VectorFirstAid: Text Operations Buttons).
VectorFirstAid Point Text Alignment Dialog
4. Break Text Apart...
Available when there are one or more text objects selected. The menu item brings up a dialog which lets you specify the type of breaks. It is equivalent to using the fourth, fifth or sixth text operations buttons (see VectorFirstAid: Text Operations Buttons).
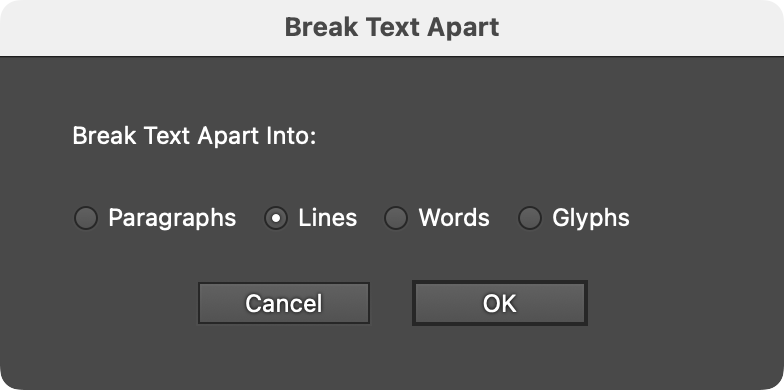
VectorFirstAid Break Text Apart Dialog
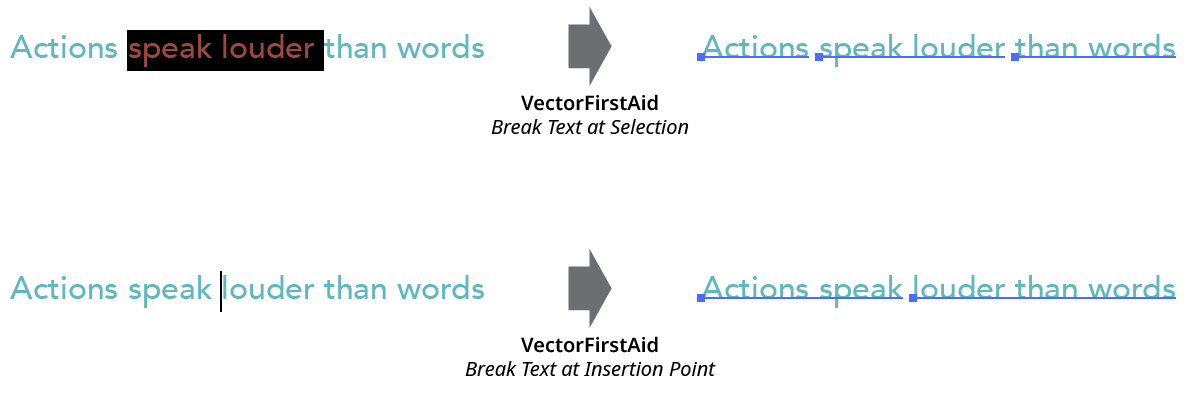
5. Break Text at Selection/Insertion Point
Available when the native Type Tool has been used on a text object and either some of its text is selected (highlighted), or the insertion point is somewhere in the text. In these cases, the text is broken into three (for selections) or two (for insertion point) point text objects. Trailing spaces are automatically removed.
VectorFirstAid Break Text at Selection or Insertion Point
When multiline type objects are broken, each resulting point text object will have a different margin:

VectorFirstAid Break Text at Selection Multiline
6. Remove Text Transforms
Available when there are one or more text objects selected. The menu item is equivalent to using the far right text operation button (see VectorFirstAid: Text Operations Buttons).
7. Completely Ungroup...
Removes all grouping from the selected art, including nested groups. When the menu item is chosen, the parameters dialog is displayed:
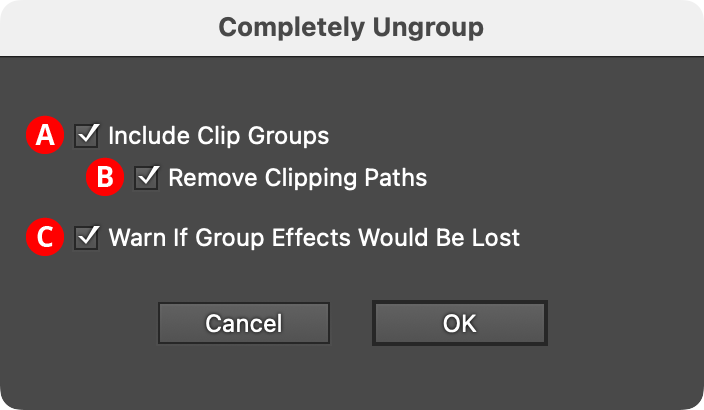
VectorFirstAid Completely Ungroup Dialog
A. Include Clip Groups: Generally, clip groups would excluded from this operation, as ungrouping them will usually change the look of the artwork. However, they can be included using this option.
B. Remove Clipping Paths: If clip groups are included in the ungroup operation, enabling this option will automatically remove the clipping paths afterwards.
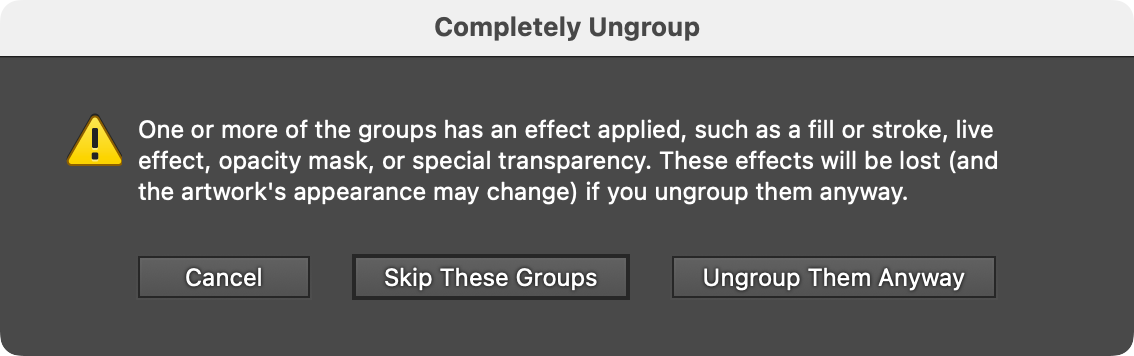
C. Warn if Group Effects Would Be Lost: When strokes, fills, live effects, opacity masks, or transparency modes are applied at the group level, ungrouping will cause those effects to be discarded, changing the look of the artwork. When this option is enabled (the default, and recommended), a dialog will be shown if completely ungrouping would cause such live effects to be lost, allowing you to cancel the operation, skip those groups with effects, or ungroup them anyway:
VectorFirstAid Completely Ungroup Warning
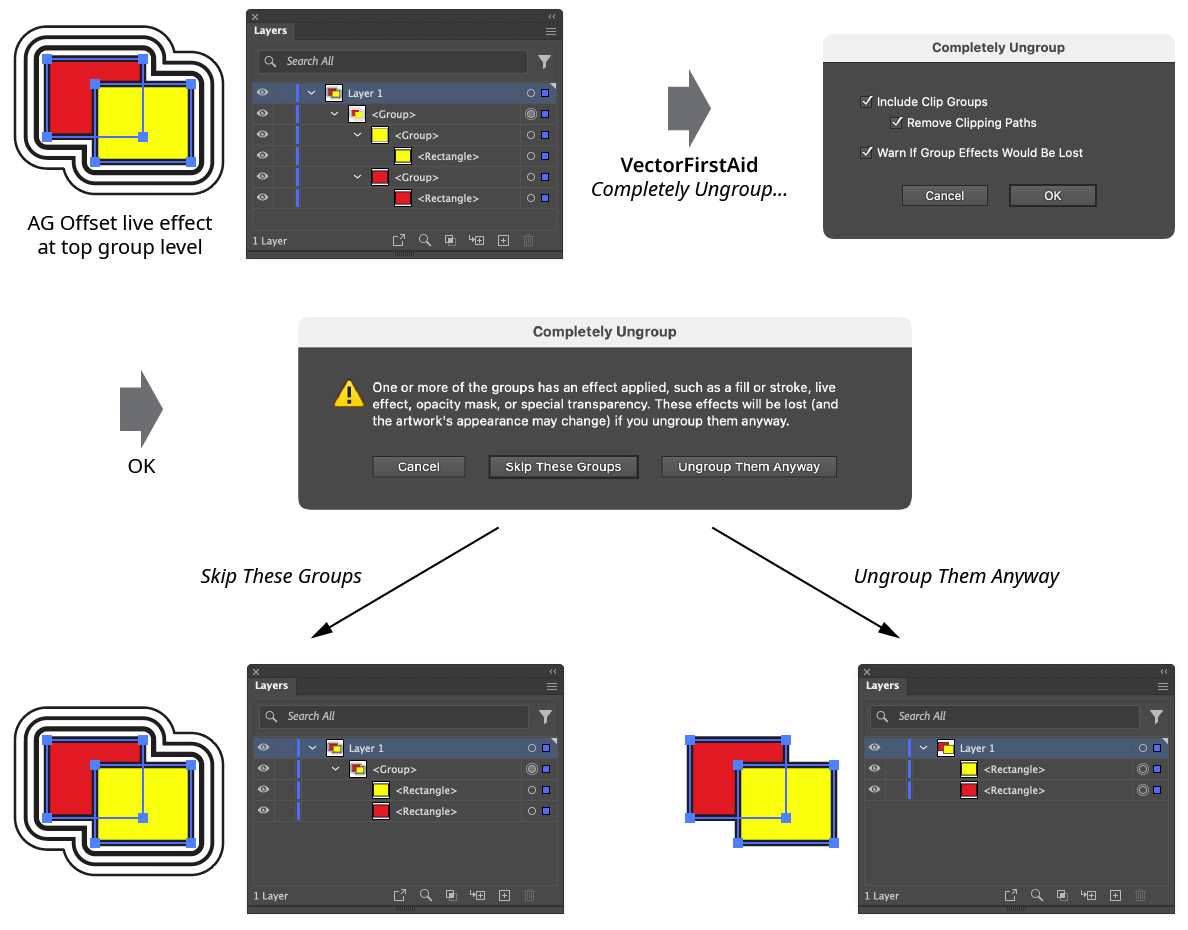
VectorFirstAid Completely Ungroup Example
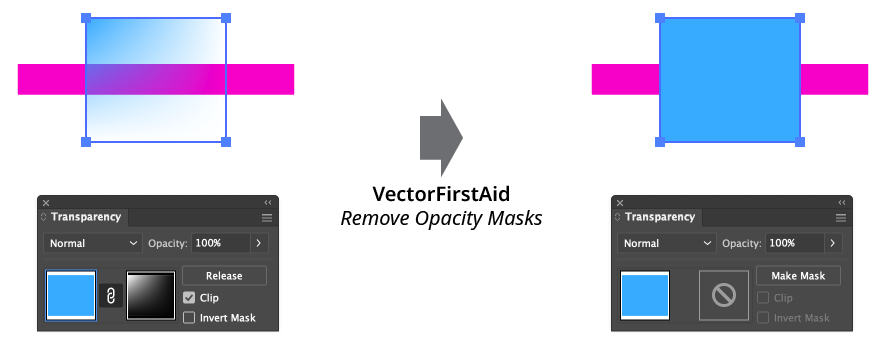
8. Remove Opacity Masks
Removes all opacity masks from the selected art.
VectorFirstAid Remove Opacity Masks
9. Convert to Dynamic Shapes
This menu item is only present if Astute Graphics’ VectorScribe plugin is also installed. It converts each path in the selection (or in the entire document, if there is no selection) into Dynamic Shapes, whenever possible, for use with the Dynamic Shapes tool and panel.
10. Flush Font Data Cache
When using the Unoutline Text operation (see VectorFirstAid: Convenience Operation Buttons), certain font data is kept in memory to speed up additional uses of the operation. If the Unoutline Text operation won’t be used again in the current Illustrator session, this menu item may be selected to reclaim memory.
11. Remove All Astute Graphics Active Content...
Expands or otherwise removes any art references to Astute Graphics plugins, such as dynamic objects, live effects, and other objects such as Space Fills and Width Stamps. This allows a user who does not have any Astute Graphics plugins installed to open the file and edit it without any limitations. However, it should be used with caution (or only after keeping a backup of the unmodified source file) because removing the active content will make future edits more difficult, and could even include text being outlined if it is affected by an Astute Graphics live effect. A dialog will ask for confirmation:
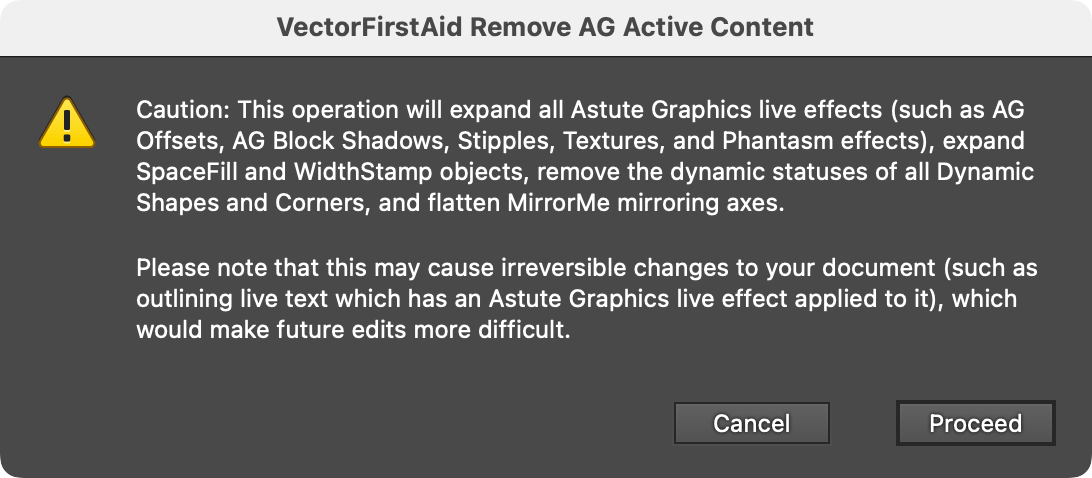
VectorFirstAid Remove Active Content Dialog
12. Hide Text Operation Buttons
The line of seven text operations buttons can be shown or hidden on the panel using this menu item. When the buttons are hidden, the menu item will change to Show Text Operation Buttons.
13. Hide Explanatory Text
The area showing checkup result explanatory text can be shown or hidden on the panel using this menu item. When the explanatory text is hidden, the menu item will change to Show Explanatory Text.
14. Dynamic Sketch Preferences…
Brings up the Preferences dialog (see VectorFirstAid: Preferences).
VectorFirstAid Preferences
Using the flyout menu of the VectorFirstAid panel will bring up the VectorFirstAid preferences dialog:

VectorFirstAid Preferences
1. Get Bounds of Text Objects Using Text Outlines
When enabled, the bounds of text objects are calculated using the outlines of the text rather than the usual ascender to descender height (for use with issues which require the bounds of an object: removing unnecessary clip groups, removing off-artboard art, and removing unused artboards). The default value is enabled.
2. Ignore Unneeded Points in Blend Art
When enabled, blend objects are ignored when checking for unneeded points, because these points may be needed to maintain the look of the blend. The default value is enabled.
3. Ignore Unpainted Paths in Blend Art
When enabled, blend objects are ignored when looking for unpainted paths, because these paths may be used to define the spine of a blend. The default value is enabled.
4. Duplicate Art Considers Path Geometry Only
When enabled, duplicate path art is determined solely by its geometry (i.e., as it appears in Outline View), ignoring all other attributes like color, stroke width, transparency, etc. Use with caution, as this may cause the look of the document to change. The default value is disabled.
5. Unused Artboards Includes Duplicates
When enabled, duplicate artboards (those that lie exactly on top of another artboard with the same dimensions) will be considered unused. The default value is disabled.
6. Unneeded Point Tolerance
A dimensionless number (from 0 to 0.1) which relates to the angle with which a path changes at an anchor point. Higher tolerances mean points can be removed even if they change the path’s angle slightly, so the path may lose subtle deviations from straight. The default value is 0.005.
7. Redundant Point Tolerance
The largest distance that an anchor point can be from adjacent points and still be considered redundant (from 0 to 1 pt). The default value is 0.01 pt.
8. Short Handle Tolerance
The length below which a handle is considered “short” for the purposes of removal, from 0 to 6 pt. The default value is 0.01 pt.
9. Open Path Tolerance
Tolerance for detecting barely open paths, from 0 to 6 pt (if a path’s endpoints are further apart than the specified distance, then the path will not be closed when closing barely-open paths). The default value is 0.01 pt.
10. Coincident Point Tolerance
Tolerance for detecting close points, from 0 to 6 pt (points further apart than the specified distance will be ignored when aligning close points). This setting is also used when axis-aligning paths, to keep touching corners together. The default value is 0.01 pt.
11. Axis Alignment Angle Tolerance
The maximum angle a path’s segment can be from horizontal or vertical to be aligned, from 0 to 5°. The default value is 0.5°.
12. Smooth Point Tolerance
Points with handles more than this value away from 180° will not be changed to smooth when using the Modify Point Types operation. The tolerance can be set from 0 to 15°, with a default of 3°.
13. Unnecessary Handle Angle Tolerance
Handles more than this angle away from the straight segment will not be removed when removing unnecessary handles. The tolerance can be set from 0 to 1°, with a default of 0.1°.
14. Super Smart Remove Tolerance
Controls the balance between the number of anchor points removed and the accuracy of the resulting path’s geometry. It can range from 1 to 100. The higher the tolerance, the more anchor points are removed, but the more the geometry of the path may change. The default value is 20.
15. Protect Sharp Corners
When enabled, corner points where the path makes a sharp change in direction will never be removed by Super Smart Remove, regardless of the tolerance setting. The default setting is disabled.
16. Rejoin Paths Tolerance
The maximum distance that the endpoints of each segment can be from each other and still be joined, ranging from 0 to 6 pt. The default setting is 0.1 pt.
17. Rejoin Paths With Different Styles
Whether paths with different styles are allowed to be rejoined. When enabled, the style of the final path is taken from the section which is highest in the stacking order.
18. Rejoin Paths With Different Directions
Whether paths that touch head-to-head or tail-to-tail are allowed to be rejoined. When enabled, the direction of the final path is taken from the section which is highest in the stacking order.
19. Rejoin Paths With Variable Width Strokes
Whether paths stroked with a variable width stroke are allowed to be rejoined. When enabled, the variable width profile for the final path is taken from the section which is highest in the stacking order.
20. Retain Horizontal Spacing When Combining Text
When enabled (the default), kerning is modified and/or space characters are added to precisely duplicate the original spacing of the text. When disabled, the spacing is normalized when possible, to give the text the look it would have if it were not tracked or kerned. Gaps wider than a single space character will still be retained as a single space.
21. Replacement Font
The font to use when using the Replace All Missing Fonts operation. The default font is Myriad Pro.
22. Unoutline Text Set
Specifies the Unoutline Text Set to use when Unoutlining text (see VectorFirstAid: Convenience Operation Buttons). By default, this is simply all the fonts.
23. Configure...
Brings up the Unoutline Text Set Configuration dialog:
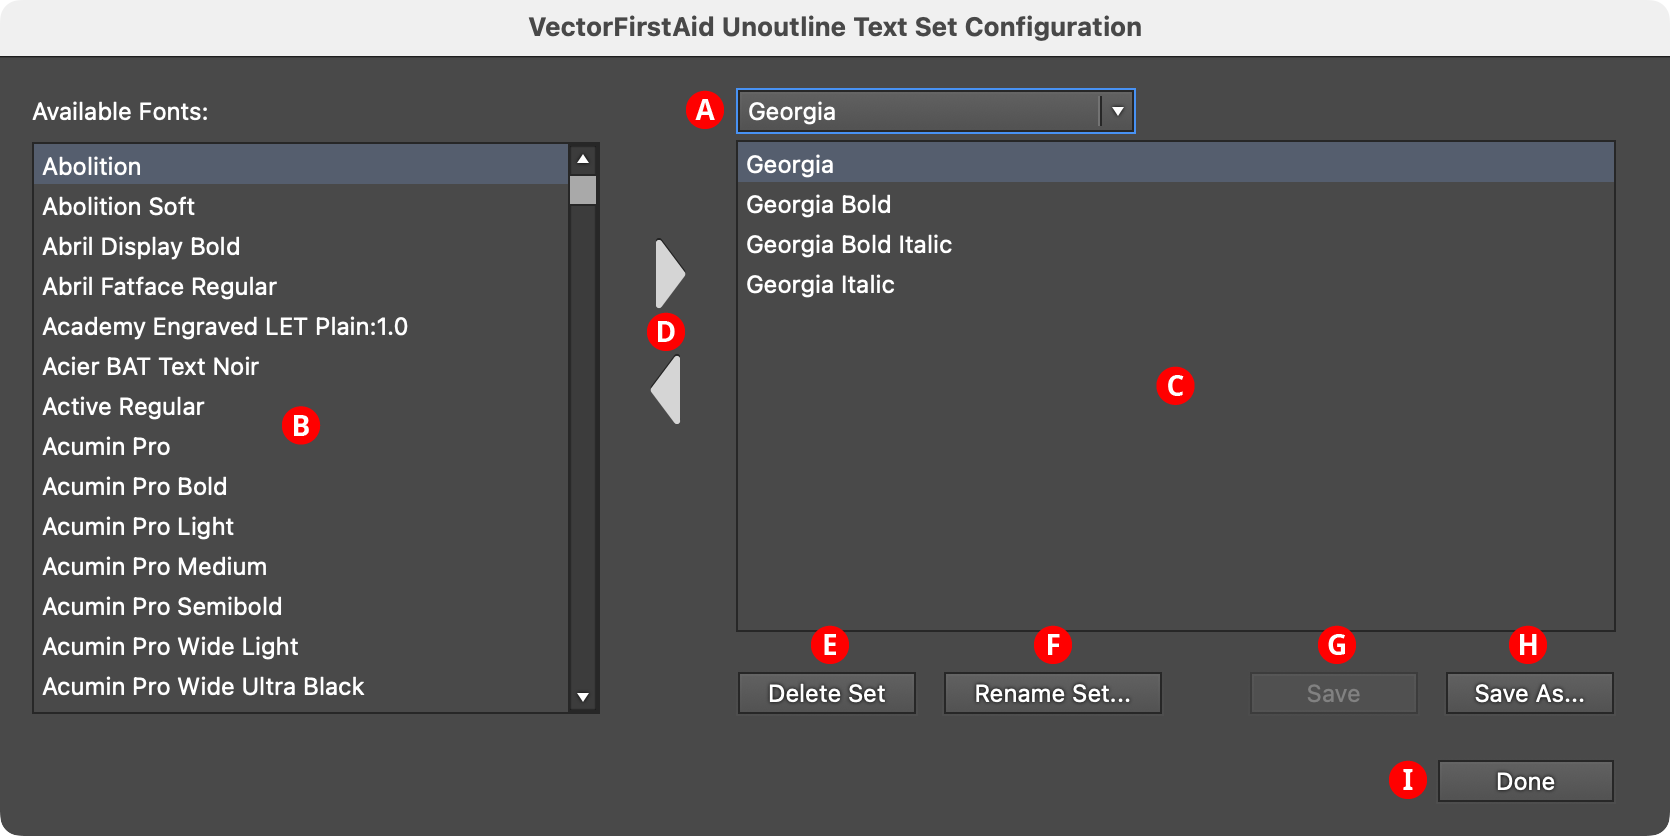
VectorFirstAid Unoutline Text Set Configuration Dialog
A. Test Set Dropdown Menu: Specifies the current Unoutline Text Set being edited. To create a new set, choose [New Set].
B. Available Fonts List: Shows a list of fonts that can be added to the current Unoutline Text Set.
C. Current Fonts List: Shows a list of the fonts that have been added to the current Unoutline Text Set.
D. Add/Remove Buttons: Move one or more selected fonts into or out of the current Unoutline Text Set.
E. Delete Set Button: Removes the current Unoutline Text Set. A dialog will appear asking for confirmation.
F. Rename Set Button: Brings up a dialog in which the current Unoutline Text Set may be renamed.
G. Save Button: Available once the current Unoutline Text Set has already been saved, but has been modified.
H. Save As... Button: Saves the current Unoutline Text Set, allowing you to give it a name.
I. Done Button: Exits the configuration dialog. If the current Unoutline Text Set has unsaved changes, a warning dialog will be displayed.
24. Unoutline Text Combines Glyphs When Possible
When enabled, the Unoutline Text operation combines the individual glyphs which have been recognized and converted back into live text into as few point text objects as possible. Otherwise, each glyph is left as a separate point text object. The default setting is enabled.
25. Unoutline Text Ignore Clipping Paths
When enabled, the Unoutline Text operation will ignore paths which are set as clipping paths for the purposes of conversion. The default setting is enabled.
26. Center View When Showing Issues
When enabled, using the Show button will automatically scroll the document to put the highlighted issue in the center of the window. The default setting is enabled.
27. Check and Fix Locked Items
When enabled, art objects which are locked will be treated as unlocked when detecting and fixing issues. The default setting is disabled.
28. Re-run Checkup After Fix All
When enabled, fixing all issues in a checkup will cause the checkup to automatically be re-run immediately. This helps find issues which take two or more passes to fix, such as axis-alignment of certain shapes. The default setting is disabled.
29. Fix All If Issues Are Still Detected
If the Re-run Checkup After Fix All preference is enabled, enabling this preference automatically fixes additionally-found issues.
30. Repeat Count
The number of times to automatically check and fix all issues if they continue to be found, when the previous two preferences are enabled. The default setting is 3 times.
31. Informational area
Shows a brief description of each preference control when the cursor is being hovered over it.
32. Reset Button
Resets all parameters to their default values.
33. Help Button
Opens the help documentation in the Astute Manager. If this does not automatically appear, please ensure your Astute Manager is running first.
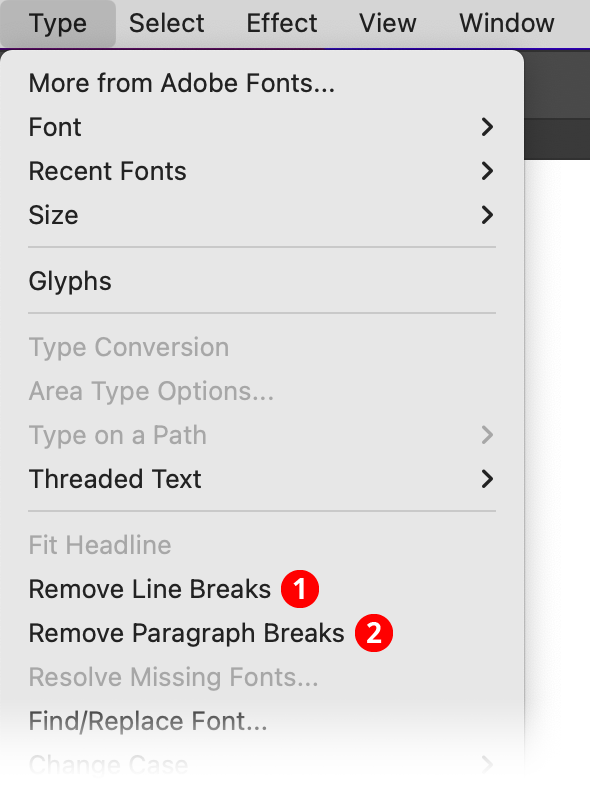
Type Menu Additions
VectorFirstAid adds two menu items to the top-level native Type menu:
VectorFirstAid Type Menu Additions
1. Remove Line Breaks
Strips all line breaks (created by pressing Shift+Enter) from the text selection, or, if there is no active text selection, from all selected text objects:
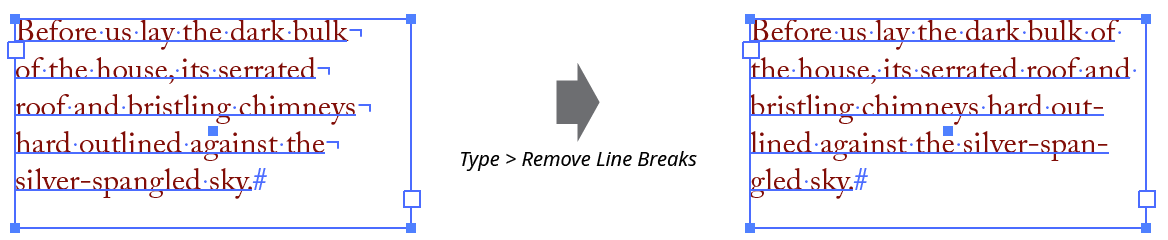
VectorFirstAid Remove Line Breaks
2. Remove Paragraph Breaks
Strips all paragraph breaks from the text selection, or, if there is no active text selection, from all selected text objects. If the Shift key is held down when choosing the menu item, only consecutive paragraph breaks are removed (i.e., each run of consecutive paragraph breaks is replaced with a single paragraph break). This menu item is especially useful because while line breaks can be specified in the native Find & Replace dialog, paragraph breaks cannot be.
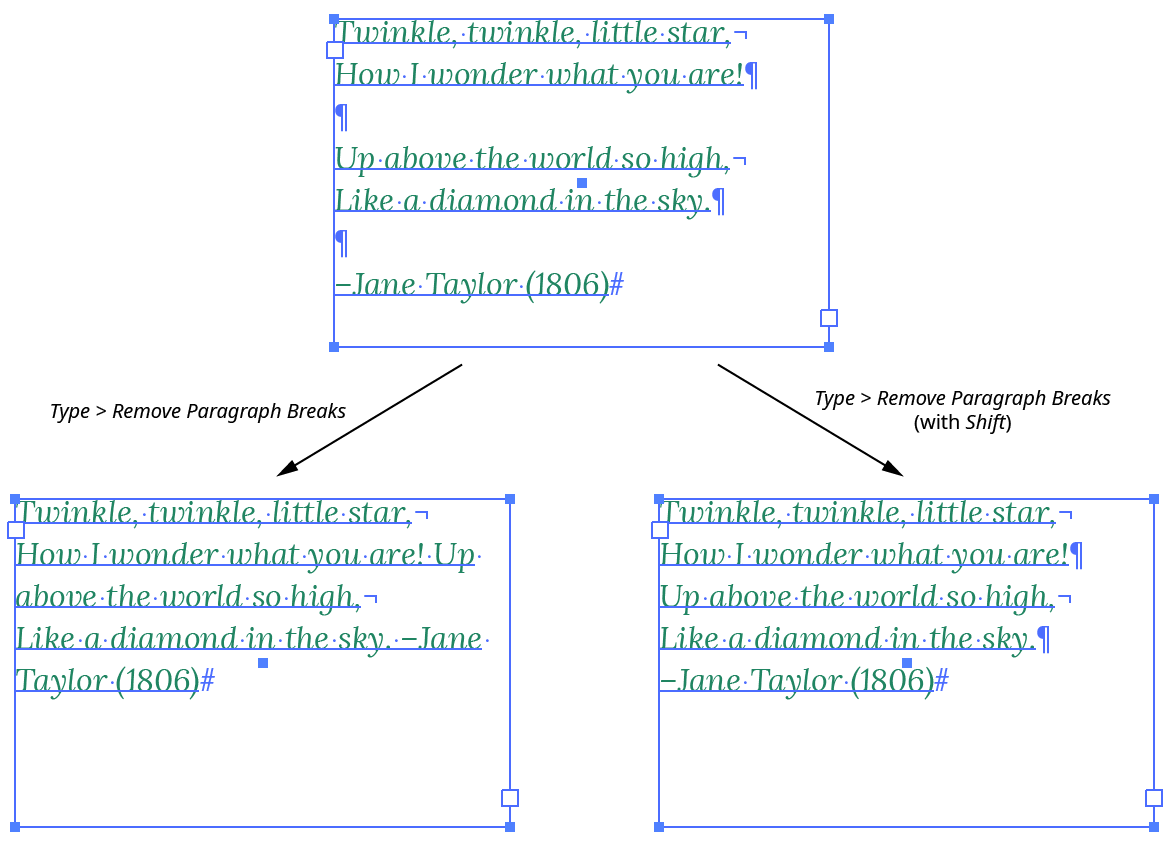
VectorFirstAid Remove Paragraph Breaks
Actionability
The following operations can be recorded and played back as Actions:
1. All Checkup Operations (the top 22 panel flyout menu items)
2. All Convenience Operations (whether through the buttons or their panel flyout menu equivalents)
3. All Text Operations (whether through the buttons or their panel flyout menu equivalents)
4. Completely Ungroup... panel flyout menu item
5. Remove Opacity Masks panel flyout menu item
6. Remove Line Breaks menu item
7. Remove Paragraph Breaks menu item