Reprofile
 Reprofile
![]() Reprofile Panel
Reprofile Panel
 Reform Text Panel
Illustrator Location:
Illustrator Main Menu > Window > Astute Graphics > Reprofile
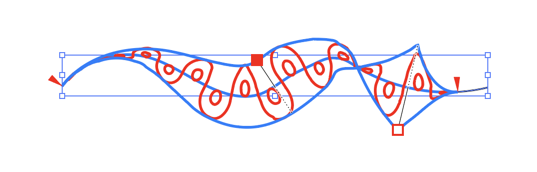
This diagram shows a path in the process of being reshaped, or “reprofiled”, using the Reprofile tool (with the default interface settings).
Reprofile Terminology Offset Marker Examples
The following items are shown:
1. Start and end delimiters
(red triangles)
The delimiters mark the section of the path that will be affected by the reshape. Initially, they are put at the nearest corner points on either side of the clicked or dragged segment. If the entire path is smooth, the delimiters will be placed at the ends of the path (for an open path) or at point zero (for a closed path).
2. Offset markers
(red squares)
Markers represent points along the path where you specify the height of the profile. A marker's position along the path is indicated by a small black square, joined to it by a thin black line whose length represents the offset distance.
The selected marker (filled square) is “smooth”. The profile height changes smoothly through it.
The unselected marker (open square) is “sharp”. The profile height changes abruptly at this marker.
You can use any number of markers to reshape a path, but, like anchor points, for the smoothest results you should use the fewest number that still produce the shape you want.
3. Mirrored offset lines
(dashed lines)
If the profile extends in both directions, a mirrored line appears. This is purely a visual guide and cannot be interacted with.
4. Target path
(blue path)
The original shape of the path (or section of the path) is drawn as a blue line.
5. Guide path
(blue paths)
The blue lines give a guide to the height of the profile. Clicking on the top guide path will add a marker. The guide path is only approximate, especially for mitered corners, due to the way Reprofile warps geometry at corners. The guide paths will cross if markers are dragged to opposite sides of the target path.
6. Virtual reshaped path
(red path)
The reshaped path is “virtual” because the underlying path art is not actually changed until you finalize the reshaping. Until this is done you may continue to refine it (e.g. by moving the delimiters, editing the markers, or changing parameters on the panel) or, if you change your mind, by resetting the Reprofile tool, thereby removing all annotations.
7. Profile
The profile being used here is the “Wiggle Round 2” from the supplied sample profile. It is repeated several times along the target path
8. Key path
The wavy line is the “key path”. It replaces the target path. The circles are not key paths, if present non-key paths are added to the new path as elements of a compound path.
Illustrator Location:
Illustrator Main Menu > Window > Astute Graphics > Reprofile
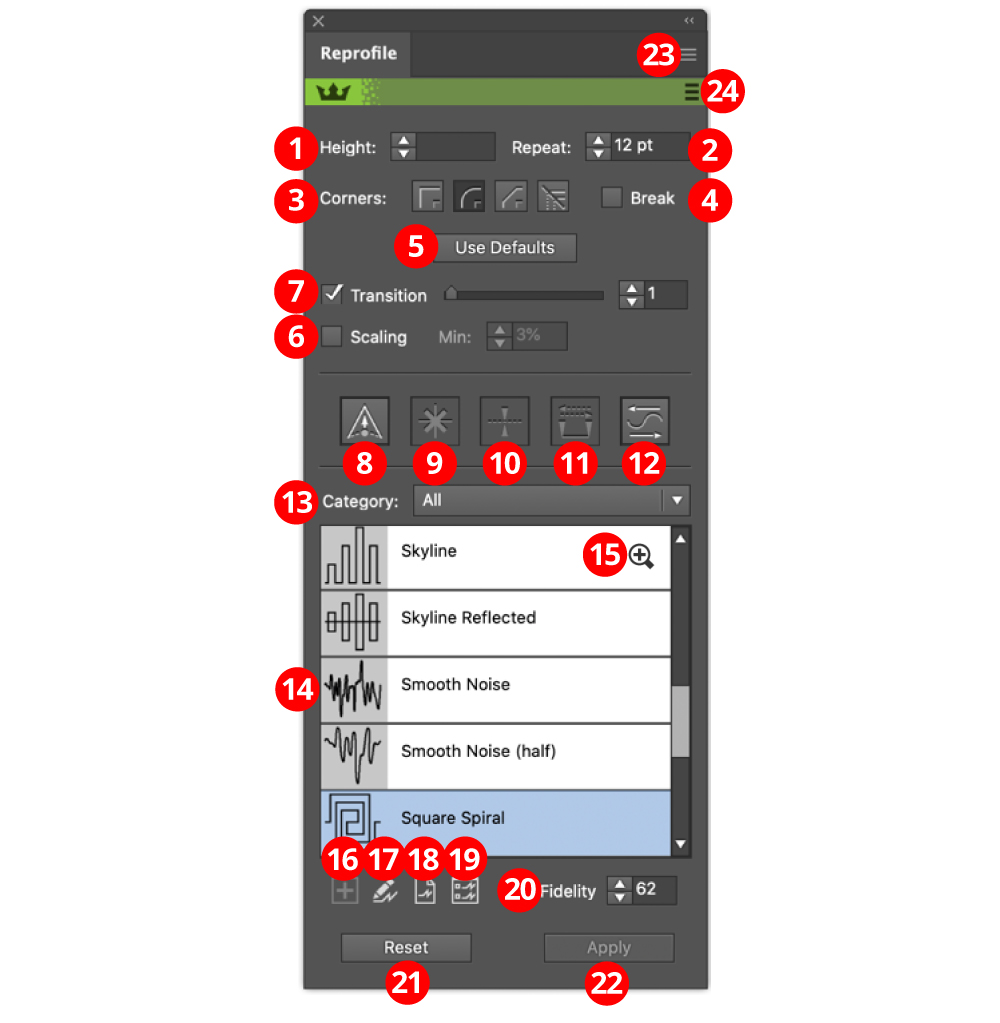
Reprofile Panel Expanded Overview
1. Height value
To numerically enter the height of the selected markers. Note that negative values are allowed and create a mirrored reprofile. It is possible to mix positive and negative markers.
2. Repeat value
Sets the width of the profile element, in document units. Note that this will be rounded to create a whole number of repeats. If scaling is enabled, the value is the average width of the scaled elements.
3. Corners buttons
When reprofiling a path with an abrupt change in path direction, the corner type specifies how the reprofiled path bends around the original corner.
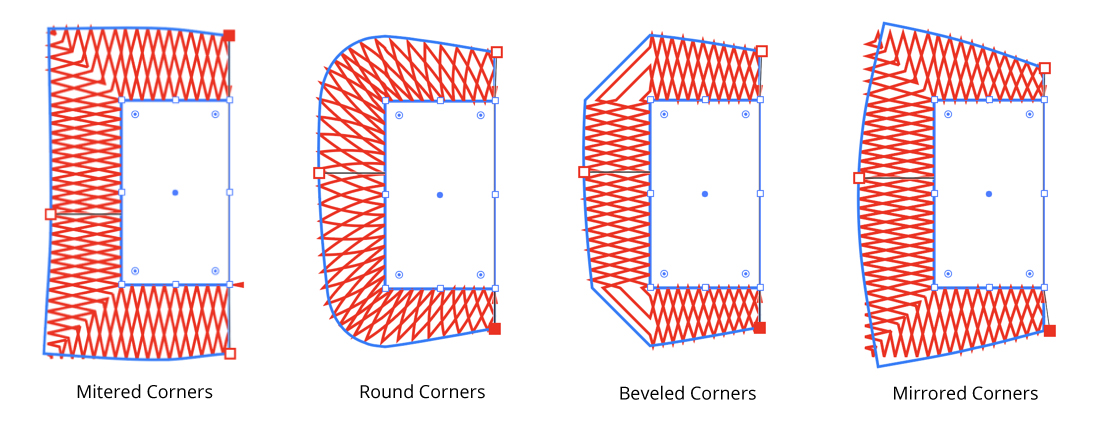
Reprofile Panel Corner Types
4. Break checkbox
Forces a whole number of repeats for each smooth section of the path without corners. This option is always enabled for mirrored corners.
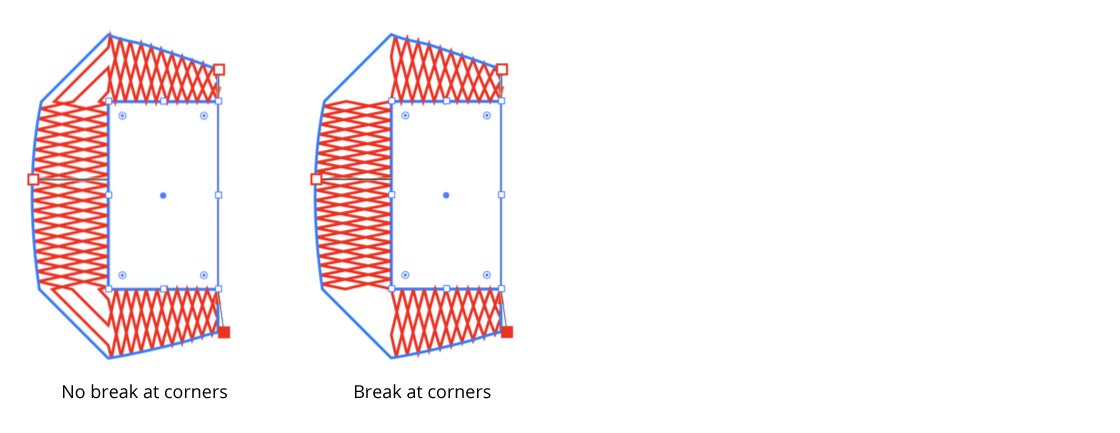
Reprofile Panel Corner Type Break
5. Use Defaults button
Sets the parameters to the values stored for the profile in the Profile Library. These can be edited in the Profile Attributes panel.
6. Scaling checkbox and value
When selected, profile width is varied by the height of the profile at that point. The minimum scaling value sets a minimum scaling to prevent profiles at very low points being scaled to tiny sizes.
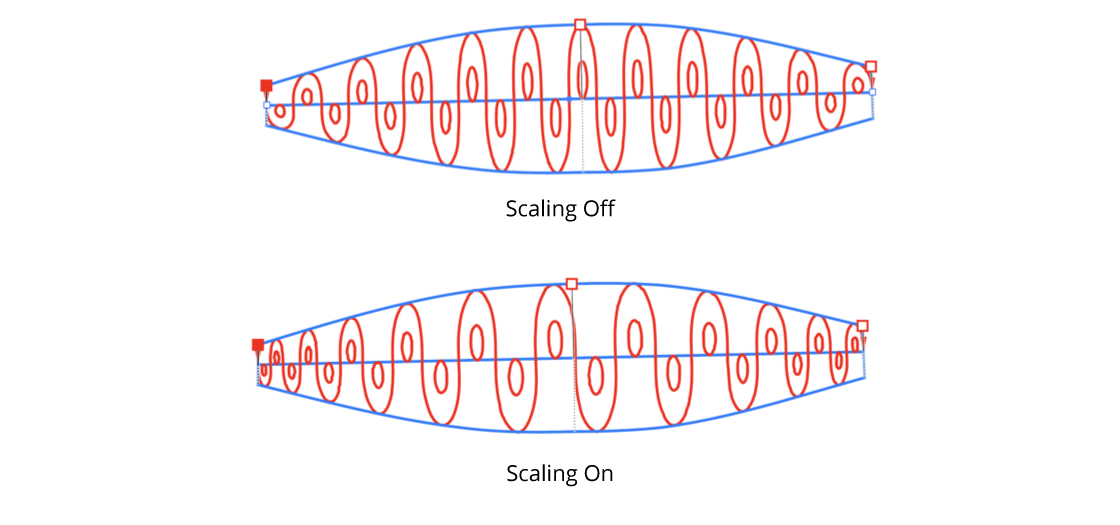
Reprofile Panel Scaling Option
7. Transition checkbox / value
Controls the smoothness of the transition between the original path and its reprofiled portion (off, or values of 1 - 10).
8. Sharp marker button
Toggles the selected markers between smooth and sharp (see above for explanation of different types). It also controls the type of any newly-created markers.
9. Delete marker button
Removes all selected markers.
10. Mirror offset button
Changes the direction of the height of all selected markers. This is the same as changing the sign of the height value.
11. Swap marker direction button
Changes the position of all markers (selected or not) along the reshape extent. If, for example, a marker is located 1/5 of the way from the start to the end delimiter, swapping the direction will change it to be 1/5 of the way from the end to the start delimiter. Offset values are not changed.
12. Flip profile direction button
Toggles the profile direction horizontally along the path.
13. Category dropdown
Sets the category of profile to display in the selection panel.
14. Profile selection panel
Selects the profile to use for reprofiling.
15. Profile zoom icon
Toggles the profile thumbnail displayed in the profile selection panel between small and expanded. Shift + clicking will toggle all the profiles. This is purely to aid in profile selection, it does not affect the behaviour of the tool.
16. Grab button
If artwork is selected, it will take the artwork and open the Profile Attributes Editor. If the profile is accepted, it will be added to the library. Option/Alt-click to overwrite the geometry of the currently selected profile (ie. edit the existing profile shape).
17. Profile edit button
Opens the Profile Attributes Editor to edit the attributes of the selected profile.
18. Profile dump button
Copies the selected profile to the artboard. Note that dumping and re-grabbing is the only way to edit the geometry of a profile.
19. Profile Manager button
Opens Profile Manager. Profile Manager allows you to import, export, and delete profiles.
20. Fidelity control
Controls the accuracy with which paths are reprofiled. A high value means greater accuracy, but longer processing time. For technical reasons, artifacts will also occasionally appear if fidelity is too high. A lower fidelity value also maintains more straight lines. You might consider editing with a lower fidelity to retain interactivity, then setting the value higher before applying.
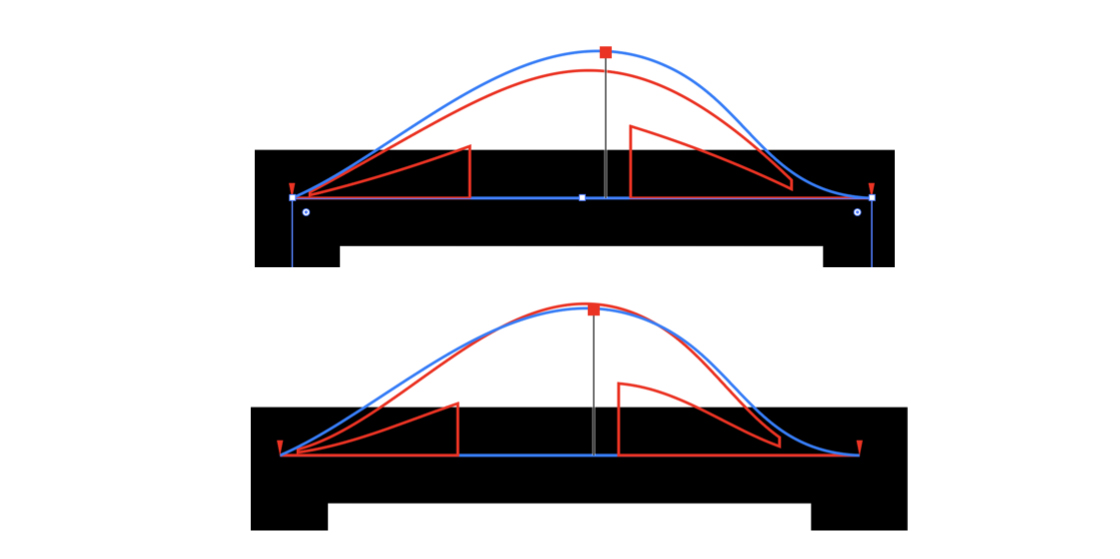
Reprofile Panel Fidelity Option
Scale: the thick black line is a path of one point width.
Low fidelity: the short lines are interpreted as straight lines.
High fidelity: the short lines are curved to follow the width profile.
21. Reset button
Cancels the Reprofile operation. The path remains unmodified. This can also be achieved by pressing the Esc key when the cursor is in motion.
22. Apply button
Finalizes the path reprofile. This can also be achieved by pressing Return or Enter. Holding down Alt/Option will cause the original artwork to be retained.
23. Flyout menu
Provides access to the preferences dialog, and allows saving and recalling of height marker settings.
24. Panel banner
The help button on the right opens the help documentation in the Astute Manager. If this does not automatically appear, please ensure your Astute Manager is running first.
Click on the other area of the color bar to activate the Reprofile tool. This is a quick method of locating the tool within the default Advanced toolbar or a custom toolbar.
Illustrator Location:
When reprofiling an entire closed path, the target path does not have a beginning and an end. In this case you may use “looped mode”. In this mode, which is only applicable for closed paths, there are no delimiters. Instead, there is a special blue marker pair which is located at “point zero” along the path and cannot be moved or deleted. If point zero is smooth, the pair will appear as a single marker; if point zero is a corner point, the markers will appear separately. In either case, the pair's common length may be adjusted by dragging either of the blue markers to set the height of the path at that point. Additional normal markers may be set at other positions along the path.
Reprofile Terminology Looped Mode
To enter looped mode on a closed path which is already being reshaped, doubleclick either one of the delimiters. To enter looped mode immediately when starting a new reshape, hold down Option/Alt when initially clicking or dragging the path.
Since the entire path is affected in looped mode, the Transition parameter is no longer applicable.
Illustrator Location:
A common operation is to extend one section of a path by a uniform amount. You can achieve this by placing markers of equal height value exactly on the start and end delimiters. To save time, you may quickly create a constant offset by holding down Shift + Option/Alt while initially dragging the path to create a new reprofile.
Illustrator Location:
Reprofile has an internal Undo/Redo system that keeps track of all changes as you refine the profile. If you move a marker, for example, but then want to put it back exactly where it was, you can simply undo your last change. Reprofile uses the keystrokes that Illustrator assigns to the tool commands “Decrease/Increase Diameter” to do this. By default, these are the left and right square bracket keys respectively ( [ and ] ), but these may be reassigned, as with any keyboard shortcut.
Resetting or applying a Reprofile profile clears the Undo/Redo history, as does editing the profile library with the Profile Manager.
Illustrator Location:
Reprofile comes with a set of standard sample profiles. It is possible to add user-defined profiles to the library, or to import and export profile files as xml data.
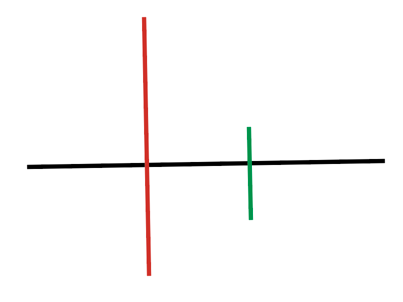
Reprofile Terminology Key Path Example
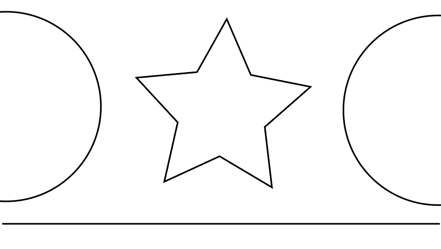
The key path defines the path which replaces the target path. Profile geometry cannot overhang the key path. In this profile, the black path or the red path can be used as the key path, but the green path cannot because of its short length.
To create a profile, draw the profile in Illustrator. Any styling or coloring will be stripped. The profiles have rubber sheet geometry, so height and width will be set by the tool. However dimensions should be within an order of magnitude of the expected final result to avoid scaling artefacts. The profile must contain at least one open path, which is used as the key path. It is not possible to create a profile without a legal key path. However the key path can be suppressed, meaning that it will not appear in the final result.
The key path cannot be overhung by any other artwork. Select the artwork to be used for the profile, open the Reprofile tool, and click the “Grab” button (the addition sign icon) in the main tool panel. The Profile Attributes Editor will open. If the wrong path has been chosen as the key path, correct it in the Profile Attributes Editor. If the default dimensions are not desired, enter the correct values. Accept the new profile by clicking the OK button, and the new profile will be added to the library. A unique name is assigned automatically, though usually you will wish to provide your own name.
To back up the profile, or to share it with other artists, open the Profile Manager (see below) to export it as an xml file. Profile Manager also allows the import of profiles, the deletion of unwanted profiles, and other library operations. Profile geometry cannot be edited once the profile has been created. To edit profile geometry, dump it to the artboard using the profile dump button (lightening icon, see below), edit it using Illustrator’s normal artwork tools, delete the old profile, and add it again to the library. As a shortcut it is possible to Option/Alt-click on the Grab button. This overwrites the geometry of the selected profile, whilst keeping the other attributes.
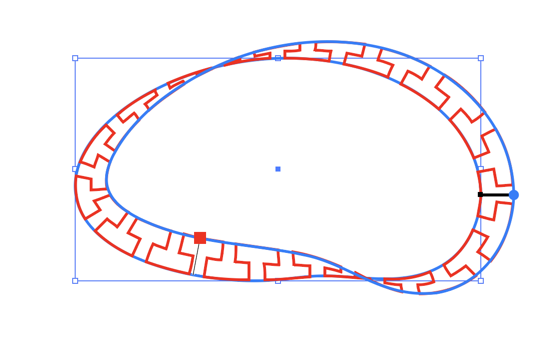
Reprofile Compound Path Example
Sometimes it is desirable to create paths which join on profile boundaries to prevent the unit cell from being visually obvious. These may be detected as overhanging artwork, in which case paths will have to be adjusted by a tiny amount in Illustrator. The tool will join adjacent open paths, within a tolerance.
If the profile contains more than one path, the key path does not have to appear in the final result. There is an option to suppress it. It then acts purely as a guide to placement of the profile along the target path.
Text can be used as a profile. Select the text as usual and press the Grab button. It is not necessary to outline it, though Reprofile will outline the text internally and it will no longer be editable within the tool. A key path is automatically added at the baseline of the text, and suppressed by default. Alternatively, it is possible to supply a key path by adding an open path and selecting it along with the text when the profile is created.
Illustrator Location:
Illustrator Main Menu > Window > Astute Graphics > Reprofile
The Profile Attributes Editor allows editing of the metadata associated with the profile. It will not allow editing of the geometry itself (dump the profile to the artboard, edit it in Illustrator, and re-grab it to alter profile geometry). Not all artwork is suitable for use as a profile. If artwork is unsuitable, the editor will come up, but it will be impossible to accept the profile and the OK button will be greyed out. A diagnostic message will be shown explaining why the artwork cannot be accepted.
The Profile Attributes Editor comes up when a new profile is created by pressing the Grab button in the main tool panel (see above). Aside from giving the profile a name and setting the category, another important operation is setting the key path. The key path is used to replace the original path in the target art. The key path must be an open path, and it cannot be overhung by any other artwork. However it is possible to create artwork with more than one valid key path. A profile must be given a valid key path to be created.
The Profile Attributes Editor can be invoked from the Grab button or the Profile Edit button in the main tool panel.
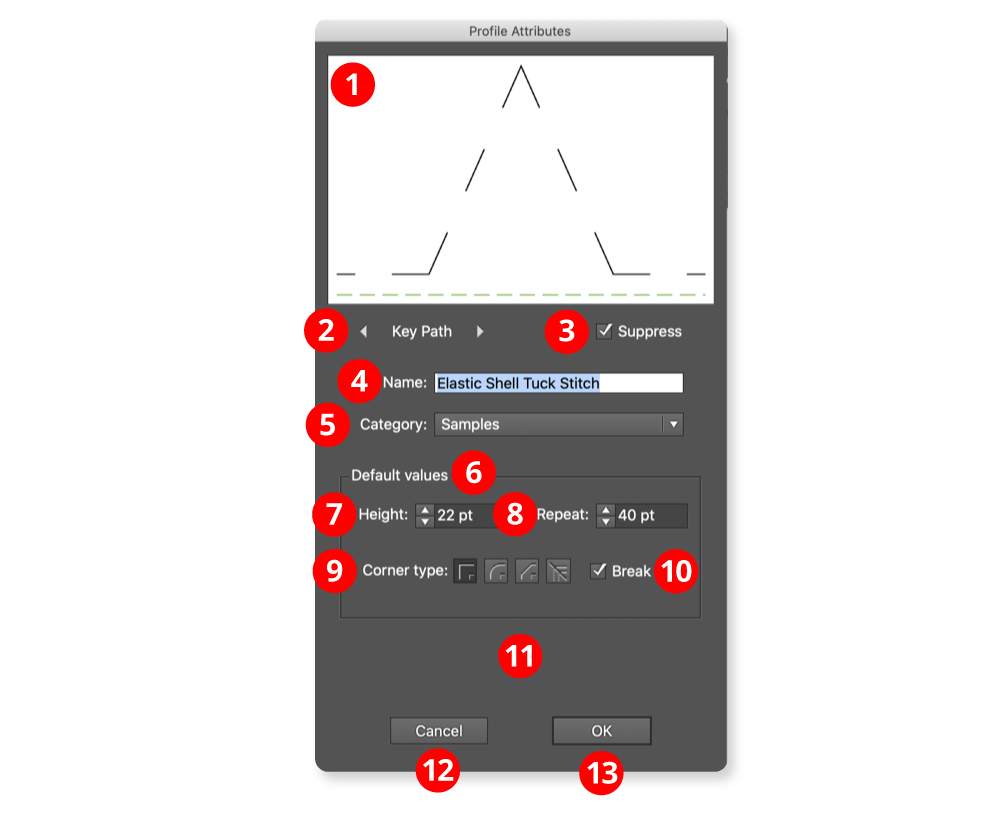
Reprofile Attributes and Captions
1. The Profile thumbnail
Profiles use rubber sheet geometry, so the aspect ratio of the artwork selected in Illustrator will not be preserved. The key path is shown in red, or in a dotted green line if it is suppressed. It is possible to interact with the thumbnail using the mouse to select the key path. The thumbnail will then rotate to show the new key path in the horizontal position.
2. Key path cycle buttons
If the artwork has only a few open paths, it may be more convenient to select the key path using the buttons. If the artwork has only one open path, they will be disabled. It is possible to select an invalid path as the key path, but not to accept the resulting profile (OK button is greyed out).
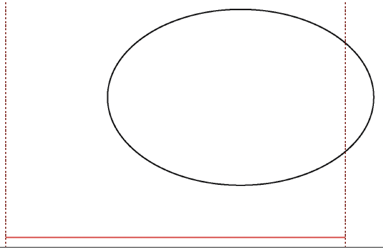
Reprofile Invalid Paths
An invalid key path has been selected. The dotted lines show where artwork is overhanging. Note: Sometimes the overhang can be very small.
3. Suppress key path checkbox
If the key path is suppressed, it is shown as a dotted green line. The key path is used to align the profile to the target art, but doesn’t appear when the reprofile is applied. If only part of the target path is selected, a closed path will become an open path and an open path will be broken into two.
4. Name edit box
The name of the profile. Names are also used as filenames, so currently only Latin names that do not contain special characters are supported.
5. Category dropdown
Set the category of the profile. It is also possible to create a new category. Manage categories using the Profile Manger.
6. Default values
These are the settings for the profiles which are set when pressing the Use Defaults button in the main tool panel.
7. Height control
Default height of the profile, usually overridden by editing with the tool, but useful for preserving aspect ratio.
8. Repeat control
Default repeat width of the profile. Use with the height setting to preserve aspect ratio. Unlike height, repeat is not affected by editing with the tool.
9. Corner type buttons
When reprofiling a path with an abrupt change in path direction, the corner type specifies how the reprofiled path bends around the original corner.
10. Break checkbox
Forces a whole number of repeats for each section of the path without corners. This option is always enabled for mirrored corners.
11. Information area
If the profile cannot be accepted, explanatory text appears here and the OK button is greyed out.
12. Cancel button
Cancels the profile edit, or cancels the profile creation if dialog invoked from the Grab button.
13. OK button
Accepts the edits or the new profile and saves it in the library. Note: that if creating a new profile it may not be possible to accept it and the OK button will always be greyed out. This is so it is possible to examine the profile to find the problem, which will usually be artwork overhanging the key path.
Illustrator Location:
Illustrator Main Menu > Window > Astute Graphics > Reprofile > Panel Flyout Menu > Manage Profiles...
The Profile Manager is used for editing the Profile Library and can be located via Reprofile Panel Flyout Menu > Manage Profiles... or by using the Open Profile Manager button at the bottom of the panel. There is some overlap with the Profile Attributes Editor, which is intended for editing metadata associated with a single profile. Profile Manager operates on the library as a whole.
The "Sample profiles", which are automatically added when Reform is first installed, can be edited or deleted like profiles you create yourself. When all profiles are deleted, the Sample profiles will be reset. Profiles can also be exported or imported in an open xml format. This allows the sharing of profiles and the creation of backup files.
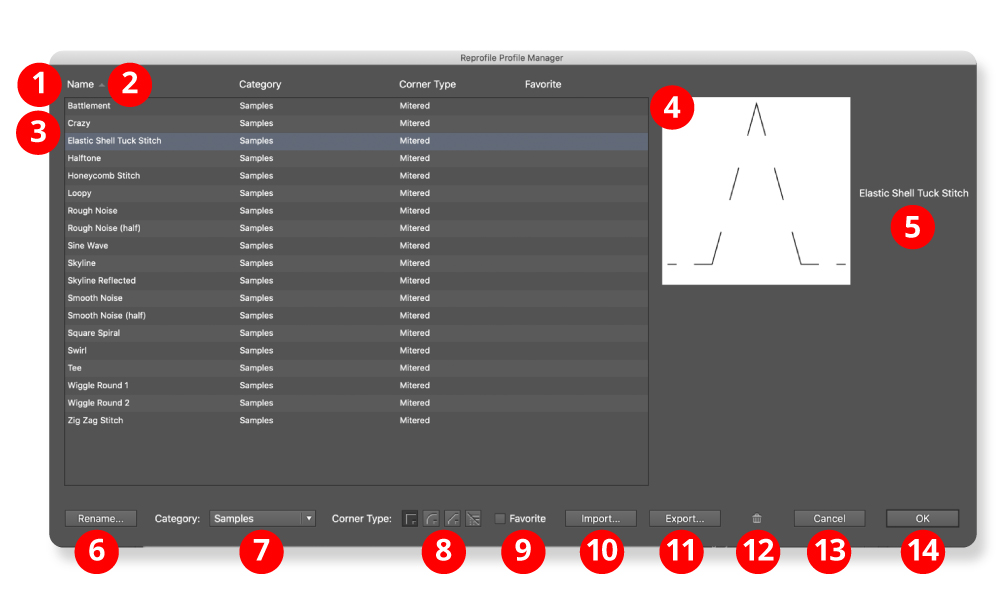
Reprofile Profile Manager
1. The field headers
The field headers sort on the field when clicked. If the field is already selected, the sort order is toggled.
2. Sort order arrow
Shows whether the sort is ascending or descending.
3. The Profile list
Every profile in the library is listed. It is possible to select a single profile or a group of profiles. Profile Manager edit operations always operate on the selection.
Fields are:
Name: the name of the profile
Category: the category to which the profile is assigned, or “None”.
Corner type: behaviour at sharp joins in the target path.
Favorite: set if the profile is a favorite
4. Profile thumbnails
Shows up to sixteen profiles for preview. Profiles have rubber sheet geometry so aspect ratio with drawn artwork will not be preserved. If width is much greater than height, it decides intelligently whether to display the profile as repeating elements or to stretch it.
5. Names
Profile names displayed here to identify the thumbnails.
6. Rename button
Brings up a dialog to rename the selected profile. (The Profile Attributes Editor may also be used to set the name).
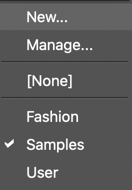
Reprofile Flyout Menu
7. Category dropdown
Sets the category of the selected profiles. The “New…” option brings up a dialog to create a new category (the Profile Attributes Editor may also be used). The “Manage…” option brings up the Category Manager dialog, which allows the renaming, deletion, or creation of categories (not available from the Profile Attributes Editor).
8. Corners buttons
When reprofiling a path with an abrupt change in path direction, the corner type specifies how the reprofiled path bends around the original corner.
9. Favorite checkbox
To mark a profile as a favorite for easy selection.
10. Import button
Brings up a dialog to import profiles from xml files. The library stores the profiles as a flat list, so names cannot be duplicated. It will attempt to intelligently resolve name conflicts.
11. Export button
Brings up a dialog to export the selected profiles. Profiles are exported as open xml files. The profile name is stored in the xml data so the name of the file can be changed without affecting the library name.
12. Delete button
Deletes the selected profiles. Delete every profile to reset the library to the original sample profiles on next start-up.
13. Cancel button
Cancels every library editing operation, including import operations, but not export operations.
14. OK button
Accept the edits and updates the profile library. This will purge the undo list if the Reprofile tool is active.
Illustrator Location:
Illustrator Main Menu > Window > Astute Graphics > Reprofile > Panel Flyout Menu > Save/Manage Width Profiles...
Reprofile shares width profile settings with Reform. Reprofile width profile settings can be used in Reform, or Reform profiles in Reprofile. A Reprofile operation consists of a Reform operation to set the guide paths followed by a second operation to apply the Reprofile profiles. To avoid confusion, in Reprofile, Reform profiles are termed “width profiles”. Reform profiles (sequences of offset markers along a delimited extent) may be saved and recalled, so that multiple paths may be reshaped in the same manner. To save width profile settings, use the panel flyout menu when a Reprofile operation is in progress and choose Save Width Profile... and give the settings a name. To apply an existing Reform profile or Reprofile Width Profile setting to a path, start editing the path with the Reprofile tool and (if necessary) move the delimiters to the desired positions. Then choose the desired width profile setting from the panel's flyout menu.
Width profile settings may be renamed or deleted by choosing Manage Width Profiles... from the panel flyout menu.
Illustrator Location:
Illustrator Main Menu > Window > Astute Graphics > Reprofile > Panel Flyout Menu > Reprofile Preferences...
The Reprofile Preferences dialog may be opened by either double-clicking the Reprofile tool icon in the toolbar, or by choosing "Reprofile Preferences..." at the top of the panel flyout menu.
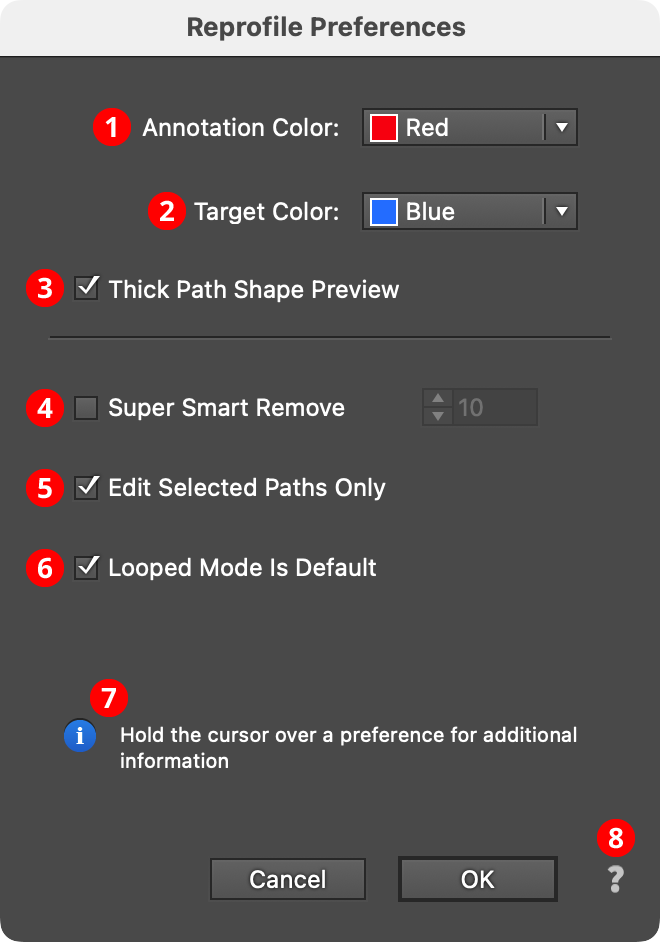
Reprofile Preferences Dialog
1. Annotation Color
The main color used to draw the reshaped path, markers, and delimiters; red by default.
2. Target Color
The color used to show the original path. It is also used for loop mode markers; blue by default.
3. Thick Path Shape Preview checkbox
When enabled, the original and reshaped path previews are drawn with a thick line, and larger marker annotations are used.
4. Super Smart Remove checkbox / value
When enabled, unnecessary anchor points are removed from the final reshaped path, using the value as a tolerance. Higher tolerance values will remove more points but may make the final path vary from its preview slightly.
5. Edit Selected Paths Only checkbox
When enabled, paths must be selected before the Reform tool will edit them.
6. Looped Mode is Default
When enabled, the Option/Alt key reverses its function and does not turn looped mode on but instead turns it off.
7. Informational area
Shows a brief description of each preference setting when the cursor is being held over it.
8. Help Button
Opens the help documentation in the Astute Manager. If this does not automatically appear, please ensure your Astute Manager is running first.
Illustrator Location:
Illustrator Main Menu > Window > Astute Graphics > Reform Text
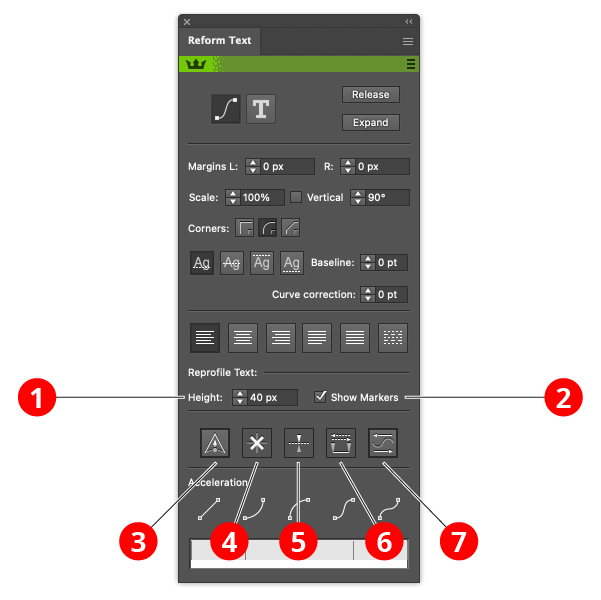
Reform Text Variable Height Controls
1. Height control
Set the height of a marker by entering a value.
2. Show markers checkbox
When unchecked, the tool is in basic mode. When checked, it is in variable height mode.
3. Sharp marker button
Toggles the selected markers between smooth and sharp (see above for explanation of different types). It also controls the type of any newly-created markers.
4. Delete marker button
Removes all selected markers.
5. Mirror offset button
Changes the direction of the offset of all selected markers. This is the same as changing the sign of the offset value.
6. Swap marker direction button
Changes the position of all markers (selected or not) along the reshape extent. If, for example, a marker is located 1/5 of the way from the start to the end delimiter, swapping the direction will change it to be 1/5 of the way from the end to the start delimiter. Offset values are not changed.
7. Reverse flow direction button
Reverses the direction of the text. Used in conjunction with the Mirror offset button it turns text upside down instead of reflecting it.