Opacity
Opacity Brush
Opacity Brush Tool
Opacity Randomizer Live Effect
Illustrator Location:
Advanced Toolbar > Opacity Brush Tool
Tool Location and Cursor Appearance
The Opacity Brush tool appears in Illustrator’s main toolbar (which must be in Advanced mode: View > Toolbars > Advanced).

Opacity Brush Tool Location
The Opacity Brush tool’s cursor is a crosshair. When the tool is not actively brushing, or when brush previews are disabled, it also displays a dark gray, dashed circle (or ellipse) indicating the size and shape of the brush:

Opacity Brush Tool Cursors
A minus sign symbol indicates that the brush is in “erasing” mode.
Illustrator Location:
Advanced Toolbar > Opacity Brush Tool
As the Opacity Brush tool has several keypresses which can add or change its functionality, we suggest installing the free Astute Graphics plugin Astute Buddy, which creates a panel that dynamically updates to inform you of the various keys which can be pressed in the tool’s current context.
While the Opacity Brush tool can be used without its panel, some functionality, such as adjusting the amount of noise, requires the panel to access.
To use the tool, simply brush over selected artwork to make it “fade out” in those areas. Opacity Brush automatically creates a raster opacity mask for each selected art object that is not part of the same group. The raster has a default resolution of 72ppi, but the value can be changed in the tool Preferences dialog (see Opacity Brush: Preferences).
If the artwork already has an opacity mask, the raster object will be added to it, at the bottom of the stacking order. If the existing mask was set to invert, this setting will be retained and the brush will appear work in an inverted manner.
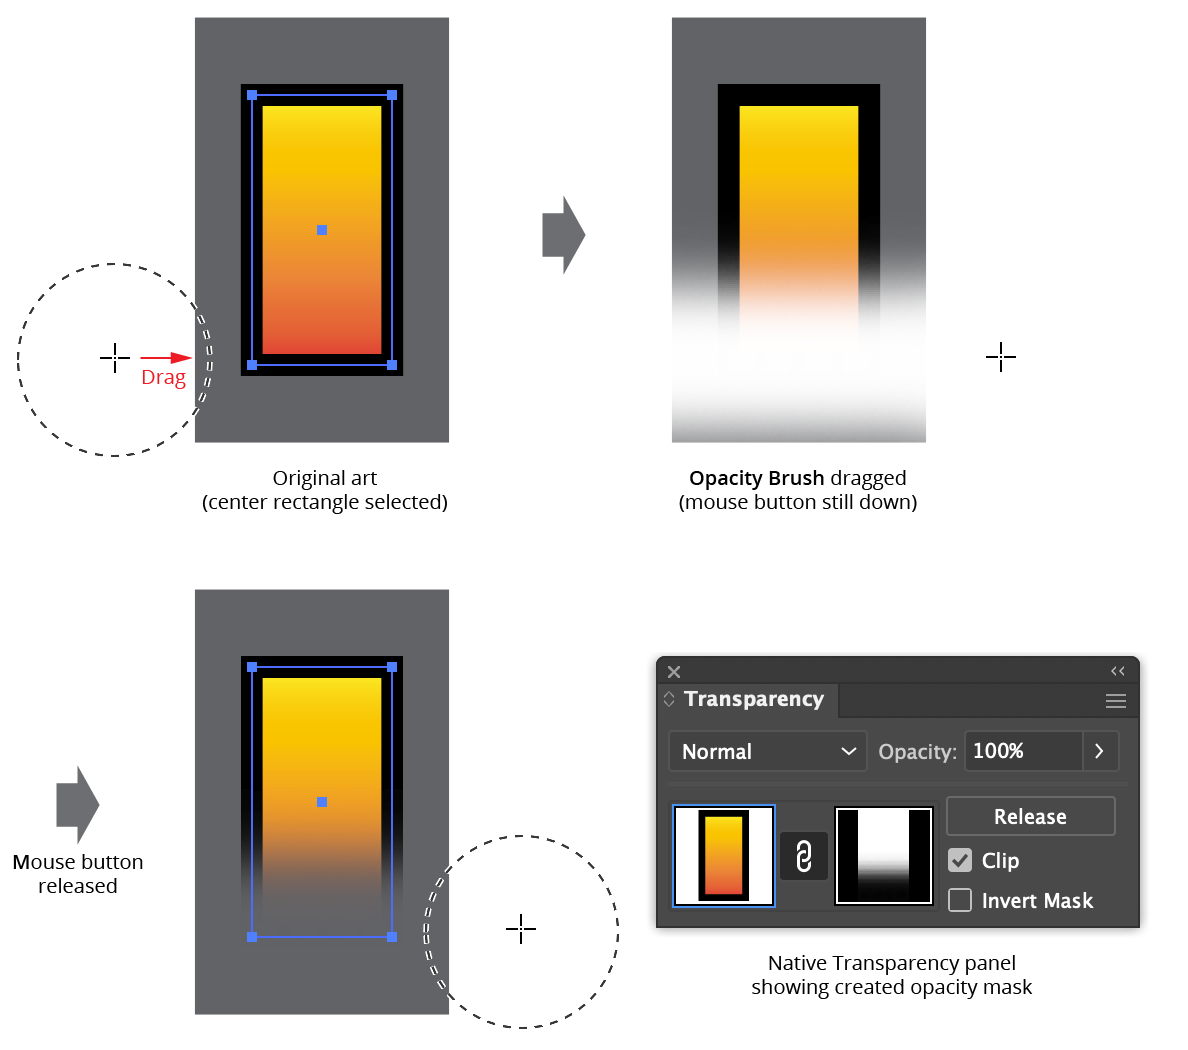
Opacity Brush Example
The Opacity Brush tool’s preview can be changed in its preferences; by default, it is white and shows its size, hardness, and opacity faithfully, similar to how a Photoshop brush would draw. Due to technical limitations of Illustrator, this requires CPU preview to be enabled in order to display properly when brushing long distances.
If the Option/Alt key is held down before brushing, the tool will be set to “erasing” mode, whereby each brush stroke adds opacity to the artwork (up to a maximum of 100%), instead of removing it. Like other brush tools, the diameter of the brush can be changed at any time it is active by pressing the keys assigned in the native Keyboard Shortcuts dialog to “Decrease Diameter” and “Increase Diameter.” For English language installations, these default to the open square bracket and close square bracket keys ([ and ]).
Another way to change the brush diameter (and hardness) is to hold down Shift-Option/Alt and click-drag the mouse; this adjusts the diameter. After releasing Shift-Option/Alt (and with the mouse button still down), a second drag will adjust the hardness.
While brushing (i.e., with the mouse button down), several keypresses can be used:
Shift: Constrains the brush motion to the nearest increment of 45° around the general constrain angle.
Left/Right Arrow: Decreases or increases the brush diameter.
0–9: Sets the brush opacity. 1 sets the opacity to 10%, 2 to 20%, etc.
D: Changes the drawing annotation color, cycling through red, blue, magenta, green, black, and white.
E: Changes the erasing annotation color, cycling through red, blue, magenta, green, black, and white.
To reset, invert, or remove the opacity mask created by the Opacity Brush tool, use the Opacity Brush panel.
Illustrator Location:
Illustrator Main Menu > Window > Astute Graphics > Opacity Brush
The menu item to show and hide the Opacity Brush panel can be found in the main menu under Window > Astute Graphics > Opacity Brush.
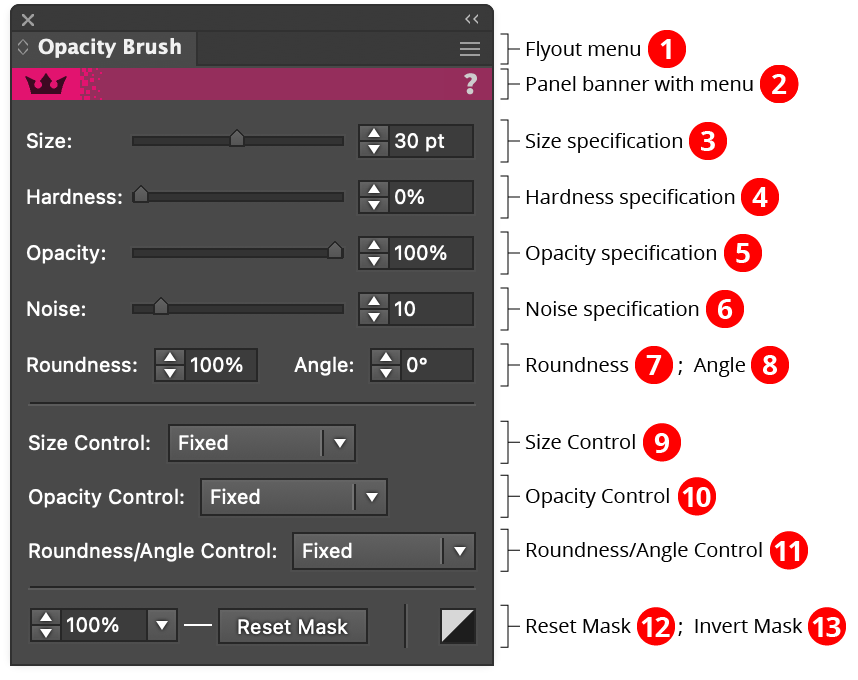
Opacity Brush Panel
1. Flyout menu
See Opacity Brush Panel: Flyout Menu.
2. Panel banner
The help button on the right opens the help documentation in the Astute Manager. If this does not automatically appear, please ensure your Astute Manager is running first.
Click on the other area of the color bar to activate the Opacity Brush tool. This is a quick method of locating the tool within the default Advanced toolbar or a custom toolbar.
3. Size Specification
The size (diameter) of the brush, from 1pt to 1000pt.
4. Hardness Specification
The hardness of the brush, from 0% to 100%.
5. Opacity Specification
The opacity of the brush, from 0% to 100%.
6. Noise Specification
The amount of noise in the brush, from 0 (no noise) to 100 (maximum noise).
7. Roundness
The roundness of the brush, from 10% (highly elliptical) to 100% (circular).
8. Angle
When the brush is not at 100% roundness, the angle of the major axis of its elliptical shape.
9. Size Control
Visible when the panel is expanded. When using a mouse as the input device, it should be set to Fixed; otherwise, enables the brush size to be controlled by either the pressure or wheel setting of a stylus-like device.
10. Opacity Control
Visible when the panel is expanded. When using a mouse as the input device, it should be set to Fixed; otherwise, enables the brush opacity to be controlled by either the pressure or wheel setting of a stylus-like device.
11. Roundness/Angle Control
Visible when the panel is expanded. When using a mouse as the input device, it should be set to Fixed; otherwise, enables the brush opacity to be controlled by either the tilt/bearing or tilt/rotation setting of a stylus-like device.
12. Reset Mask
Visible when the panel is expanded. The value input specifies the base opacity of the entire mask when it is reset (or first created, if the tool preference Base Opacity Applies to New Masks is enabled), with a default of 100%. The Reset Mask button resets the mask, removing all existing brush strokes that may have been made to it and filling it with the base opacity specified in the value input box.
13. Invert Mask
Visible when the panel is expanded; inverts the raster portion of the opacity mask.

Opacity Brush Panel Invert Mask
Illustrator Location:
Illustrator Main Menu > Effect > Randomino > Opacity Randomizer...
Opacity Randomizer is an Astute Graphics live effect for randomly and non-destructively varying the opacity of one or more objects. Both linear and Gaussian random distributions are supported, and the applied opacity values can be rounded. Objects can be “filtered” so only some of them are affected, and, when applying the effect to nested groups, the depth at which it is applied can be specified.

Opacity Randomizer Example
As with most live effects, Opacity Randomizer appears in the main menu, under Effect > Randomino. It can also be applied directly from the Appearance panel using the “Add New Effect” button at the bottom of the panel.
Opacity Randomizer Parameters Dialog
After applying the live effect using the menu item (or when clicking on the existing effect in the Appearance panel to edit it), the parameters dialog will appear:
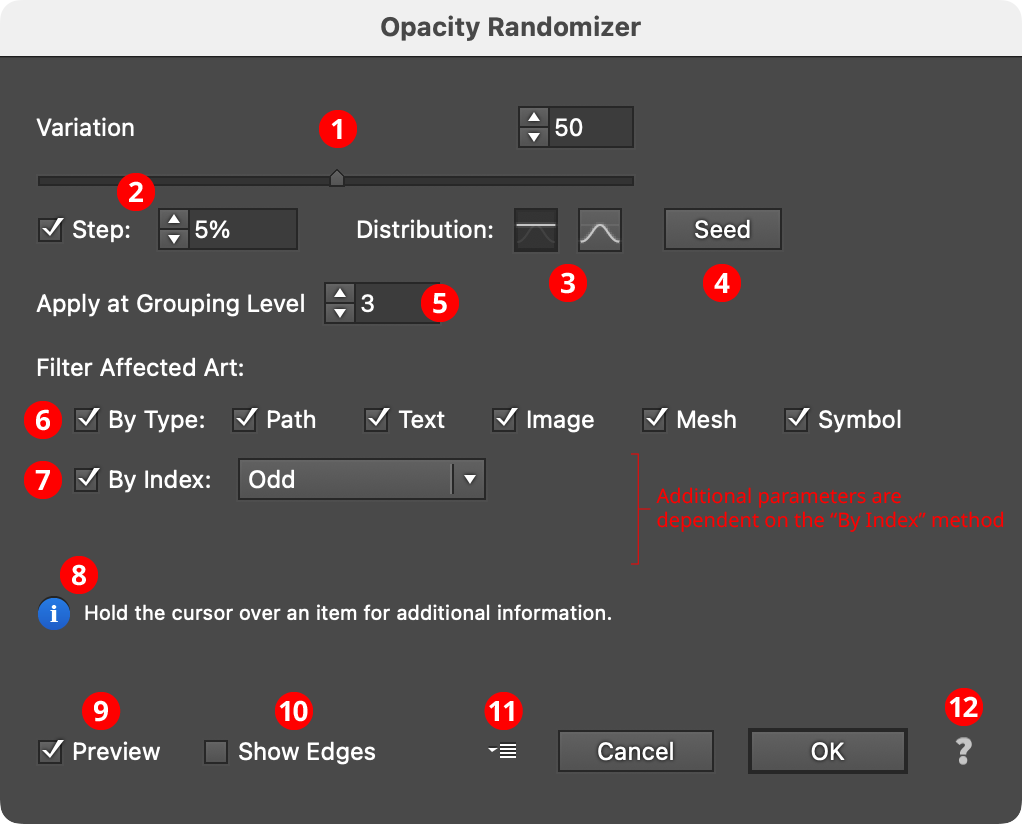
Opacity Randomizer Parameters Dialog
1. Variation
The amount of variation in opacity to apply, ranging from 0 (no variation) to 100 (maximum variation). The value can be changed with the slider or entered numerically in the text box. A variation of 20, for example, would apply opacities randomly ranging from 80% to 100%, while a variation of 75 would apply opacities from 25% to 100%.

Opacity Randomizer Variation Examples
Because the opacities that Opacity Randomizer applies are multiplied onto existing opacities, final random opacities from 0% to 50%, say, may be achieved by setting the art’s overall opacity to 50% and then applying Opacity Randomizer with a variation of 100.
2. Step
Constrains each applied opacity value (after randomization) to multiples of the specified step value while still remaining in the original range (when possible). For example, if the variation is set to 34, then normally any opacity value between 66% and 100% might be produced — say, 87%. But enabling Step with a value of 10% would result in only values of 70%, 80%, 90%, or 100%.
3. Distribution Curves
Specifies either a linear distribution in random values (all values in the range are equally likely to be chosen) or a Gaussian distribution (central values in the range are more likely to be chosen).
4. Seed
Each random seed number leads to a different sequence of random values. Clicking the button picks a new seed, thereby changing the look of the artwork. To view or specify the seed number directly, Option/Alt-click the button. This lets you recreate a previously-generated look.
5. Apply at Grouping Level
Unless a live effect is applied above all strokes and fills (a “pre” effect), or inside a stroke or a fill and above other live effects, the art object internally passed to it is always a group. And this group may contain other groups, and so on. The Grouping Level controls the level at which the effect is applied, which affects what elements in the hierarchy get different random opacities. It can range from 0 (representing the top-level art) to 29 (the deepest level of group nesting allowed in Illustrator).
In the simplest case (when the effect is applied to a single stroked-and-filled path), the live effect mechanism separates the stroke from the fill, and passes a stroke-only path and a fill-only path to the live effect in a group. So while a Grouping Level of 0 would apply the same (random) opacity to the stroke and fill (because it is applied at the top grouping level), a Grouping Level of 1 would cause it to choose a different opacity for the fill than that of the stroke:
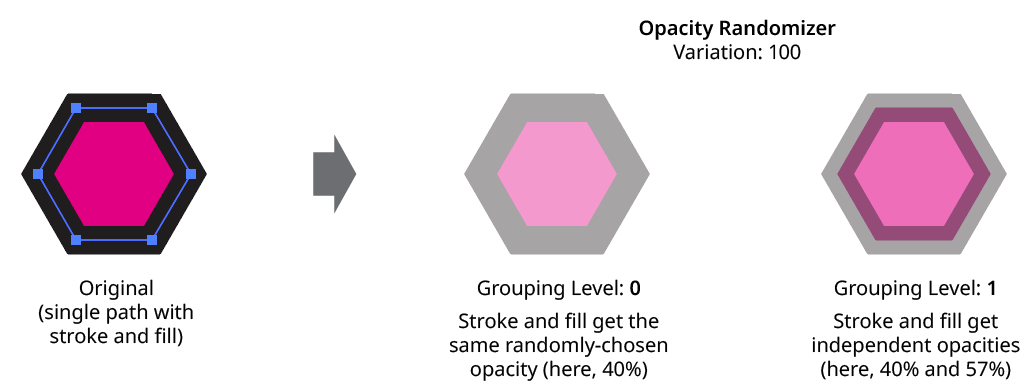
Opacity Randomizer Grouping Level on Simple Path
Next, consider the case of applying Opacity Randomizer to a group of stroked and filled paths. This top-level group may or may not have its own stroke and/or fill in its appearance. Here, the group passed to the effect has three groups inside it. One is composed of the paths with group level strokes (if there is no group level stroke, these would have no stroke or fill); another is composed of the paths with group level fills (similarly, if there is no group level fill, these would also have no stroke or fill); and the last is composed of the original paths in the group (and here, strokes and fills are not broken apart).
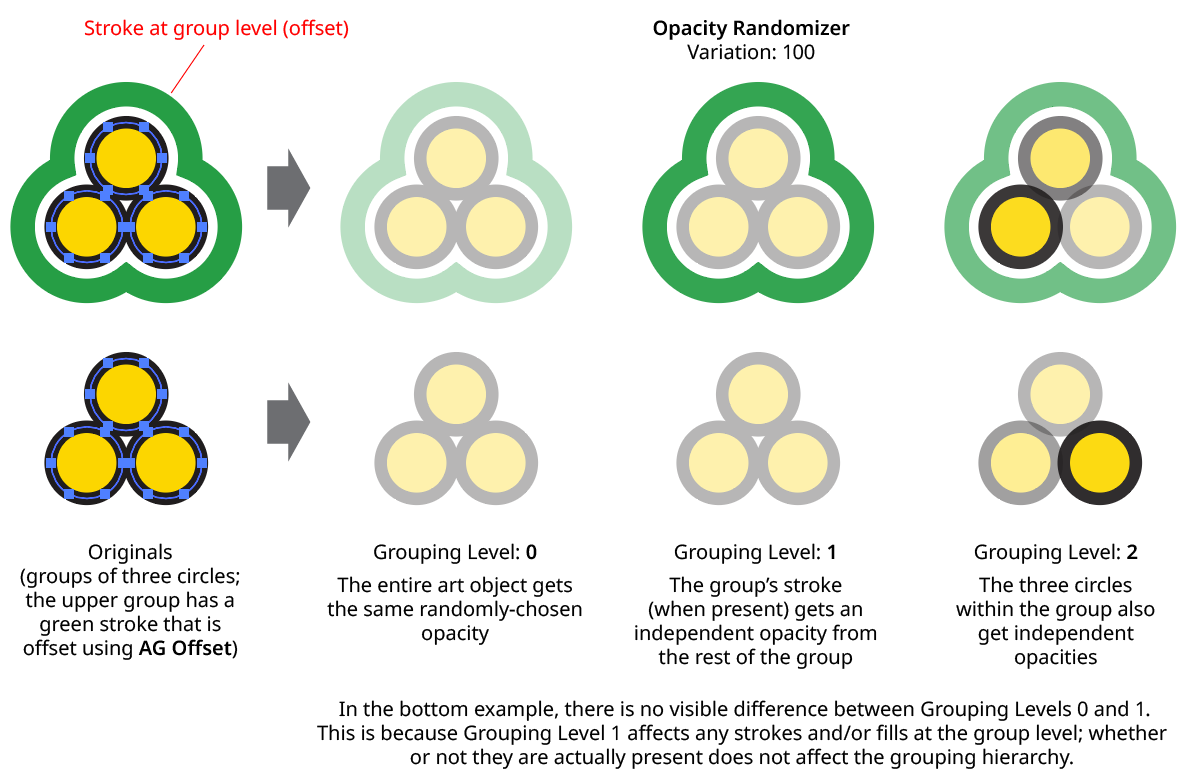
Opacity Randomizer Grouping Level on Group of Paths
In general, each nested group in the original art requires two Grouping Levels to “dig into,” due to the fact that a group stroke or fill can be present at each level. Because it can be difficult to anticipate what Grouping Level to use because the live effect mechanism can be complicated, it is recommended to simply increase the Grouping Level until the results are what is desired (changing the seed, if necessary, to see what is really changing independently). Setting the Grouping Level above the highest “valid” value will not cause a problem.
6. Filter Affected Art By Type
When enabled, only the art types that have a checkmark next to them will have their opacities randomly changed. For example, if many images are each grouped with a text caption, the opacities of just the images could be randomized by turning off the “Text” checkbox:

Opacity Randomizer Filter by Type Example
7. Filter Affected Art By Index
When enabled, each art object’s index is used to determine whether it should have its opacity randomly changed, using one of seven different methods. The index is simply an integer sequentially assigned to each object at the specified Grouping Level in the order it is encountered, starting with zero for the first object. Generally, the index increases going downwards in the stacking order; however, other live effects present in the appearance stack may change this order, sometimes randomly (such as PathFinder effects). The available By Index methods are as follows:
a. First: Only the first n objects are affected, where n is the specified value.

Opacity Randomizer by Index First Controls

Opacity Randomizer Filter by Index - First
b. Last: Only the last n objects are affected, where n is the specified value.

Opacity Randomizer by Index Last Controls

Opacity Randomizer Filter by Index - Last
c. First or Last: Only the first and last objects are affected.
d. Odd: Only objects with an odd index (1, 3, 5, 7...) are affected.
e. Even: Only objects with an even index (0, 2, 4, 6...) are affected.

Opacity Randomizer Filter by Index - Odd & Even
f. Pattern: Creates a repeating pattern of matching indices based on the three pattern parameters.

Opacity Randomizer by Index Pattern Controls
Initial Skip specifies the number of indices to skip over at the start (art with these indices will not be affected). Then, Match specified the number of indices that will match and therefore be affected. Finally, Skip specifies the number of indices to skip over following the matching indices. When the total of the values in the three parameters is less than the number of eligible art objects, the pattern repeats, using the Match and Skip values in alternation.

Opacity Randomizer Index by Pattern
g. Randomly: Each art object has the specified random chance (from 0% to 100%) of being affected. The parameter has a seed value that is independent from the main opacity seed value. Just as with that seed value, clicking the button picks a new seed, thereby changing the look of the artwork. To view or specify the seed number directly,
Option/Alt-clickthe button. This lets you recreate a previously-generated look.

Opacity Randomizer by Index Randomly Controls
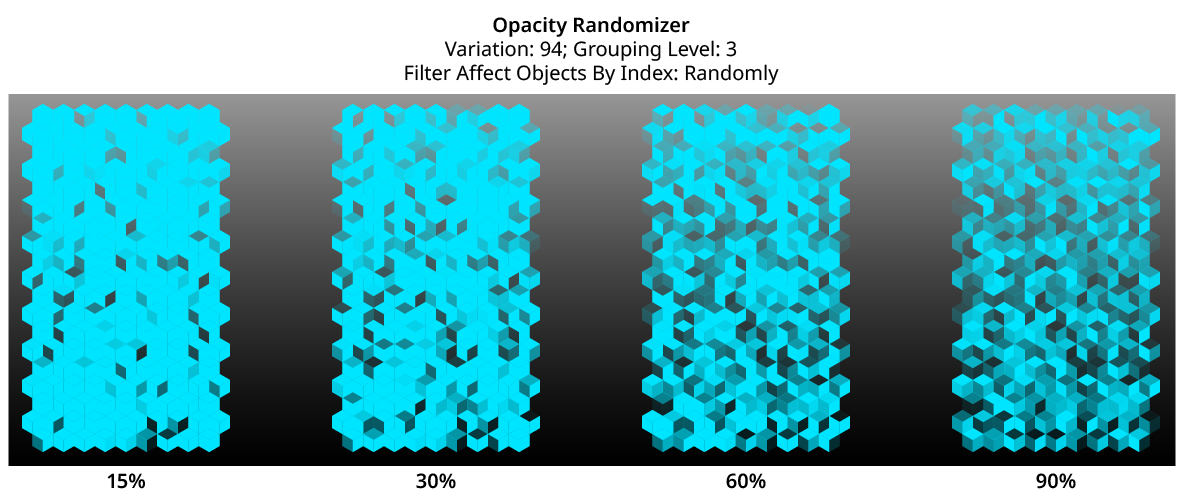
Opacity Randomizer Filter by Index - Randomly
8. Informational area
Shows a brief description of each control when the cursor is being hovered over it.
9. Preview
As with all live effects, when enabled, changing a parameter will immediately update the artwork while the dialog is still open.
10. Show Edges
By default, artwork selection edges are automatically hidden when the Opacity Randomizer parameters dialog is up, to make it easier to see opacity changes. However, by toggling the checkbox on, they may be shown again.
11. Defaults Popup Menu
Contains several functions concerning the default Opacity Randomizer settings. Default settings are those that initially appear in the parameters dialog whenever Opacity Randomizer is applied to art as a new effect (i.e., not when adjusting an existing instance of the effect).
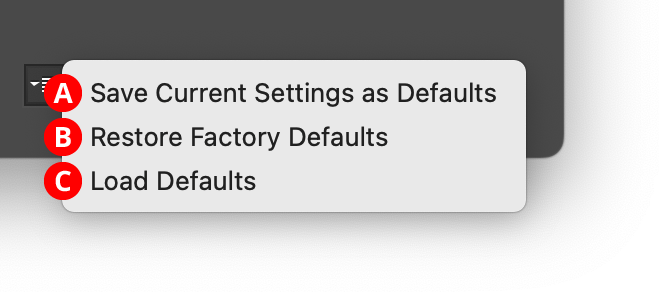
Opacity Randomizer Default Menu
A. Save Current Settings as Defaults: The settings that are currently displayed in the dialog will be saved and used as the defaults in the future.
B. Restore Factory Defaults: The default settings will be restored to those that were in place when the plugin was installed and run for the first time. They will also automatically be loaded into the dialog.
C. Load Defaults: All current settings will be replaced with the default settings (which may have been customized through the first menu item).
12. Help Button
Opens the help documentation in the Astute Manager. If this does not automatically appear, please ensure your Astute Manager is running first.
