 Reform Text
Reform Text is a tool to place text on paths. It is intended as an alternative to the native Text on a Path tool. The main advantage is that it is easier to use and gives more intuitive control over text placement.
Reform Text’s functionality allows for:
Variable height text
Mirroring and reversing
Sharp corner control
Baseline placement
Control of the distortion as text flows over curved paths
When applied the text is distorted to match the curve of the control path, the glyphs are not simply rotated as some similar tools will output. It also allows for text to be bent to represent a curved surface, such as the label of a bottle.
Reform Text consists of a tool and an associated panel.
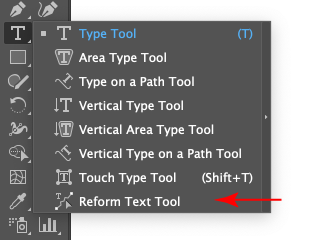
The Reform Text tool appears in Illustrator’s main toolbar (which must be in Advanced mode: View > Toolbars > Advanced) stacked under the native Text tool. As with other stacked tools, click and hold on the top tool icon to display the tools stacked under it.
Reform Text Tool Location
You can also click on the Reform Text panel to activate the tool. To locate the Reform Text panel from the menu, go to Window > Astute Graphics > Reform Text. Initially all the controls will be greyed out. This is because Reform Text needs one Text Box object and one path to be selected before it can place the text on the path. When these two objects are selected, the Make button will become available. Clicking the Make button will activate the other controls, and the selected text should be placed on the selected path.
The Text Box object is not destroyed by this process, though it will not appear in the rendering of the artwork. The text remains editable until the art is expanded, at which point it turns into regular paths. The path also remains editable using the normal Illustrator tools.
Reform Text Terminology
The Reform Text tool has two modes, the basic mode and the variable height mode. Most of the time the basic mode will be used. The modes are toggled with the "show markers" checkbox.
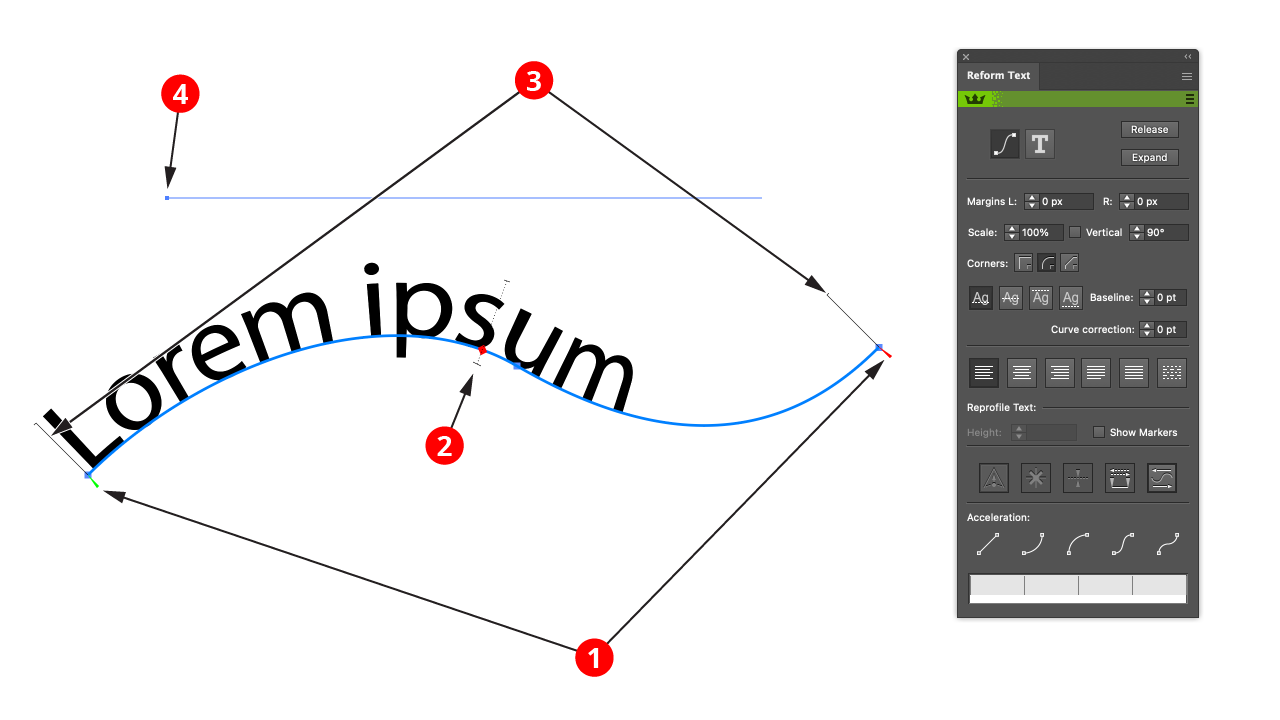
Basic Mode
This diagram shows a Text Box in the process of being reshaped along a path using the Reform Text tool in basic mode (with the default interface settings).
Reform Text Basic Mode Example
1. Start and end delimiters
(green + red triangles)
The delimiters mark the section of the path which Reform Text considers. This is important for left aligning, right aligning, or justifying text.
2. The centerpoint
(red diamond)
This represents the center of the path section marked out by the delimiters. By clicking and dragging on it, the text can be moved along the path easily and efficiently.
3. Height Stems
(thin black lines)
These show the height of the text, and are a visual cue to help placement.
4. Original Text Box object
(thin blue line)
The original Text Box will be shown as a thin blue line by default. Whilst adjusting the delimiters or the centerpoint with the cursor will highlight the original text.
Variable Height Mode
This diagram shows a Text Box in the process of being reshaped along a path using the Reform Text tool in variable height mode (with the default interface settings). To activate variable height mode the Show Markers option in the panel must be enabled.
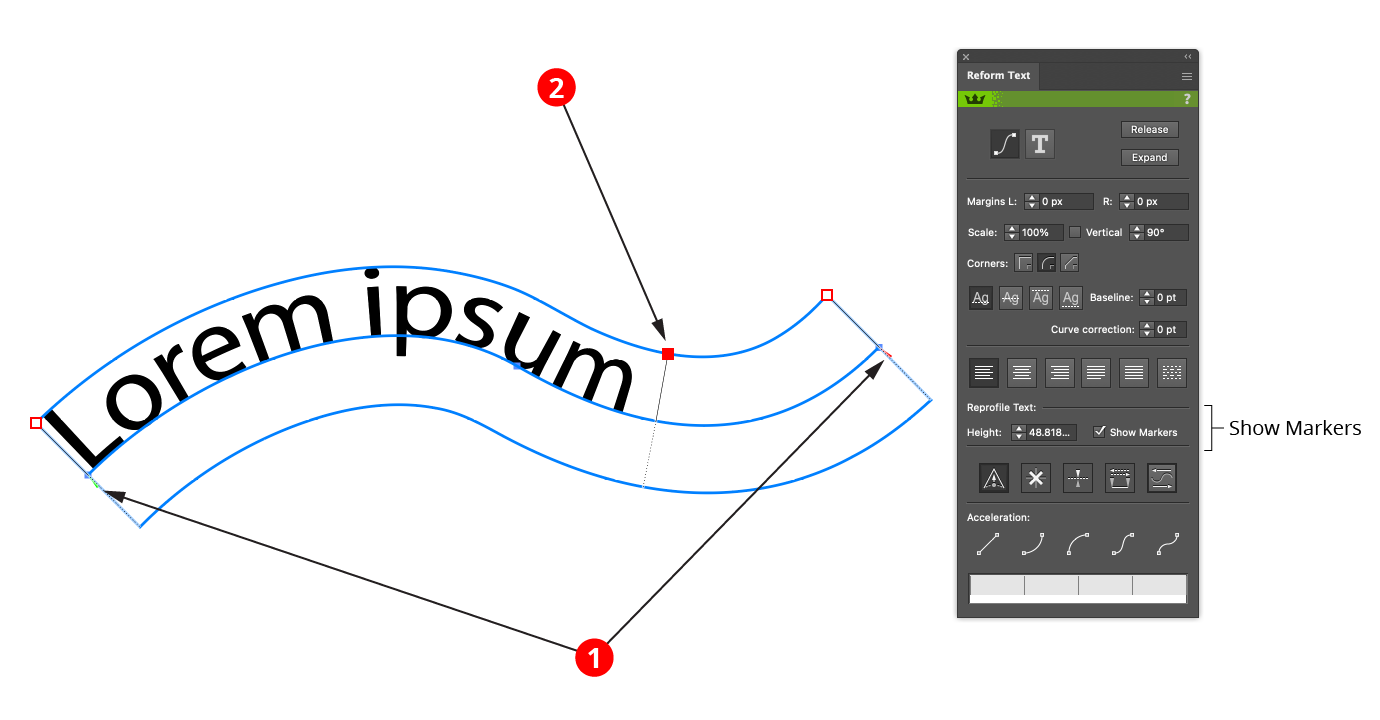
Reform Text Variable Height Mode Example
1. Start and end delimiters
(green + red triangles)
As in the basic mode (see above).
2. Height Markers
(red squares)
Markers represent points along the path where the height of the text is specified. A marker's position along the path is indicated by a small black square, joined to it by a thin black line whose length represents the text height at that point.
Markers drawn as circles are "smooth" markers: the reshaped path passes smoothly through them.
Markers drawn as diamonds are "sharp" markers: the reshaped path can make an abrupt angle change there.
You can use any number of markers to reshape a path, but, like anchor points, for the smoothest results you should use the fewest number that still produce the shape you want. They work in a similar fashion to Reform markers, the difference is that whilst every Reform path uses markers, only occasionally is there likely to be a need for variable height text.
Reform Text Tool Basic Edits
Text can be edited either from the Reform Text panel or by using the tool. Virtually all operations are available from both, but sometimes it is easier to work interactively with the cursor, and sometimes it is easier to enter values into the panel.
The delimiters can be moved by dragging them. To disable snapping to anchor points, hold down Command/Ctrl while dragging. To quickly move the delimiters so that the entire path is affected by the Reform Text tool, doubleclick either one of them. This will move them to the path's endpoints. If a delimiter is dragged such that a marker would fall outside of the newly-delimited portion of the path, the marker will be automatically deleted. If a marker is located exactly on a delimiter, then moving the delimiter will also move the marker.
Markers can be moved by dragging them within the delimited reshape extent. To disable snapping to the path's underlying anchor points, hold down Command/Ctrl while dragging. Dragging a marker by its circle annotation will allow you to freely change both its position along the path and its offset; to change only its offset, hold down Shift while dragging.
To change only its position, drag the marker's black line.
To select a single marker, click on its red annotation shape.
Multiple markers may be selected by Shift + clicking them or by dragging a marquee over them in the normal manner.
To delete a marker, doubleclick its red shape.
To create an additional marker, place the cursor over either the original or virtual reshaped path and click or click-and-drag.
To change a marker from smooth to sharp or vice versa while dragging it, press the X key.
When using the Reform Text tool, Astute Graphics’ AstuteBuddy panel should be kept open to show relevant keypresses.
Reform Text Panel
Panel Settings and Operations
Reform Text Panel Settings
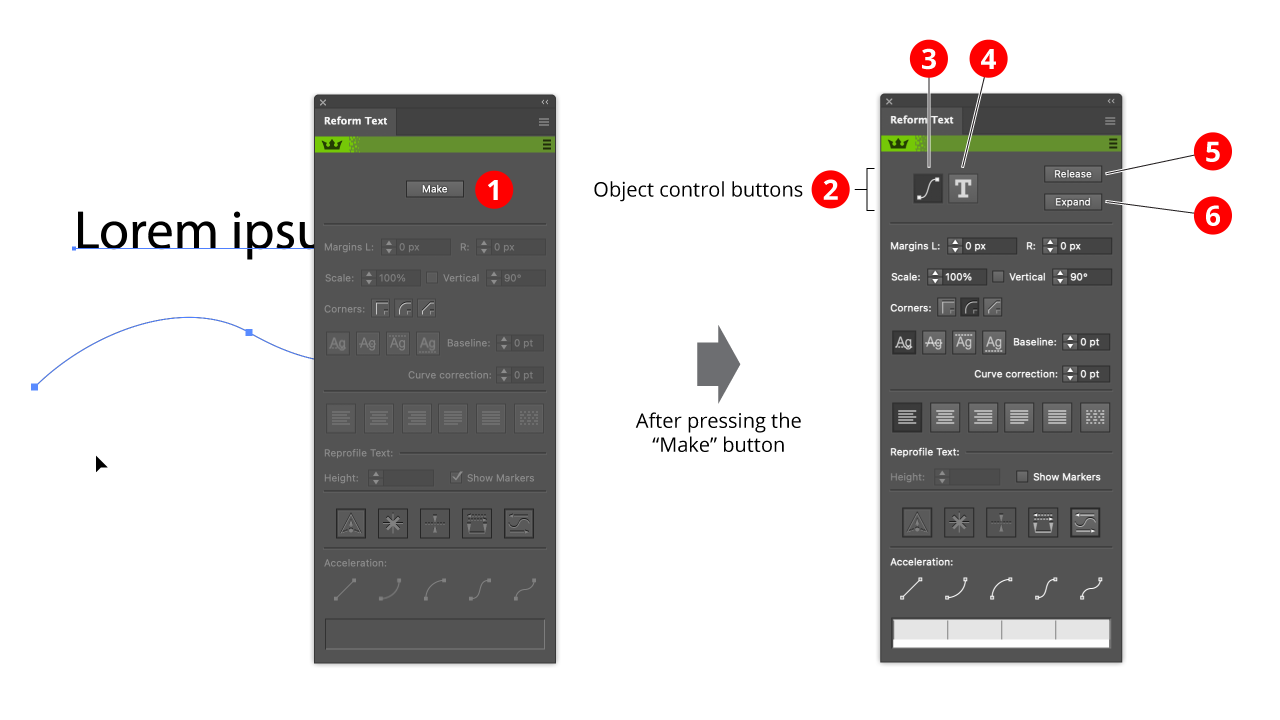
1. Make button
This is available when one Text Box object and one path is selected. It creates a Reform Text object from the two elements. The Text Box object and the Path object are not deleted, but they are moved under the control of the Reform Text object, and will not be rendered.
2. Object control buttons
When a Reform Text object is created and selected, the Make button disappears and the Reform text object control buttons appear.
3. Edit Path button
This radio button makes the path editable by standard Illustrator path editing tools. Reform is especially recommended as a powerful and intuitive path editor, but you can also use the native anchor point tool.
4. Edit text button
This radio button makes the text editable. The text will appear in a box. Click on the text box to obtain a caret, which can be used in conjunction with the other text entry tools to edit the text. It is not possible to edit the text in place on the path, but edits will be echoed to the text on the path interactively.
5. Release button
This deletes the Reform Text object, releasing the Text Box object and the path back to normal Illustrator control.
6. Expand button
This turns the Reform Text object into regular artwork. The Text Box object and the path will be deleted, and Illustrator no longer understands the artwork as text.
Editing Controls
Reform Text Editing Controls
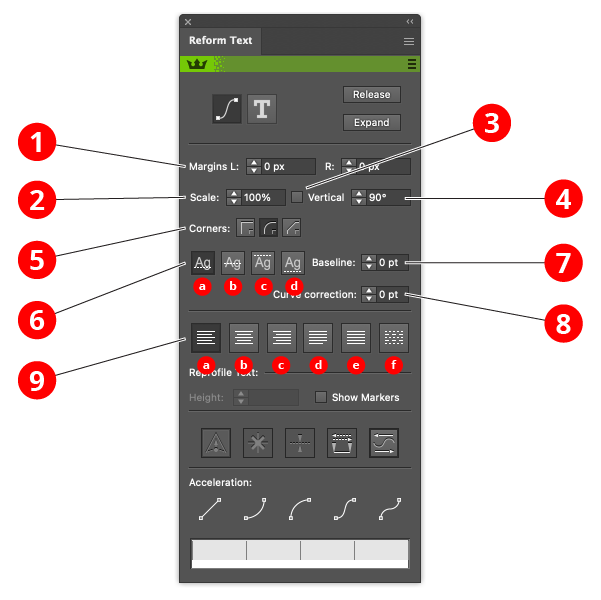
1. Left and Right margins controls
This is an alternative to dragging the delimiters. Enter a value or use the arrow keys to adjust the position.
2. Scale control
Resizes the text to a given percentage of its original size.
3. Vertical checkbox
When checked, the text is vertical rather than rotated in the direction of the path. This option is useful for curves which represent 3D transformations.
4. Vertical angle control
By default 90° is "vertical".
5. Corner buttons
Defines the behaviour when text goes around a corner. There is no good way of flowing text around a sharp corner other than adding spaces to ensure that glyphs do not break on the corner. However if text is in fact non-text symbols, corner behaviour might be crucial.
6. Baseline radio buttons
Text can be:
a: placed with its baseline on the path (normally what you want)
b: placed so that the path goes through the text midpoint
c: placed so that the path touches the top of the text
d: placed so that the path touches the bottom of the text
7. Baseline offset control
The text baseline can be further refined with the baseline control.
8. Curve correction control
Adjust how the text distorts when going round curves. The value represents the adjustment to the offset from the curve. If text is not distorted nicely around sharp curves, setting this value will change the distortion.
9. Justification radio buttons
a: align to left delimiter
b: align to the center of the delimiters
c: align to right delimiter
d: justify (reflow text and adjust spacing so that lines fit exactly in delimiters)
e: scale the text until it fits exactly within the delimiters
f: scale the text horizontally but not vertically until it fits exactly within the delimiters
Variable Height Controls
Reform Text Variable Height Controls
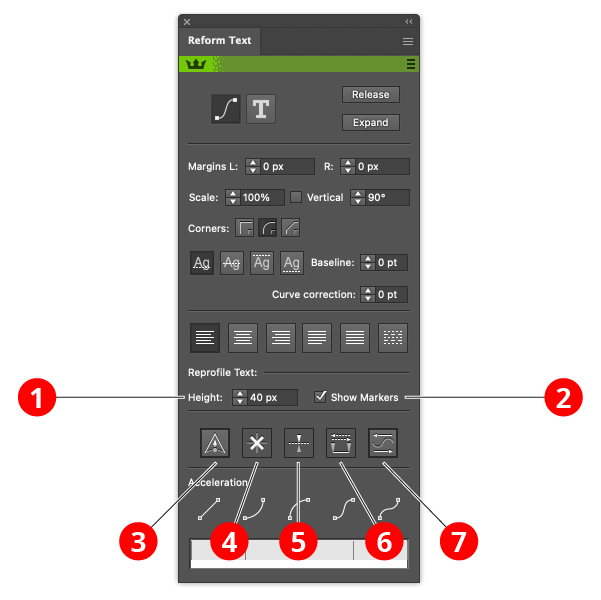
1. Height control
Set the height of a marker by entering a value.
2. Show markers checkbox
When unchecked, the tool is in basic mode. When checked, it is in variable height mode.
3. Sharp marker button
Toggles the selected markers between smooth and sharp (see above for explanation of different types). It also controls the type of any newly-created markers.
4. Delete marker button
Removes all selected markers.
5. Mirror offset button
Changes the direction of the offset of all selected markers. This is the same as changing the sign of the offset value.
6. Swap marker direction button
Changes the position of all markers (selected or not) along the reshape extent. If, for example, a marker is located 1/5 of the way from the start to the end delimiter, swapping the direction will change it to be 1/5 of the way from the end to the start delimiter. Offset values are not changed.
7. Reverse flow direction button
Reverses the direction of the text. Used in conjunction with the Mirror offset button it turns text upside down instead of reflecting it.
Acceleration Controls
Acceleration refers to distortion of the text in the horizontal direction. This is useful for 3 dimensional or other special effects. The buttons are control buttons and it is possible to further edit the acceleration in the Acceleration widget to have fine-grained custom control.

Reform Text Acceleration Controls
1. Linear acceleration button
The default. No acceleration or uniform acceleration.
2. Ease in acceleration
Text starts very stretched, then becomes very compressed.
3. Ease out acceleration
Text starts very stretched, then becomes very stretched.
4. Shallow sigmoid acceleration
Text starts very compressed, becomes very stretched, then ends very compressed. This one is set up to represent text printed on cylindrical object such as a can or a bottle.
5. Steep sigmoid acceleration [A misnomer]
Text is uniform, but here are two handles which you can use in the acceleration widget control to define your own sigmoid acceleration profile easily.
6. The acceleration widget
This displays the acceleration graphically, and allows for fine control or custom accelerations.
7. Acceleration widget control handles
With a linear acceleration you get no handles (no editing possible), with ease in or ease out one handle, and with the sigmoid controls, two handles. Grab and pull the handles, and the acceleration adjusts to reflect the new handle position. Note that sometimes the handles will appear to get stuck. This is to prevent the entering of extreme accelerations which would produce undesirable results.
Saving and Recalling Height Markers
"Height Markers" (sequences of offset markers along a delimited extent) may be saved and recalled, so that multiple paths may be reshaped in the same manner. To save a height marker profile, use the panel flyout menu when a Reform Text operation is in progress and choose Save Height Markers... and give the profile a name. To apply an existing height marker profile to a path, start editing the path with the Reform Text tool and (if necessary) move the delimiters to the desired positions. Then choose the desired saved option from the panel flyout menu.
Height Marker Profiles may be renamed or deleted by choosing Manage Height Markers... from the panel flyout menu.
Reform Text Flyout Menu
The flyout menu gives access to the profiles library, which is shared with the other tools in the Reform suite, Reform and Reprofile. In Reform Text, the markers represent the height of the text, and so are referred to as “height markers”.
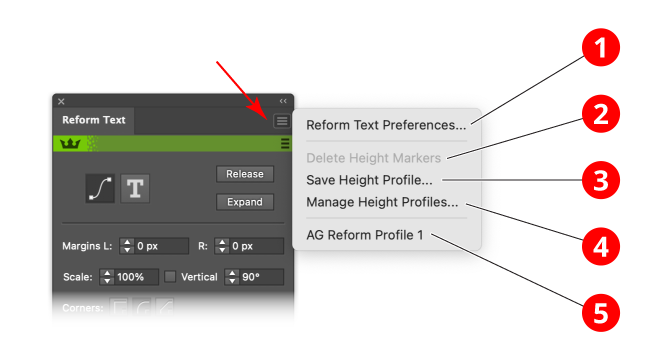
1. Reform Text Preferences
Goes to the Reform Text Preferences panel..
2. Delete Height Markers
Convenience function delete all current height markers.
3. Save Height Profile
Adds the current height profile to the profile library.
4. Manage Height Profiles
Opens a dialog to allow deleting and renaming of stored profiles in the profile library.
5. Stored height profiles
List of available stored height profiles. Shared with Reform and Reprofile.
Reform Text Preferences
The Reform Text Preferences dialog may be opened by either double-clicking the Reform Text tool icon in the toolbar, or by choosing "Reform Text Preferences..." at the top of the panel flyout menu.
Reform Text Preferences Dialog
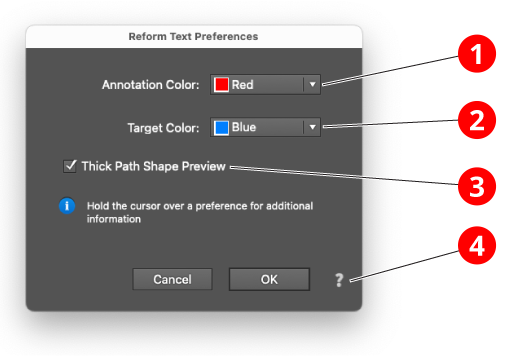
1. Annotation color
The color of the width markers in variable height mode.
2. Target color
The color of the edit path, and the guide paths in variable height mode.
3. Thick path shape preview
When set, the edit path and the guid paths are draw with thick lines.
4. Help Button
Opens the help documentation in the Astute Manager. If this does not automatically appear, please ensure your Astute Manager is running first.
Reform Text Technical Note
Reform Text is implemented as an Adobe Illustrator plugin group. This means that it takes control of the so-called edit art, in this case the Text Box object and the Path object. However the edit art is still editable using all of Illustrator's functionality. However due to some internal problems to Illustrator we have had to provide special logic to allow interactive editing of text. Hence it is necessary to have a mode for editing the text and a mode for editing the curve.
By pressing the Release button, the Reform Text object will be deleted, and the edit art will be placed back on the artboard. If there are problems editing the edit art, due to weaknesses in the Illustrator system, then releasing the edit art then applying Reform Text again with the Make button is a workaround.
The text on the path is the result art. The resulting art is the art that is passed to Illustrator for rendering. You can apply styles to it in the normal manner. However it cannot be manipulated. To do that, it is necessary to expand it. This will delete the Reform Text object, the Text Frame object, and the path. You can expand either using Adobe's native expand menu command Object > Expand Appearance or the Expand button shown in the panel. Whilst these should achieve the same result, they use different logic internally. The Astute Graphics button is provided partly for convenience, partly so that there is a fallback if one expand command fails.