Join Paths
![]() VectorFirstAid Panel
VectorFirstAid Panel
![]() AG Trim and Join Tool
AG Trim and Join Tool
Illustrator Location:
Illustrator Main Menu > Window > Astute Graphics > VectorFirstAid
Each convenience operation has various parameters, which are specified in the preferences dialog (see VectorFirstAid: Preferences). By holding down the Option/Alt key while clicking a convenience operation button, a small dialog will come up allowing those parameters to be changed before the operation is made. These new parameters apply to that single use of the operation only.
3. Super Smart Remove Points Button
Reduces the number of anchor points in the selected paths while attempting to maintain their shapes. There are two parameters.
VectorFirstAid Super Smart Remove Points Parameters
a. Super Smart Remove Tolerance: Ranges from 1 to 100. The higher the tolerance, the more anchor points are removed, but the more the geometry of the path may change.
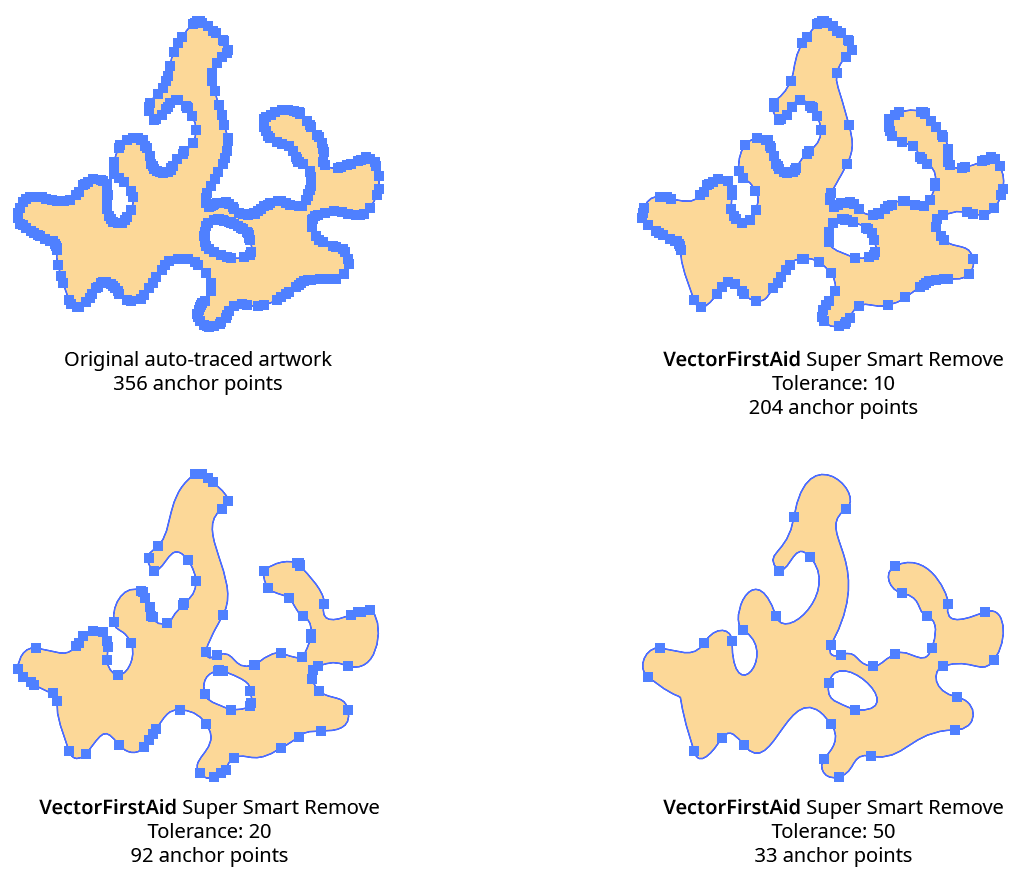
VectorFirstAid Super Smart Remove Example
b. Protect Sharp Corners: Determines whether corner type anchor points where the path has a sharp change in direction will be considered for removal. Enabling this setting lets you use a high tolerance to remove many anchor points without disturbing sharp corners, where the geometry of the path is usually more critical:
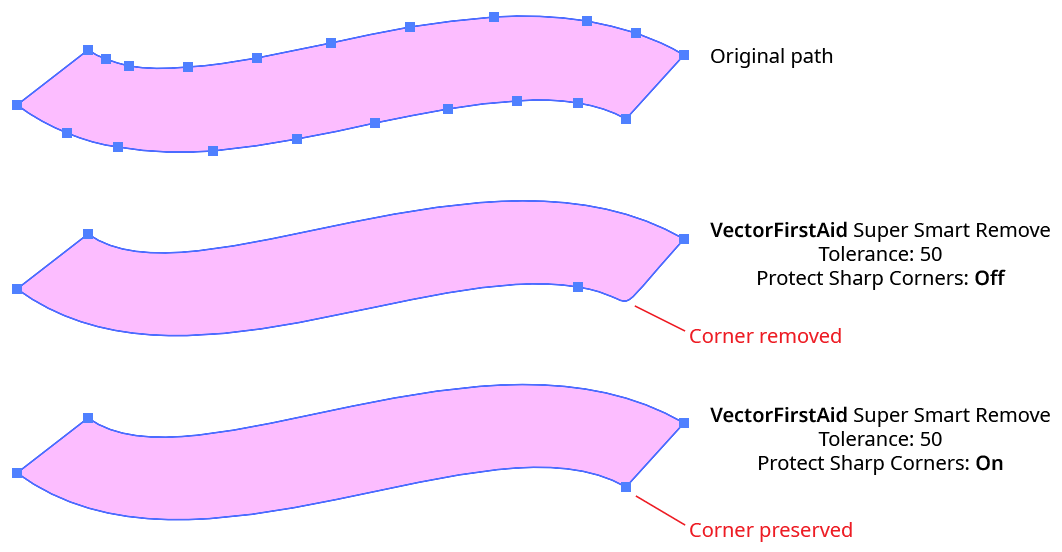
VectorFirstAid Super Smart Removal Protect Sharp Corners
4. Rejoin Paths Button
Rejoins paths which have been split apart into multiple segments back into a single path (or, if discontiguous, into multiple paths).
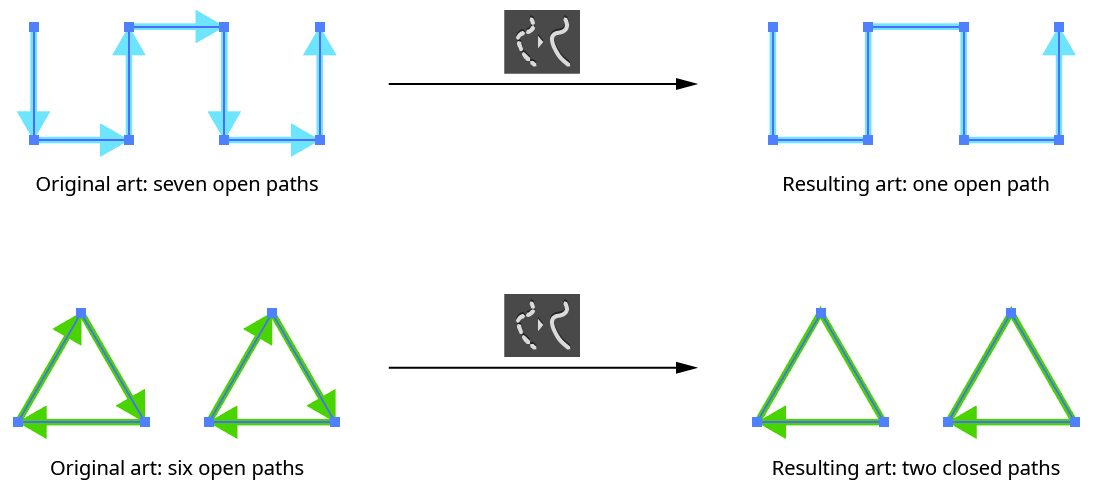
VectorFirstAid Rejoin Paths Example
The Rejoin Paths operation takes several parameters:
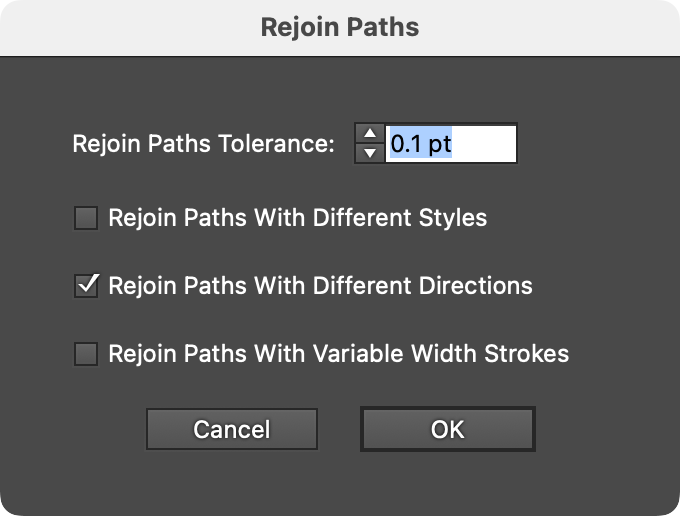
VectorFirstAid Rejoin Paths Parameters
a. Tolerance: The maximum distance that the endpoints of each segment can be from each other and still be joined, ranging from 0 to 6 pt. The default is 0.1 pt.
b. Rejoin Paths With Different Styles: Whether paths with different styles are allowed to be rejoined. When enabled, the style of the final path is taken from the section which is highest in the stacking order.

VectorFirstAid Rejoin Paths with Different Styles
c. Rejoin Paths With Different Directions: Whether paths that touch head-to-head or tail-to-tail are allowed to be rejoined. When enabled, the direction of the final path is taken from the section which is highest in the stacking order.
d. Rejoin Paths With Variable Width Strokes: Whether paths stroked with a variable width stroke are allowed to be rejoined. When enabled, the variable width profile for the final path is taken from the section which is highest in the stacking order.
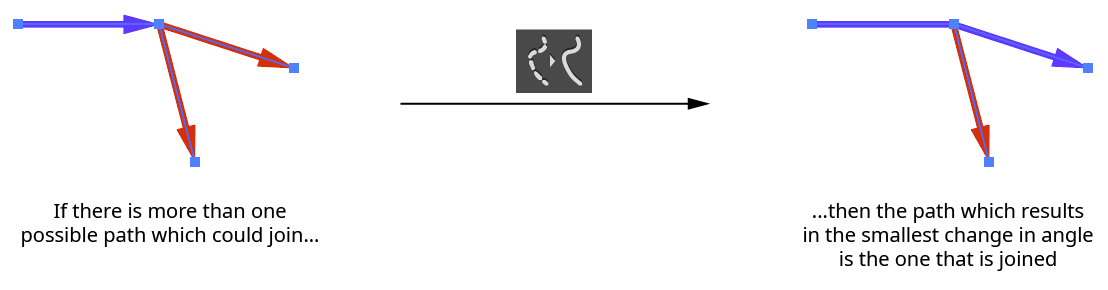
If multiple sections are eligible to be joined, VectorFirstAid uses the one that results in a path with the smallest change in angle:
VectorFirstAid Rejoin Paths Angle Selection
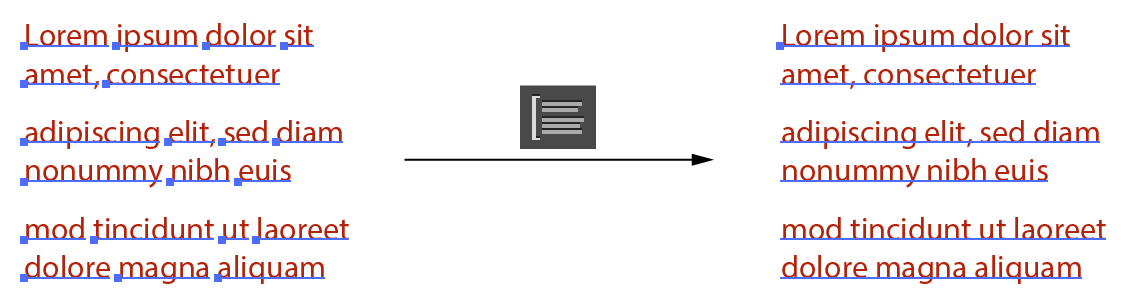
5. Combine Point Text Objects Button
Combines the selected point text objects into as few point text object as possible while maintaining the position of all characters. Text can be combined both horizontally and vertically, but must be at the same angle.
VectorFirstAid Combine Point Text Example
VectorFirstAid Combine Point Type Parameters
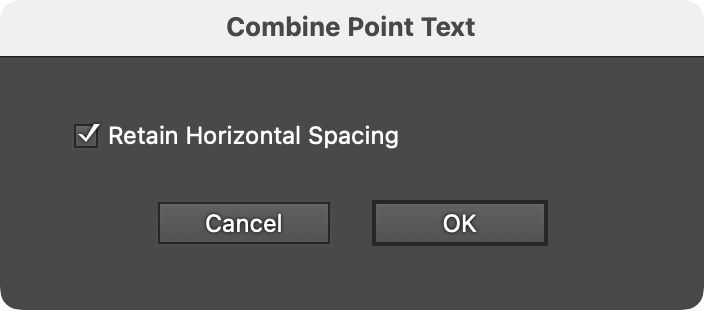
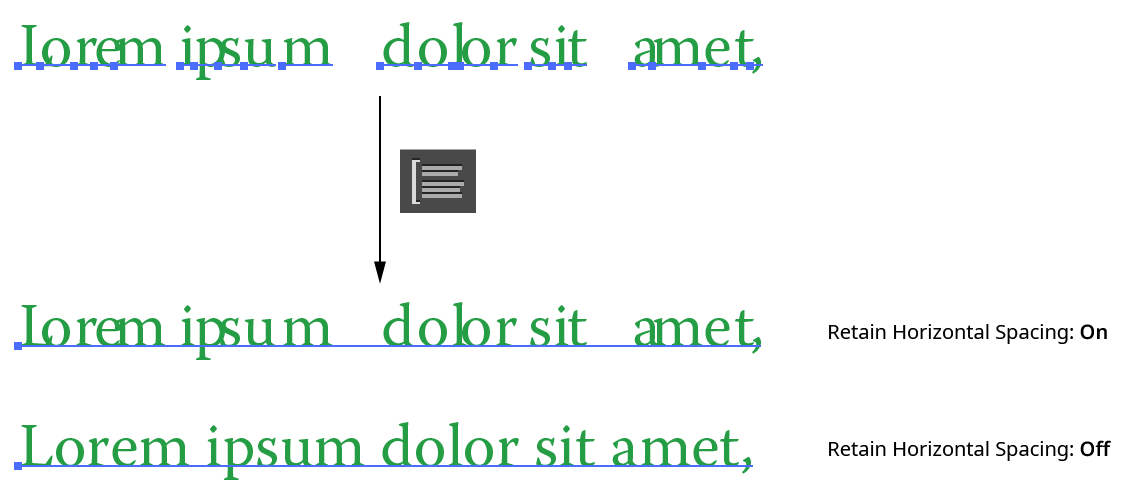
A single parameter, Retain Horizontal Spacing, controls how horizontal gaps between characters and words are handled. When enabled (the default), kerning is modified and/or space characters are added to precisely duplicate the original spacing of the text. When disabled, the spacing is normalized when possible, to give the text the look it would have if it were not tracked or kerned. Gaps wider than a single space character will still be retained as a single space. This setting can be useful when opening certain PDF files where the text has been broken into individual characters with corrupted spacing:
VectorFirstAid Combine Point Text - Retain Horizontal Spacing
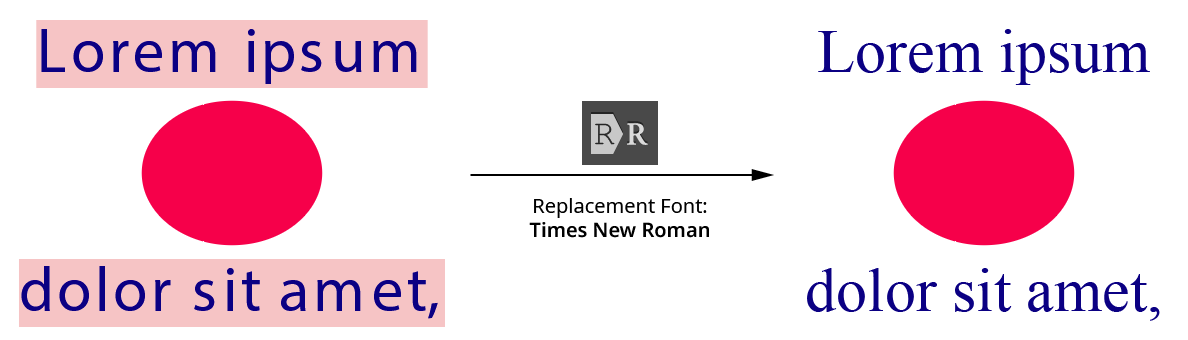
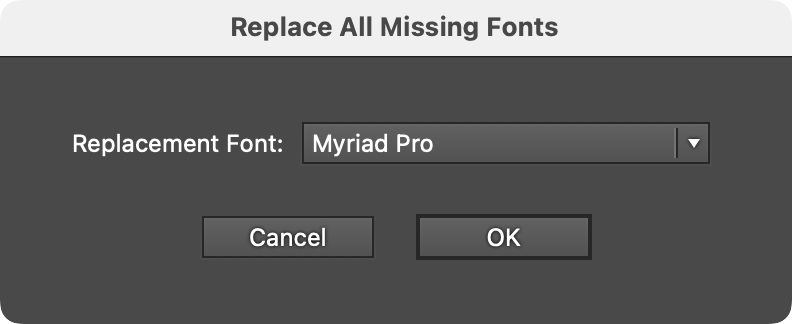
6. Replace All Missing Fonts Button
Replaces all missing fonts in the document with a specified font. Whether replacing a single missing font, or because the exact font is not critical because it will be changed later, this is much faster than going through the Find/Replace Font dialog.
VectorFirstAid Replace All Missing Fonts
The one parameter is the replacement font.
VectorFirstAid Replace Missing Fonts Parameters
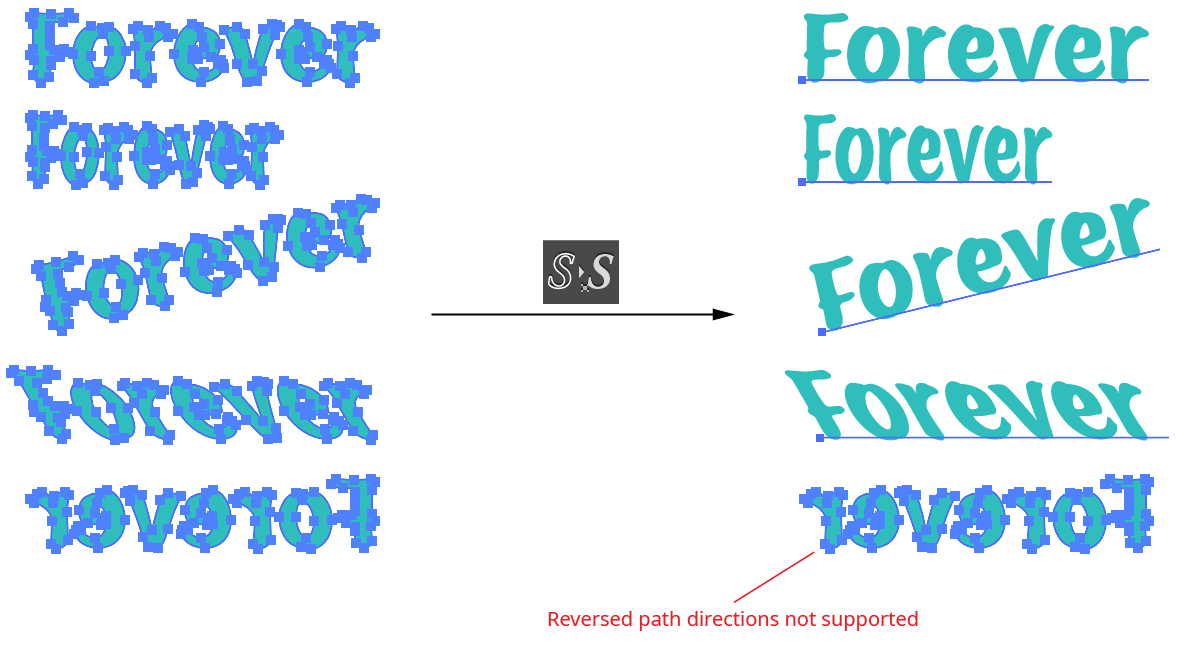
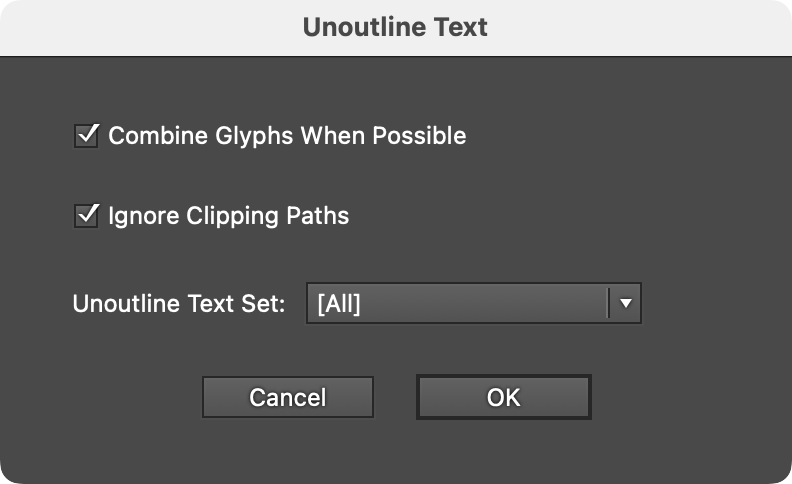
7. Unoutline Text Button
Converts the selected type that has been outlined (converted to paths) back into editable text, if possible. VectorFirstAid refers to this process as “Unoutlining.” The first time this operation is used after installing the plugin, VectorFirstAid will open a new, temporary document and scan the currently installed fonts to build an internal database of their glyphs. This may take 5 to 20 minutes or even longer, depending on how many fonts are installed and their types. In particular, the SF Pro font family contains very high numbers of glyphs and will slow down the operation. However, the data is saved out to files, so this process only needs to be done once.

VectorFirstAid Unoutline Text Example
The Unoutline Text operation can handle most linear transformations of the outlines, including scaling (except that which reverses path direction), rotation, and shearing.
VectorFirstAid Unoutline Text Example 2
If type cannot be unoutlined, it may be due to several reasons. First, the correct font may not be present on the system. Second, the path outlines may have been altered in some way, making them different from the original outlines. For example, the starting point of the paths may have changed, or individual points may have been deleted or moved slightly. Finally, the Unoutline Text operation is not supported for fonts which contain more than 7,500 glyphs, with the exception of the SF Pro family. However, support for the SF Pro family is limited to the first 14,000 glyphs for each font.
The Unoutline Text operation takes several parameters:
VectorFirstAid Unoutline Text Parameters
a. Combine Glyphs When Possible: Enabled by default, this option combines the individual glyphs which have been recognized into as few point text objects as possible. Otherwise, each glyph is left as a separate point text object.
b. Ignore Clipping Paths: Ignores paths which are set as clipping paths for the purposes of conversion.
c. Unoutline Text Set: Specifies a pre-configured set of fonts to use when recognizing the outlined paths. Checking these outlines against every possible font can take some time, and might result in the conversion to a different font than expected (due to the fact that some simple glyphs, such as lower case l’s, are identical across many sans serif fonts when linear transformations are allowed). For this reason, if the font of the outlined text is already known, VectorFirstAid can use this information to ignore other fonts and recognize the text more quickly and reliably. Unoutline Text Sets are configured through the Preferences dialog (see VectorFirstAid: Preferences). A quicker method is to simply some select live text along with the outlined text before using Unoutline Text. In this case, VectorFirstAid will only consider the fonts present in the selected live text, ignoring any specified Unoutline Text Set.
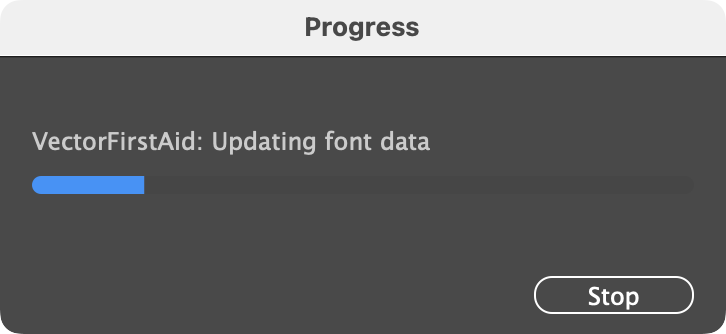
If new fonts are installed after VectorFirstAid has created its font database, the database will be updated after the button is clicked. A progress dialog will be shown.
VectorFirstAid Font Database Update
If artwork other than outlined text is selected when performing an Unoutline Text operation, it generally causes no harm, because most artwork paths are unlikely to match the shape of a glyph. However, this is not true for basic shapes such as rectangles and circles, which are used in hundreds of fonts for glyphs such as hyphens, dashes, bullets, and so on. Since text, when outlined, always results in compound paths, VectorFirstAid will display a warning if a non-compound simple shape exists in the selection:
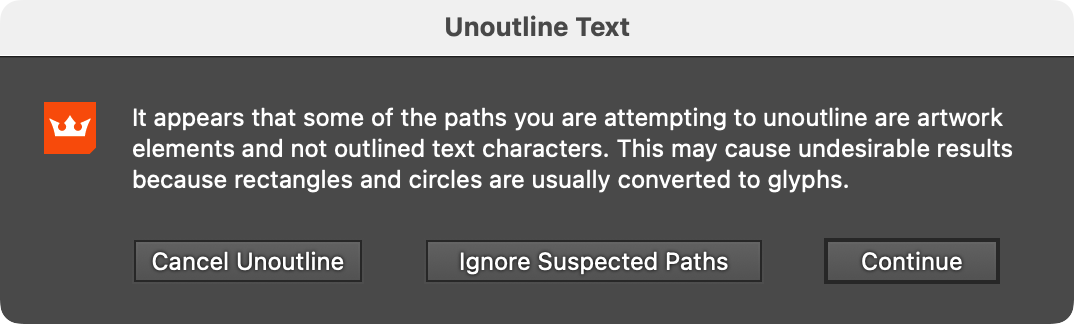
VectorFirstAid Unoutline Warning
Illustrator Location:
As the AG Trim and Join tool has several keypresses which can add or change its functionality, we suggest installing the free Astute Graphics plugin Astute Buddy, which creates a panel that dynamically updates to inform you of the various keys which can be pressed in the tool’s current context.
Much of the functionality of the AG Trim and Join tool is also available in the Dynamic Sketch tool. However, that tool requires the Shift modifier key to be pressed to enable trimming, and does not offer style-dependent joining.
To use the AG Trim and Join tool, simply drag it across a path, over the part that you want removed. A dashed line (blue by default) will show you the path of the tool. Cuts are made at the nearest intersection with another path, not at the position where the tool was dragged over the path:

AG Trim and Join Tool Trimming Example
Multiple paths may be trimmed in one pass:

AG Trim and Join Tool Trimming Multiple Paths Example
For closed paths to be trimmed, they must be intersected in at least two positions by another path (or must self-intersect). However, only one section of a closed path can be trimmed at a time:
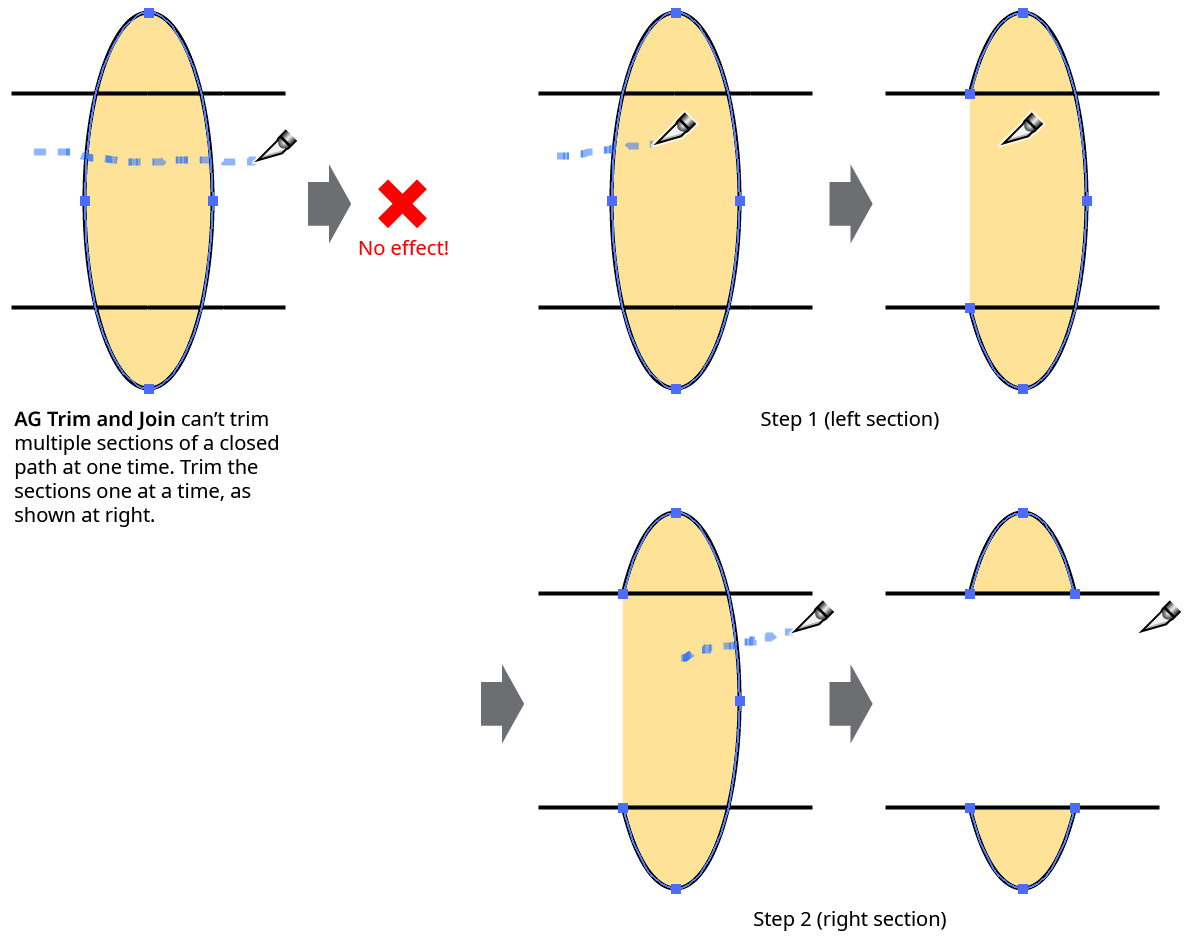
AG Trim and Join Tool Trimming Closed Path Example
The path(s) to be trimmed need not be selected. However, if the preference Prefer Selected Paths is enabled, then when the tool is dragged across a mix of both selected and unselected paths, only the selected paths will be trimmed.
When a path with a variable width stroke is trimmed, by default AG Trim and Join attempts to retain the width profile(s) of the untrimmed section(s) as they existed prior to the trimming. This behavior may be adjusted using the tool preference Trimming Splits Profiles.
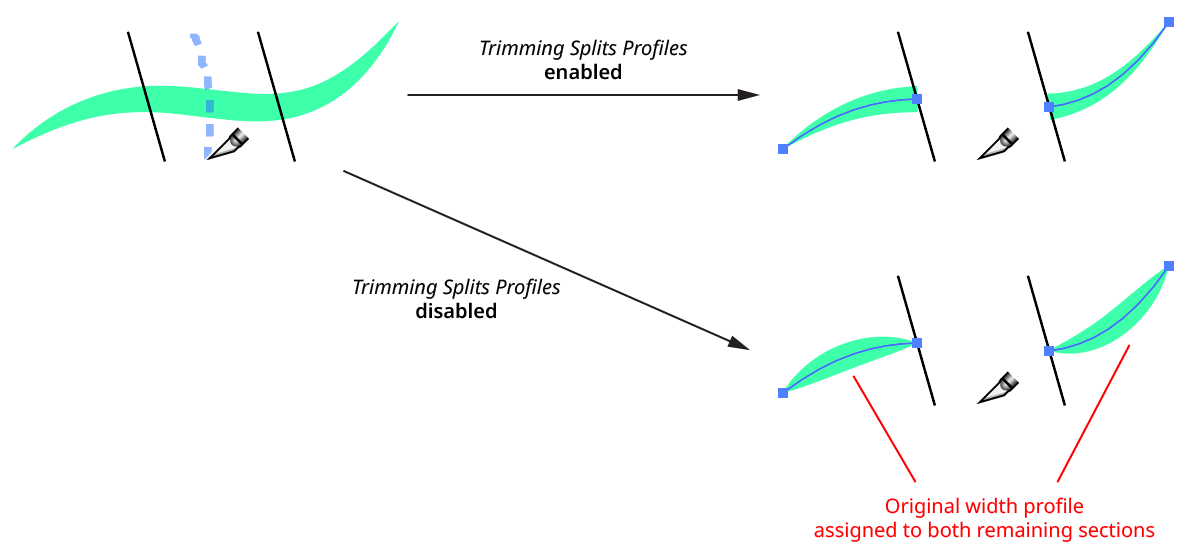
AG Trim and Join - Variable Width Stroke
If the tool preference Auto-Join Paths After Trimming is enabled, trimmed paths which contain an endpoint which is at the same spot as another path endpoint will be joined to that path (unless sub-preferences are set which only allow joining under certain circumstances; see AG Trim and Join: Preferences).
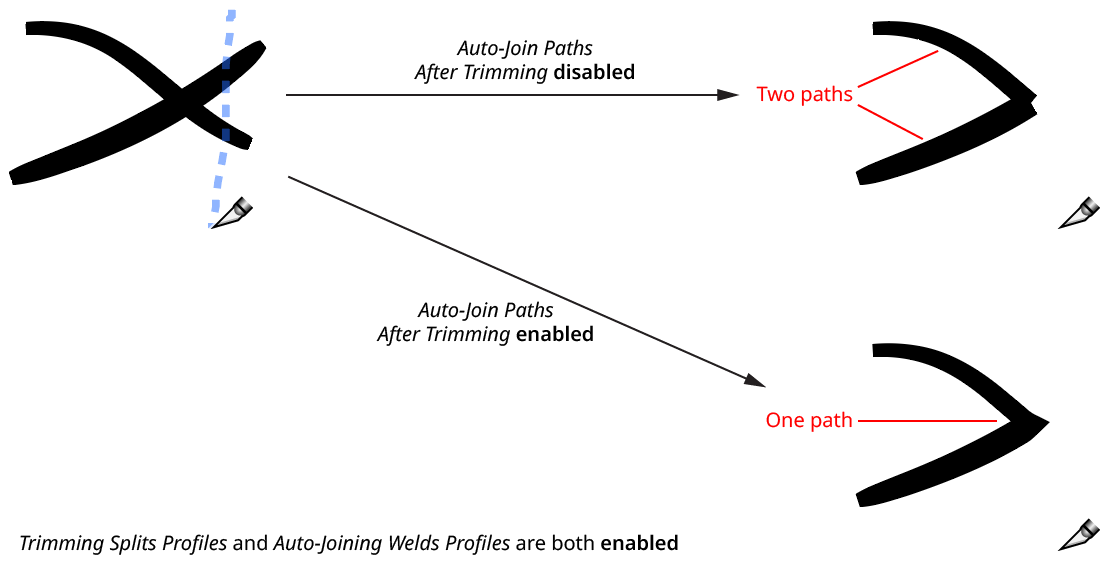
AG Trim and Join Tool - Auto-Join Paths Example
When paths with variable stroke widths are auto-joined, by default the stroke width profiles of each section will be preserved as best as possible, by “welding” together the profiles of each half. Note that this is in contrast to joining the paths with the native Command/Ctrl-J, which instead takes the entire stroke width profile for the joined path from the topmost of the original paths. However, the native behavior can be emulated using the tool preference Joining Welds Profiles.
Keypresses
While dragging the tool to trim a path, several keys may be pressed to held down for additional options:
Esc: Aborts the current trim operation (nothing will happen when the mouse button is released).
Option/Alt: Starts a “rubberband” section – a completely straight section that stretches between the point at which the modifier key was held down and the point at which it is released.
Shift: When creating a rubberband section, constrains the rubberband to angles that are 45° increments around the general constrain angle.
C: Changes the annotation color (for the dashed line preview) among the following choices: blue (default), red, magenta, green, cyan, and black.
D: Forces variable width profiles not to be split for the current operation, even when the preference is set to split them.
J: Forces joining of paths for the current operation, even when the preference is set to not join.
N: Forces no joining of paths for the current operation, even when the preference is set to join.
S: Forces variable width profiles to be split for the current operation, even when the preference is set to not split them.