Shadow + Effect
 AG Block Shadow Tool
AG Block Shadow Panel
AG Block Shadow
 Stylism Tool
Illustrator Location:
Advanced Toolbar > Stylism Stack > AG Block Shadow
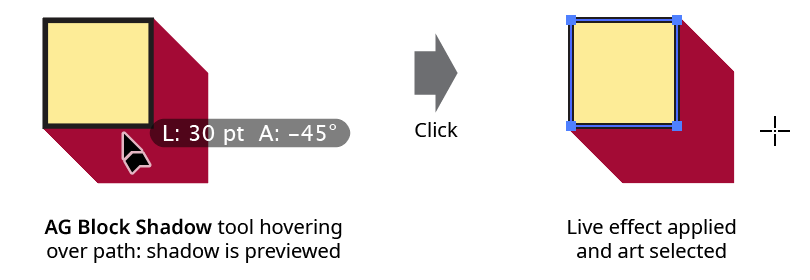
When the tool is hovered close to or over an art object that can accept an AG Block Shadow effect (but does not currently have one), it will automatically preview the shadow as it would generally appear using the current panel parameters. The art does not need to be selected. The type of preview depends on the tool preference settings. The default preview is a full one, showing the solid fill of the shadow in the specified color (however, the preview will not show gradients or patterns when the object has such a fill and the preference Shadow Adopts Artwork Fill Color is enabled). Previews are based on the shape of the base artwork, and will not reflect any existing live effects that might change that shape.

AG Block Shadow Tool Preview
By default, annotated text by the cursor will show the shadow’s length (abbreviated as “L:”), angle (as “A:”), and scale (as “S:”; omitted if it is set to the default 100%); if the shadow is a Vanishing Point type shadow, the vanishing point’s coordinates are annotated in place of its length and angle. These annotations can be temporarily hidden by holding down the Option/Alt key. Clicking will add the block shadow to the art object (always placing the live effect below all strokes and fills in the object’s appearance), or the shadow can be dragged first to adjust it in the same way an existing block shadow would be edited (see Editing Existing Block Shadows).
AG Block Shadow Tool Click Apply
Because the AG Block Shadow tool creates previews of shadows for any artwork it is over, selected or not, care should be taken not to pass it inadvertently over unlocked artwork with high numbers of path segments, such as large blocks of text or objects with Phantasm Halftone or Stipple effects, because calculating the shadow for these objects can take some time. In addition to keeping such art on locked layers, the preference Auto Switch To Fast Preview can help (see AG Block Shadow: Preferences).
Illustrator Location:
Illustrator Main Menu > Window > Astute Graphics > AG Block Shadow > Panel Flyout Menu
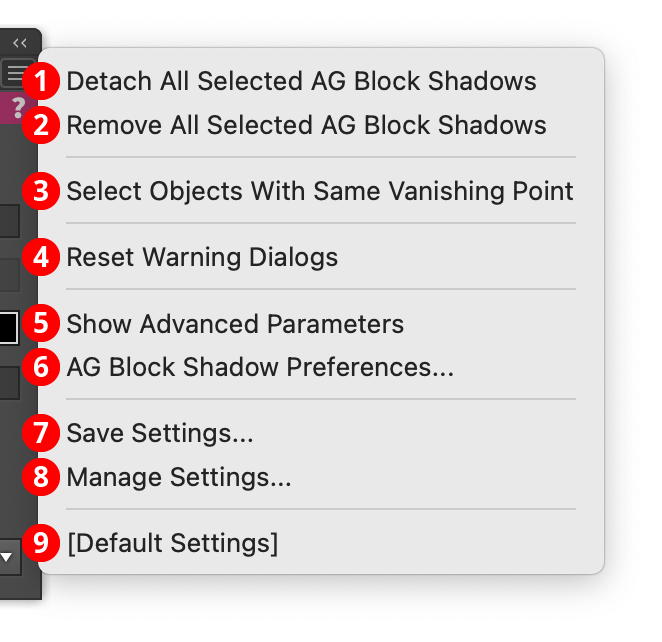
The AG Block Shadow panel flyout menu items are contextually sensitive and all items may not be available, depending on the current selection.
AG Block Shadow Panel Flyout Menu
1. Detach All Selected AG Block Shadows
Changes the shadows created by all AG Block Shadow live effects in the selection into editable artwork, and removes the effect from the appearance(s). This is similar to using the native menu command Object > Expand Appearance, but is more flexible because it leaves the existing artwork (and other live effects which may be present) intact.
2. Remove All Selected AG Block Shadows
Removes any AG Block Shadow live effects from the selection. (This can be done from the Appearance panel as well, but not if multiple AG Block Shadow effects are present with different parameters. In that case, the Appearance panel will simply display “Mixed Appearances” and the ability to select the live effect and delete it will no longer be available.)
3. Select Objects With Same Vanishing Point
Available if a single art object with a Vanishing Point type AG Block Shadow is selected. The menu item will select all other objects with an AG Block Shadow effect that has the same vanishing point coordinates. Different coordinates may then be entered on the panel, moving the vanishing point of all the objects together (this can also be done with the AG Block Shadow tool).
4. Reset Warning Dialogs
If one or more of AG Block Shadow’s warning dialogs (for example, the one shown when trying to use the AG Block Shadow tool in Pattern Editing Mode) have been suppressed using the Don’t show again checkbox, clicking this button will re-enable them.
5. Show Advanced Parameters
The Standard/Vanishing Point type controls and the Fill-Level Shadow Replaces Fill checkbox control are considered advanced parameters, and can be shown or hidden on the panel using this menu item. When the controls are visible, the menu item will change to Hide Advanced Parameters. If one or more objects in the current selection containing an AG Block Shadow effect that is Vanishing Point type or has Fill-Level Shadow Replaces Fill enabled, the advanced controls will automatically be shown so that the effect(s) can be properly edited.
6. AG Block Shadow Preferences...
Brings up the preference dialog (see AG Block Shadow: Preferences).
7. Save Settings...
Captures all of the current parameter settings on the panel to a file, which can be instantly recalled later (either in the current file session or a later one). A dialog will appear through which the file name may be specified.
8. Manage Settings...
Brings up a dialog through which existing settings files may be renamed or deleted:
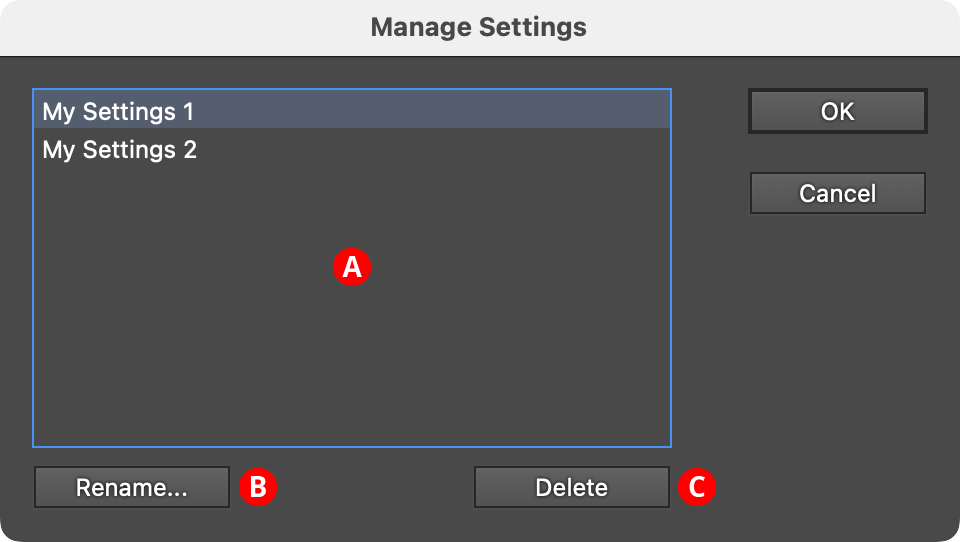
AG Block Shadow Manage Settings Dialog
A. Settings List: Shows all user-saved settings. One or more settings files can be selected for use with the buttons at the bottom of the dialog by clicking on them in the list, with Shift pressed to select contiguously or Command/Ctrl pressed to select discontiguously, as normal.
B. Rename Button: If a single settings file is selected, allows it to be renamed, through a separate dialog. If the Cancel button is used, the original names will be restored.
C. Delete Button: Removes the selected settings file(s). The files are not permanently deleted until the OK button is clicked.
9. Settings Files
User-defined settings will appear below the built-in [Default Settings] menu item. Choosing a settings menu item will load the panel with the settings it had when the file was saved; the AG Block Shadow effects in any selected art will be updated to match.
Illustrator Location:
Illustrator Main Menu > Window > Astute Graphics > AG Block Shadow
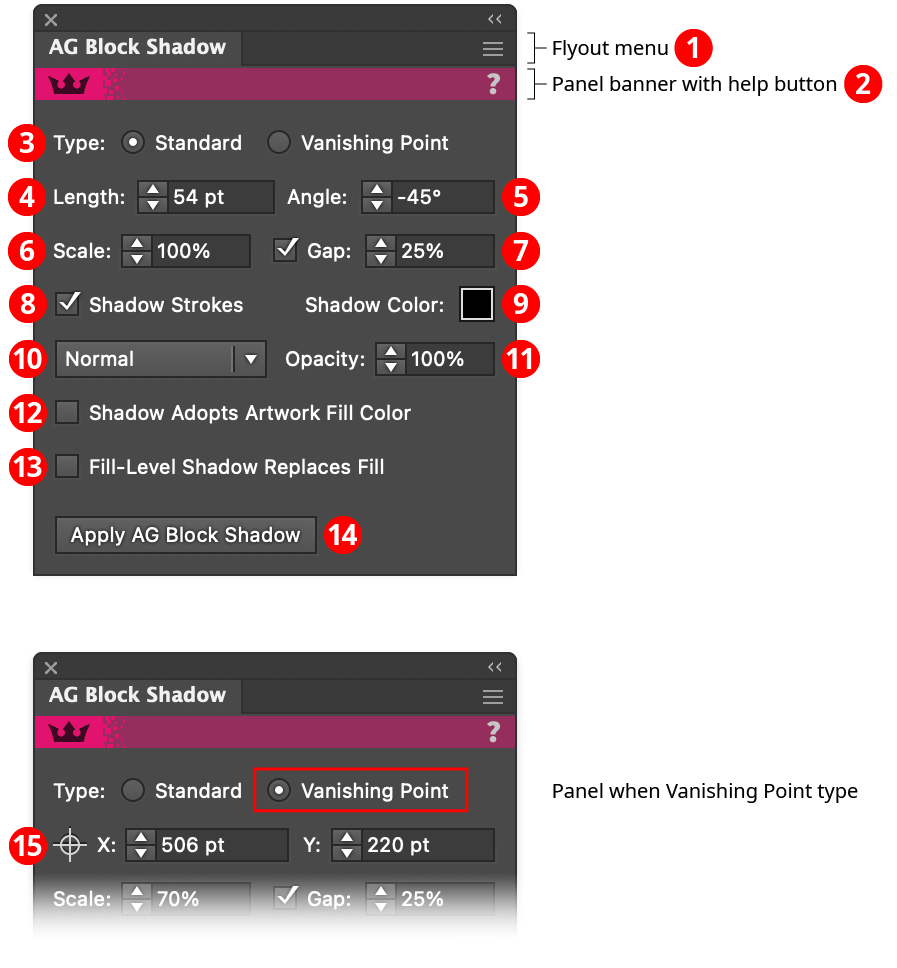
The AG Block Shadow live effect does not have a modal parameters dialog, but is instead edited using either the AG Block Shadow tool (for many parameters) or its panel (for complete control over all its parameters). The AG Block Shadow panel can be shown and hidden using the menu item found in the main menu at Window > Astute Graphics > AG Block Shadow. When at least one selected object has the AG Block Shadow live effect applied, the panel controls will update to reflect the parameters of those effects, which can then be edited. A value field which is blank or (for checkboxes) with a dash indicates that the parameter has different values in the selection. These can be unified (made the same) by entering a new value.
AG Block Shadow Panel
1. Flyout menu
See AG Block Shadow Panel: Flyout Menu.
2. Panel banner
The help button on the right opens the help documentation in the Astute Manager. If this does not automatically appear, please ensure your Astute Manager is running first.
3. Type
This control is only visible when the panel is in advanced mode (the panel flyout menu item Show Advanced Parameters has been chosen, or an AG Block Shadow effect using one of those advanced parameters is in the current selection). The radio buttons allow a choice between a Standard block shadow (specified by length and angle) and a Vanishing Point block shadow, which is specified through the coordinates of the vanishing point, the point to which the shadow appears to converge.
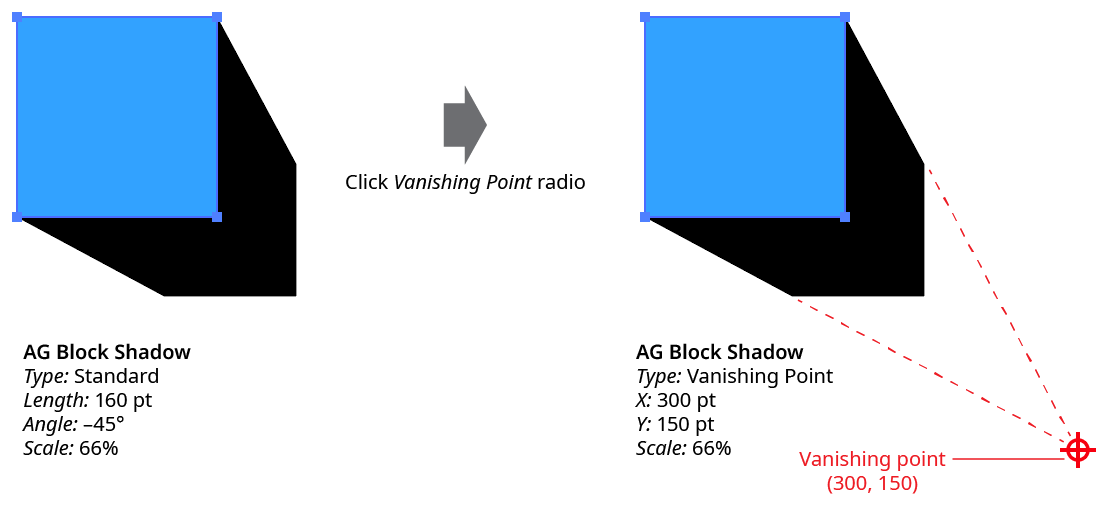
AG Block Shadow Type Example
Shadows can be freely converted between Standard and Vanishing Point, except when a Standard shadow has a Scale value of 100%, since this would imply a vanishing point at infinite distance. The advantage of a Vanishing Point type shadow is that the shadow’s point of convergence remains the same even if the object or objects to which the effect is applied are subsequently moved.
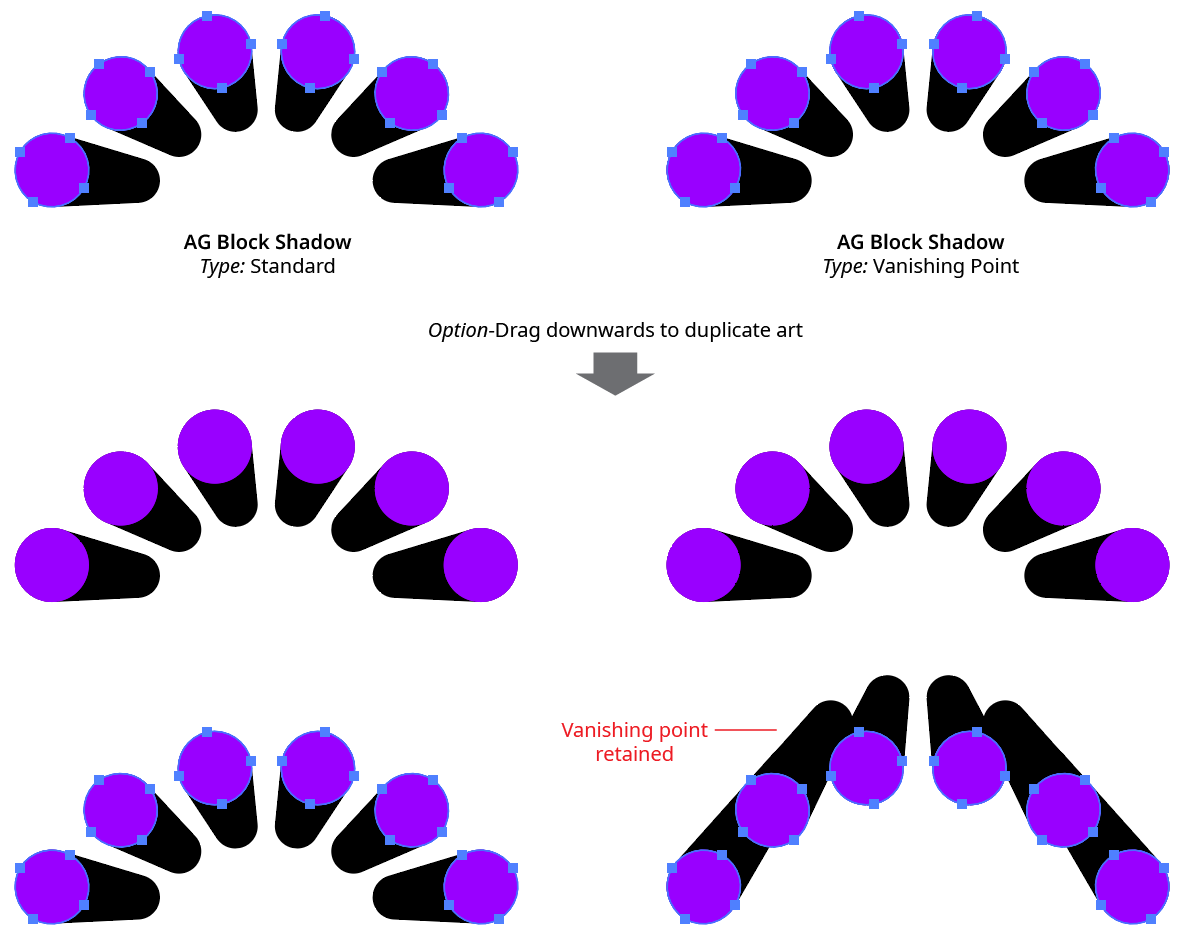
AG Block Shadow Standard vs. Vanishing Point
Tip: To move an object with a Vanishing Point type shadow and also move its vanishing point, convert the shadow to Standard type, move the object, and then convert back to Vanishing Point.
4. Length
For Standard type shadows, the nominal length of the shadow (distance from the edge of the object to the edge of the shadow, in the direction of the shadow). The default value is 72 pt. The length parameter is equal to the actual shadow length only when the shadow has no gap and the scale is set to 100%. Otherwise, the actual length may vary.
AG Block Shadow Length Comparison
5. Angle
For Standard type shadows, the angle of the shadow, specified using the normal Illustrator angle convention (to the right is 0°, with positive values going counterclockwise). The default value is –45°.
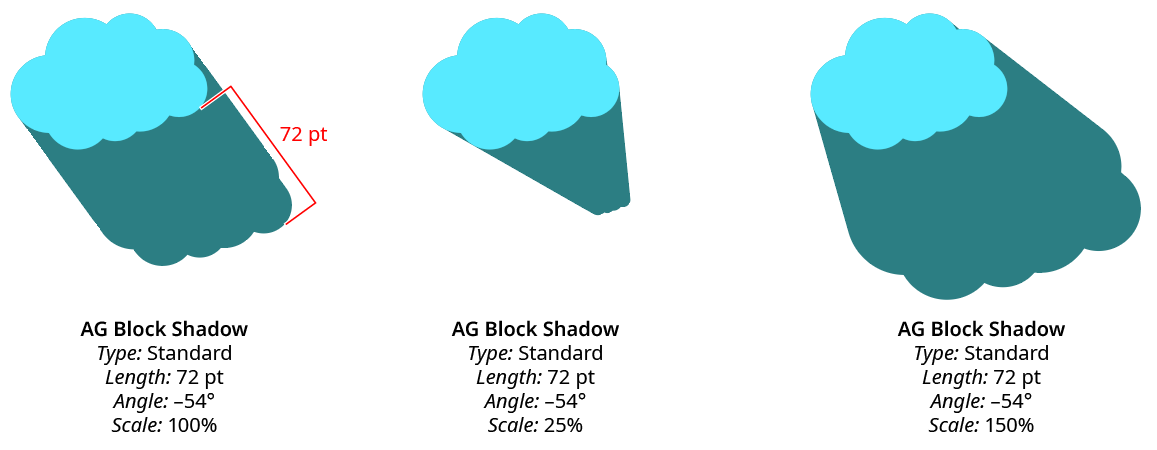
6. Scale
Specifies the relative size of the shifted shape that forms the end of the shadow, from 0% to 10000%. Scaling is done from the center of the shifted shape’s bounding box. Vanishing Point type shadows cannot have the default scale value of 100%, since this would imply a vanishing point located at infinite distance.
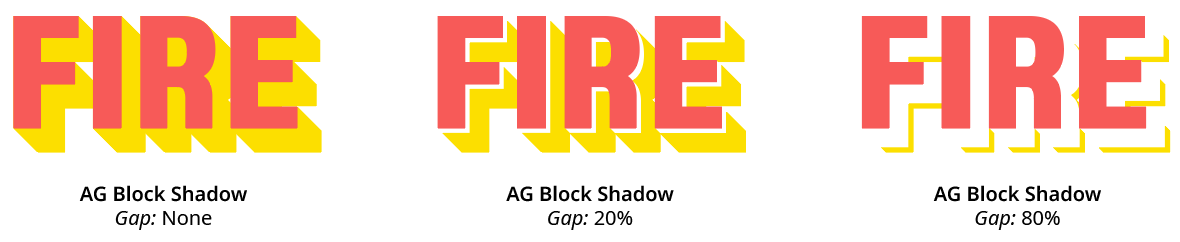
7. Gap
When enabled, a gap is left between the source object and its shadow. The size of the gap is specified as a percentage, which is relative to the length of the entire shadow.
AG Block Shadow Gap Examples
8. Shadow Strokes
When enabled, shadows are cast using not only object’s stroke, but also its fill.
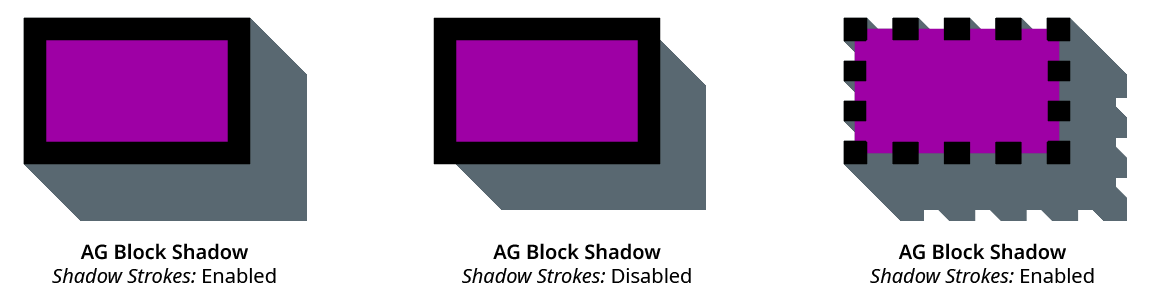
AG Block Shadow Strokes
If the stroke is dashed, shadows will be cast from each dash, as expected (but the final shadow will still be united into a single path or compound path). If a path has a stroke but no fill, then when Shadow Strokes is enabled, the shadow will be produced only from the stroke.
9. Shadow Color
The color of the shadow, unless Shadow Adopts Artwork Fill Color is enabled. Clicking the color chip will bring up the standard color picker dialog. To fill a shadow with a gradient or pattern, see the parameter Shadow Adopts Artwork Fill Color. The default Shadow Color is black.
10. Blending Mode
Specifies the blending mode of the shadow, from among the standard sixteen Illustrator blending modes. The default is Normal blending mode.
11. Opacity
Specifies the opacity of the shadow (100%, by default).
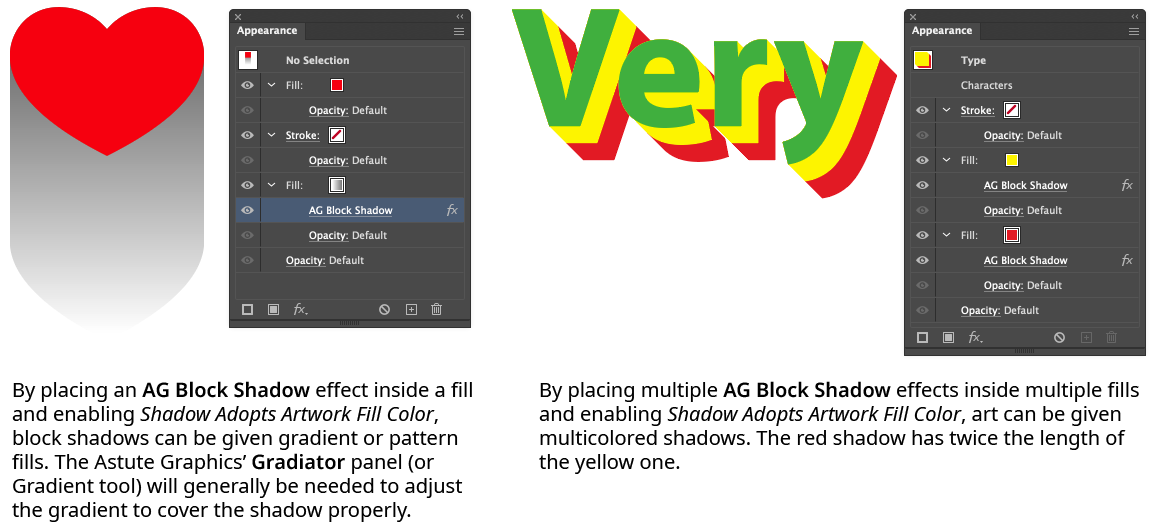
12. Shadow Adopts Artwork Fill Color
When enabled, the shadow’s color will be taken from the fill of the artwork, including gradients and patterns. If there are multiple fills, then the first one in the Appearance stacking order is used (unless the live effect is placed inside a fill, in which case that fill is used). When applied to text with differently-colored glyphs, the color of the last glyph is used. If the object has no fill, then the color is taken from the Color parameter, just as if Shadow Adopts Artwork Fill Color were not enabled.
AG Block Shadow Adopt Fill Color
13. Fill-Level Shadow Replaces Fill
This control is only visible when the panel is in advanced mode (the panel flyout menu item Show Advanced Parameters has been chosen, or an AG Block Shadow effect using one of those advanced parameters is in the current selection). When enabled, and an AG Block Shadow effect has been put inside a fill in the Appearance panel, the fill from which the shadow is created is itself suppressed in the appearance. This is generally desirable unless using a block shadow with a gap because the shadow itself will also include the fill area, and an extra copy could cause undesirable results when combined with other live effects such as Boolean operations or blurs.
14. Apply Button
Click to apply the AG Block Shadow live effect to the selected artwork, with the parameters set as they currently exist in the panel. If the button is not available, then either nothing is selected or the selection already contains at least one object with an AG Block Shadow effect. If the button is clicked with Shift pressed, the shadow will be added and immediately detached, essentially creating it as editable artwork rather than as a live effect. However, this loses the ability to preview the effect first.
Illustrator Location:
Advanced Toolbar > Stylism Stack > AG Block Shadow
As the AG Block Shadow tool has several keypresses for certain operations, we suggest installing the free Astute Graphics plugin Astute Buddy, which creates a panel that dynamically updates to inform you of the various keys which can be pressed in the tool’s current context.
The AG Block Shadow tool is works in conjunction with the associated AG Block Shadow panel, which generally should be open and accessible. If you are using the free Astute Graphics plugin DirectPrefs, you can have the AG Block Shadow panel automatically be shown when the AG Block Shadow tool is selected.
The AG Block Shadow tool offers a graphical method for both adding and editing AG Block Shadow live effects.
Illustrator Location:
Advanced Toolbar > Stylism Stack > AG Block Shadow
The AG Block Shadow tool appears in Illustrator’s main toolbar (which must be in Advanced mode: View > Toolbars > Advanced), stacked under the Stylism tool. As with other stacked tools, click and hold on the top tool icon to display the tools stacked under it.
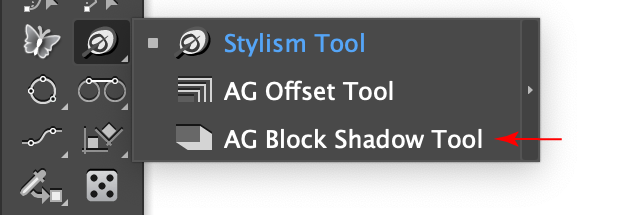
AG Block Shadow Tool Location
The AG Block Shadow tool’s cursor is a crosshair, except when previewing a new shadow or adjusting an existing shadow, in which case it appears as an arrowhead with a shadow:

AG Block Shadow Tool Cursors
Illustrator Location:
When the tool is hovered close to or over an existing block shadow, it can be edited with the tool. By default, a wireframe preview of the shadow will be added when the cursor is above it (and the cursor will show the length/angle/scale annotations, unless these have been disabled). Dragging the shadow will allow its length and angle to be changed.
If the shadow is of Vanishing Point type, the vanishing point will be annotated by a crosshair icon, which can be repositioned by dragging it (dragging the shadow itself also moves the vanishing point, and the shadow’s movement may not match the cursor’s). If at least one object with a Vanishing Point type shadow is selected, the tool may be Shift+Option/Alt-clicked to immediately move the vanishing point(s) to the clicked location. If multiple Vanishing Point type shadows are selected, the new location applies to all the shadows, regardless of the state of the Link Shadow Vanishing Points preference.
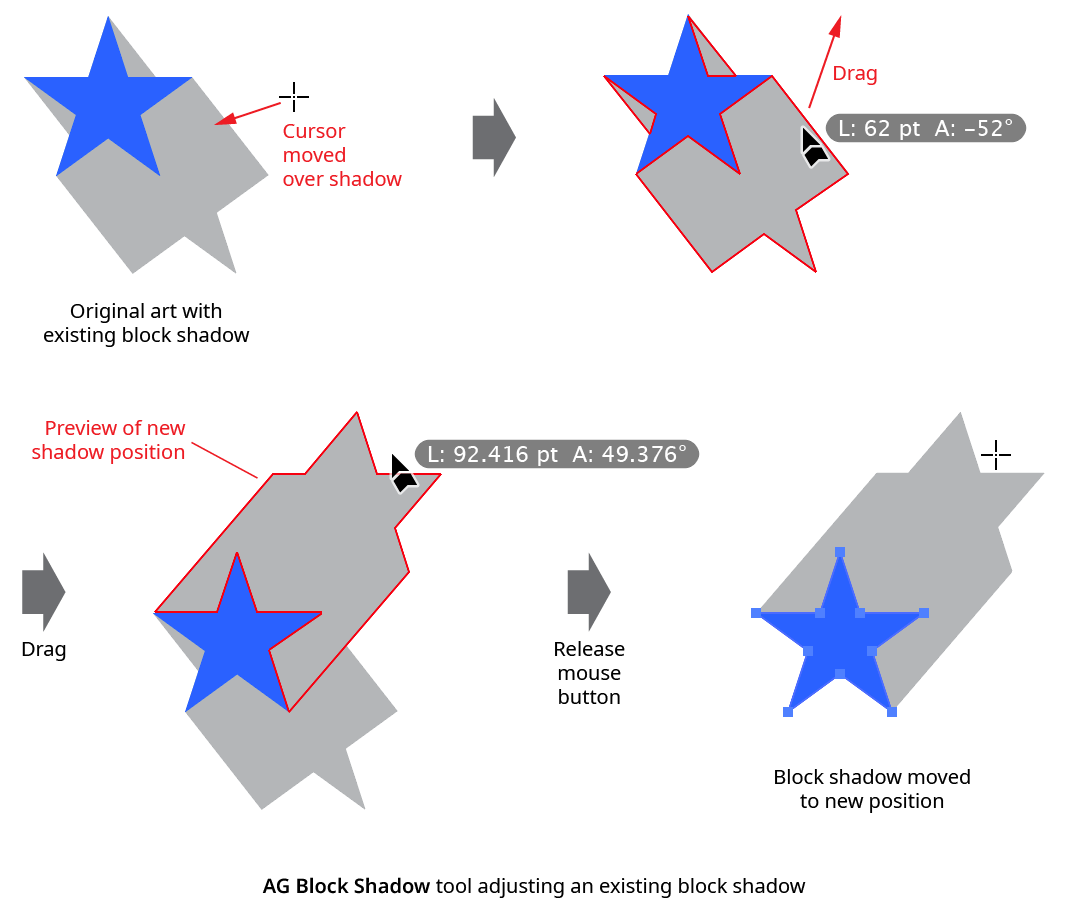
AG Block Shadow Tool Drag Edit
When the preference Edit Existing Shadows Using Original Position is enabled (the default), then a Standard type shadow is moved relative to its original position rather than being reset to zero length before being dragged.
While dragging to edit a shadow, a number of keypresses may be used:
Shift: Constrains the angle of the shadow to 45° increments around the general constrain angle (for Standard type shadows); or constrains the movement of the vanishing point to 45° increments around the general constrain angle (for Vanishing Point type shadows).
Option/Alt: For Standard type shadows, constrains the length to integer values.
Up Arrow/Down Arrow: Changes the Scale parameter by the increment value specified in the preferences (1%, by default).
Left Arrow/Right Arrow: Changes the Gap parameter by the increment value specified in the preferences (1%, by default).
1: Sets the scale to 100%.
2: Sets the scale to 200%.
5: Sets the scale to 50%.
7: Sets the scale to 75%.
0: Sets the scale to 0%.
A: Toggles on and off the tool’s cursor annotation (length, angle, and scale values).
C: Changes the wireframe color, cycling through red, blue, magenta, green, black and grey.
D: Sets the shadow to its default parameters (Standard type, 100% scale, no gap, black color, Shadow Strokes enabled; the length and angle are dependent on where the cursor is located).
G: Toggles the Gap parameter on and off.
Q: Switches the shadow preview type between Full, Wireframe, and Fast Wireframe (see AG Block Shadow: Preferences).
S: Toggles the Shadow Strokes parameter.
U: Temporarily disables Smart Guides, if they were enabled when the drag started.
X: Toggles detach mode. When true, the cursor shows a dotted line between the arrowhead and the shadow, and the shadow will be added but then immediately detached after the mouse button is released, essentially creating it as editable artwork rather than as a live effect.
The AG Block Shadow tool works on a single shadow at a time (except potentially when moving a vanishing point and the preference Link Shadow Vanishing Points is enabled), and at the highest group level. In other words, if an object is given a block shadow, and then grouped with another object, then normally the tool will not be able to edit the block shadow that is inside the group, but will instead offer to add a new block shadow at the group level. To edit the inner shadow, either isolate the grouped object (in which case the tool can be used) or edit the shadow numerically using the panel. To edit multiple shadows simultaneously, use the panel.
Illustrator Location:
Advanced Toolbar > Stylism Tool
The interactive controls for the native Drop Shadow live effect consist of two sliders and a positioning arm extending from the center circle, along with a dropdown menu and a color chip:
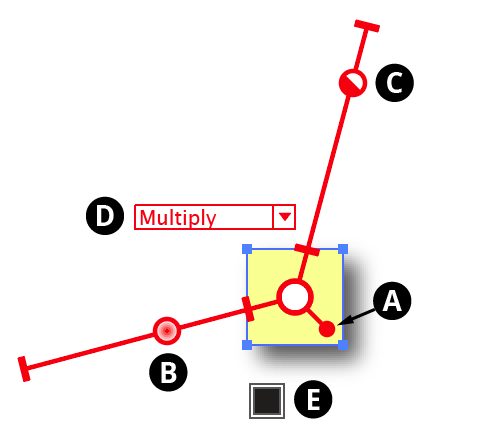
Stylism Drop Shadow Controls
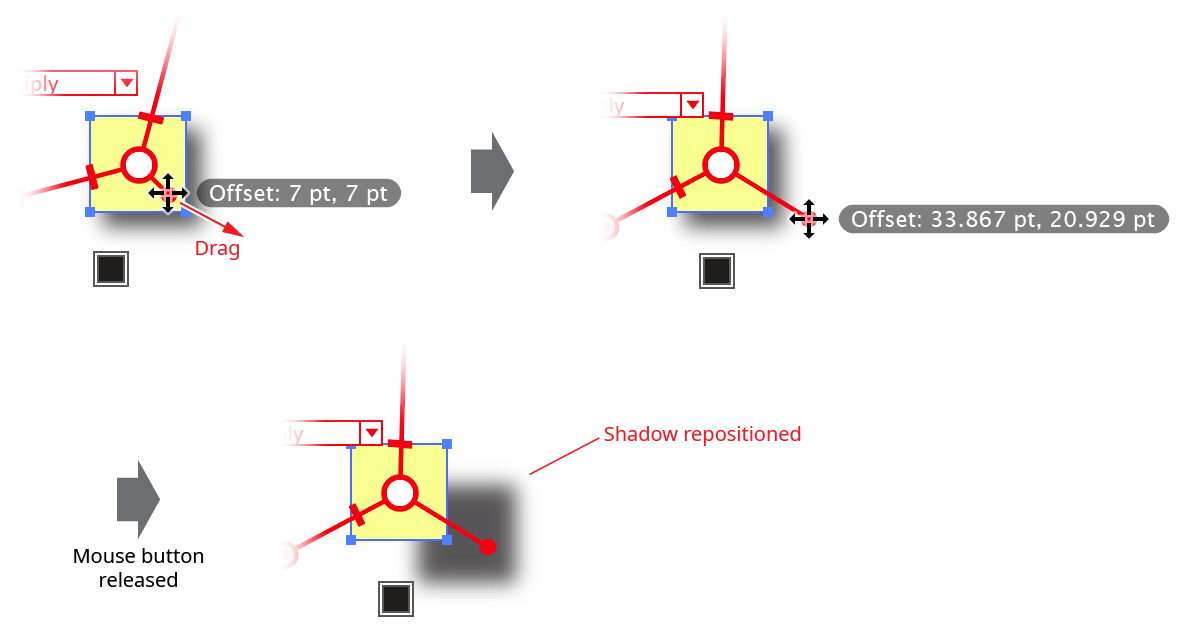
A. Shadow Offset
The position of the small “ball” at the end of the shadow position arm in relation to the center circle reflects the offset of the drop shadow. When the cursor is hovering over the control, the current X and Y offsets are displayed. Dragging the control will update the shadow offset after the mouse button is released. The two sliders will rotate with the shadow offset control.
Stylism Drop Shadow Position Control
While dragging the shadow offset control, in addition to the common keypresses (see Stylism Annotated Controls and Common Drag Keypresses), the following keypresses can be used:
Shift: Constrains the angle of the shadow to 45° increments around the general constrain angle.
Option/Alt: Constrains the change in distance to integer values (or less, depending on the zoom level).
Doubleclicking the control brings up a dialog which allows you to enter the shadow offset numerically, either as the standard X and Y values, or as distance and angle values:
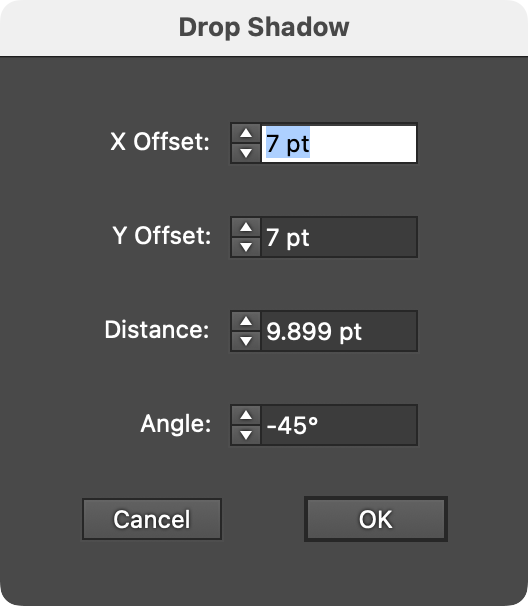
Stylism Drop Shadow Offset Dialog
B. Blur Slider
The blur slider thumb control may be dragged along the blur arm to change the shadow’s blur radius, between 0 and 144 pt. The value increases away from the center circle. When the cursor is hovering over the control or dragging it, the current blur radius is displayed. The blur slider can also be clicked anywhere along its length to move the blur thumb immediately to that position. While dragging the blur slider, in addition to the common keypresses (see Stylism Annotated Controls and Common Drag Keypresses), the following keypresses can be used:
Shift: Constrains the blur radius to integer values.
Doubleclicking the control brings up a dialog which allows you to enter the blur radius numerically.
C. Opacity Slider
The opacity slider thumb control may be dragged along the opacity arm to change the shadow’s opacity, between 0% and 100%. The value increases away from the center circle. When the cursor is hovering over the control or dragging it, the current opacity is displayed. The opacity slider can also be clicked anywhere along its length to move the opacity thumb immediately to that position. While dragging the opacity slider, in addition to the common keypresses (see Stylism Annotated Controls and Common Drag Keypresses), the following keypresses can be used:
Shift: Constrains the opacity to steps of 10%.
Doubleclicking the control brings up a dialog which allows you to enter the opacity numerically.
D. Blending Mode
The annotated blending mode dropdown menu allows you to select the shadow’s blending mode, from among Illustrator’s standard 16 blending modes:
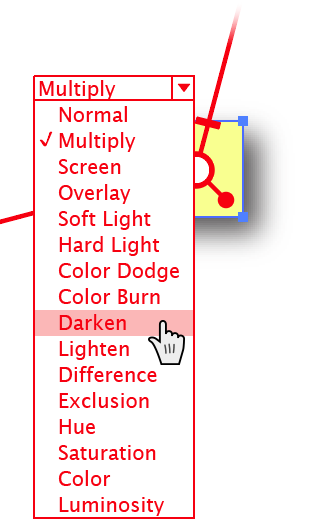
Stylism Drop Shadow Blending Mode Menu
E. Color
The color control shows the color of the shadow. To specify a new color, click the square to bring up the standard color picker. To switch from Color mode to Darkness mode, Option/Alt-click the control. A small “D” symbol is displayed to indicate Darkness mode. To change the darkness value, click the square.