 Stipple Live Effect
As with most live effects, Stipple appears in the main menu, at Effect > Stipplism > Stipple. It can also be applied directly from the Appearance panel using the “Add New Effect” button at the bottom of the panel.
Stipple Parameters Dialog
After applying the live effect using the menu item (or when clicking on the existing effect in the Appearance panel to edit it), the parameters dialog will appear:

Stipple Parameters Dialog
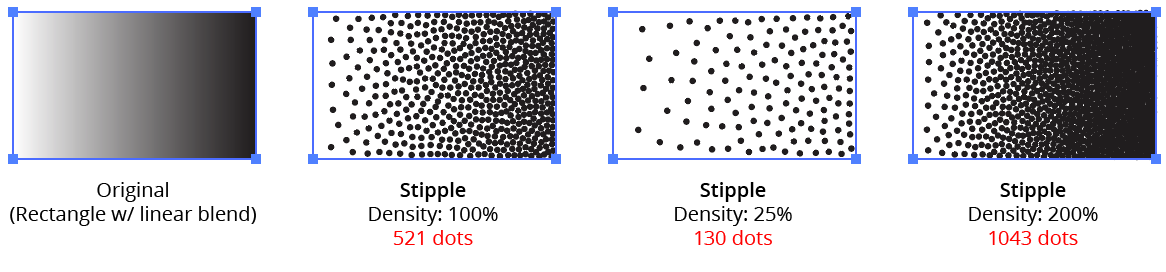
1. Density
Controls the overall density of the stipple dots (as a percentage of its full-strength value). The default value is 100%, but can vary between 0.01% and 1000%. Lower densities will result in fewer dots. If the Preview option at the bottom is enabled, the number of dots will be displayed.
Stipplism Density Example
2. Quality
Controls the uniformity of the stipple dots. Values can range between 1 and 11, with a default of 3. Higher values result in more uniform patterns (and take longer to calculate).
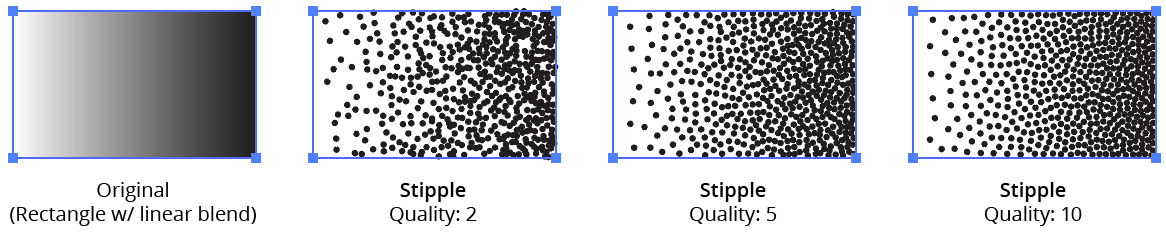
Stipplism Quality Example
The range is not linear, but is based on a logarithmic scale. Each step up in Quality roughly doubles (or more) the amount of time required to create the dots. For example, 10,000 dots typically take less than 2 seconds to create at qualities of 4 or less, but 5 seconds at quality 6, 30 seconds at quality 9, and about 300 seconds at quality 11. Therefore, for Stipples with large numbers of dots, it’s recommended to start with a low Quality value and increase it later when the design is nearly finalized. If there are many Stipples in the document, creating Graphic Styles may be useful.
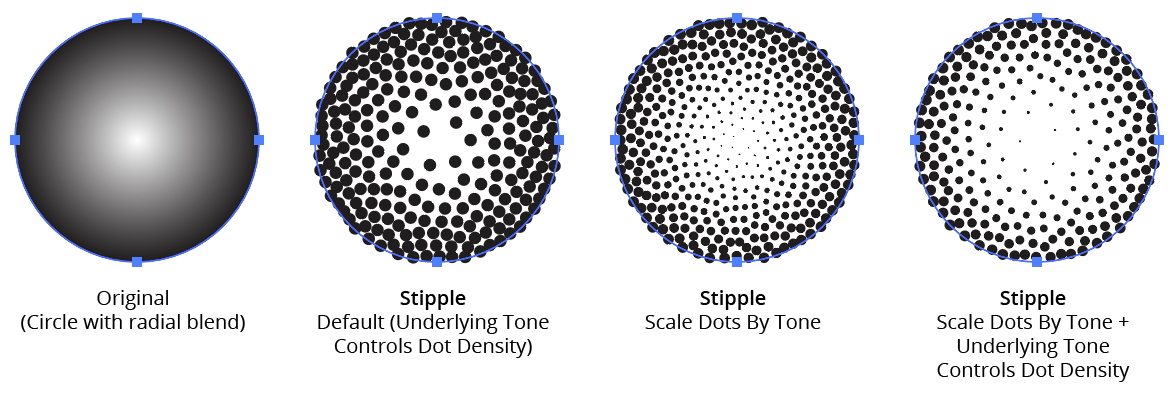
3. Underlying Tone Controls Dot Density
When enabled, the default, the lightness (tone) of the selected artwork controls the density of the generated dots, with lighter areas getting fewer dots. This underlying tone must control either the density of the dots or their size (or both), so when this setting is disabled, the Scale Dots By Tone setting will automatically be enabled.
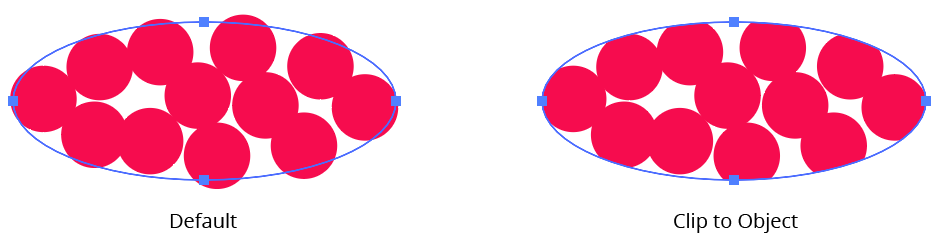
4. Clip to Object
When enabled, the outlines of the selected artwork (including those of strokes and prior effects) are used as a clipping mask for the generated dots, ensuring they do not protrude beyond these outlines.
Stipplism Clip to Object Example
5. Size
Controls the size (diameter) of the stipple dots; the default size is 6 pt / 2 mm. If Scale Dots by Tone is enabled, each dot’s size will be further modified by the curve applied.
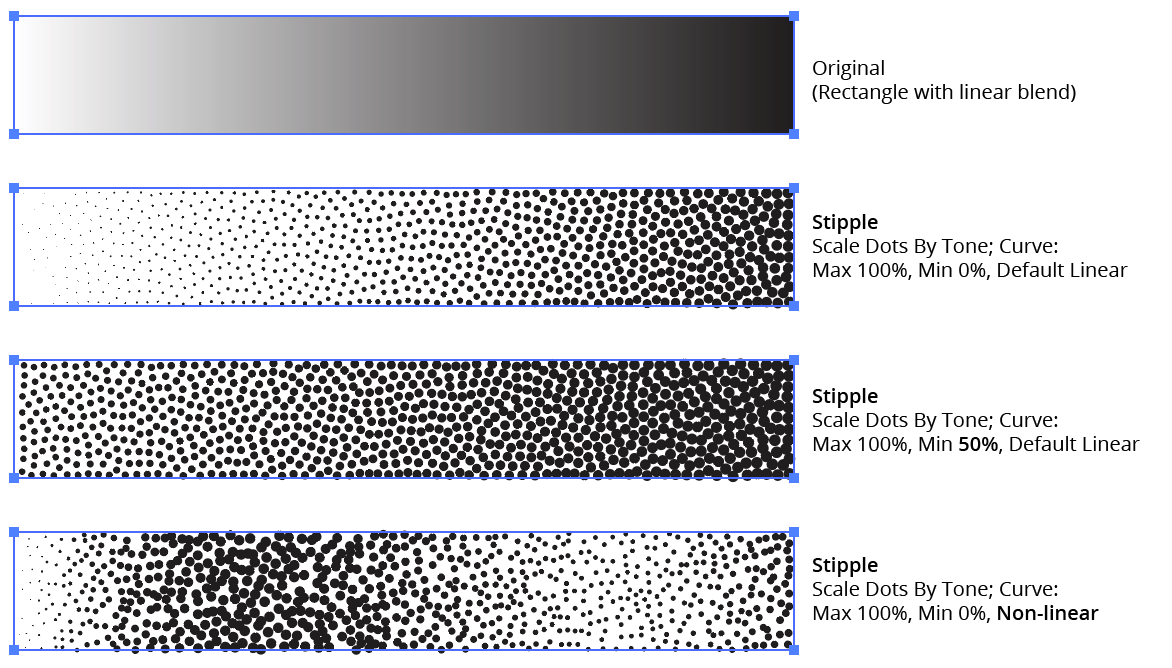
6. Scale Dots By Tone
Traditionally, stippling is made using dots which are the same size, with only the number of dots in any area (dot density) used to produce different gray levels. However, when this setting is enabled, Stipple will use the lightness (tone) of the artwork to control the size of the dots (relative to the specified Size), with a graph specifying the relationship between size and tone. Underlying Tone Controls Dot Density can enabled as well, in which case the tone will control both dot size and dot density. When this setting is disabled, the Underlying Tone Controls Dot Density setting will automatically be enabled, as the tone must control at least one or the other.
Stipplism Scale by Tone Example
7. Graph Maximum Value
The factor by which the base Size is multiplied (from 0 to 1000%) to calculate the dot size for tone values where the graph curve is at the top.
8. Graph Minimum Value
The factor by which the base Size is multiplied (from 0 to 1000%) to calculate the dot size for tone values where the graph curve is at the bottom. This allows, for example, the ability to keep the dots from becoming too small by forcing them to start at a certain percentage of the base size.
9. Graph
Available when the Scale Dots By Tone setting is enabled. The graph controls the relationship of the scale of the dots (on the vertical axis) to the tone (the horizontal gradient ramp at the bottom of the graph). In its default state, a diagonal line represents a linear relationship. Points can be added along the line and freely moved on the grid. To delete a point, drag it outside of the grid. Clicking the gradient ramp under the graph with Shift held will reset the graph to the default linear type.
Stipplism Curve Examples
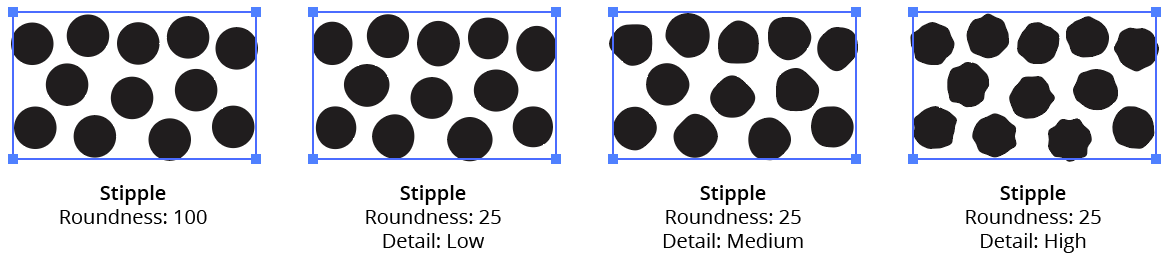
10. Roundness
By default, each stipple dot is a perfect circle, but the Roundness value can be lowered (with a minimum of zero) to make them more irregular. The smaller the Roundness value, the larger the displacement of each dot’s path will be from a true circle.
11. Detail
When Roundness is anything other than 100, the Detail dropdown menu is available. It allows a choice of four options: Low (the default), Medium, High, and Very High. Higher Detail creates more anchor points around the dot’s edge.
Stipplism Roundness and Details Example
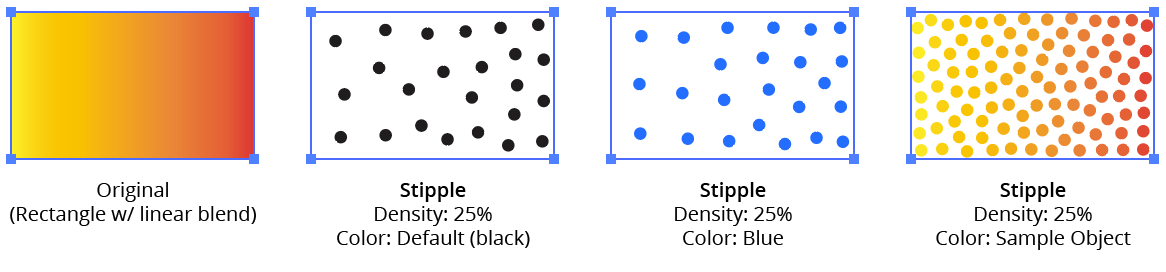
12. Color
Specifies the color of the stipple dots. By default, this is set to a fixed value: black. Clicking the color chip will bring up the native Color Picker dialog, allowing a different color to be used.
13. Sample Object
When selected, the stipple dots will automatically pick up the underlying colors of the original artwork at each dot location. Because colors are sampled uniformly without regard to their lightness, the base density of the Stipple is calculated as if the object were totally black.
Stipplism Color Examples
14. Overprint
Specifies whether the stipple dots should be overprinted — that is, if Illustrator should still print all the non-shared inks behind the dots rather than cut holes under them (knockout). This is useful mainly in CMYK documents destined for print. The default value is enabled. Pure white dots will never be set to overprint, regardless of the setting.
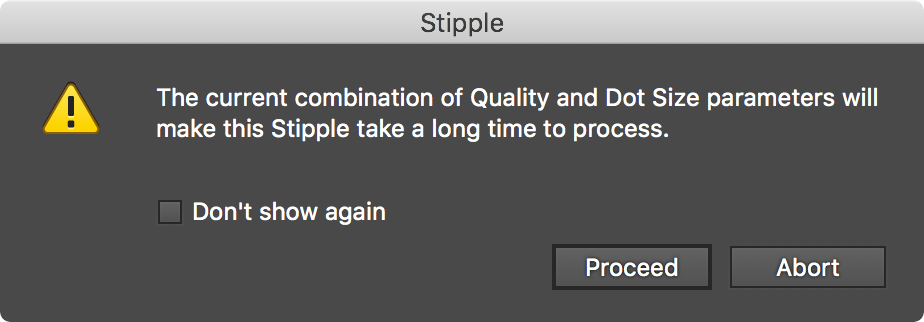
15. Ignore Slow Processing Warning
Using the effect with a small Size value and/or a high Density (i.e., high dot counts), especially combined with higher Quality values, will require long periods of time to calculate. When this is the case, by default a warning dialog will be displayed asking for confirmation to proceed. By enabling this setting, the specific Stipple to which it is applied will never show the warning dialog.
Stipplism Warning Dialog
16. Reset Warning button
The Slow Processing Warning dialog can be kept from being displayed again by enabling its Don’t show again checkbox. Thereafter, to re-enable the warning, use the Reset Warning button.
17. Preview
By default this option is disabled and not sticky, since the calculation of the Stipple effect can be slow when its settings are high. However, it can be made sticky by clicking with Option/Alt held down.
18. Dot Count
Available when Preview is enabled; shows the number of stipple dots that were generated with the current settings.
19. Help Button
Opens the help documentation in the Astute Manager. If this does not automatically appear, please ensure your Astute Manager is running first.