 Extend Path Tool
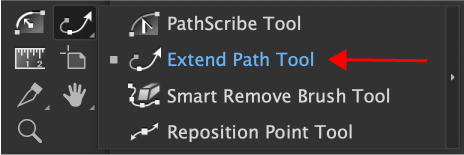
Extend Path Tool Location
By click-dragging on the end of an open path, the Extend Path tool can extend it (make it longer) or shorten it. Other selected open paths can optionally be simultaneously changed. Lengthening can be done in different ways, and the path’s length (or change in length) can be constrained to specific increments.
Extend Path Tool Operation
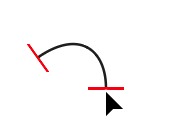
To use the Extend Path tool, place its cursor near the start or end of an open path (the path does not need to be selected). The cursor will change from a small crosshair to a tail-less arrow, and small lines (red, by default) will appear at the start and end of the path, perpendicular to it, which will dynamically indicate the start and end limits of the path during the drag.
Extend Path Tool Hovering end point
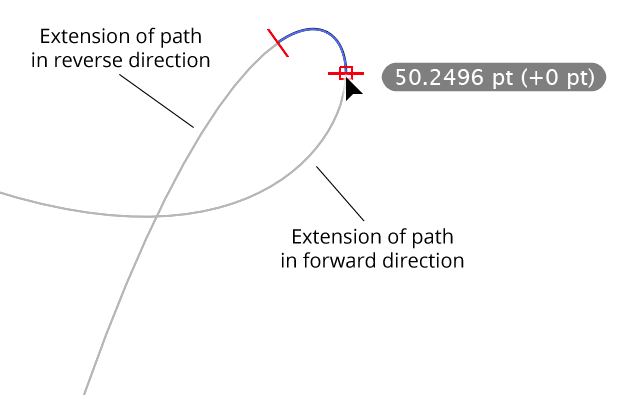
To edit the path, hold the mouse button down. Now a pair of gray lines will appear, indicating how the path would be extended (in both directions), given the current extension mode and parameters. By default, the current length of the path and its change in length will be displayed next to the cursor. The small red square indicates that the Extend Path tool is snapping to an anchor point (here, the endpoint of the original path).
Extend Path Bezier extension complete
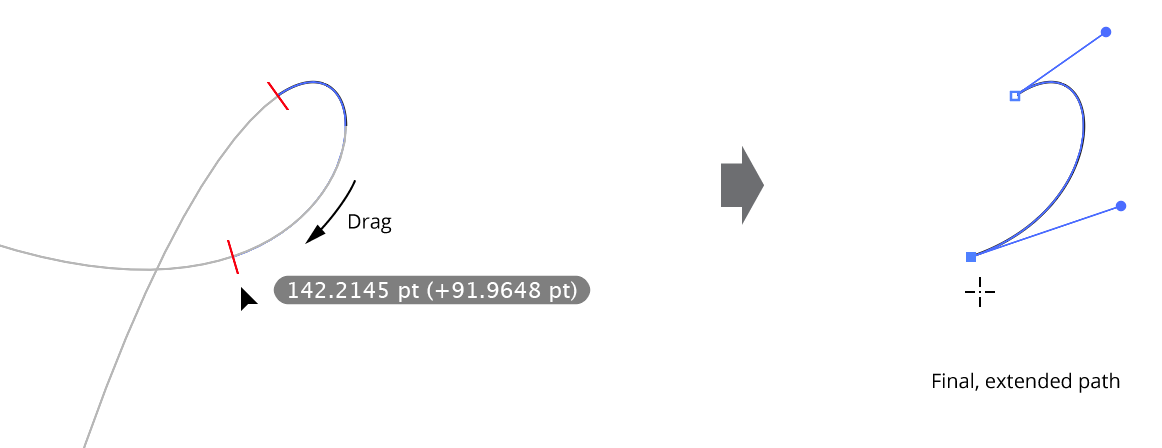
Dragging the cursor along the extension preview will move whichever limit line was clicked on, showing the virtual new endpoint of the path. The cursor does not need to be kept directly above the extension preview, as the limit line will snap to the nearest position on the line. Releasing the mouse button finalizes the edit.
Extend Path Dragging the cursor along the extension preview
During the drag, by default, the cursor will snap to intersections of the extended path to other paths (or to the extended path itself); this will be indicated by a small circle around the limit line:
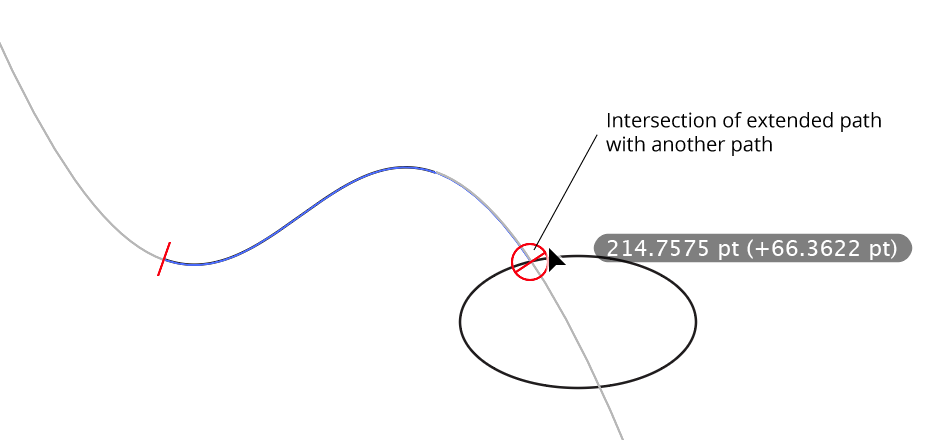
Extend Path Bezier Extension Intersection
Dragging backwards into the existing path will shorten it:

Extend Path Shortening Example
Note: If you drag from the final point of an open path, but then move the cursor so it is over the extension preview that comes from the first point of the path, the path will be extended in the reverse direction but the entire original portion of the path will be removed, as this is equivalent to shortening the path to zero length before starting to re-extend it.
Extension Modes
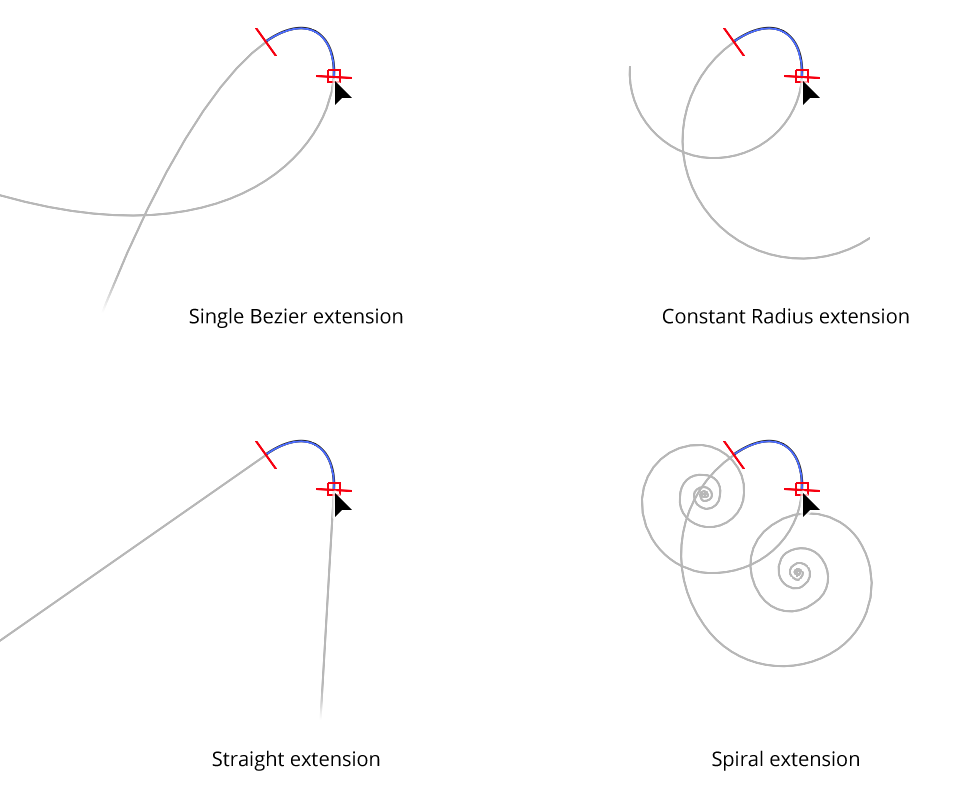
There are four different modes of path extension: Single Bezier, Constant Radius, Straight, and Spiral.
Single Bezier Extension
This is the default mode for extending a path. In this mode, no additional anchor points are added to the path. Instead, the cubic bezier curve that comprises the path segment being extended is simply expanded. Due to the mathematics of cubic beziers, this may lead to situations where the curve turns in unexpected directions or even reverses direction at a cusp point if the original bezier had only a single handle.
Constant Radius Extension
In this extension mode, the path is continued as a circular arc of constant radius. The radius value itself depends on which radius mode is active: Matched, Scaled, or Fixed. When Matched, the radius value will match the existing radius at the end of the path being adjusted. When Scaled, the radius value will be taken from the existing radius multiplied by a scale value. When Fixed, the radius value will be equal to the fixed value that is specified in the preferences. The circular arc can be extended up to 180°.
Straight Extension
In Straight extension mode, the path is continued as a simple straight line.
Spiral Extension
In Spiral extension mode, the path is continued as a logarithmic spiral with the specified winding constant.
Extend Path spiral extension types
The radius value of the spiral at the start of the path extension depends on the Radius mode, just as with Constant Radius extensions, and the spiral always gets smaller.
Constraining Extensions
When the Constrain Length by Multiples preference is enabled, a path can only be lengthened or shortened so that its total length (or change to its length, depending on the subpreference) is a multiple of the keyboard increment value (when using absolute measurements). So if the keyboard increment is set to 15 pt, the change would constrained to plus or minus 15 pt, 30 pt, 45 pt, etc. When using percentage measurements, changes to the path’s length are constrained to multiples of 5%.
Multiple Paths
When the Extend All Selected Open Paths preference is enabled, all selected open paths will be simultaneously lengthened or shortened, in addition to the path under the cursor. Unless randomization is being used, the amount of lengthening or shortening is the same as the dragged path. When randomization has been enabled with the Q key, the values for additional paths are randomly changed by an amount up to the maximum random variation value, which can be changed using the O and P keys while dragging.
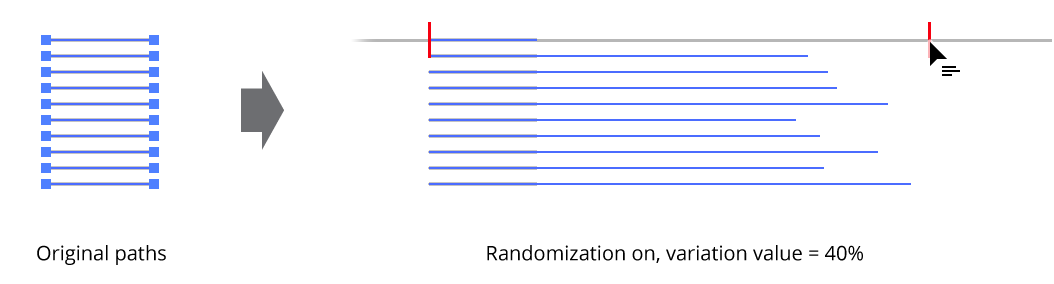
Extend multiple paths randomly
Keypresses
While extending a path, a number of keys may be pressed to change preferences on the fly or change functionality. As with all Astute tool keypresses, these will be indicated on the Astute Buddy panel.
Command/Ctrl: Overrides any snapping or constraining that is in effect.
Space: Hides the annotations.
Up Arrow/Down Arrow: Changes the spiral winding constant.
Left Arrow/Right Arrow: Changes the fixed radius value (when in Fixed radius mode) or the radius scale factor (when in Scaled radius mode).
A: Toggles the Extend All Selected Open Paths preference.
C: Toggles the Constrain Length by Multiples preference.
E: Cycles through the four extension modes (Single Bezier, Constant Radius, Straight, and Spiral).
H: Changes the annotation color (red by default).
I: Toggles the Calculate Intersections preference. When extending paths over very complex artwork, pre-calculating all the possible intersections may cause a noticeable delay in extending the path.
L: Toggles the Show Length preference.
M: Switches the measurement mode between absolute and percentage.
O & P: When extending multiple paths, changes the maximum random variation value (0% to 100%).
Q: When extending multiple paths, toggles the randomization mode.
R: Cycles through the three radius submodes (Matched, Scaled, and Fixed).
S: When extending multiple paths, changes the random seed. This produces a different randomly chosen variation value for each path.
U: Temporarily disables Smart Guides, if they were enabled when the drag started.
V: Toggles the curvature type. Normally the curvature of the extension is in the same direction as the existing path; Reverse Curvature makes the extension curve in the opposite direction:
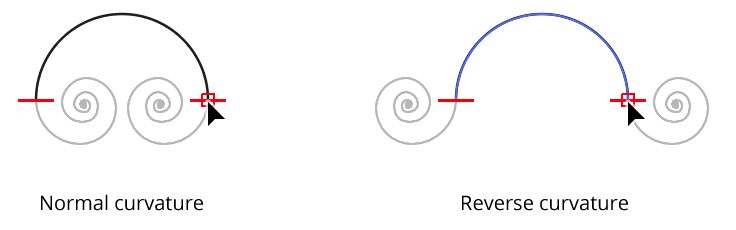
Extend Path Keypress Reverse extension curving
X: Manually locks and unlocks the extension type. Because the forward and backward extensions can sometimes overlap, locking the extension (for example, so the path can only be lengthened in the forward direction) can keep the cursor from “jumping” to the other extension and causing the path to be reverse extended. The extension type is automatically locked based on the initial drag direction and automatically unlocked if the cursor is passed near to the original endpoint from which the drag started.
Z: Switches the starting endpoint. This can be useful if the original endpoints of the open path were very close together and the opposite endpoint was the desired one.
Marqueeing
If the Extend Path tool is dragged starting from an empty area of the canvas, it will act as a marquee to select art objects. Shift may be pressed as with the native selection tool to toggle the selection.
Extend Path Preferences
The Extend Path Tool preferences dialog can be brought up in two ways: by double-clicking on the Extend Path tool icon in the toolbar; or by pressing the Return/Enter key when the Extend Path tool is selected.
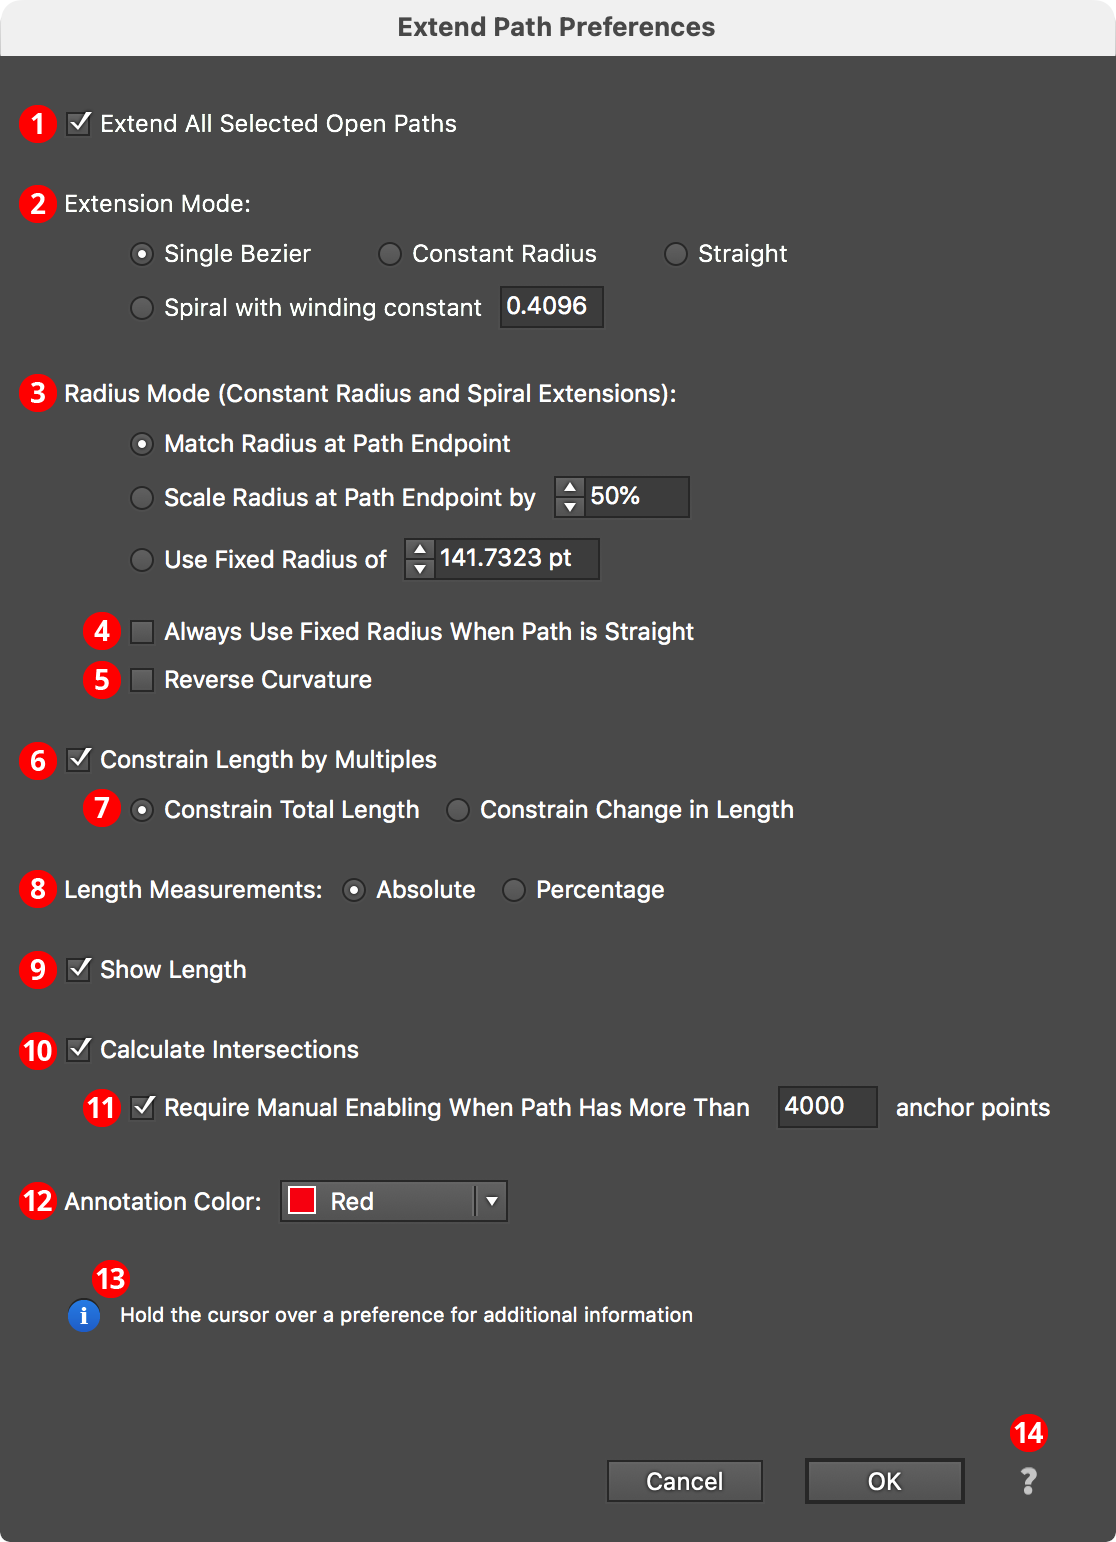
Extend Path Preferences
1. Extend All Selected Open Paths
Allows the Extend Path tool to work on multiple paths rather than just a single path. This preference can be toggled on the fly by pressing the A key. When multiple paths are being extended, the Extend Path tool cursor will change to reflect this.
2. Extension Mode
Specifies the mode to use when extending a path (see Extend Path Tool: Extension Modes). When the mode is “Spiral,” also allows specification of the winding constant (0.001 to 0.99). The mode can be changed on the fly by pressing the E key, and the spiral winding constant can be changed on the fly with the Up Arrow and Down Arrow keys.
3. Radius Mode
Specifies the radius of the extension when using Constant Radius or Spiral extensions (see Extend Path Tool: Extension Modes). The radius mode can be changed on the fly by pressing the R key. The scale value or fixed radius value can be changed on the fly with the Left Arrow and Right Arrow keys.
4. Always Use Fixed Radius When Path Is Straight
When enabled, straight paths will always be extended using Fixed mode, even if the mode is actually set to Matched or Scaled. This is because the radius of a straight path is infinite, so Matched and Scaled radii would always just produce a straight extension.
5. Reverse Curvature
When enabled, the direction of curvature of the extension will be opposite that of the existing path (see Extend Path Tool: Keypresses). The preference can be toggled on the fly by pressing the V key.
6. Constrain Length by Multiples
See Extend Path Tool: Constraining below. The mode can be toggled on the fly by pressing the C key; also, constraining can be overridden by holding down Command/Ctrl.
7. Constrain Mode
Applicable when using Absolute measurements with Constrain Length by Multiples, specifies whether it is the total length of the path which is being constrained to multiples of the keyboard increment value, or the change in the path’s length.
8. Length Measurement Type
When set to Absolute, the length of the path is measured and displayed in the current units, and the Constrain Mode is relevant. When set to Percentage, the length of the path is measured and displayed as a percentage of its original length.
9. Show Length
Displays length measurements next to the cursor. The preference can be toggled on the fly by pressing the L key.
10. Calculate Intersections
11. Require Manual Enabling...
When enabled, intersections of the path extensions to other paths, the extensions themselves, and the original path are pre-calculated and the cursor will snap to these positions (indicated by a circle being drawn around the dragged limit line). When there are many unlocked paths in the document that could be potentially intersected, this may cause a delay after pressing the mouse button down. For this reason, unless intersection snapping is specifically needed, it may be advantageous to turn off the preference, as it can always be re-enabled on the fly by pressing the I key. When working with complex paths, the subpreference may also be useful. It allows setting a threshold value for the anchor point count above which intersections are never automatically calculated (even if the Calculate Intersections preference is enabled) until the I key is pressed.
12. Annotation Color
The color with which certain annotations are displayed. The default value is red; it can be changed on the fly with the H key.
13. Informational area
Shows a brief description of each preference setting when the cursor is being held over it.
14. Help Button
Opens the help documentation in the Astute Manager. If this does not automatically appear, please ensure your Astute Manager is running first.