Textures
 Texture
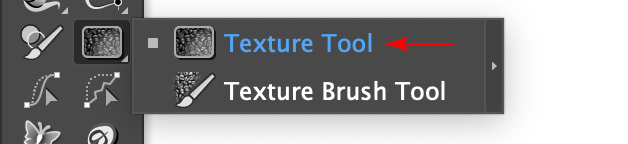
![]() Texture Tool
Texture Tool
 Texture Brush
Texture Brush Tool
Illustrator Location:
Advanced Toolbar > Texture Tool
Tool Location and Cursor Appearance
The Texture tool appears in Illustrator’s main toolbar (which must be in Advanced mode: View > Toolbars > Advanced). Stacked under it is the associated Texture Brush tool.
Texture Tool Location
The Texture tool’s cursor assumes several shapes, depending on what the cursor is hovering over:

Texture Tool Cursors
Additionally, the cursor will change to a finger when it is over an annotated menu or button.
Illustrator Location:
As the Texture tool has several keypresses which can add or change its functionality, we suggest installing the free Astute Graphics plugin Astute Buddy, which creates a panel that dynamically updates to inform you of the various keys which can be pressed in the tool’s current context.
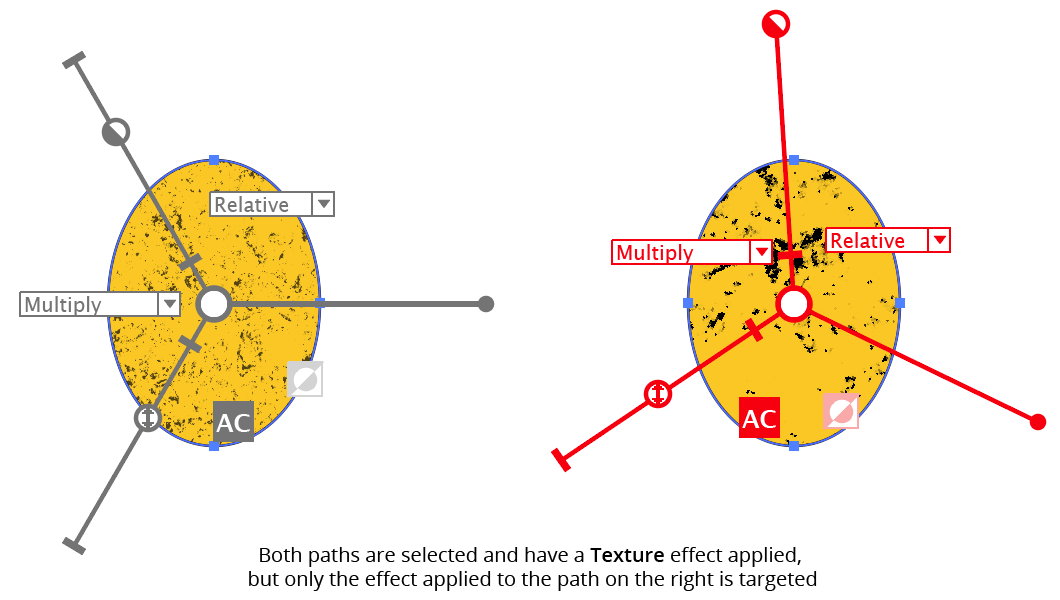
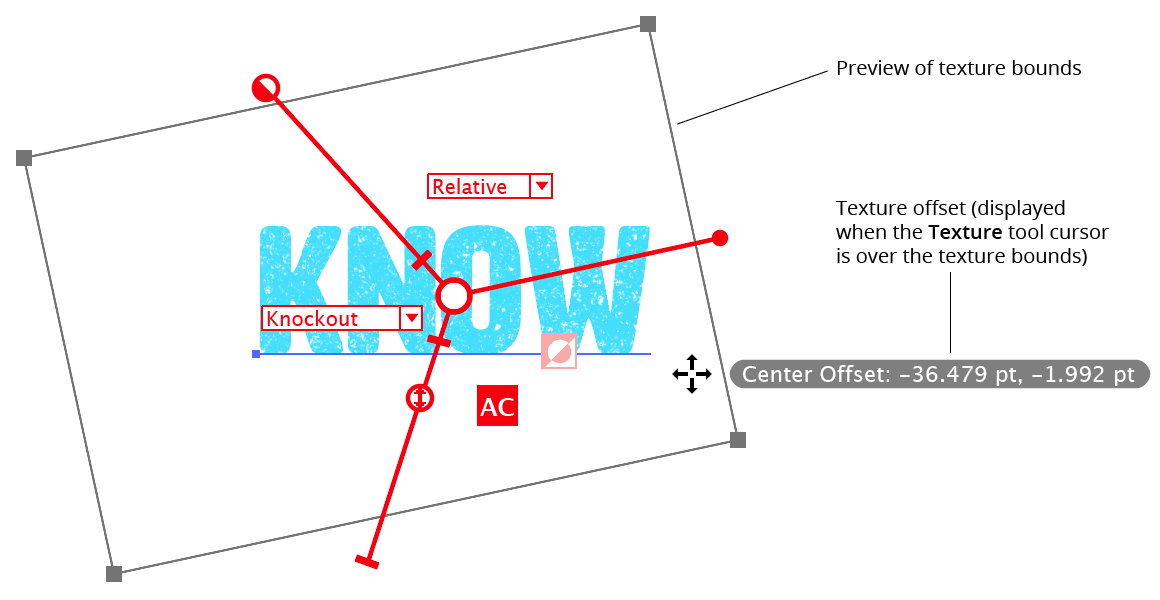
The Texture tool allows a Texture live effect’s parameters to be changed using an on-screen, annotated widget. All selected art objects with Texture live effects will display this widget (centered above the art’s bounding box) when the Texture tool is active, but only one of them will be “targeted” and displayed in color (red, by default) rather than gray. This texture is indicated on the Texture panel as the “current” texture.
Texture Targeting Annotations
Illustrator Location:
Advanced Toolbar > Texture Tool
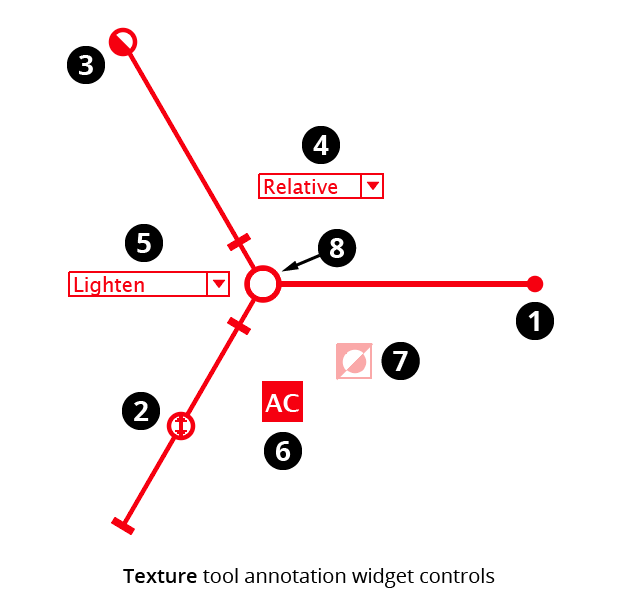
The annotated widget consists of multiple controls. For all controls, the texture will update after the mouse button is released.
Texture Annotations
1. Rotation arm and control
Dragging the rotation control changes the angle of the texture. The texture’s current angle of rotation is displayed next to the cursor when hovering over or close to the rotation control:

Texture Rotation Display
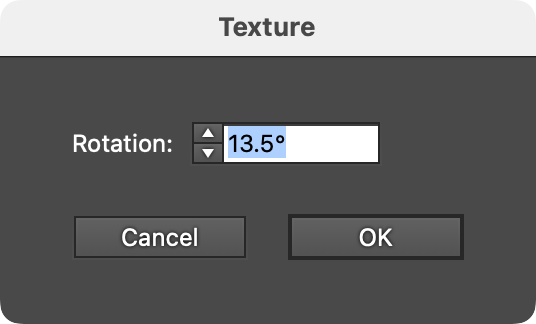
Doubleclicking the rotation control will bring up a dialog in which the texture’s angle of rotation can be specified numerically:
Texture Rotation Dialog
2. Scale Slider
Dragging the thumb changes the scale of the texture (keeping its center stationary), from 10000% at the outside end of the slider to 1% at the inside end. The texture’s current scaling and effective resolution is displayed next to the cursor when hovering over or close to the scale slider:
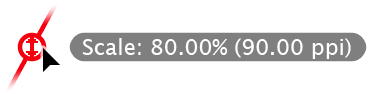
Texture Scale Display
Doubleclicking the scale slider thumb control will bring up a dialog in which the texture’s scale can be specified numerically, either as a percentage or by specifying the desired effective resolution, in pixels per inch:
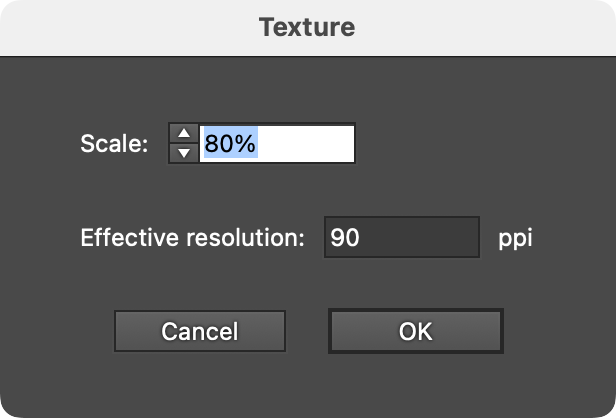
Texture Scale Dialog
The default Scale setting can be set in the preferences dialog (see Texture: Preferences). Textures are always scaled the same in the horizontal and vertical directions.
3. Opacity Slider
Dragging the thumb changes the opacity of the texture, from 100% at the outside end of the slider to 0% at the inside end. The texture’s current opacity is displayed next to the cursor when hovering over or close to the opacity slider:

Texture Opacity Display
Doubleclicking the opacity slider thumb control will bring up a dialog in which the texture’s opacity can be specified numerically:
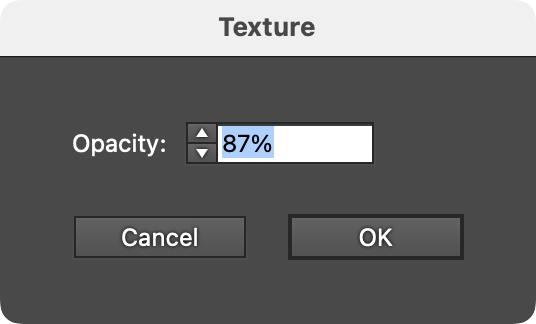
Texture Opacity Dialog
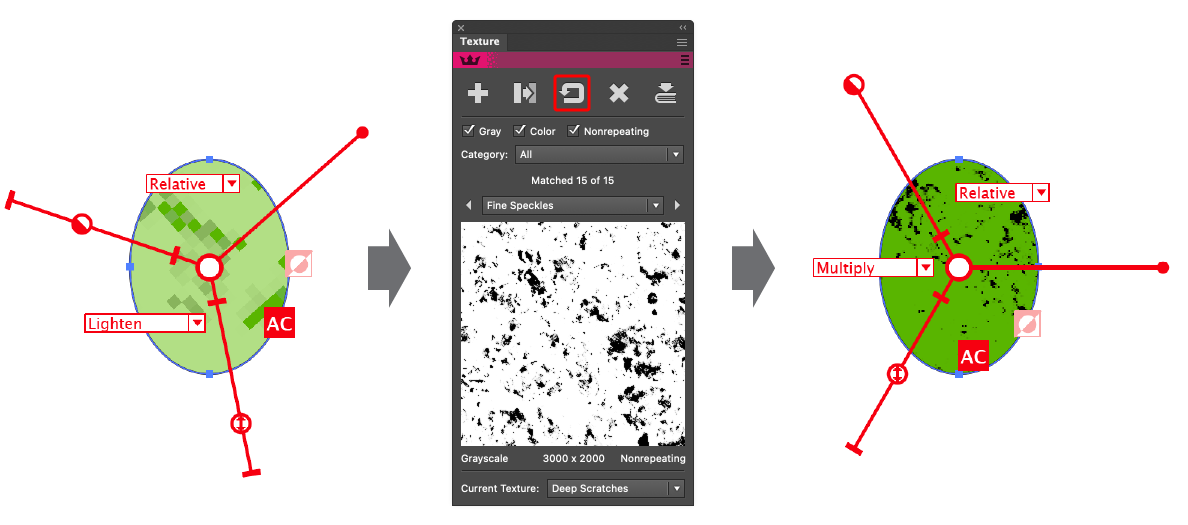
4. Position Mode Menu
Chooses the mode of positioning the texture. In Relative mode (the default), the texture’s center is positioned relative to the center of the bounding box of the art; if the art is moved, the texture will move along with it. In Absolute mode, the texture’s center is positioned at specific coordinates on the artboard; the texture will not move when the art is moved or its bounding box is changed (unless Auto-Cover is enabled; see below).
5. Blending Mode Menu
Controls the blending mode of the texture. It consists of the same sixteen blending modes that are available in the native Transparency panel, plus a special mode: Knockout. In Knockout mode, the darkness of the texture controls the opacity of the art to which it is applied; solid black areas make the art completely transparent (“knocking it out”) and therefore allowing art below it to show through.
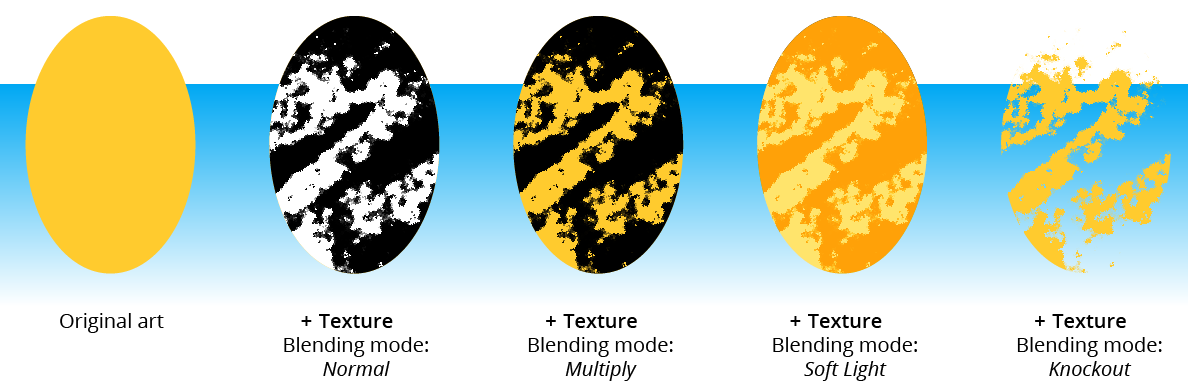
Texture Blending Mode Examples
In the Texture Manager, each texture may be assigned an Initial Blending Mode, which is the mode given to the texture as a default (see Texture: Texture Manager).
6. Autocover Button
Toggles the Autocover parameter of the texture. When enabled, indicated by an undimmed “AC” icon, nonrepeating textures will be automatically moved and/or enlarged such that they always completely cover the bounding box of the artwork (plus any specified padding). The default Autocover setting can be set in the preferences dialog (see Texture: Preferences).
7. Invert Button
Toggles the Invert state of the texture. When enabled, indicated by an undimmed icon, the color of the texture is inverted.
8. Center control
Clicking the center control of an untargeted texture targets it.
When dragging a control on the annotated widget, the following keypresses apply:
Shift: Constrains the control’s value to a “nice” value. For Rotation, this is angles that are multiples of 45° away from the general constrain angle. For Opacity, this is steps of 10%. For Scale, this is integer percentages.
Command/Ctrl: Enables “Slow-Drag,” which moves the control as if all cursor movements were reduced by a value specified in the tool preferences (with a default of 10), allowing for finer control.
Space: Temporarily hides the tool annotations.
C: Changes the annotation color.
In addition to the annotated widget, the bounds of the targeted texture are displayed as a gray rectangle:
Texture Bounds Annotation
This bounds annotation may be manipulated with the Texture tool in several ways:
a. The inside of the rectangle may be dragged to reposition the texture (hold
Shiftto constrain the movement);doubleclickinginside it allows the position to be specified numerically.b. The edges and corners of the rectangle may be dragged to resize the texture; by default, this is done keeping the opposite edge/corner stationary, but holding
Option/Altwill resize it from the center.c. Hovering the cursor just outside one of the corners of the rectangle allows rotation of the texture, either by dragging (similarly to rotating an art object using its bounding box, with
Shiftconstraining the angle of rotation) or bydoubleclickingto set the rotation numerically.
If the texture is repeating, the rectangle annotation’s borders are drawn with a dashed line.
While the rectangle bounds of the texture updates in real time when rotated or resized, the actual texture will not be updated until the mouse button is released.
When nothing is selected, the Texture tool can be used to select artwork, by either marquee-dragging over it or by clicking on it.
Illustrator Location:
Illustrator Main Menu > Window > Astute Graphics > Texture
The menu item to show and hide the Texture panel can be found in the main menu under Window > Astute Graphics > Texture.
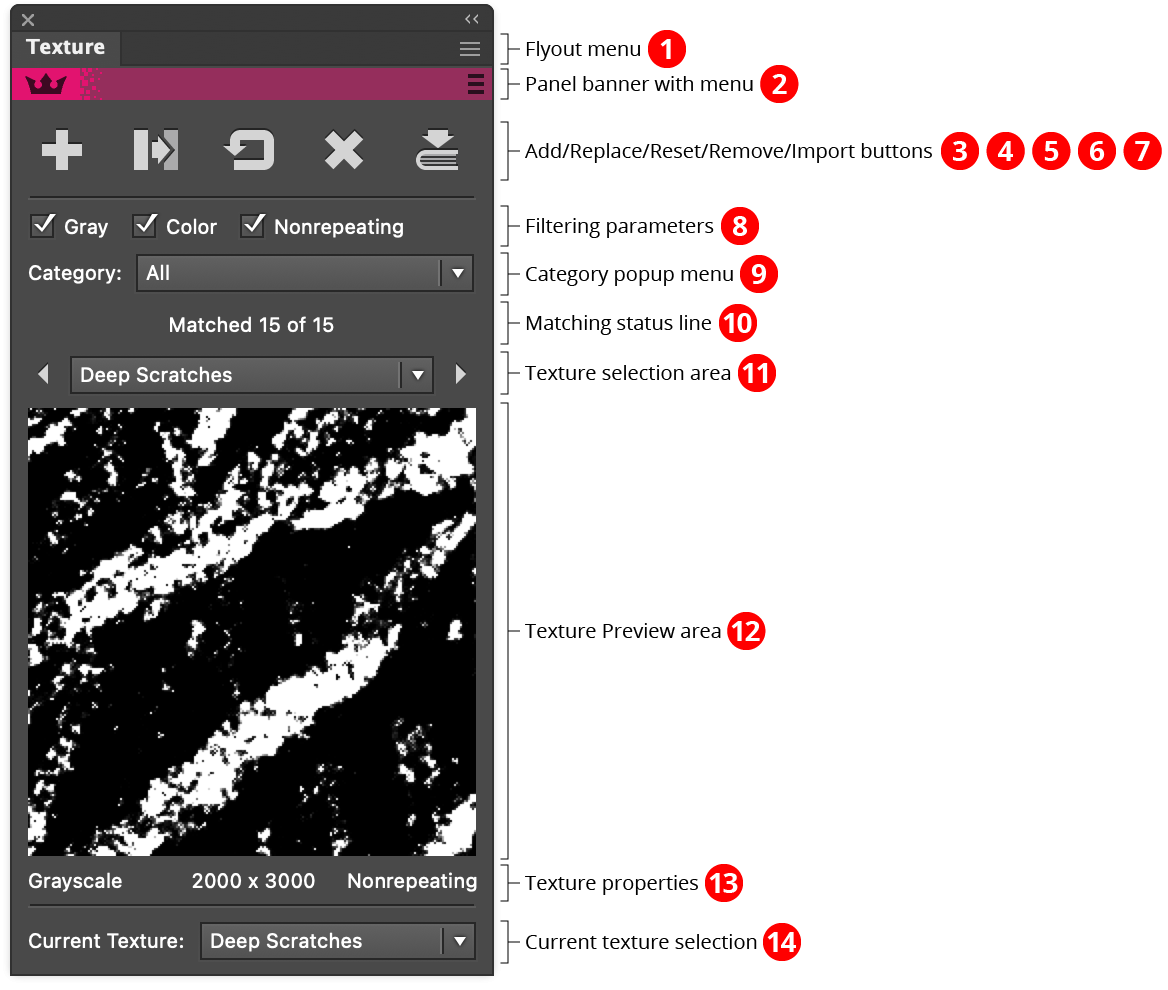
Texture Panel Overview
1. Flyout menu
See Texture Panel: Flyout Menu.
2. Panel banner
The help button on the right opens the help documentation in the Astute Manager. If this does not automatically appear, please ensure your Astute Manager is running first.
Click on the other area of the color bar to activate the Texture tool. This is a quick method of locating the tool within the default Advanced toolbar or a custom toolbar.
3. Add Button
Adds the texture being previewed on the panel to the selected artwork and (if necessary) switches the current tool to the Texture tool to allow immediate editing of the texture’s parameters, such as position, scaling, and so on, using the on-screen tool annotations (see Texture: Tool Operation).
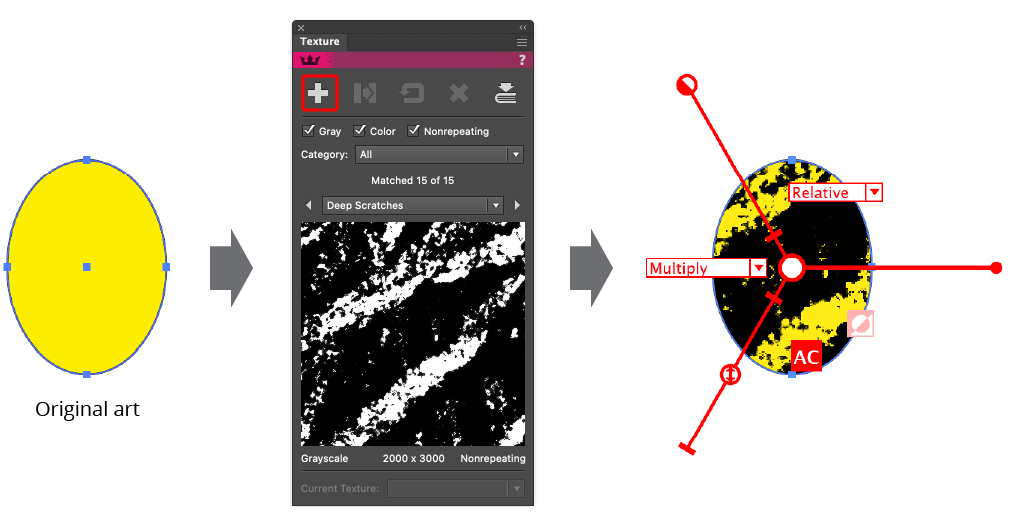
Texture Panel Add Button
Normally, when a new texture is added, its parameters are reset to their defaults, but if the Option/Alt key is held down when clicking the Add button, the parameters will be retained from the last texture that was selected or edited. Multiple copies of the same texture may be added.
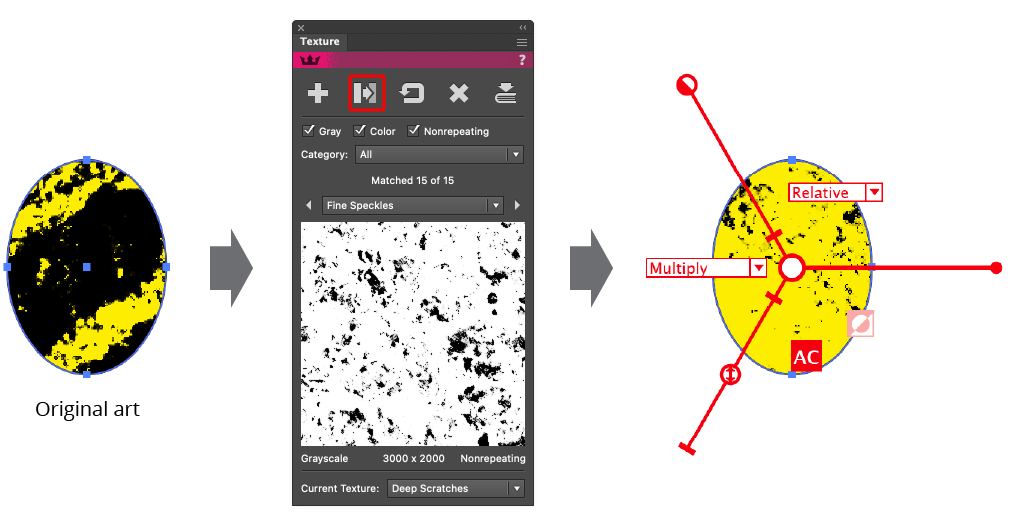
4. Replace Button
Replaces the current texture (as indicated by the Current Texture menu at the bottom of the panel) with the texture being previewed on the panel, retaining all parameters.
Texture Panel Replace Button
5. Reset Button
Resets the current texture’s parameters to their defaults: relative positioning with no offset; scaling 100%; rotation 0°; opacity 100%; Invert disabled; Auto Cover enabled; and blending mode equal to the texture’s “Initial Blend Mode” (set for each texture in the Texture Manager, with a default of Multiply).
Texture Panel Reset Button
If the Option/Alt key is held down when clicking the Reset button, then all the textures in the targeted art object will be reset.
6. Remove Button
Removes the current texture (as indicated by the Current Texture menu at the bottom of the panel) from the targeted art object. If the Option/Alt key is held down when clicking the Reset button, then all the textures in the targeted art object will be removed.
7. Import Button
Allows one or more new textures to be created and added to the library from one or more existing PNG, TIFF, or JPG files, using the standard file open dialog. A warning will be shown if a texture being imported conflicts with an existing texture. After the import process has completed, a dialog will report the total number of textures that were successfully added to the library.
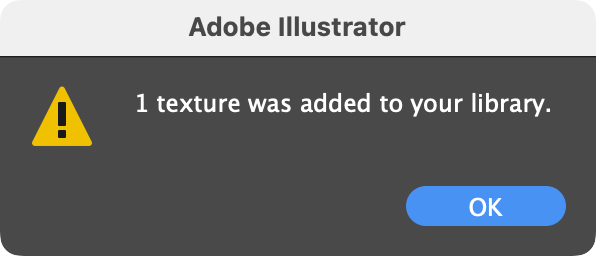
Texture Import Results Dialog
The Texture Manager will then automatically open with the newly-imported textures selected (see Texture: Texture Manager).
If the Option/Alt key is held down when clicking the Import button, the Texture Manager will be opened instead.
8. Filtering Parameters
These three checkboxes allow you to filter the textures in your library in order to make it easier to locate a desired texture. For example, if you are only interested in seeing color textures, deselecting the Gray checkbox will hide all grayscale textures from the Texture Selection menu. (Note that this only keeps matching textures from appearing in the panel’s selection menu; non-matching textures already added to artwork can still be replaced, reset, deleted, or edited using the Texture tool.) Nonrepeating textures are those which do not seamlessly repeat from left to right and top to bottom like a pattern.
9. Category Popup Menu
Choosing a category from the menu limits the textures shown in the Texture Selection menu to those textures that have that category assigned. A texture’s category can be changed using the Texture Manager (see Texture: Texture Manager). There are three special categories at the top of the menu: All, which shows textures of any category; Favorites, which shows only textures which have been favorited; and Recently Used, which shows up to five of the most recently-used textures.
10. Matching Status Line
Displays the number of textures which are currently being displayed in the Texture Selection menu (after being filtered by Gray/Color/Nonrepeating and Category), as well as the total number of textures in the library.
11. Texture Selection Area
Allows you to select a texture from the library so it may be added as a new texture to artwork or replace an existing texture. The previous and next buttons step through each texture one by one (wrapping around at the beginning and end); the popup menu allows to to select a texture directly by name, from among those textures which match the filtering checkboxes and Category menu.
12. Texture Preview Area
Displays a preview of the texture that is selected in the popup menu above it. By default, the texture is shown at actual size; if the texture is larger than the preview window, it will be cropped. To see parts of the texture outside the crop, simply place the cursor over the preview window (the cursor will change to a hand) and drag. When the cursor is over the preview window, two icons will appear near the bottom:
Texture Panel Preview Window Icons
A. Favorite Icon: Allows you to quickly change a texture’s favorite status by clicking on it (when the star is filled, the texture is a favorite).
B. Preview Size Icon: When clicked, switches the texture’s preview between actual size and fit-to-window. Each texture’s view type is retained independently.
13. Texture Properties
Displays the following properties for the selected texture: color mode, pixel size, and repeating status.
14. Current Texture Selection
Reports the “current” texture; that is, the one in the selected art object which is targeted by the tool that would be replaced or removed using the buttons at the top of the panel. The popup menu allows you to choose the current texture when the art object contains multiple textures.
Illustrator Location:
Advanced Toolbar > Texture Stack > Texture Brush Tool
Tool Location and Cursor Appearance
The Texture Brush tool appears in Illustrator’s main toolbar (which must be in Advanced mode: View > Toolbars > Advanced), stacked the associated Texture tool. As with other stacked tools, click and hold on the top tool icon to display the tools stacked under it.

Texture Brush Tool Location
The Texture Brush tool’s cursor is a crosshair. When the tool is not actively brushing, or when brush previews are disabled, it also displays a dark gray circle (or ellipse) indicating the size and shape of the brush:
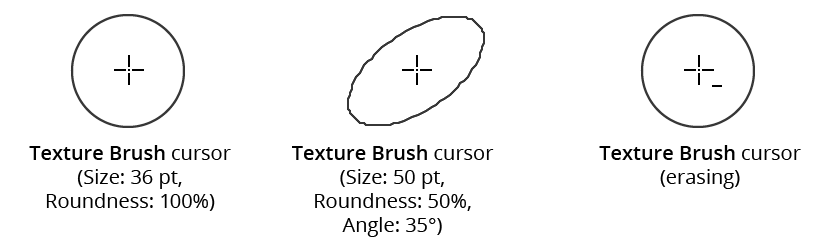
Texture Brush Tool Cursors
A minus sign symbol indicates that the brush is in “erasing” mode.
Illustrator Location:
Advanced Toolbar > Texture Stack > Texture Brush Tool
As the Texture Brush tool has several keypresses which can add or change its functionality, we suggest installing the free Astute Graphics plugin Astute Buddy, which creates a panel that dynamically updates to inform you of the various keys which can be pressed in the tool’s current context.
While the Texture Brush tool can be used without its panel, some functionality, such as adjusting the amount of noise, requires the panel to access.
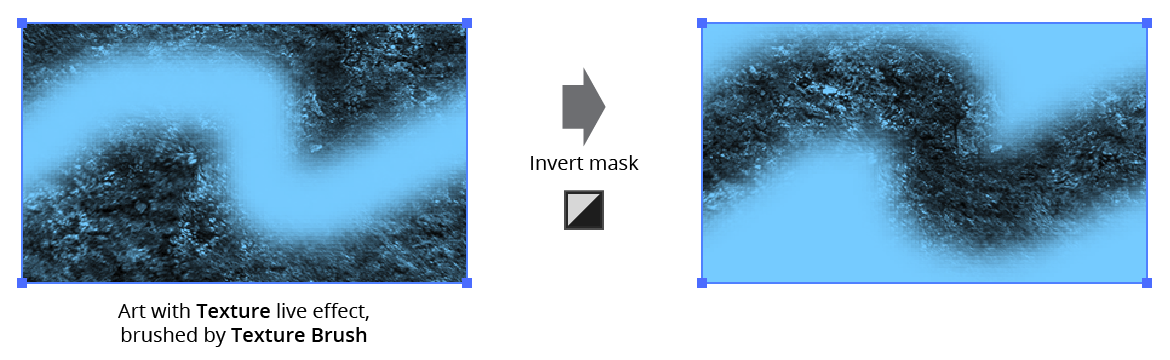
As initially applied, a Texture live effect only has an overall opacity. However, you may want the texture to fade out in certain areas, perhaps to achieve a more three-dimensional look, or to make overlaid text more legible. While the Texture effect could be expanded and an opacity mask created manually, it is much easier to simply use the Texture Brush and “brush” the opacity changes directly onto the texture. Within the live effect, this adds an opacity mask, with a default resolution of 72ppi, but the value can be changed in the tool Preferences dialog (see Texture Brush: Preferences).
With at least one object with a Texture live effect selected, dragging the Texture Brush tool over visible parts of the texture reduces its opacity (if the Texture Brush opacity is set to 100%, the texture’s opacity will be reduced by 100%, i.e., completely removing it).
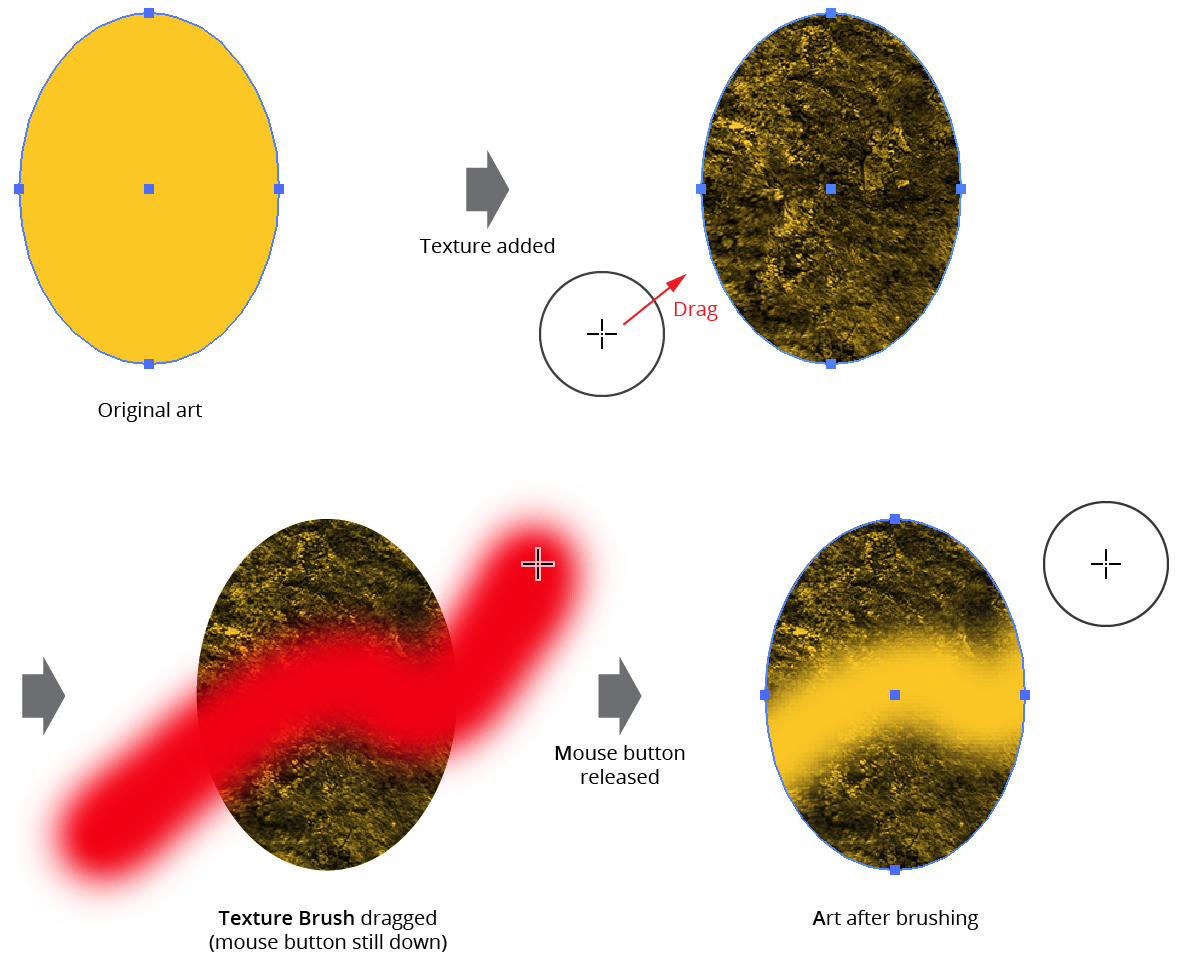
Texture Brush Example
The Texture Brush tool’s preview can be changed in its preferences; by default, it is red and shows its size, hardness, and opacity faithfully, similar to how a Photoshop brush would draw. Due to technical limitations of Illustrator, this requires CPU preview to be enabled in order to display properly when brushing long distances.
If the Option/Alt key is held down before brushing, the tool will be set to “erasing” mode, whereby each brush stroke adds opacity to the texture (up to a maximum of 100%), instead of removing it. Like other brush tools, the diameter of the brush can be changed at any time it is active by pressing the keys assigned in the native Keyboard Shortcuts dialog to “Decrease Diameter” and “Increase Diameter.” For English language installations, these default to the open square bracket and close square bracket keys ([ and ]).
Another way to change the brush diameter (and hardness) is to hold down Shift-Option/Alt and click-drag the mouse; this adjusts the diameter. After releasing Shift-Option/Alt (and with the mouse button still down), a second drag will adjust the hardness.
While brushing (i.e., with the mouse button down), several keypresses can be used:
Shift: Constrains the brush motion to the nearest increment of 45° around the general constrain angle.
Left/Right Arrow: Decreases or increases the brush diameter.
0–9: Sets the brush opacity. 1 sets the opacity to 10%, 2 to 20%, etc.
D: Changes the drawing annotation color, cycling through red, blue, magenta, green, black, and white.
E: Changes the erasing annotation color, cycling through red, blue, magenta, green, black, and white.
To reset, invert, or remove the opacity mask created by the Texture Brush tool, use the Texture Brush panel.
Illustrator Location:
Illustrator Main Menu > Window > Astute Graphics > Texture Brush
The menu item to show and hide the Texture Brush panel can be found in the main menu under Window > Astute Graphics > Texture Brush.
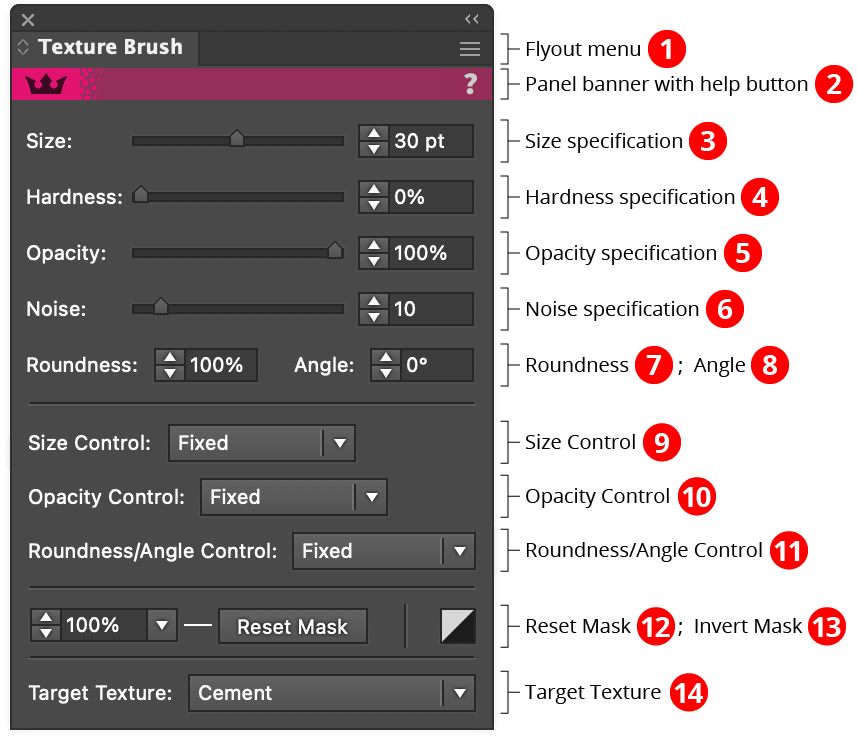
Texture Brush Panel
1. Flyout menu
See Texture Brush Panel: Flyout Menu.
2. Panel banner
The help button on the right opens the help documentation in the Astute Manager. If this does not automatically appear, please ensure your Astute Manager is running first.
Click on the other area of the color bar to activate the Texture Brush tool. This is a quick method of locating the tool within the default Advanced toolbar or a custom toolbar.
3. Size Specification
The size (diameter) of the brush, from 1pt to 1000pt.
4. Hardness Specification
The hardness of the brush, from 0% to 100%.
5. Opacity Specification
The opacity of the brush, from 0% to 100%.
6. Noise Specification
The amount of noise in the brush, from 0 (no noise) to 100 (maximum noise).
7. Roundness
The roundness of the brush, from 10% (highly elliptical) to 100% (circular).
8. Angle
When the brush is not at 100% roundness, the angle of the major axis of its elliptical shape.
9. Size Control
Visible when the panel is expanded. When using a mouse as the input device, it should be set to Fixed; otherwise, enables the brush size to be controlled by either the pressure or wheel setting of a stylus-like device.
10. Opacity Control
Visible when the panel is expanded. When using a mouse as the input device, it should be set to Fixed; otherwise, enables the brush opacity to be controlled by either the pressure or wheel setting of a stylus-like device.
11. Roundness/Angle Control
Visible when the panel is expanded. When using a mouse as the input device, it should be set to Fixed; otherwise, enables the brush opacity to be controlled by either the tilt/bearing or tilt/rotation setting of a stylus-like device.
12. Reset Mask
Visible when the panel is expanded. The value input specifies the base opacity of the entire mask when it is reset (or first created, if the tool preference Base Opacity Applies to New Masks is enabled), with a default of 100%. The Reset Mask button resets the mask, removing all existing brush strokes that may have been made to it and filling it with the base opacity specified in the value input box.
13. Invert Mask
Visible when the panel is expanded; inverts the texture opacity mask.
Texture Brush Panel Invert Mask
14. Target Texture
When multiple textures exist in the selected art object, or multiple objects are selected, the Target Texture menu controls which texture’s masks will be affected (each texture has its own independent opacity mask). By setting the popup menu to All Visible, all tool and panel operations (brushing, resetting, and inverting the mask) will be applied to the mask of every visible texture. Otherwise, these operations will be applied only to the specific texture chosen in the menu (if a single object is selected) or to the topmost visible textures (if multiple objects are selected).