 Texture Brush Tool
Tool Location and Cursor Appearance
The Texture Brush tool appears in Illustrator’s main toolbar (which must be in Advanced mode: View > Toolbars > Advanced), stacked the associated Texture tool. As with other stacked tools, click and hold on the top tool icon to display the tools stacked under it.

Texture Brush Tool Location
The Texture Brush tool’s cursor is a crosshair. When the tool is not actively brushing, or when brush previews are disabled, it also displays a dark gray circle (or ellipse) indicating the size and shape of the brush:
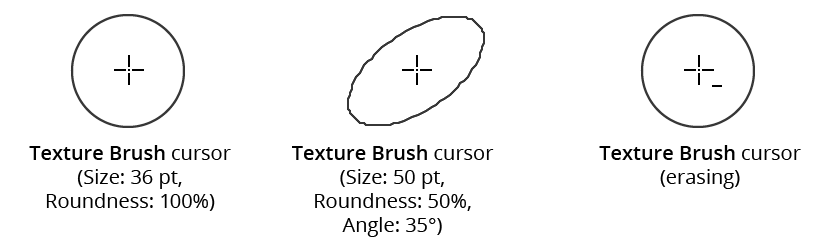
Texture Brush Tool Cursors
A minus sign symbol indicates that the brush is in “erasing” mode.
Texture Brush Tool Operation
As the Texture Brush tool has several keypresses which can add or change its functionality, we suggest installing the free Astute Graphics plugin Astute Buddy, which creates a panel that dynamically updates to inform you of the various keys which can be pressed in the tool’s current context.
While the Texture Brush tool can be used without its panel, some functionality, such as adjusting the amount of noise, requires the panel to access.
As initially applied, a Texture live effect only has an overall opacity. However, you may want the texture to fade out in certain areas, perhaps to achieve a more three-dimensional look, or to make overlaid text more legible. While the Texture effect could be expanded and an opacity mask created manually, it is much easier to simply use the Texture Brush and “brush” the opacity changes directly onto the texture. Within the live effect, this adds an opacity mask, with a default resolution of 72ppi, but the value can be changed in the tool Preferences dialog (see Texture Brush: Preferences).
With at least one object with a Texture live effect selected, dragging the Texture Brush tool over visible parts of the texture reduces its opacity (if the Texture Brush opacity is set to 100%, the texture’s opacity will be reduced by 100%, i.e., completely removing it).
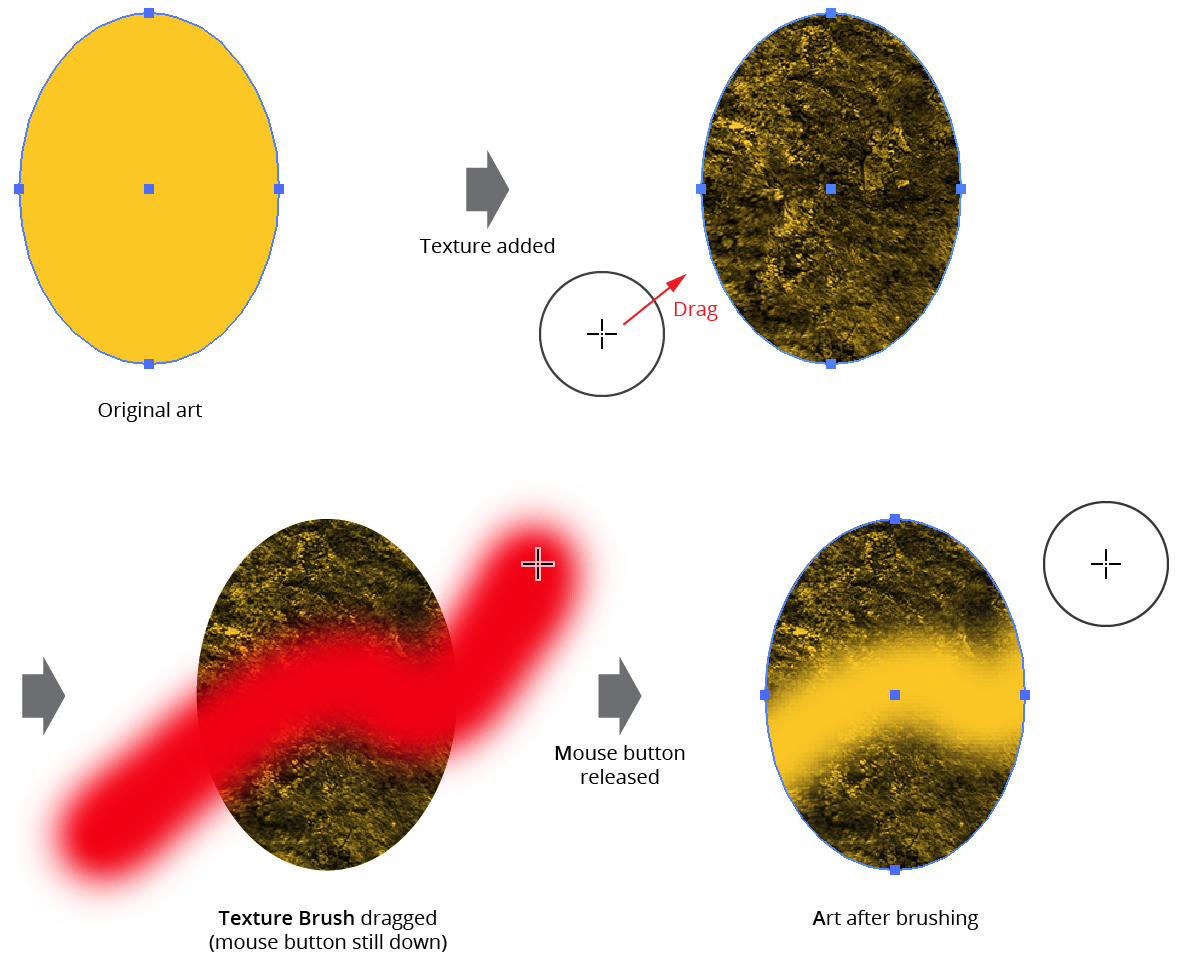
Texture Brush Example
The Texture Brush tool’s preview can be changed in its preferences; by default, it is red and shows its size, hardness, and opacity faithfully, similar to how a Photoshop brush would draw. Due to technical limitations of Illustrator, this requires CPU preview to be enabled in order to display properly when brushing long distances.
If the Option/Alt key is held down before brushing, the tool will be set to “erasing” mode, whereby each brush stroke adds opacity to the texture (up to a maximum of 100%), instead of removing it. Like other brush tools, the diameter of the brush can be changed at any time it is active by pressing the keys assigned in the native Keyboard Shortcuts dialog to “Decrease Diameter” and “Increase Diameter.” For English language installations, these default to the open square bracket and close square bracket keys ([ and ]).
Another way to change the brush diameter (and hardness) is to hold down Shift-Option/Alt and click-drag the mouse; this adjusts the diameter. After releasing Shift-Option/Alt (and with the mouse button still down), a second drag will adjust the hardness.
While brushing (i.e., with the mouse button down), several keypresses can be used:
Shift: Constrains the brush motion to the nearest increment of 45° around the general constrain angle.
Left/Right Arrow: Decreases or increases the brush diameter.
0–9: Sets the brush opacity. 1 sets the opacity to 10%, 2 to 20%, etc.
D: Changes the drawing annotation color, cycling through red, blue, magenta, green, black, and white.
E: Changes the erasing annotation color, cycling through red, blue, magenta, green, black, and white.
To reset, invert, or remove the opacity mask created by the Texture Brush tool, use the Texture Brush panel.