 Snap to Collisions Tool
Snap To Collisions is an Astute Graphics tool for Adobe Illustrator that supplements Smart Guides by enabling you to place a path next to one or more paths such that the paths precisely touch or have a predetermined space between them. An option to automatically add anchor points to the paths at their touching spots is also provided. Snap To Collisions is part of the ColliderScribe plugin.
Tool Location and Cursor Appearance
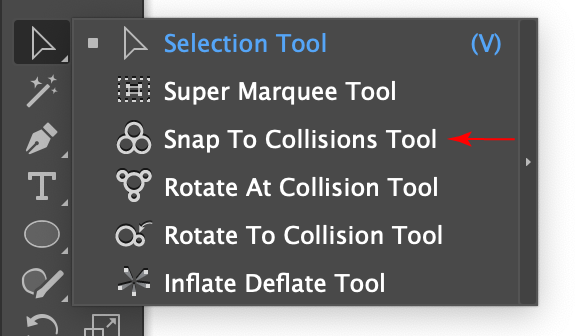
The Snap To Collisions tool appears in Illustrator’s main toolbar (which must be in Advanced mode: View > Toolbars > Advanced) stacked under the native Selection tool along with ColliderScribe’s other tools. As with other stacked tools, click and hold on the top tool icon to display the tools stacked under it.
Snap to Collisions Tool Location
The Snap To Collisions tool’s cursor changes depending on what the tool is currently doing:

Snap to Collisions Tool Cursors
Additionally, a small dot will appear next to the last two cursors when the Add Points to Paths at Collisions preference is enabled.
Snap to Collisions Tool Operations
As the Snap To Collisions tool has several keypresses which can add or change its functionality, we strongly suggest installing the free Astute Graphics plugin Astute Buddy, which creates a panel that dynamically updates to inform you of the various keys which can be pressed in the tool’s current context.
Clicking
The Snap To Collisions tool can be used to select an art object by simply clicking on it, functioning similarly to either the native Selection or Direct Selection tool (depending on the tool preference Fully Select Groups and Compound Paths). Shift-clicking will deselect an already-selected object. Clicking on an empty area of the canvas will deselect everything.
Dragging
If the Snap To Collisions tool starts a drag across the artboard from a blank spot, it simply acts as a selection tool which creates a marquee for selecting objects. The tool preference Fully Select Groups and Compound Paths controls whether it acts like the Selection tool or the Direct Selection tool, and by holding down Option/Alt while dragging, you can temporarily invert the setting on the fly. To toggle the setting and affect future marquee operations as well, press the V key.
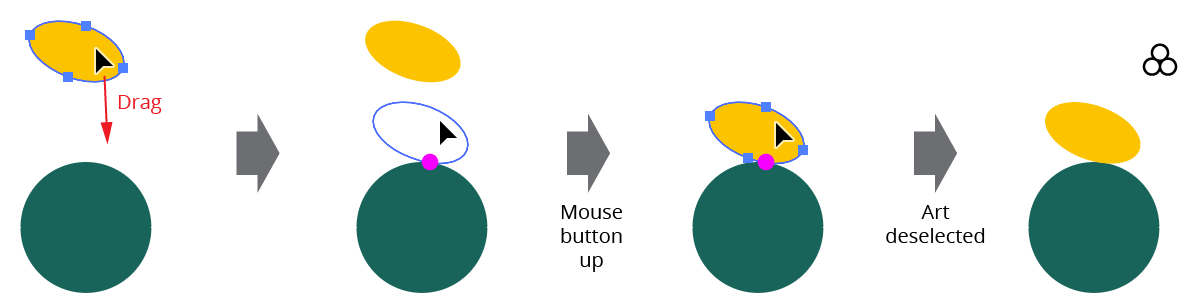
When the drag starts over an art object, the art object (and any other selected artwork) is moved, snapping to positions where paths “collide” (first touch) other paths, either at corner points or at places where the paths share a tangency. Small magenta dots will be drawn at spots where the tool has detected points of collision. The snap tolerance is 12 pixels by default but can be changed (see Snap To Collisions: Preferences).
Snap to Collisions Tool Examples
When the mouse button is released, the snapping dots will continue to be drawn for the paths over which the cursor is being hovered, providing a way to confirm whether two paths are snapped to each other without having to drag again.
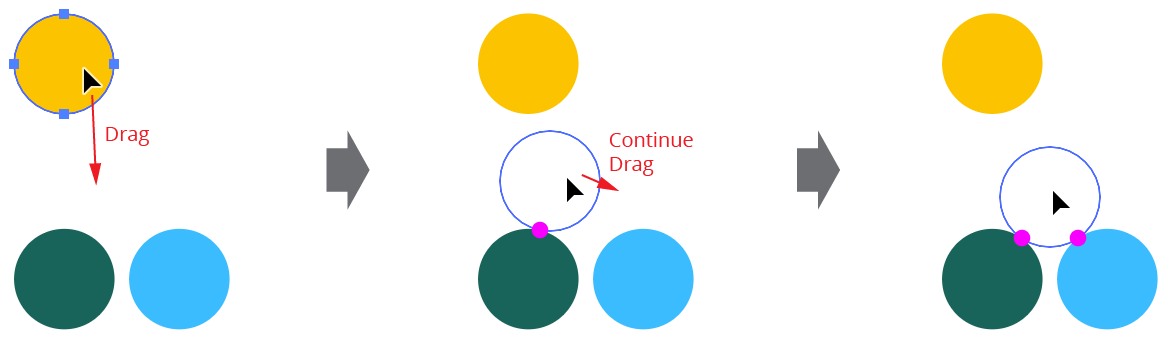
If one paths snaps to another, the Snap To Collisions tool will continue to search for a second collision it can snap to while retaining the first snap, allowing you to easily place one path against two others.
Snap to Collisions Tool Example 2
Pressing one or more modifier keys while dragging artwork changes or adds tool functionality:
Shift: Constrains the motion of the dragged artwork to increments of 45° around the constrain angle.
Option/Alt: Duplicates the dragged artwork instead of moving it.
The following non-modifier keys can be pressed while dragging artwork to toggle or change various tool preferences on the fly (i.e., without having to go to the Snap To Collisions Preferences dialog):
Up/Down Arrows: When the Use Collision Spacing preference is active, increases or decreases the spacing value by the native Keyboard Increment amount (see Snap To Collisions: Preferences).
A: Toggles the Add Points to Paths at Collisions preference.
D: Toggles Snap To Dragged Path Only. By default, all paths in the selection being dragged are tested for collision against the non-dragged (stationary) paths, which allows maximum flexibility. However, if the selection being dragged is comprised of many complicated paths, this may cause lag. By enabling Snap To Dragged Path Only, Snap To Collisions will only look for collisions to the path under the cursor.
L: Toggles the Snap To Locked Paths preference.
S: Toggles the Use Collision Spacing preference.
X: Toggles the Snap To Pre-Drag Path Positions preference.
Snap to Collisions Preferences
Doubleclicking the Snap To Collisions tool in the toolbox (or pressing the Enter key when the tool is selected) will bring up its preferences dialog, which it shares with two other tools in the ColliderScribe plugin. Some of the preference can be changed on the fly when dragging artwork, by pressing various keys (see Snap To Collisions: Tool Operation).

Snap to Collisions Preferences
1. Snap Tolerance
Controls the distance from which paths will be snapped to their points of collision, from 2 to 36 px; the default value is 12 px.
2. Snap to Pre-Drag Path Positions
When enabled, dragged paths will snap to themselves in their original position (even if not being duplicated), as long as they have been moved by slightly more than the snap tolerance value. As this can sometimes interfere with positioning the artwork against other art, it can be toggled on the fly using the X key.

Snap to Collisions Tool Self Collisions Example
3. Snap to Locked Paths
When enabled, dragged paths will snap to other paths on the artboard that are locked; can be toggled on the fly using the L key.
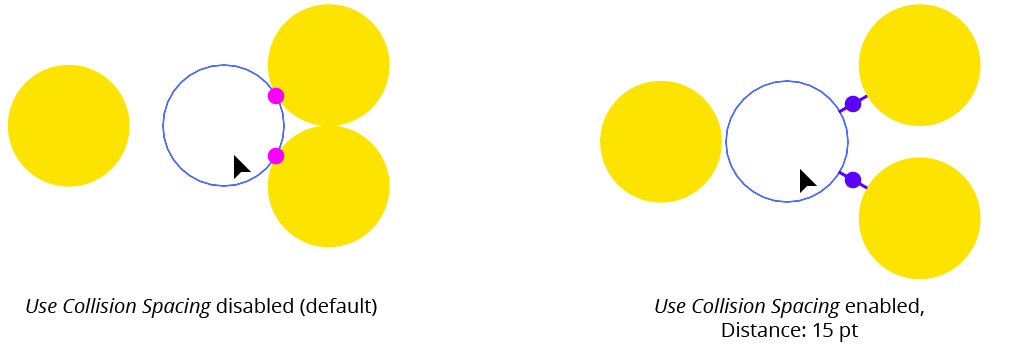
4. Use Collision Spacing
By default, the Snap To Collisions tool snaps when paths collide with other paths (i.e., first touch them). However, when Use Collision Spacing is enabled, snapping occurs when the paths are a specified distance apart. A purple dot with a line connecting the two paths visualizes the “collisions.”
5. Collision Spacing value
Specifies the distance for collision spacing, from 0.001 pt to 16384 pt; the value can be changed on the fly using the Up/Down Arrow keys. Values which are much larger than the snapping distance may make the tool hard to control.
Snap to Collisions Tool Spacing Example
Spacing can be useful when one or both objects to be snapped have stroked paths and you want the outside edges of the strokes to touch. In this case simply use a spacing distance that is equal to half the sum of the stroke weights (assuming the strokes are center-aligned).
6. Add Points to Paths at Collisions
When enabled, an anchor point is automatically added, when it does not already exist, to each colliding path at their place(s) of collision. A small dot by the cursor when dragging or duplicating indicates that the preference is active. It can be toggled on the fly with the A key. This preference can be useful for making additional constructions, because Smart Guides does not always reliably detect intersections between paths which touch at a tangent, and, of course, if collision spacing is enabled there won’t be any intersections at all.
7. Fully Select Groups and Compound Paths
When enabled, the tool acts in the manner of the native Selection tool, selecting and moving groups and compound paths in their entirety. If turned off, the tool acts like the native Direct Selection tool, allowing individual group members and subpaths of compound paths to be selected and moved independently. Once an artwork drag has started, the setting cannot be changed on the fly; however, it can be changed while marqueeing (see Snap To Collisions: Tool Operation).
8. Informational area
Shows a brief description of each preference control when the cursor is being hovered over it.
9. Help Button
Opens the help documentation in the Astute Manager. If this does not automatically appear, please ensure your Astute Manager is running first.