Selection
 Snap to Collisions Tool
 Super Marquee Tool
 Width Selector Tool
 Rotate at Collision Tool
 Gradiator Panel
 Gradient Forge Panel
![]() AG Color Select Tool
AG Color Select Tool
 Gradient From Art
Illustrator Location:
Advanced Toolbar > Selection Stack > Snap to Collisions Tool
As the Snap To Collisions tool has several keypresses which can add or change its functionality, we strongly suggest installing the free Astute Graphics plugin Astute Buddy, which creates a panel that dynamically updates to inform you of the various keys which can be pressed in the tool’s current context.
Clicking
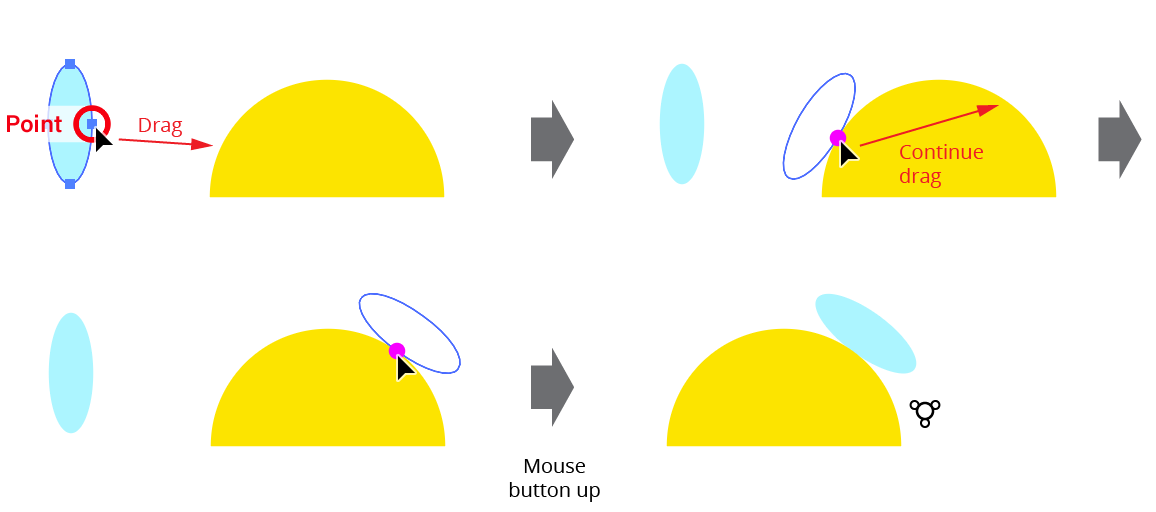
The Snap To Collisions tool can be used to select an art object by simply clicking on it, functioning similarly to either the native Selection or Direct Selection tool (depending on the tool preference Fully Select Groups and Compound Paths). Shift-clicking will deselect an already-selected object. Clicking on an empty area of the canvas will deselect everything.
Dragging
If the Snap To Collisions tool starts a drag across the artboard from a blank spot, it simply acts as a selection tool which creates a marquee for selecting objects. The tool preference Fully Select Groups and Compound Paths controls whether it acts like the Selection tool or the Direct Selection tool, and by holding down Option/Alt while dragging, you can temporarily invert the setting on the fly. To toggle the setting and affect future marquee operations as well, press the V key.
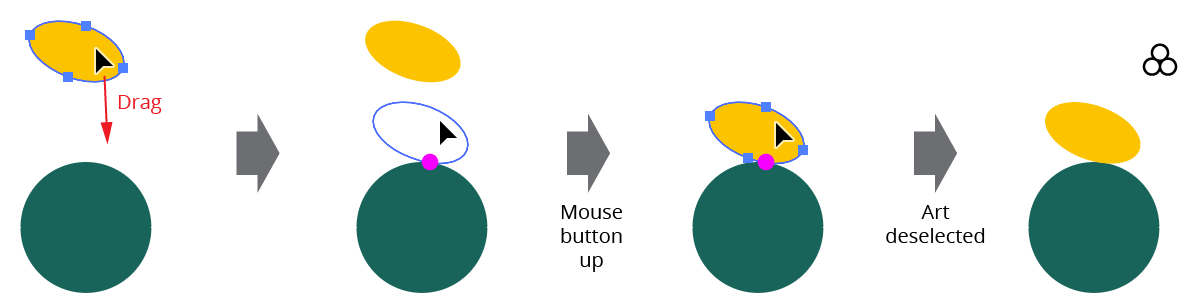
When the drag starts over an art object, the art object (and any other selected artwork) is moved, snapping to positions where paths “collide” (first touch) other paths, either at corner points or at places where the paths share a tangency. Small magenta dots will be drawn at spots where the tool has detected points of collision. The snap tolerance is 12 pixels by default but can be changed (see Snap To Collisions: Preferences).
Snap to Collisions Tool Examples
When the mouse button is released, the snapping dots will continue to be drawn for the paths over which the cursor is being hovered, providing a way to confirm whether two paths are snapped to each other without having to drag again.
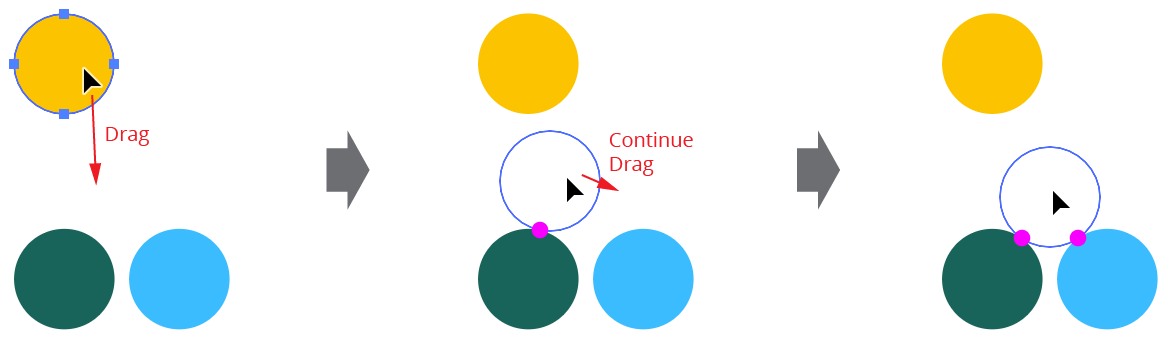
If one paths snaps to another, the Snap To Collisions tool will continue to search for a second collision it can snap to while retaining the first snap, allowing you to easily place one path against two others.
Snap to Collisions Tool Example 2
Pressing one or more modifier keys while dragging artwork changes or adds tool functionality:
Shift: Constrains the motion of the dragged artwork to increments of 45° around the constrain angle.
Option/Alt: Duplicates the dragged artwork instead of moving it.
The following non-modifier keys can be pressed while dragging artwork to toggle or change various tool preferences on the fly (i.e., without having to go to the Snap To Collisions Preferences dialog):
Up/Down Arrows: When the Use Collision Spacing preference is active, increases or decreases the spacing value by the native Keyboard Increment amount (see Snap To Collisions: Preferences).
A: Toggles the Add Points to Paths at Collisions preference.
D: Toggles Snap To Dragged Path Only. By default, all paths in the selection being dragged are tested for collision against the non-dragged (stationary) paths, which allows maximum flexibility. However, if the selection being dragged is comprised of many complicated paths, this may cause lag. By enabling Snap To Dragged Path Only, Snap To Collisions will only look for collisions to the path under the cursor.
L: Toggles the Snap To Locked Paths preference.
S: Toggles the Use Collision Spacing preference.
X: Toggles the Snap To Pre-Drag Path Positions preference.
Illustrator Location:
Advanced Toolbar > Selection Stack > Super Marquee Tool
As the Super Marquee tool has numerous keypresses which can add or change its functionality, we strongly suggest installing the free Astute Graphics plugin Astute Buddy, which creates a panel that dynamically updates to inform you of the various keys which can be pressed in the tool’s current context.
Clicking
The Super Marquee tool can be used to select an art object by simply clicking on it. This functions just like the native Selection tool except when the tool is in Boolean Mode (see below). In that case, Shift-clicking will not toggle the selection state of the clicked object; to remove an object from the current selection you must Option/Alt-click. Clicking on an empty area of the canvas will deselect everything.
Dragging
Dragging the Super Marquee tool across the artboard creates a marquee, similar to the native Selection tool, which, after the mouse button is released, will select art objects. But by default, the Super Marquee tool starts in Enclosing Mode, in which art objects must be completely enclosed by (and not just touching) the marquee. When objects are close together, this makes selection much easier in many cases. However, the tool can easily be switched to Traditional Mode (by pressing the E key while dragging) in which the art objects need only touch the marquee to be selected. In addition to the tool’s cursor, the marquee will change appearance depending on the mode, being rendered with either a dotted line (for Enclosing) or a solid line (for Traditional):
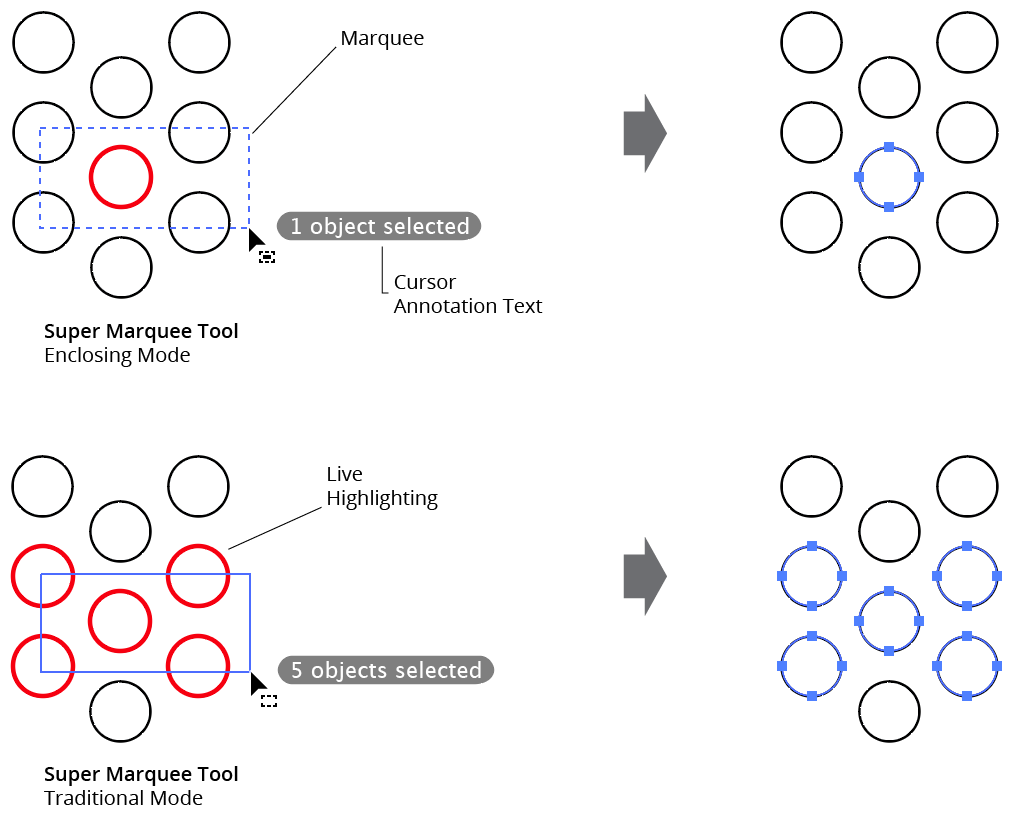
Super Marquee Tool Marquees
Like the native Lasso tool, the Super Marquee tool will only select (or deselect) objects, never move them. So when starting to marquee, you don’t need to take any special care to avoid starting on top of an object and thereby accidentally moving it. Also, note that the Super Marquee tool only selects paths or subpaths in their entirety (i.e., you can’t select some anchor points and not others).
By default, the Super Marquee tool dynamically highlights the objects that are currently being selected by the marquee, allowing you to easily visualize the final result before the mouse button is released. The color (default of red) is customizable and can be changed on the fly with the C key. Also, by default, is the annotation text by the cursor displaying the current selected object count.
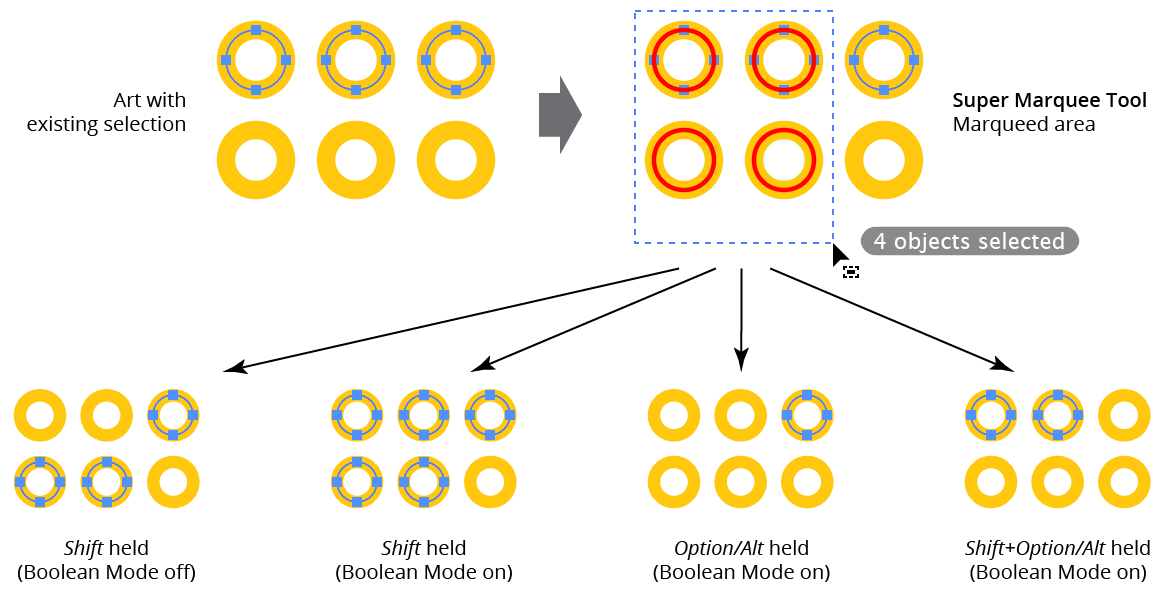
Pressing one or more modifier keys while dragging out a marquee changes or adds functionality:
Shift: When Boolean Mode is off (the default), the
Shiftkey works in the same way as the native selection tools: objects which areShift-marqueedhave their selection state inverted. When Boolean Mode is on,Shift-marqueeingadds the marqueed objects to the selection (a “plus” sign badge is added to the cursor).Option/Alt: When Boolean Mode is off (the default), the
Option/Altkey enables center out marqueeing (the starting point of the marquee becomes the center point of the marquee rather than one of its corners). When Boolean Mode is on,Option/Alt-marqueeingsubtracts the marqueed objects from the selection (a “minus” sign badge is added to the cursor).Shift+Option/Alt: When Boolean Mode is off (the default), holding both
ShiftandOption/Altsimply combines the effects of those keys held individually (see above). When Boolean Mode is on,Shift+Option/Alt-marqueeingintersects the marqueed objects with the selection (i.e., only objects that were marqueed and were already in the selection will be left selected; this is identical to how Photoshop’s Intersect mode works on pixels). An “×” badge is added to the cursor.
Super Marquee Tool Modifiers
Command/Ctrl: Temporarily hides live highlighting.
The following non-modifier keys can also be pressed while dragging to toggle or change various tool preferences on the fly (i.e. without having to go to the Super Marquee Preferences dialog):
Space: Allows repositioning of the entire marquee when the cursor is moved (rather than resizing it).
Up Arrow/Down Arrow: When Alternating Mode is active, increases or decreases the Select chunk size (see Super Marquee: Alternating Modes). When Random Mode is active, increases or decreases the random selection value (see Super Marquee: Random Mode).
Left Arrow/Right Arrow: When Alternating Mode is active, increases or decreases the Skip chunk size.
/: Resets the tool to its default settings (Enclosing Mode on; Full Selection, Boolean, Alternating, Random, and Text Modes off; highlighting color red; marquee shape rectangular; Selected Object count on).
A: Steps through the two Alternating Modes and back to Non-Alternating Mode.
B: Toggles Boolean Mode off and on. When off, the default, the
Shiftkey works as with the native selection tools, to invert the selection status of any marqueed objects. When on, separate modifier keypresses can add to, subtract from, or intersect the marqueed objects with the current selection (see above).C: Changes the live highlighting color among the following choices: red, blue, magenta, green, black, and grey.
D: Toggles the Selected Object count annotation that appears next to the cursor. The count refers to the number of objects currently being selected by the marquee (taking into account Alternating or Random Modes), not any existing selection.
E: Toggles between Enclosing Mode and Traditional Mode. In Enclosing Mode, objects are only selected if their bounds are entirely within the marquee, rather than simply needing to touch it.
F: Toggles Full Selection Mode off and on. In Full Selection Mode, groups and compound paths can only be selected in their entirety (like the native Selection tool). Turning it off allows the selection of individual group members and subpaths of compound paths (like the native Direct Selection tool).
Super Marquee Tool Full Partial Selection
N: When an Alternating Mode is active, resets the Select and Skip chunk sizes to their default values of 1.
Q: When Boolean Mode is on, allows you to marquee from the center out (as the
Option/Altmodifier, which normally handles this function, is instead used to subtract from the selection).R: Toggles Random Mode on and off.
S: When Random Mode is on, shuffles the random seed.
X: Changes the marquee shape. The default is rectangular, but you can also choose elliptical, square, or round.
Illustrator Location:
Advanced Toolbar > Selection Stack > Super Marquee Tool
Normally, all objects within the marquee (or touching it, in Traditional Mode) are selected. In one of the two Alternating Modes, only some of the objects are selected, using a pattern which specifies both the consecutive number of objects which will be selected (the “Select” chunk) and the number that will then be skipped (the “Skip” chunk), in alternating fashion. The order of the objects is the same as their stacking order on the artboard, moving from the bottom to the top.
The difference between the two Alternating Modes (A and B) is that mode A starts with one or more selected objects, while mode B starts with one or more skipped objects:
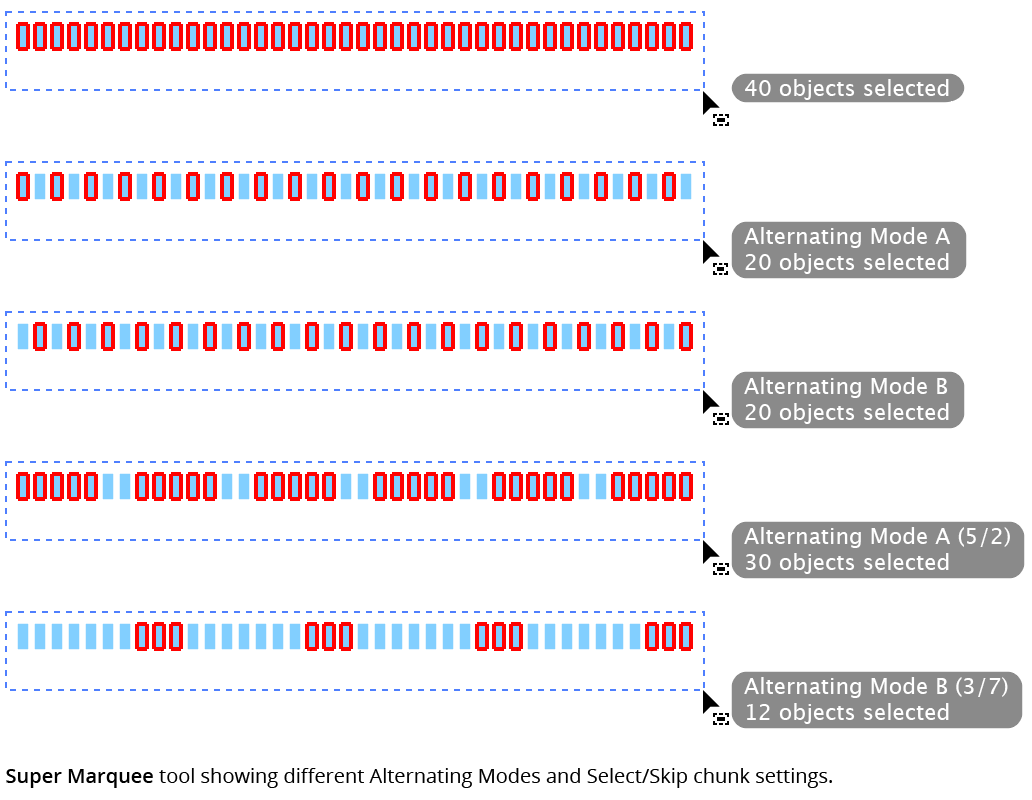
Super Marquee Tool Alternating Modes
If the Super Marquee tool is not already in Alternating Mode, pressing the A key while dragging will enter Alternating Mode A, and a second press will enter Mode B. A third press will then exit Alternating Mode. While in either Alternating Mode, the Select chunk value can be changed by pressing the Up/Down Arrow keys; the Skip chunk value can be changed by pressing the Left/Right Arrow keys. The cursor annotation shows the current chunk values in parentheses, Select chunk first (unless the values are at their default settings of 1, which can be quickly achieved by pressing the N key).
Illustrator Location:
Advanced Toolbar > Selection Stack > Super Marquee Tool
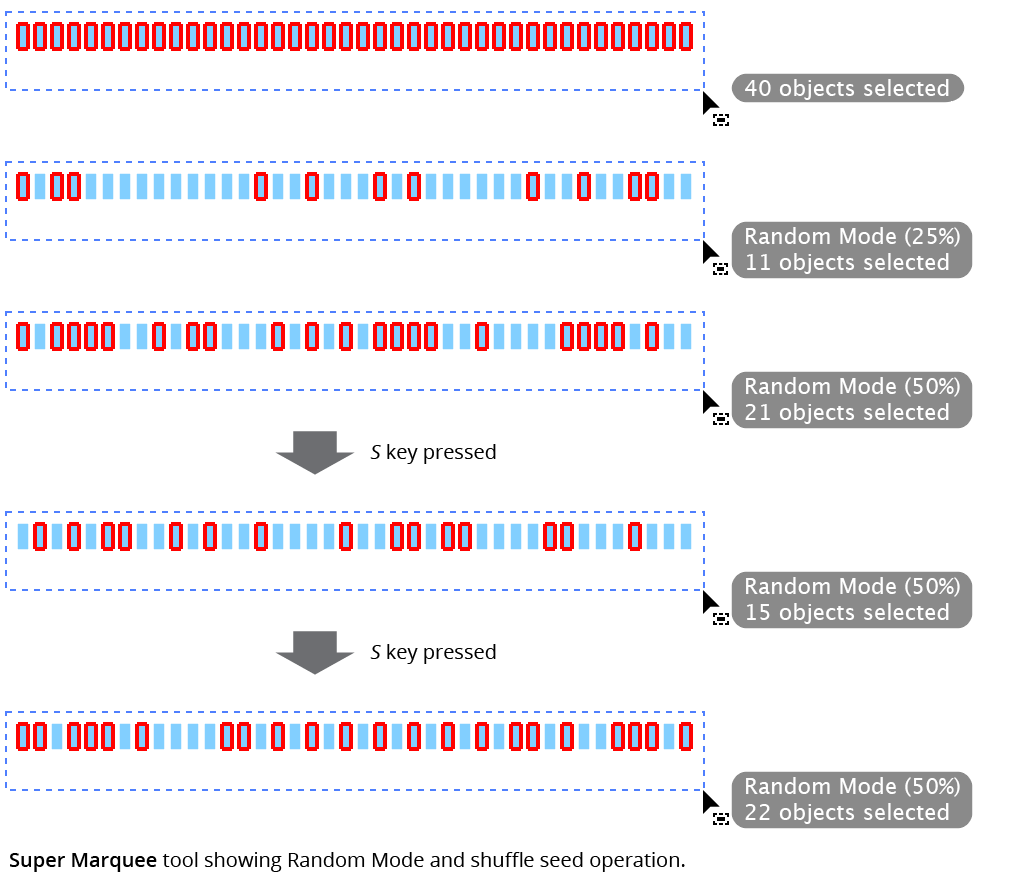
It is often useful to select a random subset of a number of objects. The Super Marquee tool can do this by using Random Mode (press the R key while dragging if the tool is not already in Random Mode). The cursor annotation shows the value which is used to decide whether each selected object should instead be ignored, from 1% to 99%. For example, if the value is set to 40%, then each selected object has a 40% chance of staying selected and a 60% chance of being ignored instead. The value can be changed using the Up/Down Arrow keys while dragging.
Because the results are probabilistic, some random selections may be less desirable than others (just as flipping a coin ten times can still occasionally produce 9 heads). Pressing the S key will shuffle the random seed, leading to a different subset of objects being selected.
Super Marquee Tool Random Mode
Illustrator Location:
Advanced Toolbar > Width Gradient Stack > Width Selector Tool
As the Width Selector tool has several keypresses for certain operations, we suggest installing the free Astute Graphics plugin Astute Buddy, which creates a panel that dynamically updates to inform you of the various keys which can be pressed in the tool’s current context.
The Width Selector tool works largely in conjunction with the associated Width Selector panel, which should be open and accessible. If you are using the free Astute Graphics plugin DirectPrefs, you can have the Width Selector panel automatically be shown when the Width Selector tool is selected.
Illustrator Location:
Advanced Toolbar > Width Gradient Stack > Width Selector Tool
The Width Selector tool can select width markers on one or more paths by either clicking on them or by dragging a marquee over them. Holding the Shift key down while doing so adds markers to the current selection, while holding Option/Alt down subtracts them from the current selection. The current marker selection is retained across uses of the tool.

Width Selector Marquee Select
Illustrator Location:
Advanced Toolbar > Width Gradient Stack > Width Selector Tool
After one or more width markers are selected, the tool can perform several operations on them:
Width Adjustment
While the tool does not support dragging to change the width of a marker (the native Width tool can still be used for this purpose), it can adjust the widths of one or more markers simultaneously if the preference Use Increase/Decrease Diameter Keys is set to Change Stroke Width. In this case the keys assigned to Decrease Diameter and Increase Diameter in the native Keyboard Shortcuts dialog (the left and right square bracket keys respectively, by default, for English language keyboards) will decrease or increase their widths, using the numerical Change Width value set on the Width Selector panel.
Moving Markers
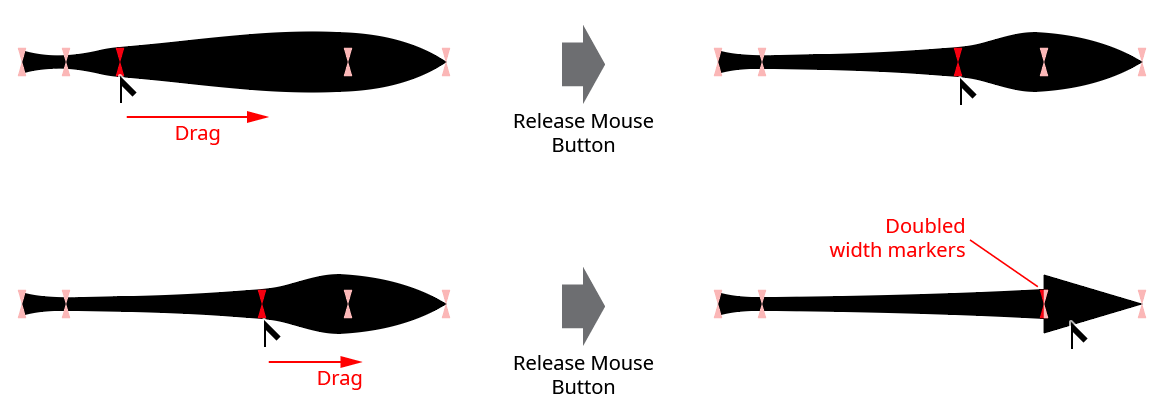
Dragging one or more selected width markers will move them along the path. A width marker may not be moved past the previous or next unselected marker, and the markers at the start and end of the path cannot be moved at all (therefore, if the selection includes either the end or start marker, it won’t be able to be moved either). Dragging a marker until it contacts another marker and releasing the mouse button will create a doubled marker, which may be used to produce an abrupt change in stroke width:
Width Selector Dragging Markers
To “stretch” markers (move a contiguous selection of one or more markers as a group while proportionally shifting all the other markers on the path, except those at the start and end of the path), hold down Shift while dragging them:

Width Selector Stretching Markers
Duplicating Markers
To duplicate one or more selected width markers, hold down the Option/Alt key after starting to drag them:

Width Selector Duplicating Markers
Adding Width Markers
The Width Selector tool can add a new width marker to a stroke by holding down Option/Alt and then clicking along the path. The new marker’s initial width will be equal to the current width of the stroke at that point.

Width Selector Adding Marker
When a variable width stroke is used on a compound path, all of the subpaths must share the same width profile. So selecting one or more width markers on one subpath with the Width Selector tool will automatically select the same markers on all of the subpaths:

Width Selector and Compound Paths
Illustrator Location:
Advanced Toolbar > Selection Stack > Rotate at Collisions Tool
As the Rotate At Collision tool has several keypresses which can add or change its functionality, we strongly suggest installing the free Astute Graphics plugin Astute Buddy, which creates a panel that dynamically updates to inform you of the various keys which can be pressed in the tool’s current context.
Clicking
The Rotate At Collision tool can be used to click-select the two types of object that it operates on: paths and point text objects. Paths must be clicked at an anchor point or along a segment (not on their fills) and point text objects must be clicked on their baselines. In both cases the Rotate At Collision cursor will snap when hovering to eligible spots and display a red ring with informational text. Shift-clicking will deselect an already-selected object. Clicking on an empty area of the canvas will deselect everything.
Dragging
If the Rotate At Collision tool starts a drag from anywhere except over a path or point text object, it simply acts as a selection tool which creates a marquee for selecting objects. The tool preference Fully Select Groups and Compound Paths controls whether it acts like the Selection tool or the Direct Selection tool, and by holding down Option/Alt while dragging, you can temporarily invert the setting on the fly. To toggle the setting and affect future marquee operations as well, press the V key.
When the drag starts over a path or point text object, the object (and any other selected artwork) is dragged with the cursor, snapping when it “collides” with other paths on the artboard. The snap tolerance is 12 pixels by default but can be changed (see Rotate At Collision: Preferences). When a snap occurs, the dragged path or point text object, along with any other selected artwork, is rotated around the collision point in one of two ways. If an open path was dragged by one of its endpoints, then the path is rotated to be perpendicular (at the dragged endpoint) to the stationary path. Otherwise, the path or point text object is made tangent to the stationary path.
Rotate at Collisions Tool Path Example
When calculating the tangent angle of a path at a sharp corner point, the angle of the path going into the point and the angle of the path coming out of the point are averaged together, so a dragged path will be perpendicular to the imaginary line that bisects the angle:

Rotate at Collisions Tool Sharp Point Example
Because the tangent angle depends on path direction (clockwise vs. counter-clockwise), some paths may orient themselves on the opposite side from what is desired. In this case, pressing Space will toggle between the “normal” orientation and the alternate orientation:

Rotate at Collisions Tool Alternate Orientation
Pressing one or more modifier keys while dragging artwork changes or adds tool functionality:
Shift: Constrains the motion of the dragged artwork to increments of 45° around the constrain angle.
Option/Alt: Duplicates the dragged artwork instead of moving it.
Command/Ctrl: Overrides snapping to anchor points and straight midpoints along the stationary paths.
The following non-modifier keys can be pressed while dragging artwork to toggle or change various tool preferences on the fly (i.e., without having to go to the Rotate At Collision Preferences dialog):
Space: Toggles between normal orientation and alternate orientation (see above).
Up/Down Arrows: When the Use Collision Spacing preference is active, increases or decreases the spacing value by the native Keyboard Increment amount (see Rotate At Collision: Preferences).
A: Toggles the Add Points to Paths at Collisions preference.
L: Toggles the Snap To Locked Paths preference.
S: Toggles the Use Collision Spacing preference.
Illustrator Location:
Illustrator Main Menu > Window > Astute Graphics > Gradiator
3. Selection Specification
Specifies which gradients to operate on: those on the fills of the selected paths, those on the strokes, or both. Clicking on the Fill or Stroke area toggles its selection state. Previews of the gradient present in each area are shown; if multiple, different gradients are selected, the corresponding area will show “Mixed gradients”.
4. Origin Point Specification
Lets you specify the origin point of the selected gradients either by entering the coordinates numerically, or, after clicking the icon on the right side, by using a tool to click on the artboard to specify the position.
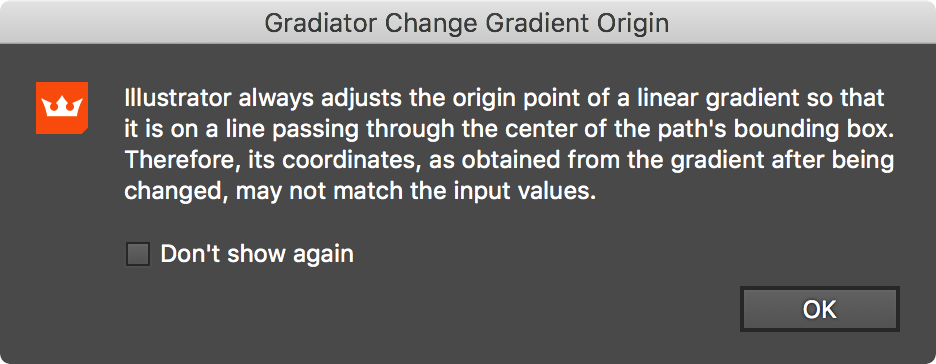
The first time you change the origin point of a linear gradient, Gradiator will display a message reminding you that a linear gradient’s origin is always adjusted by Illustrator so it lies on a line passing through the center of the path’s bounding box (this behavior is also apparent when using the native Gradient tool). You can suppress this message from coming up again by clicking the Don’t show again checkbox. To restore this and other messages and warnings, see Gradiator Panel: Flyout Menu.
Gradiator Panel Warning Dialog
To center the gradient’s origin, Shift-click the crosshair icon on the left. To set a gradient’s center rather than its origin when clicking with the origin setter tool, hold down Shift before clicking. After clicking, the tool will switch back to the previously-selected tool.
Illustrator Location:
Illustrator Main Menu > Window > Astute Graphics > Gradient Forge
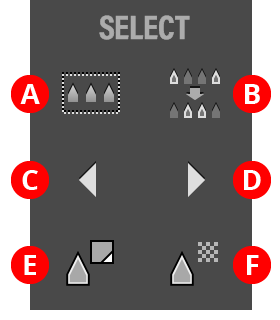
Contains controls which select stops or change the current selection.
Gradient Forge Panel Select Section
A. Select All Button
Selects all the stops in the gradient. If Option/Alt is held, every other stop (starting with the first) is selected instead.
B. Select Inverse Button
Inverts the stop selection (stops which were selected become unselected, and vice versa).
C. Select Previous Button
Selects the previous stop(s), wrapping around the end of the gradient if necessary. To extend the selection, hold Shift when clicking the button.
D. Select Next Button
Selects the next stop(s), wrapping around the end of the gradient if necessary. To extend the selection, hold Shift when clicking the button.
E. Select Same Color Button
Selects all stops with the same color as the selected stop. If multiple stops are selected, all of their colors are included in the matching.
F. Select Same Opacity Button
Selects all stops with the same opacity as the selected stop. If multiple stops are selected, all of their opacity values are included in the matching.
Illustrator Location:
As the AG Color Select tool has several keypresses which can add or change its functionality, we suggest installing the free Astute Graphics plugin Astute Buddy, which creates a panel that dynamically updates to inform you of the various keys which can be pressed in the tool’s current context.
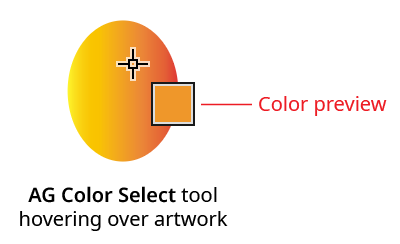
To use the AG Color Select tool, simply position it over an art object whose color you want to pick up. By default, the tool continually shows a large preview of the current color in the center of the cursor using an annotated “chip” next to the cursor:
AG Color Select Example
When the previewed color is the desired one, clicking with the tool assigns it to the current fill or stroke, whichever is active. If one or more artwork objects are selected, the color is also assigned to that art’s fill or stroke, if they exist, just as with the native Eyedropper tool when pressing the Shift key (which forces color-only mode). However, unlike the eyedropper, the AG Color Select tool will work with live effects:

AG Color Select Vs. Native Eyedropper
When a semi-transparent object is sampled with the native Eyedropper in color mode, it does not “see” the transparency and instead picks up the full-strength color. However, AG Color Select gives you a choice of how to handle semi-transparent objects. When saving a color to a swatch, or if no objects are selected, transparency can’t be retained, so AG Color Select will flatten the transparency and pick up the reduced strength color. But when assigning the color to the fill or stroke of selected objects and the Shift key is held down, the objects(s) are given the full-strength color but have their stroke or fill opacity changed to match the original color:
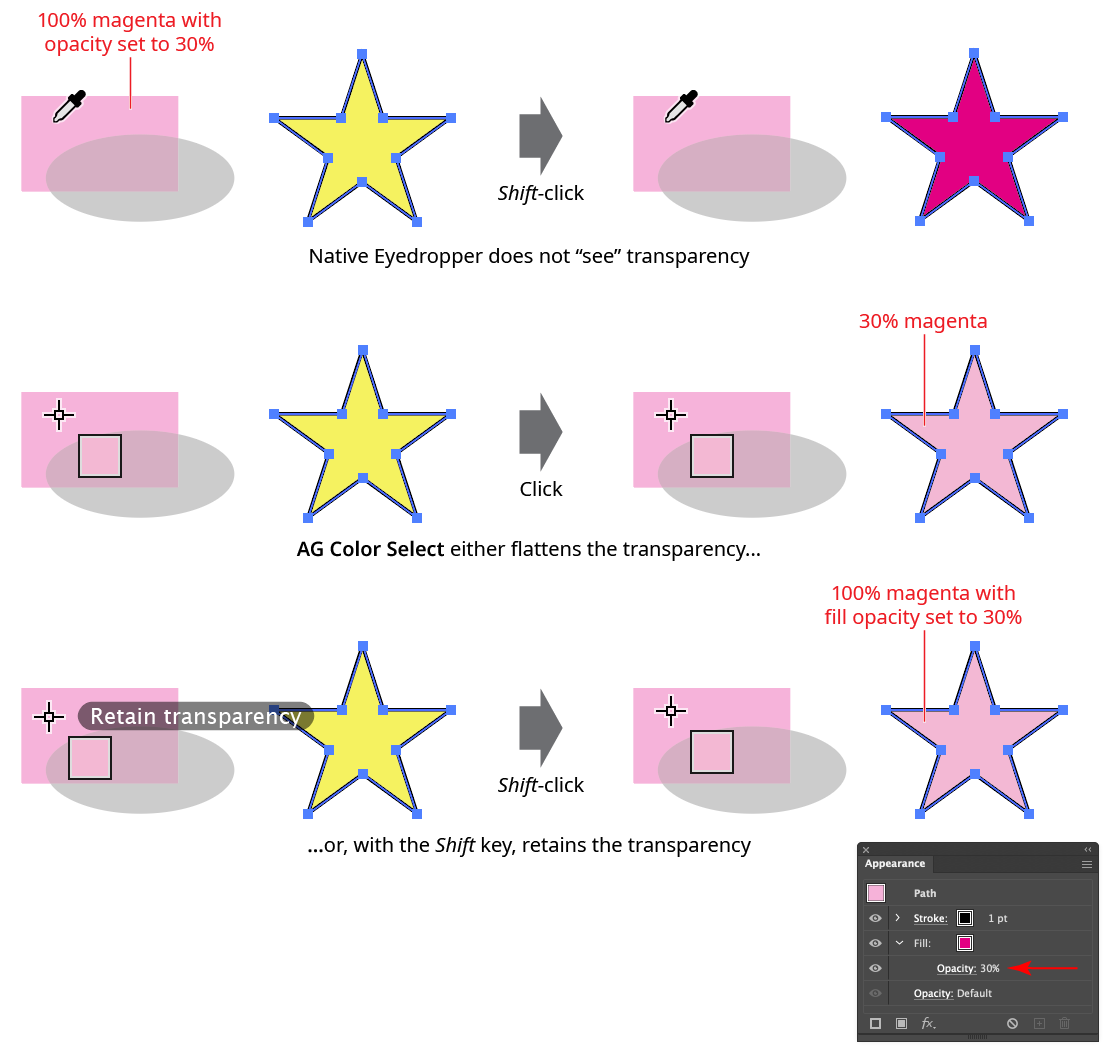
AG Color Select Vs. Native Eyedropper Example
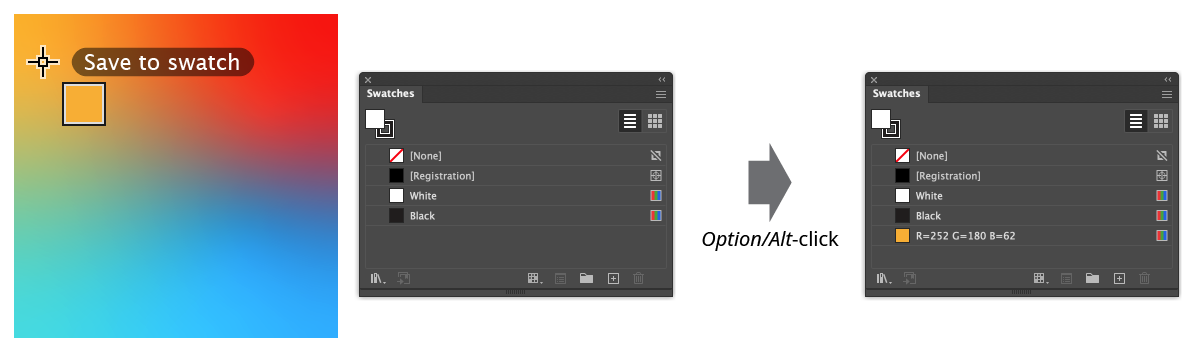
To save the selected color directly to a swatch, hold down the Option/Alt key when clicking:
AG Color Select Save to Swatch
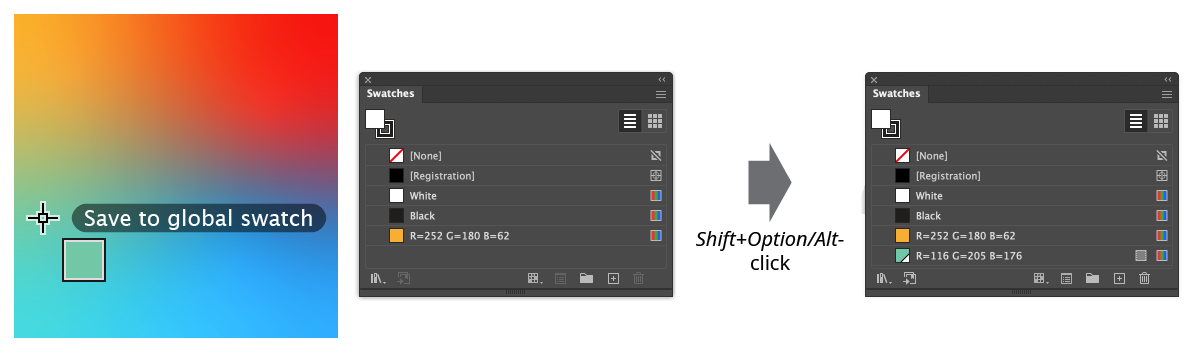
To save as a global swatch, hold down Shift in addition to Option/Alt:
AG Color Select Save to Global Swatch
The AG Color Select tool internally rasterized artwork to merge arbitrarily complex blend modes and opacities to a single one. As Illustrator only rasterizes at 8-bits/channel (i.e., integers between 0 and 255), small changes in the sampled color compared to the original can occur. For example, a 70% cyan color would be rasterized with a cyan pixel value of 178, which, when converted back to an Illustrator color, produces a cyan value of 178/255 = 0.69804 or 69.8%. Although this color would not not distinguishable from the original if the document were printed or exported as an image, Illustrator would still see them as different colors (for example, by the Select Same Fill Color function).
For this reason, and because the AG Color Select tool does not work with spot colors, and does not pick up art styles, it should not be viewed as a replacement for the Eyedropper tool. Instead, it complements the native tool when working with live effects, transparent colors, and other situations where the Eyedropper gives an undesirable result.
Illustrator Location:
Advanced Toolbar > AG Color Select Stack > Gradient From Art Tool
Tool Location and Cursors
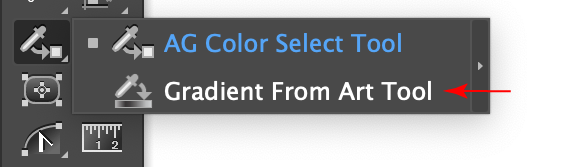
The Gradient From Art tool appears in Illustrator’s main toolbar (which must be in Advanced mode: View > Toolbars > Advanced), stacked under the AG Color Select tool. As with other stacked tools, click and hold on the top tool icon to display the tools stacked under it.
Gradient From Art Tool Location
The Gradient From Art tool’s primary cursor is a crosshair, which can have badges; there is an additional form when moving a sampling line node or segment:

Gradient From Art Tool Cursors
Tool Operation
As the Gradient From Art tool has several keypresses for certain operations, we suggest installing the free Astute Graphics plugin Astute Buddy, which creates a panel that dynamically updates to inform you of the various keys which can be pressed in the tool’s current context.
The Gradient From Art tool is works in conjunction with the associated Gradient From Art panel, which should be open and accessible. If you are using the free Astute Graphics plugin DirectPrefs, you can have the Gradient From Art panel automatically be shown when the Gradient From Art tool is selected.
Note: For clarity, some of the images in this manual show a sampling line on an empty part of the artboard, but this is not particularly useful as it would simply create a gradient which is all transparent or all white. In reality, the line would always be created above actual artwork.
Creating a sampling line with the Gradient From Art tool is like creating a straight segment-only path with the native Pen tool: the cursor is clicked at the desired locations on the artboard to create nodes (visualized as small circles), which the sampling line passes through. After the first node is placed, a “rubberband” will follow the cursor previewing the next segment location. Holding down Shift constrains the new segment to 45° angles around the general constrain angle.

Gradient From Art Tool Sampling Line Creation
To place the last node, press the Option/Alt key while clicking to create it:
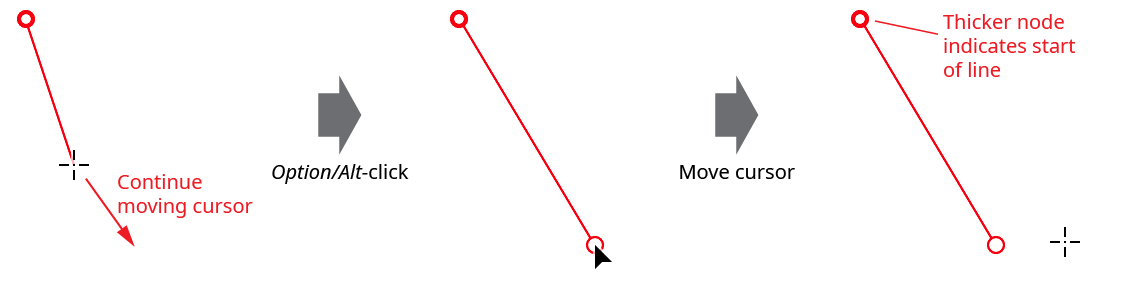
Gradient From Art Tool Sampling Line Creation Example 2
The sampling line can also be ended by pressing the Esc key while the cursor is moving. However, it is not strictly necessary to manually end the sampling line, as this will happen automatically when a different tool is selected.
Because single segment (two-node) sampling lines are commonly drawn, clicking-and-dragging, by default, will automatically end the line with the single segment.
To continue a sampling line which was previously terminated, click on either end node; the rubberband will become active again and the line can be continued. If it is the starting node that was clicked, the sampling line reverses itself.
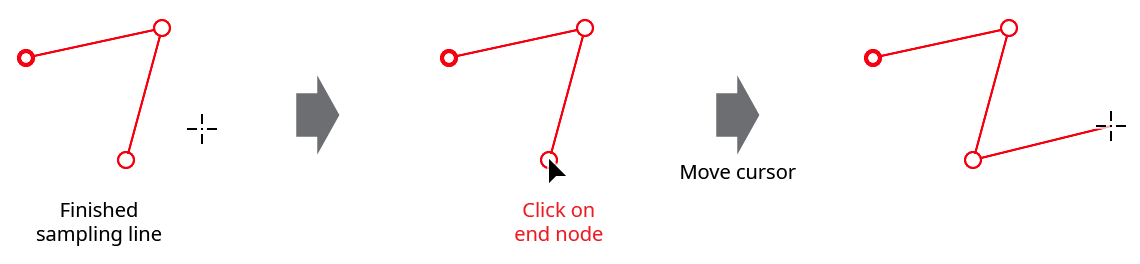
Gradient From Art Tool Restart Line
Nodes or segments can be moved by dragging them (the cursor changes to a solid, tail-less arrowhead); pressing Shift constrains the motion to 45° angles around the general constrain angle. Nodes can be deleted by Option/Alt-clicking on them (the cursor shows a minus sign), and a new node may be added along an existing segment by Option/Alt-clicking on the segment (the cursor shows a plus sign).
A new sampling line may be started in two ways. If the current line is complete (not in the process of being drawn), then simply clicking anywhere other than on the existing line will begin a new line. If the current line is still being drawn, and the tool preference Dragging Starts New Line is enabled (the default), then dragging the cursor will clear the current line and start a new one.
The sampling line may be deleted without starting a new one by Option/Alt-clicking a blank area of the canvas. All changes made to the sampling line are affected by the normal undo and redo operations.
Illustrator Location:
Illustrator Main Menu > Window > Astute Graphics > Gradient From Art
The menu item to show and hide the Gradient From Art panel can be found in the main menu under Window > Astute Graphics > Gradient From Art. When the Gradient From Art tool is not in use, the panel displays only a “Click to select” message; clicking anywhere on the panel selects the tool and displays all the controls.
Gradient From Art Panel
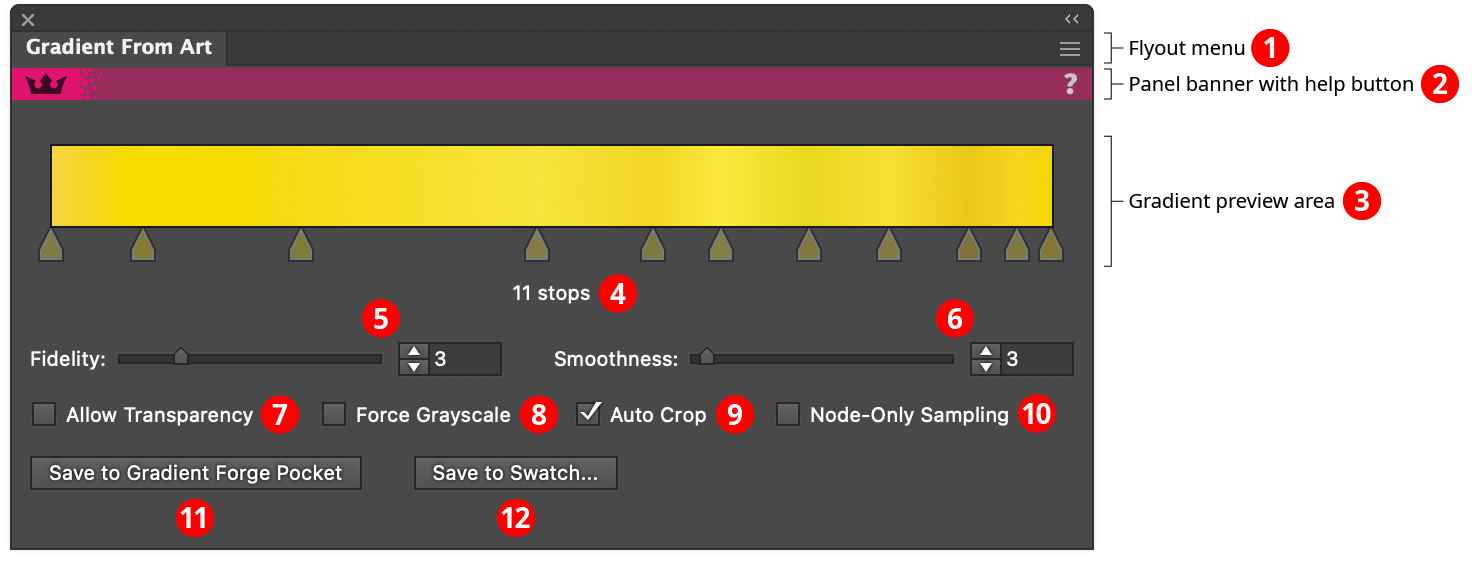
1. Flyout menu
Contains a single menu item which brings up the Preferences dialog (see Gradient From Art: Preferences).
2. Panel banner
The Gradient From Art panel banner has a help button on the right which opens the help documentation in the Astute Manager. If this does not automatically appear, please ensure your Astute Manager is running first.
3. Gradient Preview Area
Shows the gradient that would result from using the sampling line with the current settings. If the sampling line is edited, or a parameter is changed, or the artwork is changed, then the gradient is automatically recalculated. The gradient’s stops are displayed for reference, but are not directly editable. If no sampling line exists, the preview area will display “No Sampling Line”, and if the gradient is incomplete or in the process of being calculated, the preview area will display “Calculating...”.
4. Stop Count
Shows the current number of stops in the gradient. A warning symbol will be displayed next to the stop count when it exceeds 256 stops, because Illustrator does not render stops past that limit.
5. Fidelity
Not available when Node-Only Sampling is enabled. Fidelity determines how closely the gradient matches the original sampled colors. It can range from 1 to 10, with a default of 3. Higher fidelity values retain subtle color changes at the expense of creating a gradient with more stops, which generally makes it more difficult to manually tweak later.
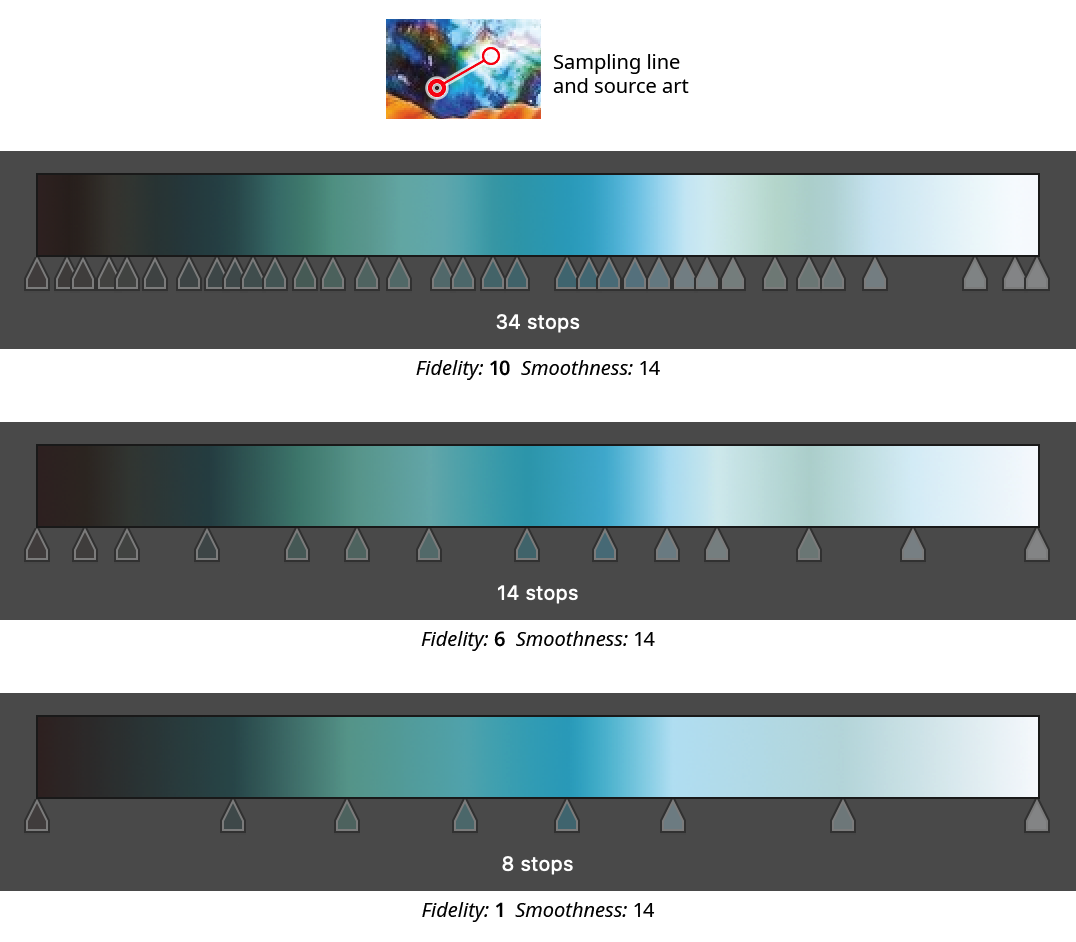
Gradient From Art Panel Fidelity Examples
6. Smoothness
Not available when Node-Only Sampling is enabled. Smoothness controls how gradually transitions from one color to another are made; it is essentially a kind of Gaussian blur for stop colors. This is most evident when sampling from source art that has sharp transitions. The setting can range from 0 to 100, with a default of 3. The lowest value will produce very sharp transitions, but it does not produce stacked gradient stops, which are not recommended due to these types of gradient’s poor rendering. (They can, however, be created using the Gradient Forge panel).

Gradient From Art Panel Smoothness Examples
7. Allow Transparency
When enabled, transparency in the sampled art will be retained in the gradient stops. If there is no artwork under a sampling location, the color will be set to 100% transparent.
8. Force Grayscale
When enabled, all sampled colors will be converted to their grayscale equivalent.
9. Auto Crop
Not available when Node-Only Sampling is enabled. When Auto Crop is enabled, white or partially transparent stops are trimmed off the ends of the gradient (unless the gradient only has two stops). This makes it possible to sample artwork from end to end without having to place the sampling line end nodes exactly on the edges of the object(s):
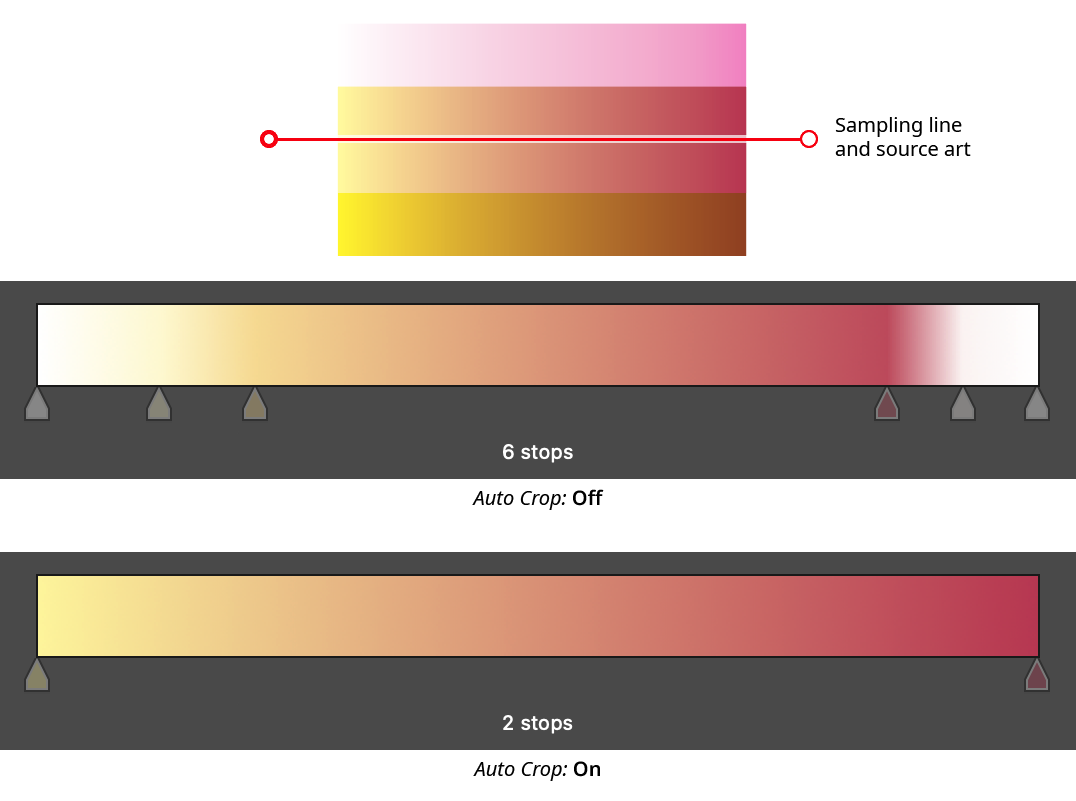
Gradient From Art Panel Auto Crop
10. Node-Only Sampling
When enabled, colors for the gradient stops are not sampled continuously along the sampling line, but rather only at the nodes. Each node corresponds to exactly one stop, which will be evenly spaced along the gradient.
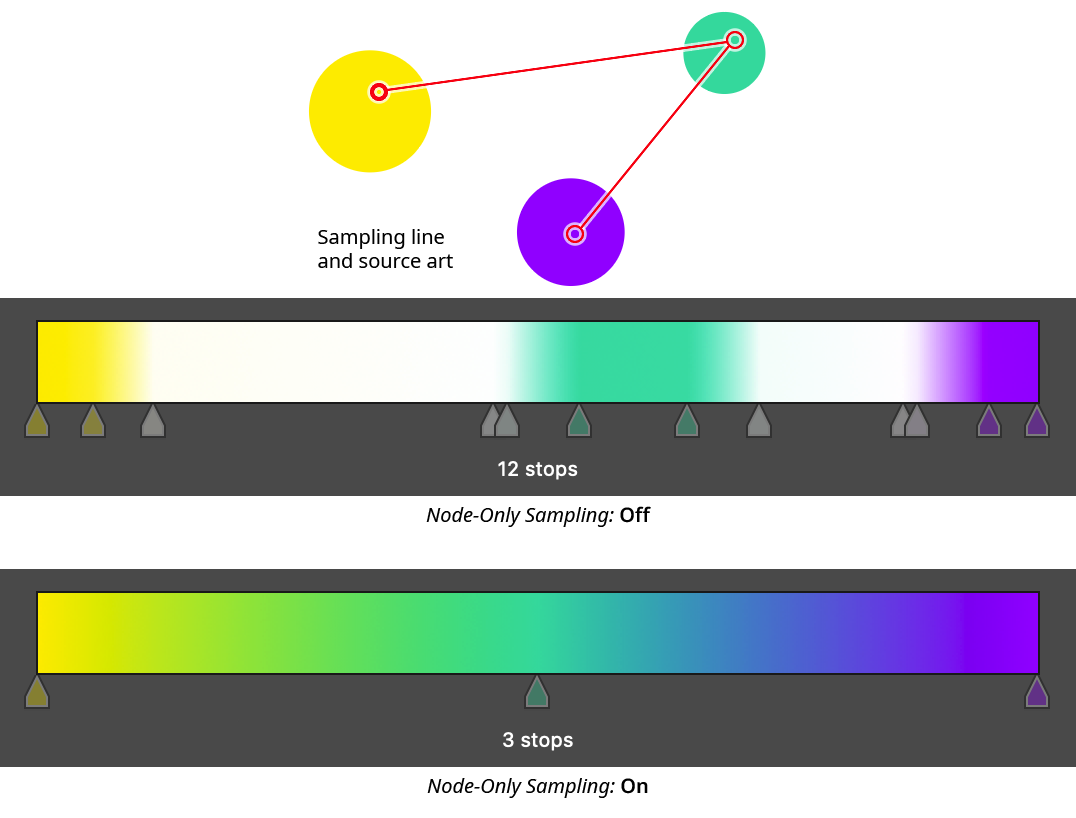
Gradient From Art Panel Node Only Sampling
11. Save to Gradient Forge Pocket Button
Saves the previewed gradient into a pocket on the Gradient Forge panel. The gradient will be put into the first empty pocket. If there are no empty pockets, a warning dialog will appear, allowing you to overwrite the last pocket.
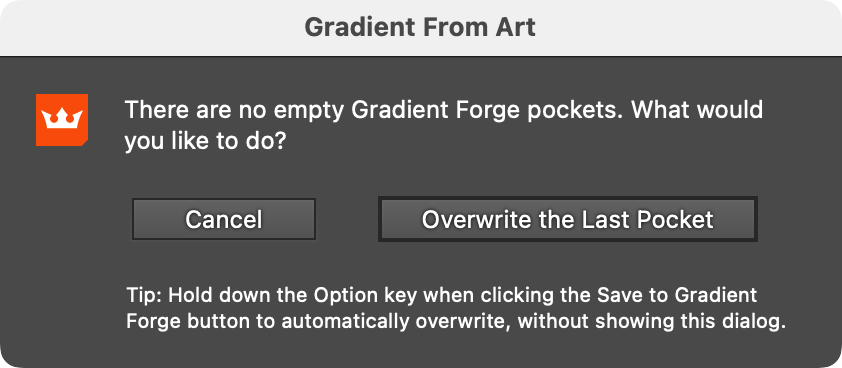
Gradient From Art No Free Pockets Warning
As noted at the bottom of the warning dialog, holding Option/Alt when clicking the Save to Gradient Forge Pocket button will automatically overwrite the last pocket if there are no free pockets.
12. Save to Swatch... Button
Saves the previewed gradient into a swatch. The button brings up a dialog allowing the gradient to be named, and its direction and type changed, before it is saved:
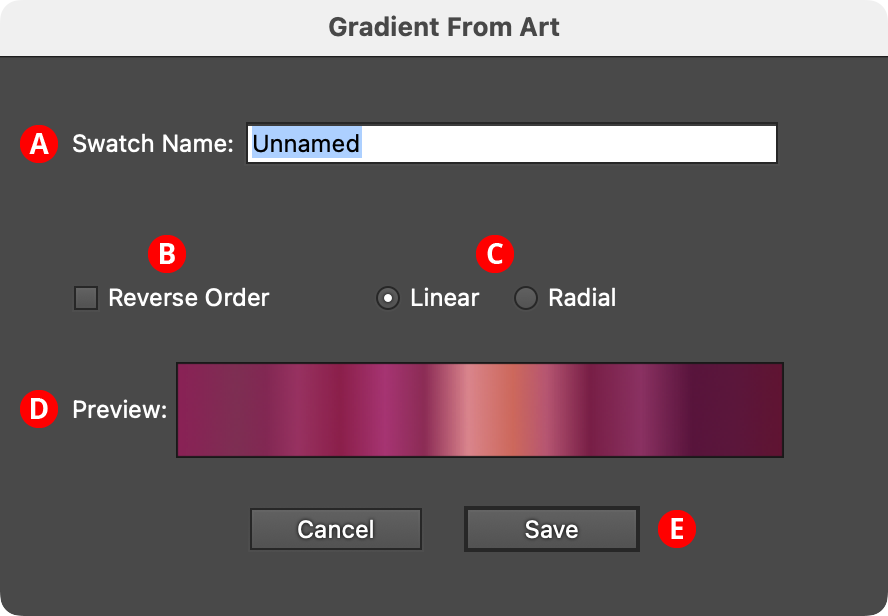
Gradient From Art Save to Swatch Dialog
A. Swatch Name: The user-specified name of the new gradient swatch.
B. Reverse Order Checkbox: Reverses the order of the stops.
C. Linear/Radial Buttons: Specify whether the new gradient will be linear or radial.
D. Preview Area: Previews the gradient with the current settings.
E. Save Button: Saves the gradient as a swatch when clicked; the new swatch is automatically selected and displayed in the Gradient Forge panel, where it can be edited further.
If a sampling line is present (i.e., a gradient is being previewed in the panel), pressing the Enter key will have the same effect as clicking the Save to Swatch... button.