Guides
![]() DirectPrefs Overview
DirectPrefs Overview
![]() QuickOps Panel
QuickOps Panel
Illustrator Location:
Illustrator Main Menu > Window > Astute Graphics > DirectPrefs
The menu item to show and hide the DirectPrefs panel can be found in the main menu under Window > Astute Graphics > DirectPrefs.
DirectPrefs Panel
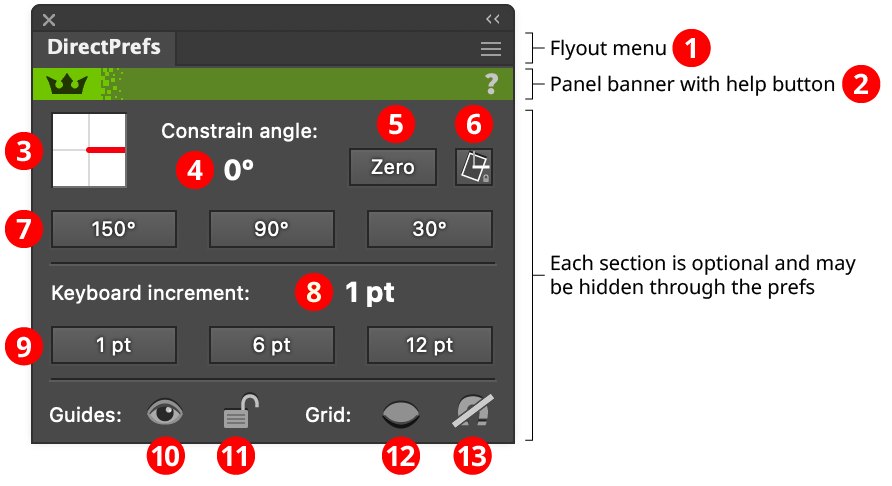
1. Flyout menu
See DirectPrefs Panel: Flyout Menu.
2. Panel banner
The DirectPrefs panel banner has a help button on the right which opens the help documentation in the Astute Manager. If this does not automatically appear, please ensure your Astute Manager is running first.
3. Constrain Angle Graphic
(This control may not be visible if this section has been hidden.) Provides an easy-to-visualize graphical representation of the current constrain angle, which is the direction of the thick red line segment. Clicking the graphic brings up a small dialog allowing the constrain angle to be entered directly:
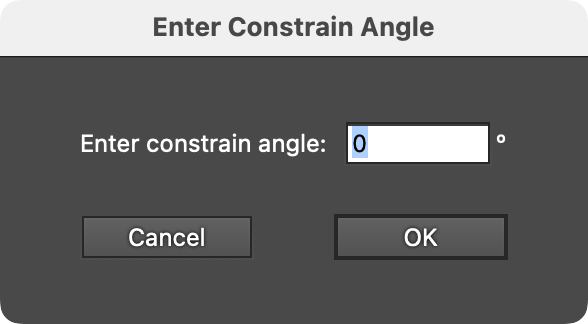
DirectPrefs Enter Constrain Angle Dialog
4. Constrain Angle Readout
(This control may not be visible if this section has been hidden.) Displays the current constrain angle numerically. Like the graphic, it may be clicked to bring up a small dialog allowing the constrain angle to be entered directly.
5. Constrain Angle Zero button
(This control may not be visible if this section has been hidden.) Clicking the button changes the constrain angle to the most-commonly-used value of 0°.
6. Constrain Lock button
(This control may not be visible if using a version of Illustrator prior to 25.3, or if this section has been hidden, or if the DirectPrefs preference Show Constrain Lock is disabled.) When the canvas has been rotated, the arrow keys no longer work in the expected manner to move artwork. For example, if the canvas rotation is set to 90°, then pressing Up Arrow to move artwork upwards will actually move it to the left. As this can be very frustrating, DirectPrefs provides a Constrain Lock function. After clicking on the icon to make it active (the icon has a dark background), the constrain angle will automatically be locked to the inverse of the artboard rotation value. This results in arrow keys that always work in the expected manner: Up Arrow will move art upwards (in relation to the screen), Left Arrow will move it to the left, etc.
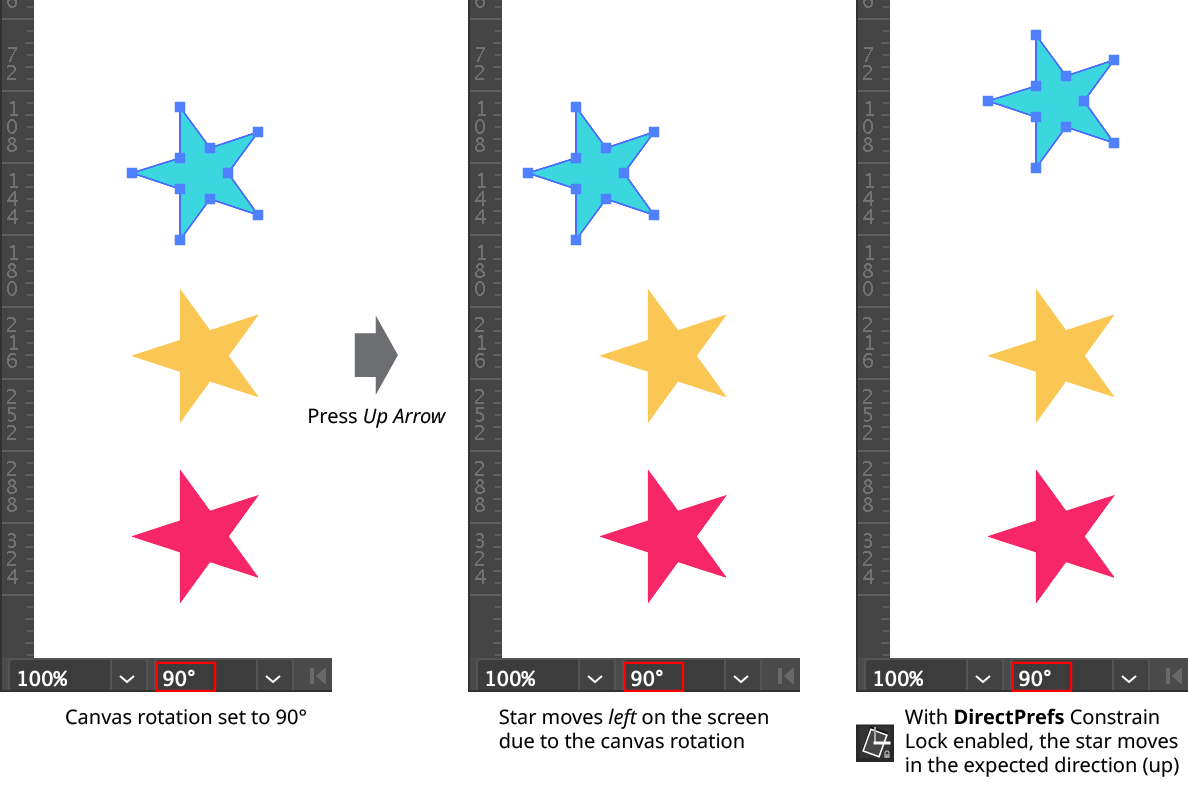
DirectPrefs Constrain Lock
Attempting to set the constrain angle manually when the Constrain Lock function is enabled will result in a warning message:
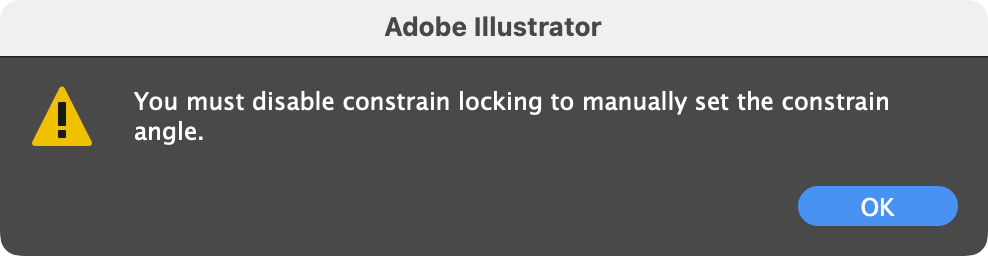
DirectPrefs Constrain Lock Dialog
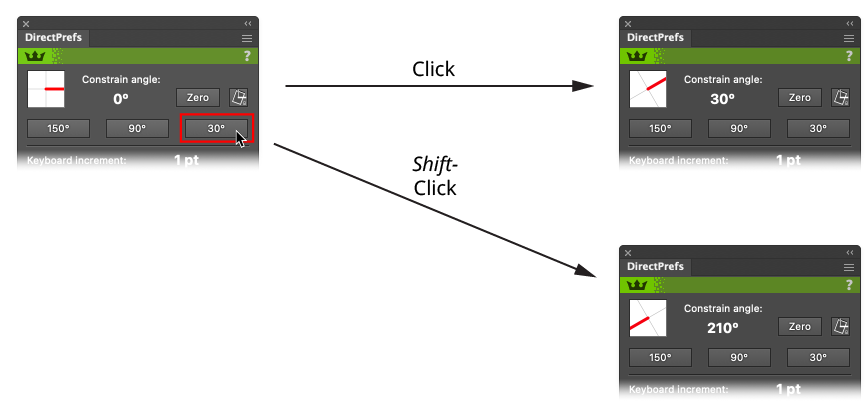
7. Constrain Angle Presets
Each button directly sets the constrain angle to its labeled value. Shift-clicking on a button will change the constrain angle to the specified angle plus 180°.
DirectPrefs Constrain Angle Preset Buttons
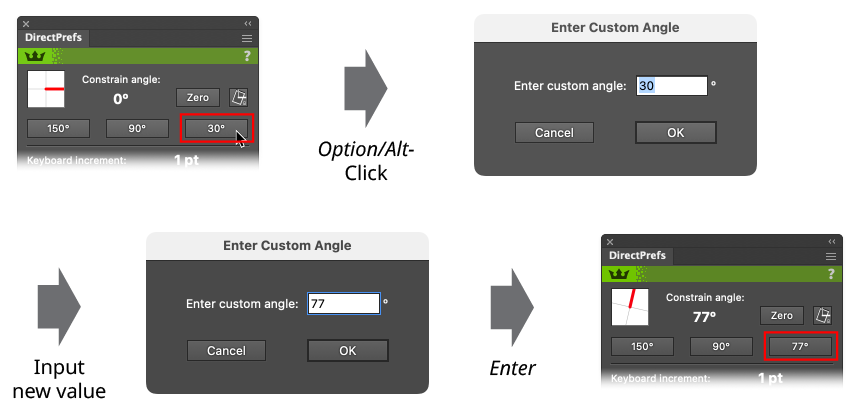
To customize a button, Option/Alt-click on it. This will bring up a small dialog allowing you to reassign a custom value to the button.
DirectPrefs Custom Constrain Angle Preset Button
8. Keyboard Increment Readout
(This control may not be visible if this section has been hidden.) Displays the current keyboard increment value. Clicking on it brings up a small dialog allowing the value to be changed:

DirectPrefs Enter Keyboard Increment Dialog
9. Keyboard Increment Presets
Each button directly sets the keyboard increment to its labeled value. Shift-clicking on a button will change the value to the labeled value multiplied by ten. To customize a button, Option/Alt-click on it. This will bring up a small dialog allowing you to reassign a custom value to the button.

DirectPrefs Custom Keyboard Increment Preset Button
DirectPrefs keeps six independent sets of keyboard increment preset buttons: one for each different unit of measurement from among points, pixels, millimeters, centimeters, picas, and inches.
10. Guide Visibility Icon
The icon shows the visibility state of guides (which is natively changed through the View > Guides > Hide/Show Guides menu command). An open eye indicates that guides are visible, while a shut eye indicates that they are hidden. Clicking on the icon toggles the visibility state.
DirectPrefs Guide Visibility Icon
If the DirectPrefs preference Lock Guides When Hidden is enabled, then hiding the guides through the panel icon will automatically lock them, as the native Hide Guides menu command does.
11. Guide Lock Status Icon
The icon shows the locked state of guides (which is natively changed through the View > Guides > Lock/Unlock Guides menu command). An open padlock indicates that guides are unlocked, while a closed padlock indicates that they are locked. Clicking on the icon toggles the locked state.
DirectPrefs Guides Locked Icon
12. Grid Visibility Icon
The icon shows the visibility state of the grid (which is natively changed through the View > Show/Hide Grid menu command). An open eye indicates that the grid is visible, while a shut eye indicates that it is hidden. Clicking on the icon toggles the visibility state.
DirectPrefs Grid Visibility Icon
13. Grid Snap Status Icon
The icon shows the snap state of the grid (which is natively changed through the View > Snap to Grid menu command). A plain magnet indicates that snap to grid is enabled, while a magnet with a thick line through it indicates that snapping is disabled. Clicking on the icon toggles the snap state.
DirectPrefs Grid Snap Icon
Illustrator Location:
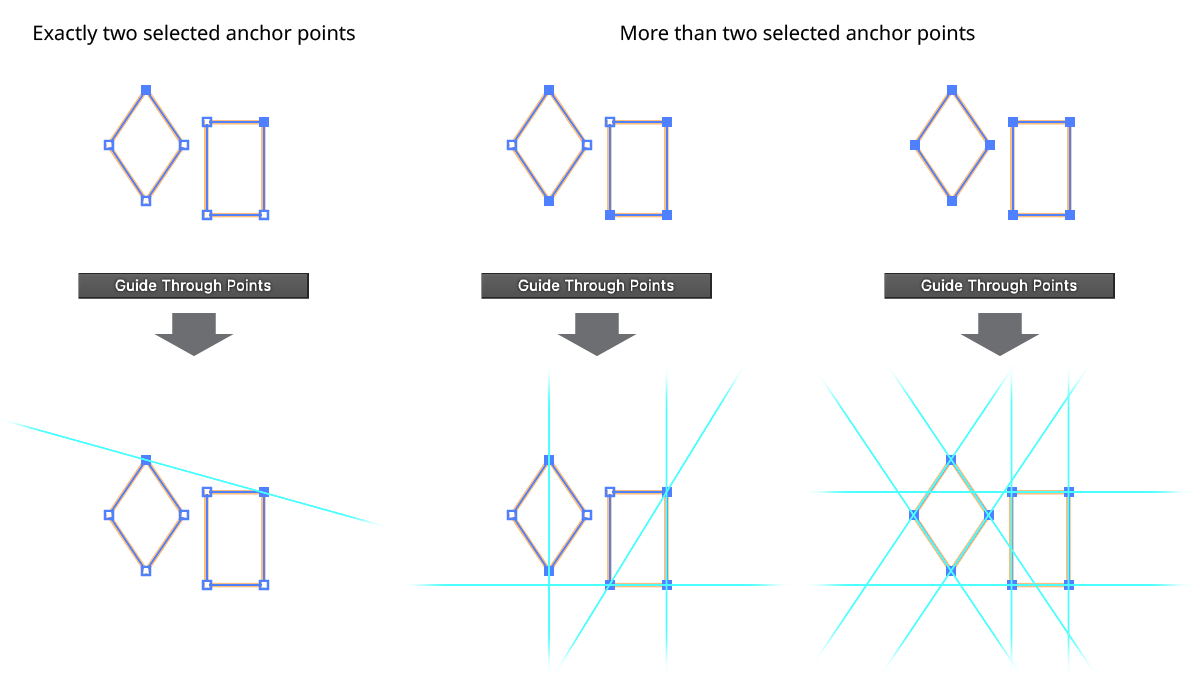
The Guide Through Points operation creates a straight-line guide that passes through the selected two anchor points. If more than two anchor points are selected, the operation works on an path-by-path basis (ignoring groups). Paths with fewer than two selected anchor points are ignored. Otherwise, guides are created through successive pairs of the path’s selected anchor points, working around the path in the order in which they are encountered. For example, if a path with seven anchor points has points 0, 3, and 5 selected, then three guides would be created: a) through points 0 and 3; b) through points 3 and 5; and c) through points 5 and 0.
QuickOps Guide Through Points