Colliding
 Snap to Collisions Tool
 Rotate at Collision Tool
 Rotate to Collision Tool
Illustrator Location:
Advanced Toolbar > Selection Stack > Snap to Collisions Tool
As the Snap To Collisions tool has several keypresses which can add or change its functionality, we strongly suggest installing the free Astute Graphics plugin Astute Buddy, which creates a panel that dynamically updates to inform you of the various keys which can be pressed in the tool’s current context.
Clicking
The Snap To Collisions tool can be used to select an art object by simply clicking on it, functioning similarly to either the native Selection or Direct Selection tool (depending on the tool preference Fully Select Groups and Compound Paths). Shift-clicking will deselect an already-selected object. Clicking on an empty area of the canvas will deselect everything.
Dragging
If the Snap To Collisions tool starts a drag across the artboard from a blank spot, it simply acts as a selection tool which creates a marquee for selecting objects. The tool preference Fully Select Groups and Compound Paths controls whether it acts like the Selection tool or the Direct Selection tool, and by holding down Option/Alt while dragging, you can temporarily invert the setting on the fly. To toggle the setting and affect future marquee operations as well, press the V key.
When the drag starts over an art object, the art object (and any other selected artwork) is moved, snapping to positions where paths “collide” (first touch) other paths, either at corner points or at places where the paths share a tangency. Small magenta dots will be drawn at spots where the tool has detected points of collision. The snap tolerance is 12 pixels by default but can be changed (see Snap To Collisions: Preferences).
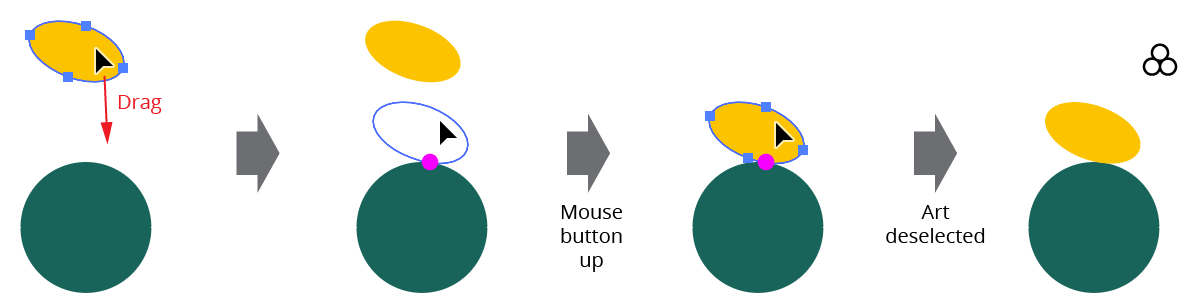
Snap to Collisions Tool Examples
When the mouse button is released, the snapping dots will continue to be drawn for the paths over which the cursor is being hovered, providing a way to confirm whether two paths are snapped to each other without having to drag again.
If one paths snaps to another, the Snap To Collisions tool will continue to search for a second collision it can snap to while retaining the first snap, allowing you to easily place one path against two others.
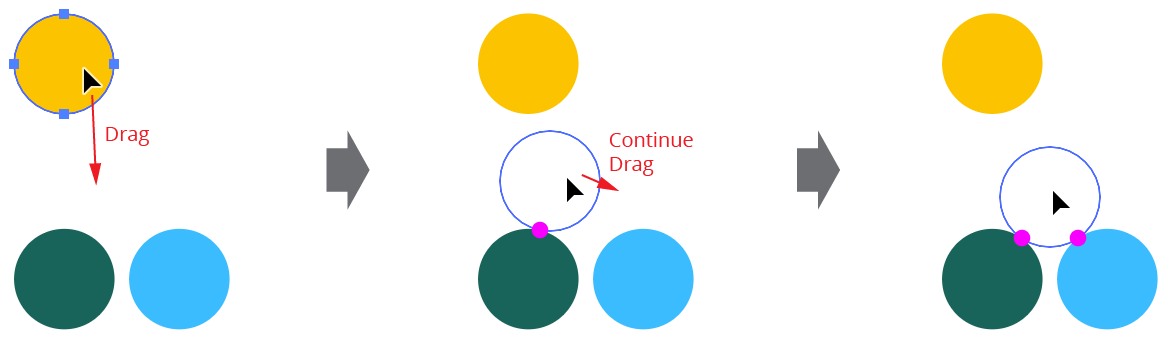
Snap to Collisions Tool Example 2
Pressing one or more modifier keys while dragging artwork changes or adds tool functionality:
Shift: Constrains the motion of the dragged artwork to increments of 45° around the constrain angle.
Option/Alt: Duplicates the dragged artwork instead of moving it.
The following non-modifier keys can be pressed while dragging artwork to toggle or change various tool preferences on the fly (i.e., without having to go to the Snap To Collisions Preferences dialog):
Up/Down Arrows: When the Use Collision Spacing preference is active, increases or decreases the spacing value by the native Keyboard Increment amount (see Snap To Collisions: Preferences).
A: Toggles the Add Points to Paths at Collisions preference.
D: Toggles Snap To Dragged Path Only. By default, all paths in the selection being dragged are tested for collision against the non-dragged (stationary) paths, which allows maximum flexibility. However, if the selection being dragged is comprised of many complicated paths, this may cause lag. By enabling Snap To Dragged Path Only, Snap To Collisions will only look for collisions to the path under the cursor.
L: Toggles the Snap To Locked Paths preference.
S: Toggles the Use Collision Spacing preference.
X: Toggles the Snap To Pre-Drag Path Positions preference.
Illustrator Location:
Advanced Toolbar > Selection Stack > Rotate at Collisions Tool
As the Rotate At Collision tool has several keypresses which can add or change its functionality, we strongly suggest installing the free Astute Graphics plugin Astute Buddy, which creates a panel that dynamically updates to inform you of the various keys which can be pressed in the tool’s current context.
Clicking
The Rotate At Collision tool can be used to click-select the two types of object that it operates on: paths and point text objects. Paths must be clicked at an anchor point or along a segment (not on their fills) and point text objects must be clicked on their baselines. In both cases the Rotate At Collision cursor will snap when hovering to eligible spots and display a red ring with informational text. Shift-clicking will deselect an already-selected object. Clicking on an empty area of the canvas will deselect everything.
Dragging
If the Rotate At Collision tool starts a drag from anywhere except over a path or point text object, it simply acts as a selection tool which creates a marquee for selecting objects. The tool preference Fully Select Groups and Compound Paths controls whether it acts like the Selection tool or the Direct Selection tool, and by holding down Option/Alt while dragging, you can temporarily invert the setting on the fly. To toggle the setting and affect future marquee operations as well, press the V key.
When the drag starts over a path or point text object, the object (and any other selected artwork) is dragged with the cursor, snapping when it “collides” with other paths on the artboard. The snap tolerance is 12 pixels by default but can be changed (see Rotate At Collision: Preferences). When a snap occurs, the dragged path or point text object, along with any other selected artwork, is rotated around the collision point in one of two ways. If an open path was dragged by one of its endpoints, then the path is rotated to be perpendicular (at the dragged endpoint) to the stationary path. Otherwise, the path or point text object is made tangent to the stationary path.
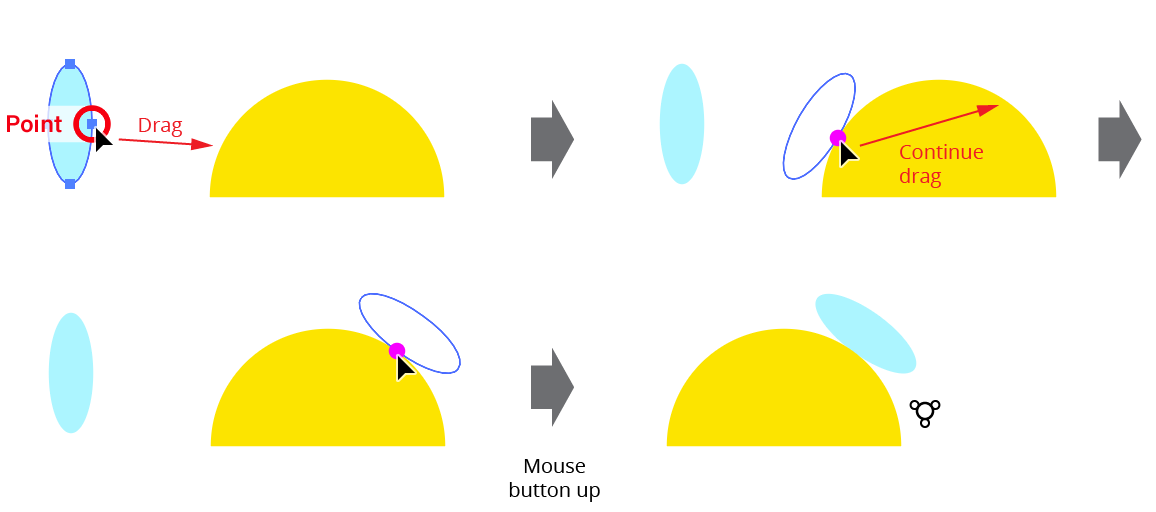
Rotate at Collisions Tool Path Example
When calculating the tangent angle of a path at a sharp corner point, the angle of the path going into the point and the angle of the path coming out of the point are averaged together, so a dragged path will be perpendicular to the imaginary line that bisects the angle:

Rotate at Collisions Tool Sharp Point Example
Because the tangent angle depends on path direction (clockwise vs. counter-clockwise), some paths may orient themselves on the opposite side from what is desired. In this case, pressing Space will toggle between the “normal” orientation and the alternate orientation:

Rotate at Collisions Tool Alternate Orientation
Pressing one or more modifier keys while dragging artwork changes or adds tool functionality:
Shift: Constrains the motion of the dragged artwork to increments of 45° around the constrain angle.
Option/Alt: Duplicates the dragged artwork instead of moving it.
Command/Ctrl: Overrides snapping to anchor points and straight midpoints along the stationary paths.
The following non-modifier keys can be pressed while dragging artwork to toggle or change various tool preferences on the fly (i.e., without having to go to the Rotate At Collision Preferences dialog):
Space: Toggles between normal orientation and alternate orientation (see above).
Up/Down Arrows: When the Use Collision Spacing preference is active, increases or decreases the spacing value by the native Keyboard Increment amount (see Rotate At Collision: Preferences).
A: Toggles the Add Points to Paths at Collisions preference.
L: Toggles the Snap To Locked Paths preference.
S: Toggles the Use Collision Spacing preference.
Illustrator Location:
Advanced Toolbar > Selection Stack > Rotate to Collisions Tool
As the Rotate To Collision tool has several keypresses which can add or change its functionality, we strongly suggest installing the free Astute Graphics plugin Astute Buddy, which creates a panel that dynamically updates to inform you of the various keys which can be pressed in the tool’s current context.
Clicking
Clicking with the Rotate To Collision tool relocates the rotation center point, indicated by a small red crosshair. This can be done whether or not artwork is selected (however, if artwork is not selected, then selecting it to actually rotate it may result in the rotation center point automatically moving if the preference Reset Rotation Center On New Selection is enabled (see Rotate To Collision: Preferences).
Doubleclicking
Doubleclicking on the rotation center point crosshair icon allows you to set its position numerically:
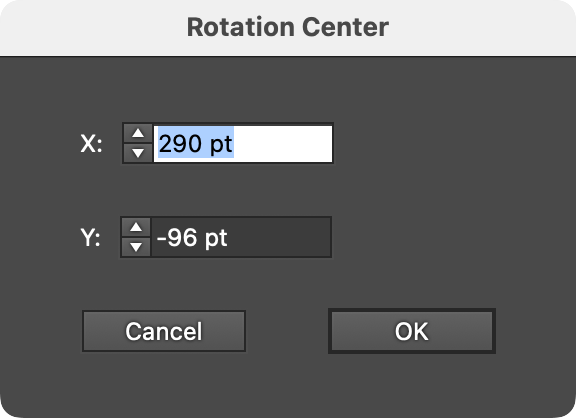
Rotate to Collisions Tool - Rotation Center Dialog
Dragging
If no artwork is selected, dragging with the Rotate To Collision tool simply relocates the rotation center point. Otherwise, all the selected art objects are rotated around the rotation center point in a manner similar to the native Rotation tool, except that they will snap to positions where paths in the selection “collide” with other paths, either at corner points or at places where the paths share a tangency. Small magenta dots will be drawn at spots where the tool has detected points of collision. The snap tolerance is 12 pixels by default but can be changed (see Rotate To Collision: Preferences).
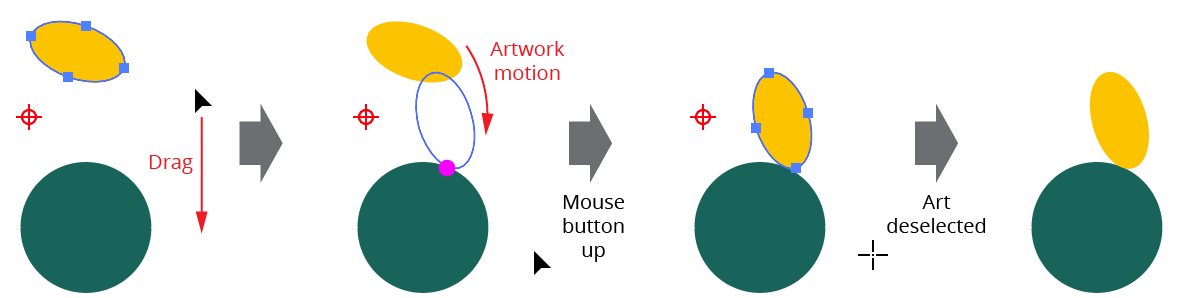
Rotate to Collisions Tool Example
Pressing one or more modifier keys while dragging artwork changes or adds tool functionality:
Shift: Constrains the rotation of the dragged artwork to increments of 45°. Since this takes precedence over the snapping behavior, it is provided for convenience only, since the same operation could be accomplished with the native Rotation tool.
Option/Alt: Duplicates the dragged artwork instead of moving it.
Command/Ctrl: Overrides collision snapping. This is provided for convenience only, since the same operation could be accomplished with the native Rotation tool.
The following non-modifier keys can be pressed while rotating artwork to toggle or change various tool preferences on the fly (i.e., without having to go to the Rotate To Collision Preferences dialog):
Up/Down Arrows: When the Use Collision Spacing preference is active, increases or decreases the spacing value by the native Keyboard Increment amount.
A: Toggles the Add Points to Paths at Collisions preference.
L: Toggles the Snap To Locked Paths preference.
S: Toggles the Use Collision Spacing preference.
X: Toggles the Snap To Pre-Drag Path Positions preference.