 Gradient From Art
Gradient From Art is an Astute Graphics tool and panel for Adobe Illustrator that allows the creation of gradients through a virtual sampling line, which picks up color information from the art objects under it, both raster and vector. Colors can be sampled from specific locations or continuously along the line. Parameters such as fidelity and smoothness can be adjusted, and a preview of the gradient is automatically updated. The resulting gradients can be saved either to a Gradient Forge pocket or to a swatch. Gradient From Art is part of the SubScribe plugin.
Gradient From Art Tool
Tool Location and Cursors
The Gradient From Art tool appears in Illustrator’s main toolbar (which must be in Advanced mode: View > Toolbars > Advanced), stacked under the AG Color Select tool. As with other stacked tools, click and hold on the top tool icon to display the tools stacked under it.

Gradient From Art Tool Location
The Gradient From Art tool’s primary cursor is a crosshair, which can have badges; there is an additional form when moving a sampling line node or segment:

Gradient From Art Tool Cursors
Tool Operation
As the Gradient From Art tool has several keypresses for certain operations, we suggest installing the free Astute Graphics plugin Astute Buddy, which creates a panel that dynamically updates to inform you of the various keys which can be pressed in the tool’s current context.
The Gradient From Art tool is works in conjunction with the associated Gradient From Art panel, which should be open and accessible. If you are using the free Astute Graphics plugin DirectPrefs, you can have the Gradient From Art panel automatically be shown when the Gradient From Art tool is selected.
Note: For clarity, some of the images in this manual show a sampling line on an empty part of the artboard, but this is not particularly useful as it would simply create a gradient which is all transparent or all white. In reality, the line would always be created above actual artwork.
Creating a sampling line with the Gradient From Art tool is like creating a straight segment-only path with the native Pen tool: the cursor is clicked at the desired locations on the artboard to create nodes (visualized as small circles), which the sampling line passes through. After the first node is placed, a “rubberband” will follow the cursor previewing the next segment location. Holding down Shift constrains the new segment to 45° angles around the general constrain angle.

Gradient From Art Tool Sampling Line Creation
To place the last node, press the Option/Alt key while clicking to create it:

Gradient From Art Tool Sampling Line Creation Example 2
The sampling line can also be ended by pressing the Esc key while the cursor is moving. However, it is not strictly necessary to manually end the sampling line, as this will happen automatically when a different tool is selected.
Because single segment (two-node) sampling lines are commonly drawn, clicking-and-dragging, by default, will automatically end the line with the single segment.
To continue a sampling line which was previously terminated, click on either end node; the rubberband will become active again and the line can be continued. If it is the starting node that was clicked, the sampling line reverses itself.

Gradient From Art Tool Restart Line
Nodes or segments can be moved by dragging them (the cursor changes to a solid, tail-less arrowhead); pressing Shift constrains the motion to 45° angles around the general constrain angle. Nodes can be deleted by Option/Alt-clicking on them (the cursor shows a minus sign), and a new node may be added along an existing segment by Option/Alt-clicking on the segment (the cursor shows a plus sign).
A new sampling line may be started in two ways. If the current line is complete (not in the process of being drawn), then simply clicking anywhere other than on the existing line will begin a new line. If the current line is still being drawn, and the tool preference Dragging Starts New Line is enabled (the default), then dragging the cursor will clear the current line and start a new one.
The sampling line may be deleted without starting a new one by Option/Alt-clicking a blank area of the canvas. All changes made to the sampling line are affected by the normal undo and redo operations.
Gradient From Art Panel
The menu item to show and hide the Gradient From Art panel can be found in the main menu under Window > Astute Graphics > Gradient From Art. When the Gradient From Art tool is not in use, the panel displays only a “Click to select” message; clicking anywhere on the panel selects the tool and displays all the controls.
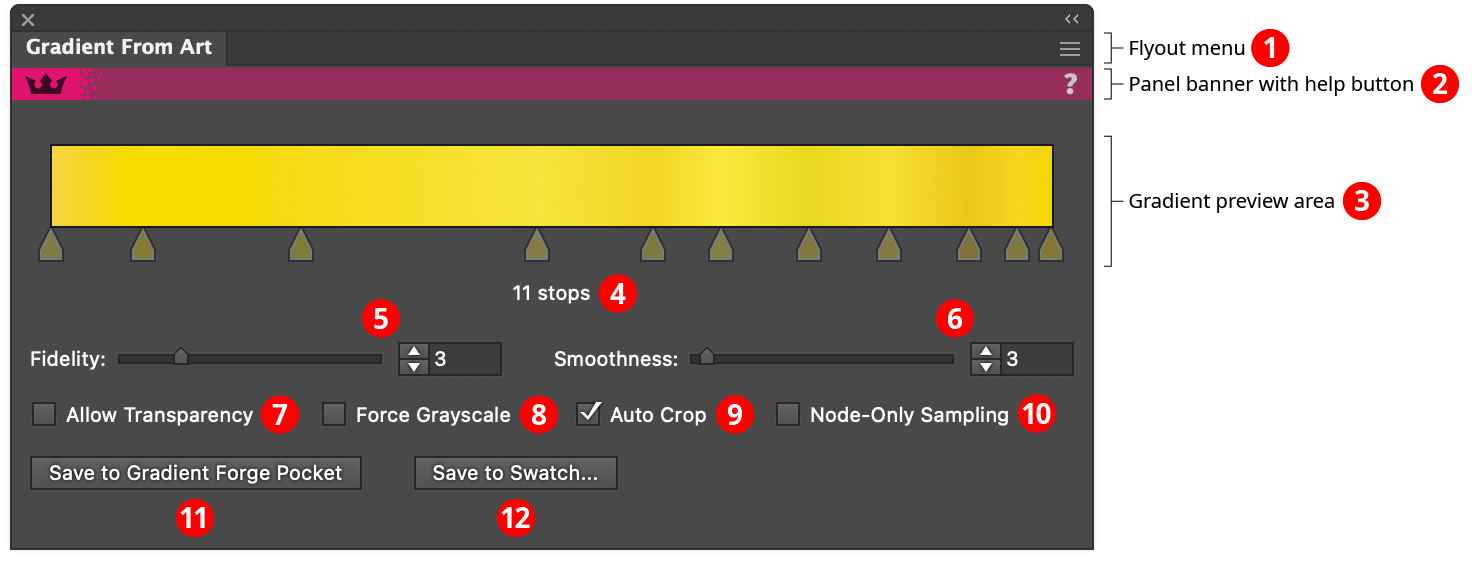
Gradient From Art Panel
1. Flyout menu
Contains a single menu item which brings up the Preferences dialog (see Gradient From Art: Preferences).
2. Panel banner
The Gradient From Art panel banner has a help button on the right which opens the help documentation in the Astute Manager. If this does not automatically appear, please ensure your Astute Manager is running first.
3. Gradient Preview Area
Shows the gradient that would result from using the sampling line with the current settings. If the sampling line is edited, or a parameter is changed, or the artwork is changed, then the gradient is automatically recalculated. The gradient’s stops are displayed for reference, but are not directly editable. If no sampling line exists, the preview area will display “No Sampling Line”, and if the gradient is incomplete or in the process of being calculated, the preview area will display “Calculating...”.
4. Stop Count
Shows the current number of stops in the gradient. A warning symbol will be displayed next to the stop count when it exceeds 256 stops, because Illustrator does not render stops past that limit.
5. Fidelity
Not available when Node-Only Sampling is enabled. Fidelity determines how closely the gradient matches the original sampled colors. It can range from 1 to 10, with a default of 3. Higher fidelity values retain subtle color changes at the expense of creating a gradient with more stops, which generally makes it more difficult to manually tweak later.
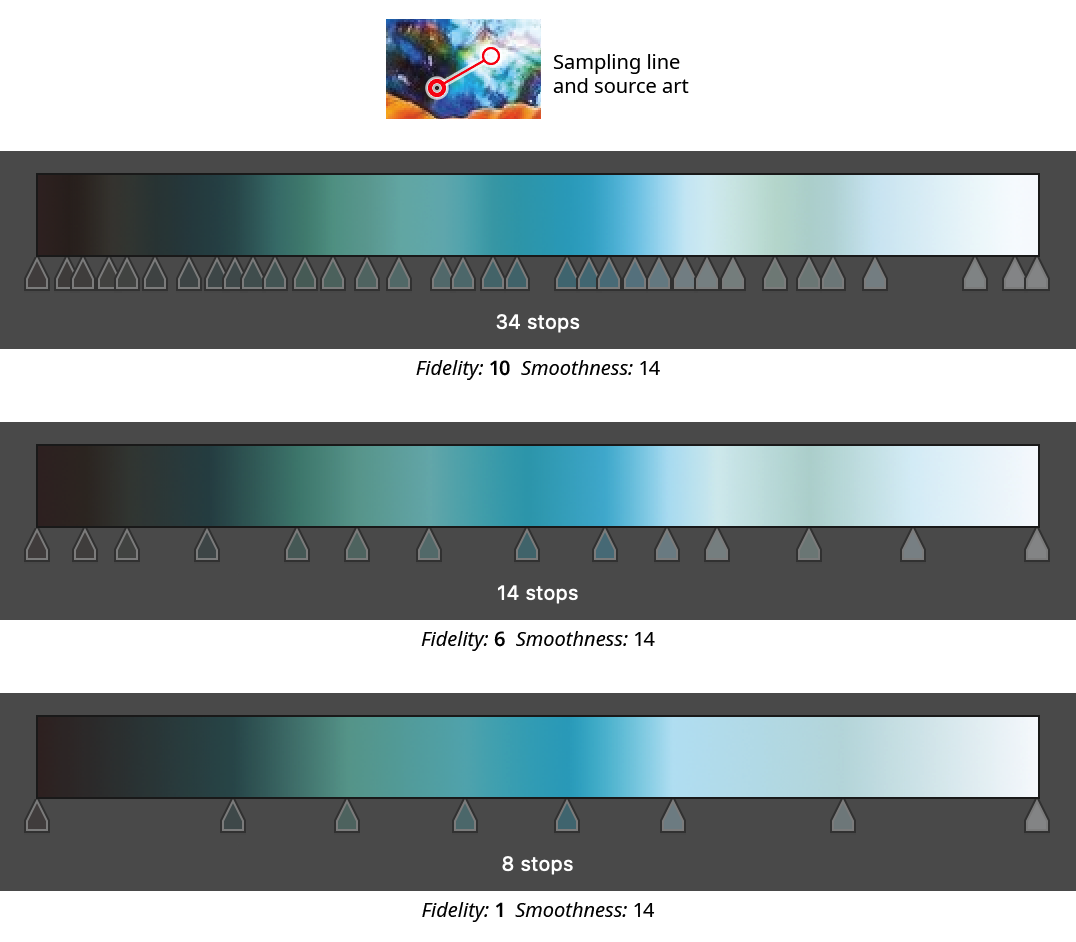
Gradient From Art Panel Fidelity Examples
6. Smoothness
Not available when Node-Only Sampling is enabled. Smoothness controls how gradually transitions from one color to another are made; it is essentially a kind of Gaussian blur for stop colors. This is most evident when sampling from source art that has sharp transitions. The setting can range from 0 to 100, with a default of 3. The lowest value will produce very sharp transitions, but it does not produce stacked gradient stops, which are not recommended due to these types of gradient’s poor rendering. (They can, however, be created using the Gradient Forge panel).
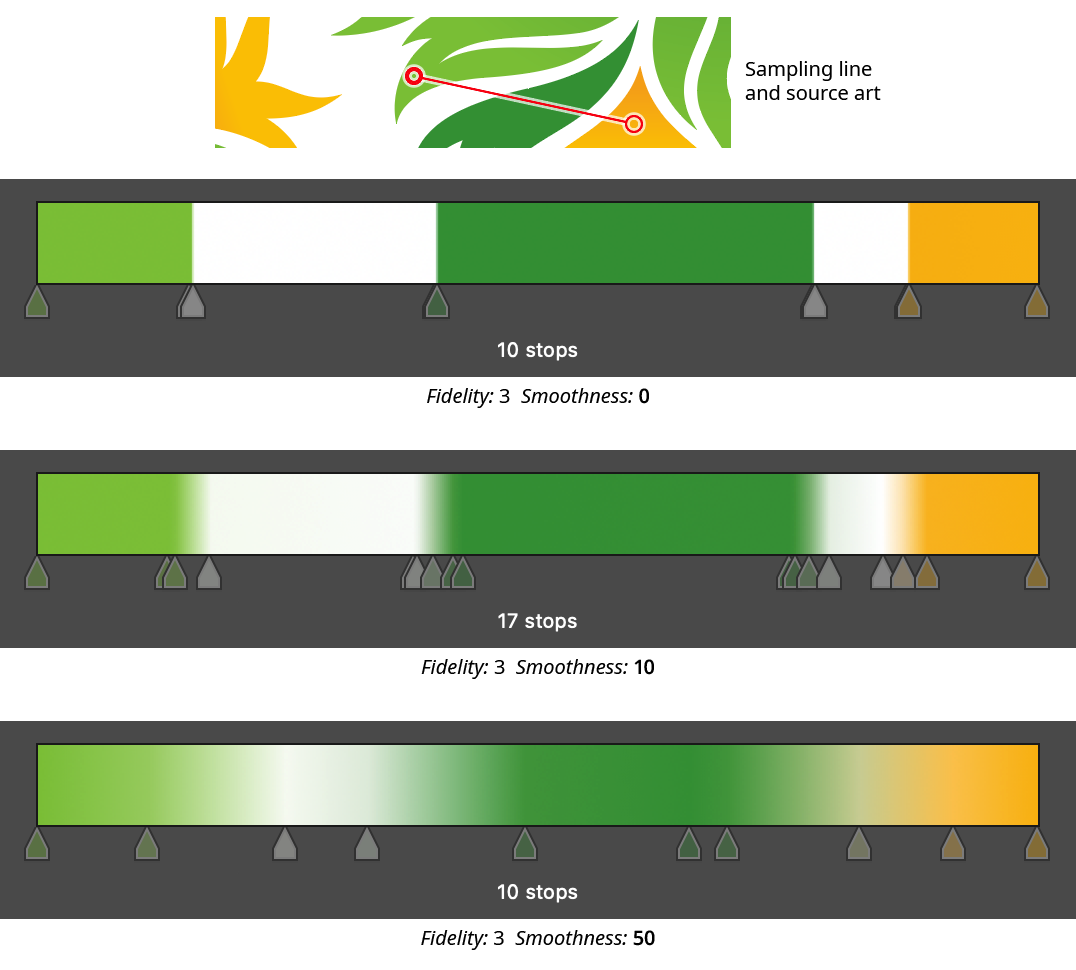
Gradient From Art Panel Smoothness Examples
7. Allow Transparency
When enabled, transparency in the sampled art will be retained in the gradient stops. If there is no artwork under a sampling location, the color will be set to 100% transparent.
8. Force Grayscale
When enabled, all sampled colors will be converted to their grayscale equivalent.
9. Auto Crop
Not available when Node-Only Sampling is enabled. When Auto Crop is enabled, white or partially transparent stops are trimmed off the ends of the gradient (unless the gradient only has two stops). This makes it possible to sample artwork from end to end without having to place the sampling line end nodes exactly on the edges of the object(s):
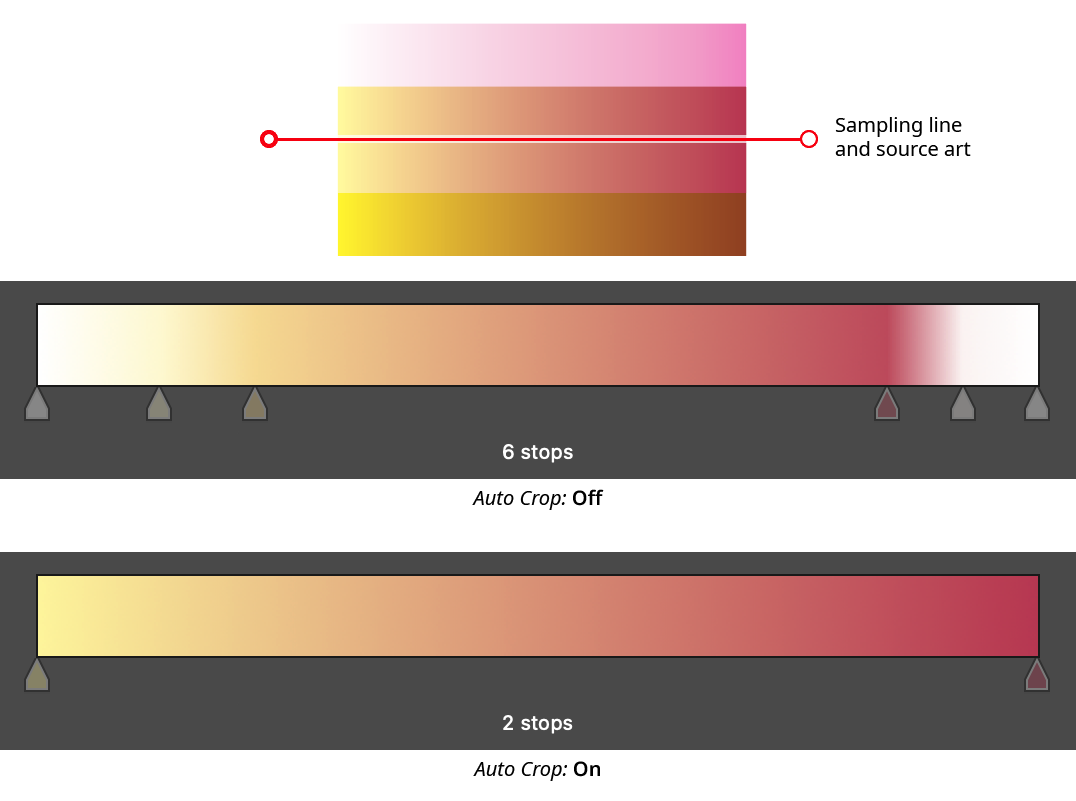
Gradient From Art Panel Auto Crop
10. Node-Only Sampling
When enabled, colors for the gradient stops are not sampled continuously along the sampling line, but rather only at the nodes. Each node corresponds to exactly one stop, which will be evenly spaced along the gradient.
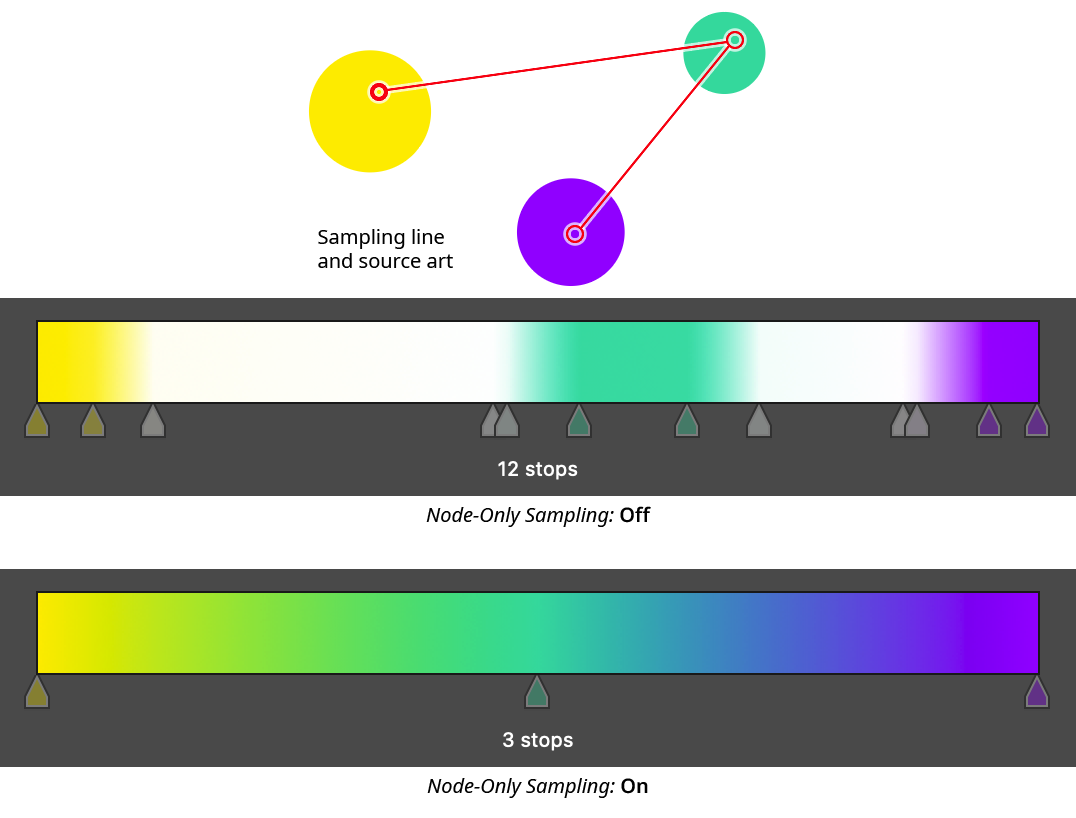
Gradient From Art Panel Node Only Sampling
11. Save to Gradient Forge Pocket Button
Saves the previewed gradient into a pocket on the Gradient Forge panel. The gradient will be put into the first empty pocket. If there are no empty pockets, a warning dialog will appear, allowing you to overwrite the last pocket.
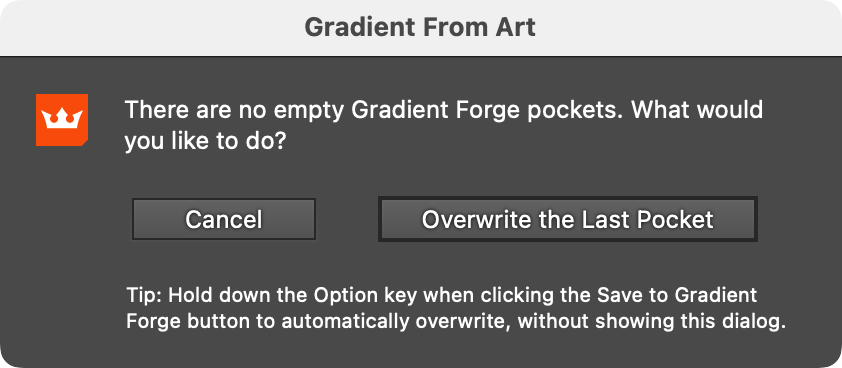
Gradient From Art No Free Pockets Warning
As noted at the bottom of the warning dialog, holding Option/Alt when clicking the Save to Gradient Forge Pocket button will automatically overwrite the last pocket if there are no free pockets.
12. Save to Swatch... Button
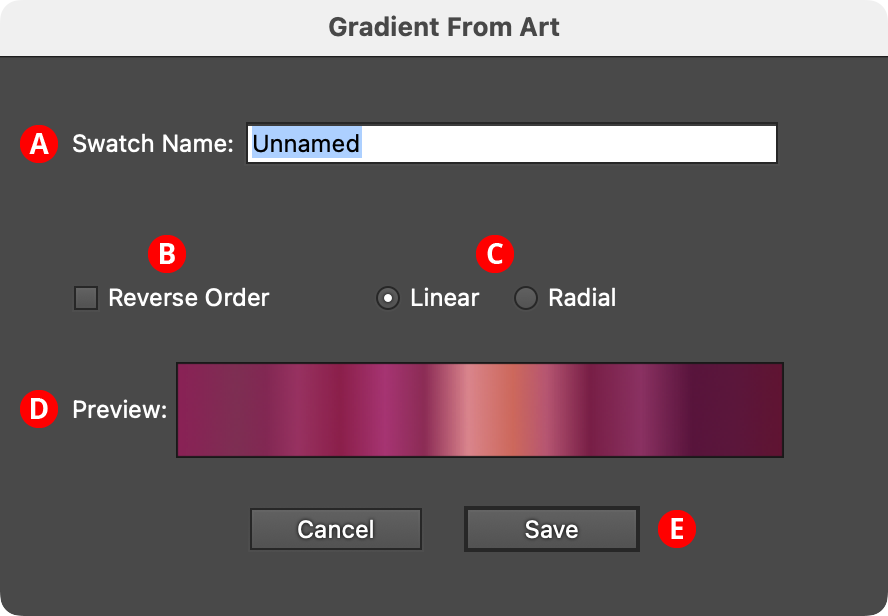
Saves the previewed gradient into a swatch. The button brings up a dialog allowing the gradient to be named, and its direction and type changed, before it is saved:
Gradient From Art Save to Swatch Dialog
A. Swatch Name: The user-specified name of the new gradient swatch.
B. Reverse Order Checkbox: Reverses the order of the stops.
C. Linear/Radial Buttons: Specify whether the new gradient will be linear or radial.
D. Preview Area: Previews the gradient with the current settings.
E. Save Button: Saves the gradient as a swatch when clicked; the new swatch is automatically selected and displayed in the Gradient Forge panel, where it can be edited further.
If a sampling line is present (i.e., a gradient is being previewed in the panel), pressing the Enter key will have the same effect as clicking the Save to Swatch... button.
Gradient From Art Preferences
Using the flyout menu of the Gradient From Art panel, doubleclicking the Gradient From Art tool in the toolbox, or pressing the Enter key when the tool is selected and a sampling line is not present will bring up the Gradient From Art preferences dialog:

Gradient From Art Preferences
1. Annotation Color
Allows a choice of colors in which to annotate the sampling line from among red, blue, magenta, green, black, and gray. The color can be changed on the fly while dragging by pressing the C key.
2. Annotate With White Outline
Adds a white outline behind the sampling line to make it more visible on various backgrounds. The outline can be toggled off or on while dragging by pressing the A key.
3. Dragging Starts New Line
When enabled (the default), dragging the tool, whether or not a sampling line is already in the process of being drawn, will always remove any existing line and start a new one.
4. Dragging Creates Two-Node Line
When enabled (the default), dragging the tool will end the sampling line when the mouse button is released, resulting in a sampling line with two nodes (a single straight segment).
5. Ignore Short Drags
When enabled, drags shorter than 5 pixels will be ignored. This is useful when working with a tablet and stylus input device, because trying to click by tapping the stylus often unintentionally results in a very short drag as well.
6. Node-Only Sampling Averages Color
When enabled, and Node-Only Sampling is active, then the colors that are picked up by sampling the underlying art at each node will be calculated from an average of colors in the immediate vicinity of the node. This may be useful when the underlying source art is a raster image containing noise.
7. Informational area
Shows a brief description of each preference control when the cursor is being hovered over it.
8. Help Button
Opens the help documentation in the Astute Manager. If this does not automatically appear, please ensure your Astute Manager is running first.
