Color
Color Randomizer Live Effect
Color Stamp
AG Color Select Tool
Gradient From Art
QuickOps Panel
Illustrator Location:
Illustrator Main Menu > Effect > Randomino > Color Randomizer...
Color Randomizer is an Astute Graphics live effect for randomly and non-destructively varying the hue, saturation, and/or lightness of one or more objects. Both linear and Gaussian random distributions are supported, and the variation amounts can be quantized to a specific number of distinct values. Objects can be “filtered” so only some of them are affected, and, when applying the effect to nested groups, the depth at which it is applied can be specified.

Color Randomizer Example
As with most live effects, Color Randomizer appears in the main menu, under Effect > Randomino. It can also be applied directly from the Appearance panel using the “Add New Effect” button at the bottom of the panel.
Color Randomizer Parameters Dialog
After applying the live effect using the menu item (or when clicking on the existing effect in the Appearance panel to edit it), the parameters dialog will appear:
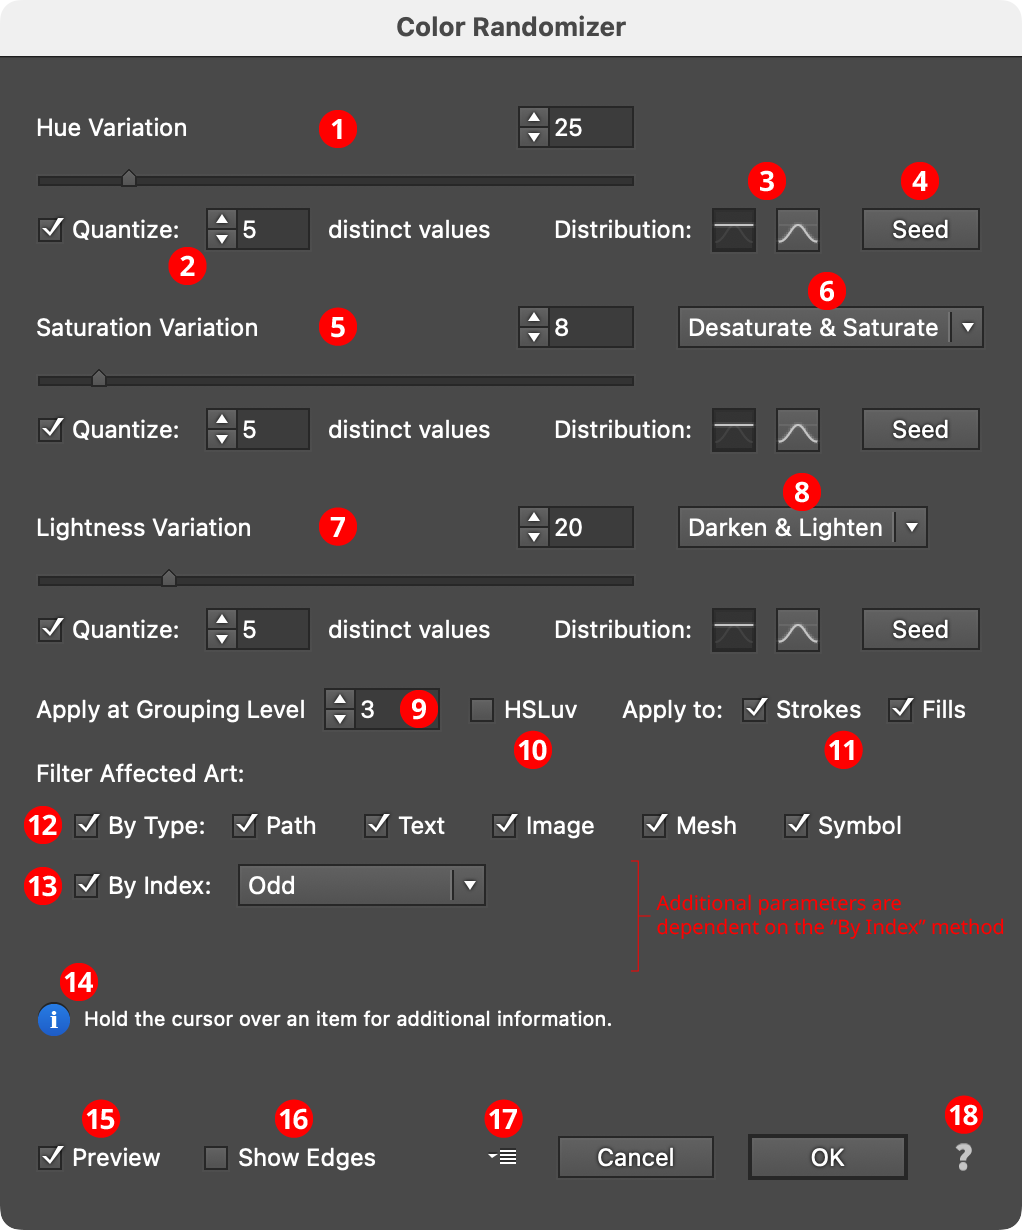
Color Randomizer Parameters Dialog
1. Hue Variation
The amount of variation in hue to apply, ranging from 0 (no variation) to 180 (maximum variation). The value can be changed with the slider or entered numerically in the text box.

Color Randomizer Hue Variation Examples
Variation values are equivalent to moving in both directions the specified angle away from the original hue around the color wheel. The full wheel is 360°, so a variation of 90 would move 90° or one-quarter of the way, in each direction around the wheel. Any hue between these two end colors may be randomly picked.
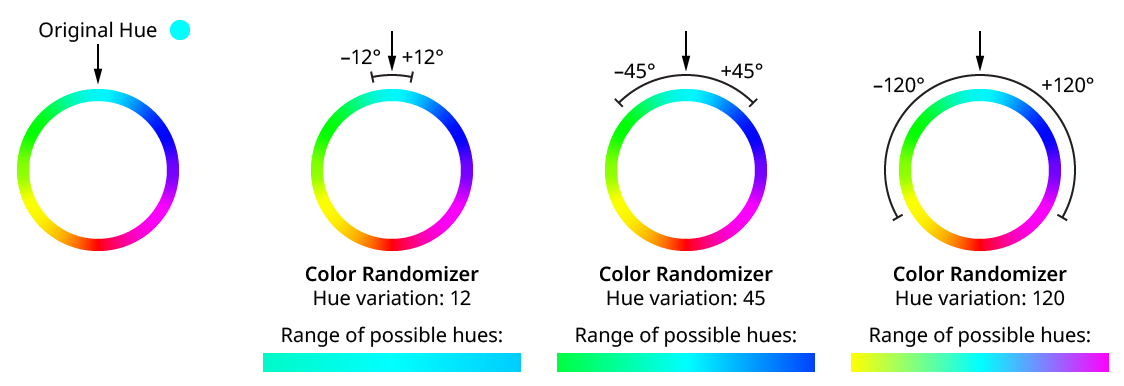
Color Randomizer Hue Variation
2. Quantize
Reduces the range of random variation values so only the specified number of distinct values are produced. For example, a hue variation of 45 would normally produce any value between –45 and 45 — say, 17.63. However, with Quantize turned on and 5 distinct values, the only values that will result are –45, –22.5, 0, 22.5, and 45. Quantized values always include the two end values with some number of evenly-spaced values in between.
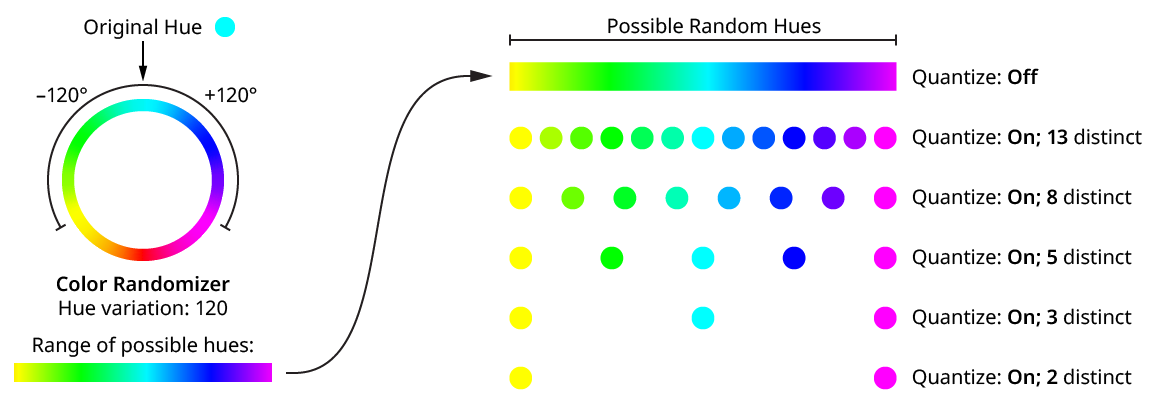
Color Randomizer Hue Variation Quantize
Note that when using a variation of 180 or close to it, the two end values result in the same or roughly the same hue (since they are both halfway around the color wheel, though in opposite directions), so the number of distinct values will appear to be one fewer than specified.
Using the HSLuv color space (see below) changes the way hue and saturation changes are made.
3. Distribution Curves
Specifies either a linear distribution in random values (all values in the range are equally likely to be chosen) or a Gaussian distribution (central values in the range are more likely to be chosen).

Color Randomizer Distribution
4. Seed
Each random seed number leads to a different sequence of random values. Clicking the button picks a new seed, thereby changing the look of the artwork. To view or specify the seed number directly, Option/Alt-click the button. This lets you recreate a previously-generated look.
5. Saturation Variation
The amount of variation in color saturation to apply, ranging from 0 (no variation) to 100 (maximum variation). Saturation changes are made in the same way that Photoshop and the Phantasm plugin calculates them (unless the HSLuv color space is being used; see below).
6. Saturation Direction
The dropdown menu specifies whether the saturation variation applies in both the negative and positive directions (Desaturate & Saturate), or in just one direction (Desaturate Only or Saturate Only).

Color Randomizer Saturation Variation Examples
7. Lightness Variation
The amount of variation in lightness to apply, ranging from 0 (no variation) to 100 (maximum variation).
8. Lightness Direction
The dropdown menu specifies whether the lightness variation applies in both the negative and positive directions (Darken & Lighten), or in just one direction (Darken Only or Lighten Only).

Color Randomizer Lightness Variation Examples
9. Apply at Grouping Level
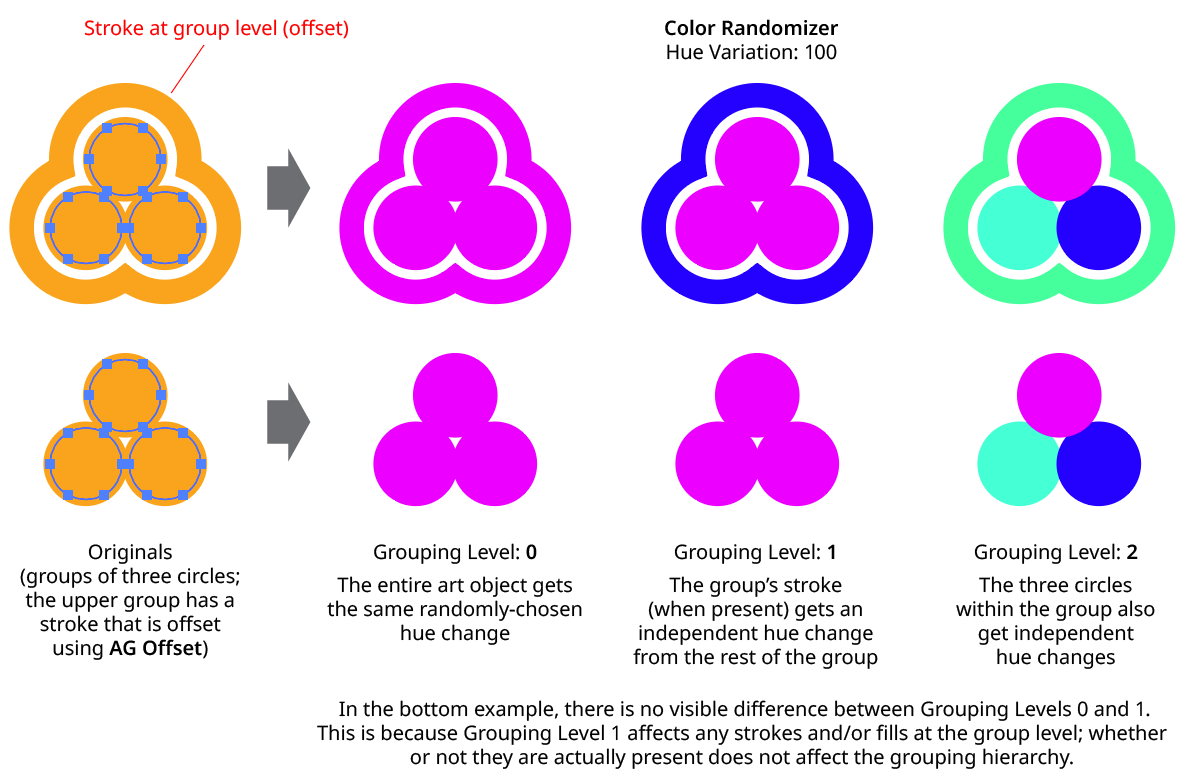
Unless a live effect is applied above all strokes and fills (a “pre” effect), or inside a stroke or a fill and above other live effects, the art object internally passed to it is always a group. And this group may contain other groups, and so on. The Grouping Level controls the level at which the effect is applied, which affects what elements in the hierarchy get different random opacities. It can range from 0 (representing the top-level art) to 29 (the deepest level of group nesting allowed in Illustrator).
In the simplest case (when the effect is applied to a single stroked-and-filled path), the live effect mechanism separates the stroke from the fill, and passes a stroke-only path and a fill-only path to the live effect in a group. So while a Grouping Level of 0 would apply the same (random) hue change to the stroke and fill (because it is applied at the top grouping level), a Grouping Level of 1 would cause it to choose a different hue change for the fill than that of the stroke:
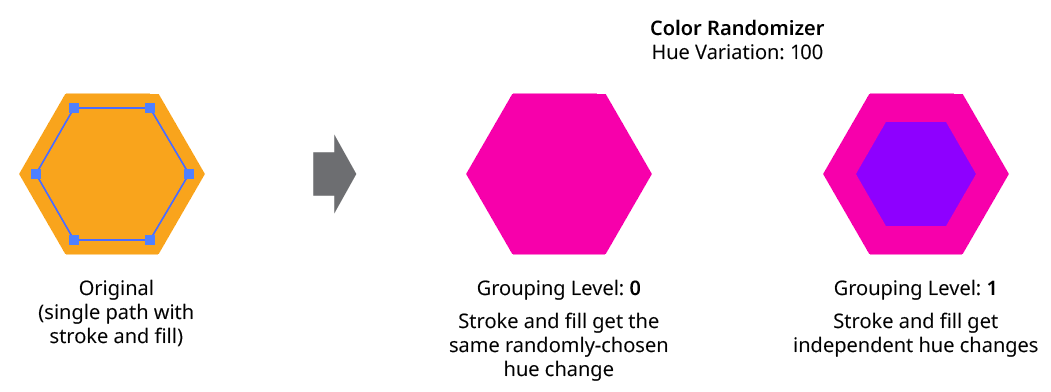
Color Randomizer Grouping Level on Simple Path
Next, consider the case of applying Color Randomizer to a group of stroked and filled paths. This top-level group may or may not have its own stroke and/or fill in its appearance. Here, the group passed to the effect has three groups inside it. One is composed of the paths with group level strokes (if there is no group level stroke, these would have no stroke or fill); another is composed of the paths with group level fills (similarly, if there is no group level fill, these would also have no stroke or fill); and the last is composed of the original paths in the group (and here, strokes and fills are not broken apart).
Color Randomizer Grouping Level on Group of Paths
In general, each nested group in the original art requires two Grouping Levels to “dig into,” due to the fact that a group stroke or fill can be present at each level. Because it can be difficult to anticipate what Grouping Level to use because the live effect mechanism can be complicated, it is recommended to simply increase the Grouping Level until the results are what is desired (changing the seed, if necessary, to see what is really changing independently). Setting the Grouping Level above the highest “valid” value will not cause a problem.
10. HSLuv
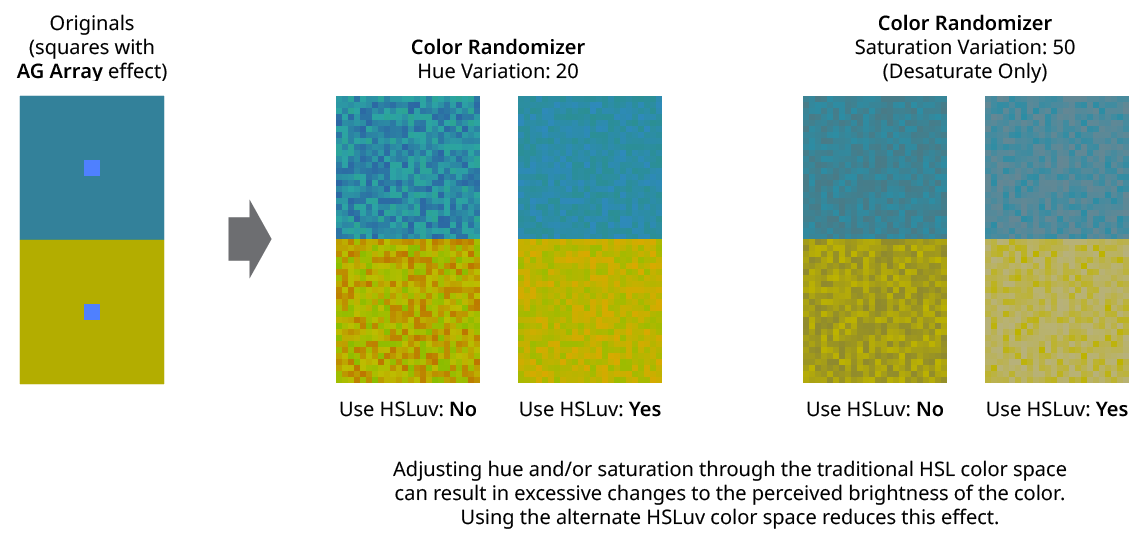
When enabled, the color changes are made using the HSLuv color space, which reduces perceived brightness changes when the hue and/or saturation is shifted.
Color Randomizer Use HSLuv
11. Apply To Strokes/Fills
Allows strokes and/or fills to be ignored by the effect. If both options are turned off, the effect would still apply to raster images.

Color Randomizer Apply to Strokes/Fills
12. Filter Affected Art By Type
When enabled, only the art types that have a checkmark next to them will have their colors randomly changed. For example, if many images are each grouped with a text caption, the colors of just the images could be randomized by turning off the “Text” checkbox:

Color Randomizer Filter by Type Example
13. Filter Affected Art By Index
When enabled, each art object’s index is used to determine whether it should have its color randomly changed, using one of seven different methods. The index is simply an integer sequentially assigned to each object at the specified Grouping Level in the order it is encountered, starting with zero for the first object. Generally, the index increases going downwards in the stacking order; however, other live effects present in the appearance stack may change this order, sometimes randomly (such as PathFinder effects). The available By Index methods are as follows:
a. First: Only the first n objects are affected, where n is the specified value.

Color Randomizer by Index First Controls

Color Randomizer Filter by Index - First
b. Last: Only the last n objects are affected, where n is the specified value.

Color Randomizer by Index Last Controls

Color Randomizer Filter by Index - Last
c. First or Last: Only the first and last objects are affected.
d. Odd: Only objects with an odd index (1, 3, 5, 7...) are affected.
e. Even: Only objects with an even index (0, 2, 4, 6...) are affected.

Color Randomizer Filter by Index - Odd & Even
f. Pattern: Creates a repeating pattern of matching indices based on the three pattern parameters.

Color Randomizer by Index Pattern Controls
Initial Skip specifies the number of indices to skip over at the start (art with these indices will not be affected). Then, Match specified the number of indices that will match and therefore be affected. Finally, Skip specifies the number of indices to skip over following the matching indices. When the total of the values in the three parameters is less than the number of eligible art objects, the pattern repeats, using the Match and Skip values in alternation.

Color Randomizer Index by Pattern
g. Randomly: Each art object has the specified random chance (from 0% to 100%) of being affected. The parameter has a seed value that is independent from the hue/saturation/lightness seed values. Just as with those seed values, clicking the button picks a new seed, thereby changing the look of the artwork. To view or specify the seed number directly,
Option/Alt-clickthe button. This lets you recreate a previously-generated look.

Color Randomizer by Index Randomly Controls

14. Informational area
Shows a brief description of each control when the cursor is being hovered over it.
15. Preview
As with all live effects, when enabled, changing a parameter will immediately update the artwork while the dialog is still open.
16. Show Edges
By default, artwork selection edges are automatically hidden when the Color Randomizer parameters dialog is up, to make it easier to see color changes. However, by toggling the checkbox on, they may be shown again.
17. Defaults Popup Menu
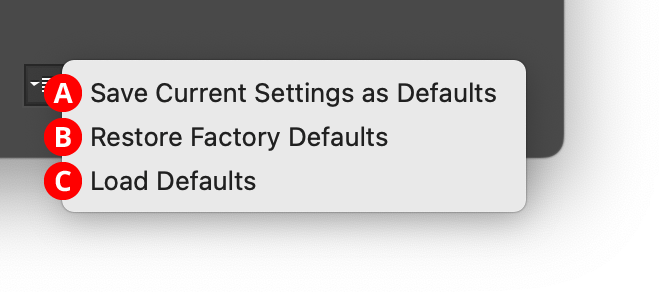
Contains several functions concerning the default Color Randomizer settings. Default settings are those that initially appear in the parameters dialog whenever Color Randomizer is applied to art as a new effect (i.e., not when adjusting an existing instance of the effect).
Color Randomizer Defaults Menu
A. Save Current Settings as Defaults: The settings that are currently displayed in the dialog will be saved and used as the defaults in the future.
B. Restore Factory Defaults: The default settings will be restored to those that were in place when the plugin was installed and run for the first time. They will also automatically be loaded into the dialog.
C. Load Defaults: All current settings will be replaced with the default settings (which may have been customized through the first menu item).
18. Help Button
Opens the help documentation in the Astute Manager. If this does not automatically appear, please ensure your Astute Manager is running first.
Illustrator Location:
Illustrator Main Menu > Object > Create Color Stamp
Color Stamp is an Astute Graphics function for Adobe Illustrator that colorizes any number of closed paths, taking each color from an average of the art that lies below them. Color Stamp is part of the SubScribe plugin.
Menu Item Location
Color Stamp is implemented as the single menu command Create Color Stamp, located in the main Object menu. It appears in the same upper section as the Rasterize... and Create Gradient Mesh... commands:

Color Stamp Menu Location
The command may be assigned a keyboard shortcut in the usual manner through the native Keyboard Shortcuts dialog.
Operation
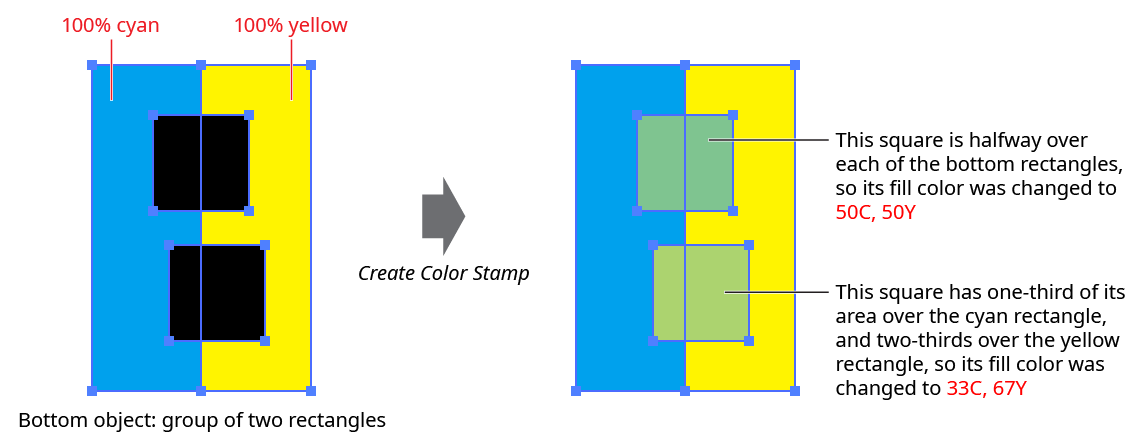
To use Color Stamp, make sure at least two objects are selected. The selected object at the bottom of the stacking order (the “reference” object) can be any type of art, including a group. The selected top objects must include at least one closed path or group containing a closed path. If the correct selection is not present, a tip dialog will automatically be shown after choosing the Create Color Stamp menu item. Otherwise, the fill color of each closed path within the selected top objects is changed to match the average color of the part of the reference object that is being covered by that path. If there is nothing under the path, it will be colored white. Any strokes, if present, are not affected.
Color Stamp Basic Operation
The real utility and power of Color Stamp can be better appreciated when applying it to dozens or hundreds of small paths to create mosaics:
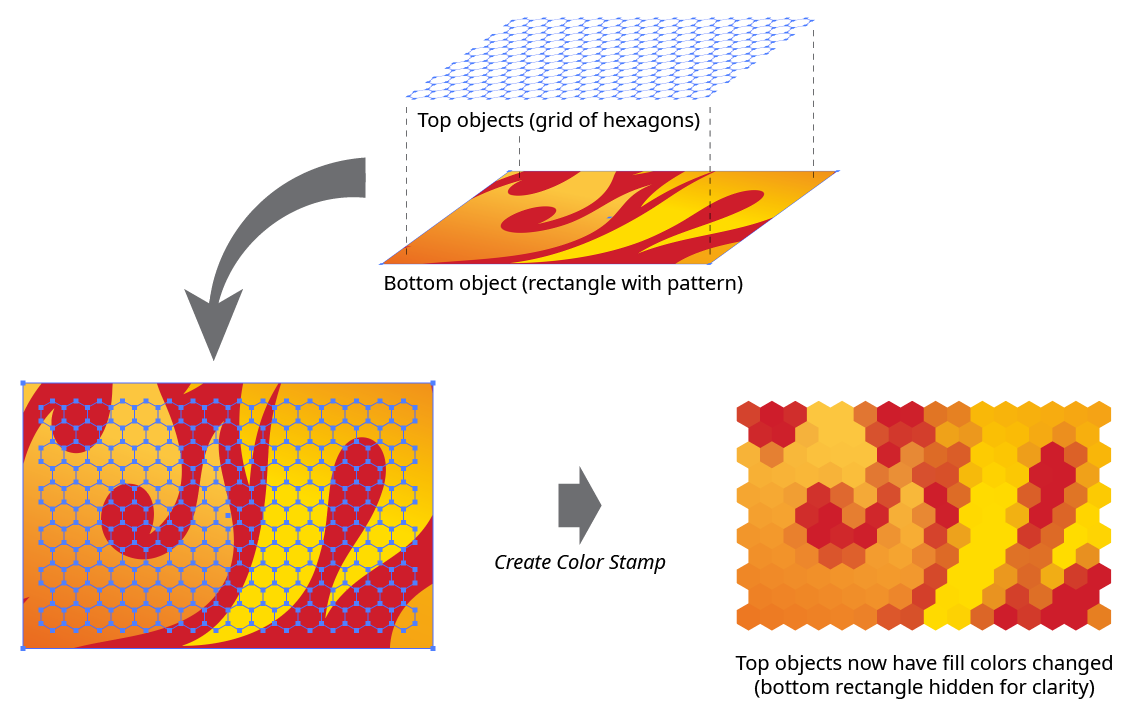
Color Stamp Example
As Color Stamp does not work in a “live” sense, it would need to be re-applied if the top objects are subsequently moved in relation to the reference object, or if the reference object’s colors are changed.
Illustrator Location:
As the AG Color Select tool has several keypresses which can add or change its functionality, we suggest installing the free Astute Graphics plugin Astute Buddy, which creates a panel that dynamically updates to inform you of the various keys which can be pressed in the tool’s current context.
To use the AG Color Select tool, simply position it over an art object whose color you want to pick up. By default, the tool continually shows a large preview of the current color in the center of the cursor using an annotated “chip” next to the cursor:
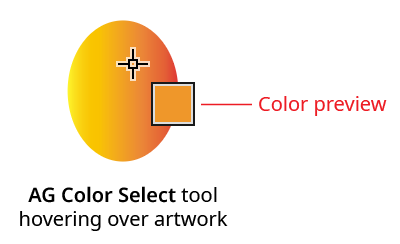
AG Color Select Example
When the previewed color is the desired one, clicking with the tool assigns it to the current fill or stroke, whichever is active. If one or more artwork objects are selected, the color is also assigned to that art’s fill or stroke, if they exist, just as with the native Eyedropper tool when pressing the Shift key (which forces color-only mode). However, unlike the eyedropper, the AG Color Select tool will work with live effects:
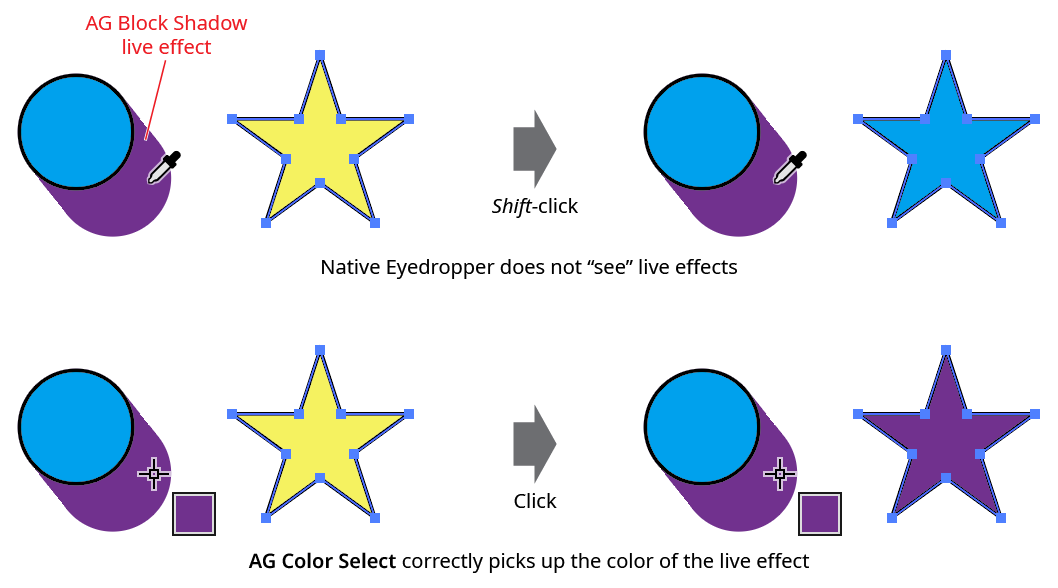
AG Color Select Vs. Native Eyedropper
When a semi-transparent object is sampled with the native Eyedropper in color mode, it does not “see” the transparency and instead picks up the full-strength color. However, AG Color Select gives you a choice of how to handle semi-transparent objects. When saving a color to a swatch, or if no objects are selected, transparency can’t be retained, so AG Color Select will flatten the transparency and pick up the reduced strength color. But when assigning the color to the fill or stroke of selected objects and the Shift key is held down, the objects(s) are given the full-strength color but have their stroke or fill opacity changed to match the original color:
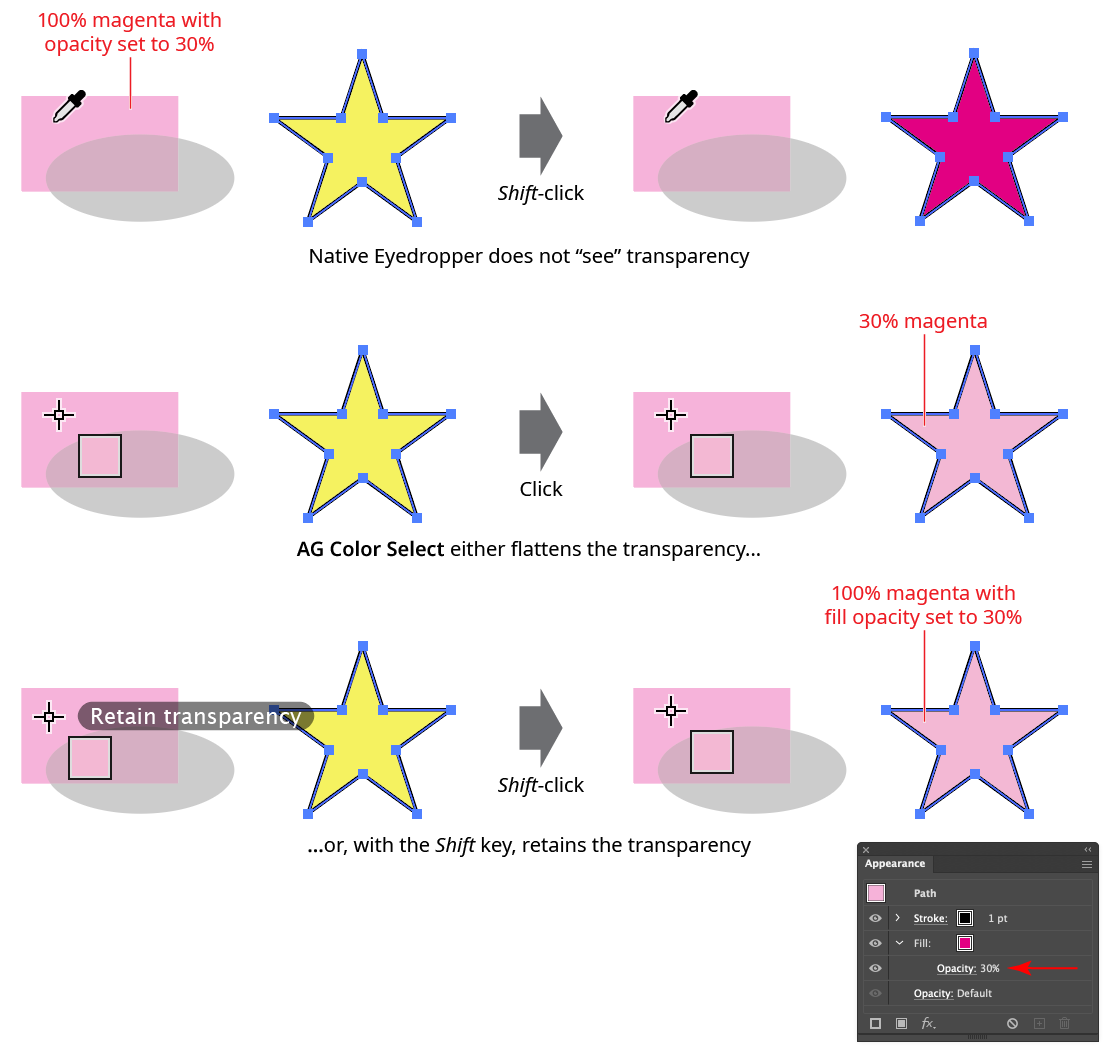
AG Color Select Vs. Native Eyedropper Example
To save the selected color directly to a swatch, hold down the Option/Alt key when clicking:

AG Color Select Save to Swatch
To save as a global swatch, hold down Shift in addition to Option/Alt:

AG Color Select Save to Global Swatch
The AG Color Select tool internally rasterized artwork to merge arbitrarily complex blend modes and opacities to a single one. As Illustrator only rasterizes at 8-bits/channel (i.e., integers between 0 and 255), small changes in the sampled color compared to the original can occur. For example, a 70% cyan color would be rasterized with a cyan pixel value of 178, which, when converted back to an Illustrator color, produces a cyan value of 178/255 = 0.69804 or 69.8%. Although this color would not not distinguishable from the original if the document were printed or exported as an image, Illustrator would still see them as different colors (for example, by the Select Same Fill Color function).
For this reason, and because the AG Color Select tool does not work with spot colors, and does not pick up art styles, it should not be viewed as a replacement for the Eyedropper tool. Instead, it complements the native tool when working with live effects, transparent colors, and other situations where the Eyedropper gives an undesirable result.
Illustrator Location:
Advanced Toolbar > AG Color Select Stack > Gradient From Art Tool
Tool Location and Cursors
The Gradient From Art tool appears in Illustrator’s main toolbar (which must be in Advanced mode: View > Toolbars > Advanced), stacked under the AG Color Select tool. As with other stacked tools, click and hold on the top tool icon to display the tools stacked under it.

Gradient From Art Tool Location
The Gradient From Art tool’s primary cursor is a crosshair, which can have badges; there is an additional form when moving a sampling line node or segment:

Gradient From Art Tool Cursors
Tool Operation
As the Gradient From Art tool has several keypresses for certain operations, we suggest installing the free Astute Graphics plugin Astute Buddy, which creates a panel that dynamically updates to inform you of the various keys which can be pressed in the tool’s current context.
The Gradient From Art tool is works in conjunction with the associated Gradient From Art panel, which should be open and accessible. If you are using the free Astute Graphics plugin DirectPrefs, you can have the Gradient From Art panel automatically be shown when the Gradient From Art tool is selected.
Note: For clarity, some of the images in this manual show a sampling line on an empty part of the artboard, but this is not particularly useful as it would simply create a gradient which is all transparent or all white. In reality, the line would always be created above actual artwork.
Creating a sampling line with the Gradient From Art tool is like creating a straight segment-only path with the native Pen tool: the cursor is clicked at the desired locations on the artboard to create nodes (visualized as small circles), which the sampling line passes through. After the first node is placed, a “rubberband” will follow the cursor previewing the next segment location. Holding down Shift constrains the new segment to 45° angles around the general constrain angle.

Gradient From Art Tool Sampling Line Creation
To place the last node, press the Option/Alt key while clicking to create it:

Gradient From Art Tool Sampling Line Creation Example 2
The sampling line can also be ended by pressing the Esc key while the cursor is moving. However, it is not strictly necessary to manually end the sampling line, as this will happen automatically when a different tool is selected.
Because single segment (two-node) sampling lines are commonly drawn, clicking-and-dragging, by default, will automatically end the line with the single segment.
To continue a sampling line which was previously terminated, click on either end node; the rubberband will become active again and the line can be continued. If it is the starting node that was clicked, the sampling line reverses itself.

Gradient From Art Tool Restart Line
Nodes or segments can be moved by dragging them (the cursor changes to a solid, tail-less arrowhead); pressing Shift constrains the motion to 45° angles around the general constrain angle. Nodes can be deleted by Option/Alt-clicking on them (the cursor shows a minus sign), and a new node may be added along an existing segment by Option/Alt-clicking on the segment (the cursor shows a plus sign).
A new sampling line may be started in two ways. If the current line is complete (not in the process of being drawn), then simply clicking anywhere other than on the existing line will begin a new line. If the current line is still being drawn, and the tool preference Dragging Starts New Line is enabled (the default), then dragging the cursor will clear the current line and start a new one.
The sampling line may be deleted without starting a new one by Option/Alt-clicking a blank area of the canvas. All changes made to the sampling line are affected by the normal undo and redo operations.
Illustrator Location:
Illustrator Main Menu > Window > Astute Graphics > Gradient From Art
The menu item to show and hide the Gradient From Art panel can be found in the main menu under Window > Astute Graphics > Gradient From Art. When the Gradient From Art tool is not in use, the panel displays only a “Click to select” message; clicking anywhere on the panel selects the tool and displays all the controls.
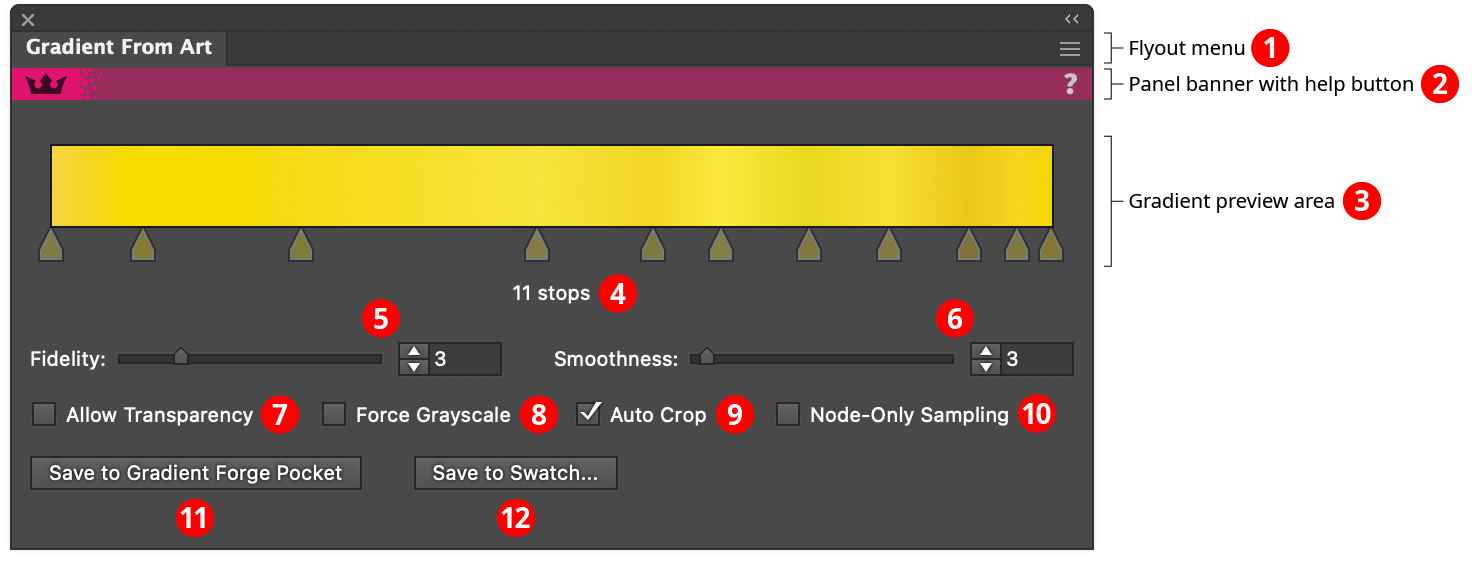
Gradient From Art Panel
1. Flyout menu
Contains a single menu item which brings up the Preferences dialog (see Gradient From Art: Preferences).
2. Panel banner
The Gradient From Art panel banner has a help button on the right which opens the help documentation in the Astute Manager. If this does not automatically appear, please ensure your Astute Manager is running first.
3. Gradient Preview Area
Shows the gradient that would result from using the sampling line with the current settings. If the sampling line is edited, or a parameter is changed, or the artwork is changed, then the gradient is automatically recalculated. The gradient’s stops are displayed for reference, but are not directly editable. If no sampling line exists, the preview area will display “No Sampling Line”, and if the gradient is incomplete or in the process of being calculated, the preview area will display “Calculating...”.
4. Stop Count
Shows the current number of stops in the gradient. A warning symbol will be displayed next to the stop count when it exceeds 256 stops, because Illustrator does not render stops past that limit.
5. Fidelity
Not available when Node-Only Sampling is enabled. Fidelity determines how closely the gradient matches the original sampled colors. It can range from 1 to 10, with a default of 3. Higher fidelity values retain subtle color changes at the expense of creating a gradient with more stops, which generally makes it more difficult to manually tweak later.
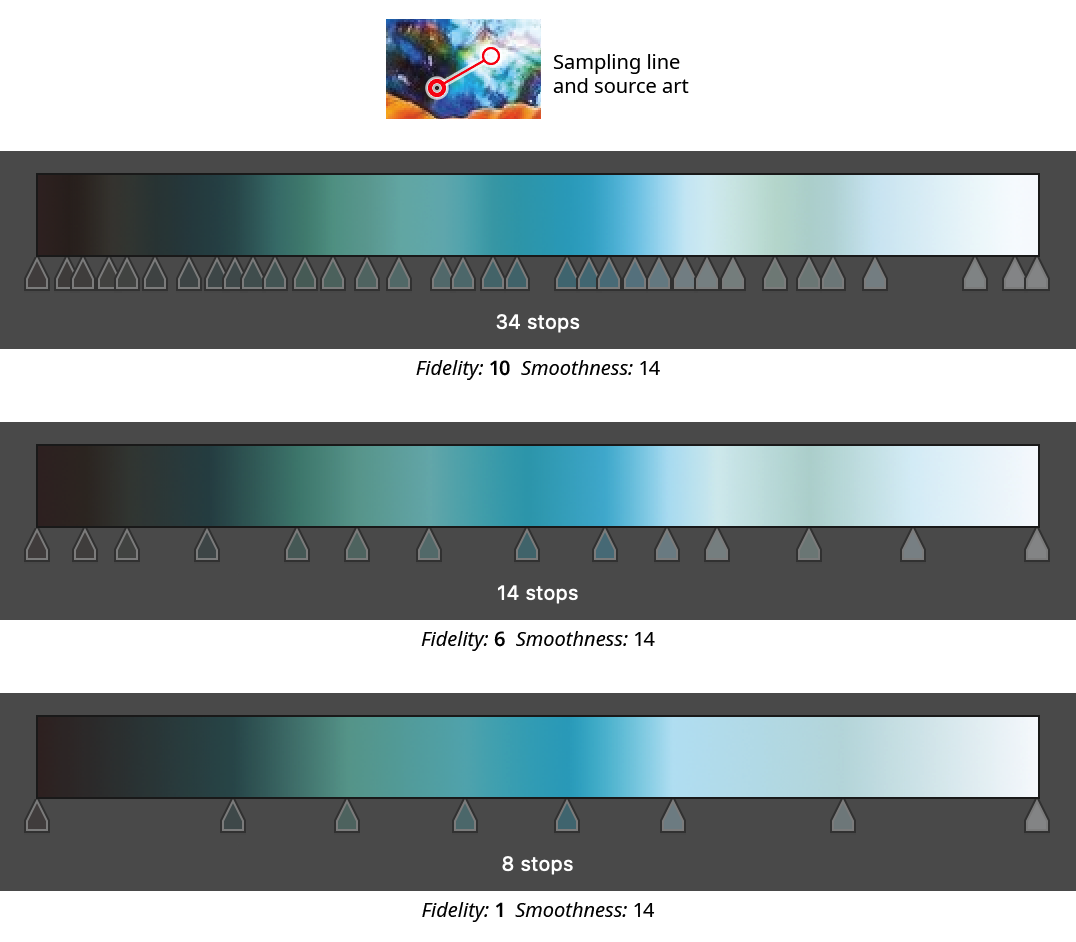
Gradient From Art Panel Fidelity Examples
6. Smoothness
Not available when Node-Only Sampling is enabled. Smoothness controls how gradually transitions from one color to another are made; it is essentially a kind of Gaussian blur for stop colors. This is most evident when sampling from source art that has sharp transitions. The setting can range from 0 to 100, with a default of 3. The lowest value will produce very sharp transitions, but it does not produce stacked gradient stops, which are not recommended due to these types of gradient’s poor rendering. (They can, however, be created using the Gradient Forge panel).
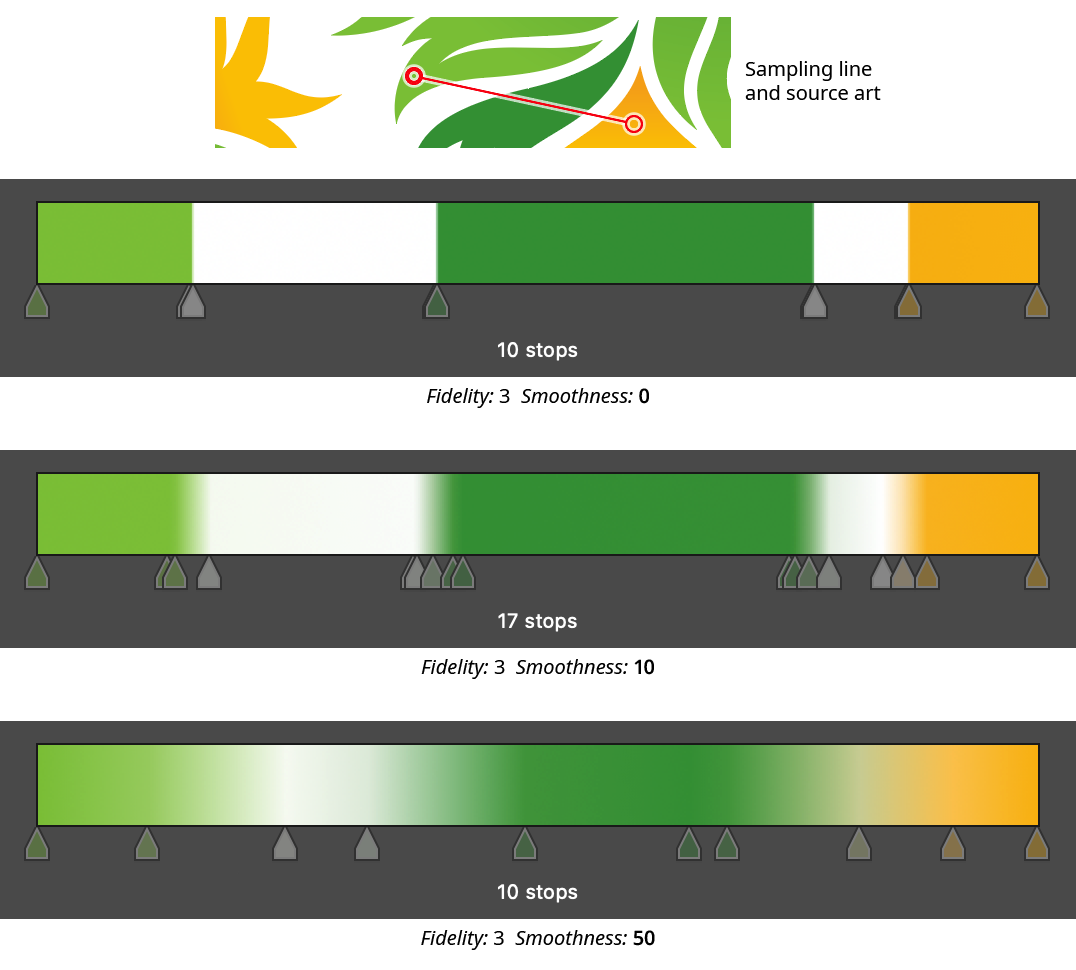
Gradient From Art Panel Smoothness Examples
7. Allow Transparency
When enabled, transparency in the sampled art will be retained in the gradient stops. If there is no artwork under a sampling location, the color will be set to 100% transparent.
8. Force Grayscale
When enabled, all sampled colors will be converted to their grayscale equivalent.
9. Auto Crop
Not available when Node-Only Sampling is enabled. When Auto Crop is enabled, white or partially transparent stops are trimmed off the ends of the gradient (unless the gradient only has two stops). This makes it possible to sample artwork from end to end without having to place the sampling line end nodes exactly on the edges of the object(s):
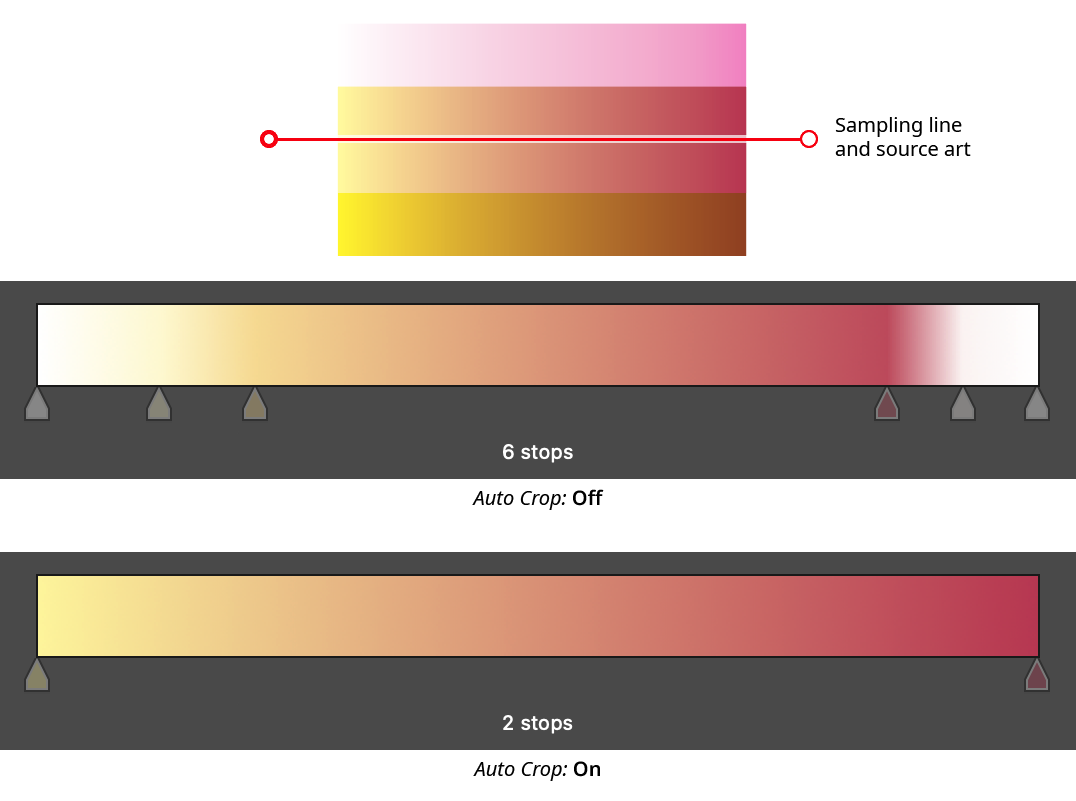
Gradient From Art Panel Auto Crop
10. Node-Only Sampling
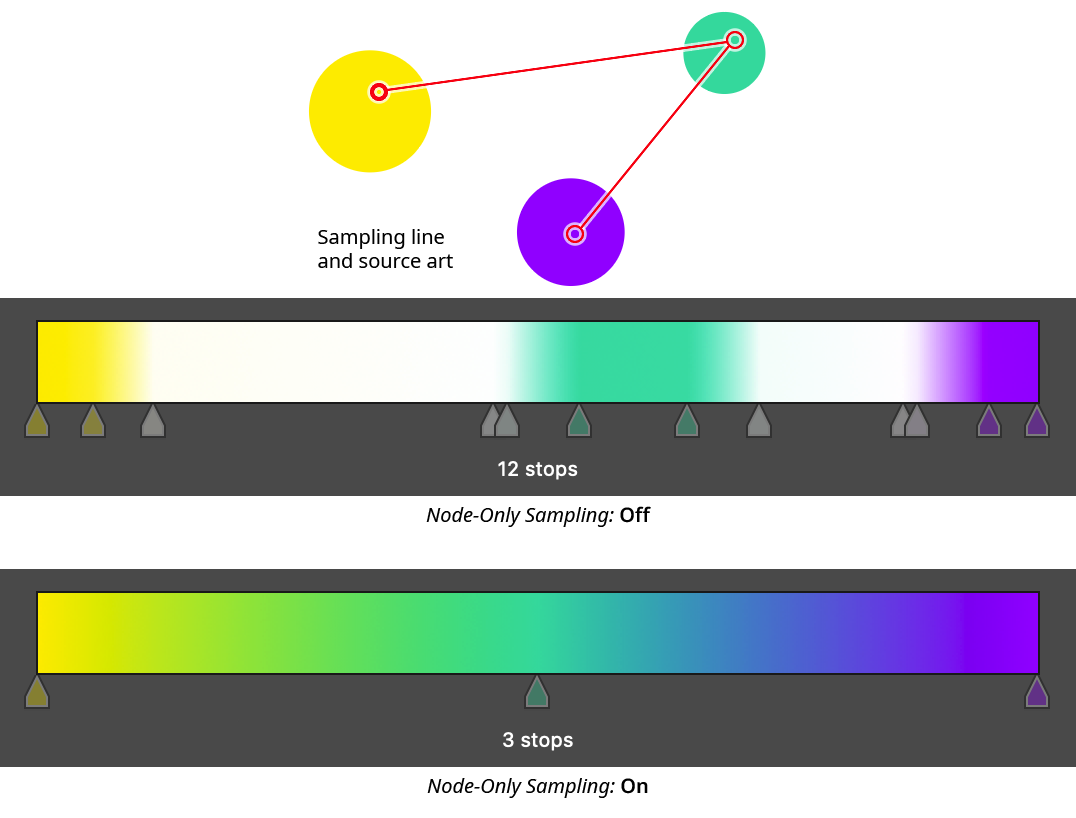
When enabled, colors for the gradient stops are not sampled continuously along the sampling line, but rather only at the nodes. Each node corresponds to exactly one stop, which will be evenly spaced along the gradient.
Gradient From Art Panel Node Only Sampling
11. Save to Gradient Forge Pocket Button
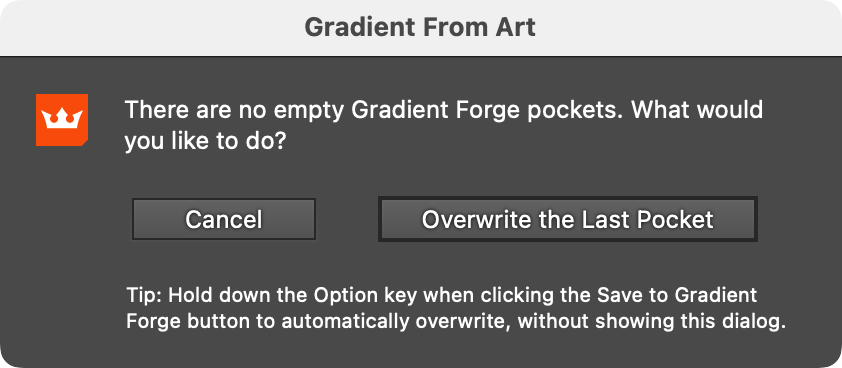
Saves the previewed gradient into a pocket on the Gradient Forge panel. The gradient will be put into the first empty pocket. If there are no empty pockets, a warning dialog will appear, allowing you to overwrite the last pocket.
Gradient From Art No Free Pockets Warning
As noted at the bottom of the warning dialog, holding Option/Alt when clicking the Save to Gradient Forge Pocket button will automatically overwrite the last pocket if there are no free pockets.
12. Save to Swatch... Button
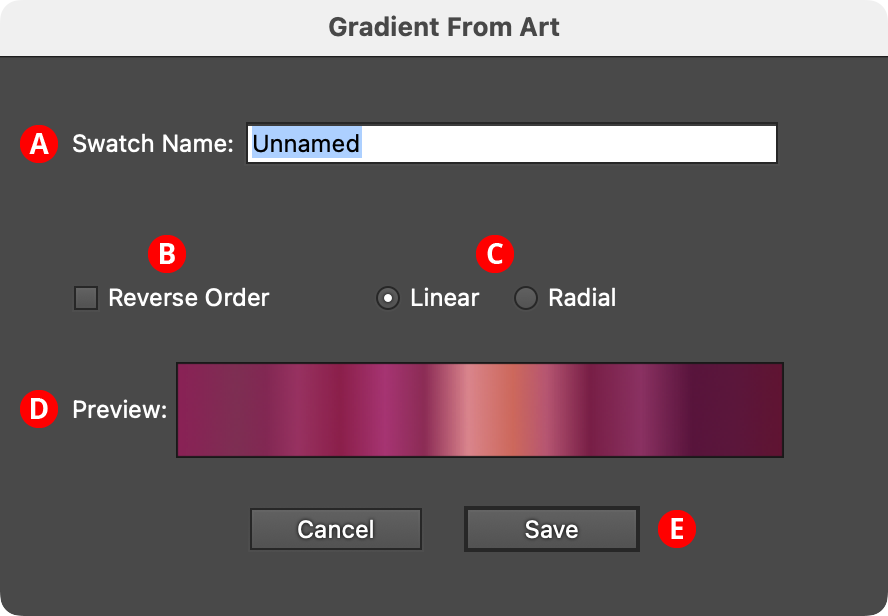
Saves the previewed gradient into a swatch. The button brings up a dialog allowing the gradient to be named, and its direction and type changed, before it is saved:
Gradient From Art Save to Swatch Dialog
A. Swatch Name: The user-specified name of the new gradient swatch.
B. Reverse Order Checkbox: Reverses the order of the stops.
C. Linear/Radial Buttons: Specify whether the new gradient will be linear or radial.
D. Preview Area: Previews the gradient with the current settings.
E. Save Button: Saves the gradient as a swatch when clicked; the new swatch is automatically selected and displayed in the Gradient Forge panel, where it can be edited further.
If a sampling line is present (i.e., a gradient is being previewed in the panel), pressing the Enter key will have the same effect as clicking the Save to Swatch... button.
Illustrator Location:
Illustrator Main Menu > Window > Astute Graphics > QuickOps
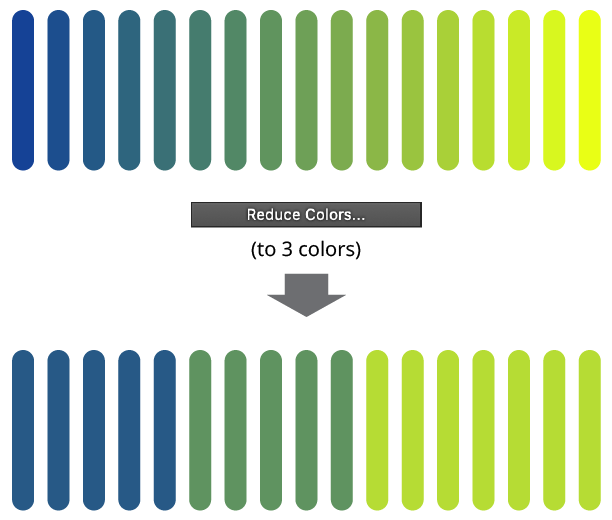
The Reduce Colors operation reduces the number of colors used in strokes, fills, and (optionally) gradient stops by averaging and combining similar colors together. The resulting colors may be saved as regular swatches or as global swatches.
QuickOps Reduce Colors Overview
Clicking the button brings up the settings dialog:
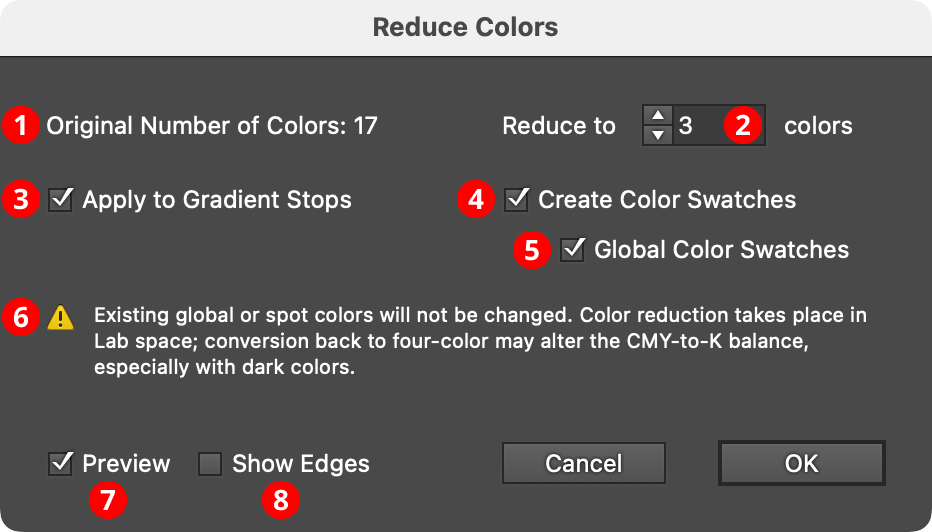
QuickOps Reduce Colors Settings
1. Original Number of Colors
Shows the original number of colors in the selected artwork which can be reduced. Reducible colors are the non-global, non-spot colors in strokes, fills, and (when Apply to Gradient Stops is enabled) gradient stops.
2. Color Count
The desired number of colors in the final artwork, from 1 to 1000. The value must be lower than the original number of colors.

QuickOps Reduce Colors Examples
3. Apply to Gradient Stops
Available when there are linear or radial gradients in the selected artwork. When enabled, the reducible colors in the stops of each gradient are also affected. (Note that as with all gradients, there will still be additional intermediate colors created between the stops, if the stop colors are different).
4. Create Color Swatches
When enabled, new swatches are created for each of the reduced colors.
5. Global Color Swatches
Available when the Create Color Swatches setting is enabled. The Global Color Swatches setting makes each new swatch a global color, so that the artwork can be recolored more easily afterwards.
6. Warnings
Possible warning include:
Existing global or spot colors will not be changed. To affect these colors, use one of the native Edit > Edit Colors > Convert to... menu items to change them to CMYK or RGB first.
The selection contains colors in patterns, artwork types, or live effects which will not be changed. The Reduce Colors operation is meant only for flat colors and linear/radial gradients in strokes and fills. The colors used in gradient meshes, raster images, symbols, and so on will not be affected.
Color reduction takes place in Lab space; conversion back to four-color may alter the CMY-to-K balance, especially with dark colors. This warning is shown when reducing colors in a CMYK document.
7. Preview
When Preview is enabled, the artwork’s new appearance with the colors reduced is shown on the artboard, and will update whenever the settings are changed. Turning Preview off will show the artwork in its original state, allowing you to toggle to quickly see “before and after.”
8. Show Edges
By default, artwork selection edges are automatically hidden when the Reduce Colors settings dialog is up, to make it easier to see the color changes. However, by toggling the checkbox on, they may be shown again.
