Gradient
 Width Gradient
Width Gradient Tool
![]() Replacing Art Panel
Replacing Art Panel
 Gradiator
Gradiator Panel
Gradiator Panel Flyout Menu
 Gradient Forge
Gradient Forge Panel
Gradient Forge Panel Flyout Menu
 Gradient From Art
Illustrator Location:
Advanced Toolbar > Width Gradient Tool
Tool Location and Cursor Appearance
The Width Gradient tool appears in Illustrator’s main toolbar (which must be in Advanced mode: View > Toolbars > Advanced).

Width Gradient Tool Location
The Width Gradient tool’s cursor is a crosshair, accompanied by a caption if no paths are selected:

Width Gradient Cursors
Illustrator Location:
Advanced Toolbar > Width Gradient Tool
As the Width Gradient tool has several keypresses for certain operations, we suggest installing the free Astute Graphics plugin Astute Buddy, which creates a panel that dynamically updates to inform you of the various keys which can be pressed in the tool’s current context.
The Width Gradient tool works in conjunction with the associated Width Gradient panel, which should be open and accessible. If you are using the free Astute Graphics plugin DirectPrefs, you can have the Width Gradient panel automatically be shown when the Width Gradient tool is selected.
Using the Width Gradient tool is similar to using the Gradient tool in Photoshop, except an actual color-to-color gradient is not generated. Instead, all selected paths that fall within the bounds of the virtual gradient are converted to variable width (if they aren’t already), and their width markers are adjusted using values corresponding to each location along the virtual gradient, as specified in the Width Gradient panel. Adjustment may be in either an absolute sense (the widths are changed to specific values) or a relative sense (the widths are changed to a percentage of their original values).
For example, if the panel were set to adjust in an absolute, linear fashion, with start and end widths of 4 pt and 20 pt, then after dragging the tool, spots along the path(s) that were in line with the start of the gradient would get width markers set to 4 pt, while those in line with the end of the gradient would get width markers set to 20 pt. Those in the middle would receive a width of 12 pt (because half of 4 + 20 is 12, and the panel graph is linear).

Width Gradient Basic Example
Of course, the line in the previous example could easily have had its widths set manually with the native Width tool, since only a single width marker at each end was necessary. The real power of Width Gradient comes when multiple paths are adjusted, possibly in a non-linear manner:
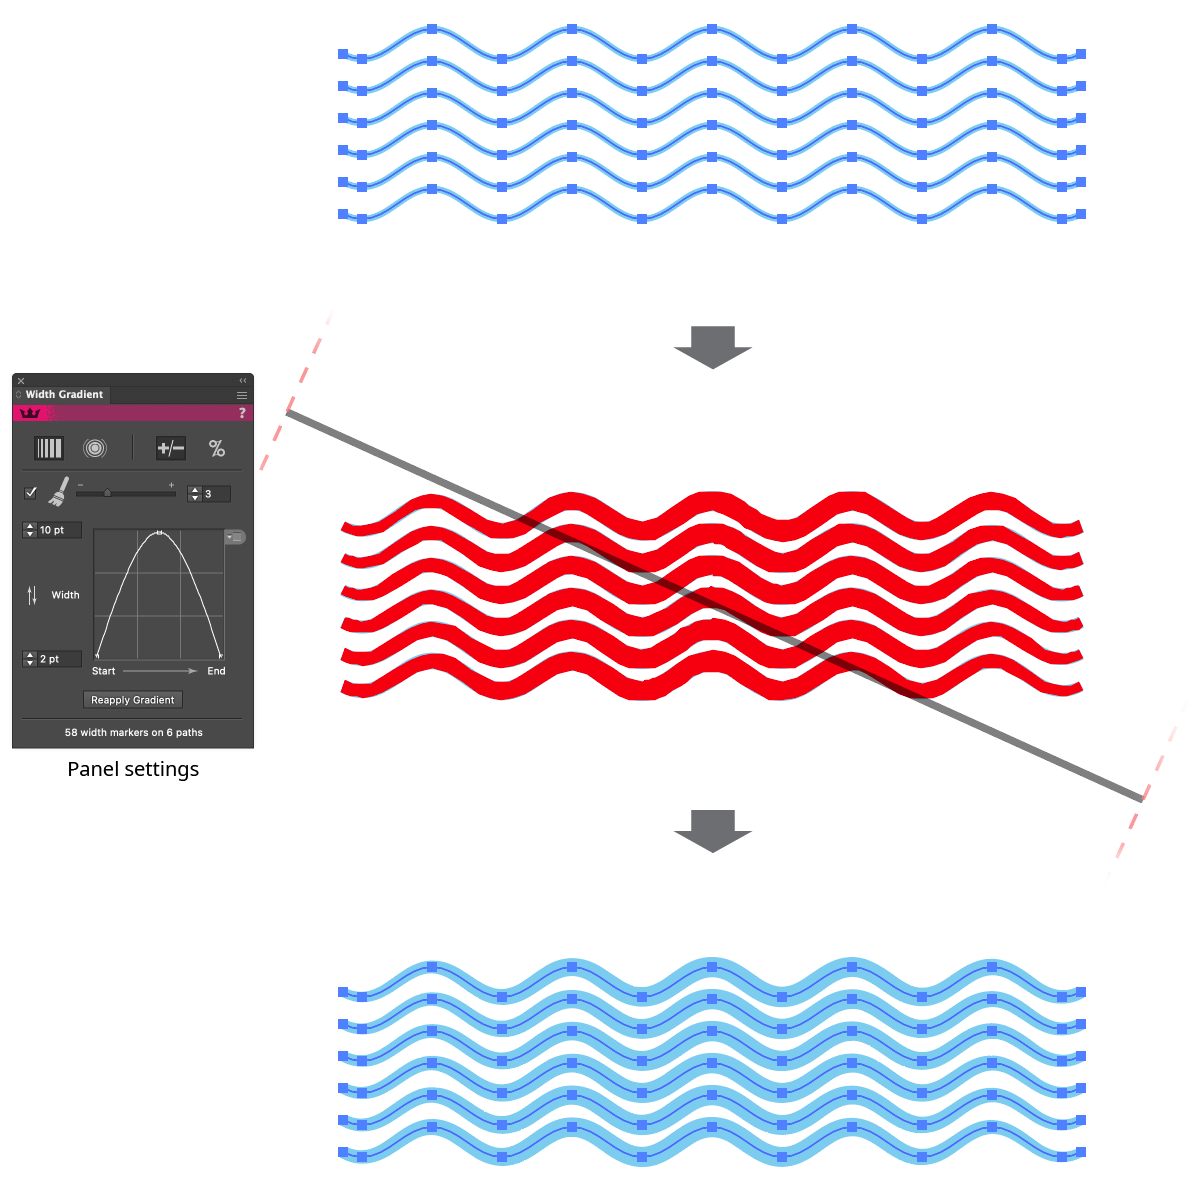
Width Gradient Example
The tool draws annotations while in use, showing the start and end points of the gradient (represented by a gray, semi-transparent line), and, using semi-transparent dashed lines, either perpendiculars to the gradient (for linear gradients) or a circle at the outer edge of the gradient (for radial gradients).

Width Gradient Tool Annotations
In addition, by default, the new widths of the path(s) are previewed, using a solid, user-specifiable color (red, by default). This preview is only approximate and may not agree exactly with the final paths. In particular, corner joins and end caps are not previewed.
While dragging with the Width Gradient tool, a number of keypresses may be used:
Shift: Constrains the gradient angle to 45° angles around the general constrain angle.
Option/Alt: Toggles between linear and radial mode.
Space: Repositions the entire gradient.
Up Arrow/Down Arrow: Adjusts the bottom width value on the panel (typically assigned to the start of the gradient). For each keypress, the value is changed by 1 pt (in absolute mode) or 10% (in relative mode).
Left Arrow/Right Arrow: Adjusts the top width value on the panel (typically assigned to the end of the gradient). For each keypress, the value is changed by 1 pt (in absolute mode) or 10% (in relative mode).
C: Switches the width preview color (if enabled) between red and blue.
S: Switches the affected strokes (between all strokes, which is the default), and the focal stroke only. This is only makes a difference if the path has multiple strokes on it:
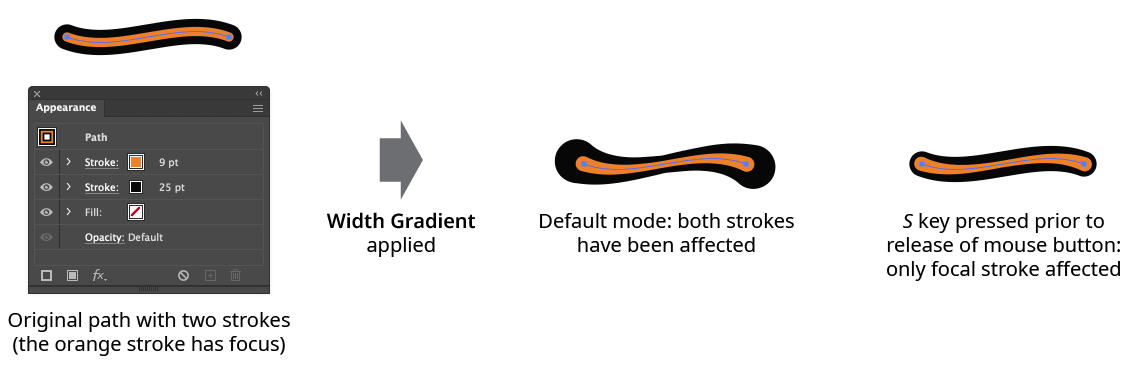
Width Gradient All Strokes vs. Focal Stroke
U: Temporarily disables Smart Guides, if they were enabled when the drag started.
W: Swaps the adjustment widths. For linear gradients, this is the same as reversing its direction.
Although Width Gradient can be used on compound paths, because each subpath must share the same width profile, results may not be as expected. A warning dialog will be displayed in this situation:
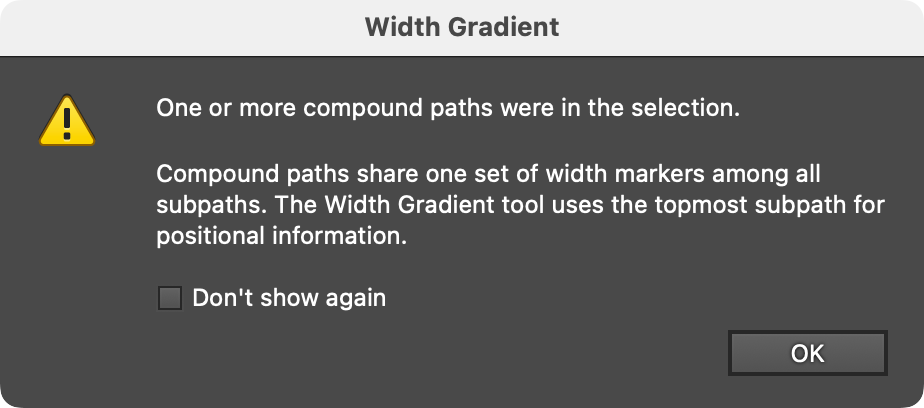
Width Gradient Compound Path Warning
Illustrator Location:
For attributes which specify a gradient or pattern (such as a path stroke or fill), clicking on the color chip will being up the corresponding picker dialog.
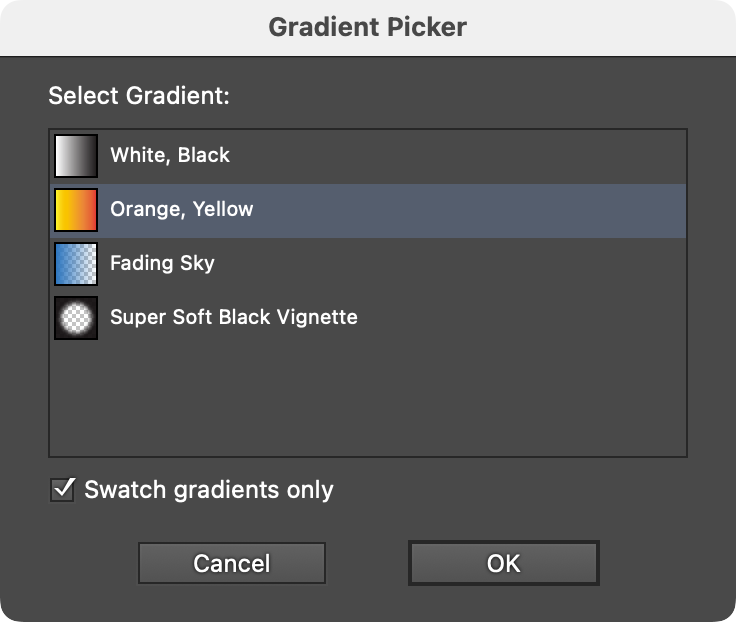
FindReplace Art Gradient Picker
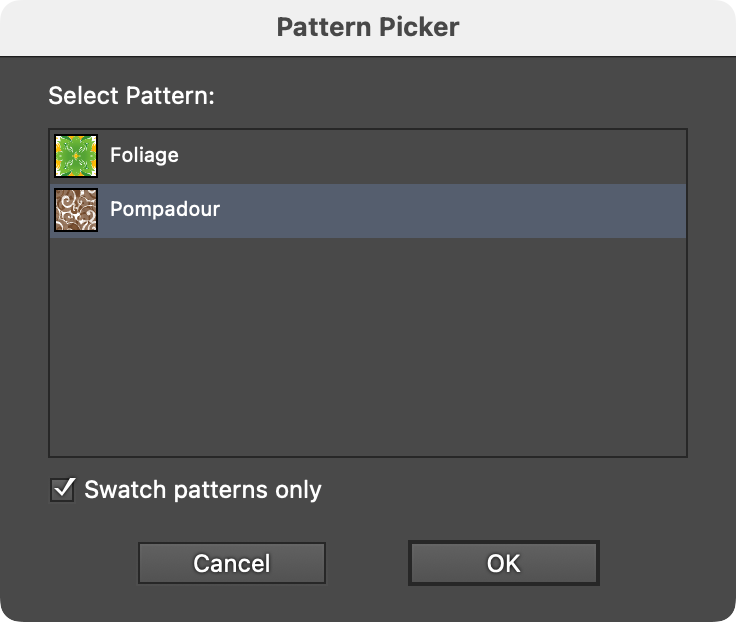
FindReplace Art Pattern Picker
In the Gradient Picker, Swatch gradients only controls whether only gradients that have associated swatches are shown in the list (there are often many unnamed gradients defined but not available as a swatch).
In the Pattern Picker, Swatch patterns only controls whether only patterns that have associated swatches are shown in the list.
Illustrator Location:
Illustrator Main Menu > Window > Astute Graphics > Width Gradient
The menu item to show and hide the Width Gradient panel can be found in the main menu under Window > Astute Graphics > Width Gradient. When the Width Gradient tool is not in use, the panel displays only a “Click to select” message; clicking anywhere on the panel selects the tool and displays all the controls, which affect the next use of the tool.
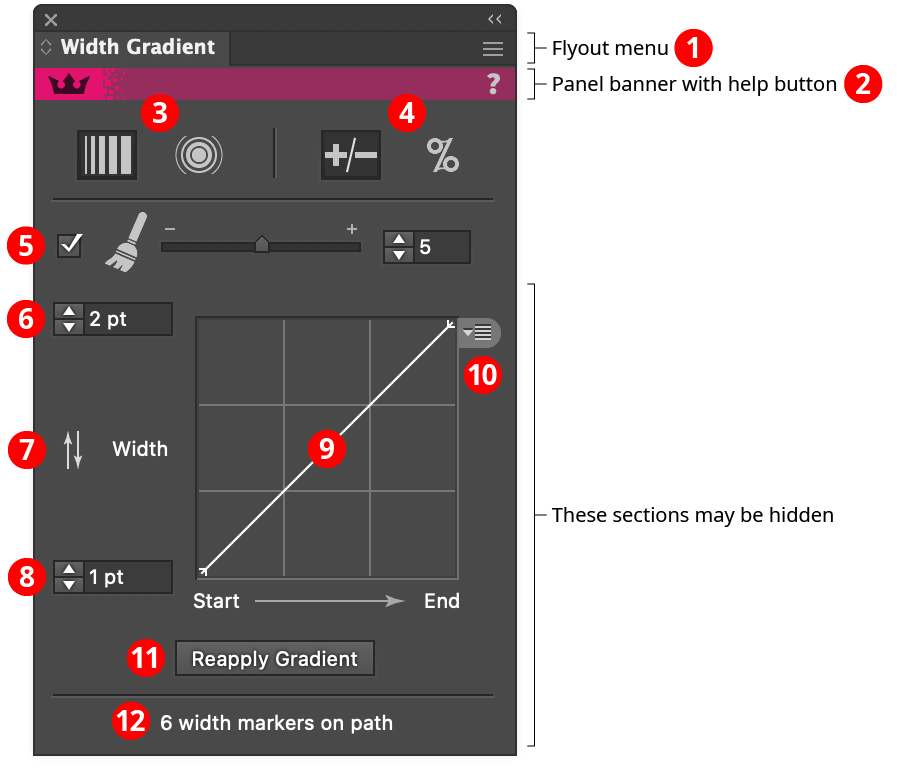
Width Gradient Panel
1. Flyout menu
See Width Gradient Panel: Flyout Menu.
2. Panel banner
The Width Gradient panel banner has a help button on the right which opens the help documentation in the Astute Manager. If this does not automatically appear, please ensure your Astute Manager is running first.
3. Linear/Radial Mode
Switches the tool between linear (straight line) and radial (circular) modes. This can be accomplished while dragging the tool by holding down the Option/Alt key.
4. Absolute/Relative Adjustment
Switches the tool’s adjustment type. When set to absolute, width markers are set to the widths calculated based solely on the adjustment values, graph, and position along the virtual gradient; the original width has no influence on the final width. When set to relative, the width at each marker is calculated as a percentage of the original width of the stroke at that position along the path.
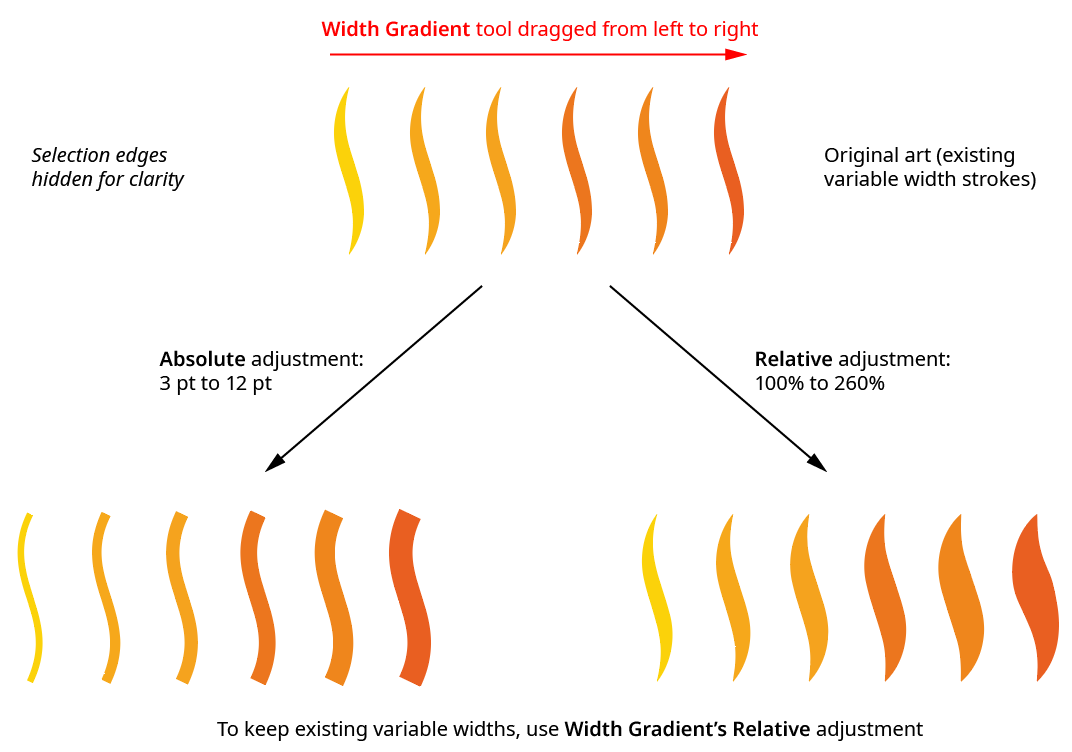
Width Gradient Absolute vs. Relative
5. Optimization
When enabled, the number of width markers in the resulting paths will be reduced after the gradient has been applied. The degree of optimization can be set from 0 to 10, with a default of 5. Higher optimization values will remove more width markers, making the path profile smoother and easier to edit manually, but may result in slightly less accurate results compared to the unoptimized results. The number of width markers on a selected path is displayed at the bottom of the panel, if Display Marker Count is enabled in the panel flyout menu.
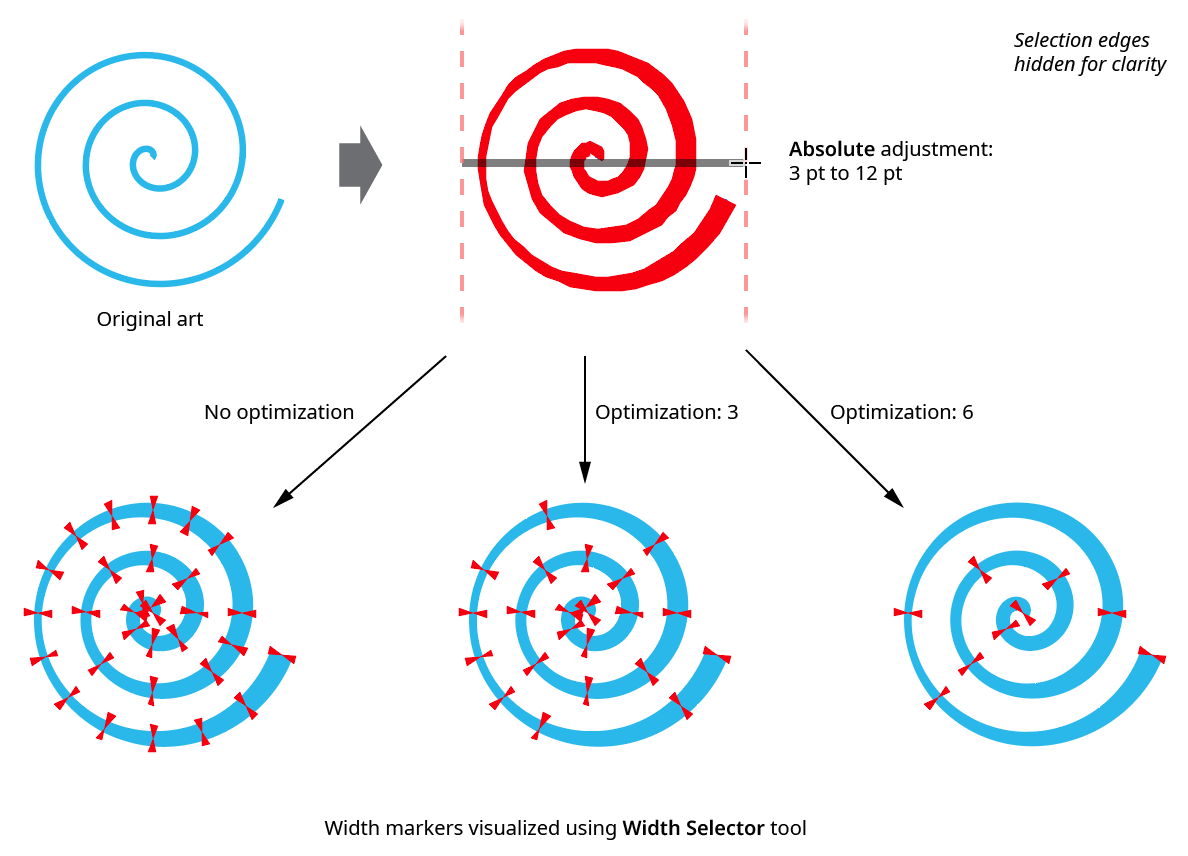
Width Gradient Optimization
6. Adjustment Value 1
Because it is at the top, this value can be thought of as the “maximum” value, although it can be set to any value. When the graph curve is set to the default (a straight line rising from lower left to upper right), it controls the width at the end of the gradient. It can be changed while dragging the tool by pressing the Left Arrow and Right Arrow keys.
7. Switch button
Switches the two adjustment values; this can also be achieved while dragging the tool by pressing the W key.
8. Adjustment Value 2
Because it is at the bottom, this value can be thought of as the “minimum” value, although it can be set to any value. When the graph curve is set to the default (a straight line rising from lower left to upper right), it controls the width at the start of the gradient. It can be changed while dragging the tool by pressing the Up Arrow and Down Arrow keys.
9. Graph
Specifies the relationship between the adjustment values and the gradient. The horizontal axis represents positions along the gradient (from beginning to end), while the vertical axis represents the adjustment amount, specified by the “maximum” and “minimum” value inputs. With the default diagonal line, the relationship is a linear one. Nodes on the curve may be moved simply by clicking and dragging them. A new node may be added by clicking at a spot along the curve which does not already have a node. Nodes (except the ones at the beginning and the end of the curve) may be deleted by dragging them off the graph area.

Width Gradient Graph Examples
10. Graph Preset Menu
Provides access to saving, managing, and applying graph settings.

Width Gradient Graph Preset Menu
A. Save Graph…
When you save the current graph, its nodes and maximum and minimum values are captured to an internal file which can be recalled later. The file name may be specified.
B. Manage Graphs…
Brings up the Manage Graphs dialog, which lets you rename, delete, import, or export graph files:

Width Gradient Manage Graphs Dialog
a. Rename: Allows the selected graph file to be renamed.
b. Delete: Removes the selected graph file(s).
c. Import...: Imports a previously-exported graphs package file of type “.wgg” using the standard operating system open file dialog.
d. Export...: Exports the selected graph(s) into a graphs package file of type “.wgg” using the standard operating system save file dialog. This file could be used as a backup or passed to another user.
C. Graphs List
Choosing a graph file from this list will update the graph to the values saved within that file (or, the case of “[Default]”, to the default graph). If the Shift key is held down when choosing a graph file, then the current maximum and minimum adjustment values will be retained rather than being loaded from the graph file. When the plugin is first installed, five presets will be added; their names are indicative of the shapes of the curves (for example, curve named “V” goes down and back up).
11. Reapply Gradient button
Reapplies the gradient at its previous position but possibly with new optimization, adjustment width, and graph settings. This allows you to try different parameters without having to actually drag out the gradient in the exact same spot repeatedly. Note: The reapplied gradient will always keep its original mode, i.e. linear or radial. For Relative Adjustment gradients, the path’s width markers will be restored to their original values before the gradient is reapplied unless Option/Alt is held down when clicking the button; in that case the gradient will modify the already-adjusted widths. If the adjustment were set from 102% to 102%, say, this could be useful for incrementally increasing all the stroke weights of the selected paths until they “look right.”
12. Marker Count
Displays the number of width markers (if any) on the selected paths. To visualize these width markers, use the Width Selector tool (also part of the WidthScribe plugin).
Illustrator Location:
Illustrator Main Menu > Window > Astute Graphics > Gradiator
Menu items to show and hide the Gradiator panel can be found in the main menu under Window > Astute Graphics > Gradiator.
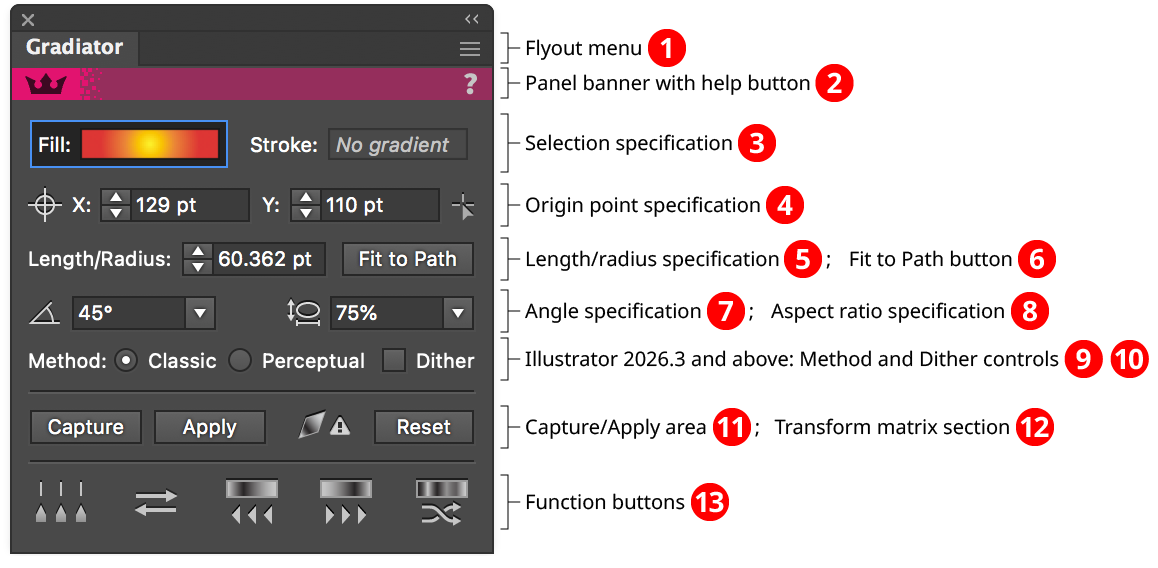
Gradiator Panel Overview
1. Gradiator Panel Flyout Menu
See Gradiator Panel: Flyout Menu.
2. Panel banner
The help button on the right opens the help documentation in the Astute Manager. If this does not automatically appear, please ensure your Astute Manager is running first.
3.4. Selection and Origin Point Specification
See Gradiator Panel: Selection and Origin Point Specification.
5.6.7.8. Length, Angle, Fit and Aspect Ratio Specifications
See Gradiator Panel: Length, Angle, Fit and Aspect Ratio Specifications.
9.10. Method and Dither Controls
See Gradiator Panel: Method and Dither Controls.
11. Capture/ Apply area
See Gradiator Panel: Capture/ Apply area.
12. Transform Matrix Section
See Gradiator Panel: Transform Matrix Section.
13. Function Buttons
Illustrator Location:
Illustrator Main Menu > Window > Astute Graphics > Gradiator
3. Selection Specification
Specifies which gradients to operate on: those on the fills of the selected paths, those on the strokes, or both. Clicking on the Fill or Stroke area toggles its selection state. Previews of the gradient present in each area are shown; if multiple, different gradients are selected, the corresponding area will show “Mixed gradients”.
4. Origin Point Specification
Lets you specify the origin point of the selected gradients either by entering the coordinates numerically, or, after clicking the icon on the right side, by using a tool to click on the artboard to specify the position.
The first time you change the origin point of a linear gradient, Gradiator will display a message reminding you that a linear gradient’s origin is always adjusted by Illustrator so it lies on a line passing through the center of the path’s bounding box (this behavior is also apparent when using the native Gradient tool). You can suppress this message from coming up again by clicking the Don’t show again checkbox. To restore this and other messages and warnings, see Gradiator Panel: Flyout Menu.
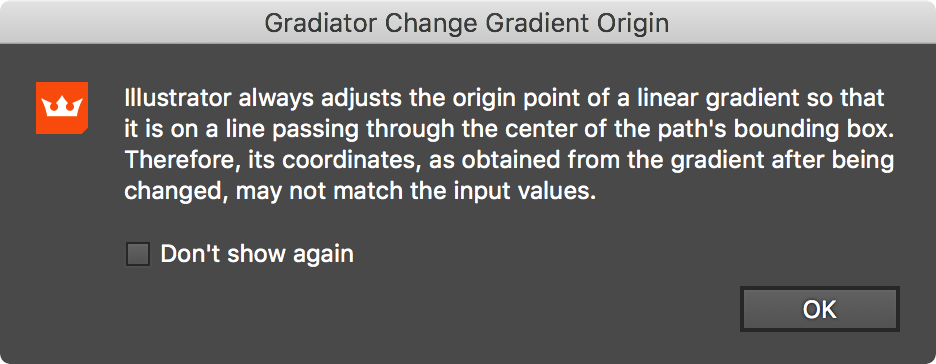
Gradiator Panel Warning Dialog
To center the gradient’s origin, Shift-click the crosshair icon on the left. To set a gradient’s center rather than its origin when clicking with the origin setter tool, hold down Shift before clicking. After clicking, the tool will switch back to the previously-selected tool.
Illustrator Location:
Illustrator Main Menu > Window > Astute Graphics > Gradiator
5. Length/Radius Specification
Allows you to numerically specify the length (for linear gradients) or radius (for radial gradients) of the selected gradients.
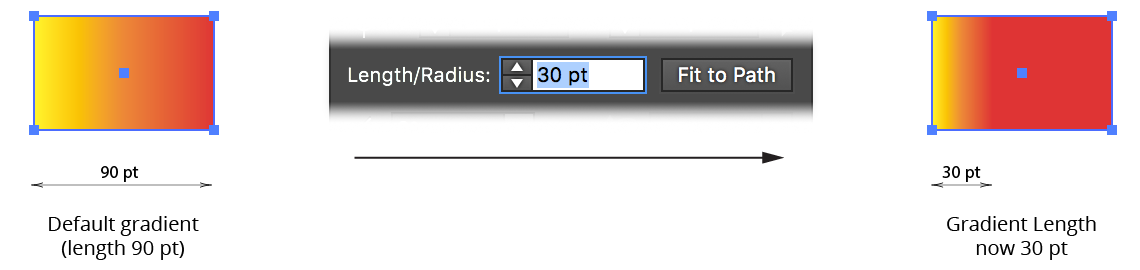
Gradiator Panel Change Length Example
By default, the length is adjusted from the origin (i.e., the left side, for linear gradients with no rotation). To adjust the length from the middle of the gradient, enable the preference Adjust Linear Gradient Lengths From Center (see Gradiator Preferences).
Note that Illustrator places lower limits on the length of a gradient. Specifically, it cannot be less than 0.1% of the default (fitted) length. A warning message will be displayed if the gradient length could not be changed to the length specified.
6. Fit to Path Button
The Fit to Path button resets the length (and origin) of each gradient to the default values that Illustrator assigns whenever the path’s geometry is edited, causing linear gradients to precisely stretch across the entire bounds of the path.
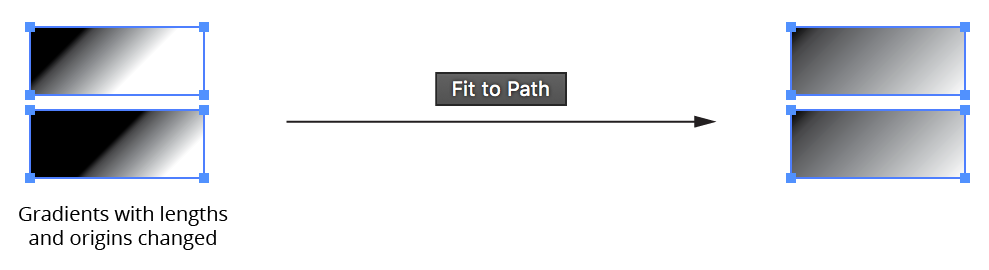
Gradiator Panel Fit to Path Example
For radial gradients, the default fit is more complicated: its radius is set to half the hypotenuse of the bounding box divided by the square root of 2.
7. Angle Specification
By default, the Gradiator panel angle control is in Absolute mode; i.e., the value you enter becomes the gradient’s new angle (the same as the native Gradient panel). However, either through the preferences or by Option/Alt-clicking on the angle icon, you can change this mode to Relative. In this mode (indicated by a change in icon), the value specified is added to the current angle of each gradient when the now-visible Change button is clicked.
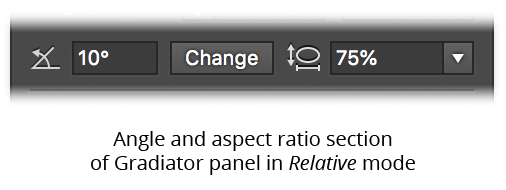
Gradiator Panel Relative Angle Section
Holding Shift when clicking the Change button has the effect of reversing the sign of the angle value (thereby causing the gradient to rotate in the opposite direction).
8. Aspect Ratio Specification
This control is only enabled when a radial gradient is present in the selection. Unlike the native gradient panel, you can change the aspect ratio of all selected radial gradients even if there are linear gradients also present in the selection.
Illustrator Location:
9. Method
This control is only present in Illustrator 2026.3 (v30.3) and above. It allows you to choose the method of the gradient (Standard or Perceptual), just as with the control on the native Gradient panel.
10. Dither
This control is only present in Illustrator 2026.3 (v30.3) and above. It allows you to choose the whether dithering is enabled for the gradient or not, just as with the control on the native Gradient panel. As gradients placed on strokes cannot have dithering, the control is not available if a stroke gradient is being operated on.
Illustrator Location:
Illustrator Main Menu > Window > Astute Graphics > Gradiator
11. Capture/Apply Area
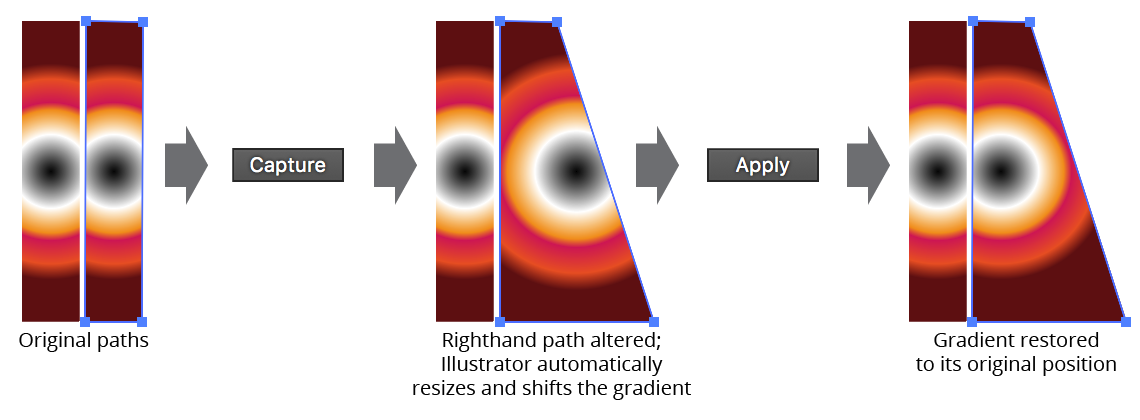
Available when a single gradient is selected, the Capture button allows you to effectively take a “snapshot” of the gradient; this snapshot can then subsequently be applied to any other paths, or to the same path after it has been edited. Crucially, the gradient retains its absolute position, allowing you to effortlessly line up a single gradient across several separate paths, or to return a gradient to the position it was in before the path was changed.
Gradiator Panel Apply Gradient Example
If Shift is held down when the Apply button is clicked, only the captured gradient’s length and origin will be applied to the selected gradients.
Illustrator Location:
Illustrator Main Menu > Window > Astute Graphics > Gradiator
12. Transform Matrix Section
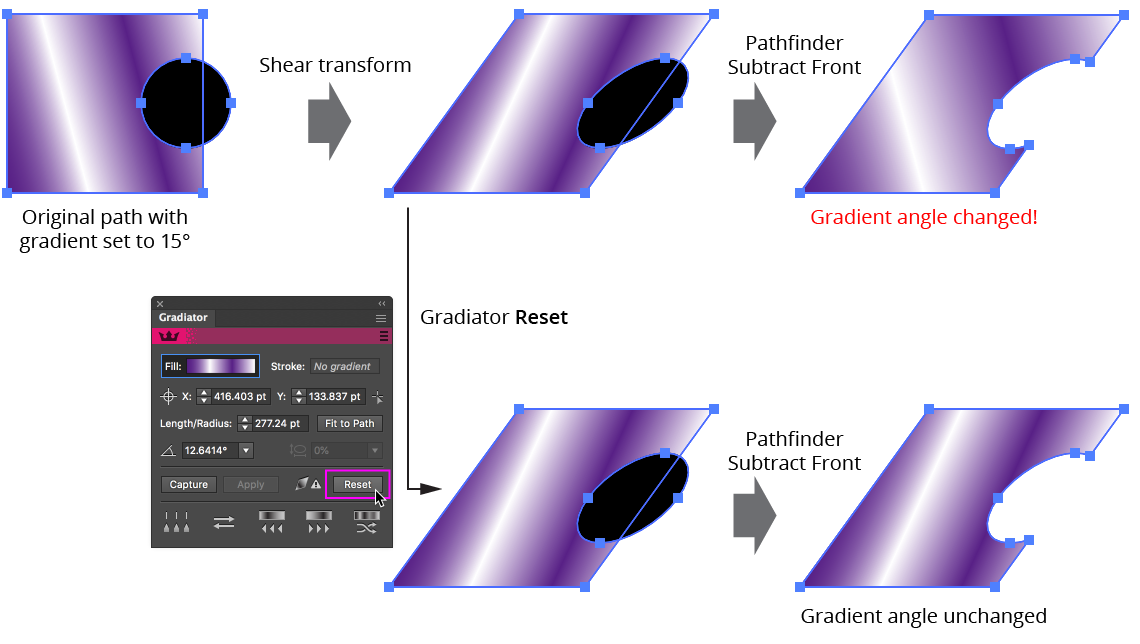
When a path with a gradient fill or stroke is subsequently transformed (scaled, rotated, or sheared), the gradient internally stores this transform using a mathematical construct called a matrix. This can lead to several issues. For example, if the path’s geometry is modified by certain Pathfinder operations, Illustrator resets the transform matrix, causing the gradient’s angle to change. Also, if the transform is non-uniform (caused by shearing or the equivalent rotation plus non-uniform scaling), the numerical values of the gradient’s length, angle and aspect ratio will not always agree with its visual appearance, even though the displayed values are technically correct in a mathematical sense. For these reasons, it is generally preferable to keep artwork free of transform matrices.
The Transform Matrix Alert icon is displayed whenever at least one gradient in the current selection has a transform matrix. Also displayed is the Reset button, which will remove each transform matrix from the selected gradients.
Gradiator Panel Reset Gradient Example
When Reset is used on a linear gradient, the gradient’s position is retained. Unfortunately, this is generally not possible with radial gradients. As a convenience, holding down Shift when clicking the Reset button will also reset the angle to 0°.
Illustrator Location:
Illustrator Main Menu > Window > Astute Graphics > Gradiator
13. Function Buttons
a. Distribute Stops Button: Adjusts the positions of the selected gradients’ stops (except for the first and last) so that there is equal space between them, and sets all midpoints to a location of 50%. To retain the midpoints’ positions, hold
Shiftwhen clicking the button. To use an eased distribution, where the space between stops gradually increases or decreases, holdOption/Altwhich clicking.
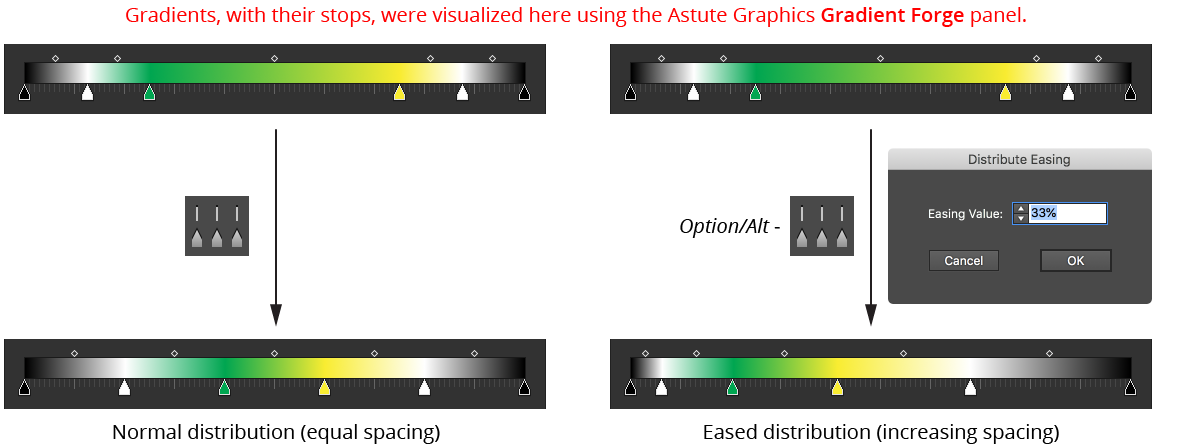
Gradiator Panel Distribute Stops Example
b. Reverse Gradient Button: Reverses the stop positions of the selected gradients. Unlike the native Gradient panel, you can do this even when there is a mix of different gradients selected.
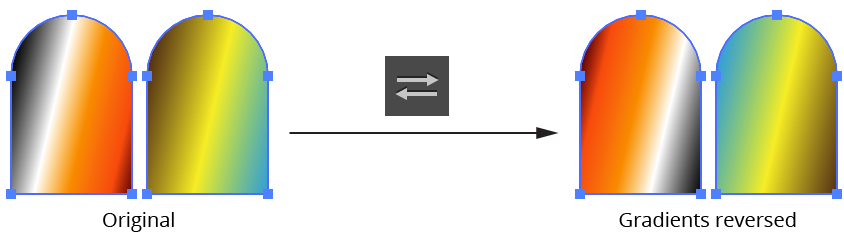
Gradiator Panel Reverse Gradient Example
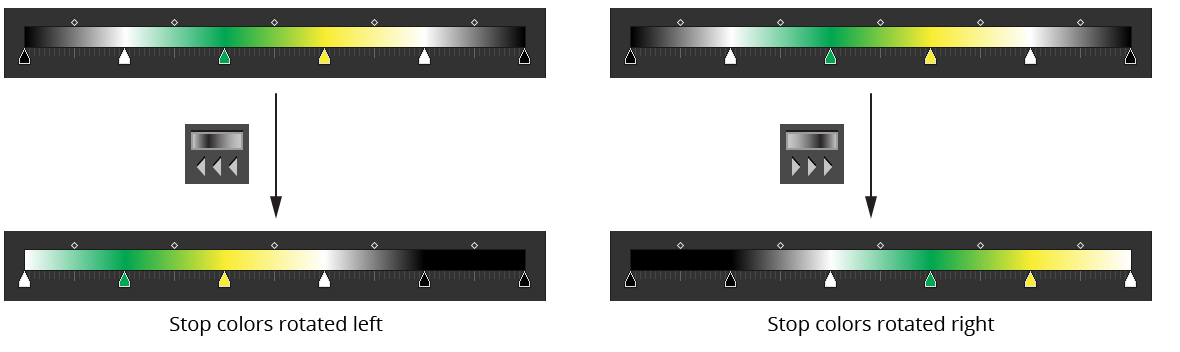
c. Rotate Colors Left Button: Changes the colors of the selected gradients’ stops so the color of each stop is moved one stop to the left (and the color of the last stop becomes the color of the first stop). This, therefore, has the effect of rotating the colors to the left.
d. Rotate Colors Right Button: Changes the colors of the selected gradients’ stops so the color of each stop is moved one stop to the right (and the color of the first stop becomes the color of the last stop). This, therefore, has the effect of rotating the colors to the right.

Gradiator Panel Rotate Gradient Example
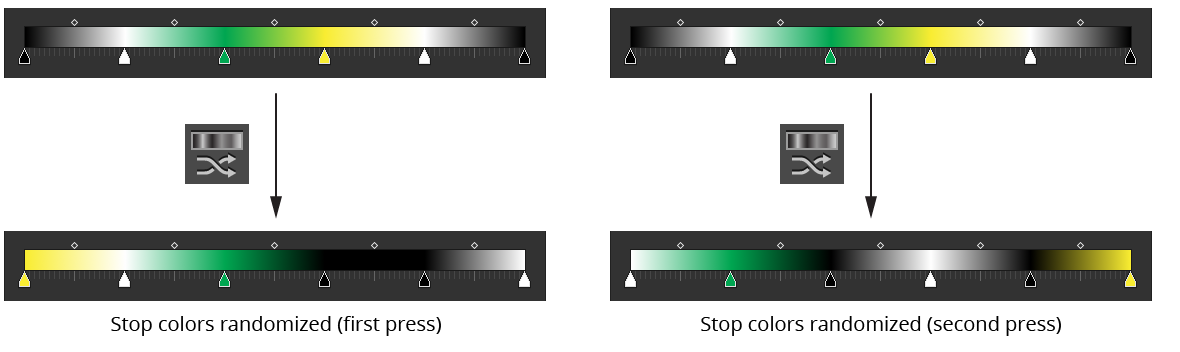
e. Randomize Color Order Button: Randomizes the order of the colors of the selected gradients’ stops. The positions of the stops themselves are not changed. A new random seed is used on each press of the button, which usually results in a different look.

Gradiator Panel Randomize Example
Illustrator Location:
Illustrator Main Menu > Window > Astute Graphics > Gradiator > Panel Flyout Menu
Allows you to convert the fills and/or strokes of the selected paths from flat colors into two-stop linear gradients, according to the parameters in the Flat Color to Gradient dialog:

Flat Color to Gradient Dialog
A. Color Adjustment Method
Specifies the method that is used to create the color of the first (or second) stop of the new gradient based on the flat color. Five of the methods — Retain, Lighten, Darken, Saturate, and Desaturate — are “presets” (although their underlying parameters can be altered), while the other two, Alter Black and Custom, require numerical parameters to be entered. The default method for the first stop is Lighten; for the second stop it is Darken.
a. Retain: The stop color is identical to the original color.
b. Lighten: The stop color is a lightened version of the original color (default change: +40 Lightness).
c. Darken: The stop color is a darkened version of the original color (default change: –40 Lightness).
d. Saturate: The stop color is a saturated version of the original color (default change: +25 Saturation).
e. Desaturate: The stop color is desaturated version of the original color (default change: –25 Saturation).
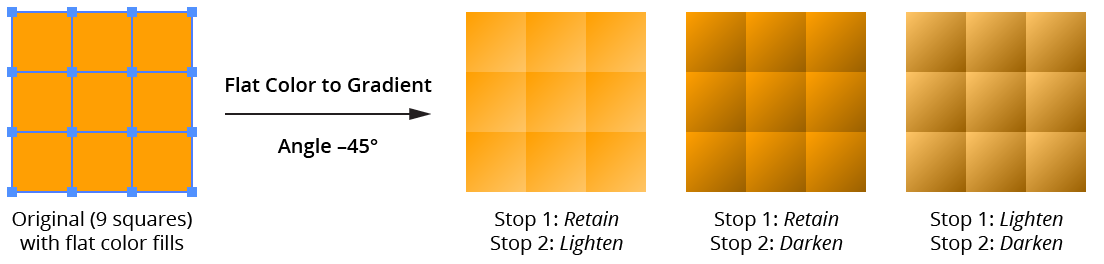
Gradiator Flat Color to Gradient Preset Examples
f. Alter Black: Available only for CMYK documents. The stop color uses the original color with the black value changed by the specified amount (the final value, of course, being held between 0% and 100%).
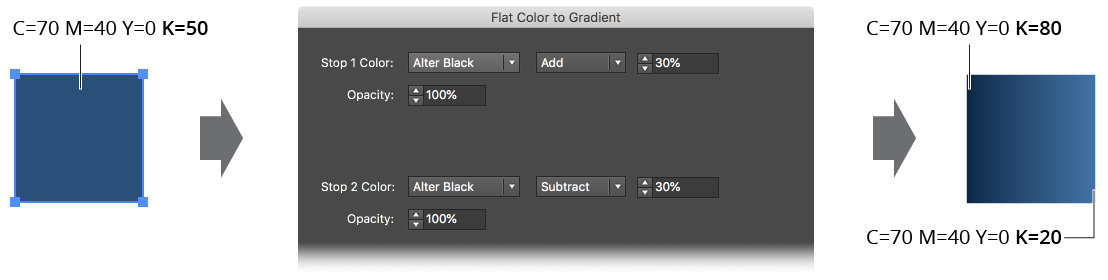
Gradiator Flat Color to Gradient Alter Black Example
g. Custom: Enables full control of changing the Hue, Lightness and Saturation of the original color.
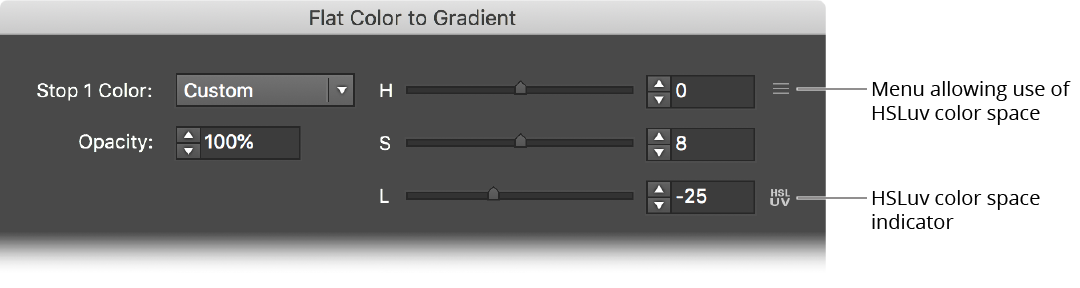
Gradiator Flat Color to Gradient Dialog Custom
By default the Hue, Saturation and Lightness sliders operate in standard HSL color space, but using the popup menu you can change this to use the HSLuv space. This is indicated by a small icon.
B. Opacity
Specifies the opacity of the first (or second) stop of the gradient.
C. Midpoint
Specifies the midpoint location of the gradient.
D. Angle mode
Specifies the method used to determine the angle of the new gradient. The default is Absolute.
a. Absolute: The gradient angle is simply taken from the provided value.
b. Relative: The gradient angle is the same as the angle from one anchor point in the path to another, using the anchor point indices provided. This can be useful if you are converting the flat colors of many paths that are the same except for their rotation.
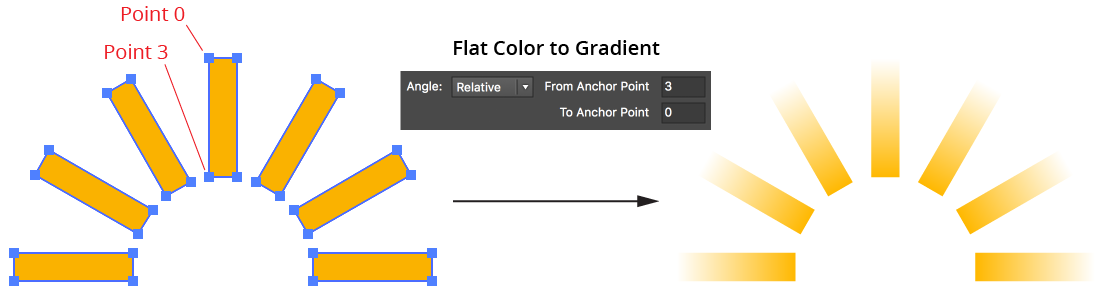
Gradiator Flat Color to Gradient Angle Relative Example
c. Random: The angle is randomly chosen between –180° and 180°.
E. Angle (Absolute)
The value that each new gradient will be given.
F. Angle (Absolute) Visualizer
Shows the angle that each new gradient will be given, graphically. Clicking on the widget will set the angle appropriately.
G, H. Angle (Relative) Anchor Point Indices
The indices of the anchor points in each path from which to calculate the gradient angle. To specify the last anchor point, you can use an index higher than the length of any selected path, such as “9999”.
I, J. Affect Fills/Affect Strokes Checkboxes
Enables conversion of flat colors in the corresponding area of the path.
K. Convert Spot Colors Checkbox
When enabled, spot colors used as a fill or stroke will be converted to the document color model (RGB or CMYK) in order to perform the appropriate color adjustment.
L. “Before” Preview
Shows a sample flat color (taken from the selection) before being converted to a gradient. To cycle through different colors in the selection (if any), click on the preview.
M. “After” Preview
Shows a preview of the gradient into which the sample flat color will be converted.
N. Informational area
Shows a brief description of each control when the cursor is being held over it.
O. Edit Presets... Button
Allows you to change the parameters used in each of the six preset operations:
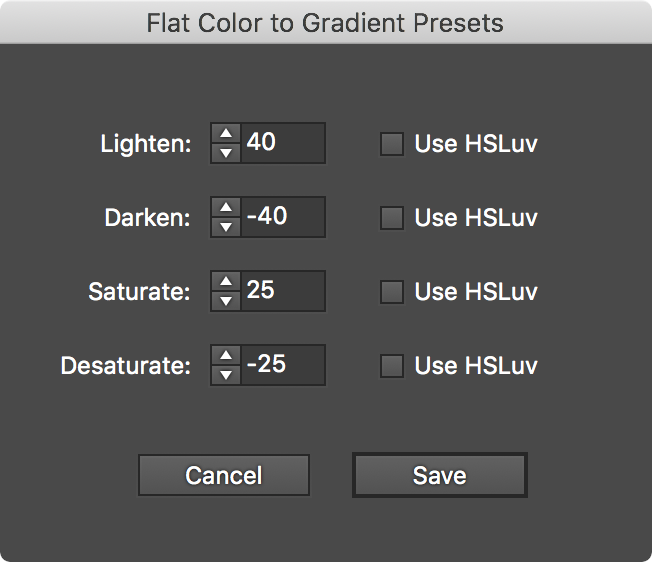
Gradiator Flat Color to Gradient Presets Dialog
P. Settings Manager
The Settings Manager popup menu provides access to saving, managing, and applying Flat Color to Gradient settings.
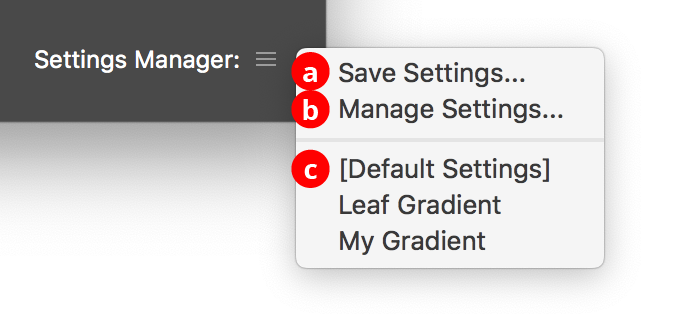
Gradiator Flat Color to Gradient Settings Manager Menu
a. Save Settings...
When you save the settings, all of the current settings in the dialog are captured in a file which can be recalled later.
b. Manage Settings...
Brings up the Manage Settings dialog, which lets you rename or delete existing settings files:
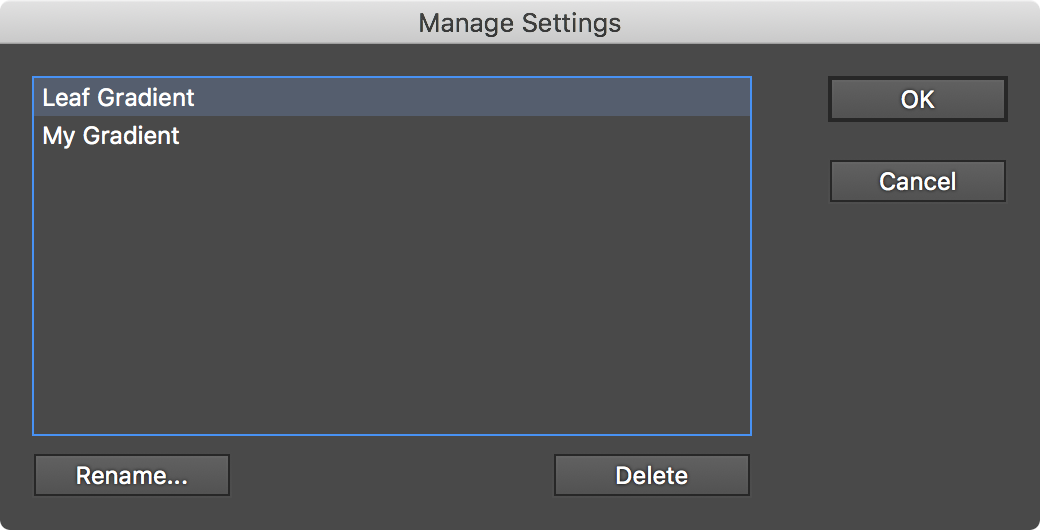
Gradiator Flat Color to Gradient Manage Settings Dialog
c. Settings List
Choosing a settings file from this list will change the settings to match the state of the dialog when the settings file was saved (or, the case of [Default Settings], to the default values).
Q. Help Button
Opens the help documentation in the Astute Manager. If this does not automatically appear, please ensure your Astute Manager is running first.
Illustrator Location:
Illustrator Main Menu > Window > Astute Graphics > Gradiator > Panel Flyout Menu
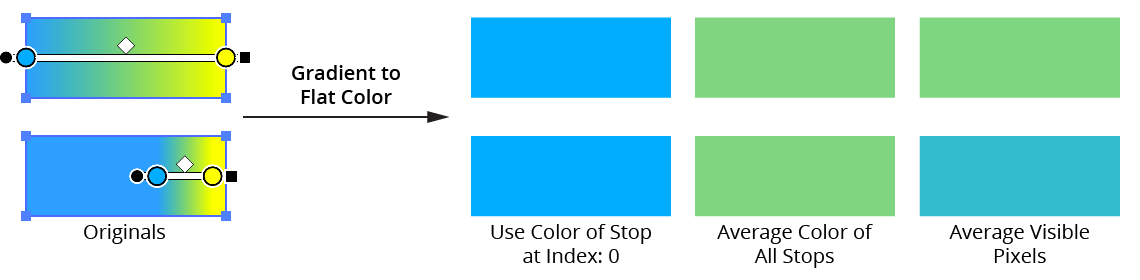
Allows you to converts the gradients in the fills and/or strokes of selected paths to flat colors using one of three different methods.
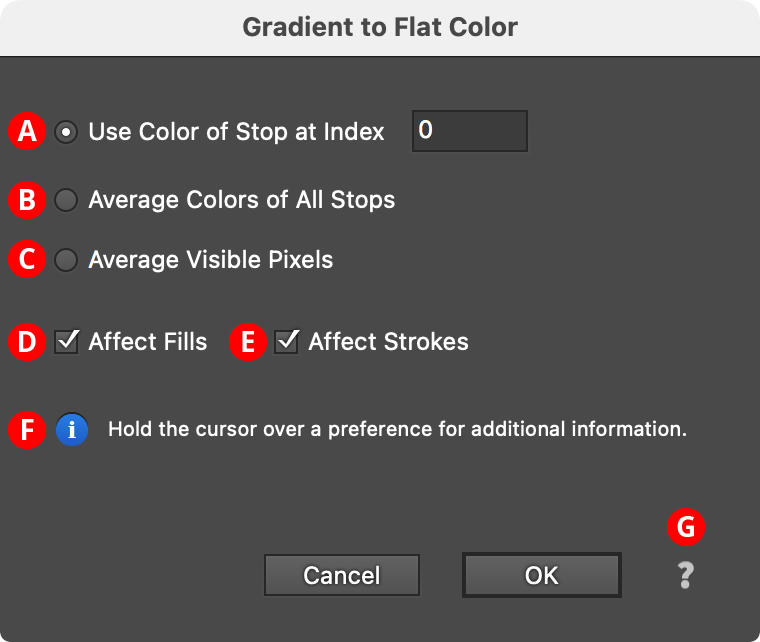
Gradient to Flat Color Dialog
A. Use Color of Stop at Index
The flat color is simply taken from the color of the gradient stop with the given index (starting at zero). To specify the last stop, you can use an index higher than the number of stops in any of the selected path, such as “9999”.
B. Average Color of All Stops
The flat color is calculated by averaging the colors of all the stops in the gradient. When spot colors are used, they are converted to the document color model (RGB or CMYK) for the purposes of averaging. Stops which do not contribute to the gradient (e.g., a stop at location 0% when there is a second stop stacked directly above it) are not included in the average.
C. Average Visible Pixels
The flat color is calculated by rasterizing the art and averaging the colors of the pixels making up the fill or stroke. Thus, when you can only see a portion of the gradient (because its length has been changed by the Gradiator panel or native Gradient tool), only the portion of the gradient that is actually visible contributes to the flat color.
Gradiator Gradient to Flat Color Methods
D, E. Affect Fills/Affect Strokes Checkboxes
Enables conversion of gradients in the corresponding area of the path.
F. Informational area
Shows a brief description of each control when the cursor is being held over it.
G. Help Button
Opens the help documentation in the Astute Manager. If this does not automatically appear, please ensure your Astute Manager is running first.
Illustrator Location:
Illustrator Main Menu > Window > Astute Graphics > Gradiator > Panel Flyout Menu
Converts the gradient in the fill of a path into a group of simple lines with the same angle as the gradient, located at the stop positions of the gradient, and having stroke colors corresponding to the stops. If the path has a stroke, the lines use the same stroke width; otherwise, they are made with 1pt strokes. If Shift is held down before the menu is opened and the menu item is selected, the item will change to Gradient Fill to Lines (Keep Original). In this case the original art is retained behind the newly-created lines.

Gradiator Gradient Fill to Lines Example
These lines may be used for creative purposes or can be duplicated and/or manipulated and turned back into a new gradient using the Build Gradient From Lines function of Astute Graphics’ Gradient Forge panel. For the latter use, it is generally advisable to have the gradient at a zero-degree angle.
Illustrator Location:
Illustrator Main Menu > Window > Astute Graphics > Gradiator
The following operations can be recorded and played back as Actions:
Gradient to Flat Color (panel menu item)
Flat Color to Gradient (panel menu item)
Fit To Path (panel button)
Change Angle (panel value field)
Distribute Stops (panel button)
Reverse Gradient (panel button)
Rotate Colors Left (panel button)
Rotate Colors Right (panel button)
Randomize Color Order (panel button)
Illustrator Location:
Illustrator Main Menu > Window > Astute Graphics > Gradient Forge
Menu items to show and hide the Gradient Forge panel can be found in the main menu under Window > Astute Graphics > Gradient Forge.
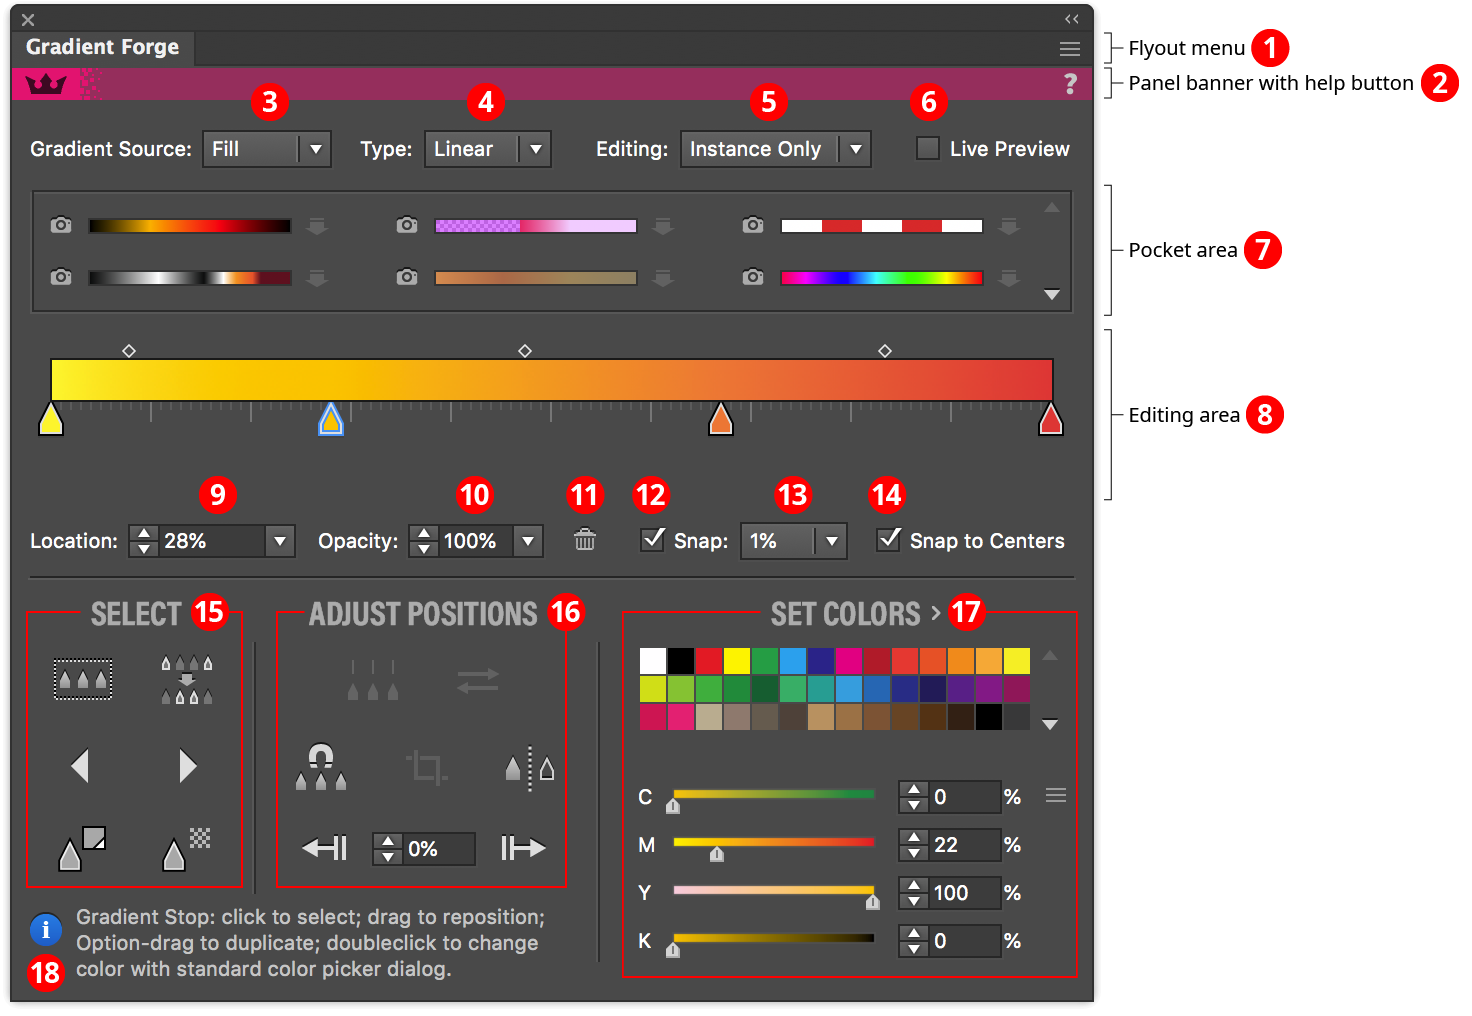
Gradient Forge Panel
1. Flyout Menu
See Gradient Forge Panel: Flyout Menu.
2. Panel Banner
The help button on the right opens the help documentation in the Astute Manager. If this does not automatically appear, please ensure your Astute Manager is running first.
3.4.5.6. Source, Type, Editing and Preview
See Gradient Forge Panel: Source, Type, Editing and Preview.
7. Pocket Area
See Gradient Forge Panel: Pocket Area.
8. Editing Area
See Gradient Forge Panel: Editing Area.
9.10. Location and Opacity Values
See Gradient Forge Panel: Location and Opacity Values.
11.12.13.14. Snapping and Deleting
See Gradient Forge Panel: Snapping and Deleting.
15. Select Section
See Gradient Forge Panel: Select Section.
16. Adjust Positions Section
See Gradient Forge Panel: Adjust Point Section.
17. Set Colors
See Gradient Forge Panel: Set Colors/ Adjust Colors Section.
Illustrator Location:
Illustrator Main Menu > Window > Astute Graphics > Gradient Forge
Gradient Source
Indicates the source of the gradient currently being edited. This may be the selected swatch, the selected art’s fill, or the selected art’s stroke. If the selected artwork has a gradient in both the fill and the stroke, a popup menu will be displayed allowing you to switch between the two.
Type Popup
Changes the active gradient between linear and radial. Option/Alt-clicking the “Type:” label is a fast way to switch the menu between its two values.
Editing Mode Popup
Determines how changes to a gradient are applied. Instance Only mode (the default) acts similarly to the native Gradient panel: edits to the gradient are only applied to the selected artwork. If the gradient is used elsewhere, it remains unchanged. Therefore, a new gradient is created. But in Global mode, changes are immediately applied to the gradient wherever it appears in the document, including all art objects (regardless of selection, locked or hidden status); symbols; swatches, etc. Because this powerful functionality can also cause unintended changes if you are not aware of how it works, a tip dialog will be displayed the first time the Editing Mode is changed to Global. Enabling the Don’t show again setting will keep the dialog from showing again (unless tips and warnings are reset; see Gradient Forge: Flyout Menu).
When editing a swatch gradient with no gradient art selected, the setting is hidden, because swatch editing is always done in Global mode.
Live Preview
When enabled, changing the active gradient by dragging (such as moving, duplicating, or deleting gradient stops) causes the affected art to be updated in real time. Because Illustrator gives priority to artboard redraw, this may cause some lag in the redraw of the panel interface elements.
Illustrator Location:
Illustrator Main Menu > Window > Astute Graphics > Gradient Forge
Allows you to make and store up to sixty “snapshots” of the active gradient. These “pocket gradients” are retained even if you switch documents or quit and restart Illustrator.

Gradient Forge Panel Pocket Gradient Area
A. Snapshot Button
When there is an active gradient in the main editing area, clicking the snapshot button copies it to the corresponding pocket slot. If there is already a gradient in the pocket, a dialog will come up to confirm that you want to overwrite the existing gradient. To avoid this dialog, hold Option/Alt when clicking on the button.
B. Pocket Gradient
Each pocket displays a small preview of the gradient it contains. When the cursor is passed over the preview (or the buttons to the left and right of it), the gradient’s stops and midpoints are also temporarily displayed. To delete the pocket gradient, Shift-click on it.
C. Insert/Save Button
Inserts the corresponding pocket gradient into the selected stops of the active gradient, or, if no stops are selected, replaces the entire active gradient. Insertion is only valid when the selected stops are contiguous. If the pocket gradient has stops at both ends (at positions 0% and 100%), then the outer selected stops in the main gradient are replaced by the end stops of the pocket gradient. Otherwise, they are retained and only the inner stops are replaced.
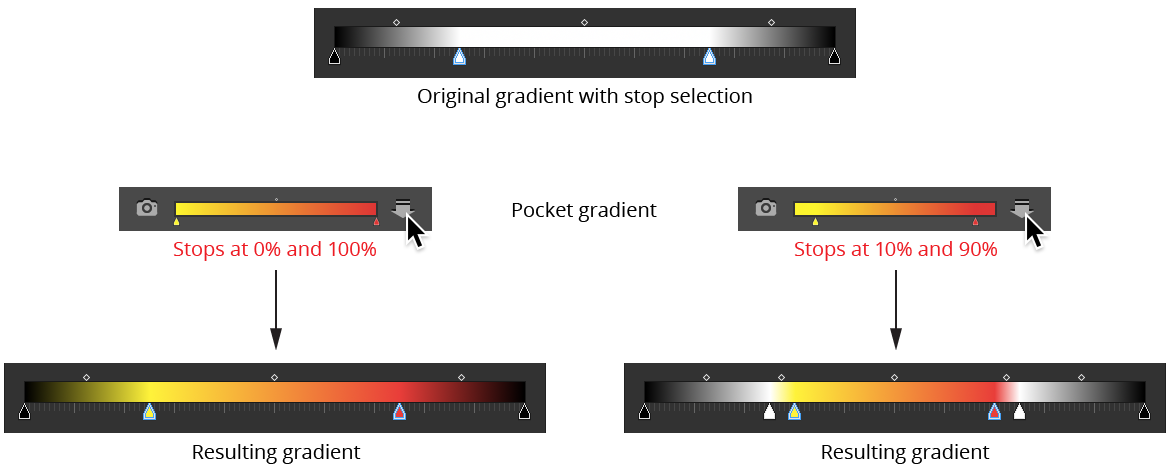
Gradient Forge Panel Insert Pocket Example
If the button is Shift-clicked, the pocket gradient is saved to a gradient swatch. A dialog will appear letting you specify the name of the new swatch. You can save a pocket gradient to a gradient swatch as long as a document is open, even if the Insert/Save button is grayed out.
Illustrator Location:
Illustrator Main Menu > Window > Astute Graphics > Gradient Forge
This is the main area, which displays the active gradient and allows you to manipulate its stops and midpoints as with the native Gradient panel. However, unlike the native panel, you can select and operate on multiple stops or midpoints.
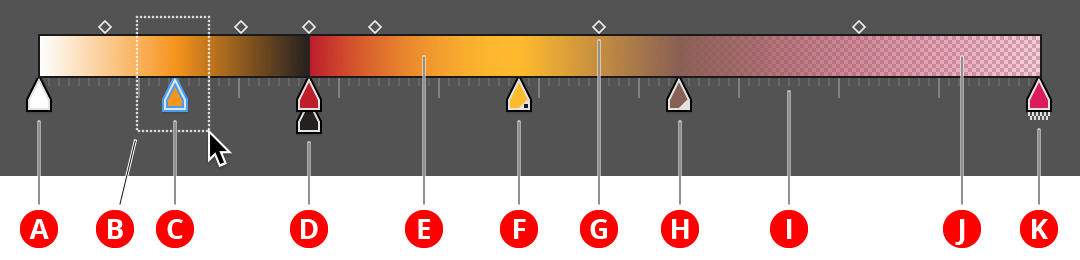
Gradient Forge Panel Editing Area
A. Unselected Stop
Can be made selected by dragging the marquee over it, or clicking on it. Shift-clicking or dragging inverts the selection, as per the Illustrator artboard.
B. Marquee
Dragging the cursor starting from an empty spot in the editing area creates a marquee which is used to select either midpoints or stops.
C. Selected Stop
Distinguished by a hollow blue highlight around it. While some of the function buttons will work with no stops selected (and, in general, then act as if all the stops were selected), other functions, such as setting the location/opacity value or the delete button, require there to be a stop selection.
D. Stacked Stops
Unlike the native Gradient panel, Gradient Forge lets you see stops which are “on top of each other”, i.e., have the same location value. Stacked stops create a hard edge in the gradient, and can be used to create stripes. Stops can be stacked to any depth, but only the first and last contribute to changing the color. Just as stop order proceeds from left to right, stacked stops should be read from bottom to top. In the example shown, the second, orange stop blends to the black stop; the color then changes abruptly to dark red, and then blends to the lighter orange of the right-hand stop.
E. Gradient Preview
F. Spot Color Stop
Stops with spot colors are indicated by the small triangular badge at lower right with a dot (similar to swatches).
G. Midpoint
As per the native Gradient panel; indicates the midpoint of the gradient between stops to its left and right. Selected midpoints are solid while unselected ones are hollow.
H. Global Color Stop
Stops with global colors are indicated by the small triangular badge at lower right (similar to swatches).
I. Ruler
Indicates the positions to which stops are snapped when snapping is enabled (up to 1.0% snapping increments; 0.5% increments are not shown).
J. Opacity Grid
Per the native Gradient panel; the opacity grid is drawn below the gradient, and therefore shows areas where the gradient’s color is not fully opaque.
K. Stop With Opacity
Stops with non-100% opacity are indicated by a small checkered badge below. This is useful for spotting opacities that close to but not exactly 100% (and would therefore leave the opacity grid almost invisible).
Editing Area: Midpoint Operations
Midpoints may be repositioned by dragging them. When a single midpoint is selected, it may be reset to its default 50% location by doubleclicking it.
Editing Area: Stop Operations
Stops may be repositioned by dragging them. If the stops are dragged far enough below the gradient preview, they will deleted when the mouse button is released (as per the native Gradient panel). Various modifier keys can by used when dragging stops to change functionality:
Shift: “Ripples” the locations of unselected stops, i.e. moves them proportionally in the drag direction. This essentially stretches the gradient around the selected stops, retaining stop order:
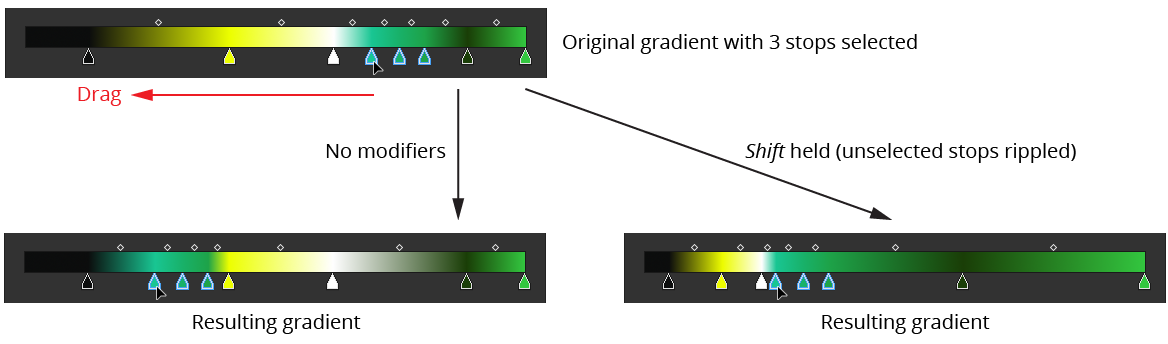
Gradient Forge Panel Stop Drag Modifiers Example 1
Option/Alt: Duplicates the dragged stop(s), as per the native Gradient panel.
Command/Ctrl: Temporarily disables snapping, if enabled (see below).
Space: Applicable only when a contiguous selection of two or more stops is being dragged by either the first or last stop in the selection; scales the selected stops proportionally (in effect, stretching them out or together). Can be combined with
Shiftto ripple the other stops.
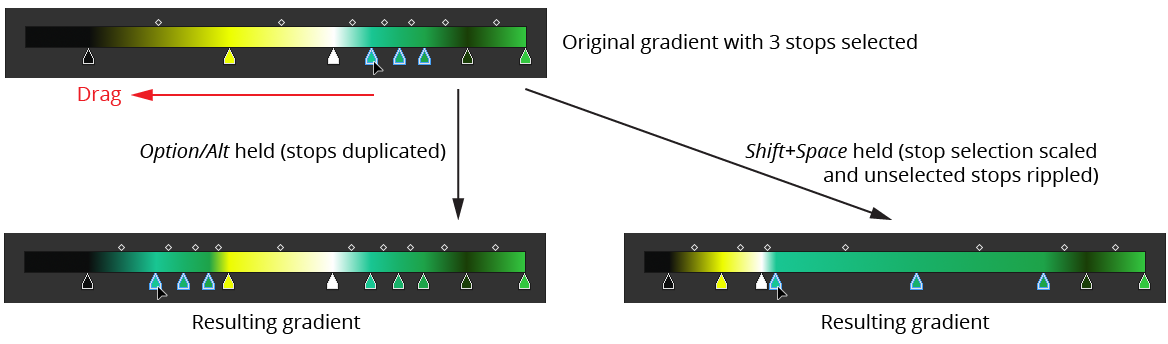
Gradient Forge Panel Stop Drag Modifiers Example 2
By default, clicking just below the gradient preview will add a new stop at the clicked position, with its color and opacity automatically set to match that of the gradient at that position (interpolating adjacent stops). If you find yourself accidentally adding stops, you may enable the preference Require Option/Alt to Add New Stop (see Gradient Forge: Preferences). In that case, you must hold down Option/Alt when clicking in order to add a new stop. After the stop is added it may immediately be dragged.
Illustrator Location:
Illustrator Main Menu > Window > Astute Graphics > Gradient Forge
Location Value
As per the native Gradient panel; allows you to specify the absolute position of the selected stop(s), or the relative location of selected midpoint(s). Midpoint locations can range between 13% and 87%.
Opacity Value
As per the native Gradient panel; allows you to specify the opacity of the selected stop(s).
Illustrator Location:
Illustrator Main Menu > Window > Astute Graphics > Gradient Forge
Delete Button
As per the native Gradient panel; deletes the selected stop(s), with the limitation that gradients must contain at least two stops.
Snap Checkbox and Value
When enabled, the dragged stop will have its location snapped to multiples of the Snap Value (0.5%, 1%, 2%, 5%, or 10%), except when it is being snapped to a centerpoint. Unselected stops, when rippled, are not snapped. If multiple stops are being dragged, their “non-snap” locations are calculated and then rounded to the nearest snap location. Thus the spacing between dragged stops may change if they were unsnapped to begin with. To snap selected stops without dragging them, see Adjust Positions Section: Snap Button. To temporarily disable snapping, hold down the Command/Ctrl key when dragging a stop.
Snap to Centers Checkbox
When enabled, the dragged stop will snap to locations that are halfway between the stops on either side of it, with magenta arrow annotations indicating this. Snapping to a centerpoint takes precedence over the grid snapping (i.e., the center snap value may not lie on the current snap grid).
Illustrator Location:
Illustrator Main Menu > Window > Astute Graphics > Gradient Forge
Contains controls which select stops or change the current selection.
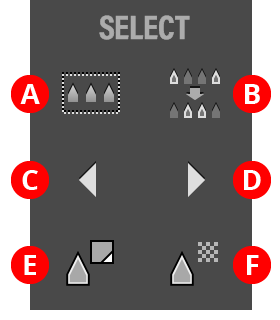
Gradient Forge Panel Select Section
A. Select All Button
Selects all the stops in the gradient. If Option/Alt is held, every other stop (starting with the first) is selected instead.
B. Select Inverse Button
Inverts the stop selection (stops which were selected become unselected, and vice versa).
C. Select Previous Button
Selects the previous stop(s), wrapping around the end of the gradient if necessary. To extend the selection, hold Shift when clicking the button.
D. Select Next Button
Selects the next stop(s), wrapping around the end of the gradient if necessary. To extend the selection, hold Shift when clicking the button.
E. Select Same Color Button
Selects all stops with the same color as the selected stop. If multiple stops are selected, all of their colors are included in the matching.
F. Select Same Opacity Button
Selects all stops with the same opacity as the selected stop. If multiple stops are selected, all of their opacity values are included in the matching.
Illustrator Location:
Illustrator Main Menu > Window > Astute Graphics > Gradient Forge
Contains controls which change the positions of one or more stops.
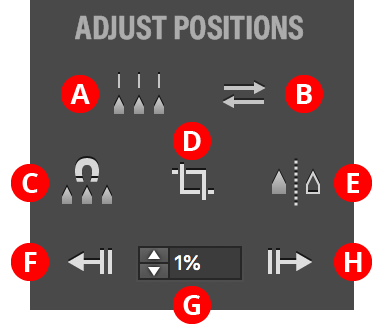
Gradient Forge Panel Adjust Positions Section
A. Distribute Button
Available when three or more contiguous stops are selected (or when no stops are selected, in which case it acts as all stops are selected); distributes their positions equally. The first and last selected stops are not moved. If Option/Alt is held, a dialog is shown allowing you to specify an eased distribution. In this case the stops are not distributed evenly, but gradually get closer together or further apart.
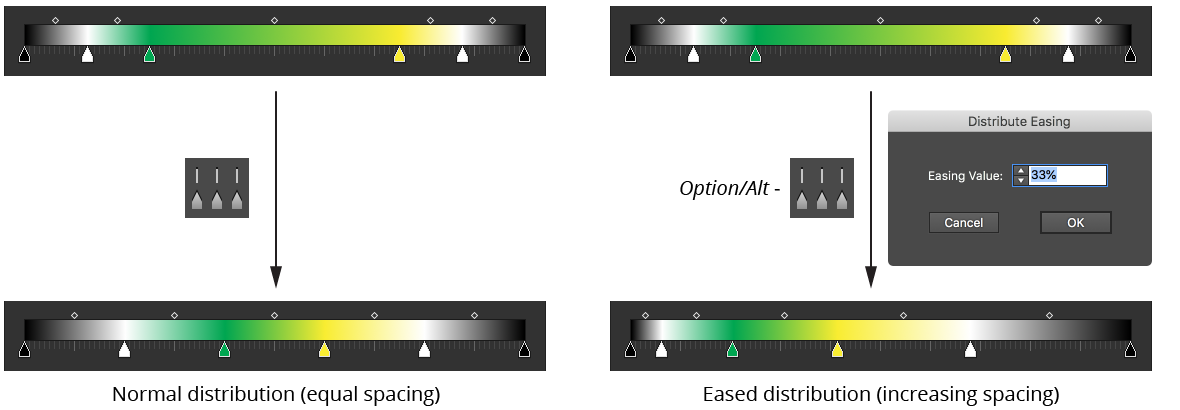
Gradient Forge Panel Distribute Stops Example
B. Reverse Gradient Button
Available when two or more contiguous stops are selected (or when no stops are selected, in which case it acts as all stops are selected); reverse the order of the stops, as per the native Gradient panel Reverse Gradient button. Affected midpoints will have their locations inverted to keep the look of the gradient identical.
C. Snap Button
Snaps all selected stop locations to multiples of the Snap Value.
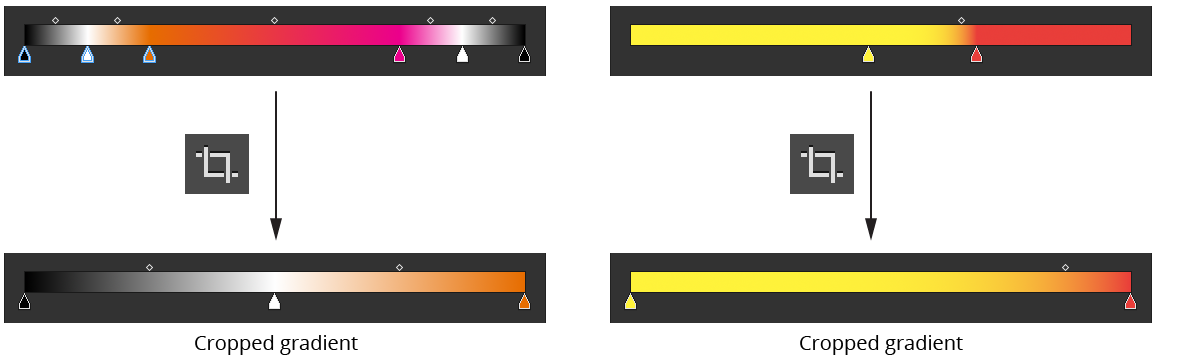
D. Crop Button
Available when the stop selection is contiguous (or, when no stops are selected, if the first stop is not at 0% or the last stop is not at 100%); removes all unselected stops and scales the remaining stops such that the gradient runs full-length (0% to 100%).
Gradient Forge Panel Crop Example
E. Mirror Button
Mirrors the entire gradient along its right-hand side. Stop selection is ignored.

Gradient Forge Panel Mirror Example
F. Move Left Button
Moves the selected stops’ locations to the left by the amount specified in the Move Value. Holding Shift moves them by ten times the specified value. Once a stop reaches the start of the gradient, it (and any additionally selected stops) cannot be moved any further left.
G. Move Value
The amount by which selected stops are moved using the Move Left and Move Right buttons.
H. Move Right Button
Moves the selected stops’ locations to the right by the amount specified in the Move Value. Holding Shift moves them by ten times the specified value. Once a stop reaches the end of the gradient, it (and any additionally selected stops) cannot be moved any further right.
Illustrator Location:
Illustrator Main Menu > Window > Astute Graphics > Gradient Forge
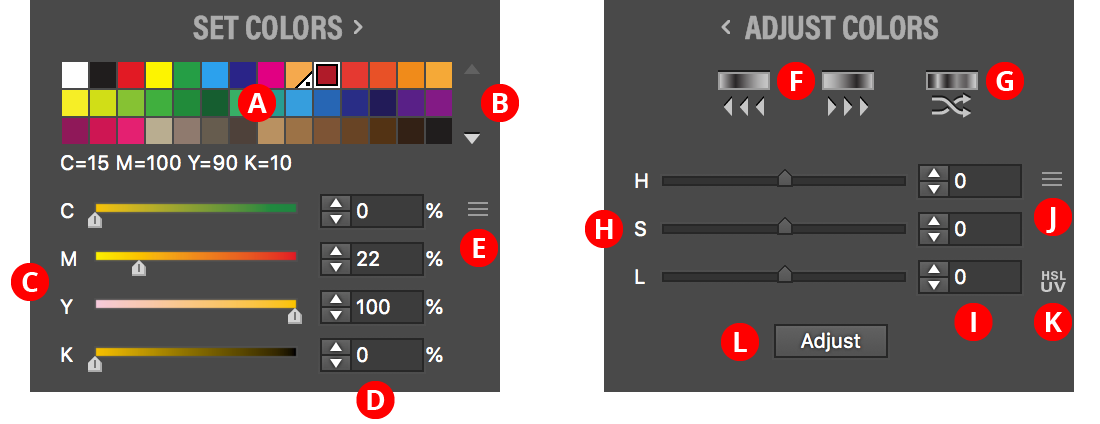
Contains controls which set or adjust the colors of selected stops. To switch between Set Colors and Adjust Colors, click the header text.
Gradient Forge Panel Set Adjust Colors Section
A. Swatch List
Shows all of the flat color swatches (i.e., no gradients or patterns) in the document. Each swatch’s name is shown below the grid when the cursor is hovered over it. Clicking on a swatch will change the color of the selected stop(s). Holding Option/Alt while clicking automatically advances the stop selection to the right after recoloring. A swatch may be dragged upwards into the Editing Area just below the gradient preview to add a new stop or recolor an existing stop without having to select it first.
B. Swatch Scroll Arrows
If more 42 swatches exist, these arrows are enabled, allowing you to scroll the list up or down to reveal additional rows of swatches.
C. Color Sliders
Similar to the native Color panel; display and allow editing of the color of the currently selected stop(s). When a global or spot color is being edited, the single slider specifies the tint of the color.
D. Color Value Inputs
Reflect the same color values as displayed in the sliders but allow precise numeric input of these values.
E. Color Model Popup Menu
Available when all selected stops have colors using the same color model; allows switching the color model for editing the color(s), choosing between Grayscale, RGB, HSB, HSLuv, and CMYK. Unlike the native Color panel, switching the color model will immediately convert the color(s) to the chosen model, which may change the color when the gamut of the new color model does not include the original color.
F. Rotate Colors Left/Right Button
Changes the colors of the selected stops (or all stops, if no stops are selected) so the color of each stop is moved one stop to the left/right (wrapping around for the end stops). This, therefore, has the effect of rotating the colors either to the left or right. The positions of the stops themselves are not changed.
Gradient Forge Panel Rotate Example
G. Randomize Color Order Button
Randomizes the order of the colors of the selected stops (or all stops, if no stops are selected). The positions of the stops themselves are not changed. A new random seed is used on each press of the button, which usually results in a different look.
Gradient Forge Panel Randomize Example
H. HLS Sliders
Control the Hue, Lightness and Saturation values which modify the colors of the selected stops when the Adjust button is pressed. While the sliders are dragged, the gradient preview will change in real-time to show what the color would look like with the current adjustment. The H, S and L labels may be clicked to reset each corresponding value to zero.
I. HLS Value Inputs
Reflect the same values that are displayed in the HLS Sliders, but allow precise numeric input of these values. Hue change can vary from -180 to 180; Lightness and Saturation can vary from -100 to 100.
J. HLS Popup Menu
Allows you to use the HSLuv color space instead of the default HSL colorspace (see https://www.hsluv.org).
K. HLSuv Indicator
When visible, indicates that the HSLuv color space is being used.
L. Adjust Button
Applies the adjustment specified by the HSL values to the color(s) of the selected stop(s) (or all stops, if no stops are selected). Stops with spot colors are not affected. When the cursor is hovered over the button, the gradient preview will change to show what the color(s) would look like after adjustment with the current values, but the gradient will not actually be changed until the button is pressed.
Illustrator Location:
Illustrator Main Menu > Window > Astute Graphics > Gradient Forge > Panel Flyout Menu
Available when one or more swatches are selected in the native Swatches panel (and no gradient artwork is selected). The menu item brings up a dialog showing the gradient that would be created with equally-spaced stops from each selected flat-color or gradient swatch:
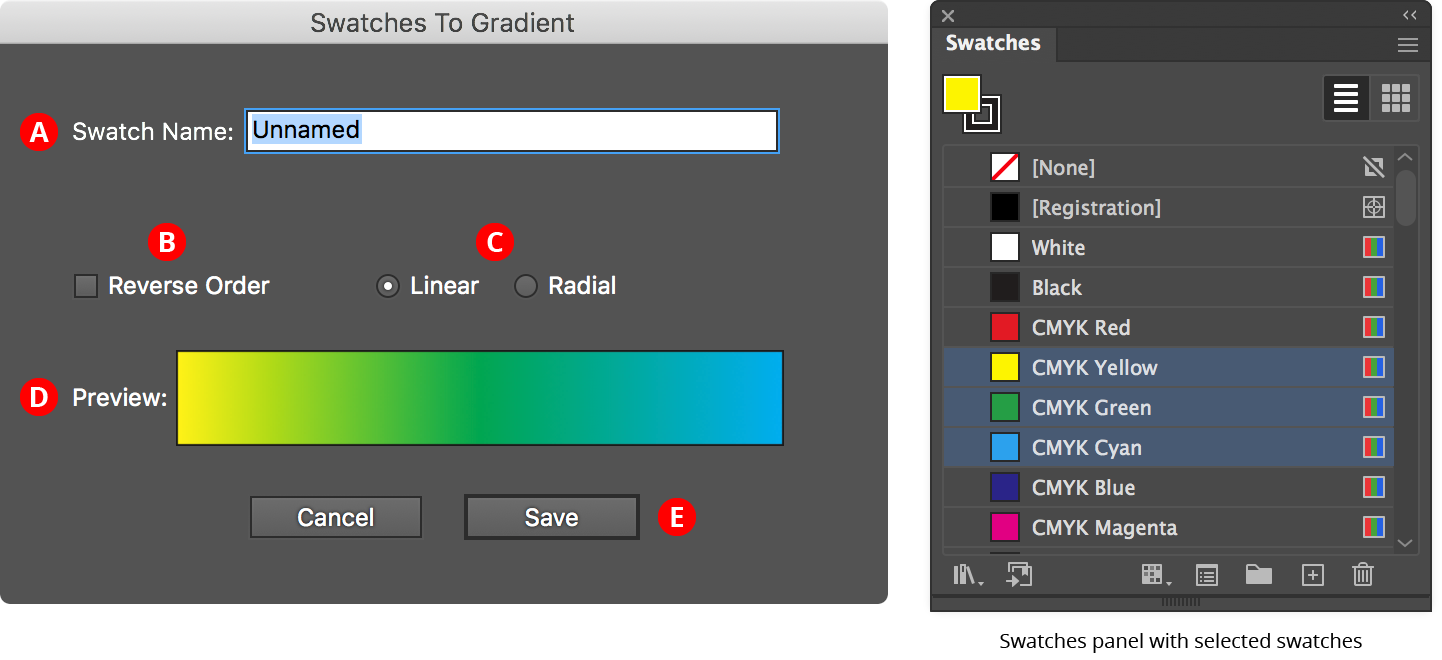
Gradient Forge Panel Swatches to Gradient
A. Swatch Name
The user-specified name of the new gradient swatch.
B. Reverse Order Checkbox
Reverses the order of the stops.
C. Linear/Radial Buttons
Specify whether the new gradient will be linear or radial.
D. Preview Area
Previews the new gradient with the current settings.
E. Save Button
Saves the new gradient as a swatch when clicked; the new swatch is automatically selected and displayed in the Gradient Forge panel, and can be edited further.
Illustrator Location:
Illustrator Main Menu > Window > Astute Graphics > Gradient Forge > Panel Flyout Menu
Similar to Swatches to Gradient..., but uses the fill colors of the selected artwork rather than swatches to determine the stop colors. The stacking order of the artwork determines the order of the stops. If any fill has a non-100% opacity value, this is retained in the resulting stop.
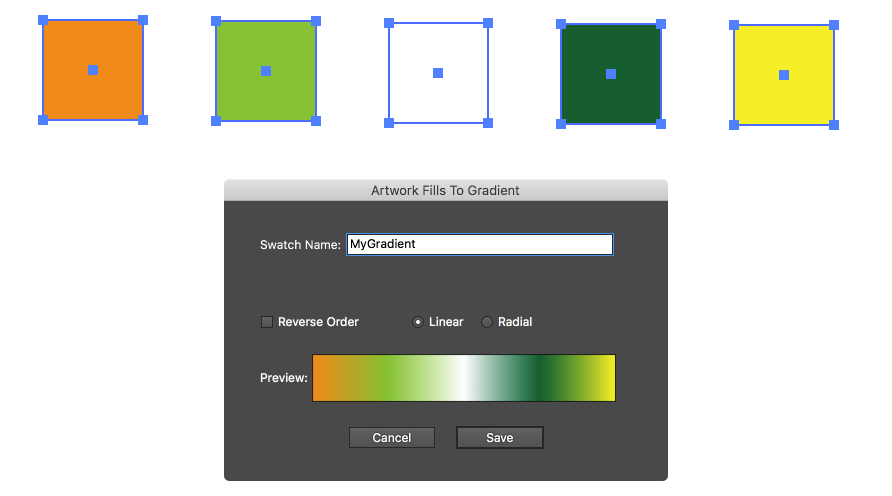
Gradient Forge Panel Artwork Fills to Gradient
Illustrator Location:
Illustrator Main Menu > Window > Astute Graphics > Gradient Forge > Panel Flyout Menu
Creates a new gradient (saved as a swatch, with the same dialog as the previous two functions) from a selection of vertical, stroked two-point paths, with the leftmost line representing the first stop, the rightmost line representing the last stop, and the relative distances between the lines preserved as distances between stops. Stroke weight is ignored. The paths may have been manually created, or may be the result of using the Gradiator panel’s Gradient Fill to Lines function. Lines which are at the same horizontal position will be stacked in the resulting gradient.
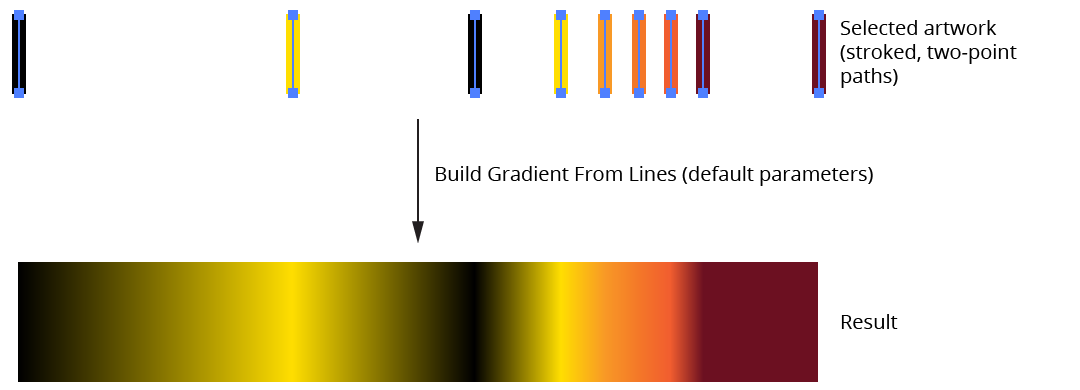
Gradient Forge Panel Build Gradient from Lines Example
Illustrator Location:
Advanced Toolbar > AG Color Select Stack > Gradient From Art Tool
Tool Location and Cursors
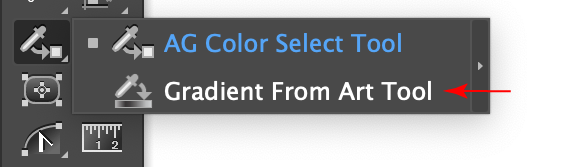
The Gradient From Art tool appears in Illustrator’s main toolbar (which must be in Advanced mode: View > Toolbars > Advanced), stacked under the AG Color Select tool. As with other stacked tools, click and hold on the top tool icon to display the tools stacked under it.
Gradient From Art Tool Location
The Gradient From Art tool’s primary cursor is a crosshair, which can have badges; there is an additional form when moving a sampling line node or segment:

Gradient From Art Tool Cursors
Tool Operation
As the Gradient From Art tool has several keypresses for certain operations, we suggest installing the free Astute Graphics plugin Astute Buddy, which creates a panel that dynamically updates to inform you of the various keys which can be pressed in the tool’s current context.
The Gradient From Art tool is works in conjunction with the associated Gradient From Art panel, which should be open and accessible. If you are using the free Astute Graphics plugin DirectPrefs, you can have the Gradient From Art panel automatically be shown when the Gradient From Art tool is selected.
Note: For clarity, some of the images in this manual show a sampling line on an empty part of the artboard, but this is not particularly useful as it would simply create a gradient which is all transparent or all white. In reality, the line would always be created above actual artwork.
Creating a sampling line with the Gradient From Art tool is like creating a straight segment-only path with the native Pen tool: the cursor is clicked at the desired locations on the artboard to create nodes (visualized as small circles), which the sampling line passes through. After the first node is placed, a “rubberband” will follow the cursor previewing the next segment location. Holding down Shift constrains the new segment to 45° angles around the general constrain angle.

Gradient From Art Tool Sampling Line Creation
To place the last node, press the Option/Alt key while clicking to create it:
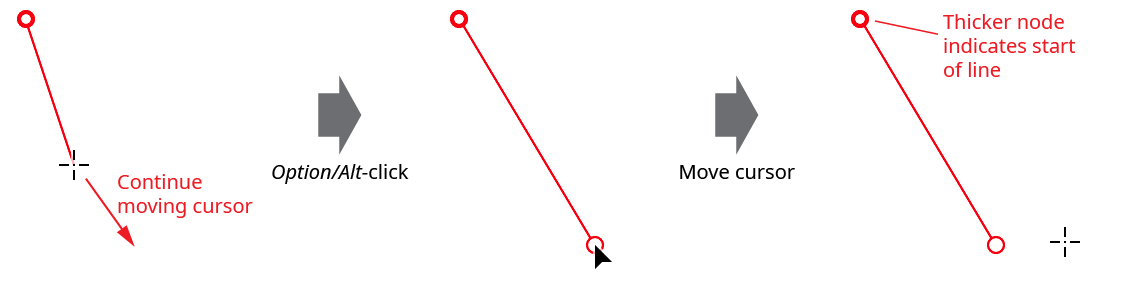
Gradient From Art Tool Sampling Line Creation Example 2
The sampling line can also be ended by pressing the Esc key while the cursor is moving. However, it is not strictly necessary to manually end the sampling line, as this will happen automatically when a different tool is selected.
Because single segment (two-node) sampling lines are commonly drawn, clicking-and-dragging, by default, will automatically end the line with the single segment.
To continue a sampling line which was previously terminated, click on either end node; the rubberband will become active again and the line can be continued. If it is the starting node that was clicked, the sampling line reverses itself.
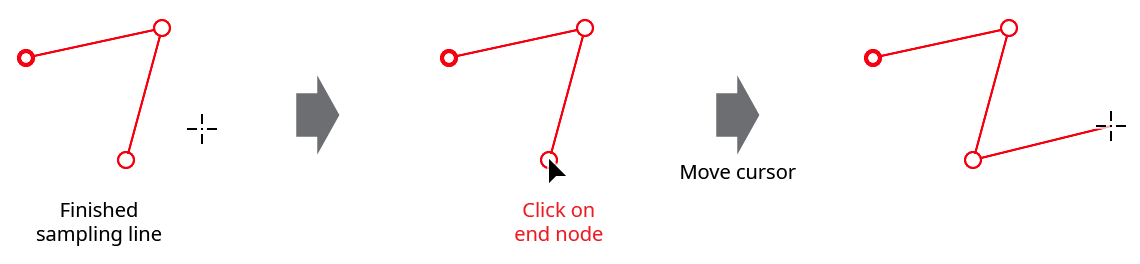
Gradient From Art Tool Restart Line
Nodes or segments can be moved by dragging them (the cursor changes to a solid, tail-less arrowhead); pressing Shift constrains the motion to 45° angles around the general constrain angle. Nodes can be deleted by Option/Alt-clicking on them (the cursor shows a minus sign), and a new node may be added along an existing segment by Option/Alt-clicking on the segment (the cursor shows a plus sign).
A new sampling line may be started in two ways. If the current line is complete (not in the process of being drawn), then simply clicking anywhere other than on the existing line will begin a new line. If the current line is still being drawn, and the tool preference Dragging Starts New Line is enabled (the default), then dragging the cursor will clear the current line and start a new one.
The sampling line may be deleted without starting a new one by Option/Alt-clicking a blank area of the canvas. All changes made to the sampling line are affected by the normal undo and redo operations.
Illustrator Location:
Illustrator Main Menu > Window > Astute Graphics > Gradient From Art
The menu item to show and hide the Gradient From Art panel can be found in the main menu under Window > Astute Graphics > Gradient From Art. When the Gradient From Art tool is not in use, the panel displays only a “Click to select” message; clicking anywhere on the panel selects the tool and displays all the controls.
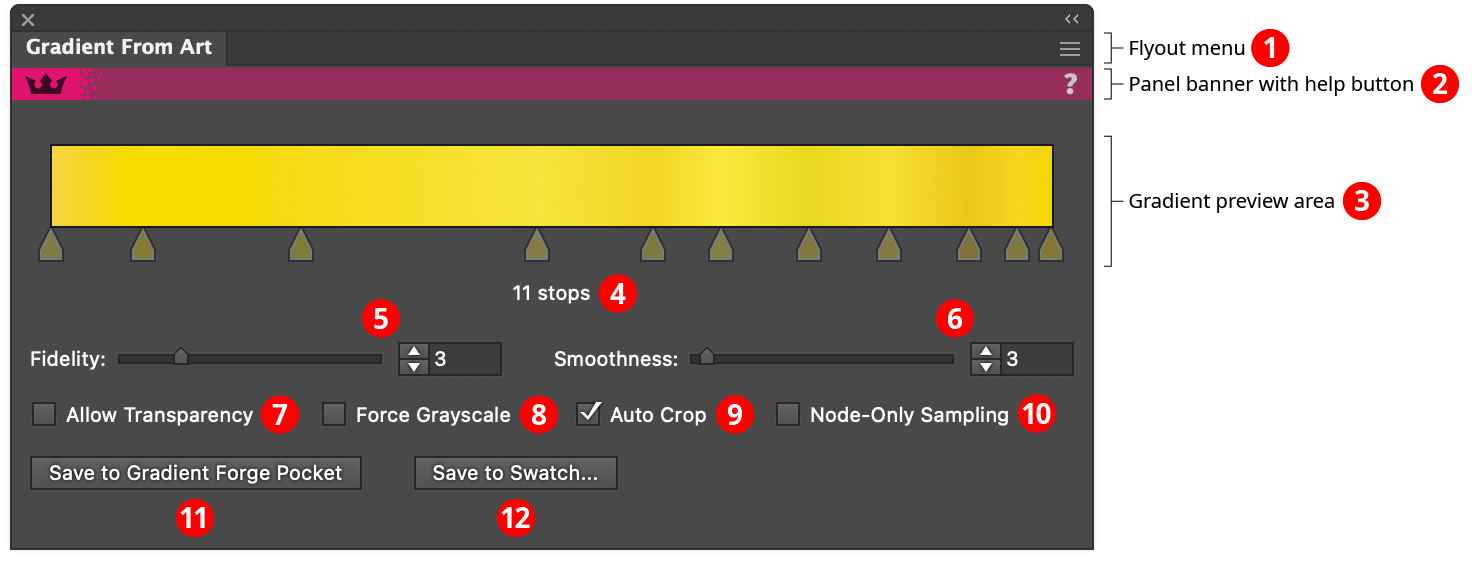
Gradient From Art Panel
1. Flyout menu
Contains a single menu item which brings up the Preferences dialog (see Gradient From Art: Preferences).
2. Panel banner
The Gradient From Art panel banner has a help button on the right which opens the help documentation in the Astute Manager. If this does not automatically appear, please ensure your Astute Manager is running first.
3. Gradient Preview Area
Shows the gradient that would result from using the sampling line with the current settings. If the sampling line is edited, or a parameter is changed, or the artwork is changed, then the gradient is automatically recalculated. The gradient’s stops are displayed for reference, but are not directly editable. If no sampling line exists, the preview area will display “No Sampling Line”, and if the gradient is incomplete or in the process of being calculated, the preview area will display “Calculating...”.
4. Stop Count
Shows the current number of stops in the gradient. A warning symbol will be displayed next to the stop count when it exceeds 256 stops, because Illustrator does not render stops past that limit.
5. Fidelity
Not available when Node-Only Sampling is enabled. Fidelity determines how closely the gradient matches the original sampled colors. It can range from 1 to 10, with a default of 3. Higher fidelity values retain subtle color changes at the expense of creating a gradient with more stops, which generally makes it more difficult to manually tweak later.
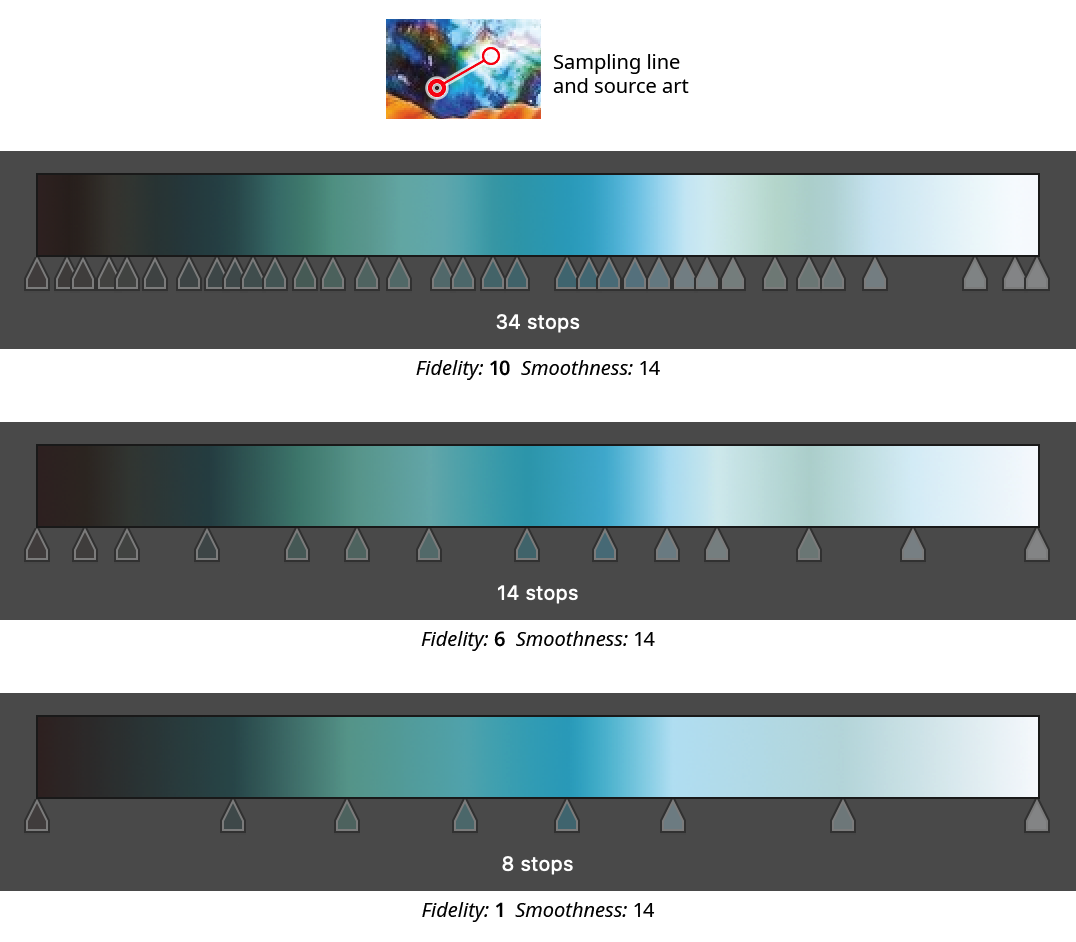
Gradient From Art Panel Fidelity Examples
6. Smoothness
Not available when Node-Only Sampling is enabled. Smoothness controls how gradually transitions from one color to another are made; it is essentially a kind of Gaussian blur for stop colors. This is most evident when sampling from source art that has sharp transitions. The setting can range from 0 to 100, with a default of 3. The lowest value will produce very sharp transitions, but it does not produce stacked gradient stops, which are not recommended due to these types of gradient’s poor rendering. (They can, however, be created using the Gradient Forge panel).

Gradient From Art Panel Smoothness Examples
7. Allow Transparency
When enabled, transparency in the sampled art will be retained in the gradient stops. If there is no artwork under a sampling location, the color will be set to 100% transparent.
8. Force Grayscale
When enabled, all sampled colors will be converted to their grayscale equivalent.
9. Auto Crop
Not available when Node-Only Sampling is enabled. When Auto Crop is enabled, white or partially transparent stops are trimmed off the ends of the gradient (unless the gradient only has two stops). This makes it possible to sample artwork from end to end without having to place the sampling line end nodes exactly on the edges of the object(s):
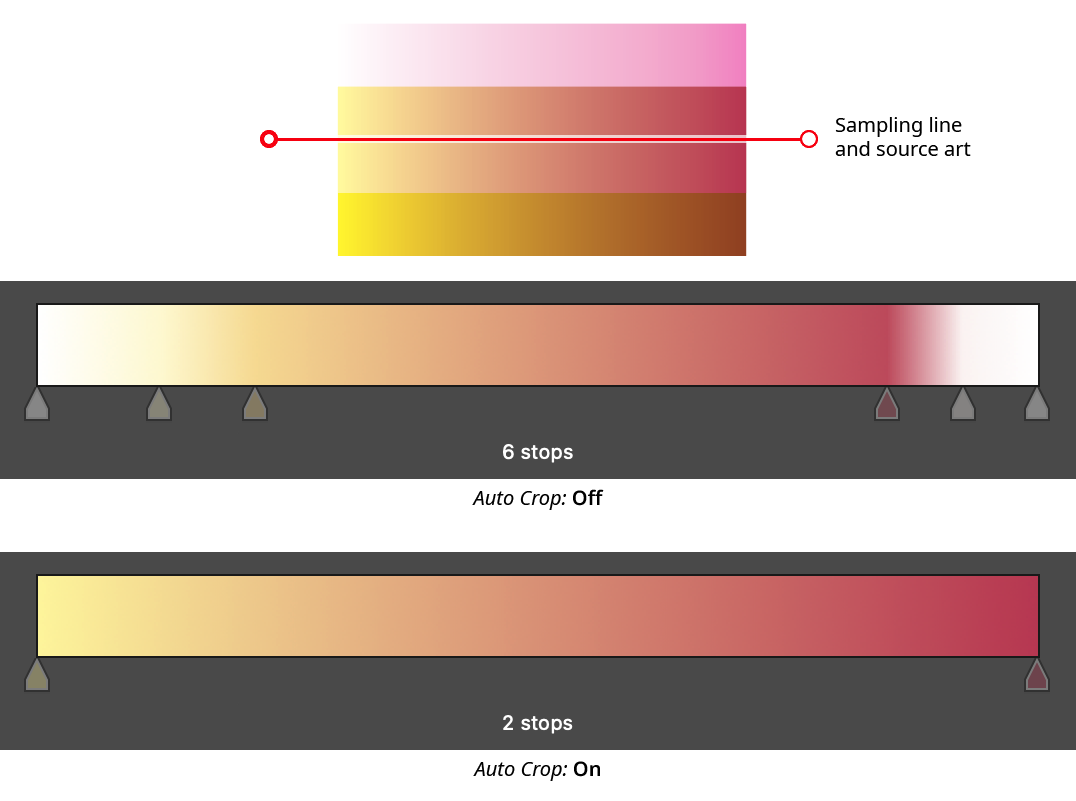
Gradient From Art Panel Auto Crop
10. Node-Only Sampling
When enabled, colors for the gradient stops are not sampled continuously along the sampling line, but rather only at the nodes. Each node corresponds to exactly one stop, which will be evenly spaced along the gradient.
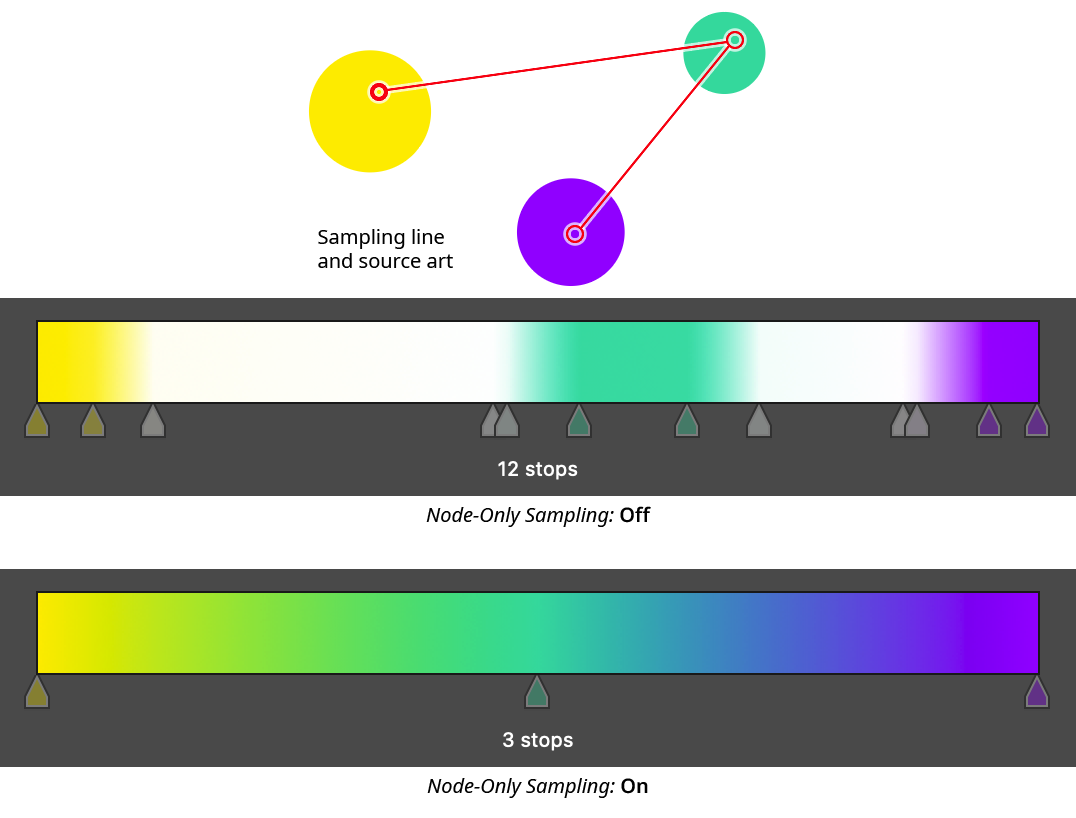
Gradient From Art Panel Node Only Sampling
11. Save to Gradient Forge Pocket Button
Saves the previewed gradient into a pocket on the Gradient Forge panel. The gradient will be put into the first empty pocket. If there are no empty pockets, a warning dialog will appear, allowing you to overwrite the last pocket.
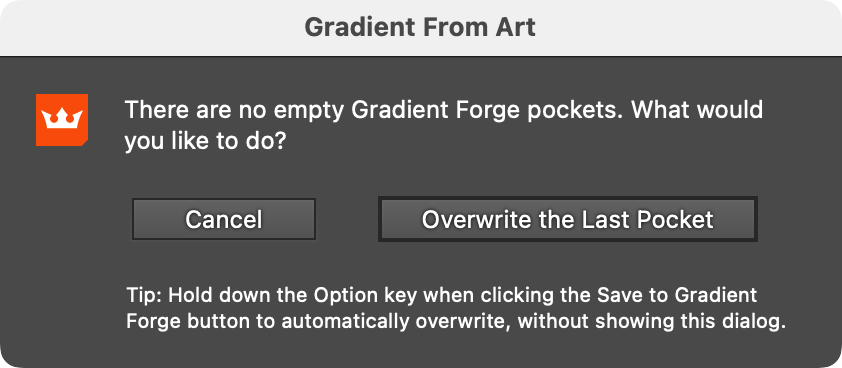
Gradient From Art No Free Pockets Warning
As noted at the bottom of the warning dialog, holding Option/Alt when clicking the Save to Gradient Forge Pocket button will automatically overwrite the last pocket if there are no free pockets.
12. Save to Swatch... Button
Saves the previewed gradient into a swatch. The button brings up a dialog allowing the gradient to be named, and its direction and type changed, before it is saved:
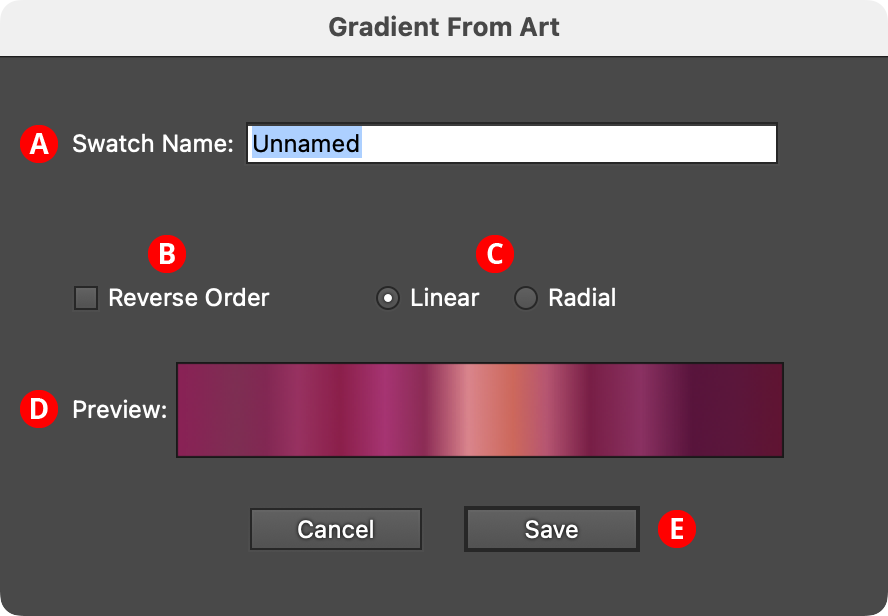
Gradient From Art Save to Swatch Dialog
A. Swatch Name: The user-specified name of the new gradient swatch.
B. Reverse Order Checkbox: Reverses the order of the stops.
C. Linear/Radial Buttons: Specify whether the new gradient will be linear or radial.
D. Preview Area: Previews the gradient with the current settings.
E. Save Button: Saves the gradient as a swatch when clicked; the new swatch is automatically selected and displayed in the Gradient Forge panel, where it can be edited further.
If a sampling line is present (i.e., a gradient is being previewed in the panel), pressing the Enter key will have the same effect as clicking the Save to Swatch... button.