 Curvature Circle Tool
Curvature Circle is an Astute Graphics tool for Adobe Illustrator that creates circular paths that are tangent to an existing curved path and have the same curvature (and thus radius) as the path at the tangency point. Curvature Circle is part of the SubScribe plugin.
Tool Location and Cursor Appearance
The Curvature Circle tool appears in Illustrator’s main toolbar (which must be in Advanced mode: View > Toolbars > Advanced) stacked under the Circle by Points tool and along with several other tools in the SubScribe plugin. As with other stacked tools, click and hold on the top tool icon to display the tools stacked under it.
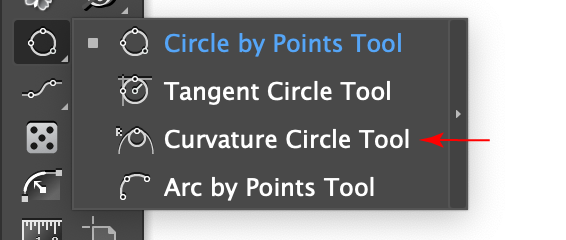
Curvature Circle Tool Location
The Curvature Circle tool’s cursor is a standard crosshair:
Curvature Circle Tool Cursor
Curvature Circle Tool Operation
Use of the Curvature Circle tool is very simple: the cursor is hovered over a path at the desired position (by default it will snap to the path, and the current radius will be displayed); clicking the mouse button creates the curvature-matched circle.

Rotate at Collisions Tool Snapping Rings
By default, the circle is created on the concave side of the curve, but it may be flipped so it is created on the convex side by holding down the Shift key before clicking.
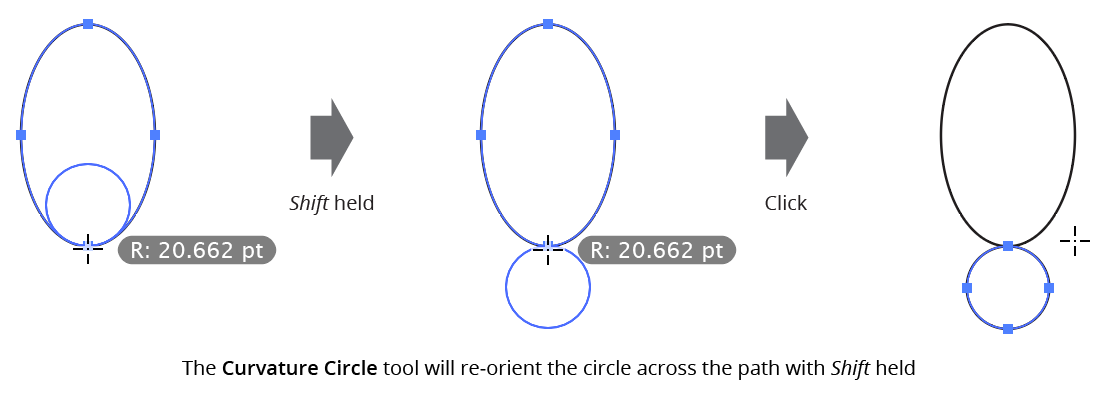
Curvature Circle Tool Shift Key Modifier
Circles will not be created along straight path segments (as they have infinite radius), or at spots along the path where the radius exceeds 8192.0 pt; a text annotation by the cursor will indicate if either of these situations exist.
Paths in Illustrator, including circular arcs, are composed of cubic beziers, which can actually never attain a truly constant radius. For example, an Illustrator circle of four anchor points with a nominal 100 pt radius will actually vary in radius mathematically along the path from about 99.2 pt to 102.2 pt. Because creating multiple circles adjacent to other circles using the tool might create circles with different radii, by default the tool preference Treat Bezier Circular Arcs As Constant Radius is enabled. In this case, when the Curvature Circle tool is used on an arc of less than 90 degrees which is mathematically as close to a true circle as possible, the created circle will always match the nominal radius value of the arc; an asterisk is appended to the displayed radius to indicate this.
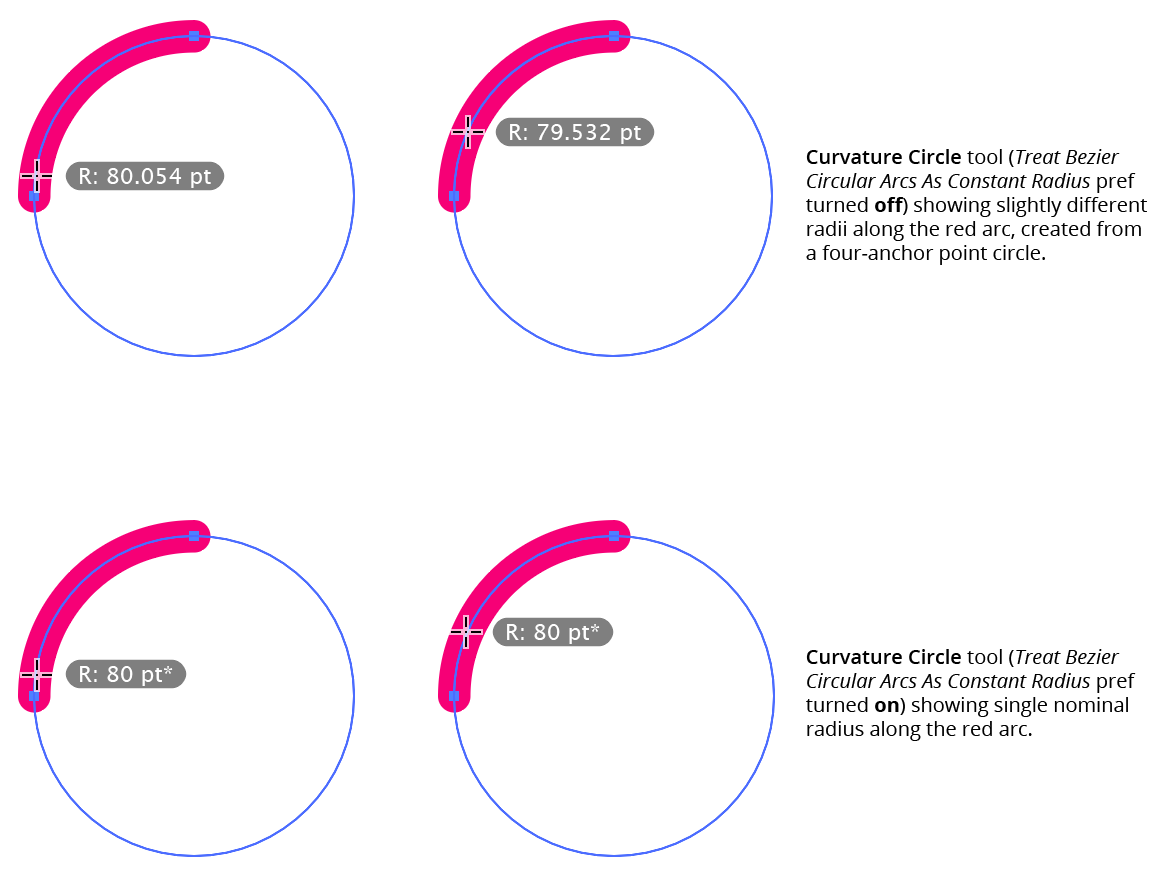
Curvature Circle Tool Circular Arcs
Curvature Circle Preferences
Doubleclicking the Curvature Circle tool in the toolbox (or pressing the Enter key when the tool is selected) will bring up its preferences dialog:
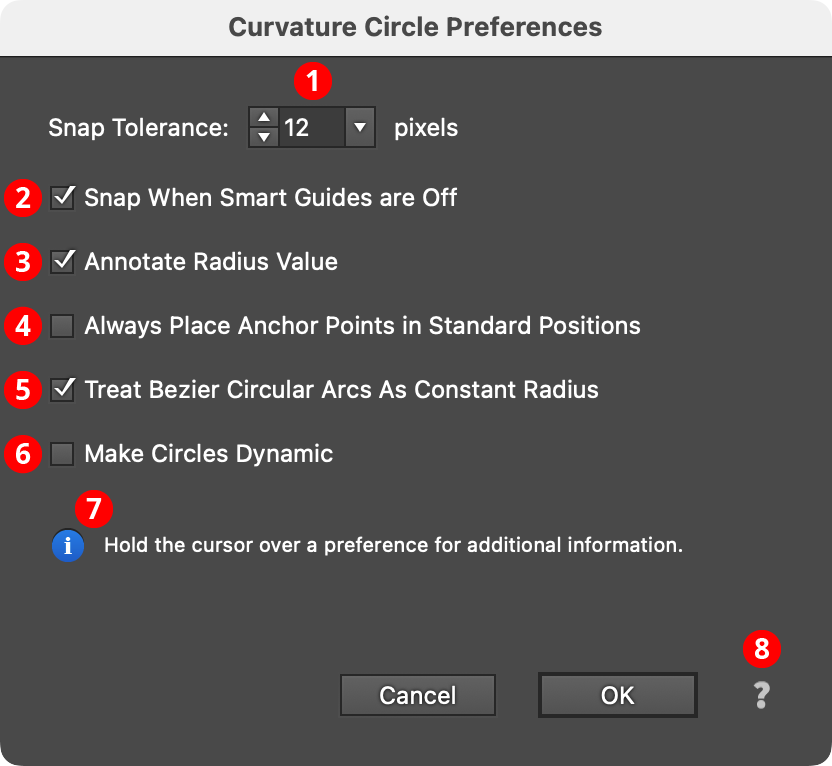
Curvature Circle Preferences
1. Snap Tolerance
The snapping tolerance for the cursor when locating the circle. If Smart Guides are turned on, the Smart Guides tolerance value is used if it is larger than the specified value.
2. Snap When Smart Guides are Off
When enabled, and Smart Guides are turned off, the cursor will still snap to paths using the specified Snap Tolerance.
3. Annotate Radius Value
When enabled, the radius of the circle that will be created is displayed dynamically next to the cursor.
4. Always Place Anchor Points in Standard Positions
When enabled, the final circular path will always have four anchors points at the standard positions (0°, 90°, 180°, and 270°, taking into account the general constrain angle). Otherwise, anchor points will be created every 90° starting at the tangency point.
5. Treat Bezier Circular Arcs As Constant Radius
When enabled, arcs of 90° or less which are mathematically as close to true circular arcs as possible are treated as if they had constant radius. An asterisk (“*”) will be appended to the displayed radius value (see Curvature Circle: Tool Operation).
6. Make Circles Dynamic
This preference will be available only if the Astute Graphics VectorScribe plugin is installed. When enabled, circles will automatically be created as Dynamic Circles, which can then be immediately modified by the Dynamic Shapes tool.
7. Informational area
Shows a brief description of each preference control when the cursor is being hovered over it.
8. Help Button
Opens the help documentation in the Astute Manager. If this does not automatically appear, please ensure your Astute Manager is running first.
