 Arc by Points Tool
Arc by Points is an Astute Graphics tool for Adobe Illustrator that creates circular arcs. The arc is defined by its two endpoints and can be constrained by either its tangent angle or by a third point it must pass through. Arc by Points is part of the SubScribe plugin.
Tool Location and Cursor Appearance
The Curvature Circle tool appears in Illustrator’s main toolbar (which must be in Advanced mode: View > Toolbars > Advanced) stacked under the Circle by Points tool and along with several other tools in the SubScribe plugin. As with other stacked tools, click and hold on the top tool icon to display the tools stacked under it.
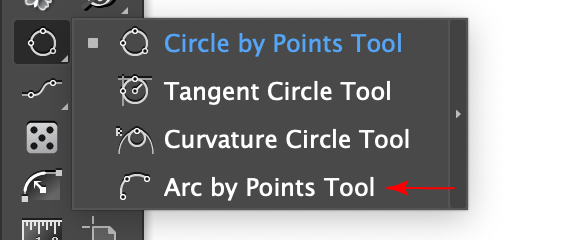
Arc by Points Tool Location
The Arc by Points tool’s cursor is a standard crosshair, with additional symbols when path joining is enabled and/or Slow-Dragging is being performed:

Arc by Points Tool Cursors
Arc by Points Tool Operation
As the Arc by Points tool has several keypresses which can add or change its functionality, we strongly suggest installing the free Astute Graphics plugin Astute Buddy, which creates a panel that dynamically updates to inform you of the various keys which can be pressed in the tool’s current context.
The Arc by Points tool is used by first specifying the two endpoints of the arc, and then adjusting the arc through these points. The first step can be done either by clicking on the first point and then dragging to the second, or by clicking on each point; the latter method has the advantage of allowing you to scroll, zoom, change the view mode, etc. in the middle of the operation. Shift may be held to constrain the angle between the endpoints.
There are two methods of adjusting the arc through the initial two points by creating a third point. Which method is initially in force depends on the tool preference Third Point Indicates Direction. By default, this preference is off and the arc is adjusted such that it passes through the third point, which is created by clicking on the artboard. When moving the cursor to locate the third point, the arc and its current radius are previewed using annotations.
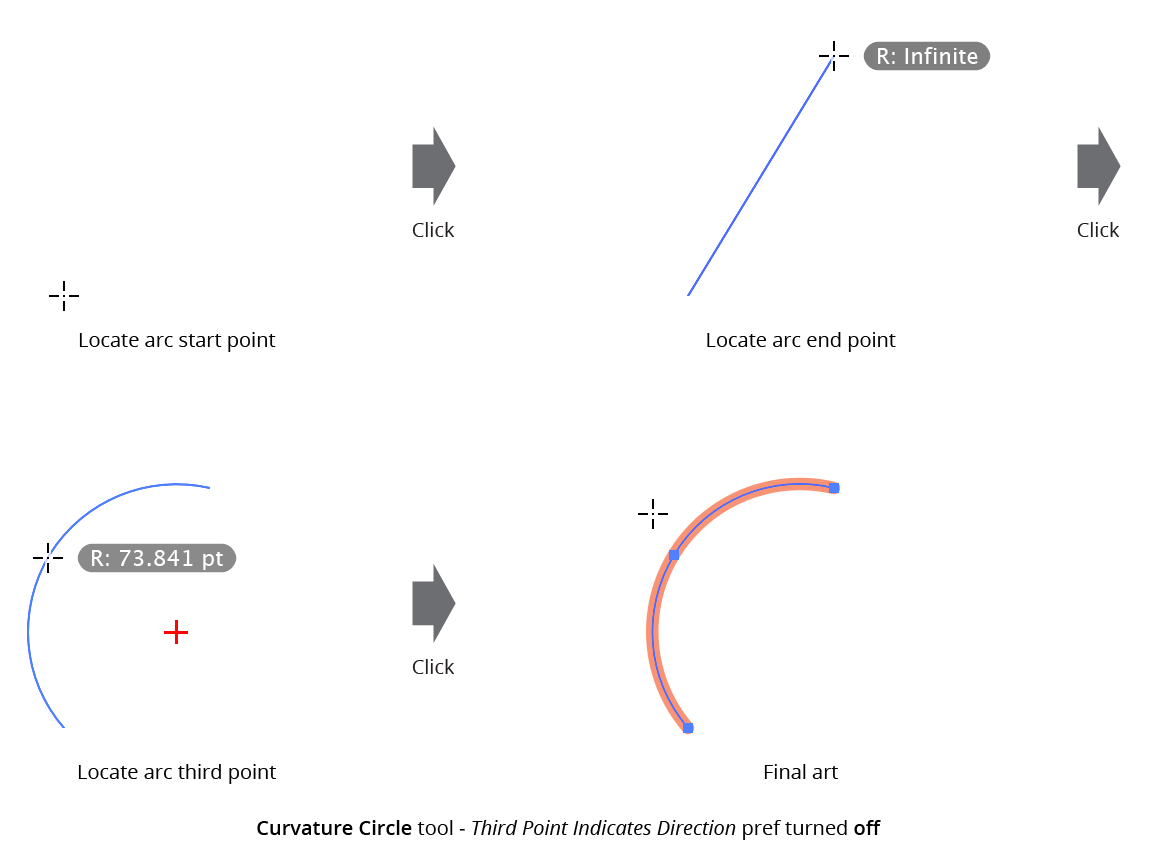
Arc by Points Tool Example
When the Third Point Indicates Direction preference is turned on, the third point is used to specify the initial tangent angle of the arc at one of its end points.
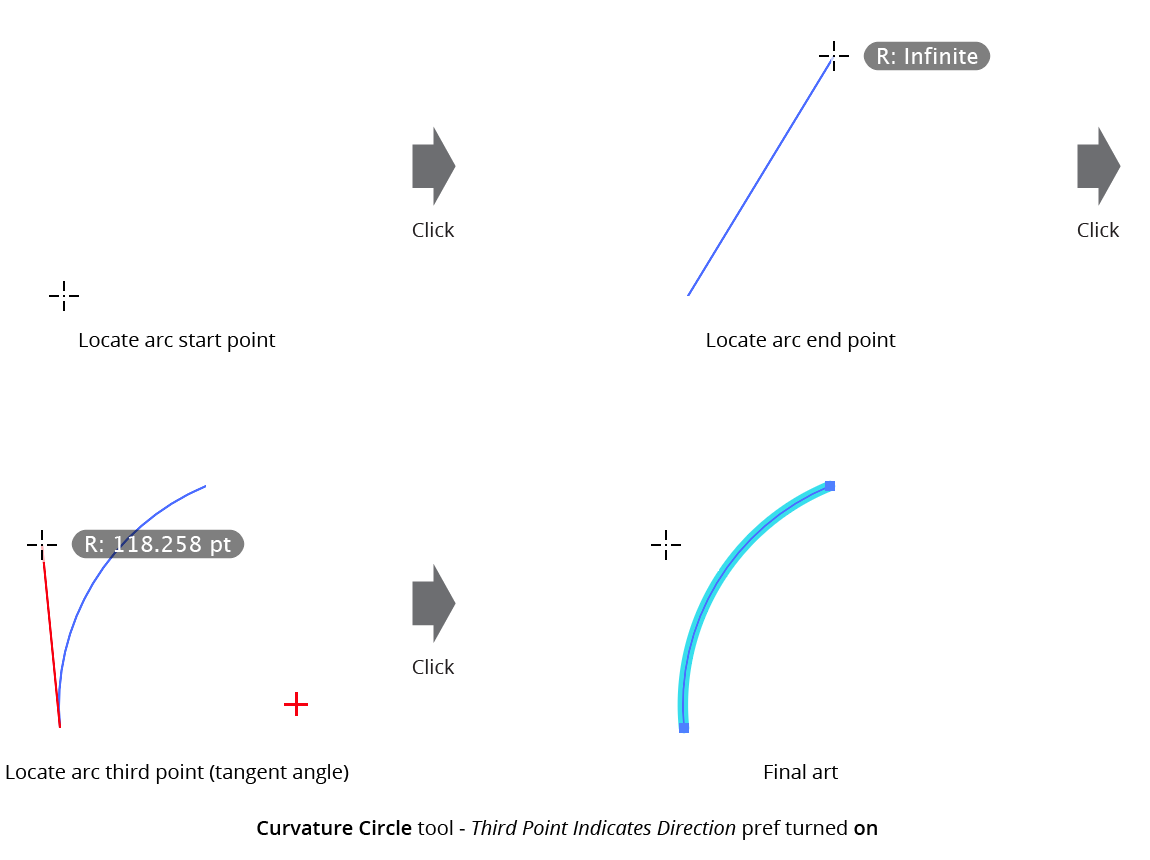
Arc by Points Tool - Third Point Indicates Direction
When locating the third point using Third Point Indicates Direction, the Shift key can be pressed to constrain the direction of the direction line, and the Option/Alt key can be pressed to change the endpoint from which the line is drawn.
Using either method, as the third point approaches a spot exactly in line with the start and end points (but not in between them), the arc will become too large to create; a text annotation by the cursor indicates this.
The Third Point Indicates Direction preference can be toggled while creating the arc by pressing the key assigned to “Increase Diameter” in the native Keyboard Shortcuts dialog (by default, for English-speaking locales, the right bracket key "]").
When dragging to locate the third point (mouse button down), two additional keypresses can be used:
Command/Ctrl: Toggles Slow-Drag mode, in which the cursor is “geared down” by a factor specified in the tool preferences for finer control over the arc’s creation.
J: Toggles the Automatically Join to Existing Paths preference (see Arc by Points: Preferences).
Arc by Points Preferences
Doubleclicking the Arc by Points tool in the toolbox (or pressing the Enter key when the tool is selected) will bring up its preferences dialog:

Arc by Points Preferences
1. Third Point Indicates Direction
Chooses the mode used to adjust the arc through its endpoints. When enabled, the third point is used to specify the tangent angle of the arc at its endpoint; otherwise, the arc must pass through the third point. Can be toggles on the fly by pressing the key assigned to “Increase Diameter” in the native Keyboard Shortcuts dialog (by default, for English-speaking locales, the right bracket key “]”). (See Arc by Points: Tool Operation)
2. Display Arc Radial Center
When enabled, the arc’s current radial center point will be annotated with a small cross while it is being created.
3. Annotation Color
Allows a choice of colors in which to annotate the arc’s radial center and/or the third point direction line, from among red, blue, magenta, green, black, and grey.
4. Display Radius Value
When enabled, the current radius of the arc is displayed next to the cursor.
5. Snap to Existing Path Points
When enabled, the cursor will snap to anchor points with a red snapping ring even when Smart Guides are turned off.
6. Snap When Path Continuation is Tangent
When enabled, and Third Point Indicates Direction is also enabled, and the arc was started at the end of an open path, then the cursor will snap to positions where the arc continues the open path in a tangent direction, or 180° opposed to it. A small “S” (or “T”, when the path reverses direction) will be displayed above the join point:
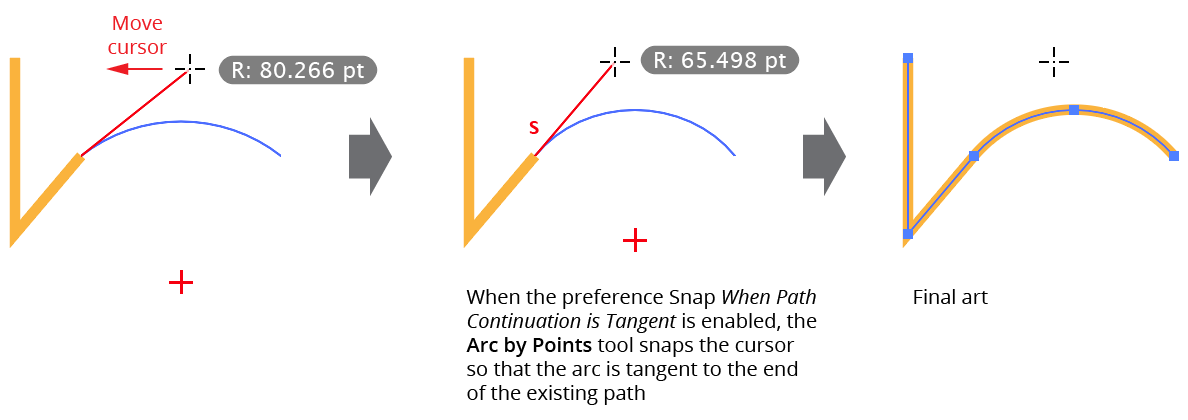
Arc by Points Tool - Snap to Tangents Option
7. Automatically Join to Existing Paths
When enabled, and the arc begins or ends at the endpoint of an existing open path, then the arc is joined to that path. Can be toggled on the fly (when dragging the third point) using the J key.
8. Replace Existing Path Segments
When enabled, and the arc starts at an anchor point of an existing path and ends at an adjacent anchor point, the arc replaces the existing path’s segment. Automatically Join to Existing Paths must also be enabled.
9. Retain Selection
When enabled, objects which are already selected when an arc is created will remain selected afterwards.
10. Slow-Drag Divider
Specifies the factor by which the cursor’s movement will be divided when using Slow-Drag (see Arc by Points: Tool Operation). The value can range from 1 to 500, with higher values allowing for smaller movements of the cursor.
11. Informational area
Shows a brief description of each preference control when the cursor is being hovered over it.
12. Help Button
Opens the help documentation in the Astute Manager. If this does not automatically appear, please ensure your Astute Manager is running first.