Editing Points
 PathScribe Tool
 InkScribe Tool
![]() PathScribe Panel
PathScribe Panel
 Reposition Point Tool
 AG Utilities Live Effects
Illustrator Location:
Advanced Toolbar > PathScribe Tool
Clicking
Clicking on a handle without any modifier keys will simply select the handle’s associated point (the point will also become selected whenever one of its handles is modified, as below). Note that unlike with the Direct Selection tool, other paths are not affected: if they were fully- or partially-selected, they remain so. To deselect everything, click on a blank area of the document.
Adding one more modifier keys while clicking a handle changes or adds functionality. As with all Astute tool keypresses, most of these will be indicated on the Astute Buddy panel.
Shift:
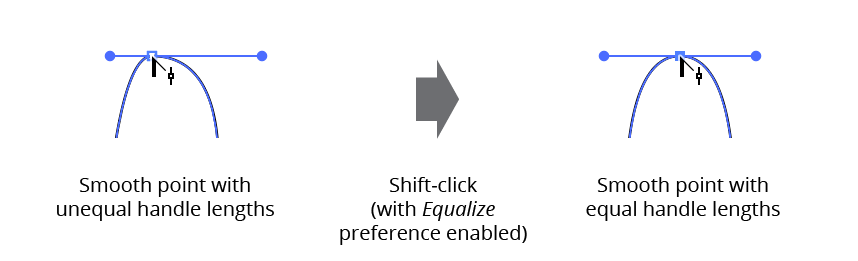
Shift-clickingon a handle will, by default, add or remove the handle’s associated point from the selection. However, by enabling the preference Shift-Clicking Equalizes Handle Lengths, you change this functionality.Shift-clickingon a handle with the preference set will adjust the handle’s length to match the point’s other handle. If the other handle is completely retracted, then the clicked handle will be retracted as well.
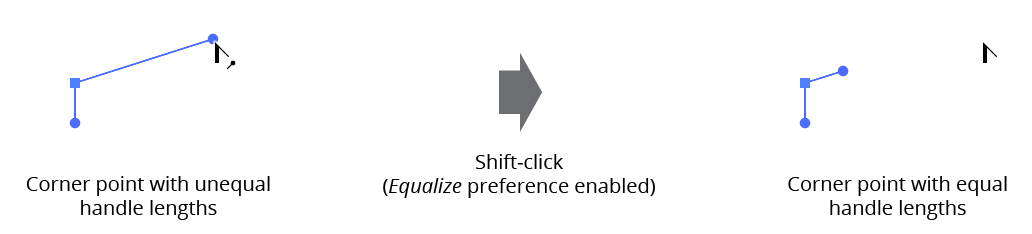
VectorScribe PathScribe handle equalization
Option/Alt:
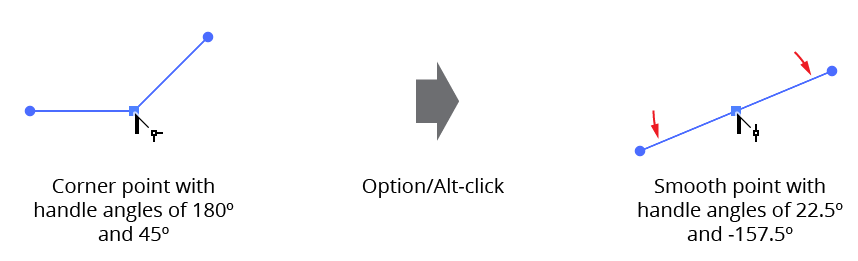
Option/Alt-clickingon a handle will change the type of point from corner to smooth or vice versa. (When cursor highlighting with text annotations is enabled, which it is by default, you can determine a point’s type by holding the cursor over it.) When a smooth point is converted to a corner point, neither handle is changed. When a corner point is converted to a smooth point, and it has two handles, the clicked handle will move, changing its angle so it is opposite (180° from) the existing handle.Shift+Option/Alt:
Shift+Option/Alt-clickingon a handle will retract the handle. The point type remains unchanged.
Dragging
Dragging a handle will move it in the same manner as the Direct Selection tool (unless connector point recognition is enabled and the point is a connector point; see Connector Points). While dragging, there are various keys which can be pressed to perform additional functions:
Shift: Constrains the handle angle to 45° increments around the general constrain angle.
Option/Alt: Constrains the handle’s angle to its original angle, or the angle that is 180° away from the original angle (this lets you flip which side the handle is on if you drag it back past its originating point).
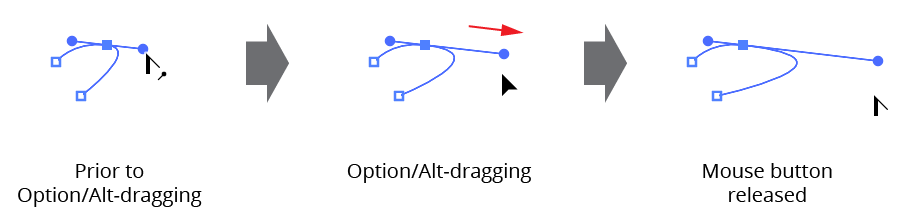
VectorScribe PathScribe handle angle constraining
Shift+Option/Alt: Same as
Option/Alt-dragging, except when Smart Guides are turned on. In this case, the handle will snap to other items on the page while remaining constrained to its original angle.Control [Mac only]: Toggles slow-drag.
Command/Ctrl: On Mac, hides handle annotations; on Windows, either toggles slow-drag or hides handle annotations, depending on the preference setting (see PathScribe: Preferences).
Space bar: Temporarily locks the handle’s anchor point to the handle’s so they move in tandem.
C: Changes the handle’s anchor point to corner type.
L: Toggles length constraining. When the handle’s length is constrained, you can only change its angle.
R: Retracts the handle completely.
S: Changes the handle’s anchor point to smooth type.
Illustrator Location:
Advanced Toolbar > PathScribe Tool
PathScribe can select and edit multiple handles simultaneously. To select multiple handles using the PathScribe tool, they must first be visible on the screen. You can show all the handles on a path by either having part of the path selected and clicking the “Show handles on selected paths” button on the PathScribe panel, or by using the PathScribe tool to Option/Alt-marquee over a small section of a path, being careful not to select any points. Once the handles are visible, simply marquee them with the PathScribe tool by dragging out a rectangle that encloses them. Handles which are selected change from the default solid circles to larger, hollow circles (unless you have changed the display of handles to be hollow, in which case selected handles will be solid).
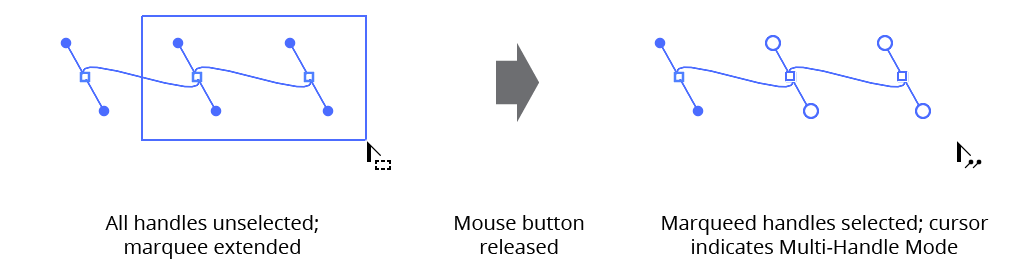
VectorScribe PathScribe marquee handle selection
You can also select the points whose handles you wish to select and use the first three menu items in the Handle Selection submenu of the PathScribe panel flyout menu.
Handles made visible with Illustrator’s Show Handles When Multiple Anchors are Selected preference may not be marquee-selectable with PathScribe. To avoid the problem, either turn the preference off, or only use the PathScribe tool to select paths and points.
You can use the Shift key while marqueeing to add or subtract handles from the current selection. To deselect all selected handles, click on a blank area of the document. If no handles fall within the marqueed rectangle, PathScribe will check for and select points or path segments instead. (You can also ignore handles and only select points or segments by holding down Option/Alt during the marquee operation.)
When one or more handles are selected, PathScribe enters “Multi-Handle Mode”. The cursor changes to show an icon of two handles to remind you of this. While in this mode, you can’t edit anything else, like an unselected handle or a point. You can Option/Alt-click on unselected paths to show their handles. But if you switch to another tool, you will lose the handle selection. If you hold down Command/Ctrl to temporarily switch to one of the selection (arrow) tools, and you modify a path that contains selected handles, they will become unselected.
Clicking
You can’t use any of the click operations on multiple handles. However, you can use the PathScribe panel to perform the same functions on them (see PathScribe Panel). If you prefer to use the panel for handle editing, you can select a single handle and do so in the same manner as multiple handles.
Dragging
When you drag one of a set of selected handles, the handle under the cursor moves in the same manner as a single dragged handle would (with one exception: connector points are not recognized in Multi-Handle Mode). How the other handles move is dependent on two preference settings (see below) and which multi-handle drag mode is active. There are four multi-handle drag modes: Constraining mode, Normal rotation mode, Counter-rotation mode, and Group mode.
Dragging in Constraining mode
If Option/Alt is held down, the angles of all of the selected handles will be constrained to their original angles. Their lengths will change in the manner explained below.
Dragging in Normal and Counter-Rotation modes
You operate in one of these modes unless the Option/Alt key or space bar are held down. Which mode is active can be seen in the bottom status line on the PathScribe panel, and you can toggle between these modes by pressing the C key when the mouse is down. In both these modes, selected handles will rotate through the same angle as the dragged handle, but in Counter-rotation mode, handles of the opposite type as the dragged handle will rotate in the opposite direction. For example, if the dragged handle is an in handle and is rotated 45° clockwise, then all selected out handles will be rotated 45° counterclockwise. If both handles of a smooth point are selected and moved in Counter-rotation mode, the point automatically becomes a corner point.
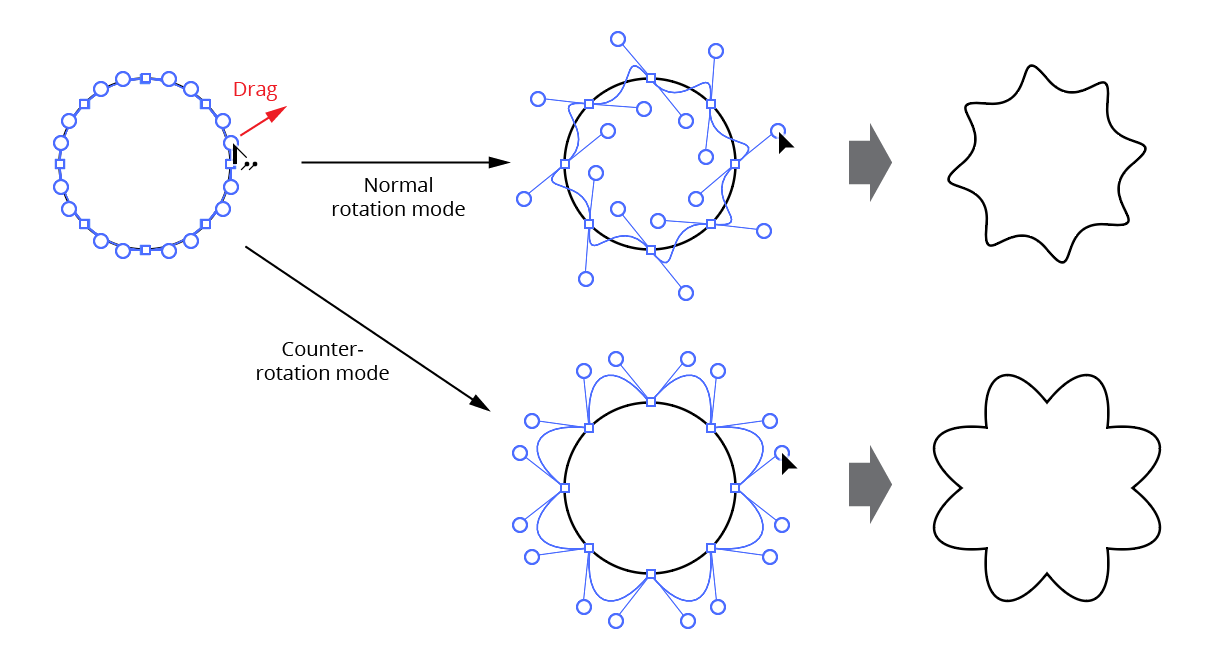
VectorScribe PathScribe multihandle normal and counter rotation
The change in each selected handle’s length depends on several preferences. By default, handles shorten or lengthen in proportion to the change in length of the dragged handle. For example, if the dragged handle was shortened to half of its original length, then all of the selected handles will be shortened to half of their original lengths. To change this behavior, see PathScribe Preferences.
Dragging in Group mode
Group mode is accessed by holding down the space bar while moving multiple handles. In this mode, all of the selected handles move as one unit in the same direction and distance as the dragged handle. As with Counter-rotation mode, if both handles of a smooth point are selected and moved, the point automatically becomes a corner point. If you begin your drag without the space bar and add it later, the angles and relative positions of all the selected handles will be restored to their original values.

VectorScribe PathScribe multihandle grouped
Illustrator Location:
Advanced Toolbar > Pen Stack > InkScribe Tool
When a path is at least partly-selected, its existing anchor points may be selected, moved, modified, or removed. As some keypresses can change depending on the way the InkScribe preferences are set, the Astute Buddy panel is the best reference, as it shows current keypresses taking into account the current preference settings.
Clicking on an anchor point selects that point; the virtual panel annotation (if enabled) is moved to that point. If the point is at one end of an open path, then the path becomes the active path and can have additional points added to it. Shift-clicking has the same effect unless the preference Option/Alt-Click On Point to is set to Select. (In that case, Shift-clicking removes the point without adjusting handles to keep the curve shape).
Option/Alt-clicking on an anchor point Smart Removes the point (unless the preference Option/Alt-Click On Point to is set to Select). When a point is Smart Removed, the handles of the adjacent anchor points are extended or retracted so the resulting path shape is as close to the original as possible. To remove a point without adjusting any handles, Shift+Option/Alt-clicking may be used. The Smart Remove button on the panel or virtual panel can also be used to remove a point.
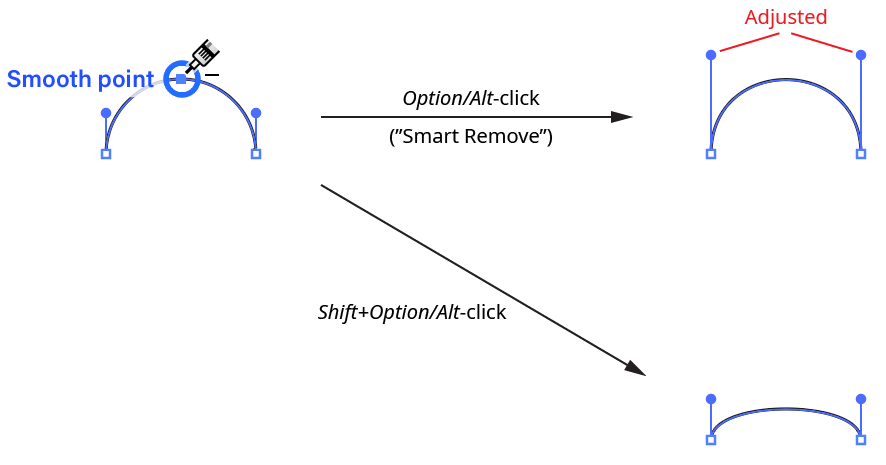
InkScribe Point Removal
Doubleclicking an anchor point (or one of its handles) on a selected path converts the point’s type from corner to smooth or vice versa. When a smooth point is converted to a corner point, handles (if any) are not moved. When a corner point is converted to a smooth point, and both handles exist, each handle swings away from the other in equal amounts until they are 180° apart (unless a handle was clicked, in which case only the clicked handle moves):
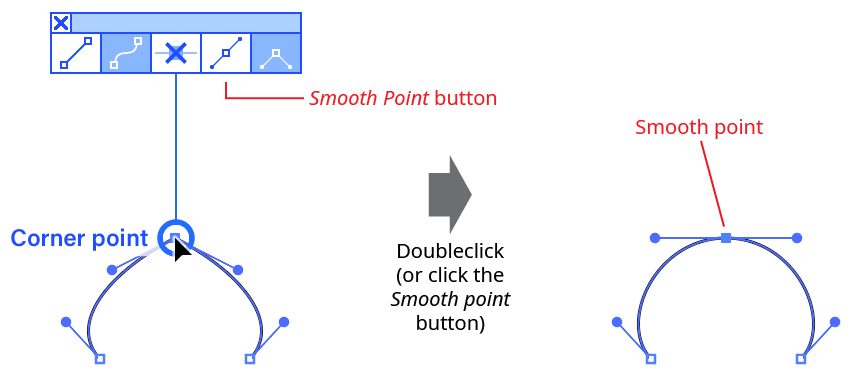
InkScribe Point Type Change
If the point did not have two handles originally, new handles are added. The Smooth Point or Corner Point buttons on the panel or virtual panel can also be used to change a point’s type.
Dragging an anchor point on a selected path moves it. InkScribe only moves a single anchor point at a time (to move multiple points, Astute Graphics’ PathScribe tool may be used). To move the point in a direction constrained to 45° increments around the general constrain angle from its original position, hold down the Shift key. If at least one of the point’s adjacent segments is straight, press the L key during the drag to toggle linear constrain mode, in which the point’s movement is constrained to the line formed by the straight segment(s).
Option/Alt-dragging an anchor point on a selected path, by default, defines the Out handle (as per the native Pen tool). If the point is a smooth point, the In handle will also move to remain opposite it. To define the Out handle on an existing point, Option/Alt must be held down before the drag starts. If the tool preference Option-Alt-Drag a Point to is set to Constrain Distance by Factor, then Option/Alt-dragging instead moves the anchor point from its original location by a multiple of the Distance Factor. For example, if the Distance Factor is set to 10 px, then the point will be moved 10 px, 20 px, 30 px, etc., but not in-between values. Distance constraining works only if the Option/Alt key is held down after the drag has started.
Illustrator Location:
Clicking
Clicking on a point without any modifier keys selects it and deselects all other points on the path. When the Keep Paths Selected preference is enabled (the default), other paths are not affected: if they were fully- or partially selected, they remain so.
Adding one more modifier keys while clicking a point changes or adds functionality:
Shift: As with a handle, Shift-clicking on a point will, by default, add or subtract the point from the selection. However, by enabling the preference Shift-Clicking Equalizes Handle Lengths, you change this functionality. Shift-clicking on a point with the preference set will make the lengths of the point’s handles equal. The point’s type does not change. If both handles exist, the new length for each is determined by averaging the lengths of the handles. If one of the handles is retracted, a new handle is created opposite the existing handle in angle and equal to it in length.
VectorScribe PathScribe point shift click
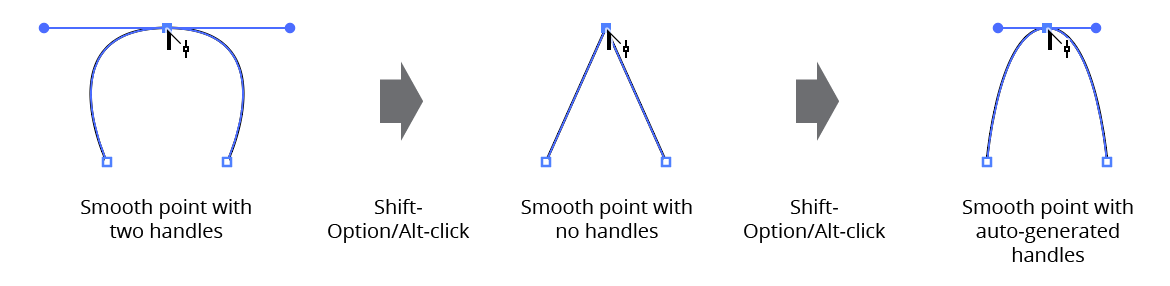
Option/Alt: Converts the point’s type from corner to smooth or vice versa. When a smooth point is converted to a corner point, neither handle moves. When a corner point is converted to a smooth point, and both handles exist, each handle swings away from the other in equal amounts until they are 180° apart:
PathScribe Point + Option Click
Shift+Option/Alt: Retracts the point’s handles. The point type remains unchanged. If both handles are already retracted, then
Shift+Option/Alt-clickingcreates two new handles, using the algorithm described for the PathScribe panel:
PathScribe Point + Shift + Option Click
Dragging
Dragging a point moves the point along with its handles, just as the Direct Selection tool would. As with dragging a handle, certain keys can be pressed while dragging to change or add functionality:
Shift: Constrains the movement to 45° increments around the general constrain angle.
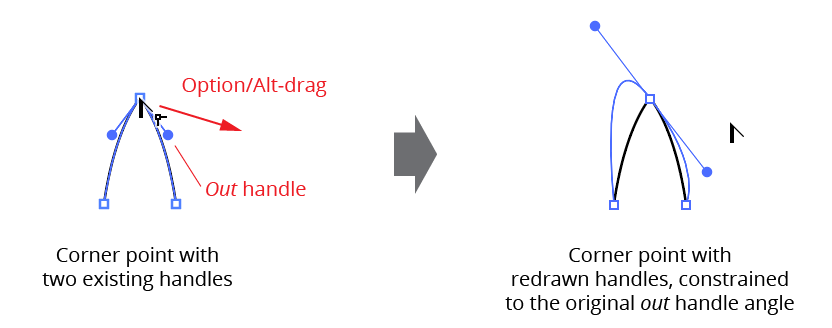
Option/Alt: Extends one or two new handles from the point, constraining their angles to their “original” angles. The point type remains unchanged. When both handles already exist, the “original” angle is the angle of the out handle. The cursor controls the out handle, while the in handle stays 180° opposed:
PathScribe Extend one or two handles
When only one handle already exists, the “original” angle for a smooth point is the angle of the existing handle plus 180°. For corner points, or when no handles exist, the “original” angle is set to the tangent angle of the path at the point.
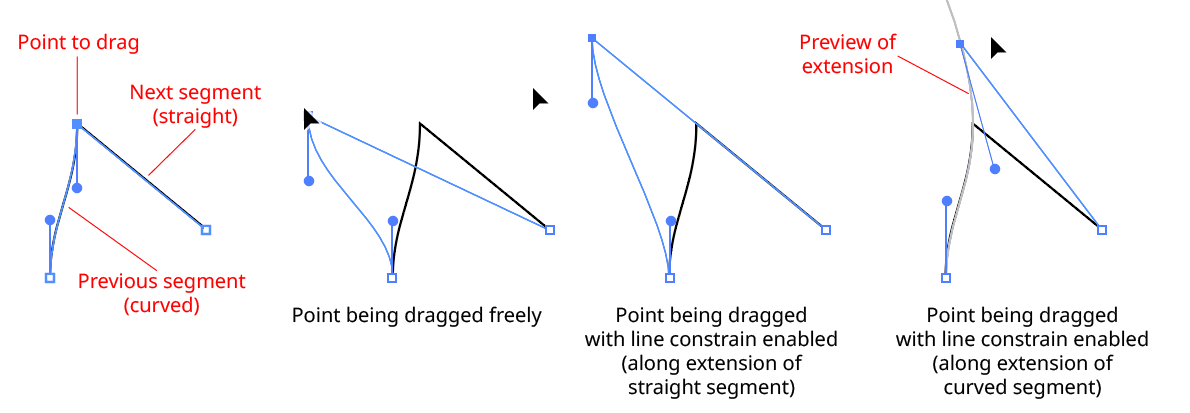
L: Toggles Line Constraining. When enabled, the motion of the dragged anchor point is constrained to positions that lie along the previous/next path segments, or their extensions. When a single anchor point is dragged, the opposing handle (if any) on the segment over which the point is being dragged is adjusted to keep the curve from changing. Previews of the extensions for curved beziers are annotated.
PathScribe Point Drag Line Constraining
Illustrator Location:
As long as a path is not being continued and the cursor is not over a selected path, the Option/Alt key may be held down to put InkScribe into marqueeing mode. In this mode, you can click-and-drag with the InkScribe tool (“marqueeing”) to draw out a rectangle that selects anchor points and path segments that fall within or intersect it, like the Direct Selection tool.
Adding the Shift key when marquee selecting has the same effect as when selecting with the native selection tools: if whatever would be selected is not yet selected, it is added to the current selection, otherwise it is subtracted from the current selection.
If, after the marqueeing operation, the selection consists of a single anchor point, then it becomes active and the virtual panel (if enabled) is moved to that point. If the point is at one end of an open path, then the path becomes the active path and can have additional points added to it.
Illustrator Location:
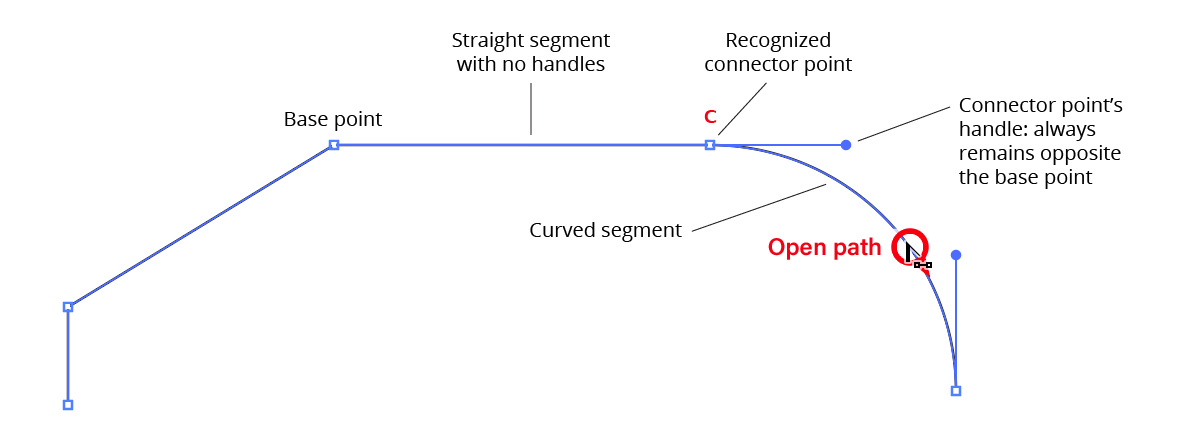
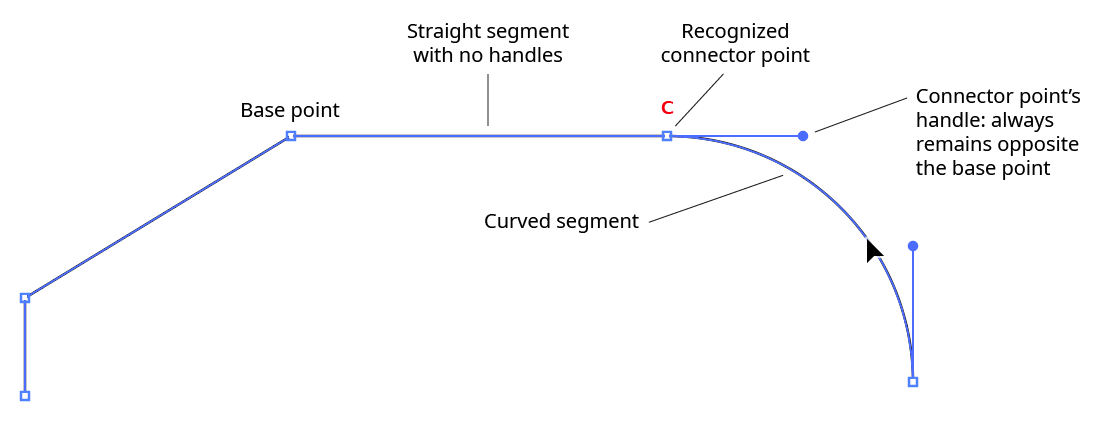
When the Recognize Connector Points preference is enabled, PathScribe can recognize and work with connector points: points that act as transitions between straight segments and curved segments.
A connector point:
Can be either a smooth or corner point, but not an endpoint of an open path;
Must have a single handle that faces directly away from another point (the base point);
Must be adjacent (on its non-handle side) to a segment with no handles
Additionally, for PathScribe to recognize a point as a connector, its handle must be lined up with the straight segment. The amount that its handle can be off and still qualify as a connector is called the angle threshold. It has a default value is 5° but can be set in the preferences dialog.
PathScribe Recognize a point as a connector
Hovering the cursor over a path will identify all of the path’s recognized connector points by drawing a small “C” above them. The color of the “C” indicates whether a connector is within the angle threshold but not perfectly lined up (gray) or aligned precisely (red):
PathScribe connector point indicator
You can use the PathScribe panel to align all recognized connector points on selected paths. Also, nearly all clicks and drags with the PathScribe tool on a connector point, its handle, the segments next to it, or the points adjacent to it, will automatically align (if not already), and keep aligned, the connector point’s handle. (Exceptions include Multi-Handle drags and Shift+Option/Alt-clicks that retract or extend new handles.) When a connector point is being automatically aligned during an edit, a red “C” will appear above it. If the edit removes the connector’s points handle (such as dragging its handle back until it is of zero length), the “C” will disappear.
Since other Illustrator tools will not see connector points any differently from non-connector points, any geometry edits other than those that affect the entire path (such as moving, rotating, and scaling) should only be done using the PathScribe tool, or any connector point’s handles may be disturbed.
Illustrator Location:
Advanced Toolbar > Pen Stack > InkScribe Tool
When the Recognize Connector Point button is enabled, InkScribe can recognize and work with connector points: points that act as transitions between straight segments and curved segments.
A connector point:
1. Can be either a smooth or corner point, but not an endpoint of an open path;
2. Must have a single handle that faces directly away from another point (the base point);
3. Must be adjacent (on its non-handle side) to a segment with no handles
Additionally, for InkScribe to recognize a point as a connector, its handle must be lined up with the straight segment. The amount that its handle can be off and still qualify as a connector is called the angle threshold. It has a default value is 5° but can be set in the preferences dialog.
InkScribe Connector Point Description
Hovering the InkScribe cursor over a path will identify all of the path’s recognized connector points by drawing a small “C” above them. The color of the “C” indicates whether a connector is within the angle threshold but not perfectly lined up (gray) or aligned precisely (red):
InkScribe Connector Point Icons
Nearly all clicks and drags with the InkScribe tool on a connector point, its handle, the segments next to it, or the points adjacent to it, will automatically align (if not already), and keep aligned, the connector point’s handle. When a connector point is being automatically aligned during an edit, a red “C” will appear above it. If the edit removes the connector’s points handle (such as dragging its handle back until it is of zero length), the “C” will disappear.
Since other native Illustrator tools will not see connector points any differently from non-connector points, any geometry edits other than those that affect the entire path (such as moving, rotating, and scaling) should only be done using the InkScribe tool (or Astute Graphics’ PathScribe tool, which also supports connector points), otherwise any connector point’s handles may be disturbed.
Illustrator Location:
When no handles are selected, the panel appears in Point Mode:

PathScribe Panel point mode
1. Flyout menu
See PathScribe Panel: Flyout Menu.
2. Panel banner
The help button on the right opens the help documentation in the Astute Manager. If this does not automatically appear, please ensure your Astute Manager is running first.
Click on the other area of the color bar to activate the PathScribe tool. This is a quick method of locating the tool within the default Advanced toolbar or a custom toolbar.
3. Status Line
Shows information about the current selection, for example “7 points selected”. When exactly two anchor points are selected, the status line shows the distance between them, and displays a small button which allows you to average the points’ positions, to make them coincident:

PathScribe Panel two point average
Option/Alt-clicking on the status line when showing the distance between two points will copy the distance value to the system clipboard.
If the third row of buttons is hidden, the status line also contains a redundant point indicator/button (see below). Finally, the status line will also indicate what you are editing during a drag operation.
4. Point and Path Buttons (row 1)
a. Connector Point Recognition Button: Toggles Connector Point recognition. When the “C” symbol is dim, connector point recognition is off and the PathScribe tool will not afford any special handling to points which qualify as connectors.
b. Smooth Point Button: Changes all selected anchor points to smooth points. By default, this also adds new handles to these points so they all have two opposed handles. This can be very useful for creating a path that runs smoothly through the points:
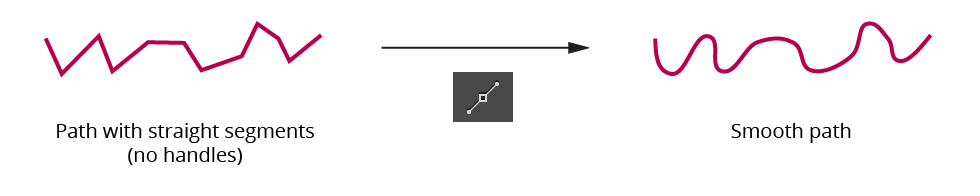
PathScribe smooth point button example
The algorithm that PathScribe uses to create new handles is as follows: If a point already has one handle, its second handle is created by mirroring the existing handle. If a point has no handles, the new handle angle is calculated by bisecting the angle formed by the previous point, the point in question, and the next point, and taking its perpendicular. The new handle length is calculated by taking the lesser of the distances from the point in question to the previous and next points, and multiplying by the smoothing ratio (set in the Preferences dialog). Handles of endpoints of open paths, if created, are adjusted to aim towards the next/previous handle.
To change selected anchor points to smooth points without adding handles, hold down Option/Alt when clicking the button.
c. Corner Point Button: Changes all selected anchor points to corner points. No handles are created or changed.
d. Split Path Button: Splits the path(s) at the selected points, just as clicking on them with the Scissors tool would. Both new endpoints get a copy of the original point’s handles.
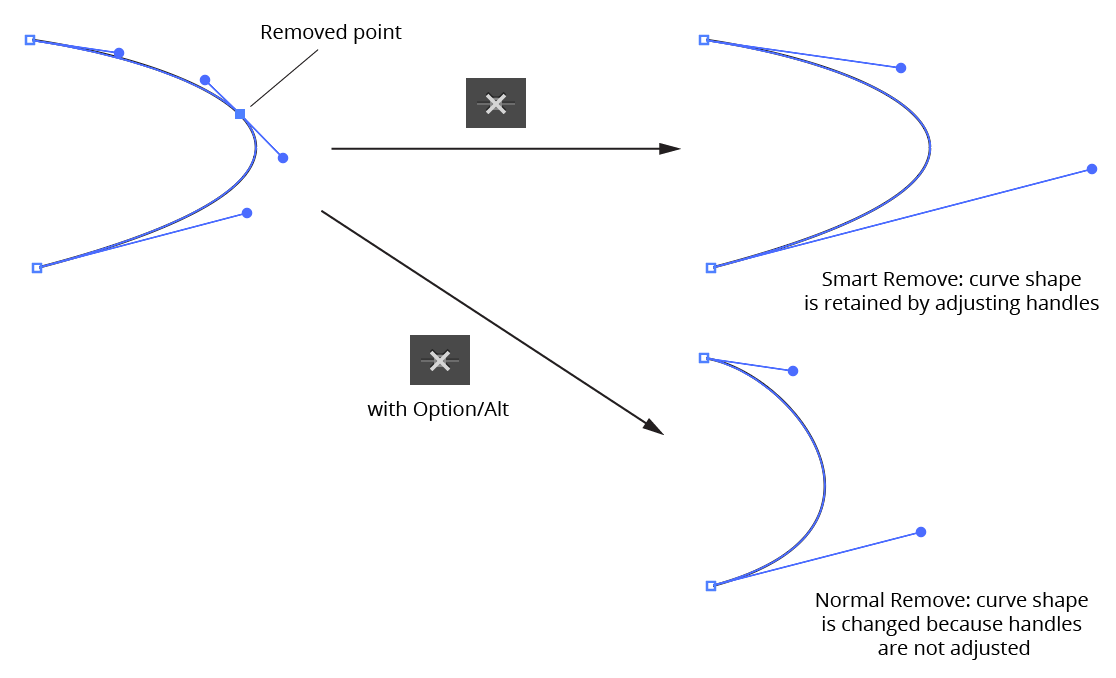
e. Smart Remove Point Button: Removes the selected point(s) from the path while attempting to keep the curve as close as possible to its original shape. This is achieved by adjusting the lengths (but not angles) of the handles on either side of the removed points. To remove points without handle adjustment in the manner of the Delete Anchor Point tool, hold down Option/Alt while clicking the button.
PathScribe Panel smart point remove
When anchor points are selected, you can use the keypress assigned in the Keyboard Shortcuts dialog for “Increase Diameter” (by default, the right bracket key – ]) as a shortcut for the Smart Remove Point button.
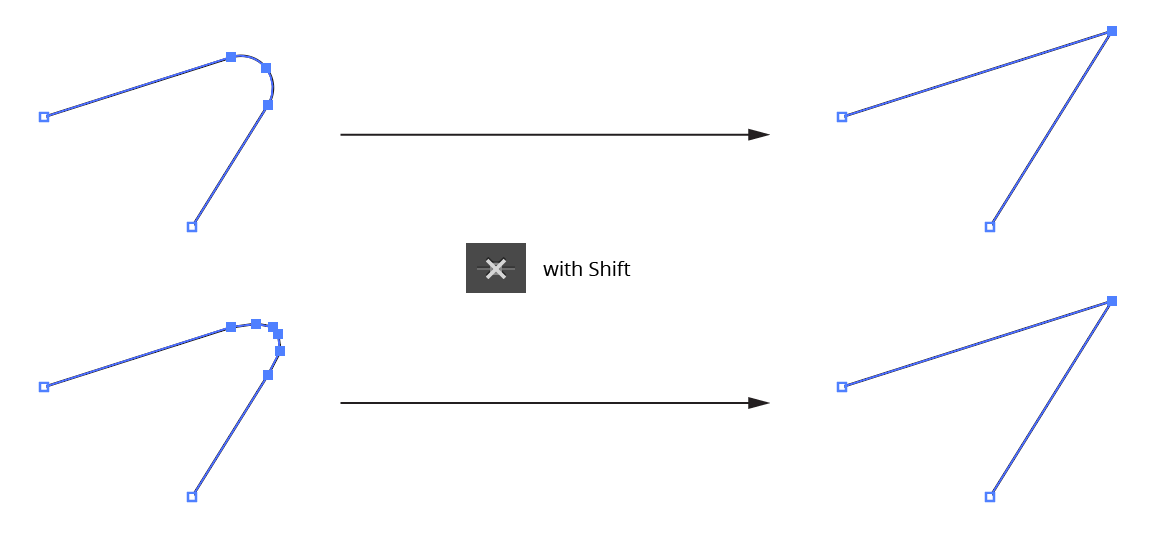
When Shift is held down while the button is clicked, PathScribe removes straight segment corners. To utilize this function, two or more adjacent anchor points must be selected, the first and last of which are adjacent to a straight segment (or at the end of an open path); the segments do not necessarily have to form a “nice” corner. The selected anchor points are replaced by a single anchor point at the intersection of the outer straight segments:
PathScribe removes handles
5. Point and Path Buttons (row 2)
a. Retract Handles Button: Retracts all of the handles on the selected point(s). Point types are not changed. Holding down Option/Alt while clicking the button activates an alternate function: it swaps the positions of the in and out handles on each selected point.
b. Retract Segment Handles Button: Retracts handles from all selected path segments. Point types are not changed.
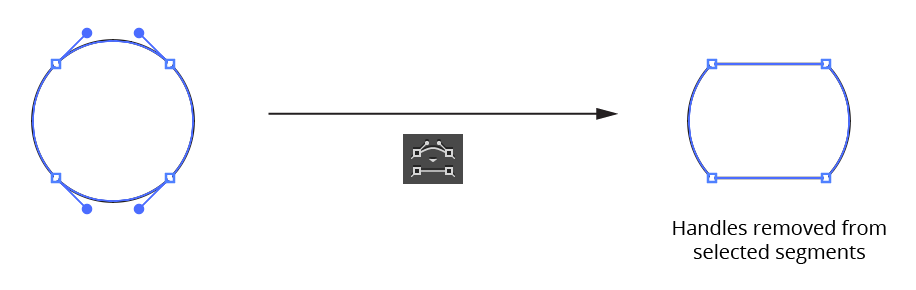
PathScribe Panel remove handles from segments
c. Show Handles Button: All paths or compound path subpaths which are at least partly selected will have all handles made visible (note that this deselects all anchor points and instead selects all path segments).
d. Select Path Points Button: Selects all points on all paths which are at least partially selected.
e. Select All Handles Button: Selects all handles on all paths which are at least partially selected; PathScribe then enters Multi-Handle mode.
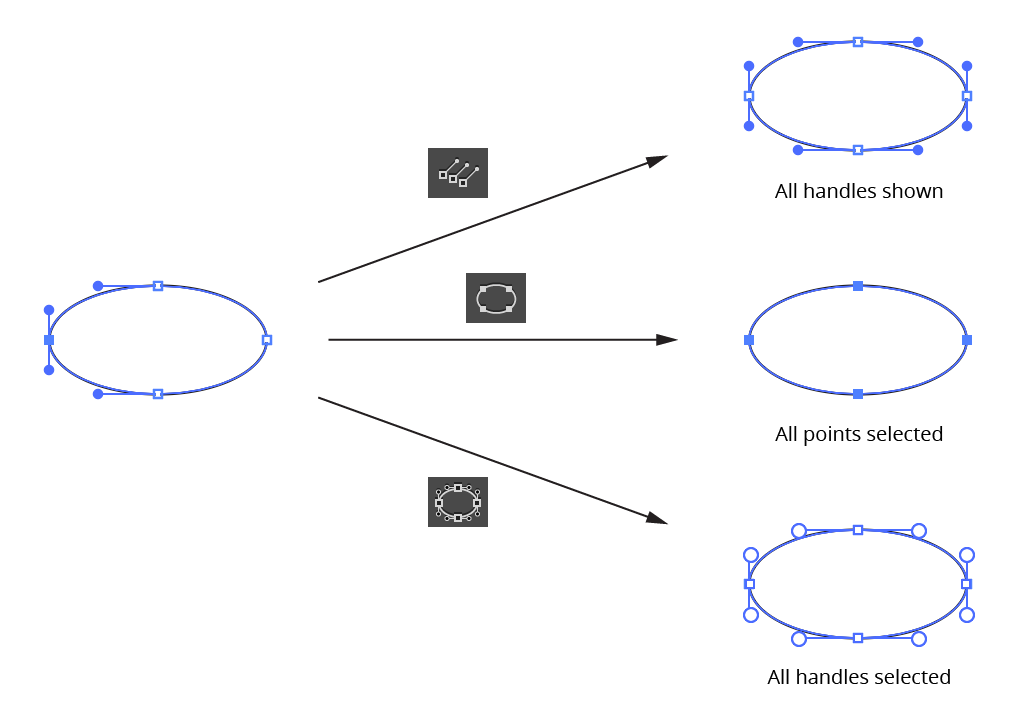
PathScribe second row icons
6. Point and Path Buttons (row 3)
This row can be shown or hidden using the PathScribe panel flyout menu.
a. Smart Smooth Button: Enables or disables “Smart Smooth”, a feature of the PathScribe tool which allows you to convert a corner point into a smooth point simply by dragging one of the point’s handles to be opposite the other (within a certain tolerance). A small red “S” annotation is drawn over points which are being aligned this way. The threshold angle value can be specified in the Preferences dialog.
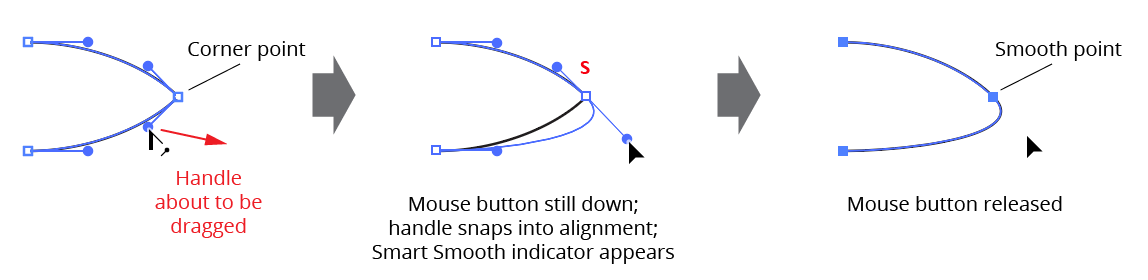
PathScribe panel smart smooth
b. Reverse Path Direction Button: Reverses the direction of any selected paths or subpaths. This will generally only produce a visible change to the artwork if a subpath of a filled compound path is reversed or if the path is being stroked by an asymmetric brush:
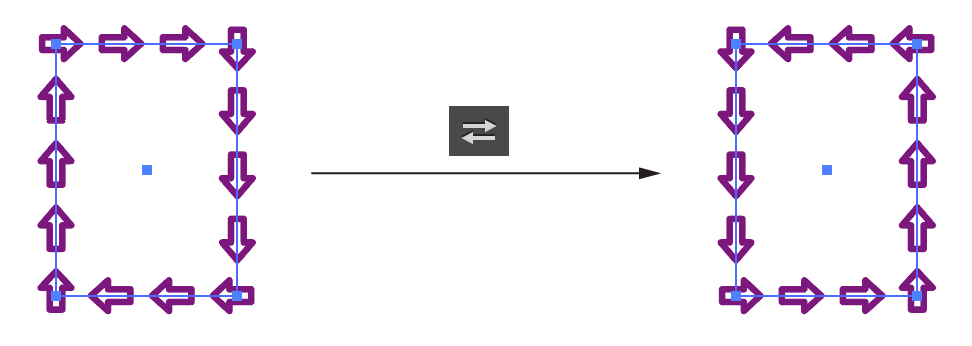
PathScribe Reverse Path Direction Button
When the third row of buttons is hidden, the “Reverse Path” command can still be accessed through the PathScribe panel flyout menu (see below).
c. Add Points to Selected Segments Button: Adds anchors points to every selected segment of every selected path. The number of points added and algorithm used to add them are taken from the last-used settings. To open the dialog which enables you to edit these values, Option/Alt-click on the button.
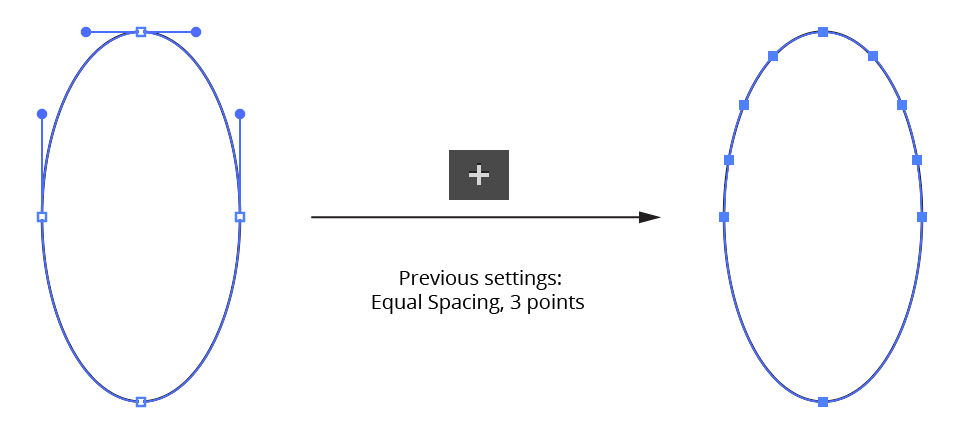
PathScribe Add Points to Selected Segments Button
When the third row of buttons is hidden, the “Add Points” command can still be accessed through the PathScribe panel flyout menu (see below).
d. Move Points to Tangencies Button: Moves anchor points on the selected paths to positions along the path where the angle of the path as it passes through the anchor point is tangent to the horizontal or vertical axes (taking into account the current constrain angle).
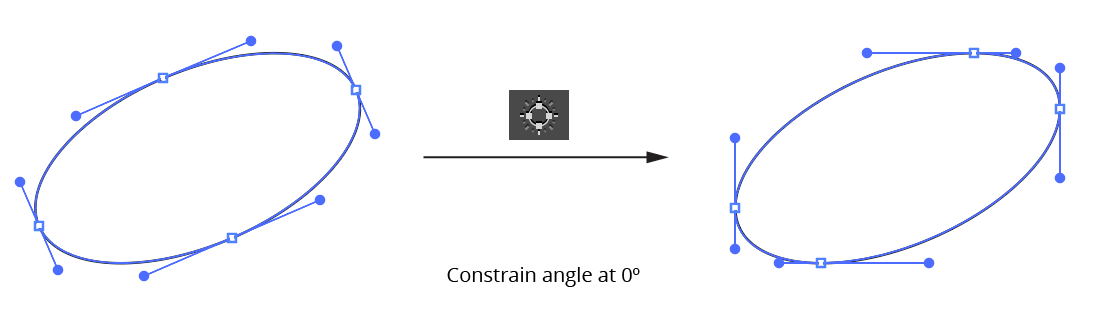
PathScribe Move Points to Tangencies Button
Holding down Option/Alt when clicking the button changes its functionality: new anchor points are placed at the tangent positions, but the existing anchor points are retained.
Holding down Shift when clicking the button also changes its functionality: Only selected points are moved to tangencies.
When the third row of buttons is hidden, the “Move Points” command can still be accessed through the PathScribe panel flyout menu (see below).
e. Remove Redundant Points Button: Removes all redundant points from all selected paths. If the button is disabled (dim), no redundant points exist. A redundant point, also known as a doubled point, is defined as the latter of two consecutive anchor points on a path that have exactly the same X and Y coordinates and don’t have handles in the (zero-length) segment between them. They are often created after using the PathFinder functions or after using Object > Path > Outline Stroke, and despite not changing the shape of the path, can cause problems when performing additional functions such as offsetting. You can highlight the locations of redundant points when using the PathScribe tool by enabling the corresponding preference (see PathScribe Preferences).
When the third row of buttons is hidden, the button will appear on the right side of the top status line. Due to space considerations, the icon uses a small exclamation point rather than the full icon:

PathScribe Remove Redundant Points Button
7. Numeric Value Fields
This area can be shown or hidden using the PathScribe panel flyout menu.
PathScribe Numeric Value Fields
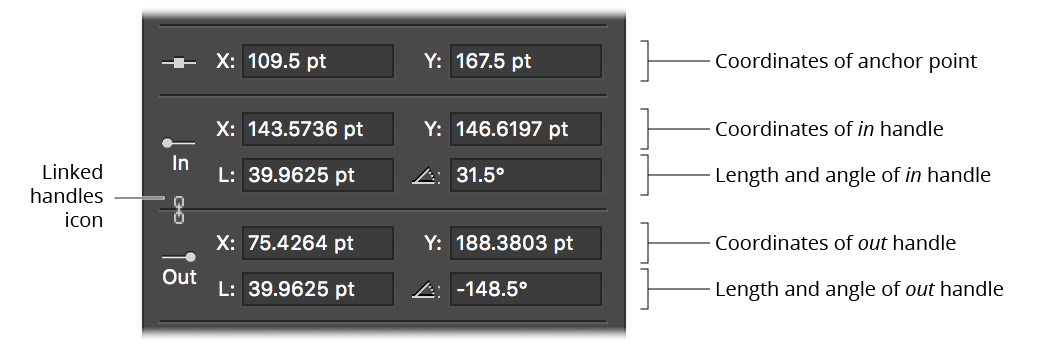
When an anchor point is selected, the numeric value fields becomes active, reflecting the X and Y coordinates of the anchor point and the coordinates, lengths and angles of its two direction handles. You can make edits to any of the fields by simply typing in a new value and pressing Return/Enter or Tab. Like other numerical entry fields in Illustrator, you can use any units you wish (except in the angle fields) and one math operator.
The linked handles icon appears when editing a smooth point, as a reminder that edits to the coordinates or angle of one handle will also affect the other handle (if it exists).
You can specify the number of digits that are displayed after the decimal point through PathScribe’s Precision preference.
When more than one anchor point is selected, fields which are blank indicate that multiple values are present. You can still type a new value into the field, thereby assigning it to all selected anchor points/ handles. Or, for the anchor point fields, you can Shift-click on the anchor point icon to average all values in both fields; or Shift-click on the “X:” or “Y:” labels to average only the corresponding value.
When the Show Anchor Point Coordinate Ranges preference is enabled, mixed values will be instead displayed in the anchor point coordinate fields as a value (in blue) representing the difference between the highest value and the lowest value:
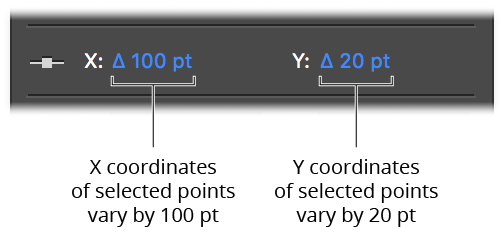
PathScribe Coordinates of points
Clicking on the range will allow you to enter a new value, just as with the preference disabled. Values which are too small to display with the current precision are displayed using scientific notation, e.g. 3.12E-06, where “E-06” means “×10–6” (one-millionth).
8. Path Control Area
This area can be shown or hidden using the PathScribe panel flyout menu. In Point Mode, the path control area has three different appearances:
a. When the selection consists of more than one path, the path control area shows the total number of selected paths and the number of each type (closed, open, or single-point). Each subpath of a compound path is reported separately.
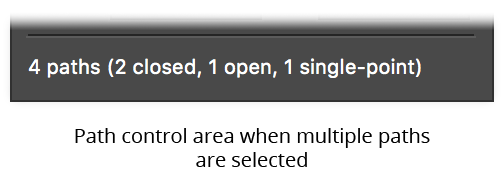
PathScribe Panel Path Control Area multiple paths
b. When the selection consists of a single path, and either multiple points or no points on the path are selected, the status line shows the type of path and a Select Point 0 button. Because Illustrator numbers points starting at zero and continuing consecutively in the direction of the path, clicking the button will therefore select the first point on the path. By default, the selected point will be briefly highlighted with a small magenta dot to make it easier to locate. If the Highlight Panel-Selected Points preference is disabled, you can still highlight the point on a use-by-use basis by holding down Option/Alt when clicking the button.

PathScribe Panel Point Control Area Show Point
c. When the selection consists of a single point on a single path, the path control area shows the index of the point, the range of indices on the path, and two buttons that let you change the point that is selected. To move to (i.e., select) the previous or next point on the path, click the Previous point or Next point button. Clicking the Next point button or Previous point button while the last point of an open path is selected will wrap around to the other end.
Holding down Shift while clicking the Next point or Previous point buttons will move ahead or back 10 anchor points (if the path has more than 10 points).
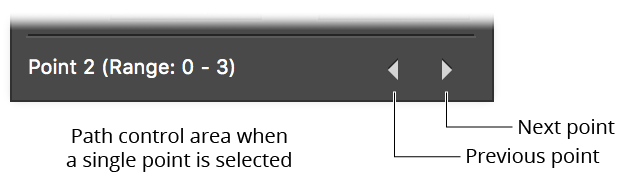
PathScribe PCA Previous Next buttons
Again, the selected point will be briefly highlighted by default.
Illustrator Location:
Advanced Toolbar > PathScribe Stack > Reposition Point Tool
To reposition an anchor point, it must be selected first. Although this can, of course, be done with any selection tool, the Reposition Point tool itself can be used to marquee-select anchor points. Then, simply drag the anchor point(s) to a new position along the path. While dragging, the new shape of the path is displayed in red, so you can see how much the path geometry may have changed. Positions along the path where the tangent angle equals any of the 45° increments around the general constrain angle are highlighted with magenta dots, and the repositioned point will snap to these positions, displaying a red guide which is the tangent line.
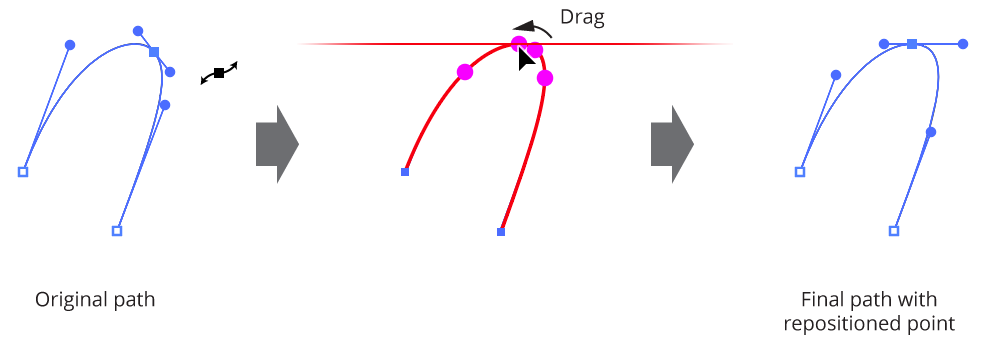
Reposition Point Tool Overview
To suppress the tangency snapping, Command/Ctrl can be pressed while dragging. The Space bar can also be pressed, to suppress all annotations.
If an endpoint of an open path is selected, it will be ignored, since it cannot be moved.
Illustrator Location:
Advanced Toolbar > PathScribe Stack > Reposition Point Tool
As a convenience, the Reposition Point tool can also add and remove points to a path by pressing the Option/Alt key when hovering over the path (to add) or an existing point (to remove). The cursor reflects the operation which will be carried out. When adding a point, tangency snapping is in effect.
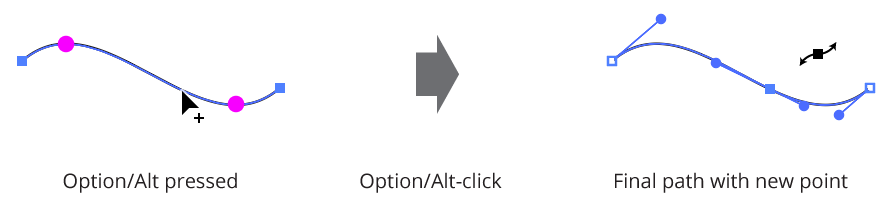
Add points with reposition point tool
Fast and Accurate Modes
By default, the tool operates in “Accurate” mode, which keeps the path’s geometry as close as possible to the original while allowing for the new point position(s). For smoother drag action (but somewhat more inaccurate results), the A key may be pressed to switch to “fast” mode.
Illustrator Location:
Illustrator Main Menu > Effect > AG Utilities > ...
Path Visualizer is an Astute Graphics live effect that provides the visualization of anchor points, handles, and redundant points on a path or live text by rendering them as art elements. These art elements remain visible even if the path is not selected. Path Visualizer can be useful when evaluating various fonts (no need to create outlines), and when building large effect stacks; by temporarily inserting it at a certain location in the stack (and hiding effects below it), the state of the path(s) at that point in the effect chain can be visualized without having to expand the effect.
As with most live effects, Path Visualizer appears in the main menu, under Effect > AG Utilities. It can also be applied directly from the Appearance panel using the “Add New Effect” button at the bottom of the panel.
Path Visualizer Parameters Dialog
After applying the live effect using the menu item (or when clicking on the existing effect in the Appearance panel to edit it), the parameters dialog will appear:

Path Visualizer Parameters Dialog
1. Visualize Anchor Points
Creates a filled square at each anchor point on the path. At default 100% scaling, the squares have a side length of 5 pt.
2. Visualize Handles
Creates a filled circle at each bezier handle on the path. At default 100% scaling, the circles have a diameter of 5 pt.
3. Visualize Handle Lines
Creates a straight line from each handle to its associated anchor point on the path. At default 100% scaling, the lines have a stroke weight of 0.75 pt.
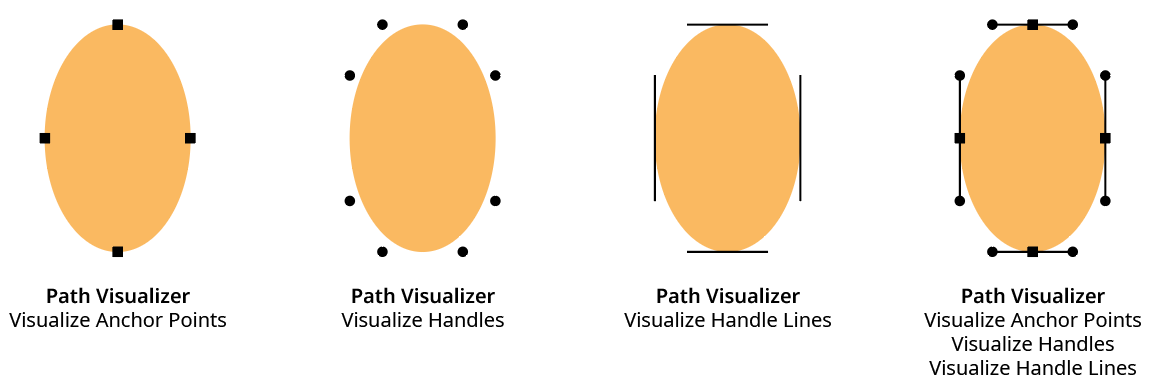
AG Utilities Live Effects - Path Visualizer Example
4. Visualize Redundant Points
Draws a semi-transparent red, triangular shape similar to the Astute Graphics PathScribe tool redundant point indicator over redundant points. A redundant point, also known as a doubled point, is defined as the latter of two consecutive anchor points on a path that have exactly the same X and Y coordinates and don’t have handles in the (zero-length) segment between them. They are often created after using the PathFinder functions or after using Object > Path > Outline Stroke, and despite not changing the shape of the path, can cause problems when performing additional functions such as offsetting.

AG Utilities Live Effects - Path Visualizer Redundant Points
5. Include Unpainted Paths
When enabled, paths that have no fill or stroke are included when generating the visualization art. This is generally only necessary when placing the Path Visualizer effect above the fills and strokes in the Appearance panel.
6. Scale
Makes all the visualization art smaller or larger by the specified amount. The annotations that typically show anchor points and handles are independent of the zoom value, but since the live effect visualizations create actual art, they will get larger when the art is zoomed in on. This can make it difficult to see points that are very close to each other, very short handles, etc. The Scale factor can vary from 0.1% to 10000%.
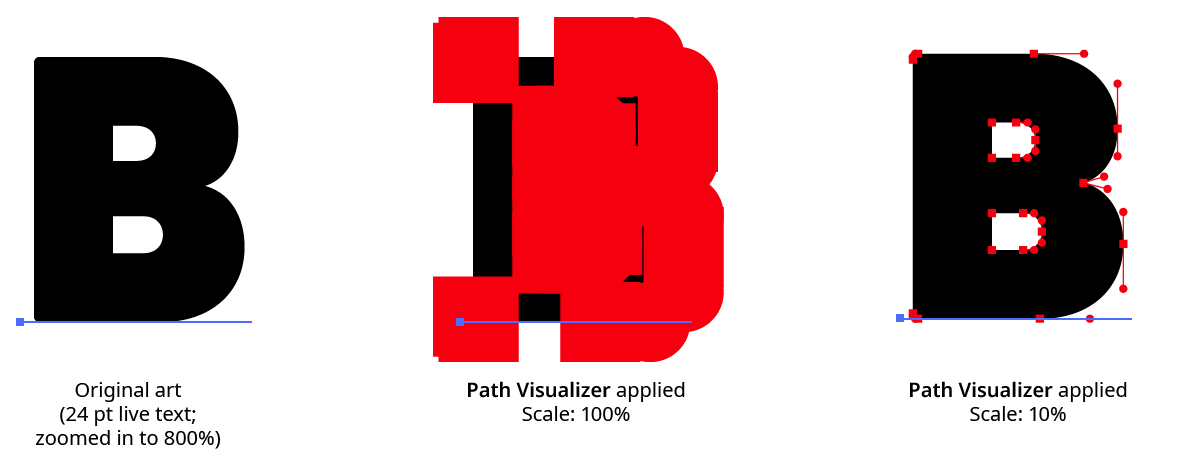
AG Utilities Live Effects - Path Visualizer Scale Example
7. Positioning
The position of the visualization art relative to the original artwork. It can replace the original, go above it (the default), or go below it.
8. Color
The color of the visualization art for anchor points, handles, and handle lines. The default color is black, but it can be changed by clicking on the color chip to bring up the standard color picker.
9. Preview
As with all live effects, when enabled, changing a parameter will immediately update the artwork while the dialog is still open.
10. Help Button
Opens the help documentation in the Astute Manager. If this does not automatically appear, please ensure your Astute Manager is running first.