 PathScribe Tool
Overview, Cursor Snapping, and Slow-Drag
PathScribe Tool Location
The PathScribe tool is used to click on or drag direction handles, anchor points, and path segments; it can also be dragged from a blank area of the document as a marquee to select handles or points. When the tool is selected and held over a blank area of the document, the cursor looks like an inverted “V,” similar to the Convert Anchor Point tool, but thicker, so as to distinguish it.
The cursor will change its appearance to give you feedback, depending on several factors: what lies underneath, whether you are dragging or not, and what modifier keys are being held down.

PathScribe Cursors
In addition, by default, PathScribe draws a red ring around the cursor and a text label when it is snapping to an item of interest (handle, anchor point, path segment). This behaviour can be customized or disabled in the tool’s preferences.
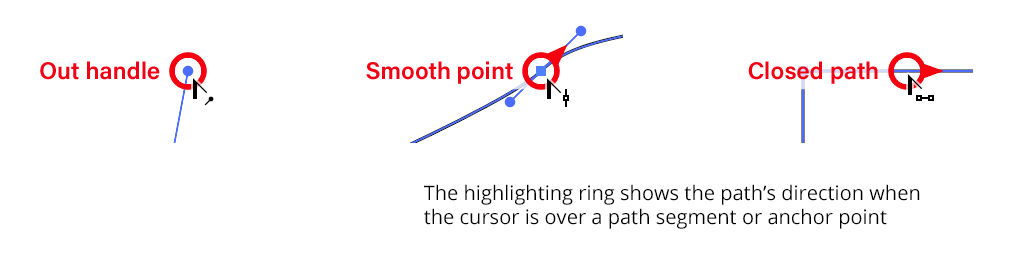
PathScribe Point Handles snapping rings
When Smart Guides are on, PathScribe snaps as usual using the radius value set in Illustrator Preferences > Smart Guides > Snapping Tolerance. When Smart Guides are off, PathScribe snaps using the snapping radius you have set in Illustrator Preferences > Selection & Anchor Display > Selection > Tolerance, plus one pixel.
Making precise adjustments to handle positions with one of the selection tools is often frustrating because you may need to zoom in so far that you can’t see everything you need to. PathScribe offers a feature called “slow-drag” that can help you.
To use slow-drag, hold down the Control key on Mac, or the Ctrl key on Windows (note: the Use Ctrl Key to Toggle Slow-Drag preference must be enabled). The cursor will show a small “S” to remind you that you are slow-dragging. The cursor’s movement will be divided by a value called the slow-drag divider (settable in the preferences). For example, at 100% View, each pixel corresponds to the unit of length of one point. You can normally move a handle, therefore, only in one-point increments at this view. But if you set the slow-drag divider to 10 and move the cursor, each pixel of movement will move the handle by only 0.1 points:
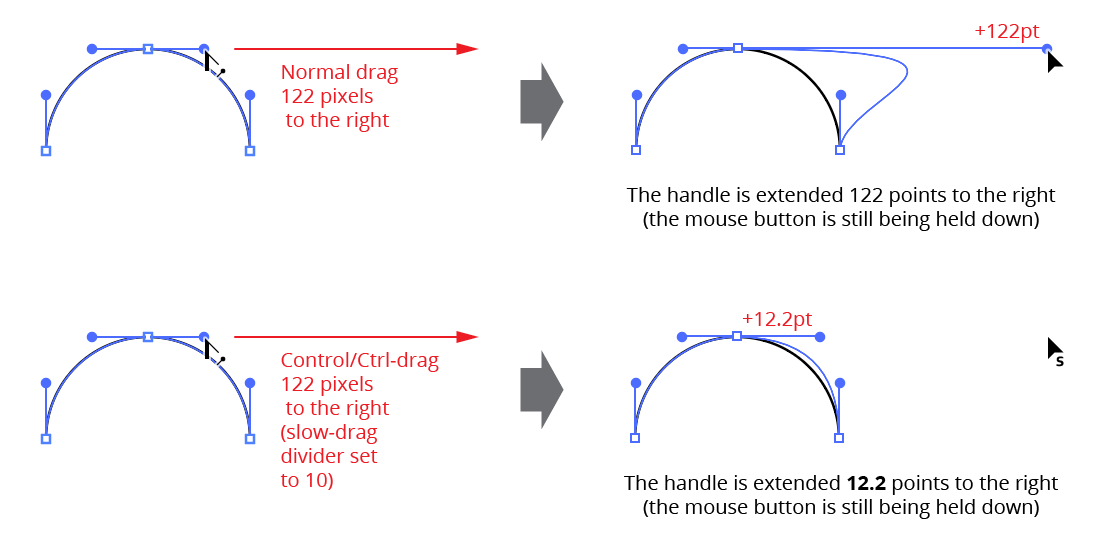
PathScribe slow-drag
Slow-drag can be used when dragging handles (single or multiple), points, and paths, and in combination with the other modifier keys. If Smart Guides were enabled when you started dragging, you can also press the U key to temporarily turn them off.
Single Handle Operations
Clicking
Clicking on a handle without any modifier keys will simply select the handle’s associated point (the point will also become selected whenever one of its handles is modified, as below). Note that unlike with the Direct Selection tool, other paths are not affected: if they were fully- or partially-selected, they remain so. To deselect everything, click on a blank area of the document.
Adding one more modifier keys while clicking a handle changes or adds functionality. As with all Astute tool keypresses, most of these will be indicated on the Astute Buddy panel.
Shift:
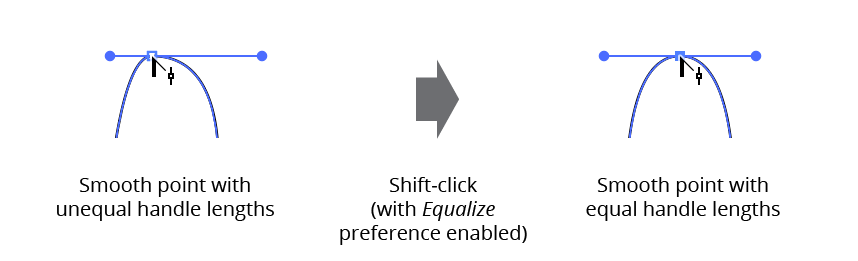
Shift-clickingon a handle will, by default, add or remove the handle’s associated point from the selection. However, by enabling the preference Shift-Clicking Equalizes Handle Lengths, you change this functionality.Shift-clickingon a handle with the preference set will adjust the handle’s length to match the point’s other handle. If the other handle is completely retracted, then the clicked handle will be retracted as well.
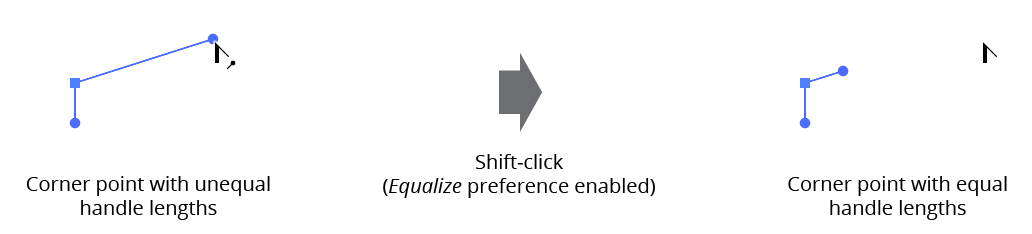
VectorScribe PathScribe handle equalization
Option/Alt:
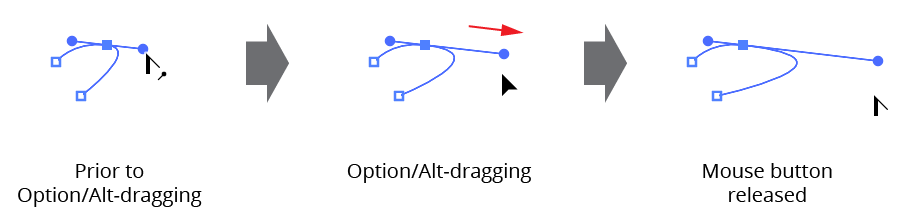
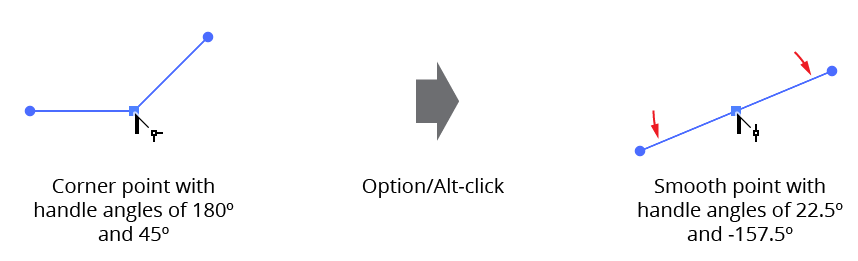
Option/Alt-clickingon a handle will change the type of point from corner to smooth or vice versa. (When cursor highlighting with text annotations is enabled, which it is by default, you can determine a point’s type by holding the cursor over it.) When a smooth point is converted to a corner point, neither handle is changed. When a corner point is converted to a smooth point, and it has two handles, the clicked handle will move, changing its angle so it is opposite (180° from) the existing handle.Shift+Option/Alt:
Shift+Option/Alt-clickingon a handle will retract the handle. The point type remains unchanged.
Dragging
Dragging a handle will move it in the same manner as the Direct Selection tool (unless connector point recognition is enabled and the point is a connector point; see Connector Points). While dragging, there are various keys which can be pressed to perform additional functions:
Shift: Constrains the handle angle to 45° increments around the general constrain angle.
Option/Alt: Constrains the handle’s angle to its original angle, or the angle that is 180° away from the original angle (this lets you flip which side the handle is on if you drag it back past its originating point).
VectorScribe PathScribe handle angle constraining
Shift+Option/Alt: Same as
Option/Alt-dragging, except when Smart Guides are turned on. In this case, the handle will snap to other items on the page while remaining constrained to its original angle.Control [Mac only]: Toggles slow-drag.
Command/Ctrl: On Mac, hides handle annotations; on Windows, either toggles slow-drag or hides handle annotations, depending on the preference setting (see PathScribe: Preferences).
Space bar: Temporarily locks the handle’s anchor point to the handle’s so they move in tandem.
C: Changes the handle’s anchor point to corner type.
L: Toggles length constraining. When the handle’s length is constrained, you can only change its angle.
R: Retracts the handle completely.
S: Changes the handle’s anchor point to smooth type.
Multiple Handle Operations
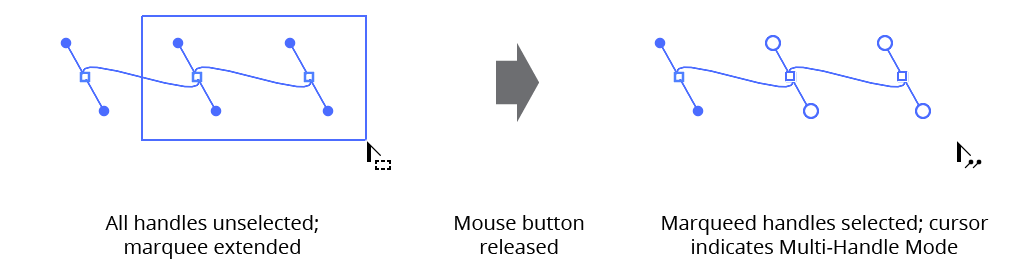
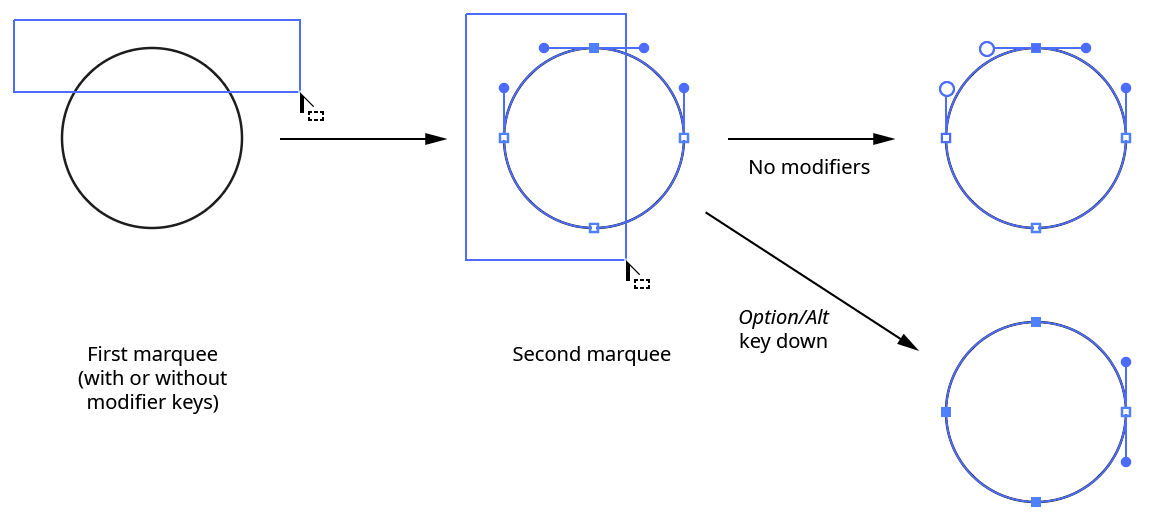
PathScribe can select and edit multiple handles simultaneously. To select multiple handles using the PathScribe tool, they must first be visible on the screen. You can show all the handles on a path by either having part of the path selected and clicking the “Show handles on selected paths” button on the PathScribe panel, or by using the PathScribe tool to Option/Alt-marquee over a small section of a path, being careful not to select any points. Once the handles are visible, simply marquee them with the PathScribe tool by dragging out a rectangle that encloses them. Handles which are selected change from the default solid circles to larger, hollow circles (unless you have changed the display of handles to be hollow, in which case selected handles will be solid).
VectorScribe PathScribe marquee handle selection
You can also select the points whose handles you wish to select and use the first three menu items in the Handle Selection submenu of the PathScribe panel flyout menu.
Handles made visible with Illustrator’s Show Handles When Multiple Anchors are Selected preference may not be marquee-selectable with PathScribe. To avoid the problem, either turn the preference off, or only use the PathScribe tool to select paths and points.
You can use the Shift key while marqueeing to add or subtract handles from the current selection. To deselect all selected handles, click on a blank area of the document. If no handles fall within the marqueed rectangle, PathScribe will check for and select points or path segments instead. (You can also ignore handles and only select points or segments by holding down Option/Alt during the marquee operation.)
When one or more handles are selected, PathScribe enters “Multi-Handle Mode”. The cursor changes to show an icon of two handles to remind you of this. While in this mode, you can’t edit anything else, like an unselected handle or a point. You can Option/Alt-click on unselected paths to show their handles. But if you switch to another tool, you will lose the handle selection. If you hold down Command/Ctrl to temporarily switch to one of the selection (arrow) tools, and you modify a path that contains selected handles, they will become unselected.
Clicking
You can’t use any of the click operations on multiple handles. However, you can use the PathScribe panel to perform the same functions on them (see PathScribe Panel). If you prefer to use the panel for handle editing, you can select a single handle and do so in the same manner as multiple handles.
Dragging
When you drag one of a set of selected handles, the handle under the cursor moves in the same manner as a single dragged handle would (with one exception: connector points are not recognized in Multi-Handle Mode). How the other handles move is dependent on two preference settings (see below) and which multi-handle drag mode is active. There are four multi-handle drag modes: Constraining mode, Normal rotation mode, Counter-rotation mode, and Group mode.
Dragging in Constraining mode
If Option/Alt is held down, the angles of all of the selected handles will be constrained to their original angles. Their lengths will change in the manner explained below.
Dragging in Normal and Counter-Rotation modes
You operate in one of these modes unless the Option/Alt key or space bar are held down. Which mode is active can be seen in the bottom status line on the PathScribe panel, and you can toggle between these modes by pressing the C key when the mouse is down. In both these modes, selected handles will rotate through the same angle as the dragged handle, but in Counter-rotation mode, handles of the opposite type as the dragged handle will rotate in the opposite direction. For example, if the dragged handle is an in handle and is rotated 45° clockwise, then all selected out handles will be rotated 45° counterclockwise. If both handles of a smooth point are selected and moved in Counter-rotation mode, the point automatically becomes a corner point.
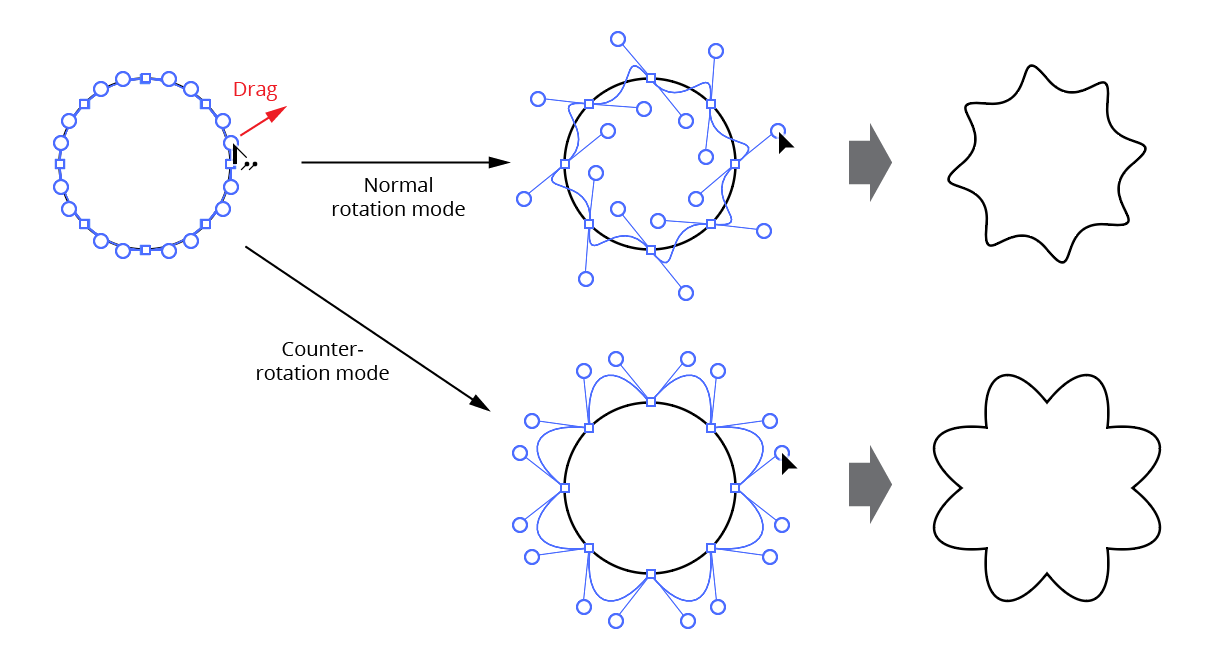
VectorScribe PathScribe multihandle normal and counter rotation
The change in each selected handle’s length depends on several preferences. By default, handles shorten or lengthen in proportion to the change in length of the dragged handle. For example, if the dragged handle was shortened to half of its original length, then all of the selected handles will be shortened to half of their original lengths. To change this behavior, see PathScribe Preferences.
Dragging in Group mode
Group mode is accessed by holding down the space bar while moving multiple handles. In this mode, all of the selected handles move as one unit in the same direction and distance as the dragged handle. As with Counter-rotation mode, if both handles of a smooth point are selected and moved, the point automatically becomes a corner point. If you begin your drag without the space bar and add it later, the angles and relative positions of all the selected handles will be restored to their original values.

VectorScribe PathScribe multihandle grouped
Point Operations
Clicking
Clicking on a point without any modifier keys selects it and deselects all other points on the path. When the Keep Paths Selected preference is enabled (the default), other paths are not affected: if they were fully- or partially selected, they remain so.
Adding one more modifier keys while clicking a point changes or adds functionality:
Shift: As with a handle, Shift-clicking on a point will, by default, add or subtract the point from the selection. However, by enabling the preference Shift-Clicking Equalizes Handle Lengths, you change this functionality. Shift-clicking on a point with the preference set will make the lengths of the point’s handles equal. The point’s type does not change. If both handles exist, the new length for each is determined by averaging the lengths of the handles. If one of the handles is retracted, a new handle is created opposite the existing handle in angle and equal to it in length.
VectorScribe PathScribe point shift click
Option/Alt: Converts the point’s type from corner to smooth or vice versa. When a smooth point is converted to a corner point, neither handle moves. When a corner point is converted to a smooth point, and both handles exist, each handle swings away from the other in equal amounts until they are 180° apart:
PathScribe Point + Option Click
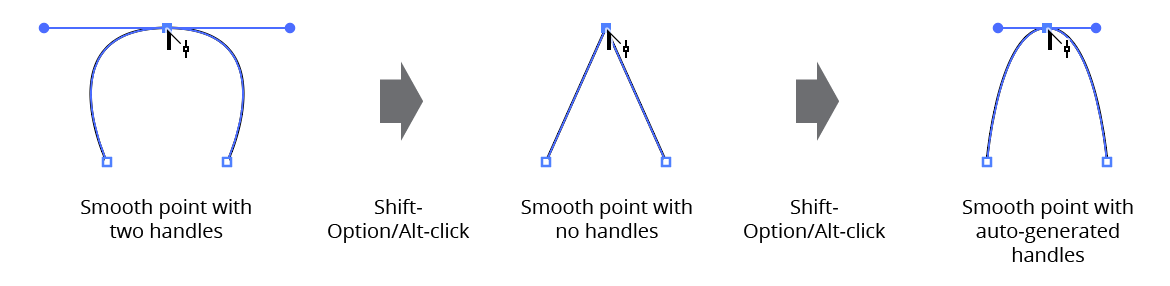
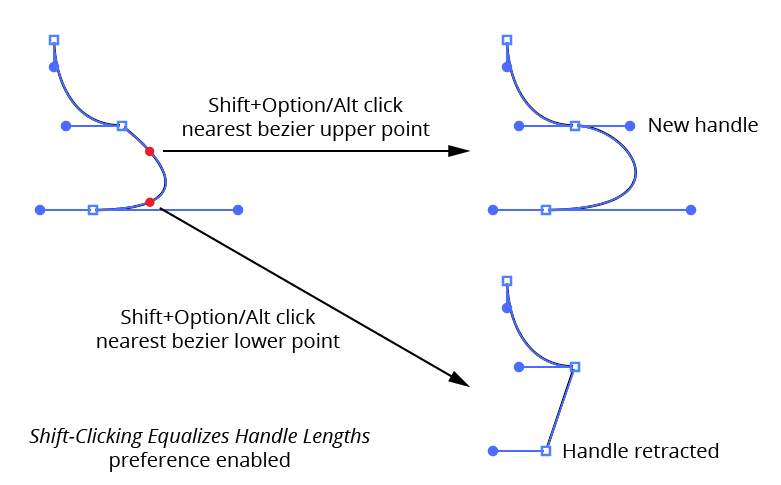
Shift+Option/Alt: Retracts the point’s handles. The point type remains unchanged. If both handles are already retracted, then
Shift+Option/Alt-clickingcreates two new handles, using the algorithm described for the PathScribe panel:
PathScribe Point + Shift + Option Click
Dragging
Dragging a point moves the point along with its handles, just as the Direct Selection tool would. As with dragging a handle, certain keys can be pressed while dragging to change or add functionality:
Shift: Constrains the movement to 45° increments around the general constrain angle.
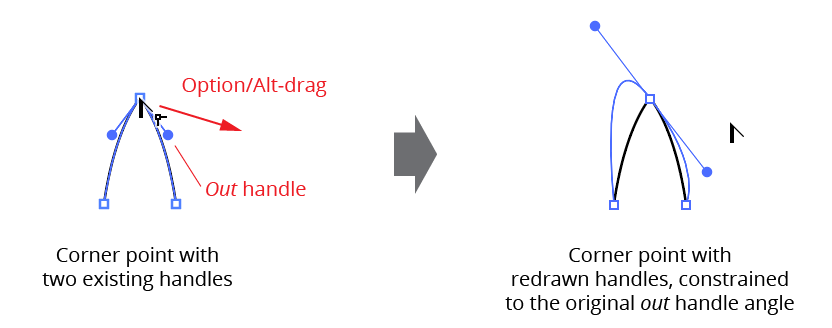
Option/Alt: Extends one or two new handles from the point, constraining their angles to their “original” angles. The point type remains unchanged. When both handles already exist, the “original” angle is the angle of the out handle. The cursor controls the out handle, while the in handle stays 180° opposed:
PathScribe Extend one or two handles
When only one handle already exists, the “original” angle for a smooth point is the angle of the existing handle plus 180°. For corner points, or when no handles exist, the “original” angle is set to the tangent angle of the path at the point.
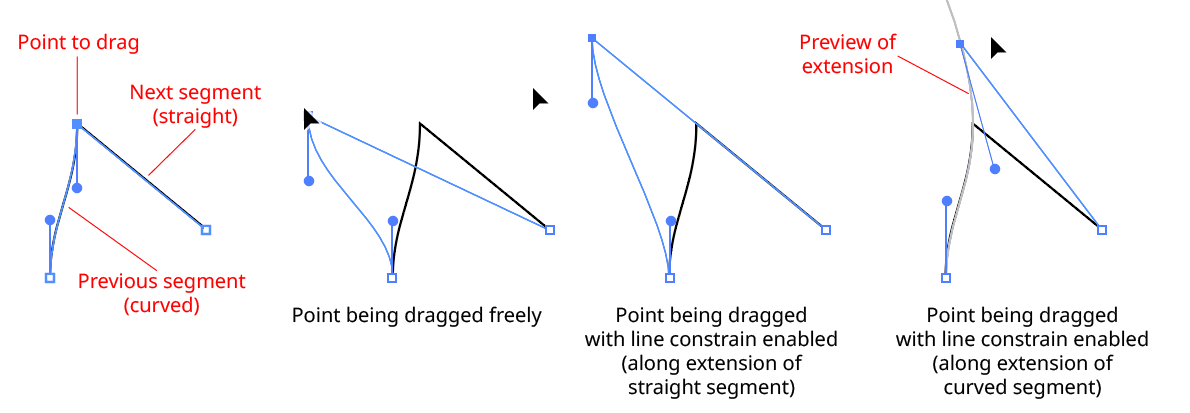
L: Toggles Line Constraining. When enabled, the motion of the dragged anchor point is constrained to positions that lie along the previous/next path segments, or their extensions. When a single anchor point is dragged, the opposing handle (if any) on the segment over which the point is being dragged is adjusted to keep the curve from changing. Previews of the extensions for curved beziers are annotated.
PathScribe Point Drag Line Constraining
Path Segment Operations
Clicking
Clicking on a path segment without any modifier keys selects it, causing its handles (in handle at one end, out handle at the other end) to become visible (if they exist), and hiding other handles on the same path. Other paths are not affected: if they were fully- or partially-selected, they remain so. Marqueeing over a segment acts in the same way as clicking on it.
If the Show All Handles on Selected Paths preference is enabled, clicking on a path segment selects all of the segments on the path (thus causing their handles to become visible).
Adding one more modifier keys while clicking a path segment changes or adds functionality:
Shift: As with a point,
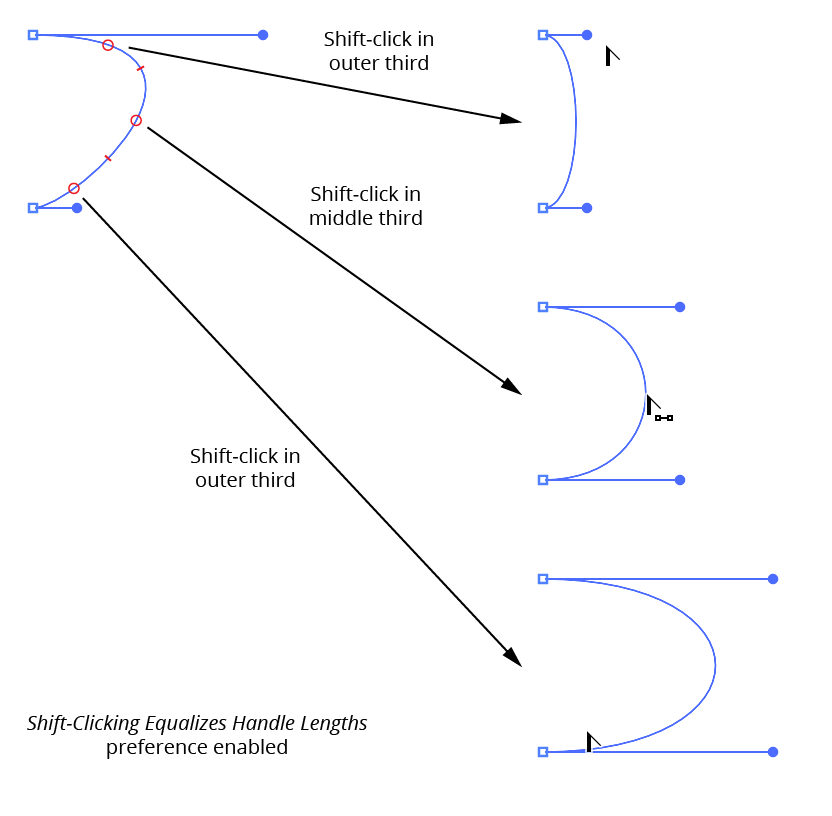
Shift-clickingon a path segment will, by default, simply add or remove the path segment from the selection (unless the Show All Handles on Selected Paths preference is enabled, in which caseShift-clickingdoes nothing). However, by enabling the preference Shift-Clicking Equalizes Handle Lengths, it instead equalizes the path segment’s handle lengths (handle angles are not affected). How the length is calculated depends on where you click along the length of the segment.Shift-clickingin the middle third will average the handle’s lengths together, whileShift-clickingin either of the outer thirds will change the length of the nearest handle to match the opposite one:
PathScribe Shift-clicking on path will add or remove segment from selection
Option/Alt: By default,
Option/Alt-clickingon a path segment will add a new smooth point to the path at the clicked point. The cursor shows a “plus” sign. If the preference Snap to Tangencies is enabled, the cursor will snap to vertical, horizontal and diagonal tangencies on the path segment (the constrain angle is honored). A red guide will appear when the cursor is snapping to show you the tangent direction:
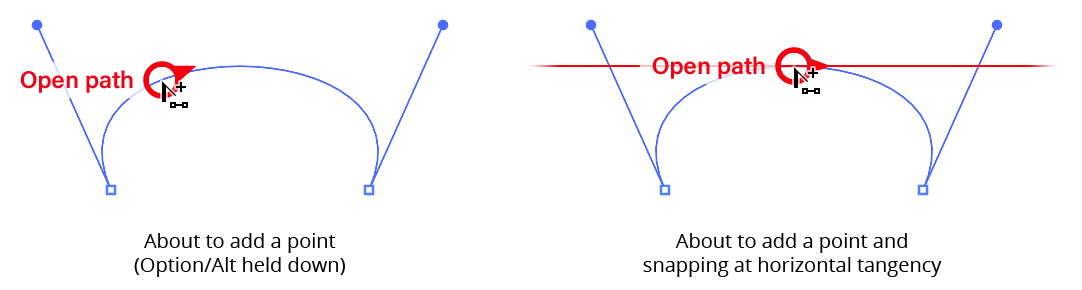
PathScribe path add point
Additionally, you can choose to highlight all of the tangencies on the current path segment with a small magenta dot by enabling the Highlight Tangencies preference:
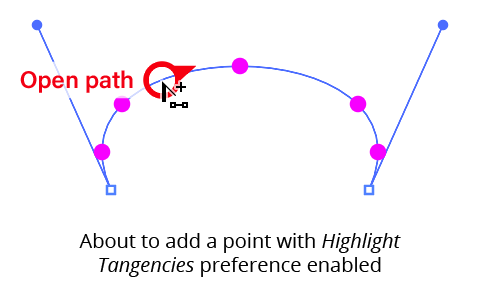
PathScribe add point highlight tangencies on the current path
If the Option/Alt-Clicking Adds New Point to Path preference is disabled, then Option/Alt-clicking a path selects all of the path’s segments, thereby making all of the handles on the entire path visible. You can do this even while in Multi-Handle Mode. Other paths are not affected.
Shift+Option/Alt: By default,
Shift+Option/Alt-clickingon a path segment toggles the visibility state of all the handles on the entire path. If a path has only some of its handles visible,Shift+Option/Alt-clickingon the path will hide them. However, by enabling the preference Shift-Clicking Equalizes Handle Lengths, it instead will retract or extend new handles. If the handle nearest the click exists, both handles will be retracted; otherwise, new handles are created where they don’t already exist. In both cases, adjacent path segments are not affected.
PathScribe Shift+Option-clicking on path toggles visibility state
Dragging
Dragging a path segment reshapes it, similarly to the Direct Selection tool. The closer the initial mouse-down is to one point, the more that point’s handle movement is affected by the cursor movement and the less the other handle is affected. Starting the drag midway along the path between the points affects both handles equally. If the Keep Path Under Cursor When Dragging preference is disabled, handles are still moved relative to the initial click location, but the path will not necessarily pass through the cursor position.
If either of the segment’s handles does not exist at the start of the drag, new ones will be created. Their initial location is controlled by PathScribe’s Smoothing Ratio preference.
Normally, adjacent segments will also be affected when you drag a segment if its endpoints are smooth points, since the opposing handles must change angles to remain 180° away from the moved handles. If you’d rather only affect the dragged segment in isolation, you can enable the preference Convert Smooth Points to Corner Points When Dragging Path Segments:
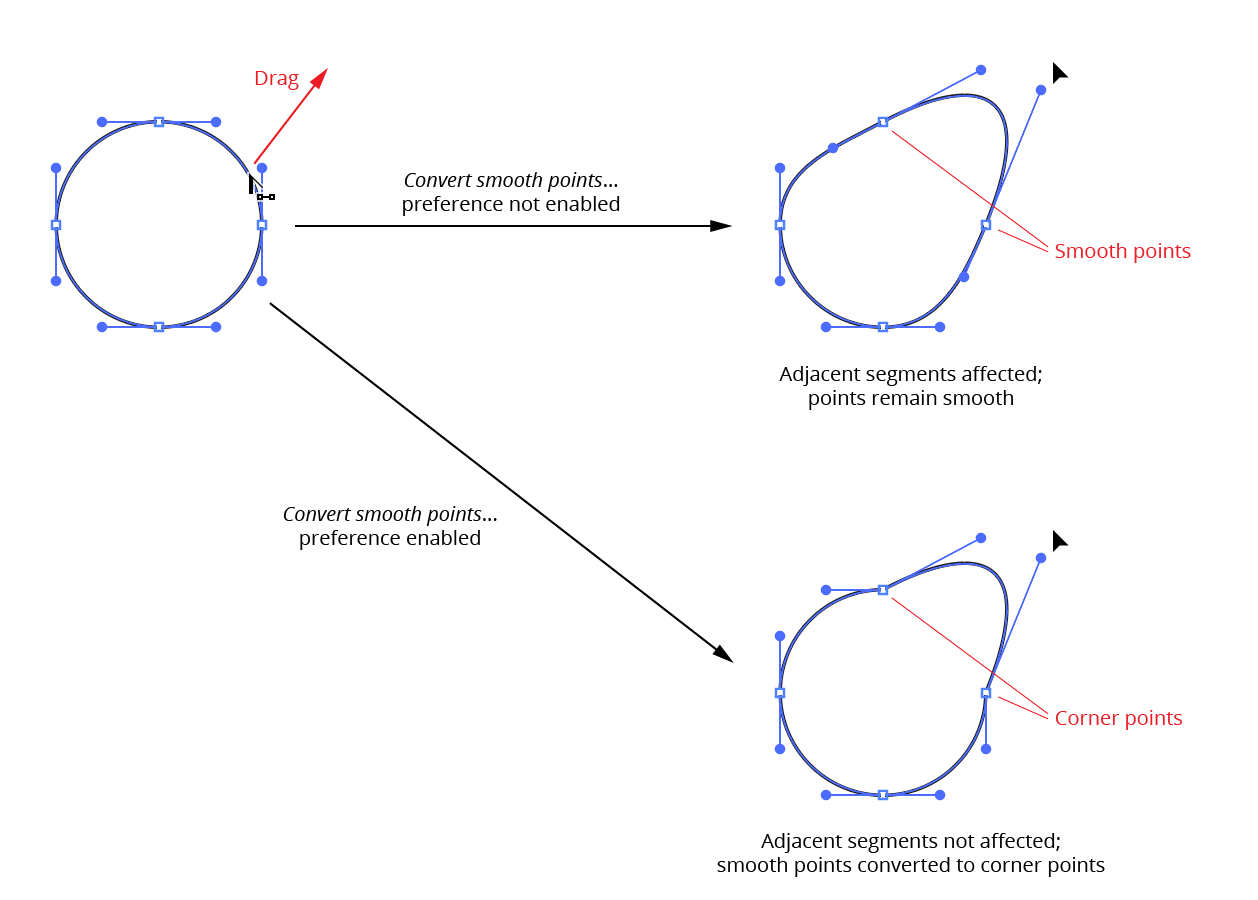
PathScribe Path drag break
This preference can also be changed on the fly by pressing the D key.
Note: When you are using Recognize Connector Points, segments with connector points at one or both ends are affected differently by drags, since a connector point can have only one handle at a fixed angle; see Connector Points).
While dragging, there are various keys which can be pressed to perform additional functions:
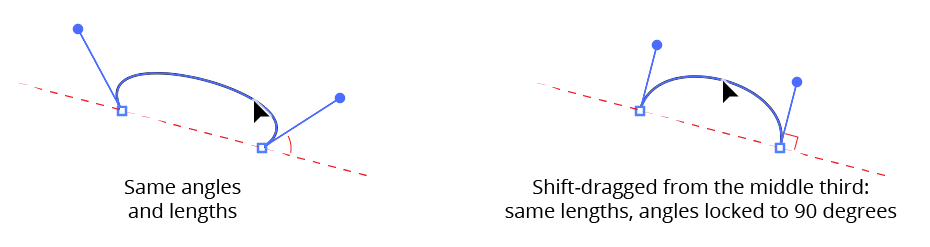
Shift: Reshapes the path segment while keeping it symmetric. Symmetric means that both handles are of the same length and are at the same angle to the imaginary line running through the endpoints of the path segment.
Shift-draggingfrom the middle third of a path segment will additionally constrain the handle angle to be perpendicular to this imaginary line:
PathScribe path drag symmetrical handles
Except for middle-third Shift-dragging, if you release the Shift key (or if you started dragging without it) and later hold it down, the curve will become symmetric using the lengths and angles of the handles as they exist at that moment.
Option/Alt: Constrains the angles of the handles to their original values (±180°). If you have the Option/ Alt-Clicking Adds New Point to Path preference enabled, you must hold down
Option/Altafter you hold down the mouse button, or you will inadvertently add a point to the path. But even if you begin to drag withoutOption/Alt, holding it down afterwards will reset the angles of the handles to the angles they had when you originally moused down on the path. Note: If the initial mouse-down was close to one of the ends of the segment, the segment shape will probably be very sensitive to movement of the cursor. You can gain better control of the final segment shape by using slow-drag in this situation.Shift+Option/Alt:
Shift+Option/Alt-dragginga path segment reshapes it with the following constraints: the handle lengths are kept equalized, and the handle angles are constrained to their original values. As withOption/Alt-dragging, handle angles will be set to the original angles unlessShiftwas held down by itself first (which will have made the curve symmetric). This allows you to first symmetrize a curve until the handles are at the angle you like, and then lengthen or shorten them without losing the symmetry. WhenShiftandOption/Altare both held down before you drag, neither the Shift-clicking Equalizes Handle Lengths nor the Option/Alt-Clicking Adds New Point to Path preferences apply.D: Toggles the current Convert Smooth Points to Corner Points When Dragging Path Segments preference. The preference reverts to its original value when the mouse button is released.
R: Retracts the handles of the path segment being dragged.
S: Immediately converts the path segments endpoints to smooth type points.
T: Enables “Tangent constraining.” In this mode, the angle of the path segment as it passes through the cursor position is kept constant, regardless of where the cursor is dragged. To achieve this, the segment’s handles are adjusted in a different manner from a normal drag.
Marqueeing Operations
Starting at an area with nothing under the cursor, you can click-and-drag with the PathScribe tool (“marqueeing”) to draw out a rectangle that selects anchor points and path segments that fall within or intersect it, like the Direct Selection tool. Although points and segments can also be selected by clicking on them, multiple handles can only be selected by marqueeing. Additionally, handles take priority over points and segments (unless Option/Alt is held down, see below); i.e., PathScribe will always look for and select handles before selecting points or segments. You can cancel a marquee in progress by pressing the Esc key.
Holding down the Space bar when marquee selecting repositions the entire marquee rectangle.
Holding down Shift when marquee selecting has the same effect as when selecting with the native selection tools: if whatever would be selected is not yet selected, it is added to the current selection, otherwise it is subtracted from the current selection.
Holding down Option/Alt when marquee selecting forces PathScribe to ignore handles and only select points or segments. (If no points are selected, but at least one segment is, all of the path’s segments will be selected, thereby showing all the path’s handles.)
PathScribe marqueeing points
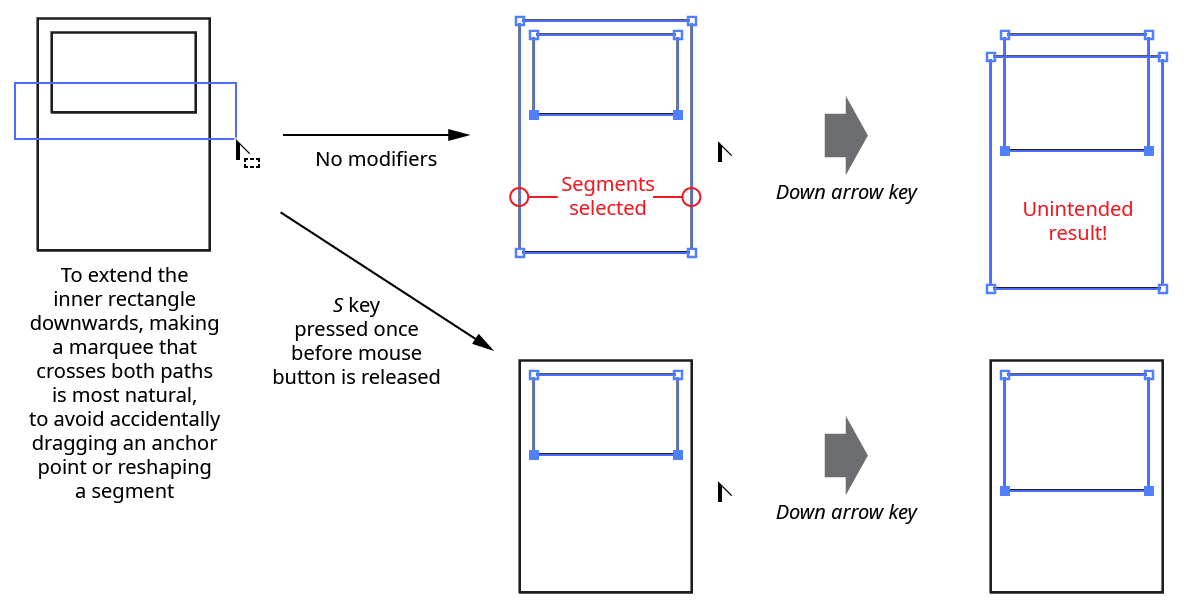
Pressing the S key when marqueeing toggles Ignore Segments mode. In this mode, segments will never be selected, even if they intersect the marquee, and only anchor points will be selected. Note that this mode does not exist for the Direct Selection tool, which always selects both anchor points and segments.
PathScribe marqueeing - ignore segments
If ghost handles are visible, pressing the G key when marqueeing will convert the ghost handles that are within the marquee into real handles (after the mouse button is released):

PathScribe marqueeing - Convert ghost handles
Shift+Option/Alt-clicking on an empty area of the document is a shortcut which will select all the handles of any selected points and enter Multi-Handle mode.
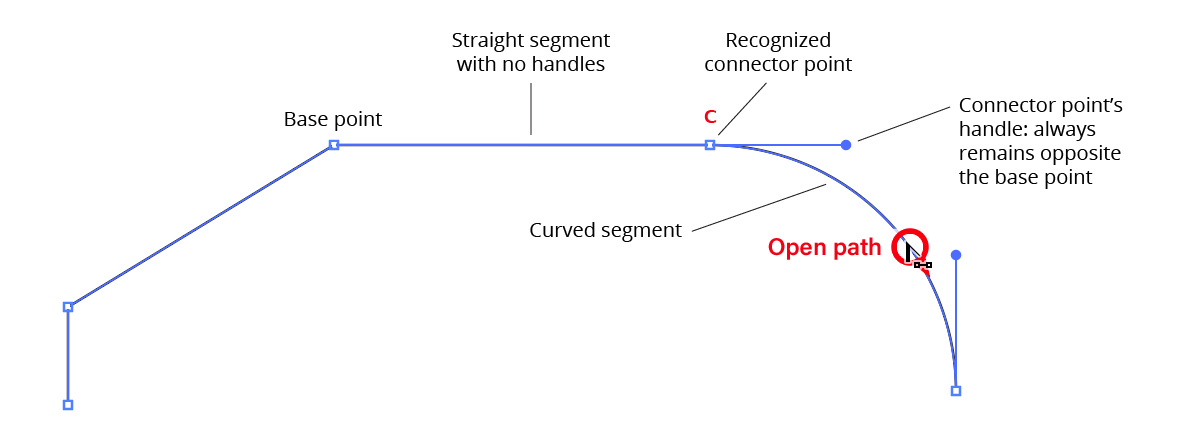
Connector Points
When the Recognize Connector Points preference is enabled, PathScribe can recognize and work with connector points: points that act as transitions between straight segments and curved segments.
A connector point:
Can be either a smooth or corner point, but not an endpoint of an open path;
Must have a single handle that faces directly away from another point (the base point);
Must be adjacent (on its non-handle side) to a segment with no handles
Additionally, for PathScribe to recognize a point as a connector, its handle must be lined up with the straight segment. The amount that its handle can be off and still qualify as a connector is called the angle threshold. It has a default value is 5° but can be set in the preferences dialog.
PathScribe Recognize a point as a connector
Hovering the cursor over a path will identify all of the path’s recognized connector points by drawing a small “C” above them. The color of the “C” indicates whether a connector is within the angle threshold but not perfectly lined up (gray) or aligned precisely (red):
PathScribe connector point indicator
You can use the PathScribe panel to align all recognized connector points on selected paths. Also, nearly all clicks and drags with the PathScribe tool on a connector point, its handle, the segments next to it, or the points adjacent to it, will automatically align (if not already), and keep aligned, the connector point’s handle. (Exceptions include Multi-Handle drags and Shift+Option/Alt-clicks that retract or extend new handles.) When a connector point is being automatically aligned during an edit, a red “C” will appear above it. If the edit removes the connector’s points handle (such as dragging its handle back until it is of zero length), the “C” will disappear.
Since other Illustrator tools will not see connector points any differently from non-connector points, any geometry edits other than those that affect the entire path (such as moving, rotating, and scaling) should only be done using the PathScribe tool, or any connector point’s handles may be disturbed.