 Halftone
Phantasm Halftone is a live effect/filter that converts artwork into a vector halftone pattern. It includes numerous options and adjustments, including full separation control, dot gain adjustment, a range of dot patterns and types, and the ability to save and recall custom halftone effects.
As a live effect, it is accessible through the main menu, under Effect > Phantasm > Halftone. It can also be applied directly from the Appearance panel using the “Add New Effect” button at the bottom of the panel, or through the Phantasm panel (see Phantasm: Panel).
After applying the live effect using the menu item (or when clicking on the existing effect in the Appearance panel to edit it), the parameters dialog will appear:
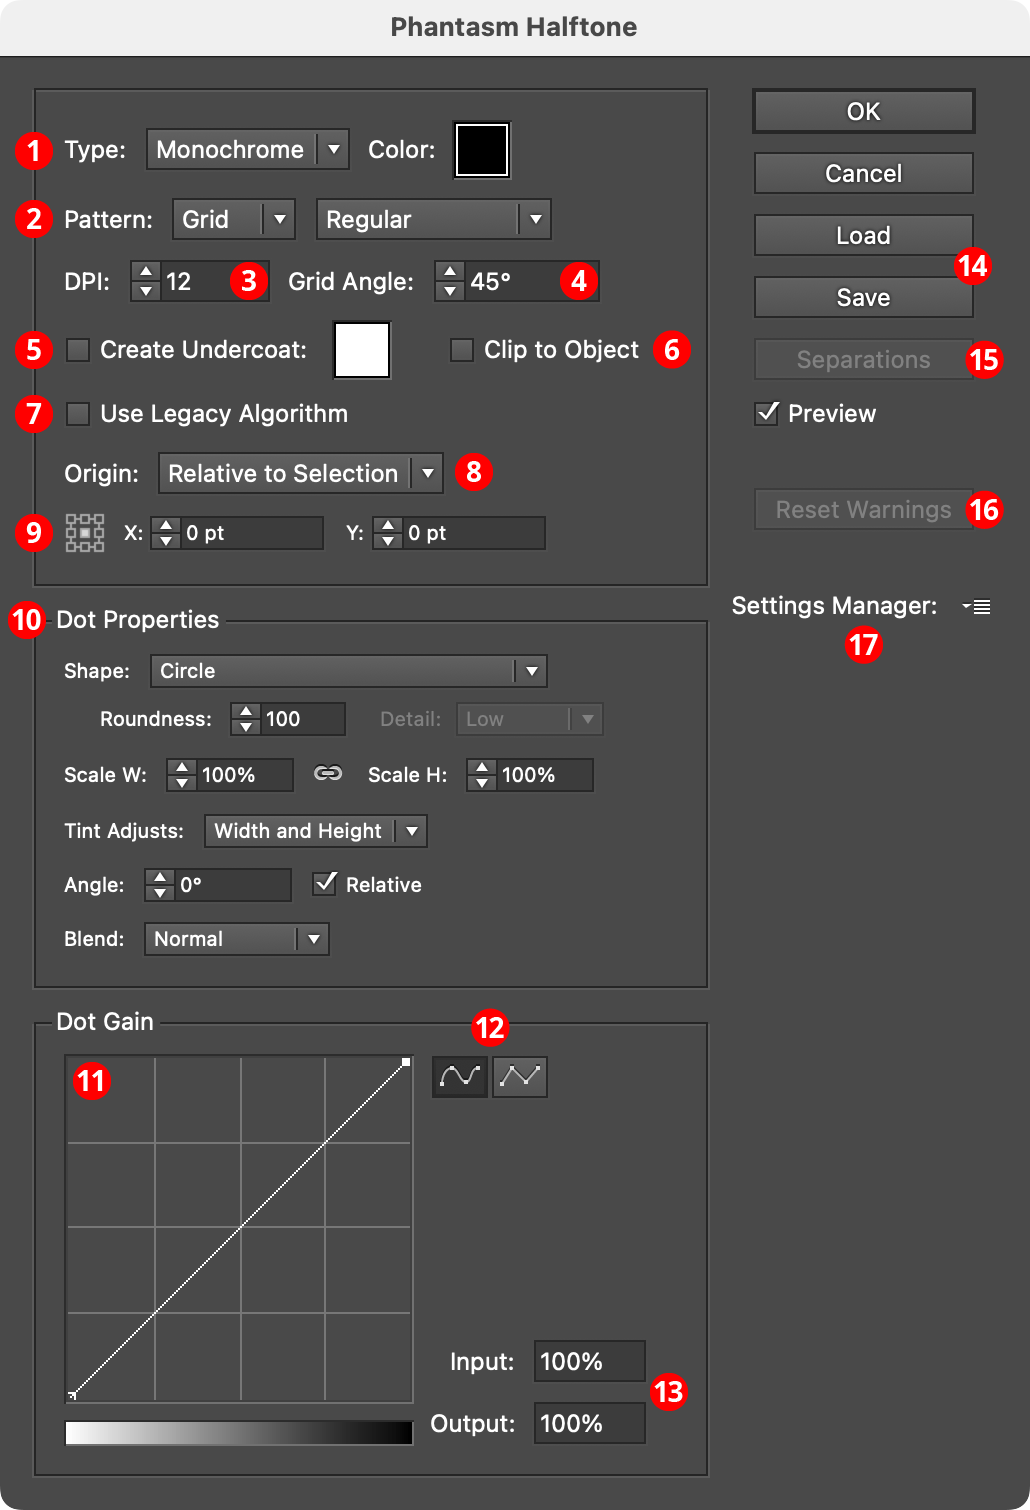
Phantasm Halftones Dialog
1. Type
Specifies the type of halftone:
Monotone: The halftone will be created using one layer of dots, all of the same color. Their sizes are (by default) based on the grayscale equivalent of the underlying artwork. Dot color may be specified by clicking on the color chip to bring up the native color picker dialog.
CMYK: Available when the document is in CMYK color mode. The halftone will be created using four layers of dots, each using one of the process colors (spot colors present in the artwork will add additional dot layers). Their sizes are (by default) based on the CMYK value at each dot’s position in the underlying artwork. By default each dot layer will have its blend mode set to Multiply. If the Sample Tint option is enabled, the grayscale equivalent of the artwork at each dot location is used to set the tint of the dot’s color.
RGB: Available when the document is in RGB color mode. The halftone will be created using three layers of dots, each using one of the primary colors (spot colors present in the artwork will create additional dot layers). Their sizes are (by default) based on the RGB value at each dot’s position in the underlying artwork. By default each dot layer will have its blend mode set to Screen. If the Sample Tint option is enabled, the grayscale equivalent of the artwork at each dot location is used to set the tint of the dot’s color.
Sampled: The halftone will be created using one layer of dots. Each dot’s color will be picked up from the underlying artwork.
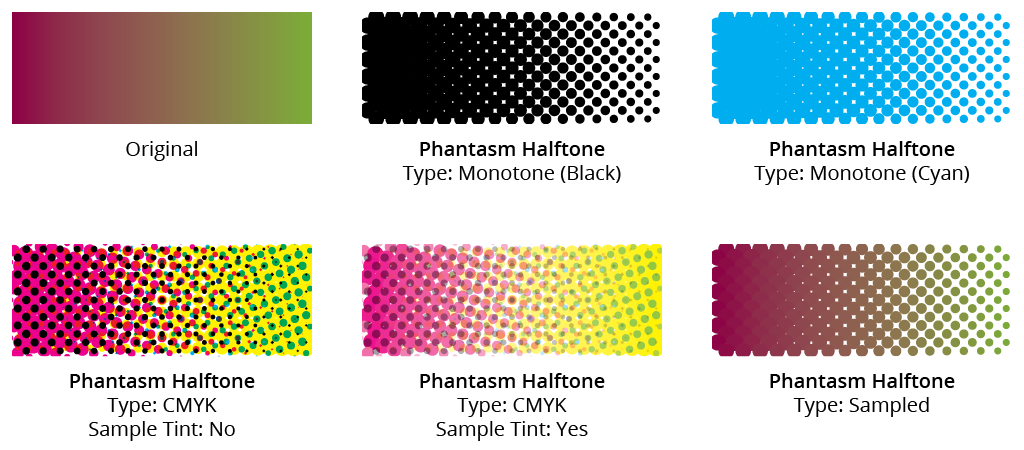
Phantasm Halftone Type Examples
2. Pattern
Specifies the pattern of the dots:
Grid: The dots are placed on a square grid. If the pull-down menu is set to Alternating, the grid cells are staggered, like rows of bricks.
FM: A specialized type of pattern (short for Frequency Modulated); it has the subtypes Floyd-Steinberg (a pseudo-random pattern) and Bayer Dither (a fixed pattern).
Radial: The dots are placed in concentric circles. The number of “spokes” is specifiable, from 5 to 7, where spokes refers to the number of dots in the first circle.
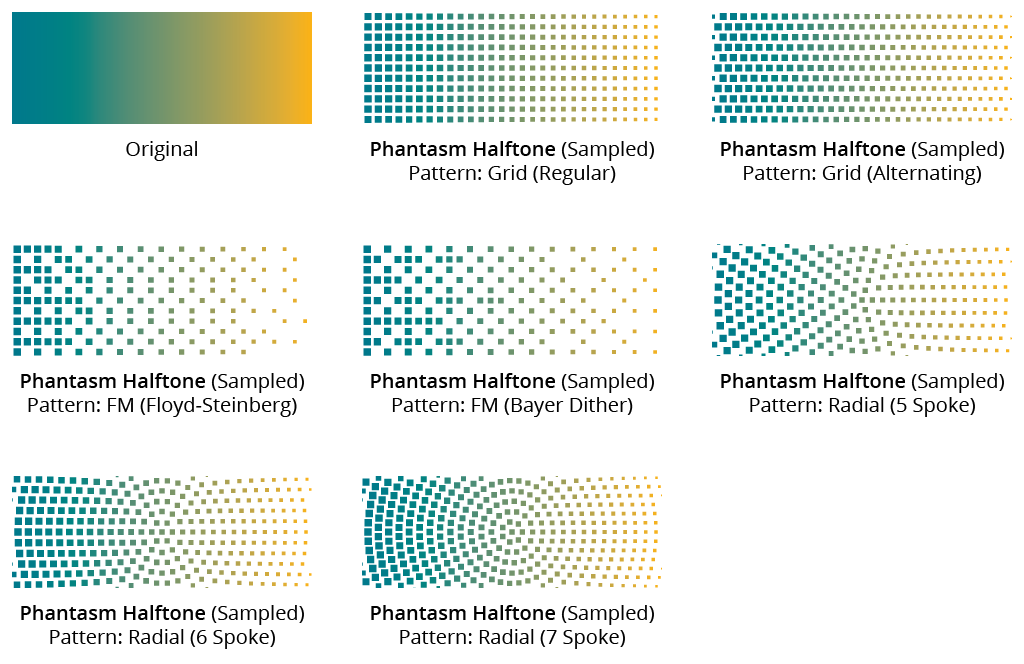
Phantasm Halftone Patterns
3. DPI
Short for dots per inch; specifies the dot size, measured as the distance between dots in inches. Values can range between 0.01 and 600. Higher DPI settings may create tens or even hundreds of thousands of dots, with potential very long processing times. A warning dialog will appear if this is the case:
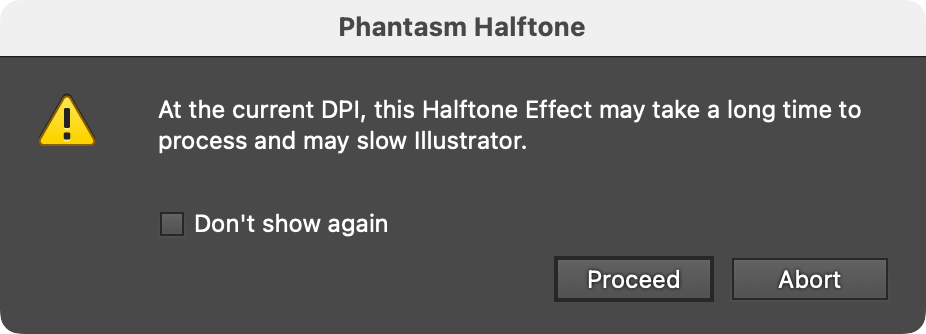
Phantasm Halftone Slow Processing Warning Dialog
Clicking Abort will keep the halftone from being calculated, but the effect will still be attached to the artwork, and if it or the artwork is edited, the effect will need to be re-calculated and thus the warning will re-appear (unless the Don’t show again setting has been enabled).
4. Grid Angle
Rotates the halftone effect relative to the page. When operating with separations (i.e., the halftone Type is CMYK or RGB), each channel’s angle is set relative to the overall Grid Angle.
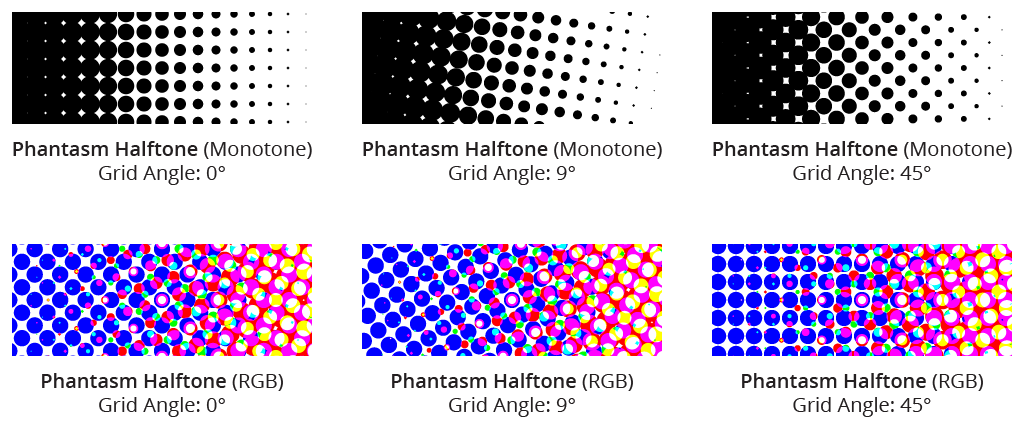
Phantasm Halftone Grid Angle Example
5. Create Undercoat
When enabled, creates a solid, opaque, “undercoat” color for blocking out any underlying artwork which might normally show through when the halftone dots are being created using transparency or overprints. White is most commonly used as the undercoat color, but it can be changed by clicking on the color chip to bring up the standard color picker dialog.
6. Clip to Object
When enabled, all halftone dots are placed inside a clipping mask so they will never protrude beyond the edges of the original artwork.
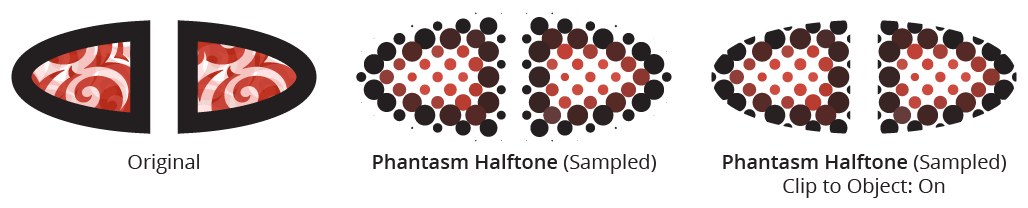
Phantasm Halftone Clip to Object Example
7. Use Legacy Algorithm
With Phantasm version 4.0.0, the algorithm which determines the size of the dots near the edges of the object was changed to better reflect an anti-aliased appearance, and to reduce the number of awkwardly-placed full-sized dots. However, the legacy algorithm may still be used by enabling this option, and it can still be useful for infographics or when used with Clip to Object.

Phantasm Halftone Legacy Algorithm
8. Origin Position
Each halftone grid has an origin, from which the positions of all the dots are calculated (this is most apparent with Radial pattern halftones). By default, the origin is positioned relative to the selection artwork, but, for example, when halftones on different objects need to align regardless of how the objects are moved, it is more appropriate to align the halftone relative to the artboard.
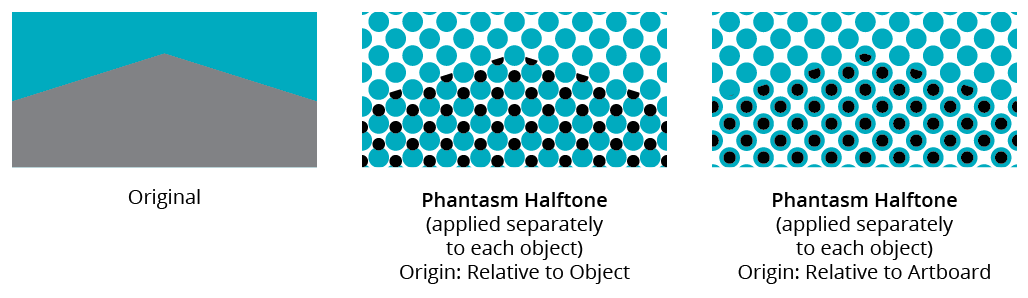
Phantasm Halftone Origin Position
9. Origin Specification
The position of the origin (relative to either the Selection or the Artboard) can be fine-tuned with the nineblock control (to specify Center, Top Left, Bottom Middle, etc.) as well as the X- and Y-offset values, which can be either positive or negative.
10. Dot Properties
By default, the dots used in the halftones are simple circles. However, the Shape pulldown menu offers a range of alternative options for dot shapes. When the Shape is changed, the upper part of the Dot Properties section of the dialog may re-configure itself with alternate or additional controls, as shown below.
11. Dot Gain Graph
The Dot Gain graph allows for precise control of the halftone’s response to tonal changes by allowing a non-linear relationship between the underlying grayscale tone and the dot scaling. This provides the ability to darken or lighten the overall results and can be invaluable when dealing with alternative dot shapes like characters and symbols.
The horizontal axis represents the underlying grayscale-equivalent tone of the artwork, from 0% to 100%, while the vertical axis represents the scaling of the dots (which is in addition to the overall Scale H and Scale V values), also from 0% to 100%. With the default diagonal line, the relationship is linear; that is, the scaling of each dot is equal to the underlying tone. Nodes on the curve may be moved simply by clicking and dragging them (or their input and/or output values may be modified, see below). A new node may be added by clicking at a spot along the curve which does not already have a node. Nodes (except the ones at the beginning and the end of the curve) may be deleted by dragging them off the graph area.
By default, the graph has a 4×4 grid, but Option/Alt-clicking on the graph will change the grid to 10×10.
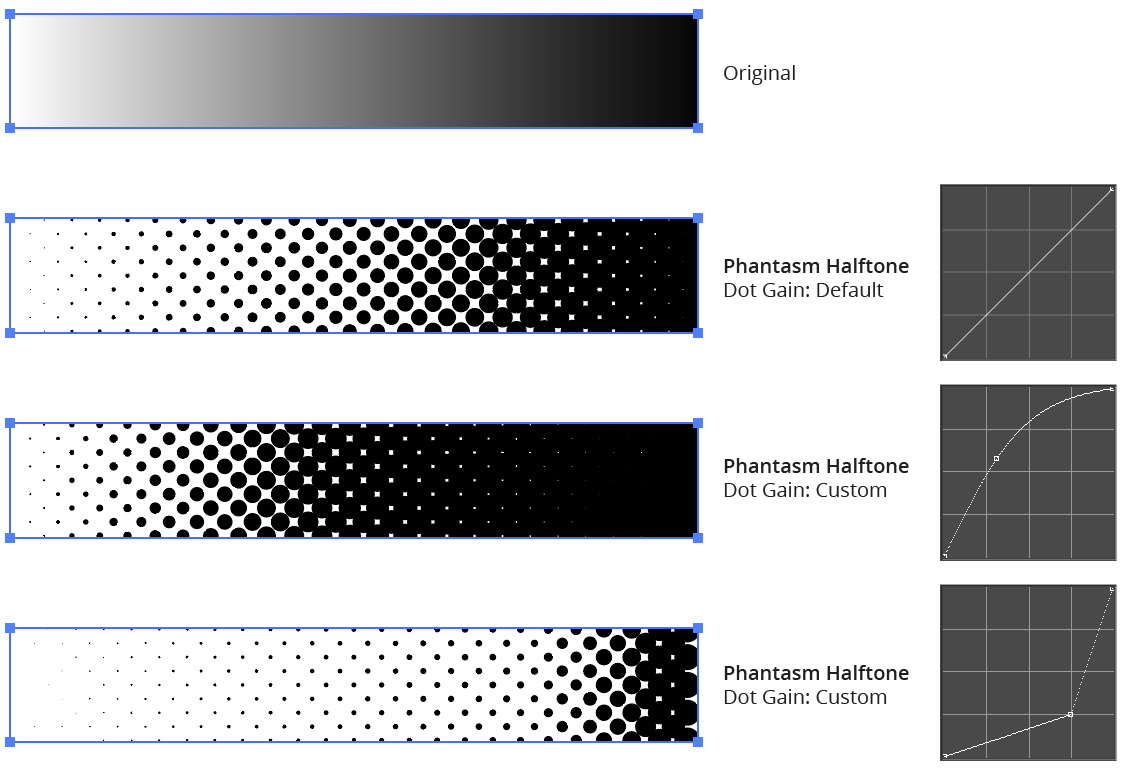
Phantasm Halftone Dot Gain Examples
12. Dot Gain Graph Smooth/Linear Buttons
By default, nodes on the dot gain graph are connected by smooth curves, but by clicking the Linear Segments button, they will instead be connected by straight lines, allowing the curve to change direction abruptly at a node.
13. Input/Output Values
When hovering over the graph, the input and output values corresponding to the cursor location are displayed. When a node of a graph is selected, the values are editable, and may be changed to move the node numerically.
14. Load/Save Buttons
Provide a means to save (or load) all of the current Phantasm Halftone settings to/from an external file, which may be shared with other users. Clicking on either the Load or Save buttons will open the standard operating system’s file load/save dialogue. The file type is of .PHT type.
15. Separations Button
Available when the halftone type is CMYK or RGB. Clicking the button brings up the Separations dialog, in which the visibility, order, angle, origin, and offset of each separation may be edited.
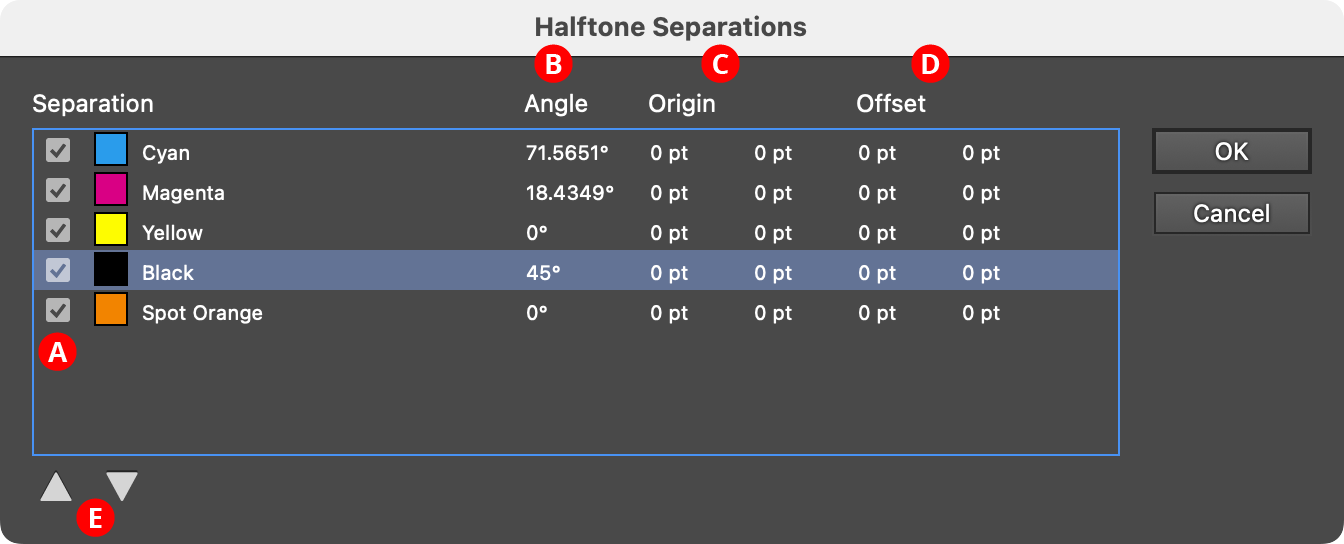
Phantasm Halftone Separations Dialog
A. Visibility Checkbox: Disabling the checkbox will hide that separation in the halftone.
B. Angle: The angle of the halftone for each channel (relative to the overall grid angle). When clicked, the Edit Separation dialog is shown, where the value may be changed. Note that the artwork will not update (even with Preview enabled) until the OK button is clicked.
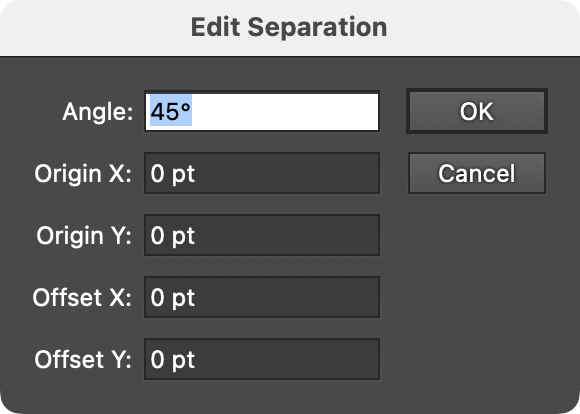
Phantasm Halftone Edit Separations Dialog
C. Origin: The origin of the halftone for each channel (relative to the overall grid origin). When clicked, the Edit Separation dialog is shown, where the value may be changed.
D. Offset: The distance that the halftone dots for a specific separation will be shifted after they have been composed using the underlying art. When clicked, the Edit Separation dialog is shown, where the value may be changed. Adding an offset can be useful for simulating printing press misregistration:
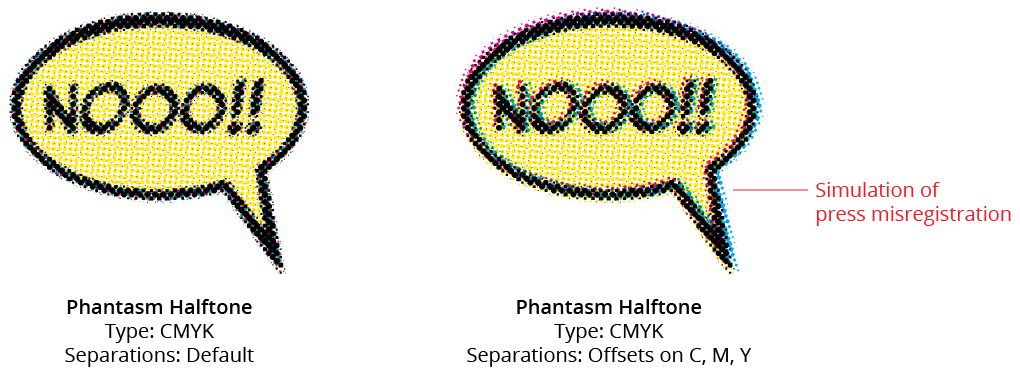
Phantasm Halftone Separations Offsets
E. Move Up/Move Down Buttons: With a separation selected, clicking one of the buttons will move it up or down in the stacking order. Generally, when the halftone blend mode is set to Transparency or Overprint, this will have no visible effect.
16. Reset Warnings Button
If a warning dialog (such as the long processing time warning) has been hidden through the Don’t show again checkbox, this button will reset all warnings so they appear again.
Dot Shape: Circle
When the dot shape is set to Circle, the Dot Properties area is configured as follows:
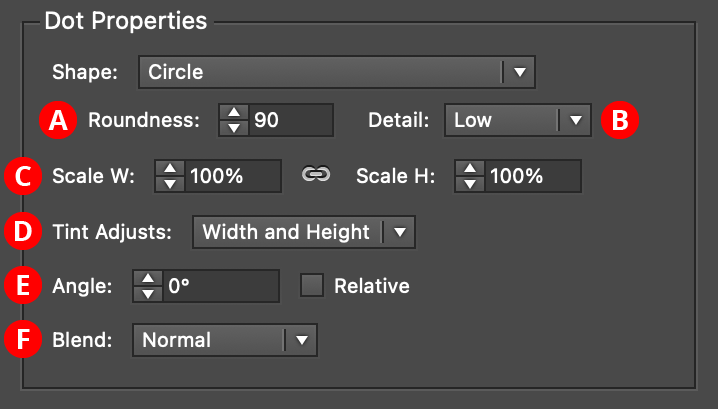
Phantasm Halftone Dot Properties - Circle
A. Roundness
Ranges from 0 to 100, with 100 corresponding to perfect circles. Lower values simulate the appearance of real halftone dots printed with ink on paper, with edges that are never perfectly smooth.
B. Detail
For Roundness less than 100, qualitatively specifies the number of anchor points used to describe the shape. Detail can be either Low, Medium, High, or Very High.
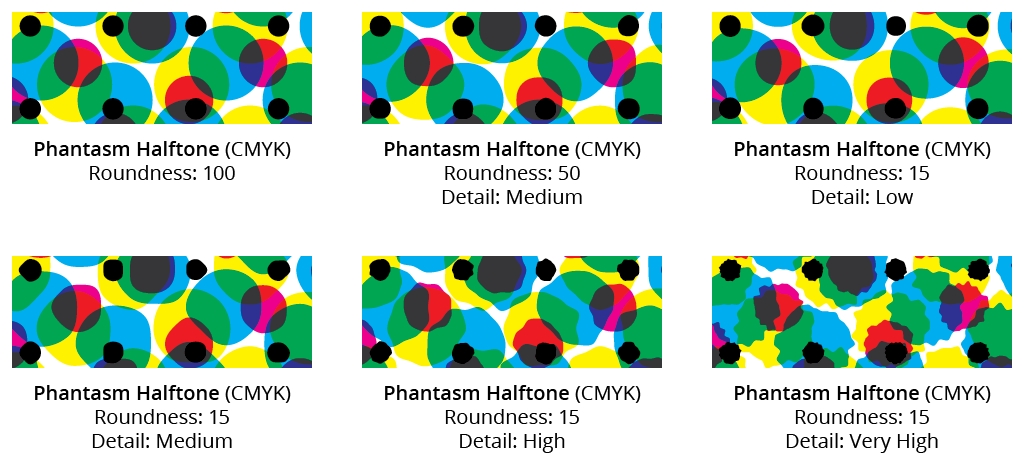
Phantasm Halftone Roundness Detail
C. Scale
Specifies the maximum size of the dot as a percentage (from 1% to 1000%) of the full coverage size. The full coverage size is set such that the dot leaves no gaps when applied to a 100% Black area. By unlinking the Width and Height inputs, the aspect ratio of the dots may be changed. For example, a circle may be transformed into an ellipse.
D. Tint Adjusts
By default, all dots have both their width and height adjusted based on the sample tint value. This is, after all, the very definition of halftoning. However, for special effects, the pull-down menu can be changed so only the Width is adjusted, or only the Height, or neither. The None setting is often useful when using a Sampled type halftone, since the dot’s color already reflects the underlying tint and therefore doesn’t need to get smaller to become lighter.
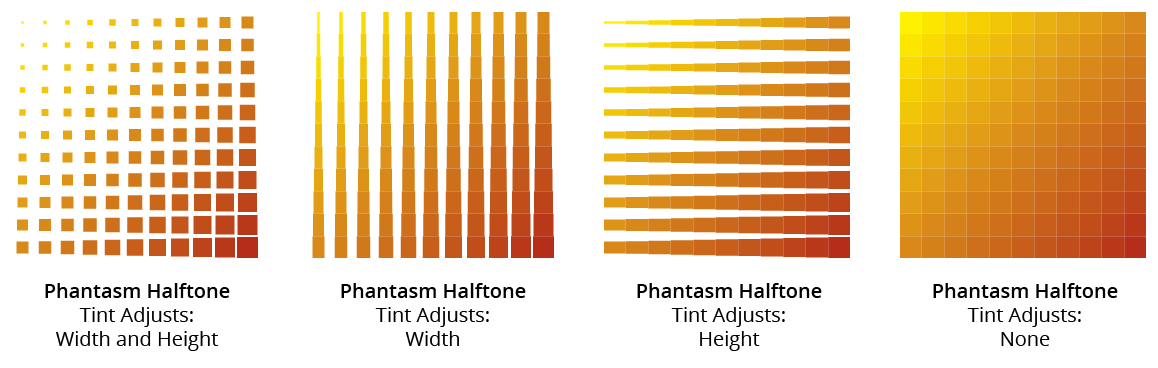
Phantasm Halftone Tint Adjusts
E. Angle
The angle with which to rotate the halftone dot. If the Relative checkbox is enabled, then the angle is relative to the angle of the entire halftone grid.
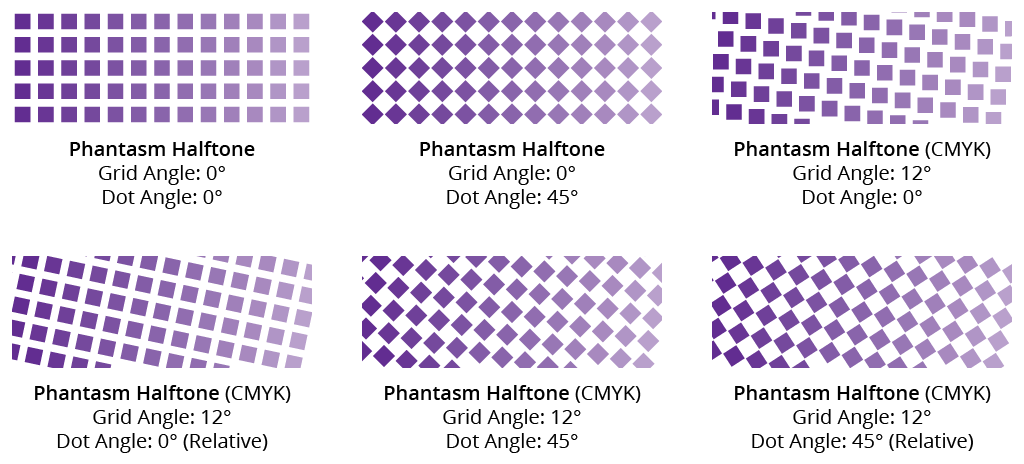
Phantasm Halftone Dot Angle
If the dot shape is set to Circle, changing the dot angle will not result in any visible change, but the placement of the anchor points on each circle is being affected and would be apparent if the appearance were expanded.
F. Blend
The blend mode to use on the halftone dots. The default for Monotone and Sampled halftone types is Normal (resulting in opaque dots), since there is only one layer of dots. Otherwise, the default mode is Transparency, either as Multiply transparency for CMYK documents or Screen transparency for RGB documents.
CMYK type halftones offer a third blend option: Overprint. To properly view halftones using the Overprint blend mode, Overprint Preview (from the View menu) needs to be enabled. This blend mode is recommended if the resultant artwork is destined to be used in commercial offset printing, as it correctly retains original spot color information.
When the blend mode is set to Transparency or Overprint, it may be desirable to opt for Create Undercoat if there is underlying artwork which has not been changed to a halftone effect. This would block out the underlying artwork from showing through.
Dot Shape: Pseudo-Euclidean
A Euclidean dot shape was traditionally produced with analog halftoning methods. It starts out as a circle, but as the tint approaches 50%, it transitions into a square. Therefore, at 50% tint, the halftone pattern is a checkerboard. At higher tint levels, the dots invert, with the gaps between the dots forming circles. Such a dot shape is difficult to implement as vector art as areas of tints greater than 50% would essentially have to form one large compound path. However, Phantasm’s Pseudo-Euclidean dot shape can often be an acceptable approximation when the DPI is set to a fairly high value.
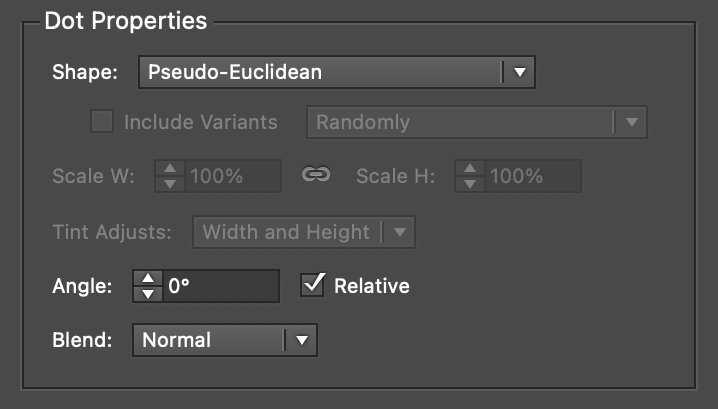
Phantasm Halftone Dot Properties - Pseudo-Euclidean
Because the Pseudo-Euclidean dots assume many different shapes which must touch to give the illusion of a continuous, inverted field for tints over 50%, dot scaling is not allowed, and the scaling controls are dimmed. While the dot angle may be changed from the default of 0%, it generally leads to undesirable results. Relative Angle should always be enabled, for the same reason. The Blend parameter acts identically to the Circle dot shape (see above).
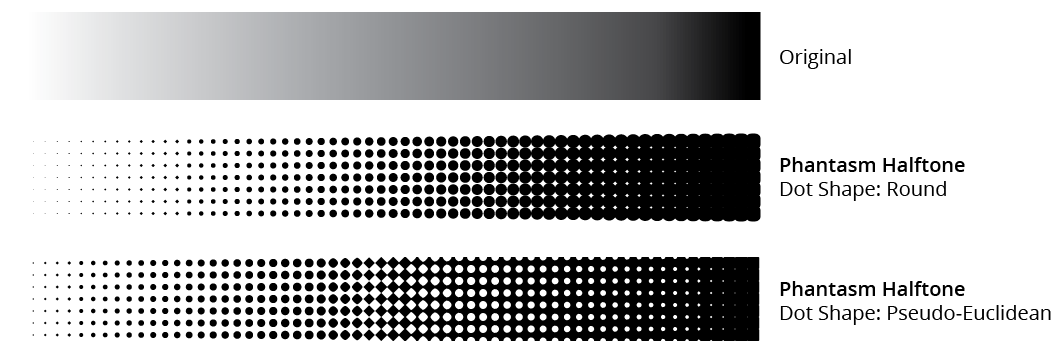
Phantasm Halftone Pseudo-Euclidean Comparison Example
Pseudo-Euclidean dots generally do a better job representing the tonality of the original artwork, especially in shadow areas, without the need to adjust the Dot Gain curve:
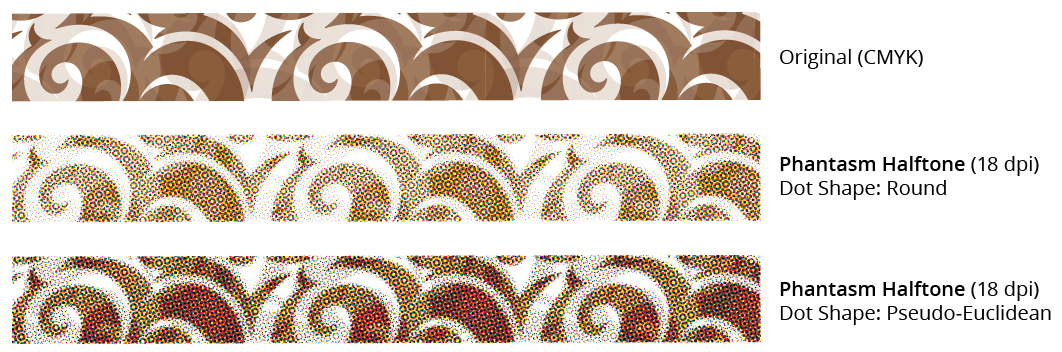
Phantasm Halftone Pseudo-Euclidean CMYK Comparison
Dot Shape: Square/Line
When the dot shape is set to Square or Line, the Dot Properties area is configured as follows:
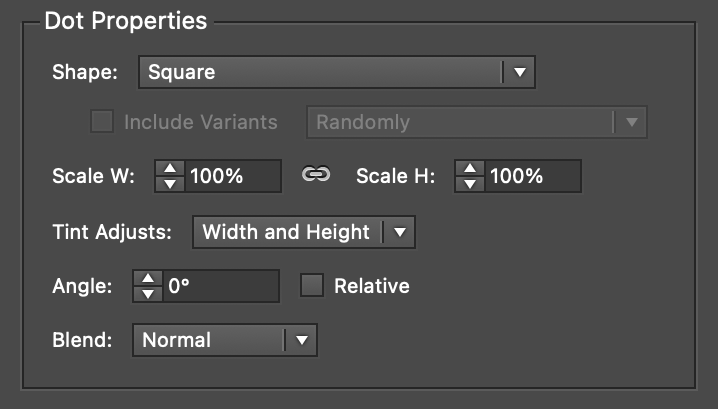
Phantasm Halftone Dot Properties - Square/Line
All of the parameters used for the Circle dot shape (with the exception of Roundness and Detail, which are not applicable) apply to Square and Line. The Line shape option constructs each “dot” out of a single, straight, stroked path. The line’s end caps are always set to rounded; if a different style end cap is required, there are two methods. The first is to add the additional Astute Graphics live effect Stroke Attributes, which can modify the end caps. The second method is to simply use a Square shape type instead, and change the Scale W parameter to be smaller than the Scale H.
Dot Shape: Character
The Character dot shape allows the use of text characters as halftone dots. When the dot shape is set to Character, the Dot Properties area is configured as follows:

Phantasm Halftone Character Options Dialog
A. Options
Opens the Halftone Character Options dialog:
Phantasm Halftone Character Options Dialog
The font of the characters may be chosen using the pull-down menu. Generally, heavier typefaces give closer color-matching results as glyphs in the lighter ones do not offer sufficient area. If Pick Random Character is enabled, each dot will use a random character from the characters which appear in the Characters field (by default, the English uppercase alphabet; up to 2047 characters may be entered). Characters may be entered more than once to increase their random frequency. When Repeat Text is enabled, dots will use the characters in their entered order, repeating as necessary.
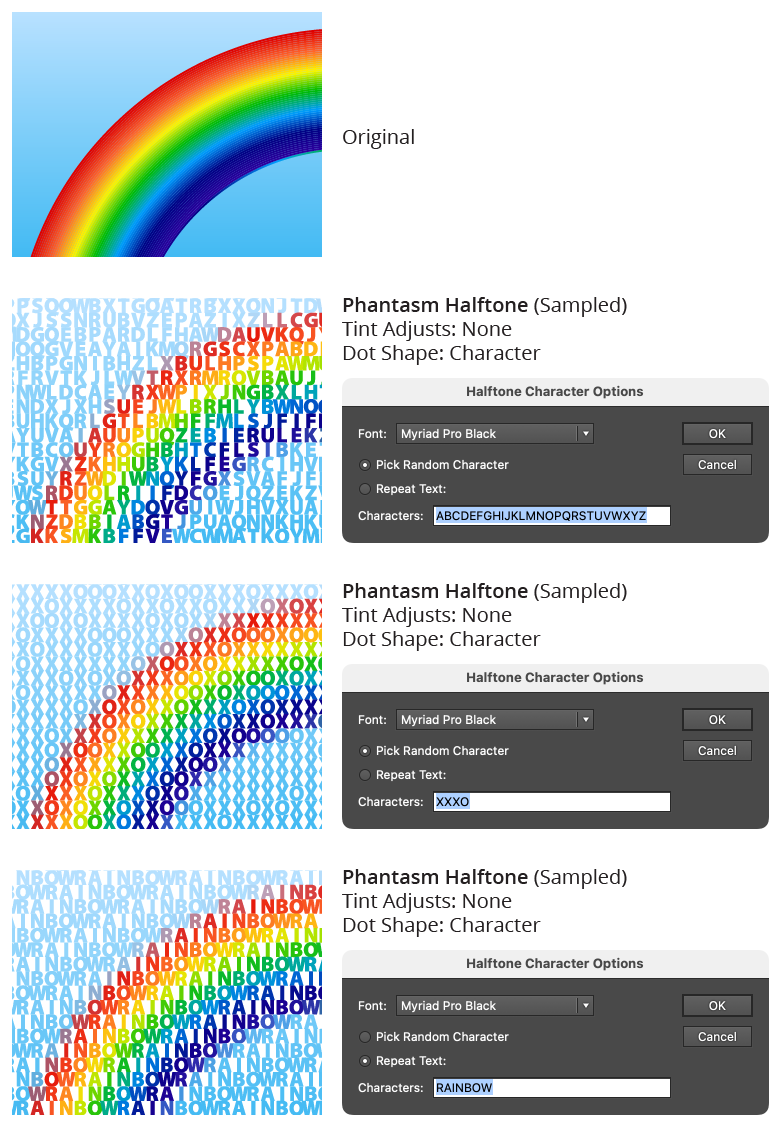
Phantasm Halftone Character Examples
All of the parameters used for the Circle dot shape (with the exception of Roundness and Detail, which are not applicable) apply to Character.
Dot Shape: Symbol
Available when there is at least one symbol in the document, the Symbol dot shape allows symbols to be used as halftone dots. Each symbol that is not a variant (see below) appears in the pull-down menu, in alphabetical order, and can be chosen as the shape to use for the dots. The Dot Properties area is configured as follows:
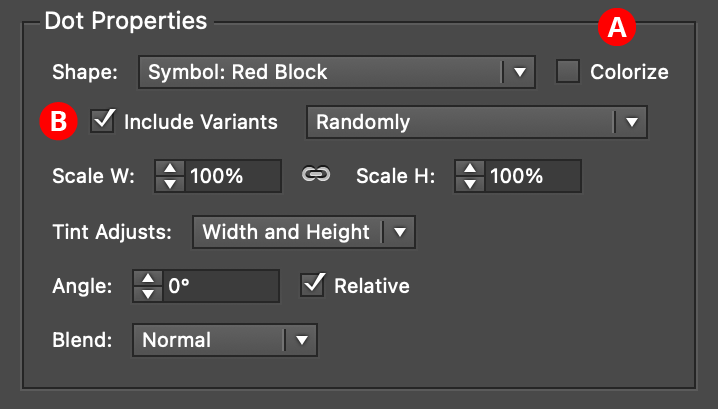
Phantasm Halftone Dot Properties - Symbol
A. Colorize
By default, symbols remain in their original colors. However, by enabling Colorize, each symbol will have all of its fills and strokes changed to the color that the dot would normally have if it were of Circle shape, say.
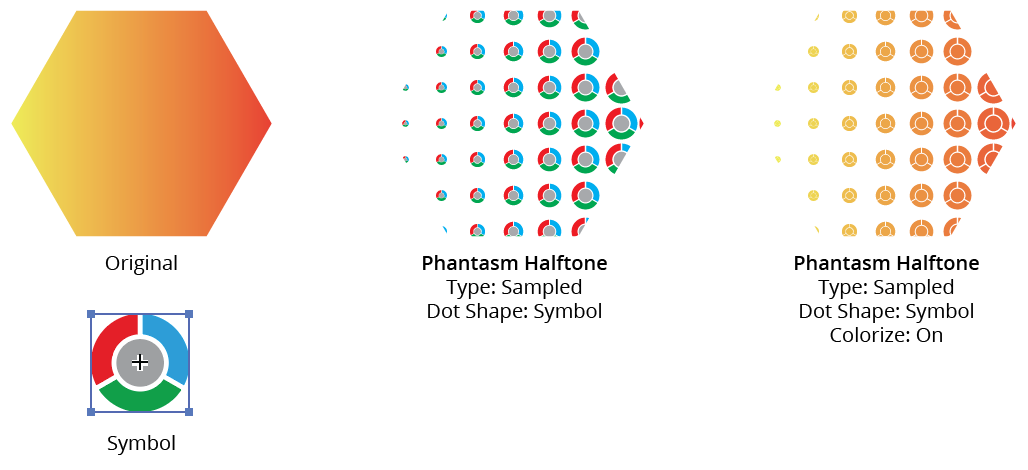
Phantasm Halftone Symbol Colorize
B. Include Variants
If the chosen symbol from the Shape pull-down menu has “variants,” this setting (disabled by default) allows them to be used in addition to the base symbol. The variants must have been created before applying the Phantasm Halftone effect to the artwork. For more information on symbol variants, see Phantasm Halftone: Symbol Variants. Additionally, when a symbol is chosen as the dot shape, a Tips button will appear on the dialog; when clicked, it brings up a dialog summarizing symbol variant creation and naming.
All of the parameters used for the Circle dot shape (with the exception of Roundness and Detail, which are not applicable) apply to Symbol.
Halftone Symbol Variants
Halftone can use more than one symbol within a single applied effect by utilizing symbol variants, which are simply additional symbols with special names that enable Halftone to identify them as belonging to one “group”. An advanced naming technique allows further control over the distribution of each variant within the halftone.
There are two ways to create symbol variants: automated and manual.
Halftone Symbol Variants: Automated creation
Note: The automated creation method requires the Astute Graphics Stipplism plugin to be installed.
1. Create the base symbol first. Due to internal limitations, automatically-created variants are always created as Static Type symbols, so it is best to also use the Static Type symbol when creating the base symbol, because otherwise they may react differently to scaling when the general preference Scale Strokes & Effects is disabled.
2. Create other artwork which will be used as the variants. These may be similar to the base symbol (such as just having a different color), but they may also be completely different. If a variant is composed of more than one object, the objects need to be grouped.
3. With the artwork selected, choose Object > Create Symbol Variants... from the main menu to display the Create Symbol Variants dialog.
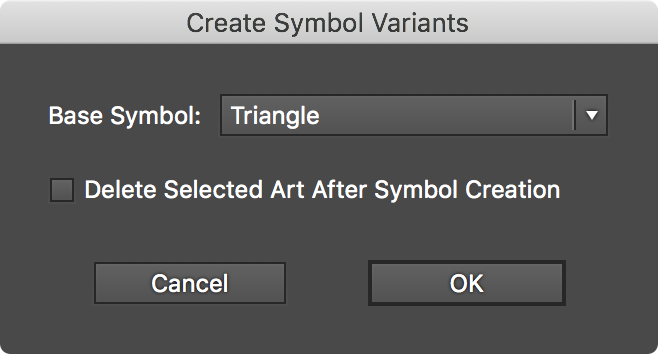
Phantasm Halftone Symbol Variants Dialog
4. Pick a symbol to use as the base symbol from the pull-down menu.
5. Enable Delete Selected Art After Symbol Creation if you don’t want the original objects to be retained on the artboard. Note that the retained artwork won’t be replaced with their respective newly-created symbols they way Illustrator does when a symbol is created manually.
6. Click OK to finish.
To see the result, open the native Symbols panel. If the symbol names are not visible, from its flyout menu choose either the Small List View or Large List View menu item.
The chosen objects are added as symbols, but with special names assigned. For example, given a base symbol name of Triangle, its symbol variants would have names like these:
Triangle_var_001
Triangle_var_002
Triangle_var_003
Halftone Symbol Variants: Manual creation
The special _var_[string] suffix, added to the base name, is the sole determinant of whether a symbol is considered a variant or not. Therefore, symbols can be named manually using this pattern to turn them into variants. The Tab key can be used to quickly rename symbols in succession. While the automated method of variant creation uses a three-digit number that increments as the string following the _var_ suffix, it need not be a number; it can be any unique identifying name. So the following names would also be equally valid:
Triangle_var_darker
Triangle_var_verydark
Triangle_var_black
Halftone Symbol Variants: Usage
To use symbol variants in addition to the base symbol in Halftone, simply enable the Use Variants checkbox in the parameters dialog. Note that only base symbols will appear in the list of available symbols, so variants can’t be used independently. For each halftone symbol dot, either the base symbol or one of its variants are chosen at random with equal frequency, unless additional naming options have been used to specify the density distribution (see below).
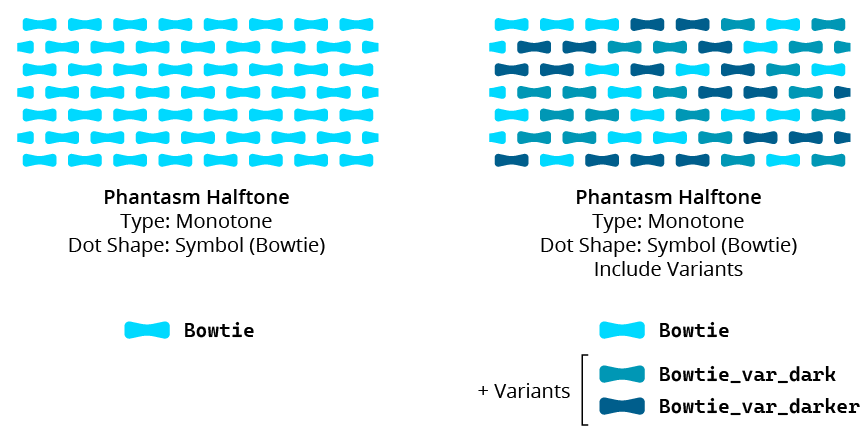
Phantasm Halftone Symbol Variants Example
Halftone Symbol Variants: Density Specification
Additional naming syntax allows control over the distribution of symbol variants used within a Halftone. The following suffix can be added to a variant symbol’s name to make it a density-specified variant (its position in the halftone is restricted to a density range):
=dxxx-xxx (where each xxx is a three-digit number between 000 and 255) means the variant will be only used within the halftone where the underlying grayscale-equivalent tone (as measured from 0–255) is equal to or between the two specified values. The smaller value must come first in the name. If the underlying tone lies inside more than one variant’s density range specifier, then the variant is randomly picked from among the valid variants, thereby creating a mix of symbols in certain areas.
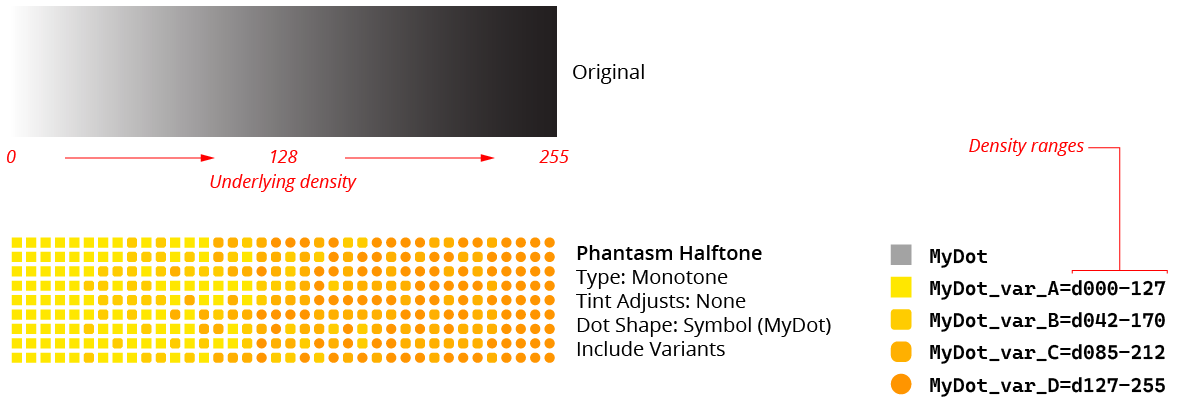
Phantasm Halftone Symbol Variants - Density Specified
If any density-specified variants are present, then the base symbol and any normal variants will not be used at all. If a variant name is changed after the Halftone is created, the live effect will not be updated until its parameters dialog is opened.