 Dynamic Corners
The Dynamic Corners component of VectorScribe consists of the Dynamic Corners tool and the Dynamic Corners panel. While the tool can be used alone, additional functionality is accessed through the panel.
Dynamic Corners allows you to add corners (of three types, using three methods) to paths. These corners — unless the path is externally edited in a way that destroys their integrity — remain “live” and may be subsequently changed or removed. Corners created with the Rounded Corners live effect or with Illustrator’s native Live Corners (which was released almost three years after Dynamic Corners, and attempted to copy many of its features) may also be converted to Dynamic Corners. The corners on Standard Dynamic Shapes can also be edited with the Dynamic Corners tool.
For a description of the types and methods of corners, see Dynamic Shapes Panel: Overview, Corners Section.
Although they contain metadata, paths which include Dynamic Corners are still normal paths. Files with Dynamic Corners may be opened on a machine without VectorScribe installed without issues.
Dynamic Corners Tool
Dynamic Corners Tool Location
The Dynamic Corners tool is used to create new corners (either from scratch, or by converting existing non-dynamic corners), select existing corners, or edit existing corners. Its cursor is a solid, tail-less arrow. When the Dynamic Corner tool is in use, all Dynamic Corners in the document, except for those on hidden paths, are annotated. By default, the annotation consists of a small red circle at the radius point of the corner and (unless selected) a red arrow connecting the radius point to the center of the corner’s segment(s). This appearance can be changed in the preferences.
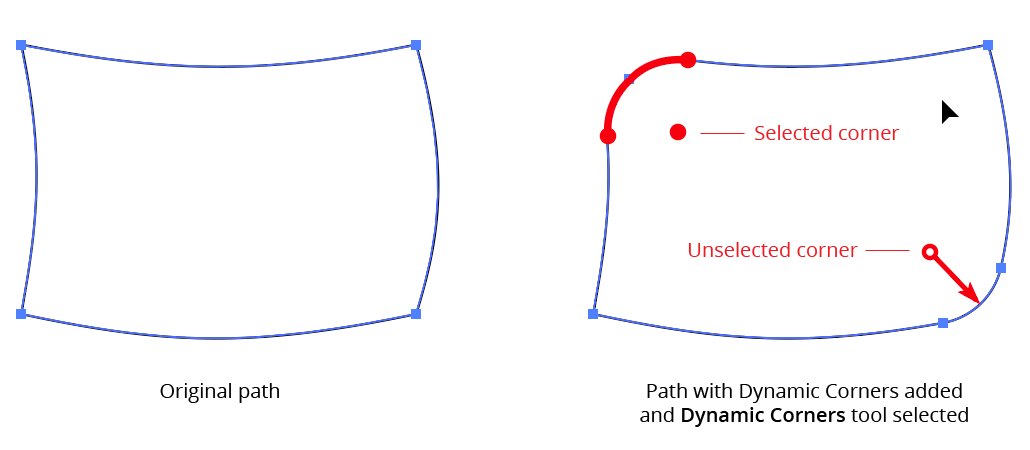
Dynamic Corner Overview Example
Creating New Corners
New Dynamic Corners can be created with the tool in four ways: by clicking on a path, by dragging on a path, by marquee-creating over one or more paths, or by converting a corner on an existing path.
Clicking
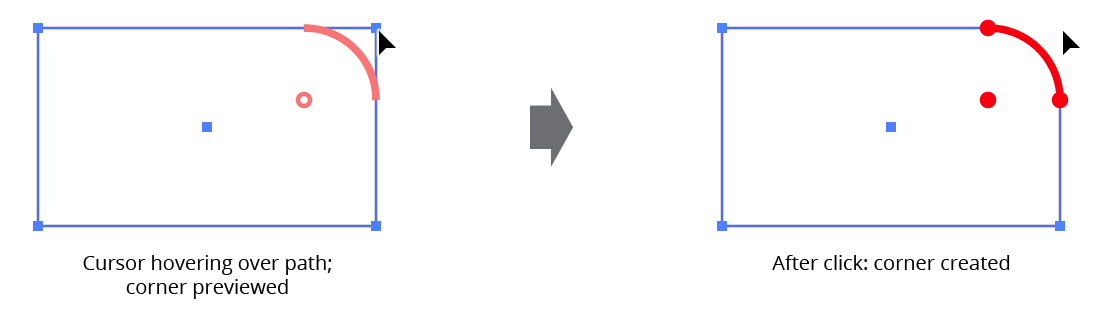
Clicking on an eligible anchor point of a path creates a Dynamic Corner at that point, with the size (when possible), type and method that are specified in the Dynamic Corners panel. The path does not need to be selected first. The corner is previewed while the cursor is hovering over the point:
Dynamic Corners click creation
Clicking is a fast way to make a new corner that matches an existing corner: by first selecting the corner you want to match, the parameters are loaded into the panel and thereby copied to any new click-created corner.
Dragging
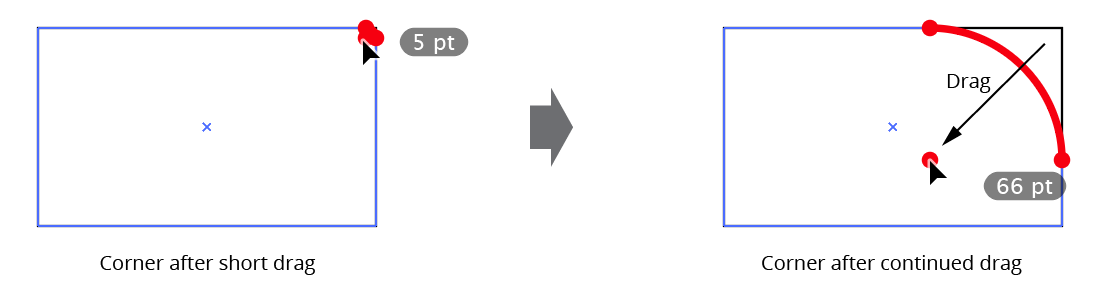
Dragging out a new corner lets you see and change its radius interactively before its creation:
Dynamic Corner drag creation
While dragging, there are several keypresses which can be used:
Shift: Constrains the radius of the corner to “nice” values. These values depend on the units in use and the zoom level. For example, when working at 100% zoom, radii specified in points are constrained to integer values while radii specified in millimeters snap to 0.25 mm increments.
Option/Alt: Shows the “zero-radius” appearance of the corner; i.e. shows the section of the path as it existed before the corner was added.
Command/Ctrl: Enables slow-drag. The cursor will show a small “S” and its movement will be divided by a value called the slow-drag divider (specifiable in the preferences), allowing finer control without having to zoom in.
Space: Hides the annotations normally associated with a Dynamic Corner.
C: Changes the corner type on the fly between Regular, Negative, and Chamfered.
M: Changes the corner method on the fly between TrueRadius, Standard, and Squircular.
U: Temporarily disables Smart Guides, if they were enabled when the drag started.
Marquee-Creating
Holding down Option/Alt when dragging out a marquee will cause all eligible points within the marquee (whether on one path or multiple paths) to have a Dynamic Corner added, with the size (when possible), type and method that are specified in the Dynamic Corners panel. The paths do not need to be selected. If Dynamic Corners already exist on any marqueed point, they will be replaced.
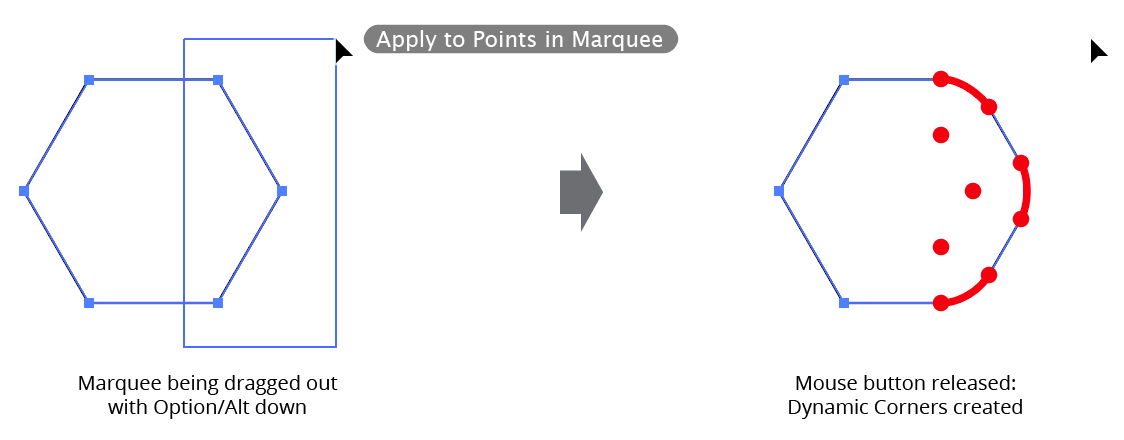
Dynamic Corner Marquee creation
If Shift is held down in addition to Option/Alt, Dynamic Corners will be added to all eligible points on all paths that are intersected by the marquee. All existing Dynamic Corners will be replaced.
Converting
If the preference Allow Hover Conversion of Individual Corners is enabled (the default), corners which are not dynamic but have the proper geometry to allow them to be recognized can be converted to Dynamic Corners by hovering over them with the cursor and clicking on them:
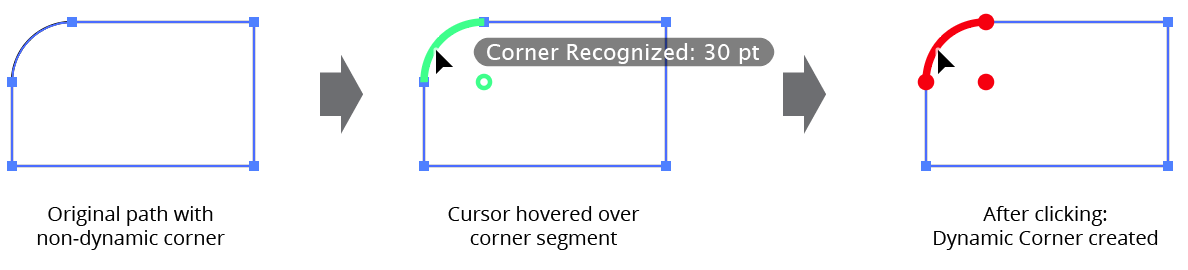
Dynamic Corner Hover converting
You may also click to convert the corner and then immediately begin dragging to edit it. Note that only Regular corners (i.e., not Negative or Chamfered corners) can be converted. To convert multiple corners in one step, use the panel menu (see Dynamic Corners Panel: Flyout Menu).
Selecting Existing Corners
To edit multiple Dynamic Corners simultaneously, they need to be selected first. To select Dynamic Corners with the tool, simply drag a marquee that encloses (or at least intersects) the desired corners, just as you would use the selection tool to select art objects. Holding Shift also works in a similar manner: corners which are Shift-marqueed have their selection state inverted. Clicking on an empty area of the canvas deselects all corners. Note that selecting a corner does not automatically select the path on which it lies.
Editing Existing Corners
Dynamic Corners are edited with the tool by dragging them to change their size. Corner may be dragged by their corner radius point, their endpoints, or their segment(s). If a corner is dragged such that its size becomes zero, it is removed when the mouse button is released. A corner may also be removed by doubleclicking its radius point. A corner which cannot be enlarged further, because one of its endpoints touches another corner or a path anchor point, will be indicated by a small circle around the endpoints which touch:
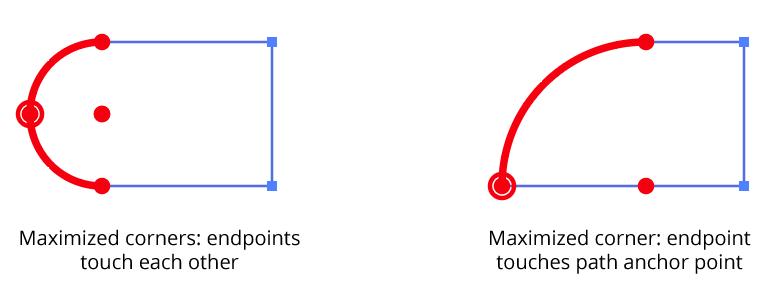
Dynamic Corners Maximized corners
When multiple corners are edited simultaneously, they are changed in a proportional manner: if the corner under the cursor has its radius changed to 50% of its original value, then all of the selected corners will have their radii changed to 50% of their original values.
While dragging, you can use the same keypresses described under Creating New Corners.
If, before starting to drag-edit a corner, Option/Alt is held down, then the corner is moved. Essentially, this is equivalent to removing the corner, moving the path’s corner anchor point, and re-applying the corner — except changes to the corner are displayed in real-time. Depending on the final geometry of the path, the corner’s radius may be forced to a smaller value. Multiple corners may be moved simultaneously.
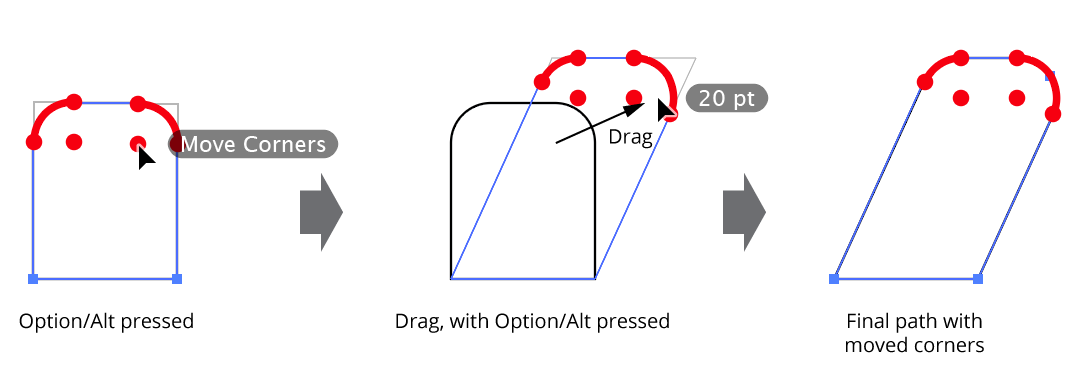
Dynamic Corners - Move dynamic corners
By default, the current radius of the corner under the cursor is displayed next to the cursor.
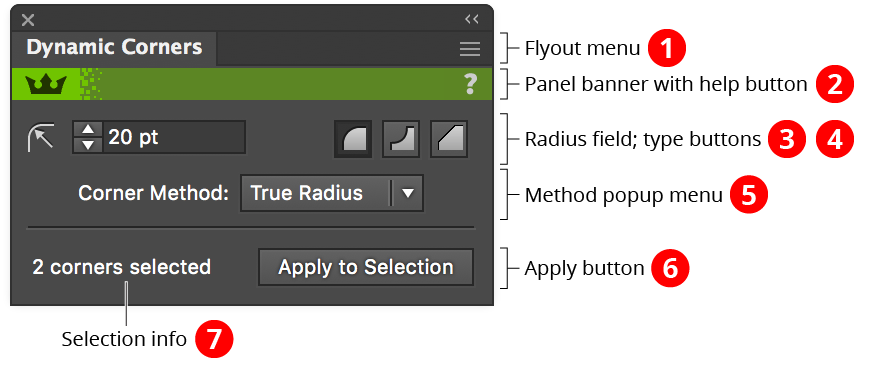
Dynamic Corners Panel
The Dynamic Corners panel is used in conjunction with the tool to change existing corners, to set the parameters that will be used for new corners, and to access several utility functions. When the Dynamic Corners tool is not in use, the panel displays only a “Click to select” message; clicking anywhere on the panel selects the tool and displays all the controls.
Dynamic Corners panel
1. Flyout menu
See Dynamic Corners Panel: Flyout Menu.
2. Panel banner
The help button on the right opens the help documentation in the Astute Manager. If this does not automatically appear, please ensure your Astute Manager is running first.
Click on the other area of the color bar to activate the Dynamic Corners tool. This is a quick method of locating the tool within the default Advanced toolbar or a custom toolbar.
3. Radius field
Specifies the radius of all selected corners, or for new corners created by clicking without dragging. If a corner cannot accommodate the specified radius, the radius will be made as large as possible.
Shift-clicking on the radius icon is a shortcut for choosing the flyout menu item Select All Corners on Selected Paths. Shift+Option/Alt-clicking on the radius icon is a shortcut for choosing the flyout menu item Convert to Dynamic Corners.
4. Type Buttons
Specifies the type of all selected corners, or for new corners created by clicking without dragging.
5. Method Popup Menu
Specifies the method of all selected corners, or for new corners created by clicking without dragging.
6. Apply Button
Applies corners (using the settings showing in the panel) to all eligible selected anchor points.
7. Selection Info
Displays the current number of selected Dynamic Corners.
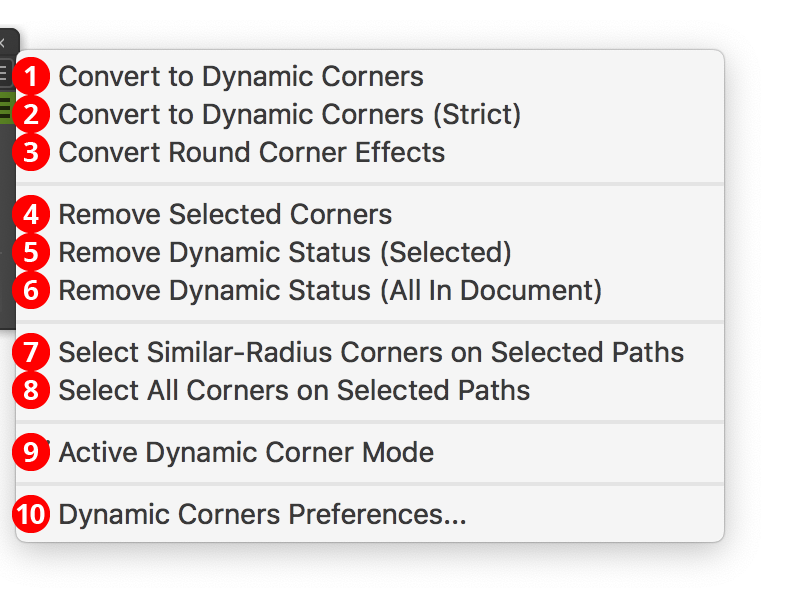
Dynamic Corners Panel Flyout Menu
Dynamic Corners panel flyout
1. Convert to Dynamic Corners
2. Convert to Dynamic Corners (Strict)
These menu items convert all Regular-type, non-dynamic corners (such as those created using Adobe’s native Live Corners) on selected paths to Dynamic Corners, when possible. If no paths are selected, all unlocked and unhidden paths in the document are considered. The “Strict” version differs in that the corner geometry must be closer to “ideal” for conversion to occur than the non-Strict version, which uses a higher tolerance. Negative corners may be detected as Regular corners facing in the opposite direction. The Dynamic Corners tool will automatically be selected afterwards if it is not already, so you can work with the new corners.
3. Convert Round Corner Effects
Converts corners on selected paths which have the native Round Corners live effect applied. If no paths are selected, all unlocked and unhidden paths in the document are considered.
4. Remove Selected Corners
Removes selected Dynamic Corners, which is equivalent to setting their radius value to zero.
5. Remove Dynamic Status (Selected)
6. Remove Dynamic Status (All In Document)
Converts all the Dynamic Corners on selected paths, or on all paths in the document, to non-Dynamic. This is recommended in a few situations, such as on artwork that is being used inside a pattern or a symbol.
7. Select Similar-Radius Corners on Selected Paths
Selects all Dynamic Corners on selected paths which have a radius that is within a tolerance of the radius of the selected corner. The tolerance value can be specified in the preferences. If no paths are selected, all similar corners in the document will be selected.
8. Select All Corners on Selected Paths
Selects all Dynamic Corners on selected paths. If no paths are selected, all corners in the document will be selected.
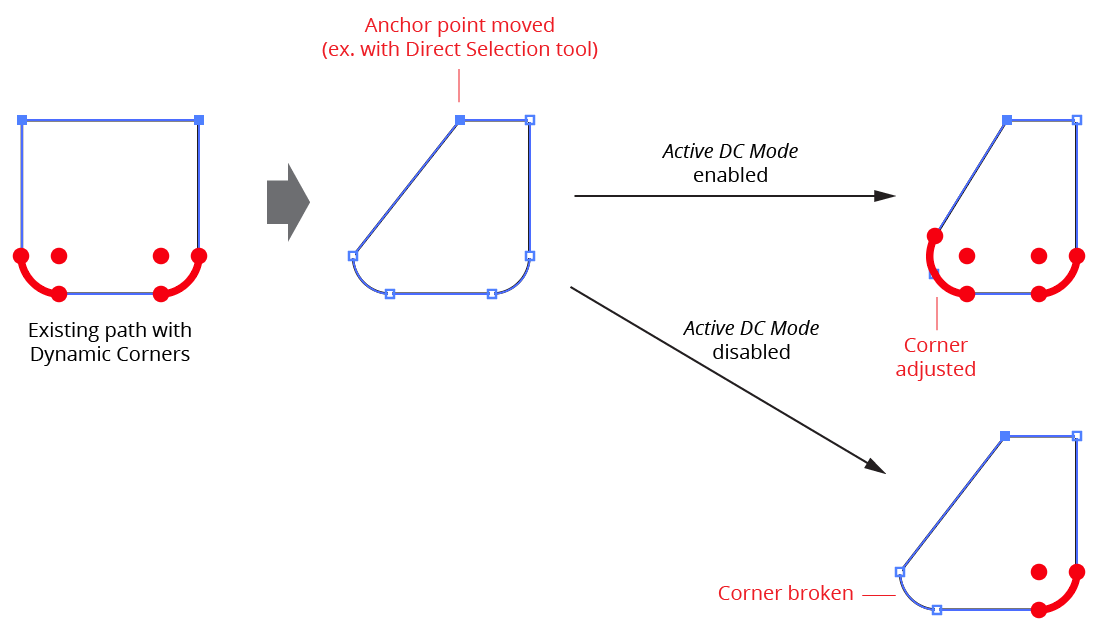
9. Active Dynamic Corner Mode
When moving an anchor point that is adjacent to a Dynamic Corner, it is best to use the Dynamic Corners tool, as it allows you to see in real-time how the adjacent corner is being affected (see Dynamic Corners Tool: Editing Existing Corners). However, when this preference is enabled (the default; indicated by a checkmark), Dynamic Corners will still monitor changes to paths which have Dynamic Corners, and, when the tool is reselected, will recalculate the corners based on the new locations of the anchor points.
Dynamic Corners active mode example
10. Dynamic Corners Preferences...
Brings up the Preferences dialog (see Dynamic Corners Preferences).
Dynamic Corners Preferences
The Dynamic Corners preferences dialog can be brought up in three ways: by choosing Dynamic Corners Preferences... in the flyout menu of the panel; by double-clicking on the Dynamic Corners tool icon in the toolbar; or by pressing the Return/Enter key when the Dynamic Corners tool is selected.

Dynamic Corners Preferences
1. Display Radius Arrow
When enabled, unselected corners are drawn with an arrow from its radius point to its segments.
2. Radius Point Style
Specifies the style to use (circle or crosshair) when drawing Dynamic Corners’ radius points.
3. Annotation Color
Chooses the color to use for corner annotation (red, blue or black).
4. Recall Last Used Between Sessions
When enabled, each time Illustrator is launched the Dynamic Corners panel will be restored to its previous settings, rather than its default settings.
5. Show Radius Annotation
When enabled, the radius of the corner under the cursor will be displayed next to the cursor.
6. Select Similar Tolerance
Specifies the tolerance to use with the menu command Select Similar-Radius Corners on Selected Paths.
7. Allow Hover Conversion of Individual Corners
Allows the Dynamic Corners tool to recognize and convert non-dynamic corners which are unlocked and under the cursor (see Dynamic Corners Tool: Creating New Corners).
8. Use Strict Tolerance
When enabled, hover converting a corner uses the stricter tolerance values as per the flyout menu command Convert to Dynamic Corners (Strict).
9. Confirm Corner Conversion
After converting corners with one of the panel flyout menu commands, a confirmation message is briefly displayed on-screen, indicating the number of paths which were successfully converted.
10. Selection Change Deselects Corners
When enabled, selecting or deselecting artwork automatically deselects all Dynamic Corners.
11. Remove Dynamic Status of All Corners When Tool is Deselected
When enabled, the dynamic status of all Dynamic Corners in the document is removed when switching to another tool. To edit these corners again, they would need to be converted back to Dynamic Corners.
12. Slow-Drag Divider
The amount to “gear down” the cursor movement when a slow-drag is being performed. It can range from 1.0 (which results in no reduction in speed) to 100.0 (extreme reduction), with a default of 5.0. See Dynamic Corners Tool: Creating New Corners.
13. Reset Warning Dialogs Button
If one or more of Dynamic Corners’ warning dialogs have been suppressed using the “Don’t Show Again” checkbox, pressing this button will re-enable those warnings.
14. Informational area
Shows a brief description of each preference setting when the cursor is being held over it.
15. Help Button
Opens the help documentation in the Astute Manager. If this does not automatically appear, please ensure your Astute Manager is running first.