Crop
Rasterino Panel
Crop Image Tool
 Crop Image Tool
Illustrator Location:
Illustrator Main Menu > Window > Astute Graphics > Rasterino
The menu item to show and hide the Rasterino panel can be found in the main menu under Window > Astute Graphics > Rasterino.

Rasterino Panel
1. Flyout menu
Contains a single menu item which brings up the Preferences dialog for the Crop Image tool (see Crop Image: Preferences).
2. Panel banner
The Rasterino panel banner has a help button on the right which opens the help documentation in the Astute Manager. If this does not automatically appear, please ensure your Astute Manager is running first.
3. Link Image button
Available if at least one embedded image is selected; clicking the button brings up the Link Embedded Image dialog, which allows you to change the selected embedded image(s) into linked images (in .psd format).

Rasterino Link Embedded Image Dialog
A. File Name: The user-specified name of the linked file which will be created from the embedded image. The default name is FileName + “ Image” (with an additional numerical suffix if either the base name already exists or multiple embedded files are being linked) but can be changed as desired.
B. Location: Shows the location where the new linked files will be saved. By default, this is the same folder as the document.
C. Change button: Allows you to specify a different location for the new linked files. Clicking the button brings up a standard OS platform dialog, allowing you to choose the folder.
D. Image Information area: Previews the embedded image and displays its color mode, size in pixels, resolution, and whether an alpha channel is present.
E. OK/Next button: If a single embedded image is being linked, the button will say OK, and clicking it will change the embedded image into a linked image using the specified name and location. If multiple embedded images are being linked, the button will say Next and each click on it will link the current image and proceed to the next image.
F. Skip button: Available when linking multiple images; it skips over the current image.
G. Link All button: Available when linking multiple images; it is the same as repeatedly clicking the Next button, using automatically-generated names. For example, if the initial file was named “Sunshine”, then subsequent files would be called “Sunshine 2”, “Sunshine 3”, etc.
H. Cancel button: Exits the dialog without linking any additional images (images which were already linked using the Next button will remain linked).
Note: If images were linked but the Undo command then used to change them back to embedded images, the created image files will remain on your disk.
4. Edit Image button
Available if at least one embedded image is selected; clicking the button saves each image to a temporary file and then opens it in Photoshop (or whichever application you have configured to handle .psd format files). The application will automatically be launched if it is not already running. The image(s) can then be edited and resaved.
5. Update Image button
After editing and resaving an image using the Edit Image button, returning to Illustrator and clicking the Update Image button will update the linked item to the edited version. For edits which change the pixel dimensions of the image, the upper left corner is held constant. Images should not be edited in Illustrator (such as moving or rotating it) between the time it was externally edited and updated, or the external edits may be lost.
6. Trim Image button
Available if at least one embedded image is selected; clicking the button brings up the Trim Image dialog, which allows the selected image or images to be trimmed based on either transparency or the color of the pixel in the upper left or lower right corners. This reduces the size of an image and is commonly used when there are transparent or white pixels around an image which are unnecessary.
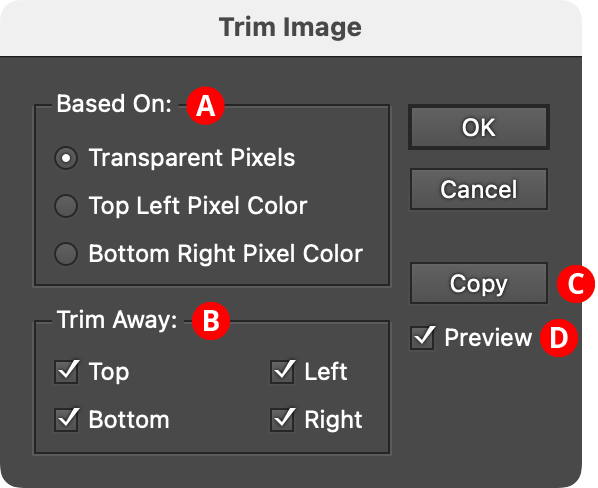
Rasterino Trim Image Dialog
A. Based On: Specifies the color of the pixels which should be trimmed from the image. Transparent Pixels removes pixels which are fully transparent. Top Left Pixel Color or Bottom Right Pixel Color get the color from the corresponding location of the image.
B. Trim Away: Specifies which edge(s) to trim: Top, Bottom, Left, or Right. For a row or column of pixels to be trimmed off, all the pixels in the row or column must match the target color.

Rasterino Trim Image Example
C. Copy button: Acts the same as the OK button, but trims a duplicate of the image, leaving the original unchanged.
D. Preview checkbox: When enabled, the selected image art is dynamically updated on the artboard to show its trimmed state using the current parameters.
7. Crop Image button
Available if at least one embedded image is selected; clicking the button brings up the Crop Image dialog which allows the image(s) to be cropped numerically (for more interactive cropping, the Crop Image tool may be used). Unlike the native Crop Image command, the Rasterino function can sensibly crop an image which has been rotated and/or sheared, retaining those transforms.

Rasterino Crop Image Dialog
A. Original Size: Shows the pre-cropped size of the image, in pixels.
B. Cropping Method: Specifies whether the width and height values are specifying an absolute size or the values by which the original size is reduced. For example, if the image is 80 × 80 pixels, and the method is set to Absolute Size, then changing the Width value to 60 image pixels would result in the cropped image being 60 × 80 pixels; whereas using the Reduce By method would result in the image being 20 × 80 (because 80 – 60 is 20).
C. Width/Height: The cropping amounts, either as absolute sizes or reductions in size, depending on the cropping method chosen. Units of cropping may be chosen from among image pixels, points, inches, millimeters, or centimeters. Reverse cropping is not allowed, and if either value results in an final width or height equal to zero, the image will simply be deleted.
D. Anchor grid: Sets the direction from which cropping will occur, similarly to the one in Photoshop’s Canvas Size dialog.

Rasterino Crop Image Examples
E. Constrain Crop to Image’s Pixel Grid: When enabled, cropping values not set to image pixels will be rounded to the nearest value which lands on a pixel boundary. Use caution when this option is not enabled, because the image may be non-uniformly scaled when the crop position does not fall on a pixel boundary (because the image must have an integral number of pixels in both dimensions, it must be scaled to match the crop position):

Rasterino Crop Image Constraining
8. Remove Image Transforms button
Removes rotations and shearing from the selected linked or embedded images. For linked images, the original size is also restored. However, this information is not stored for embedded images, so their resulting size simply reflects the scaling value that remained after removing the rotational and shear transforms. To force images to 72 ppi resolution, hold down Shift while clicking the button. If the button is disabled even though there are selected images, then those selected images have no transforms that can be removed.

Rasterino Remove Image Transforms
The untransformed image is positioned relative to the original image using the anchor nine-block control (see below).
9. Resolution
Shows the current effective resolution of the selected image(s), from 1 ppi to 29999 ppi. Image resolution is inversely proportional to its scaling, so changing the resolution is the same as scaling the image. For example, if an image with a resolution of 72 ppi is changed to 144 ppi, it will become half the size. A warning icon will be displayed if an image’s horizontal resolution is different from its vertical resolution; in this case the value field will show an average of the two resolutions.

Rasterino Panel with Transformed Linked Image Selected
There are two ways to remove nonproportional scaling. First, the warning icon can be clicked. Second, a new resolution can be entered. In either case, both the horizontal and vertical dimensions are changed to the same value, thereby removing nonproportional scaling. However, the image may still include rotational and/or shearing transforms (to remove these, use the Remove Image Transforms button; see above).
10. Anchor Nine-Block Control
If the resolution of an image is changed, or its transforms removed (which also causes it to change size), this control specifies where the resized image will be positioned in relation to the original image.
Illustrator Location:
Advanced Toolbar > Eraser Stack > Crop Image Tool
Tool Location and Cursor Appearance
The Crop Image tool included in Rasterino appears in Illustrator’s main toolbar (which must be in Advanced mode: View > Toolbars > Advanced), stacked under the native Eraser, Scissors, and Knife tools. As with other stacked tools, click and hold on the top tool icon to display the tools stacked under it.
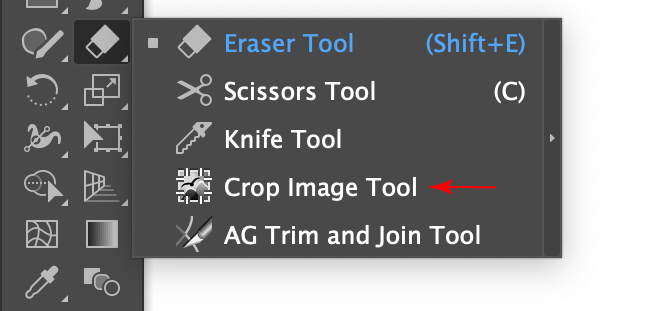
Crop Image Tool Location
The Crop Image tool’s primary cursor is an arrow with a small crop badge; when the tool is dragging an annotation control, it displays as a circle with small arrows:

Crop Image Cursors
Illustrator Location:
Advanced Toolbar > Eraser Stack > Crop Image Tool
The Crop Image tool is simple to operate. If one or more embedded images are selected when the tool is selected, then the tool’s annotated controls are immediately displayed for the topmost image, starting at its original (uncropped) bounds. Otherwise, an image may be clicked or marqueed with the tool to make it the active image (Crop Image only crops a single image at a time). By default, the cropping controls are accompanied at their lower right by a small red annotated panel which displays the image’s original size (in pixels) and its current cropped size; it also has a Close button, a Reset button, and an Apply button. The annotated panel may be repositioned by dragging on either its top bar or its informational area.
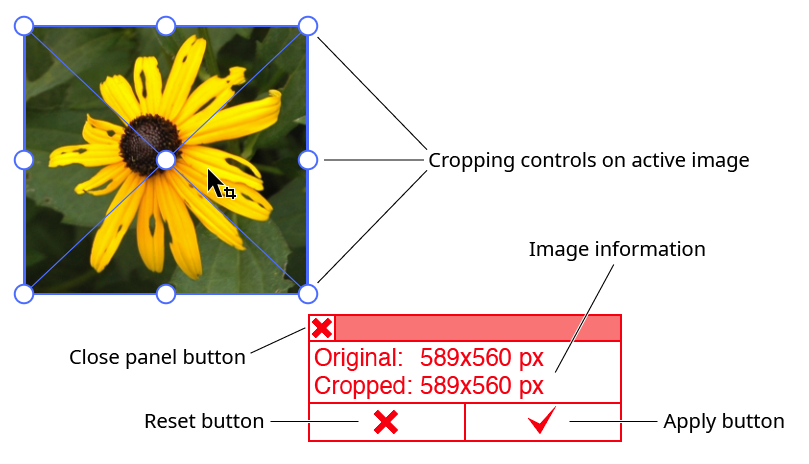
Rasterino Crop Image Controls
The cropping controls consist of nine small hollow circles, which specify the corners, mid-edges, and center of the crop box. Dragging any of the outer circles resizes the crop box, with the opposite circle as the anchor. Dragging the central circle repositions the entire crop box. Holding down Shift while dragging one of the outer circles will resize the crop box in a proportional manner. Holding down Shift while dragging the center circles constrains movement to the horizontal or vertical direction. Holding down Option/Alt while dragging an outer circle will resize the crop box from the center.
By default, the portions of the image which will be cropped off are darkened, to make the retained area easier to visualize. Cropping can only be done inwards (making the image smaller).

Rasterino Crop Image in Action
Images which have rotational and/or shear transformations applied may still be cropped with the tool:

Rasterino Crop Image with Sheared Image
If a cropping operation is started but not applied, and a different image selected or the tool deselected, then the next time the tool and the image are selected, the previous crop data will be restored.
The Reset button on the annotated panel resets the crop box to the original image’s bounds. The Apply button (or pressing the Enter key) finalizes the crop.