 Phantasm Panel
Menu items to show and hide the Phantasm panel can be found in the main menu under Window > Astute Graphics > Phantasm. Be default, all of Phantasm’s effects are shown on the panel, but, except for the top four effects (Levels, Curves, Duotone, and Halftone), they can be individually hidden or shown through the flyout menu. The lower effects include controls such as sliders which can be used to instantly adjust artwork without having to use a parameters dialog. However, for Brightness/Contrast, Hue/Saturation, and Exposure, not all parameters are adjustable directly on the panel. If multiple copies of an effect are present in the targeted artwork, only the parameters from the last copy are reflected on the panel.
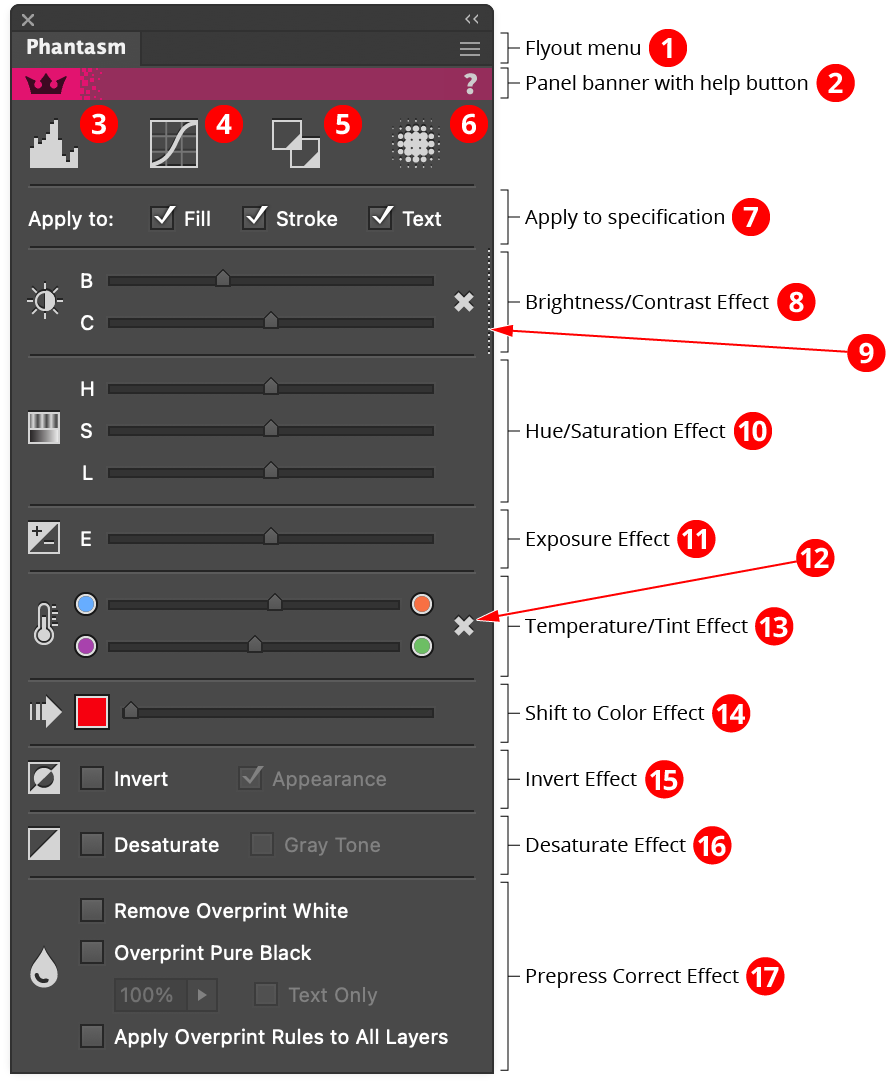
Phantasm Panel Overview
1. Flyout menu
See Phantasm Panel: Flyout Menu.
2. Panel banner
The help button on the right opens the help documentation in the Astute Manager. If this does not automatically appear, please ensure your Astute Manager is running first.
3. Levels Effect
Clicking the icon will apply the Levels effect to the targeted artwork (if not already applied) and then open its parameters dialog. Option/Alt-clicking the icon will apply Levels as a filter instead. Read more about Levels.
4. Curves Effect
Clicking the icon will apply the Curves effect to the targeted artwork (if not already applied) and then open its parameters dialog. Option/Alt-clicking the icon will apply Curves as a filter instead. Read more about Curves.
5. Duotone Effect
Clicking the icon will apply the Duotone effect to the targeted artwork (if not already applied) and then open its parameters dialog. Option/Alt-clicking the icon will apply Duotone as a filter instead. Read more about Duotone.
6. Halftone Effect
Clicking the icon will apply the Halftone effect to the targeted artwork (if not already applied) and then open its parameters dialog. Option/Alt-clicking the icon will apply Halftone as a filter instead. Read more about Halftone.
7. Apply to Specification
The checkboxes reflect the “Apply to:” settings found in the Basic options of each applied effect, except for Duotone, Halftone, and Prepress Correct. See Phantasm: Common Options (Basic).
8. Brightness/Contrast Effect
Clicking the icon will apply the Brightness/Contrast effect to the targeted art (if not already applied) and then open its parameters dialog. Option/Alt-clicking the icon will apply Brightness/Contrast as a filter instead. The sliders may also be used to instantly apply the effect (if not already applied) and adjust the Brightness and Contrast parameters qualitatively.
9. Hidden Effect Indicator
When a dotted line appears at the right edge of an effect (the four top effects share a single indicator), it means that the effect has been applied to the targeted artwork but has been hidden using the Appearance panel. Clicking the indicator will make the effect visible.
10. Hue/Saturation Effect
Clicking the icon will apply the Hue/Saturation effect to the targeted artwork (if not already applied) and then open its parameters dialog. Option/Alt-clicking the icon will apply Hue/Saturation as a filter instead. The sliders may also be used to instantly apply the effect (if not already applied) and adjust the Hue, Saturation and Lightness parameters of the Master channel qualitatively. To use Colorize mode or adjust channels other than Master, open the full parameters dialog by clicking the icon.
11. Exposure Effect
Clicking the icon will apply the Exposure effect to the targeted artwork (if not already applied) and then open its parameters dialog. Option/Alt-clicking the icon will apply Exposure as a filter instead. The sliders may also be used to instantly apply the effect (if not already applied) and adjust the Exposure parameter qualitatively. To adjust the Offset or Gamma parameters, open the full parameters dialog by clicking the icon.
12. Remove Effect Button
Each effect that has been applied to at least one targeted object will display this button, which may be clicked to remove the effect from all targeted objects.
13. Temperature/Tint Effect
Clicking the icon will apply the Temperature/Tint effect to the targeted art (if not already applied) and then open its parameters dialog. Option/Alt-clicking the icon will apply Temperature/Tint as a filter instead. The sliders may also be used to instantly apply the effect (if not already applied) and adjust the Temperature and Tint parameters qualitatively.
14. Shift to Color Effect
Clicking the icon will apply the Shift to Color effect to the targeted art (if not already applied) and then open its parameters dialog. Option/Alt-clicking the icon will apply Shift to Color as a filter instead. The color chip may be clicked to pick a color, and the slider may also be used to instantly apply the effect (if not already applied) and adjust the Shift parameter qualitatively.
15. Invert Effect
Clicking the icon will apply the Invert effect to the targeted art (if not already applied) and then open its parameters dialog. Option/Alt-clicking the icon will apply Invert as a filter instead. The checkbox may be used to instantly apply the effect (if not already applied) and the Invert Appearance parameter may be toggled with the second checkbox.
16. Desaturate
Clicking the icon will apply the Desaturate effect to the targeted art (if not already applied) and then open its parameters dialog. Option/Alt-clicking the icon will apply Desaturate as a filter instead. The checkbox may be used to instantly apply the effect (if not already applied) and the Gray Tone parameter may be toggled with the second checkbox.
17. Prepress Correct Effect
Clicking the icon will apply the Prepress Correct effect to the targeted art (if not already applied) and then open its parameters dialog. Option/Alt-clicking the icon will apply Prepress Correct as a filter instead. The Remove Overprint White and Overprint Pure Black checkboxes may be used to instantly apply the effect (if not already applied) and turn on those options. When the Apply Overprint Rules to All Layers checkbox is enabled, the Prepress Correct effect is immediately applied to all layers in the document, and will be added to any new layers that are subsequently created.
Phantasm Panel Flyout Menu
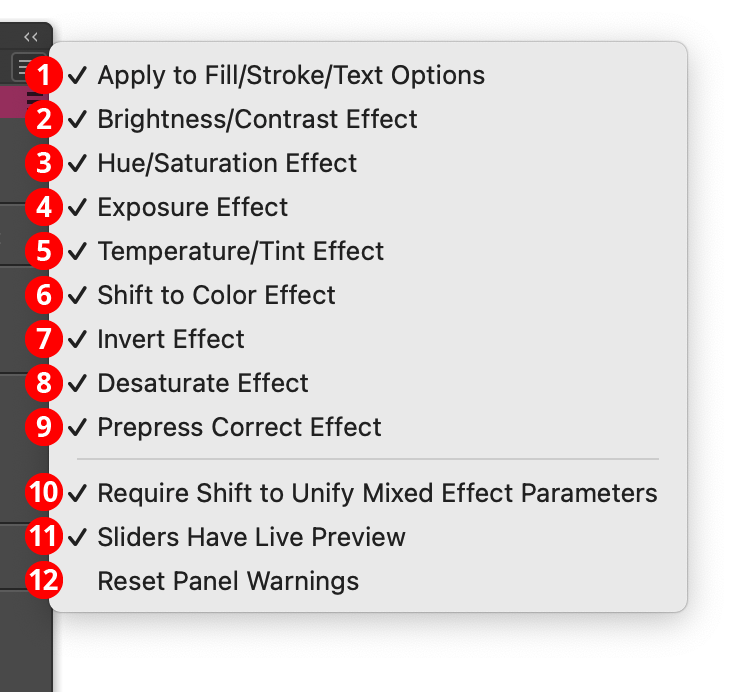
Phantasm Panel Flyout Menu
1. Apply to Fill/Stroke/Text Options...
Shows or hides the “Apply to” specification area near the top of the panel. A checkmark symbol means the area will be shown on the panel.
2–9. Effect Areas
Shows or hides the corresponding effect from the panel. Hiding effects that you never use makes the panel smaller and less cluttered, and therefore easier to focus on the effects that you do use. A checkmark symbol appears next to each effect which will be included on the panel.
10. Require Shift to Unify Mixed Effect Parameters
When multiple objects with different live effect parameters are targeted, the Appearance panel will display Mixed Appearances. Normally, the parameters dialog for an effect with different parameters is prevented from being opened because the clickable entry in the Appearance panel with the live effect’s name is simply not present. However, since the Phantasm panel has the ability to open the parameters dialog by clicking on the effect’s icon, it also allows you to automatically unify the parameters (that is, make them the same for all objects, using the bottommost object as the “master”) and therefore allow the dialog to open. By default, this requires holding the Shift key when clicking the icon so that parameters are not unified inadvertently, and if the icon is clicked without Shift when Mixed Appearance is showing, the following dialog will appear:
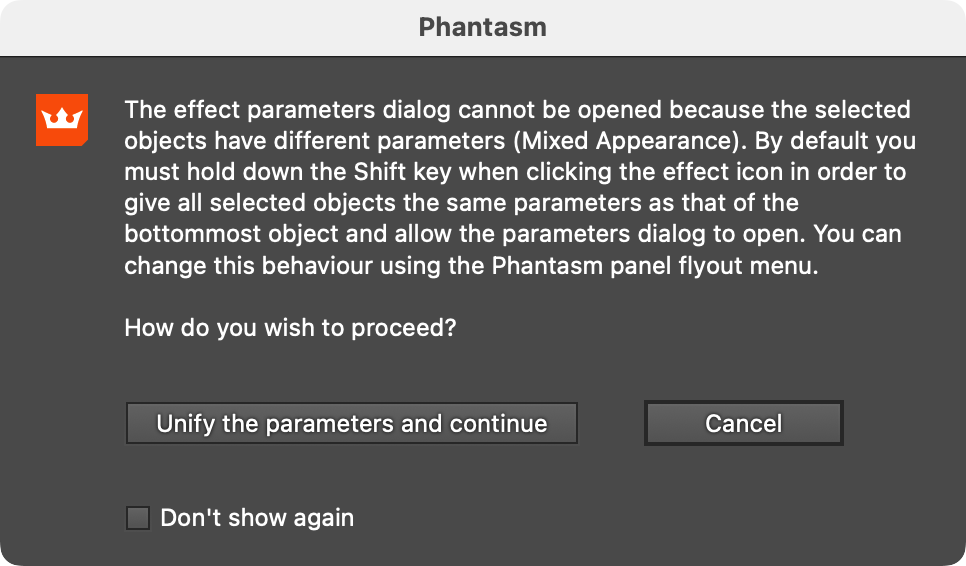
Phantasm Mixed Appearance Warning Dialog
If you are aware of the unifying behavior when dealing with mixed appearances and want to avoid having to hold Shift, you may wish to turn off the Require Shift to Unify Mixed Effect Parameters preference.
11. Sliders Have Live Preview
When enabled, dragging one of the sliders on the Phantasm panel will update the artwork in real time instead of only when the mouse button is released. Pressing the Shift key when dragging will temporarily invert the preference setting (e.g., if live preview is off, it will turn it on while the modifier key is down).
12. Reset Panel Warnings
Available when a panel warning or notification has been hidden with Don’t show again; it will allow the warning or notification to be displayed once again.
Phantasm Select Menu Additions
Phantasm adds several new entries to the native Select menu, thereby expanding the range of objects which can be quickly selected:
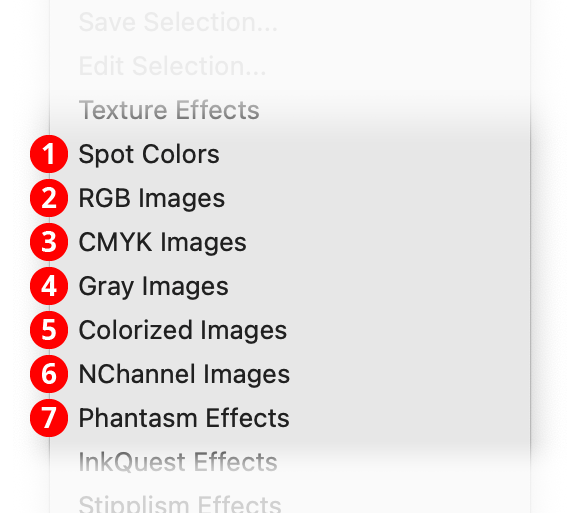
Phantasm Select Menu Additions
1. Spot Colors
Selects art objects which contain spot colors.
2. RGB Images
Selects embedded images which are in RGB format.
3. CMYK Images
Selects embedded images which are in CMYK format.
4. Gray Images
Selects embedded images which have a single channel, and are therefore in grayscale (8 bits per pixel) or bitmap (1 bit per pixel) format.
5. Colorized Images
Selects embedded images which are in grayscale or bitmap format and have been assigned a fill color to colorize them.
6. NChannel Images
Selects embedded images which are in “Device-N” (multichannel) format.
7. Phantasm Effects
Selects art objects which have at least one Phantasm live effect applied to them.