Trim Paths
![]() Dynamic Sketch Tool
Dynamic Sketch Tool
![]() AG Trim and Join Tool
AG Trim and Join Tool
 Extend Path Tool
 QuickOps Panel
Illustrator Location:
As the Dynamic Sketch tool has several keypresses which can add or change its functionality, we suggest installing the free Astute Graphics plugin Astute Buddy, which creates a panel that dynamically updates to inform you of the various keys which can be pressed in the tool’s current context.
Nearly all the functionality of the Dynamic Sketch tool is controlled by the associated Dynamic Sketch panel, which should be open and accessible.
At its most basic, the Dynamic Sketch tool is a direct replacement for the native Pencil tool: dragging the tool on the artboard creates a trail of points, referred to here as a “sketch path.” By default, the cursor is pulled by a “string” which is 50 pixels long, which creates smoother paths. When the mouse button is released, the points are converted to a path using various settings which determine how faithfully the path should conform to the original input points, whether anchor points are automatically created at horizontal and vertical tangencies, and so on. The new path’s style depends on several settings as well. By default, the path will have a stroke of variable width (ranging from 0 to 8pt), with the stroke weight determined by the speed that the cursor was moved across the artboard (faster speeds equating to a thinner weight). As the path is being drawn, the weight of the stroke will, by default, be previewed on the screen.
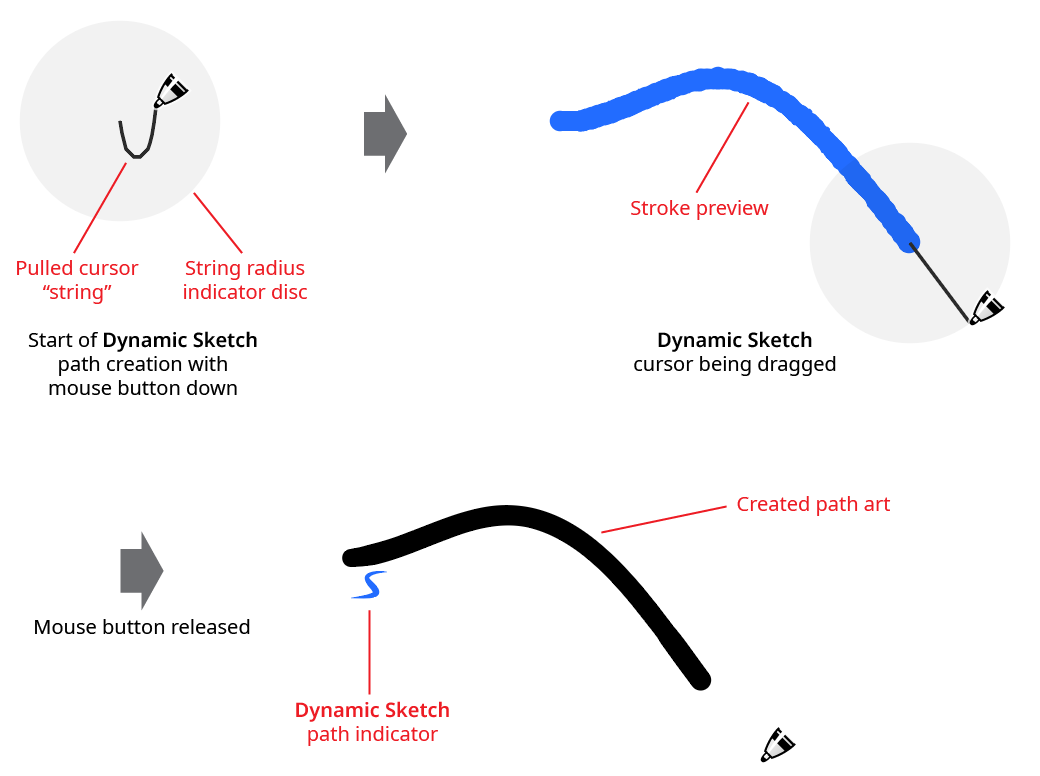
Dynamic Sketch Basic Example
Generally, Dynamic Sketch paths remain “live” after creation: their smoothness, accuracy, and stroke weight input parameters can be freely changed using the Dynamic Sketch panel controls to update the artwork. A path which is a live Dynamic Sketch path will, by default, have a small blue “S” icon annotated by the start of the path. If the path is not selected, the icon will be dimmed.
The default behavior of the tool is to allow editing, continuing, and joining paths. In each of these cases, the tool’s cursor will display a small “links” badge next to it to indicate that dragging it from the current point will not create a new path, but will instead edit, continue, or join the existing path, which can be a Dynamic Sketch path or a path created by another tool.
If the cursor is dragged from a spot along an existing path, the path will be edited to have a new shape:
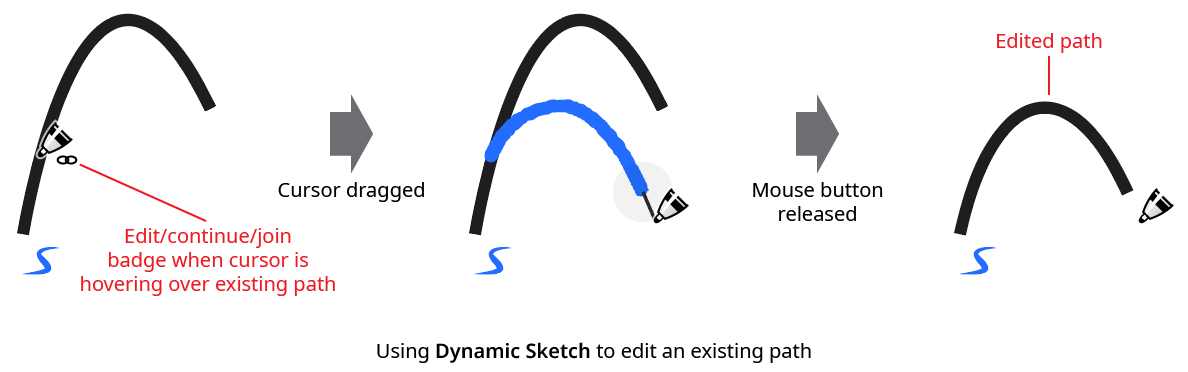
Dynamic Sketch Edit Path
If the cursor is dragged from an endpoint of an existing path, the path will be continued, with a new section added:
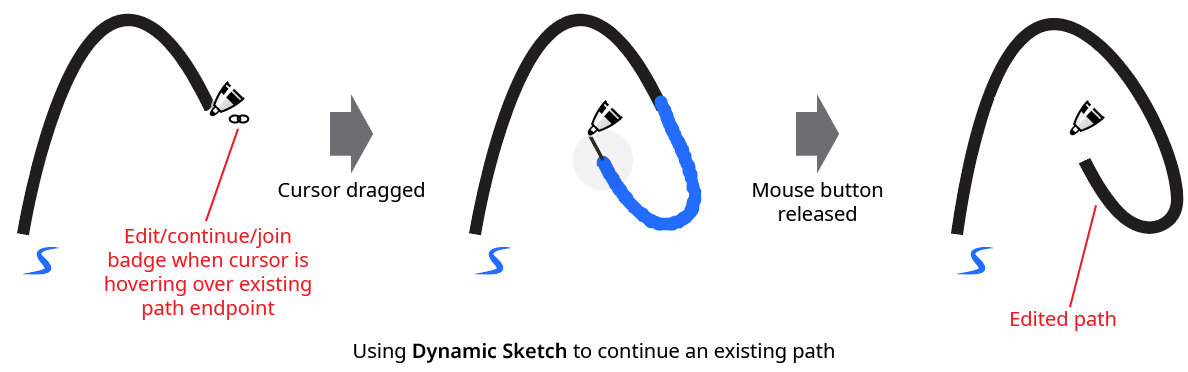
Dynamic Sketch Continue Path
Finally, if the cursor is dragged from one endpoint of an existing path to another endpoint, the path will be joined to another path (an open path can also be closed by connecting its endpoints):
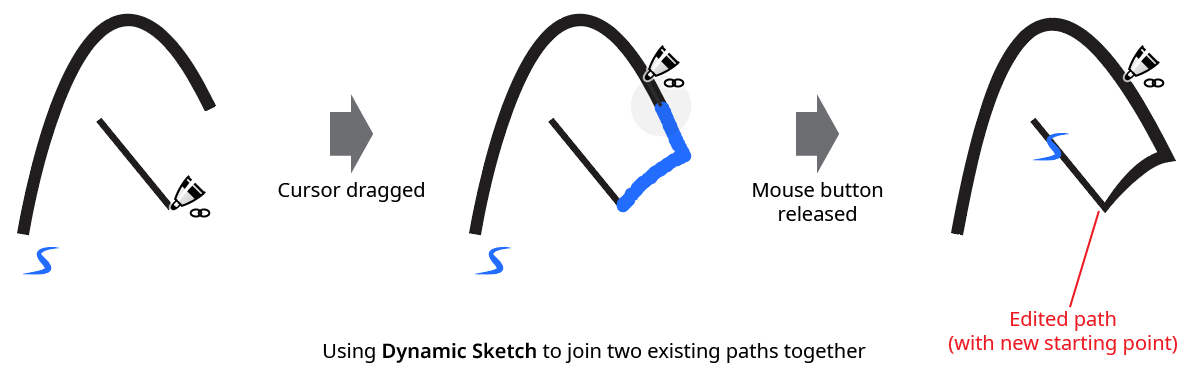
Dynamic Sketch Join Path
When joining one path to another and their stroke widths are different, the width will be blended in an attempt to join them smoothly. Tolerance values for determining how close the cursor must be to edit, continue, or join can be set in the preferences.
While dragging the tool to create a path, several keys may be pressed to held down for additional options:
Esc: Aborts the path currently being drawn.
Option/Alt: Starts a “rubberband” section – a completely straight section of path that stretches between the point at which the modifier key was held down and the point at which it is released:
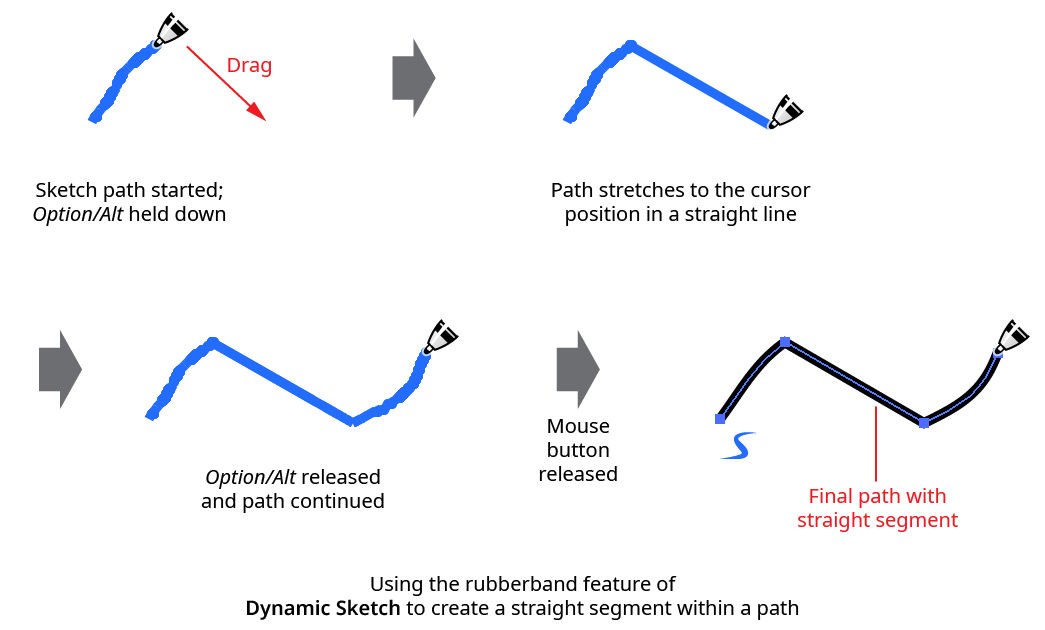
Dynamic Sketch Rubberband Example
Shift: When creating a rubberband section, constrains the rubberband to angles that are 45° increments around the general constrain angle.
Up Arrow/Down Arrow: Lengthens or shortens the pulled cursor string length.
C: Changes the annotation color among the following choices: blue (default), red, magenta, green, cyan, and black.
E: Toggles Edit/Continue/Join mode (discussed previously).
M: Toggles annotation mirroring (see Dynamic Sketch: Preferences).
S: Toggles stroke width preview (see Dynamic Sketch: Preferences).
Other features and operations of the Dynamic Sketch tool are discussed in conjunction with the Dynamic Sketch panel, below.
Illustrator Location:
As the AG Trim and Join tool has several keypresses which can add or change its functionality, we suggest installing the free Astute Graphics plugin Astute Buddy, which creates a panel that dynamically updates to inform you of the various keys which can be pressed in the tool’s current context.
Much of the functionality of the AG Trim and Join tool is also available in the Dynamic Sketch tool. However, that tool requires the Shift modifier key to be pressed to enable trimming, and does not offer style-dependent joining.
To use the AG Trim and Join tool, simply drag it across a path, over the part that you want removed. A dashed line (blue by default) will show you the path of the tool. Cuts are made at the nearest intersection with another path, not at the position where the tool was dragged over the path:

AG Trim and Join Tool Trimming Example
Multiple paths may be trimmed in one pass:

AG Trim and Join Tool Trimming Multiple Paths Example
For closed paths to be trimmed, they must be intersected in at least two positions by another path (or must self-intersect). However, only one section of a closed path can be trimmed at a time:
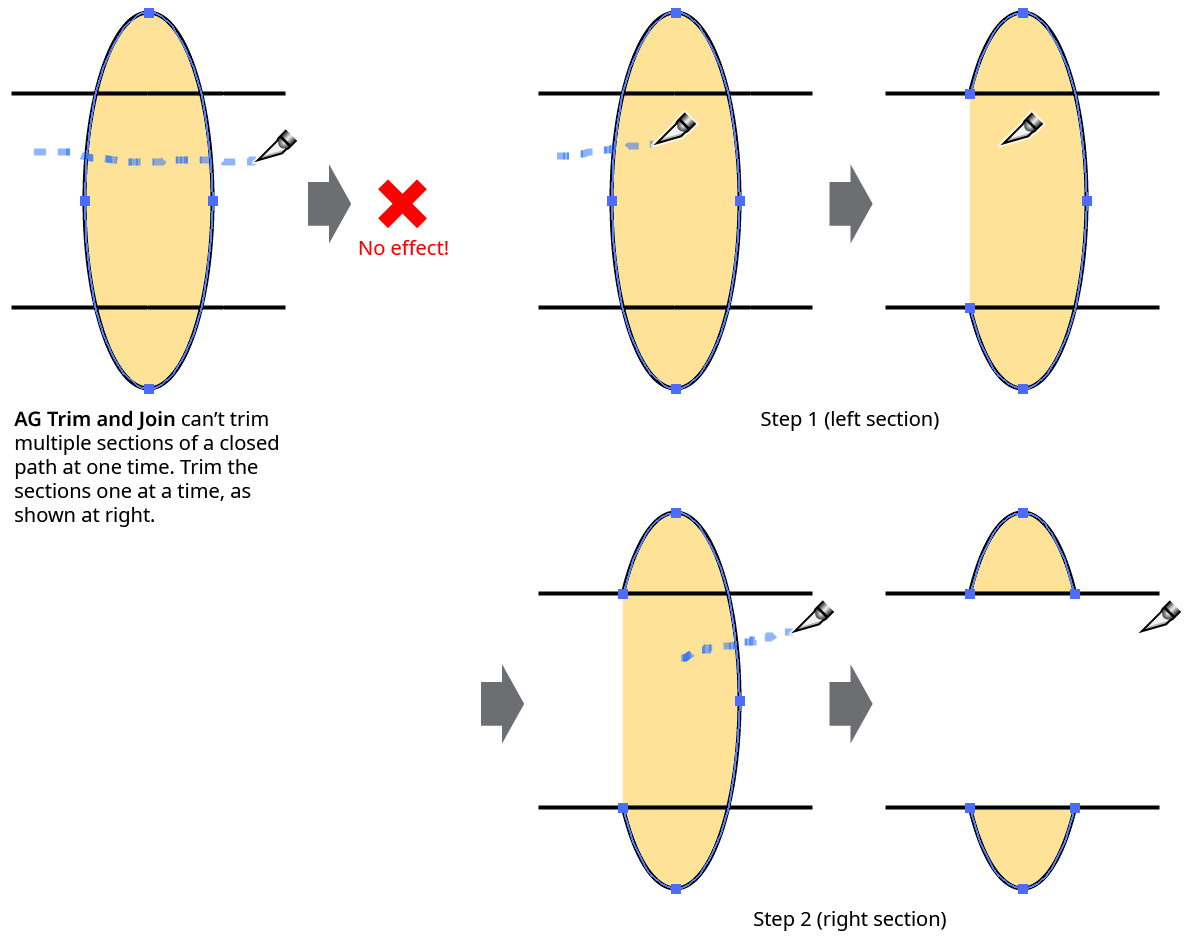
AG Trim and Join Tool Trimming Closed Path Example
The path(s) to be trimmed need not be selected. However, if the preference Prefer Selected Paths is enabled, then when the tool is dragged across a mix of both selected and unselected paths, only the selected paths will be trimmed.
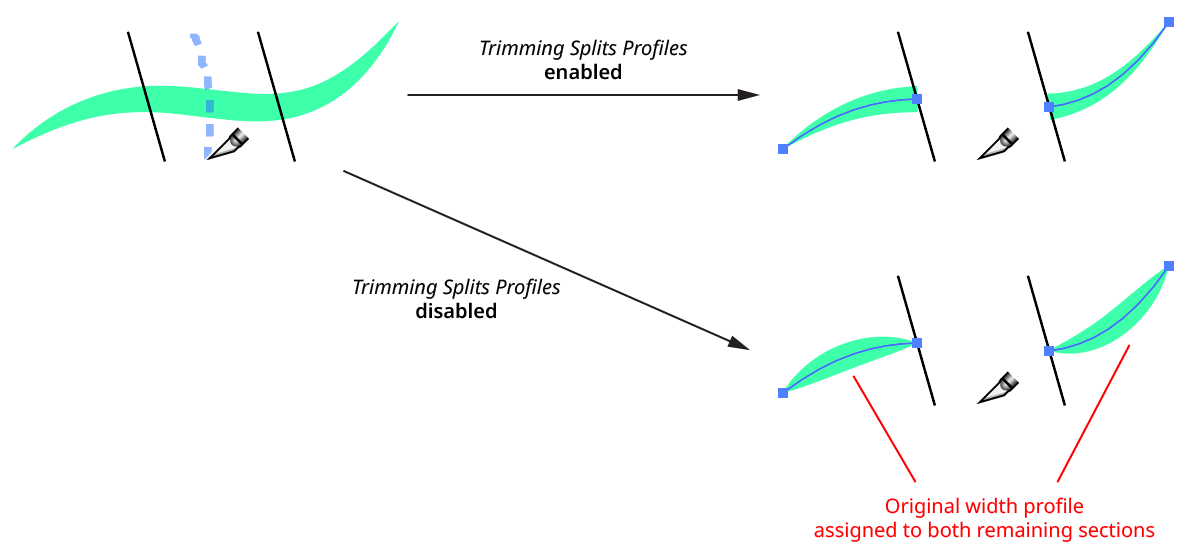
When a path with a variable width stroke is trimmed, by default AG Trim and Join attempts to retain the width profile(s) of the untrimmed section(s) as they existed prior to the trimming. This behavior may be adjusted using the tool preference Trimming Splits Profiles.
AG Trim and Join - Variable Width Stroke
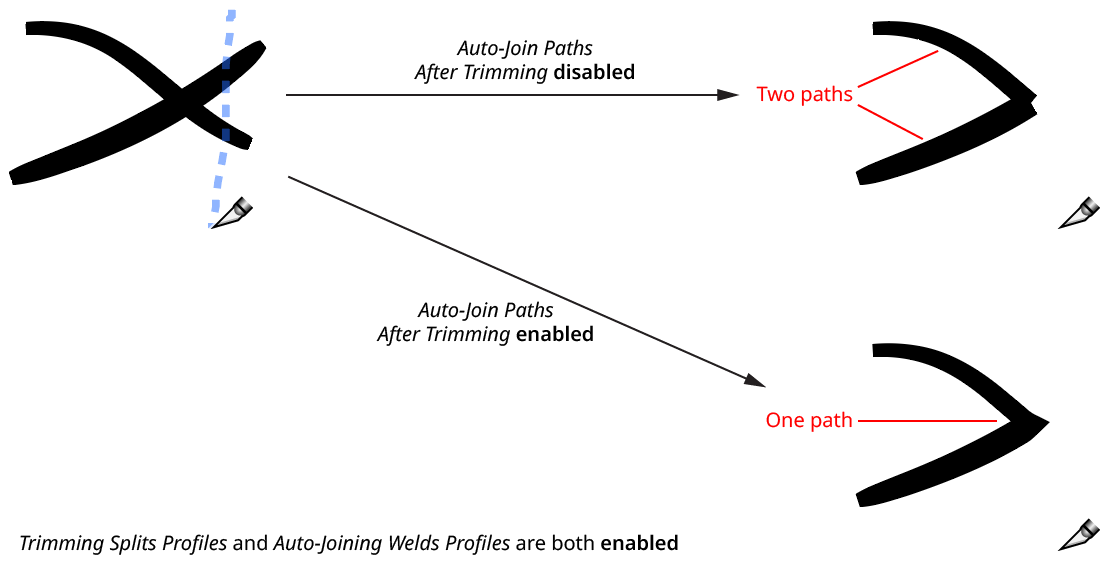
If the tool preference Auto-Join Paths After Trimming is enabled, trimmed paths which contain an endpoint which is at the same spot as another path endpoint will be joined to that path (unless sub-preferences are set which only allow joining under certain circumstances; see AG Trim and Join: Preferences).
AG Trim and Join Tool - Auto-Join Paths Example
When paths with variable stroke widths are auto-joined, by default the stroke width profiles of each section will be preserved as best as possible, by “welding” together the profiles of each half. Note that this is in contrast to joining the paths with the native Command/Ctrl-J, which instead takes the entire stroke width profile for the joined path from the topmost of the original paths. However, the native behavior can be emulated using the tool preference Joining Welds Profiles.
Keypresses
While dragging the tool to trim a path, several keys may be pressed to held down for additional options:
Esc: Aborts the current trim operation (nothing will happen when the mouse button is released).
Option/Alt: Starts a “rubberband” section – a completely straight section that stretches between the point at which the modifier key was held down and the point at which it is released.
Shift: When creating a rubberband section, constrains the rubberband to angles that are 45° increments around the general constrain angle.
C: Changes the annotation color (for the dashed line preview) among the following choices: blue (default), red, magenta, green, cyan, and black.
D: Forces variable width profiles not to be split for the current operation, even when the preference is set to split them.
J: Forces joining of paths for the current operation, even when the preference is set to not join.
N: Forces no joining of paths for the current operation, even when the preference is set to join.
S: Forces variable width profiles to be split for the current operation, even when the preference is set to not split them.
Illustrator Location:
Advanced Toolbar > PathScribe Stack > Extend Path Tool
To use the Extend Path tool, place its cursor near the start or end of an open path (the path does not need to be selected). The cursor will change from a small crosshair to a tail-less arrow, and small lines (red, by default) will appear at the start and end of the path, perpendicular to it, which will dynamically indicate the start and end limits of the path during the drag.
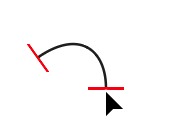
Extend Path Tool Hovering end point
To edit the path, hold the mouse button down. Now a pair of gray lines will appear, indicating how the path would be extended (in both directions), given the current extension mode and parameters. By default, the current length of the path and its change in length will be displayed next to the cursor. The small red square indicates that the Extend Path tool is snapping to an anchor point (here, the endpoint of the original path).
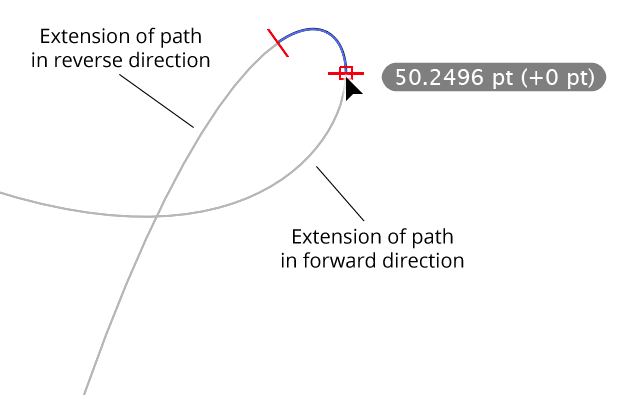
Extend Path Bezier extension complete
Dragging the cursor along the extension preview will move whichever limit line was clicked on, showing the virtual new endpoint of the path. The cursor does not need to be kept directly above the extension preview, as the limit line will snap to the nearest position on the line. Releasing the mouse button finalizes the edit.
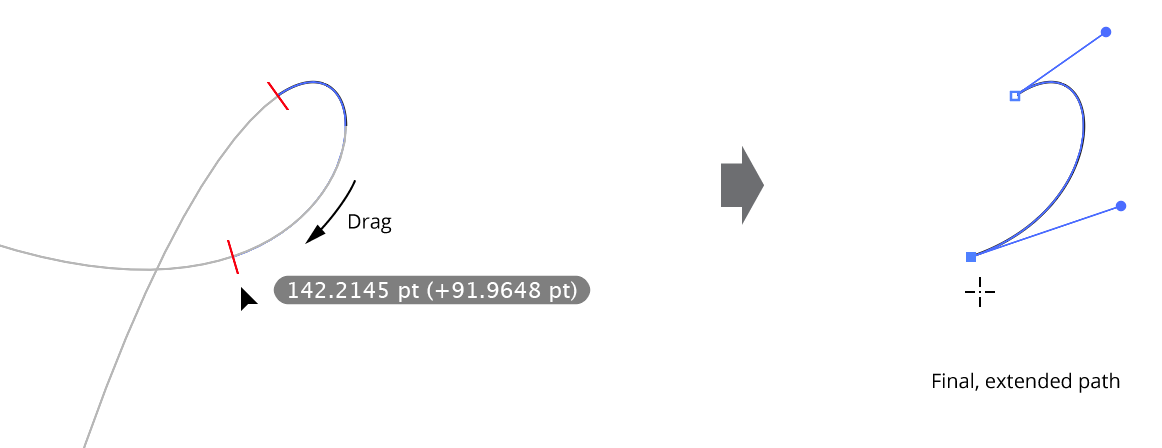
Extend Path Dragging the cursor along the extension preview
During the drag, by default, the cursor will snap to intersections of the extended path to other paths (or to the extended path itself); this will be indicated by a small circle around the limit line:
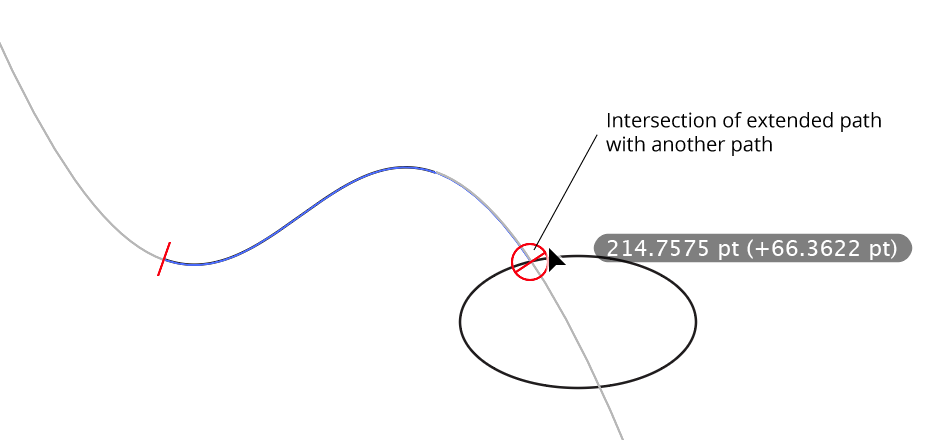
Extend Path Bezier Extension Intersection
Dragging backwards into the existing path will shorten it:

Extend Path Shortening Example
Note: If you drag from the final point of an open path, but then move the cursor so it is over the extension preview that comes from the first point of the path, the path will be extended in the reverse direction but the entire original portion of the path will be removed, as this is equivalent to shortening the path to zero length before starting to re-extend it.
Illustrator Location:
Illustrator Main Menu > Window > Astute Graphics > QuickOps
The Trim Open Paths operation is used to trim off one or multiple selected open paths where they are intersected by other visible, unlocked paths (or by self-intersections). By default, the trimming can occur from either end of the path (the shorter end, if the path is intersected only once; otherwise both ends), but Shift can be held while clicking the button to force trimming from only one end; which end depends on the preferences setting.

QuickOps Trim Open Paths
Clicking the icon to the right of the button will bring up the Trim Open Paths Preferences dialog:

QuickOps Trim Open Paths Preferences
1. Shift-Clicking Button Trims Path
Specifies which side of the path to trim if the button is clicked with Shift held down.
2. Split Variable Width Stroke Profiles
When enabled, and the trimmed path has a variable width stroke, the stroke profile will be split to keep the width of the untrimmed section as close to the original as possible.
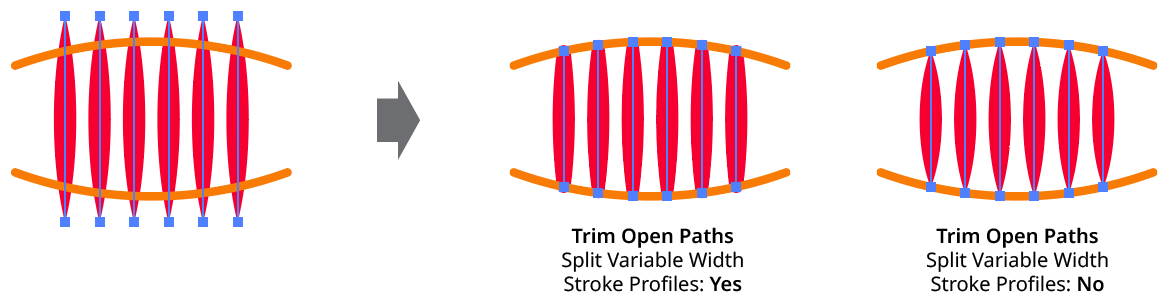
QuickOps Trim Open Paths - Split Variable Width Profiles