Width
Width Stamp
Width Selector Tool
Width Selector
Width Selector Panel
Width Gradient
Width Gradient Tool
Width Brush Tool
Width Eraser Tool
Optimize and Vary Width Markers
QuickOps Panel
Illustrator Location:
Illustrator Main Menu > Window > Astute Graphics > Width Stamp
Menu items to show and hide the Width Stamp panel can be found in the main menu under Window > Astute Graphics > Width Stamp. If the Width Stamp object is created using one of the main menu Object > Width Stamp > Make… items, the panel will be automatically shown if it is not already open.
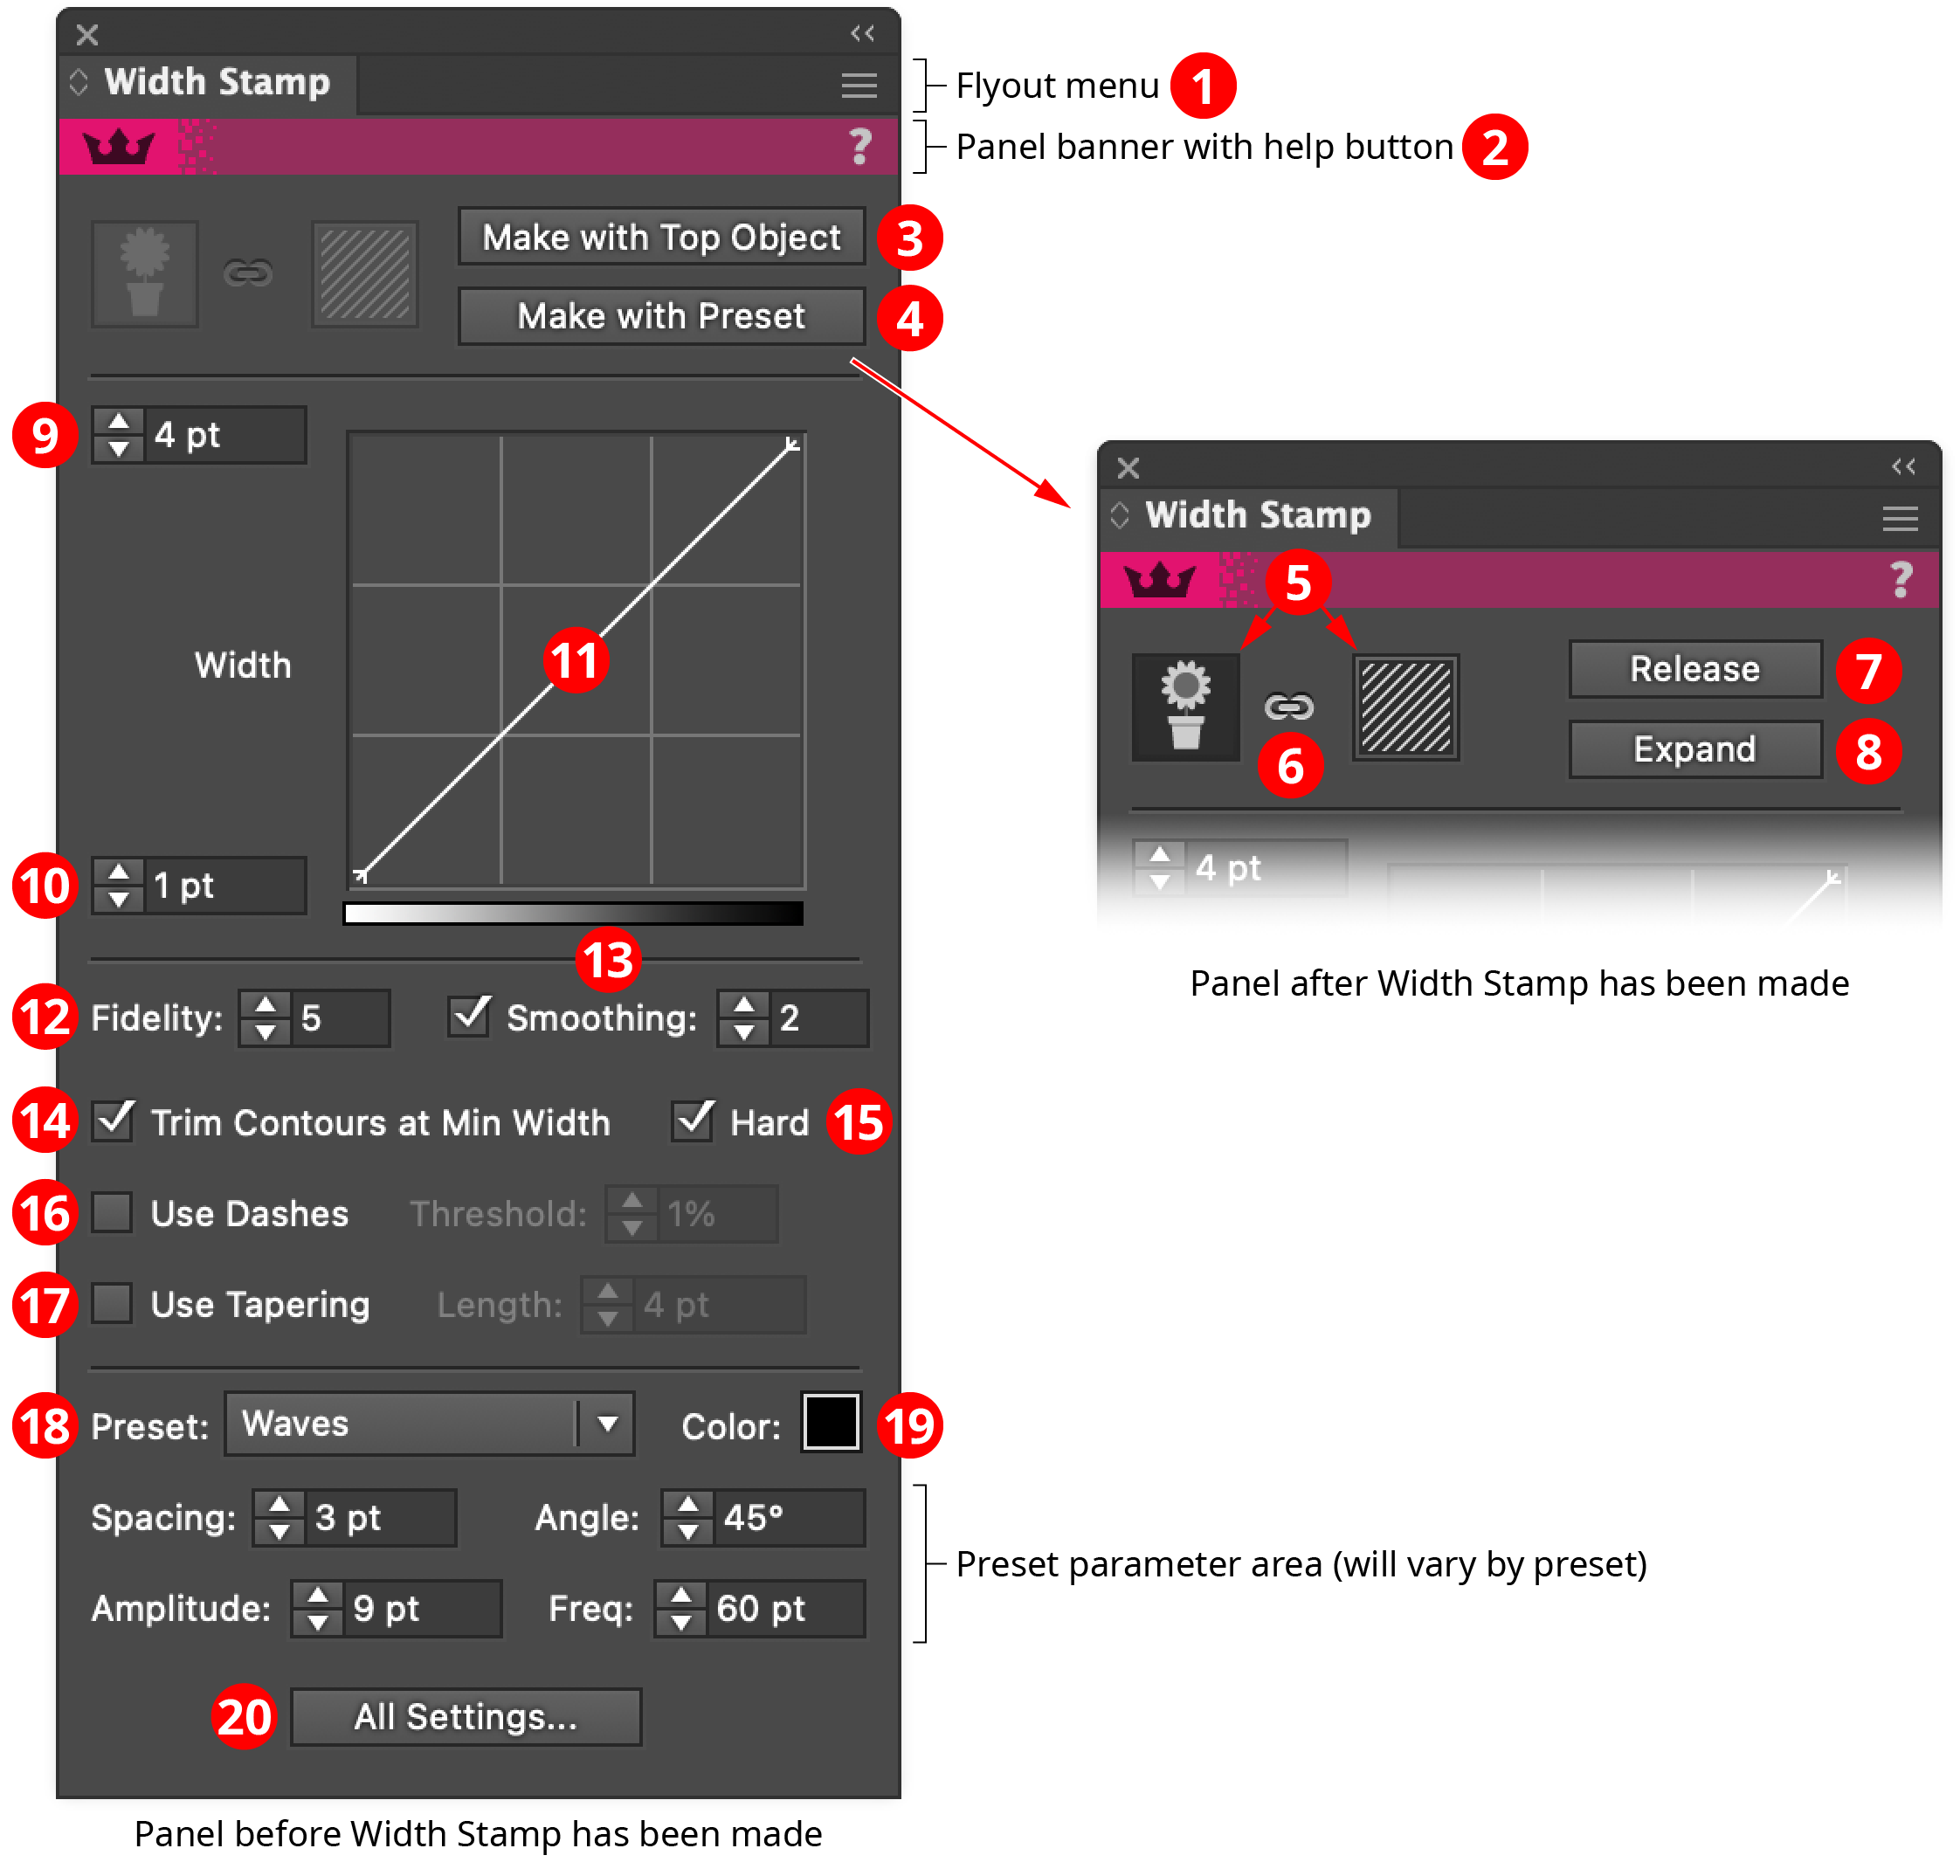
Width Stamp Panel
1. Flyout menu
See Width Stamp Panel: Flyout Menu.
2. Panel banner
The Width Stamp panel banner has a help button on the right which opens the help documentation in the Astute Manager. If this does not automatically appear, please ensure your Astute Manager is running first.
3. Make With Top Object button
When the selection consists of artwork that is eligible to be turned into a top-object Width Stamp (at least two art objects, and the topmost object is a path or a group that contains at least one path), the Make with Top Object button will be available. Clicking Make with Top Object creates a Width Stamp object from the selected artwork, using the parameters that are currently specified on the lower area of the panel. The bottom object is used as the grayscale source, while the path(s) above it, which must have a stroke, are used as the contours and will have their widths changed to reflect the grayscale values, according to the width settings and curve on the panel.

Width Stamp Make with Top Object Example
To edit the contour paths that were in the top object once the Width Stamp object has been created, either release the Width Stamp (see Release button) or click the Edit Contours button (see Edit Source Art/Contours buttons).
A Width Stamp (from top object) can also be made using the main menu item Object > Width Stamp > Make With Top Object….
4. Make With Preset button
When at least one piece of artwork is selected, the Make with Preset button will be available. Clicking Make with Preset creates one Width Stamp object for each selected piece of art, using the parameters that are currently specified on the lower area of the panel (to make a single Width Stamp object from multiple pieces of art, group them first). The contours are not created from existing art, but are generated algorithmically, their geometry determined by the type of preset (see Preset Menu below).

Width Stamp Make with Preset Example
A Width Stamp (from preset) can also be made using the main menu item Object > Width Stamp > Make With Preset….
5. Edit Source Art/Contours buttons
When at least one Width Stamp object is selected, the Edit Source Art button and the Edit Contours button will be available. Only one of the two buttons can be active at any time; the active button is distinguished by a darker border. When Edit Source Art is active (which is the default after a new Width Stamp object is created), the source art, which provides the grayscale values, is editable (although it will appear empty), while the contour paths are visible but not editable. When Edit Contours is active, the contour paths are visible and editable, while the source art is hidden and cannot be edited.
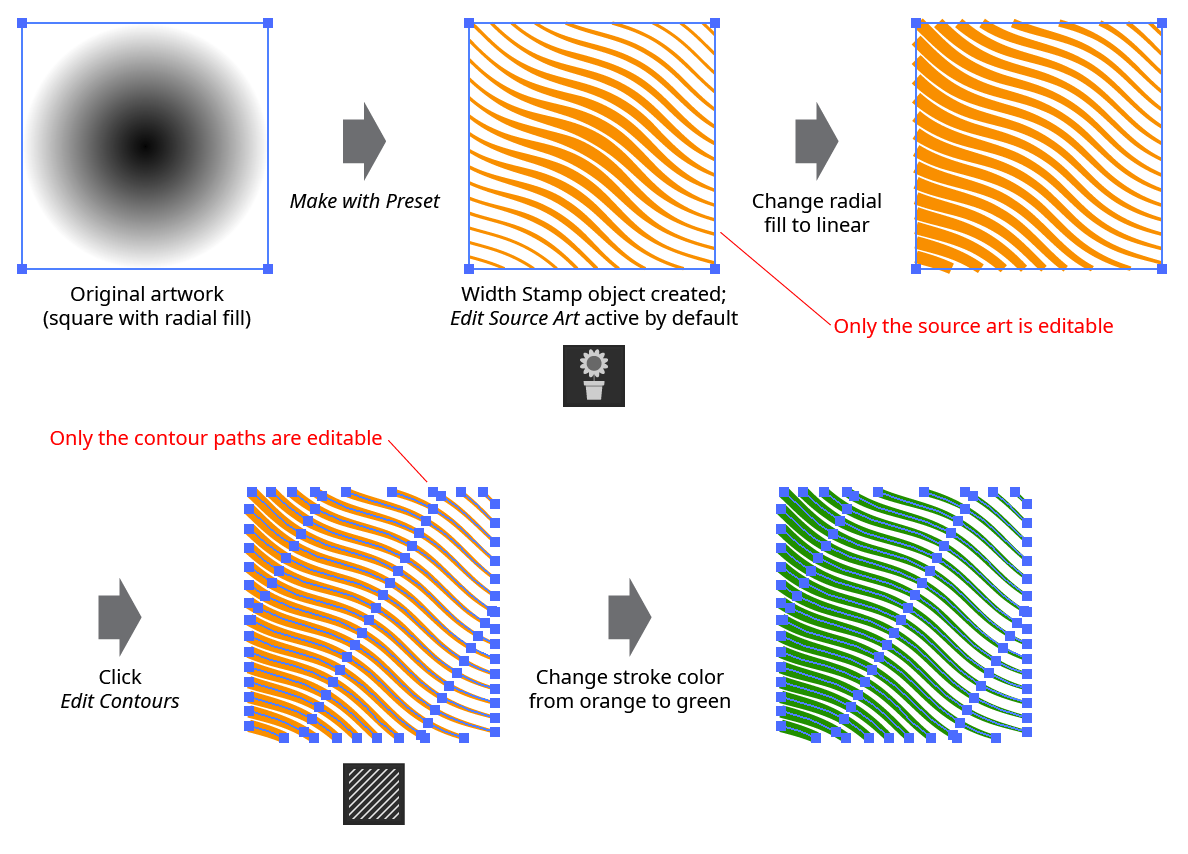
Width Stamp Edit Source Art vs. Edit Contours
Note: If a Width Stamp object that was made with a preset is active when the Edit Contours button is pressed, its contour paths become normal editable paths, and the preset parameters will no longer be available to change (in other words, it is as if the Width Stamp had been made using a top object).
6. Link/Unlink button
When at least one Width Stamp object is selected, the Link/Unlink button will be available. Clicking it toggles between linked and unlinked states. When linked, transformations (moving, scaling, rotating) made to the source art will similarly affect the contour art, and vice versa. When unlinked, transformations can be made to either the source art or contour art independently (however, if the Width Stamp was made from a preset, the Edit Contours button must be pressed before the source art and contour art will become unlinked).

Width Stamp Edit Linked vs. Unlinked
Note: Illustrator’s Real-Time Drawing and Editing (when using GPU preview) does not properly handle the case of moving the source art when linking is disabled: it appears to move both the source and the contours together, until the mouse button is released. Pressing Shift while moving the source art usually rectifies this.
7. Release button
Clicking Release restores all selected Width Stamp objects to their original component object or objects, which may then be edited and, if desired, made into Width Stamps again.

Width Stamp Release Example
Width Stamps can also be released using the main menu item Object > Width Stamp > Release.
8. Expand button
Clicking Expand “flattens” and removes all selected Width Stamp objects; the resulting variable width paths can subsequently be edited like any other art objects. Each expanded Width Stamp is placed into a group.

Width Stamp Expand Example
Width Stamps can also be expanded using the main menu item Object > Width Stamp > Expand.
9. Width Value 1
(This control may not visible if Hide Curve has been chosen from the panel flyout menu.) Because it is at the top, this value can be thought of as the “maximum” value, although it can be set to any value. When the graph curve is set to the default (a straight line rising from lower left to upper right), it controls the width of the contours where the underlying art is darkest.
10. Width Value 2
(This control may not visible if Hide Curve has been chosen from the panel flyout menu.) Because it is at the bottom, this value can be thought of as the “minimum” value, although it can be set to any value. When the graph curve is set to the default (a straight line rising from lower left to upper right), it controls the width of the contours where the underlying art is lightest.
11. Graph
(This control may not visible if Hide Curve has been chosen from the panel flyout menu.) The graph specifies the relationship between the width values and the grayscale values in the source art. The horizontal axis represents grayscale values (from white to black), while the vertical axis represents the width amount, specified by the “maximum” and “minimum” value inputs. With the default diagonal line, the relationship is a linear one.
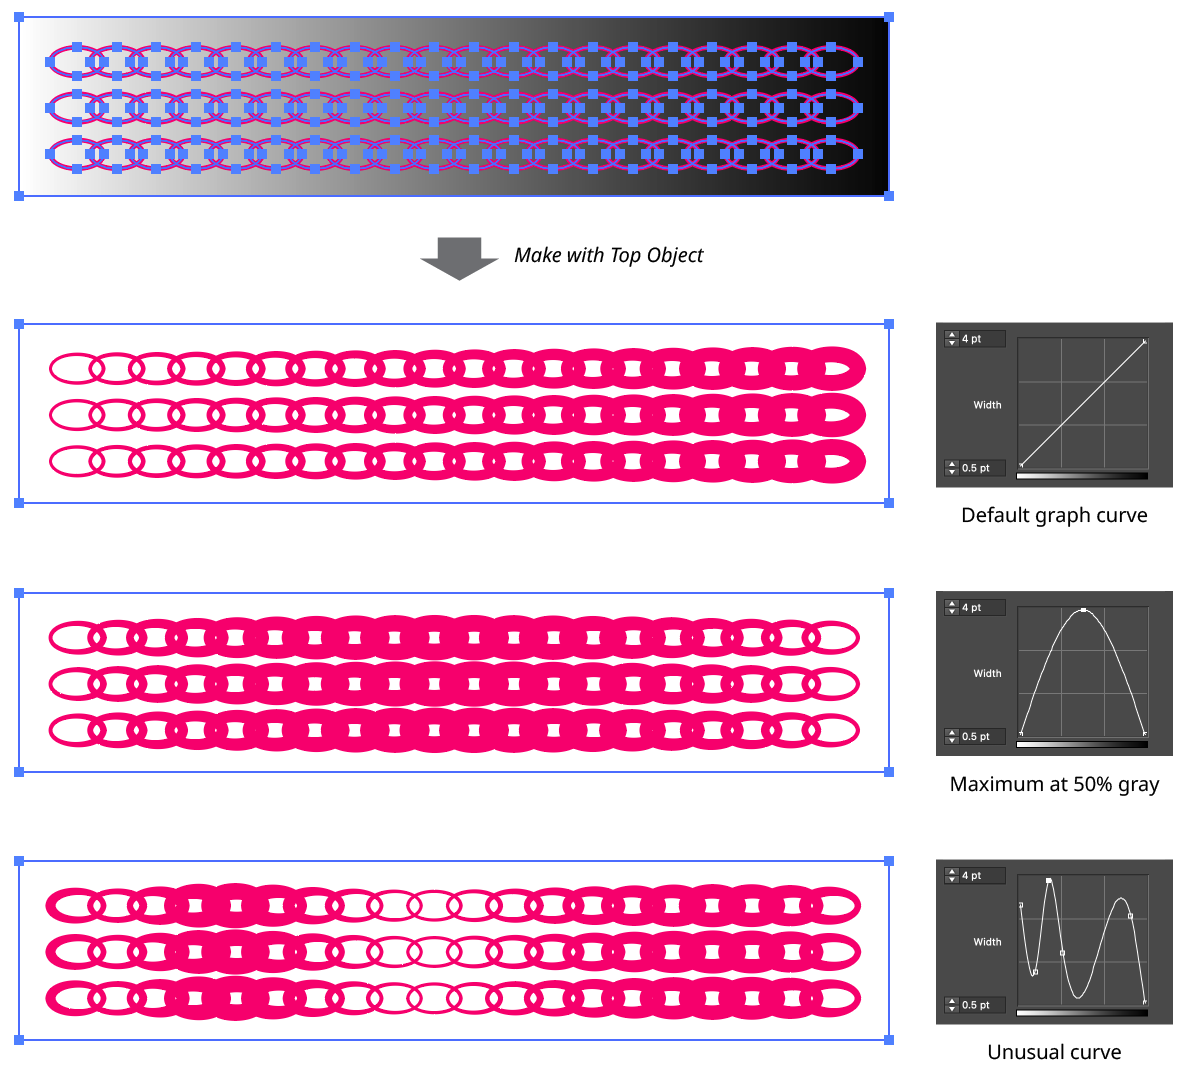
Width Stamp Graph Examples
Nodes on the curve may be moved simply by clicking and dragging them. A new node may be added by clicking at a spot along the curve which does not already have a node. Nodes (except the ones at the beginning and the end of the curve) may be deleted by dragging them off the graph area. The graph can be returned to its default linear state by holding down Shift and clicking on the thin gradient band underneath it.
12. Fidelity
Controls how accurately the grayscale levels of the source art are translated to width markers along the strokes of the contours. The value can range from 1 to 10. High values internally rasterize the source art at a higher resolution, and more closely space the width markers along the contours.

Width Stamp Fidelity Examples
13. Smoothing
When using high Fidelity values on a noisy image, the resulting variable width contours may appear “jagged” as their widths change abruptly over small distances. To alleviate this, the Smoothing setting can be enabled. Smoothing acts as a sort of Gaussian blur on the width markers, smoothing the width changes of adjacent markers:

Width Stamp Smoothing Examples
14. Trim Contours at Min Width
When enabled, contours which reach the “minimum” width (the width specified in the lower Width Value 2 control) are trimmed off at that value. For the typical curve which has a node at the bottom left, this has the effect of removing contours where the underlying image or artwork is white:

Width Stamp Trim Contours
When using Trim Contours at Min Width, a high Fidelity setting is often necessary to keep the shape of the trimmed edges smooth.
15. Hard
When Trim Contours at Min Width is enabled, and Use Tapering is not enabled, the tips of the contours do not always look pleasing when the underlying grayscale values change from a dark to white in a sharp manner (thereby creating two markers of relatively high width followed by a single marker of zero width at the end of the path). To remedy this, the Hard parameter can be enabled, which forces the contour trim point to be at the next width maker past the minimum width one:

Width Stamp Trim Contours Hard
16. Use Dashes
When enabled, contours which would normally be below a threshold width will not get any thinner, but will instead change to a dashed appearance, with the dashes getting shorter as the underlying grayscale values get lighter. Dash length depends on the Fidelity and whether Dash Reduction is enabled (the latter setting is not available directly on the panel but can be accessed through the All Settings... dialog).

Width Stamp Use Dashes
The threshold value is specified as a percentage of the minimum-to-maximum range. For example, a threshold value of 25% means the contours will become dashed whenever their calculated width falls in the last quarter of that range. Use Dashes and Use Tapering cannot both be enabled.
17. Use Tapering
When enabled, all contours will have ends that taper to zero width, using the specified length:

Width Stamp Use Tapering
Use Tapering and Use Dashes cannot both be enabled.
18. Preset
The popup menu allows a choice of eight different presets, each of which creates contour lines with a different geometry controlled by preset-specific parameters. The presets are Half Grid, Grid, Waves, Zigzag, Concentric Circles, Concentric Squares, Circular Spiral, and Square Spiral:
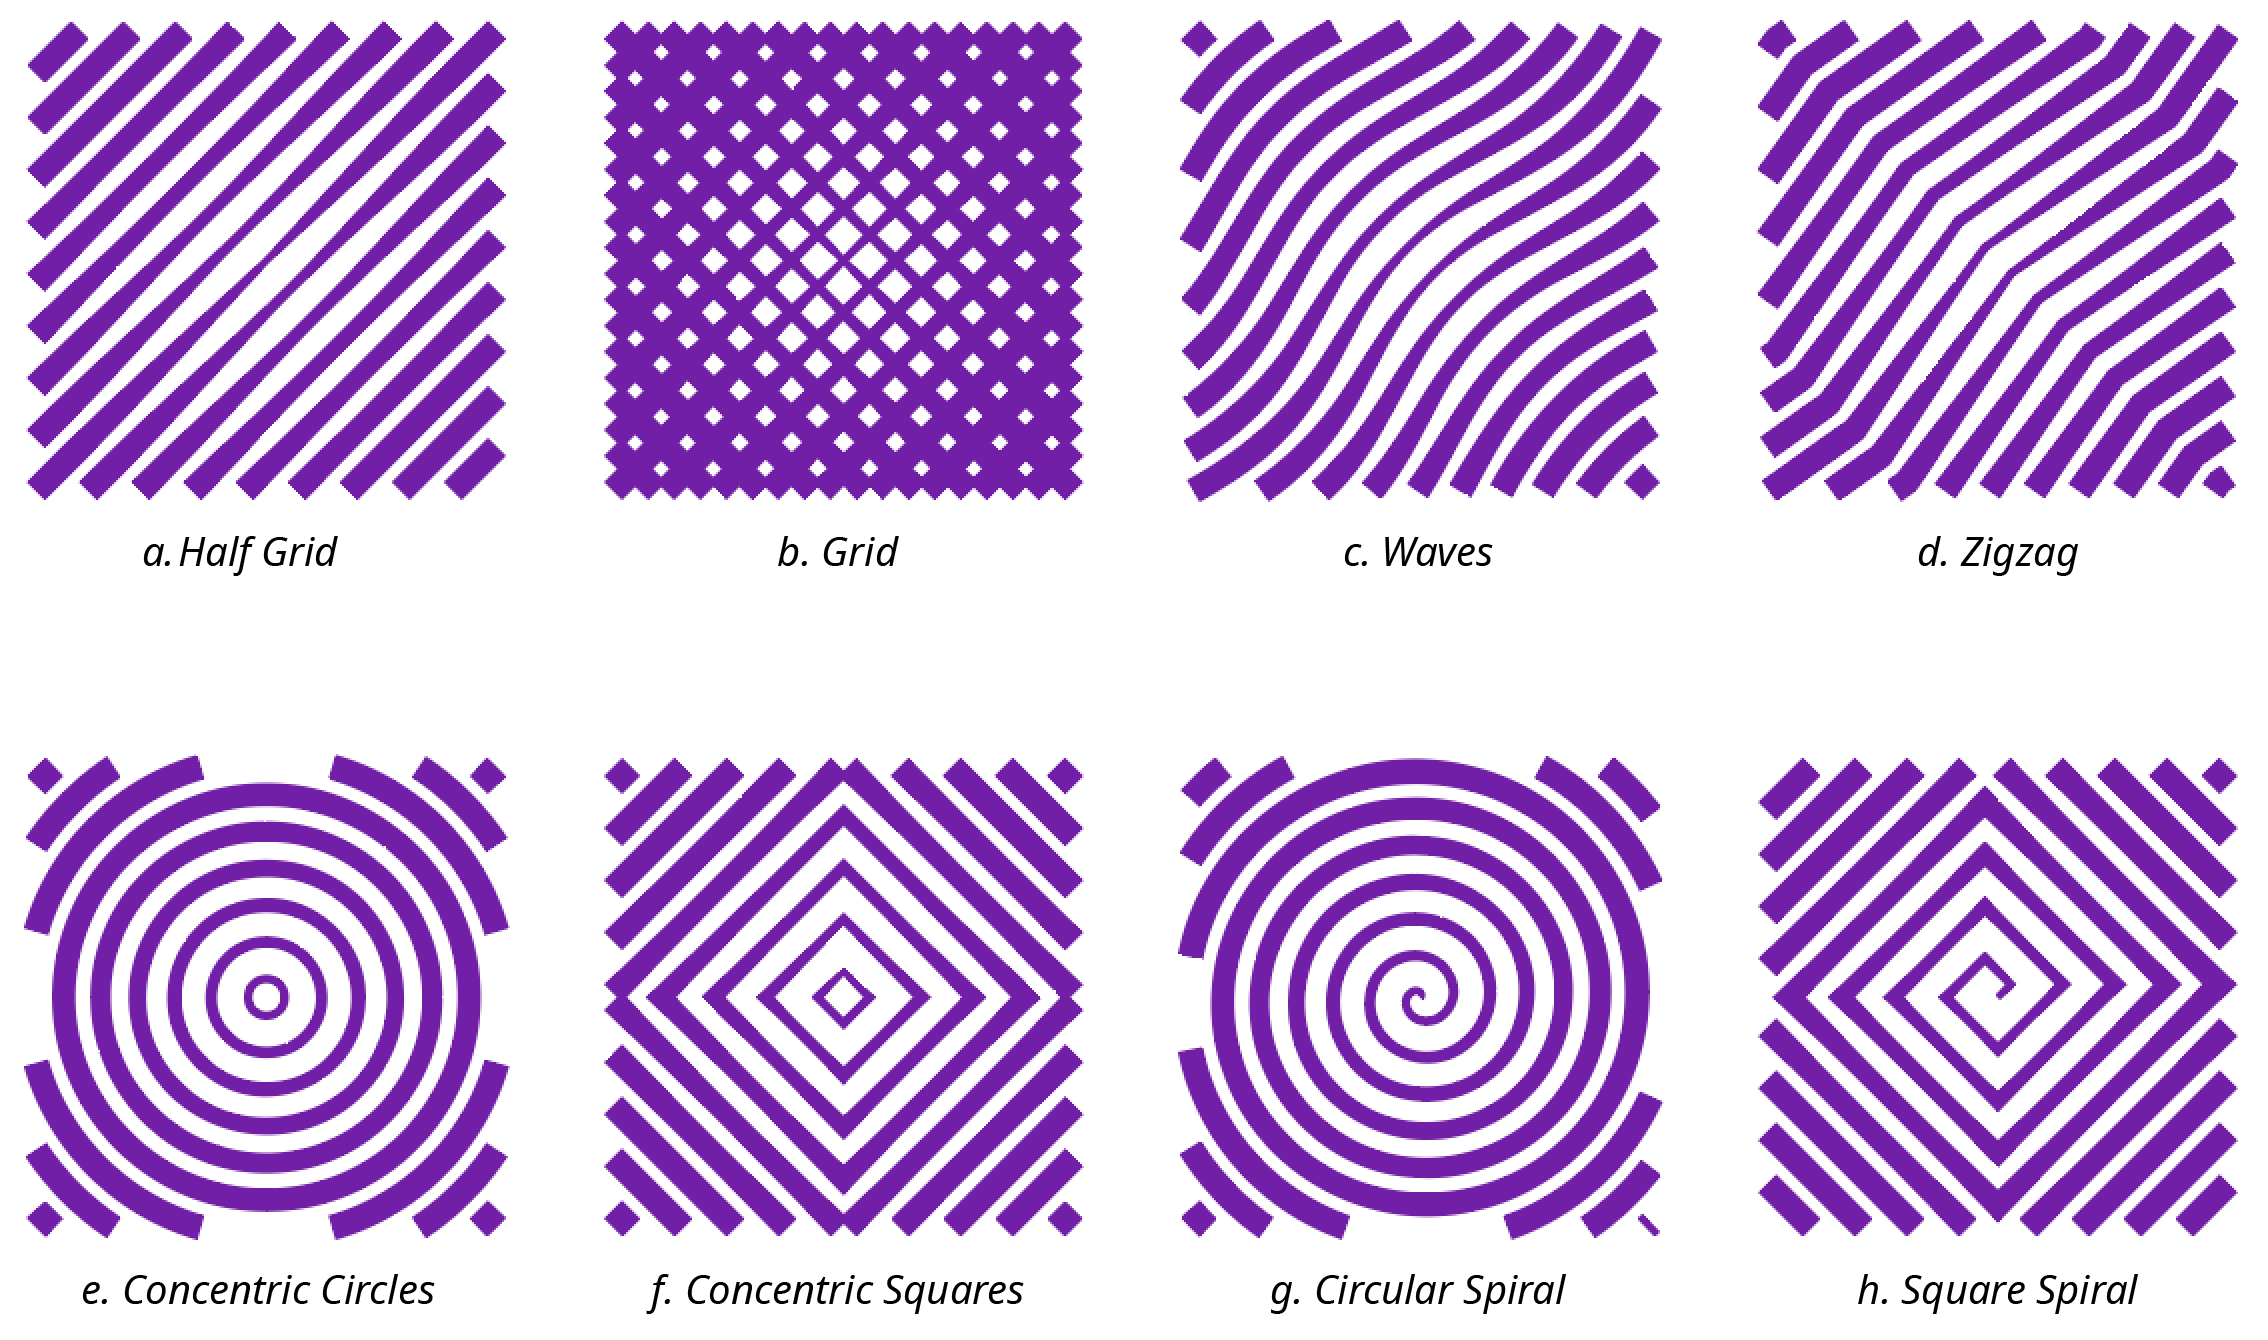
Width Stamp Presets
a. Half Grid
The Half Grid preset creates contours that consist of one set of parallel straight lines. The lines can have their spacing and angle specified.

Width Stamp Half Grid Preset Parameters
b. Grid
The Grid preset creates contours that consist of two sets of parallel straight lines. Each set of lines can have their spacing and angle specified independently.

Width Stamp Grid Preset Parameters
c. Waves
The Waves preset creates contours that consist of roughly parallel lines which curve back and forth like a wave. Their spacing and angle can be specified, as well as the amplitude and frequency of the waves.

Width Stamp Waves Preset Parameters

Width Stamp Waves Preset Examples
d. Zigzag
The Zigzag preset creates contours that consist of parallel lines in a herringbone pattern. Their spacing and angle can be specified, as well as the amplitude and frequency of the “zigzags.”

Width Stamp Zigzag Preset Parameters
e. Concentric Circles
The Concentric Circles preset creates contours that consist of closed, circular paths (or sections thereof) with the same center point. The circles have equal space between them, the value of which can be specified. The diameter of the innermost circle is equal to this spacing value.

Width Stamp Concentric Circles Preset Parameters
f. Concentric Squares
The Concentric Squares preset creates contours that consist of closed, square paths (or sections thereof) with the same center point. The squares have equal space between them, the value of which can be specified (as well as their angle). The side length of the innermost square is equal to the spacing value.

Width Stamp Concentric Squares Preset Parameters
g. Circular Spiral
The Circular Spiral preset creates contours that consist of an Archimedean spiral, where each revolution of the spiral lies a fixed distance from the previous one. This spacing value can be adjusted, as well as the angle at which the spiral initially heads, and whether the spiral is in the clockwise or counterclockwise direction.

Width Stamp Circular Spiral Preset Parameters

Width Stamp Circular Spiral Preset Examples
h. Square Spiral
The Square Spiral preset creates contours that consist of a square spiral (also described as a 4-angle spirangle). Its spacing value and angle can be adjusted, as well as whether the spiral is in the clockwise or counterclockwise direction.

Width Stamp Square Spiral Preset Parameters
19. Color
The color of the preset contours. Clicking the color chip will bring up the standard color picker dialog. To customize the colors (e.g. use different colors for different contours, or use a gradient or pattern for the strokes), convert the preset contours to ordinary paths by clicking the Edit Contours button.
20. All Settings...
In order to remain at a reasonable size, the Width Stamp panel only contains controls for the most-commonly used settings. After clicking the All Settings... button, the Width Stamp Settings Dialog opens, which offers controls for all of the panel settings as well as for several additional lesser-used settings.
Illustrator Location:
Advanced Toolbar > Width Gradient Stack > Width Selector Tool
As the Width Selector tool has several keypresses for certain operations, we suggest installing the free Astute Graphics plugin Astute Buddy, which creates a panel that dynamically updates to inform you of the various keys which can be pressed in the tool’s current context.
The Width Selector tool works largely in conjunction with the associated Width Selector panel, which should be open and accessible. If you are using the free Astute Graphics plugin DirectPrefs, you can have the Width Selector panel automatically be shown when the Width Selector tool is selected.
Illustrator Location:
Advanced Toolbar > Width Gradient Stack > Width Selector Tool
When the Width Selector tool is in use, width markers on the focal strokes of all unlocked paths (selected or unselected, unless the tool preference Show Markers on Selected Paths Only is enabled) are annotated using small red (by default) “bow-tie” shapes lying perpendicular to the path. Markers drawn in a lighter tint are unselected, while those in a darker tint are selected:

Width Selector Marker Annotations
Illustrator Location:
Advanced Toolbar > Width Gradient Stack > Width Selector Tool
The Width Selector tool can select width markers on one or more paths by either clicking on them or by dragging a marquee over them. Holding the Shift key down while doing so adds markers to the current selection, while holding Option/Alt down subtracts them from the current selection. The current marker selection is retained across uses of the tool.

Width Selector Marquee Select
Illustrator Location:
Advanced Toolbar > Width Gradient Stack > Width Selector Tool
After one or more width markers are selected, the tool can perform several operations on them:
Width Adjustment
While the tool does not support dragging to change the width of a marker (the native Width tool can still be used for this purpose), it can adjust the widths of one or more markers simultaneously if the preference Use Increase/Decrease Diameter Keys is set to Change Stroke Width. In this case the keys assigned to Decrease Diameter and Increase Diameter in the native Keyboard Shortcuts dialog (the left and right square bracket keys respectively, by default, for English language keyboards) will decrease or increase their widths, using the numerical Change Width value set on the Width Selector panel.
Moving Markers
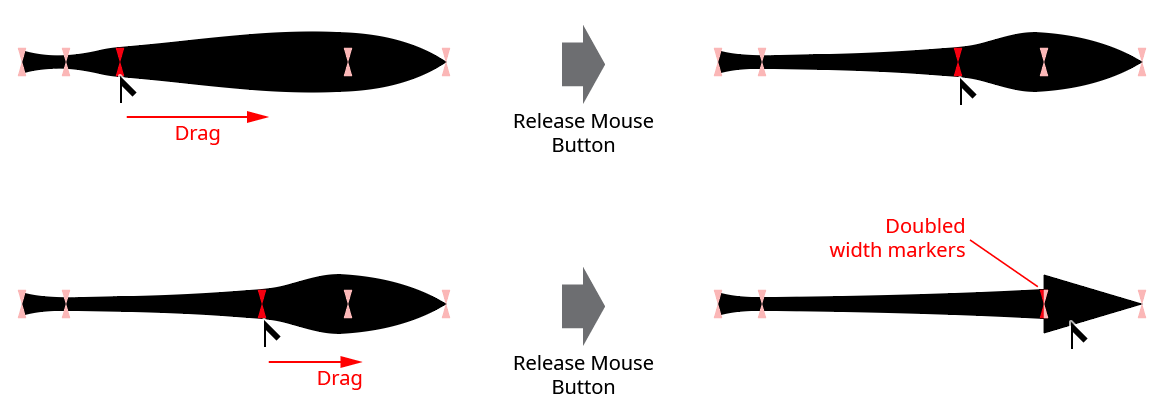
Dragging one or more selected width markers will move them along the path. A width marker may not be moved past the previous or next unselected marker, and the markers at the start and end of the path cannot be moved at all (therefore, if the selection includes either the end or start marker, it won’t be able to be moved either). Dragging a marker until it contacts another marker and releasing the mouse button will create a doubled marker, which may be used to produce an abrupt change in stroke width:
Width Selector Dragging Markers
To “stretch” markers (move a contiguous selection of one or more markers as a group while proportionally shifting all the other markers on the path, except those at the start and end of the path), hold down Shift while dragging them:

Width Selector Stretching Markers
Duplicating Markers
To duplicate one or more selected width markers, hold down the Option/Alt key after starting to drag them:

Width Selector Duplicating Markers
Adding Width Markers
The Width Selector tool can add a new width marker to a stroke by holding down Option/Alt and then clicking along the path. The new marker’s initial width will be equal to the current width of the stroke at that point.

Width Selector Adding Marker
When a variable width stroke is used on a compound path, all of the subpaths must share the same width profile. So selecting one or more width markers on one subpath with the Width Selector tool will automatically select the same markers on all of the subpaths:

Width Selector and Compound Paths
Illustrator Location:
Illustrator Main Menu > Window > Astute Graphics > Width Selector
The menu item to show and hide the Width Selector panel can be found in the main menu under Window > Astute Graphics > Width Selector. When the Width Selector tool is not in use, the panel displays only a “Click to select” message; clicking anywhere on the panel selects the tool and displays all the controls, which affect the next use of the tool.
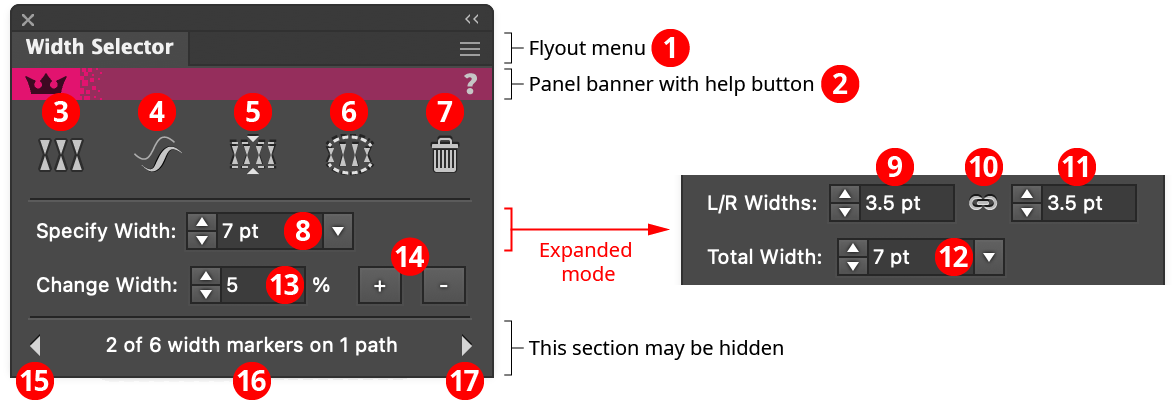
Width Selector Panel
1. Flyout menu
See Width Selector Panel: Flyout Menu.
2. Panel banner
The Width Selector panel banner has a help button on the right which opens the help documentation in the Astute Manager. If this does not automatically appear, please ensure your Astute Manager is running first.
3. Select All Markers Button
Selects all the width markers on any path which has at least one width marker selected.
4. Taper Stroke Button
Available when at least one end marker is selected, typically on an open path. The first time the button is clicked, the end marker is changed to zero width and an additional marker is added (if necessary) to create a taper with the length specified in the preferences dialog (by default, 10% of the length of the path). Each additional click lengths the taper by 10% of the remaining distance to the other end of the path. Each additional Shift-click shortens the taper in the same way.

Width Selector Taper Stroke
When both ends of the path are tapered at the same time, distance values apply to half the path only.
5. Average Widths Button
Available when two or more markers on a path are selected. When clicked, the widths of all selected markers are set to the average width of all the selected markers on the same path. If the marker is non-centered, then the ratio of left to right widths is retained.

Width Selector Average Widths
6. Smooth Widths Button
Smooths the widths of the selected markers by combining components of the widths of surrounding markers, similar to using Gaussian blur on pixel data in a image.

Width Selector Smooth Widths
If the Shift key is held down when the button is clicked, the amount of smoothing will be significantly increased, just as increasing a Gaussian blur’s radius increases the amount of blur:

Width Selector Smooth Widths Plus Shift
The button has an alternate function when the Option/Alt key is held down when it is clicked. In this case, the selected markers (which must be contiguous) are evenly distributed along the path, i.e. their spacing is made equal.

Width Selector Distribute Markers
7. Delete Markers Button
Deletes the selected markers (except for the markers at the start and end of the path, which are required to be present by Illustrator). To remove all markers and make the path uniform width, use the panel flyout menu item Convert Selected Paths to Uniform Width.

Width Selector Delete Markers
8. Specify Width
This control is visible if the flyout menu preference Display Left/Right Widths is not enabled. It specifies the overall width of the selected marker(s), from 0 pt to 1000 pt. If multiple markers are selected and they have different widths, the value will be blank. If a selected marker is non-centered (its left and right widths are different), then changing its width using this control will keep its left/right ratio constant.
9. Left Width
This control is visible if the flyout menu preference Display Left/Right Widths is enabled. It specifies the left width of the selected marker(s), from 0 pt to 500 pt.
10. Link Icon
This control is visible if the flyout menu preference Display Left/Right Widths is enabled. Clicking the control changes the mode. In linked mode, changing either the left or right width will also change the opposite side width proportionally (thereby keeping the left/right ratio constant). In unlinked mode, the left and right widths can be adjusted independently.

Width Selector Unlinked vs. Linked Widths
11. Right Width
This control is visible if the flyout menu preference Display Left/Right Widths is enabled. It specifies the right width of the selected marker(s), from 0 pt to 500 pt.
12. Total Width
This control is visible if the flyout menu preference Display Left/Right Widths is enabled. It specifies the overall width of the selected marker(s), exactly like the Specify Width control when the preference is not enabled.
13. Change Width
Controls the amount by which the selected markers’ widths are changed when the Increase Width and Decrease Width buttons are pressed (or the Increase Diameter and Decrease Diameter keys are pressed when the preference Use Increase/Decrease Diameter Keys is set to Change Stroke Width). The value can be changed from 0% to 1000%, with a default of 5%.
14. Increase/Decrease Width buttons
Increases or decreases the width(s) of the selected marker(s) by the amount specified in the Change Width control. For example, if the marker had a width of 60 pt and the Change Width value were set to 22%, then clicking the Increase Width button would add 60 pt × 0.22 = 13.2 pt to the width, for a final width of 73.2 pt. Clicking the Decrease Width button would subtract 13.2 pt from the width, for a final width of 46.8 pt.
Since widths cannot be negative, if the Change Width value is set to 100% or more, then clicking the Decrease Width button will change the marker width to zero.
15. Shift Selection Backward button
This control will not be visible if the flyout menu item Display Marker Count is not enabled. Shifts the selection to the previous marker(s), wrapping around from the start of the path to the end of the path when necessary. To select only the last marker of a closed path, click point zero of the path to select the first marker, and then click the Shift Selection Backward button.
16. Marker Count
This area will not be visible if the flyout menu item Display Marker Count is not enabled. Shows the number of selected width markers as well as the total number of markers on all unlocked paths with variable width focal strokes (if the preference Show Markers on Selected Paths Only is enabled, this will only include selected paths).
17. Shift Selection Forward button
This control will not be visible if the flyout menu item Display Marker Count is not enabled. Shifts the selection to the next marker(s), wrapping around from the end of the path to the start of the path when necessary.
Illustrator Location:
Illustrator Main Menu > Window > Astute Graphics > Width Selector > Panel Flyout Menu
The Width Selector panel flyout menu items are contextually sensitive and all items may not be available, depending on the current selection.

Width Selector Panel Flyout Menu
1. Select Inverse
Inverts the current marker selection (selected width markers become unselected while unselected width markers become selected).
2. Select Doubled Markers
Selects all doubled width markers. Doubled width markers are defined as two consecutive width markers that are coincident (appear at exactly the same spot along the path); they can be used to create an abrupt change in stroke width along the path. The markers at point zero of a closed path are not considered doubled markers when using this menu item.
3. Combine Selected Doubled Markers
Changes each selected pair of doubled markers into a single marker, using the width of the trailing marker. The markers at point zero of a closed path are not considered doubled markers when using this menu item.

Width Selector Combine Selected Doubled Markers
To combine a pair of doubled width markers while using their average width, select only the doubled width markers, click the Average Widths button, and then use the menu item.
4. Convert Selected Paths to Variable Width
Changes all selected paths which are not already variable stroke width paths to variable width. This results in centered width markers at the start and end of the path with the path’s current width. This can be useful for applying the Vary Width Markers... menu item.
5. Convert Selected Paths to Uniform Width
Changes the focal strokes on selected paths to uniform width (if they are not already). This removes all width markers; their width remains what was originally shown in the Control Bar or Stroke panel, which is equal to the maximum width among all the path’s width markers.

Width Selector Convert to Uniform Width
6. Display Left/Right Widths
When marked with a check mark (the default), the panel shows controls which allow specifying the left and widths of each marker separately. Otherwise only the total width can be numerically specified. If you never use non-centered width markers, you may want to choose the menu item to uncheck it.
7. Display Marker Count
When marked with a check mark (the default), an informational line showing width marker counts, along with the Shift Selection Backward and Shift Selection Forward buttons, will be shown at the bottom of the panel.
8. Width Selector Preferences...
Brings up the preference dialog (see Width Selector: Preferences).
Illustrator Location:
Advanced Toolbar > Width Gradient Tool
Tool Location and Cursor Appearance
The Width Gradient tool appears in Illustrator’s main toolbar (which must be in Advanced mode: View > Toolbars > Advanced).

Width Gradient Tool Location
The Width Gradient tool’s cursor is a crosshair, accompanied by a caption if no paths are selected:

Width Gradient Cursors
Illustrator Location:
Advanced Toolbar > Width Gradient Tool
As the Width Gradient tool has several keypresses for certain operations, we suggest installing the free Astute Graphics plugin Astute Buddy, which creates a panel that dynamically updates to inform you of the various keys which can be pressed in the tool’s current context.
The Width Gradient tool works in conjunction with the associated Width Gradient panel, which should be open and accessible. If you are using the free Astute Graphics plugin DirectPrefs, you can have the Width Gradient panel automatically be shown when the Width Gradient tool is selected.
Using the Width Gradient tool is similar to using the Gradient tool in Photoshop, except an actual color-to-color gradient is not generated. Instead, all selected paths that fall within the bounds of the virtual gradient are converted to variable width (if they aren’t already), and their width markers are adjusted using values corresponding to each location along the virtual gradient, as specified in the Width Gradient panel. Adjustment may be in either an absolute sense (the widths are changed to specific values) or a relative sense (the widths are changed to a percentage of their original values).
For example, if the panel were set to adjust in an absolute, linear fashion, with start and end widths of 4 pt and 20 pt, then after dragging the tool, spots along the path(s) that were in line with the start of the gradient would get width markers set to 4 pt, while those in line with the end of the gradient would get width markers set to 20 pt. Those in the middle would receive a width of 12 pt (because half of 4 + 20 is 12, and the panel graph is linear).

Width Gradient Basic Example
Of course, the line in the previous example could easily have had its widths set manually with the native Width tool, since only a single width marker at each end was necessary. The real power of Width Gradient comes when multiple paths are adjusted, possibly in a non-linear manner:
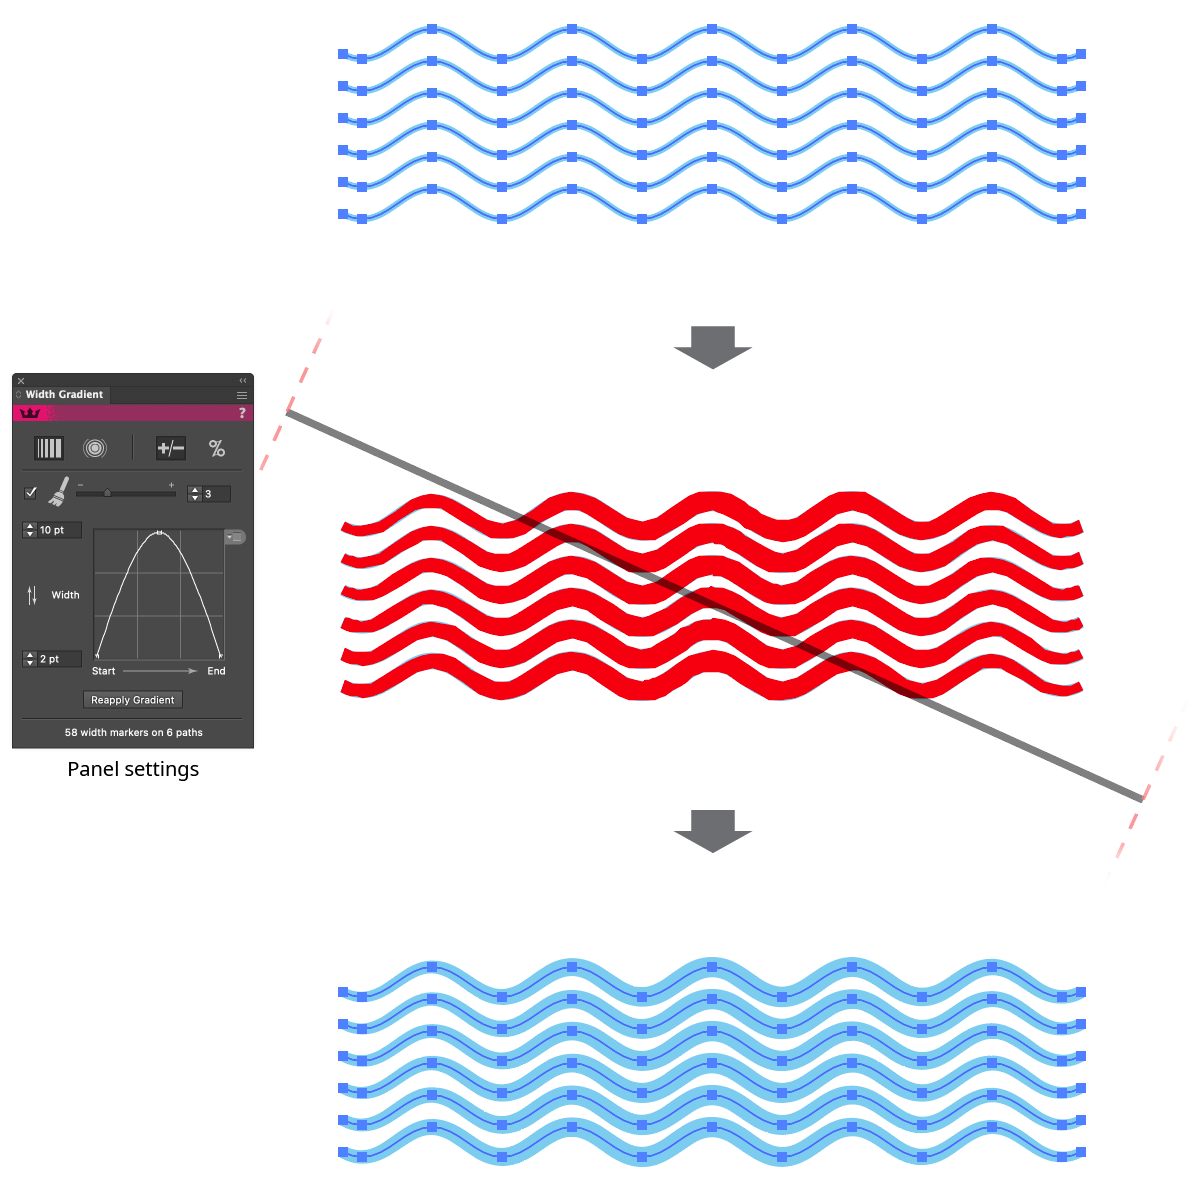
Width Gradient Example
The tool draws annotations while in use, showing the start and end points of the gradient (represented by a gray, semi-transparent line), and, using semi-transparent dashed lines, either perpendiculars to the gradient (for linear gradients) or a circle at the outer edge of the gradient (for radial gradients).

Width Gradient Tool Annotations
In addition, by default, the new widths of the path(s) are previewed, using a solid, user-specifiable color (red, by default). This preview is only approximate and may not agree exactly with the final paths. In particular, corner joins and end caps are not previewed.
While dragging with the Width Gradient tool, a number of keypresses may be used:
Shift: Constrains the gradient angle to 45° angles around the general constrain angle.
Option/Alt: Toggles between linear and radial mode.
Space: Repositions the entire gradient.
Up Arrow/Down Arrow: Adjusts the bottom width value on the panel (typically assigned to the start of the gradient). For each keypress, the value is changed by 1 pt (in absolute mode) or 10% (in relative mode).
Left Arrow/Right Arrow: Adjusts the top width value on the panel (typically assigned to the end of the gradient). For each keypress, the value is changed by 1 pt (in absolute mode) or 10% (in relative mode).
C: Switches the width preview color (if enabled) between red and blue.
S: Switches the affected strokes (between all strokes, which is the default), and the focal stroke only. This is only makes a difference if the path has multiple strokes on it:

Width Gradient All Strokes vs. Focal Stroke
U: Temporarily disables Smart Guides, if they were enabled when the drag started.
W: Swaps the adjustment widths. For linear gradients, this is the same as reversing its direction.
Although Width Gradient can be used on compound paths, because each subpath must share the same width profile, results may not be as expected. A warning dialog will be displayed in this situation:
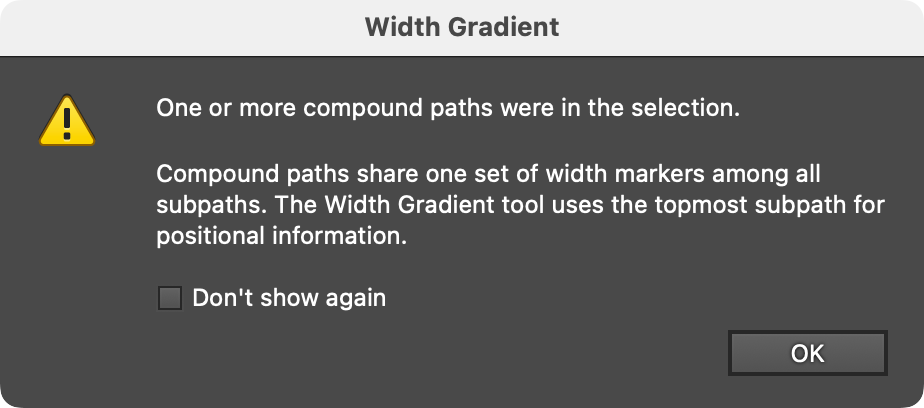
Width Gradient Compound Path Warning
Illustrator Location:
Illustrator Main Menu > Window > Astute Graphics > Width Gradient
The menu item to show and hide the Width Gradient panel can be found in the main menu under Window > Astute Graphics > Width Gradient. When the Width Gradient tool is not in use, the panel displays only a “Click to select” message; clicking anywhere on the panel selects the tool and displays all the controls, which affect the next use of the tool.
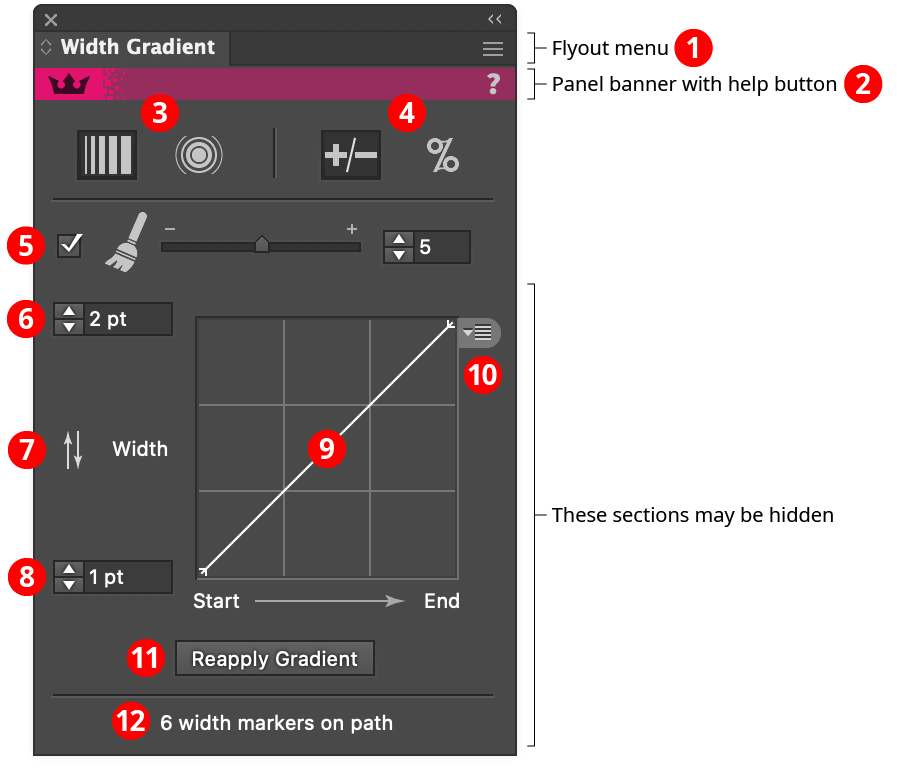
Width Gradient Panel
1. Flyout menu
See Width Gradient Panel: Flyout Menu.
2. Panel banner
The Width Gradient panel banner has a help button on the right which opens the help documentation in the Astute Manager. If this does not automatically appear, please ensure your Astute Manager is running first.
3. Linear/Radial Mode
Switches the tool between linear (straight line) and radial (circular) modes. This can be accomplished while dragging the tool by holding down the Option/Alt key.
4. Absolute/Relative Adjustment
Switches the tool’s adjustment type. When set to absolute, width markers are set to the widths calculated based solely on the adjustment values, graph, and position along the virtual gradient; the original width has no influence on the final width. When set to relative, the width at each marker is calculated as a percentage of the original width of the stroke at that position along the path.
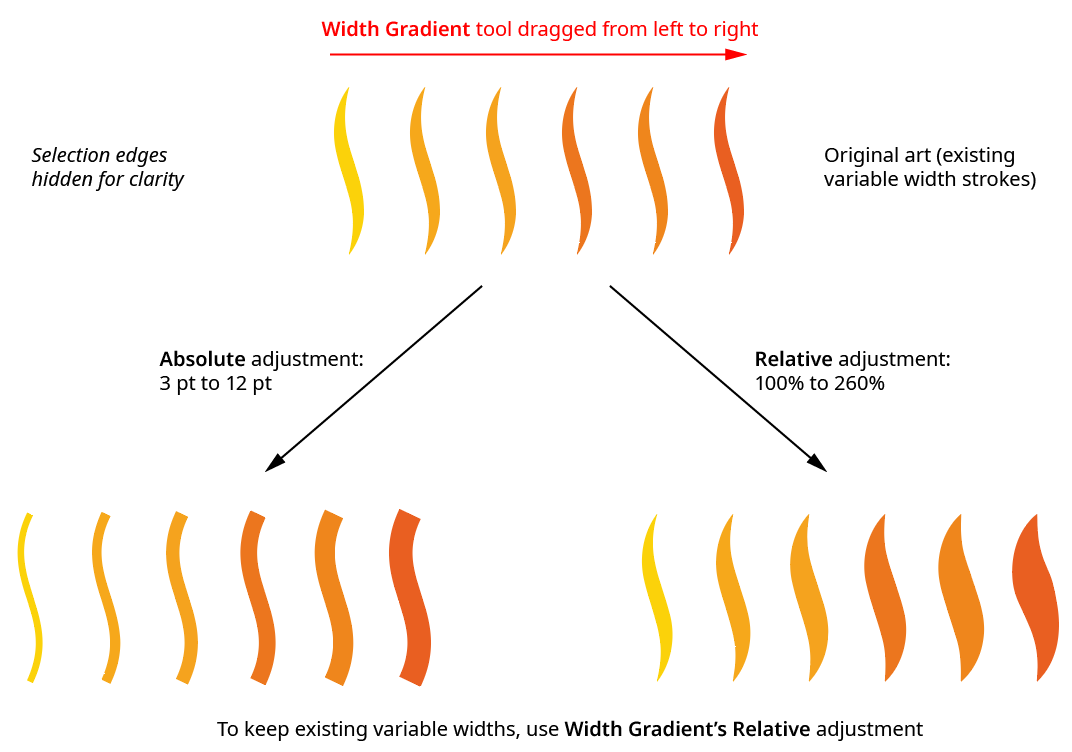
Width Gradient Absolute vs. Relative
5. Optimization
When enabled, the number of width markers in the resulting paths will be reduced after the gradient has been applied. The degree of optimization can be set from 0 to 10, with a default of 5. Higher optimization values will remove more width markers, making the path profile smoother and easier to edit manually, but may result in slightly less accurate results compared to the unoptimized results. The number of width markers on a selected path is displayed at the bottom of the panel, if Display Marker Count is enabled in the panel flyout menu.
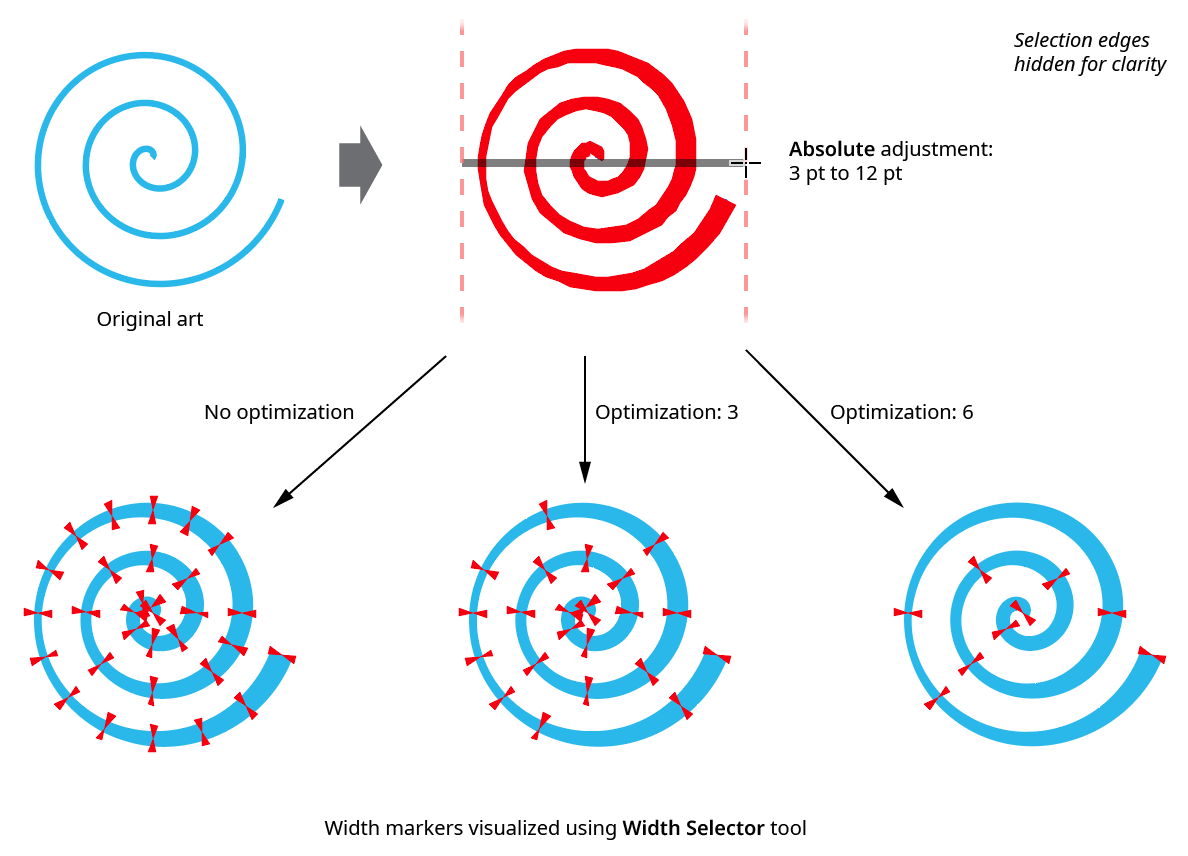
Width Gradient Optimization
6. Adjustment Value 1
Because it is at the top, this value can be thought of as the “maximum” value, although it can be set to any value. When the graph curve is set to the default (a straight line rising from lower left to upper right), it controls the width at the end of the gradient. It can be changed while dragging the tool by pressing the Left Arrow and Right Arrow keys.
7. Switch button
Switches the two adjustment values; this can also be achieved while dragging the tool by pressing the W key.
8. Adjustment Value 2
Because it is at the bottom, this value can be thought of as the “minimum” value, although it can be set to any value. When the graph curve is set to the default (a straight line rising from lower left to upper right), it controls the width at the start of the gradient. It can be changed while dragging the tool by pressing the Up Arrow and Down Arrow keys.
9. Graph
Specifies the relationship between the adjustment values and the gradient. The horizontal axis represents positions along the gradient (from beginning to end), while the vertical axis represents the adjustment amount, specified by the “maximum” and “minimum” value inputs. With the default diagonal line, the relationship is a linear one. Nodes on the curve may be moved simply by clicking and dragging them. A new node may be added by clicking at a spot along the curve which does not already have a node. Nodes (except the ones at the beginning and the end of the curve) may be deleted by dragging them off the graph area.

Width Gradient Graph Examples
10. Graph Preset Menu
Provides access to saving, managing, and applying graph settings.

Width Gradient Graph Preset Menu
A. Save Graph…
When you save the current graph, its nodes and maximum and minimum values are captured to an internal file which can be recalled later. The file name may be specified.
B. Manage Graphs…
Brings up the Manage Graphs dialog, which lets you rename, delete, import, or export graph files:

Width Gradient Manage Graphs Dialog
a. Rename: Allows the selected graph file to be renamed.
b. Delete: Removes the selected graph file(s).
c. Import...: Imports a previously-exported graphs package file of type “.wgg” using the standard operating system open file dialog.
d. Export...: Exports the selected graph(s) into a graphs package file of type “.wgg” using the standard operating system save file dialog. This file could be used as a backup or passed to another user.
C. Graphs List
Choosing a graph file from this list will update the graph to the values saved within that file (or, the case of “[Default]”, to the default graph). If the Shift key is held down when choosing a graph file, then the current maximum and minimum adjustment values will be retained rather than being loaded from the graph file. When the plugin is first installed, five presets will be added; their names are indicative of the shapes of the curves (for example, curve named “V” goes down and back up).
11. Reapply Gradient button
Reapplies the gradient at its previous position but possibly with new optimization, adjustment width, and graph settings. This allows you to try different parameters without having to actually drag out the gradient in the exact same spot repeatedly. Note: The reapplied gradient will always keep its original mode, i.e. linear or radial. For Relative Adjustment gradients, the path’s width markers will be restored to their original values before the gradient is reapplied unless Option/Alt is held down when clicking the button; in that case the gradient will modify the already-adjusted widths. If the adjustment were set from 102% to 102%, say, this could be useful for incrementally increasing all the stroke weights of the selected paths until they “look right.”
12. Marker Count
Displays the number of width markers (if any) on the selected paths. To visualize these width markers, use the Width Selector tool (also part of the WidthScribe plugin).
Illustrator Location:
Advanced Toolbar > Width Brush Tool
After the Width Brush tool is selected, its size can be changed either in its preferences dialog (see Width Brush: Preferences) or by pressing the keys assigned to Decrease Diameter and Increase Diameter in the native Keyboard Shortcuts dialog (the left and right square bracket keys respectively, by default, for English language keyboards). Its hardness, ranging from 0% to 100%, can only be changed in the preferences dialog.
When at least one path with a variable width stroke (or stroke that can be converted to a variable width stroke) is selected, clicking on it with the brush or dragging the brush across it will widen or narrow the stroke(s). Annotations will dynamically update while the mouse button is down to show the current stroke width:

Width Brush Basic Example
The brush only makes one adjustment per drag; i.e. it does not flow continuously like a Photoshop airbrush. For example, if the adjustment were set to add the fixed amount of 3 pt of width to a stroke, then moving the cursor back and forth over a path will only add 3 pt at most, regardless of how many times the cursor passes over it. However, releasing the mouse button and making a new drag could add up to another 3 pt, and so on.

Width Brush Second Drag
Brush hardness affects the smoothness of the transition between the original stroke width and the adjusted stroke width, as only positions towards the center of the brush get maximum adjustment:
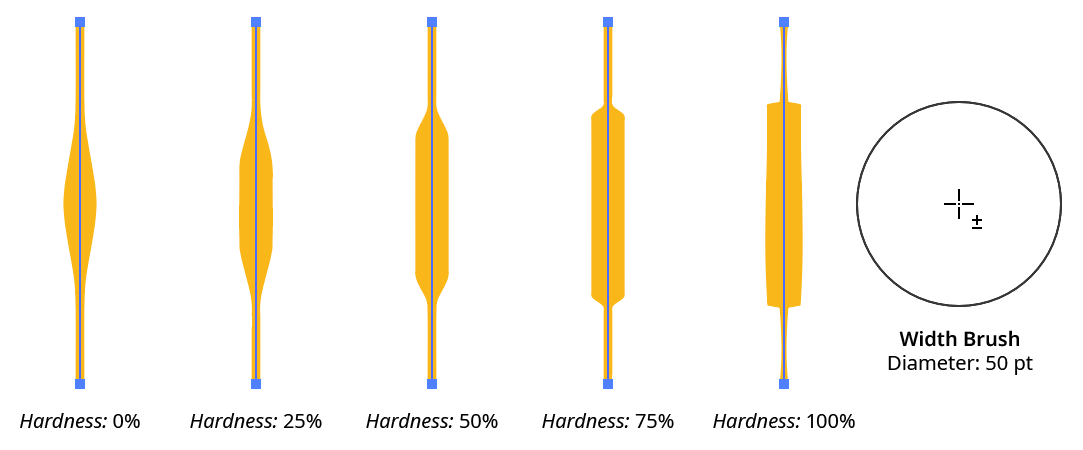
Width Brush Hardness Comparison
Before pressing the mouse button down to click or drag, there are two keypresses which can be used:
Shift: All adjustments will be in the reverse direction. In other words, if the brush were set to add 1.7 mm to all stroke widths, then instead it would subtract 1.7 mm. If it were set to double stroke widths (e.g. make them 200% of their original width), then stroke widths would be instead halved (e.g. make them 50% of their original width).
Option/Alt: Makes the tool act exactly like the Width Eraser tool, which visualizes the width markers on the path(s) and removes those that the tool is passed over (except those at the start and end of the path). Its diameter is taken from that last used in the actual Width Eraser tool, and cannot be changed.
While dragging with the tool, the X key can be pressed to toggle its annotations on and off. This allows you to see the original width of the stroke(s). Annotations are drawn in the same color as that used for the Width Gradient tool.
Illustrator Location:
Advanced Toolbar > Width Brush Stack > Width Eraser Tool
After the Width Eraser tool is selected, its size can be changed by pressing the keys assigned to Decrease Diameter and Increase Diameter in the native Keyboard Shortcuts dialog (the left and right square bracket keys respectively, by default, for English language keyboards). While dragging with the tool, its diameter can also be changed by pressing the Left Arrow and Right Arrow keys. Smaller sizes are generally more useful, as individual width markers can be targeted without inadvertently removing adjacent markers.
When at least one path is selected, all width markers on the focal strokes of those paths will be annotated using small red or pink “bow-tie” shapes lying perpendicular to the path. Pink markers cannot be removed, because they lie at the start or end of the path, and Illustrator requires those markers to be present.

Width Eraser Marker Annotations
To remove one or more width markers, simply drag the tool over them; their annotations will disappear as the center of each marker falls within the brush’s circle. After the mouse button is released, the path’s focal stroke will be updated with a new profile using the markers which remain.

Width Eraser Example
The Width Eraser tool has no preferences dialog.
Illustrator Location:
Illustrator Main Menu > Object > Path > Optimize Width Markers...
The Optimize Width Markers... menu item appears in Illustrator’s main Object > Path submenu:

Optimize Width Markers Menu Item
The menu item will only be available (ungrayed) if the selection contains one or more paths. Choosing the menu command brings up the Optimize Width Markers dialog:

Optimize Width Markers Dialog
1. Optimization Amount
Controls how many width markers will be removed from the focal strokes of the selected path(s). It can range from 0.1 to 10, with higher values removing more width markers but also resulting in potentially greater changes to the path’s width profile.

Optimize Width Markers Example
Note that markers are only removed, not replaced by new markers at different positions along the path.
2. Ignore paths with fewer than __ markers
When enabled, paths with fewer than the specified number of width markers are ignored when doing optimization. This will speed up the operation when dealing with large numbers of paths, some of which may already be optimized.
3. Original/Current Marker Count
When the Preview checkbox is enabled, shows the total number of width markers on the original path(s) versus the number that resulted using the current optimization settings.
4. Preview Checkbox
When enabled, the selected paths are updated on the screen to show how they would appear if their markers were optimized using the current settings. The control can be toggled on and off to gauge how much the optimization has changed their width profiles.
If you use the Optimize Width Markers menu command frequently, you may want to assign it a keyboard shortcut using Illustrator’s general Keyboard Shortcuts dialog.
Illustrator Location:
Illustrator Main Menu > Object > Path > Vary Width Markers...
The Vary Width Markers... menu item appears in Illustrator’s main Object > Path submenu:
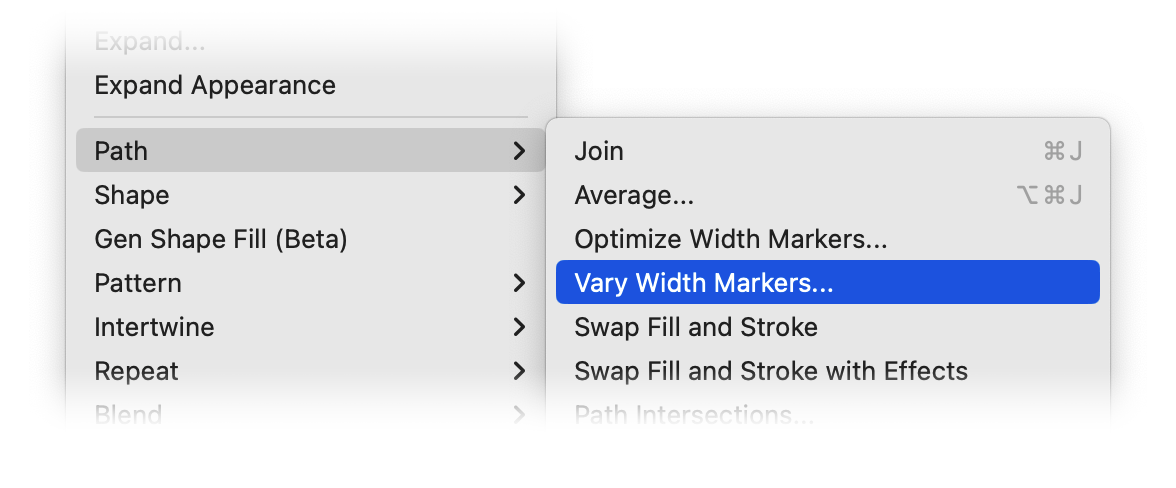
Very Width Markers Menu Item
The menu item will only be available (ungrayed) if the selection contains one or more paths; however these do not need to already be of variable width. Choosing the menu command brings up the Vary Width Markers dialog:

Very Width Markers Dialog
The varied markers are created randomly; each time a parameter is changed, a different random seed will be used to create the marker variations.
1. Min Variation
Specifies the minimum width, as a percentage of the original width, that a new width marker can randomly be assigned. It can range from 0% (new markers can be all the way down to zero width) to 100% (new markers will never get smaller).
2. Max Variation
Specifies the maximum width, as a percentage of the original width, that a new width marker can randomly be assigned. It can range from 100% (new markers will never get bigger) to 1000%.

Very Width Markers Min. and Max. Examples
3. Spacing
Specifies the space between the new varied width markers along the path, from 1 pt to 144 pt. Caution should be used when applying small values to long paths, as Illustrator may have trouble with paths that contain very high numbers of markers.
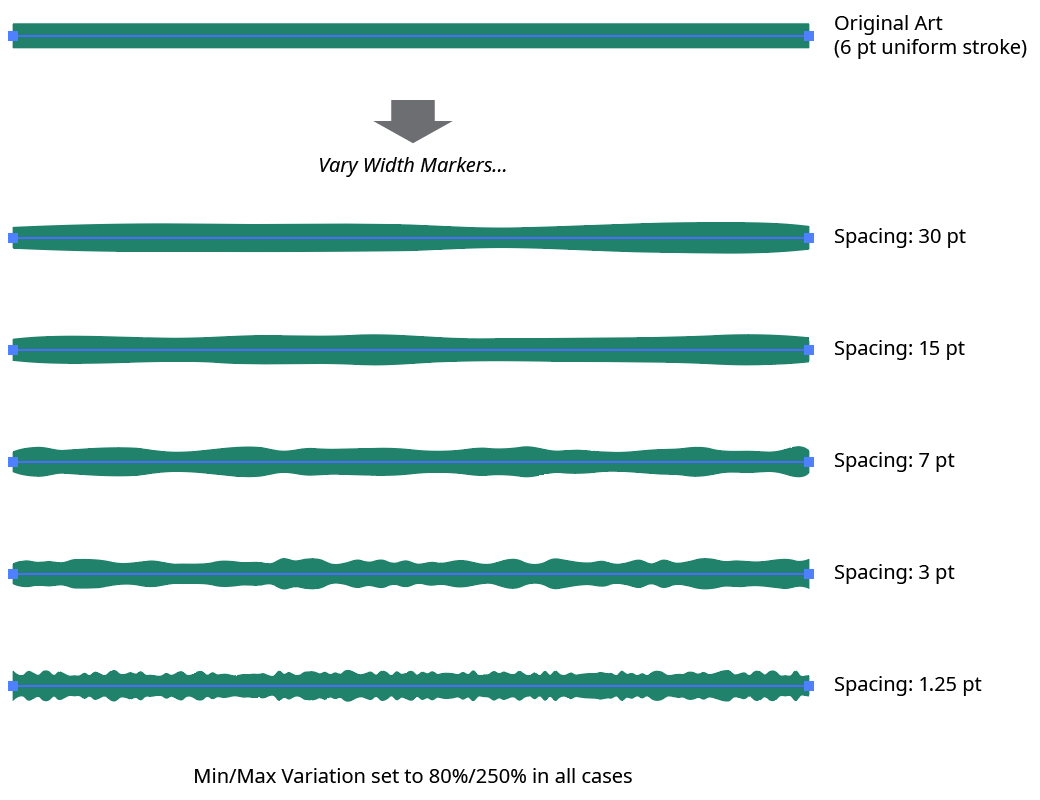
Very Width Markers Spacing Examples
4. Existing Marker Handling
Specifies the mode used to handle existing width markers when using Vary Width Markers on a stroke that is already variable width:
In Replace mode, the original stroke width profile is used to set the initial widths of the new markers, which are then randomly varied. The original markers are not kept.
In Merge mode, the new markers are initially set to the average width of the existing stroke (i.e., as if it were uniform width), and then randomly varied. This mode is generally only useful when adding a variation with large spacing over an existing variation with fairly small spacing.
In Leave Unchanged mode, new markers are added (unless they are too close to an existing width marker) with their initial width set to the current stroke profile’s width at each spot; only the new markers are then randomly varied.

Very Width Markers Existing Marker Handling
5. Vary From Side to Side
When enabled, the width added or subtracted randomly from the new width markers may be unequally distributed on the left and right, creating non-centered markers:

Very Width Markers Vary from Side to Side
6. Preview Checkbox
When enabled, the selected paths are updated on the screen to show how they would appear if they received varied markers using the current settings. The control can be toggled on and off to force a new random seed to change the variation without changing any parameters.
Illustrator Location:
Illustrator Main Menu > Object > Path > Optimize/Vary Width Markers...
Both Optimize Width Markers and Vary Width Markers can be recorded and played back as Actions.
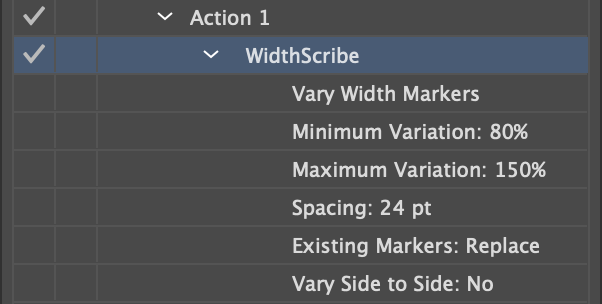
Actioned Very Width Markers
Illustrator Location:
The Scale Strokes operation allows the stroke weights of the selected art (but not the art itself) to be scaled up or down, in either an absolute or relative manner. A minimum weight can be specified, and final stroke weights can be rounded to a specified precision. Additionally, dashes, brushed strokes, and variable weight strokes can be selectively excluded from the scaling operation.

QuickOps Scale Strokes Overview
Clicking the button brings up the settings dialog:
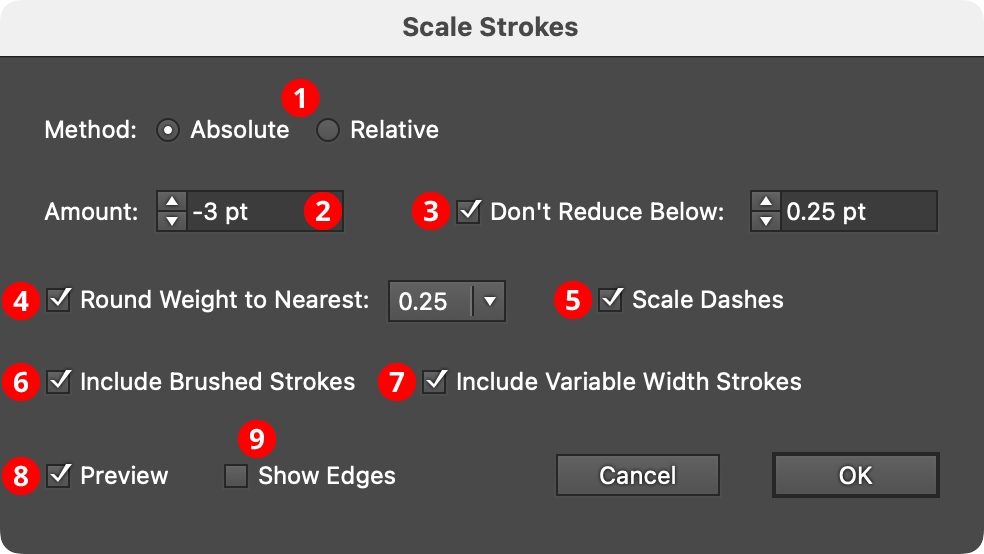
QuickOps Scale Strokes Settings
Note that stroke weight units are set independently from “general” units in Illustrator’s preferences dialog. Changing the unit of measurement for the document by right-clicking on a ruler will only change the general units, not the stroke weight units.
1. Method
With the Absolute method, each stroke weight is modified by adding a fixed amount to it; this amount can be positive or negative. Weights that end up at 0 pt or less will result in the stroke being removed (unless the Don’t Reduce Below setting is used). With the Relative method, each stroke weight is modified by multiplying it by a specified percentage.

QuickOps Scale Strokes Absolute Vs. Relative
2. Amount
The amount to change the stroke weight(s), either as an absolute amount, like “–2 pt” or “3.5 mm”, or a relative amount, like 75%. Absolute amounts can range from –1000 to 1000 pt. Relative amounts can range from 0.01% to 10000%. When a negative absolute amount causes at least one stroke to end up with a weight of zero or less, and therefore be removed, a small warning icon will appear on the dialog.
While an Absolute value of zero (or a Relative value of 100%) does not directly change any stroke weights, it can still be useful when used with the Round Weights function (see below).
3. Don’t Reduce Below
When enabled, and the Absolute value is negative or the Relative value is less than 100%, strokes will never be made thinner than the specified value. Strokes that originally had weights below that minimum value will remain unchanged.

QuickOps Scale Strokes Don't Reduce Below
4. Round Weight to Nearest
When enabled, all stroke weights will be rounded to the nearest specified fraction, using the current stroke units of measurement. Available fractional rounding amounts are 1.0 (in other words, the nearest integer), 0.5, 0.25, 0.1, 0.05, and 0.01.
For example, a 2.38 mm stroke would be rounded down to 2 mm when the rounding fraction is 1.0, up to 2.5 mm when the rounding fraction is 0.5, and up to 2.4 mm when the rounding fraction is 0.1. Weights that would normally be rounded down to zero are instead rounded up. Similarly, if Don’t Reduce Below is enabled, and a weight would be rounded down below the threshold, then it is instead rounded up.
5. Scale Dashes
When enabled, dash and gap lengths are scaled up or down with the stroke.
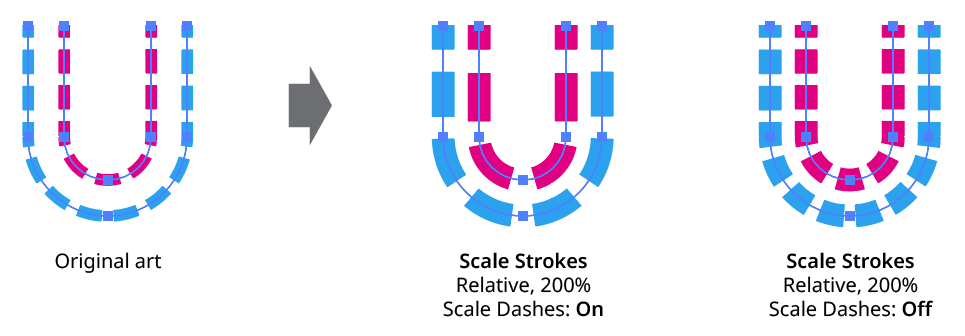
QuickOps Scale Strokes Scale Dashes
6. Include Brushed Strokes
The Include Brushed Strokes setting can be turned off to exclude strokes that have a brush applied from being scaled. This applies to all types of brushes (Calligraphic, Scatter, Art, Bristle, and Pattern).
7. Include Variable Width Strokes
The Include Variable Width Strokes setting can be turned off to exclude strokes that have a variable width profile applied from being scaled.

QuickOps Scale Strokes - Include Brushed and Variable Width Strokes
8. Preview
When Preview is enabled, the artwork’s new appearance with its scaled strokes is shown on the artboard, and will update whenever the settings are changed. Turning Preview off will show the artwork with its original stroke weights, allowing you to toggle to quickly see “before and after.”
9. Show Edges
By default, artwork selection edges are automatically hidden when the Scale Strokes settings dialog is up, to make it easier to see stroke weight changes. However, by toggling the checkbox on, they may be shown again.
Scale Strokes: Other Considerations
a. Strokes which are hidden in the Appearance panel are scaled as normal.
b. If an object contains multiple strokes, they are all scaled.
c. If some stroked items are grouped and a stroke is added at the group level, then when the entire group is selected, both the group-level stroke and the group member strokes are scaled.
d. If the type tool has been used to select some text, only the selected characters will be affected.
e. InkFlow strokes do not use the native stroke weight for their appearance, but can be scaled using the Live Effect Parameter Editor.
