Reposition
 Reposition Point Tool
Illustrator Location:
Advanced Toolbar > PathScribe Stack > Reposition Point Tool
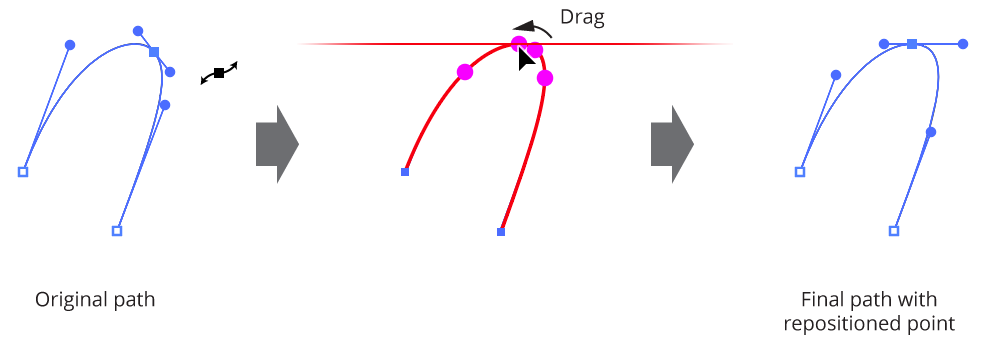
To reposition an anchor point, it must be selected first. Although this can, of course, be done with any selection tool, the Reposition Point tool itself can be used to marquee-select anchor points. Then, simply drag the anchor point(s) to a new position along the path. While dragging, the new shape of the path is displayed in red, so you can see how much the path geometry may have changed. Positions along the path where the tangent angle equals any of the 45° increments around the general constrain angle are highlighted with magenta dots, and the repositioned point will snap to these positions, displaying a red guide which is the tangent line.
Reposition Point Tool Overview
To suppress the tangency snapping, Command/Ctrl can be pressed while dragging. The Space bar can also be pressed, to suppress all annotations.
If an endpoint of an open path is selected, it will be ignored, since it cannot be moved.
Illustrator Location:
Advanced Toolbar > PathScribe Stack > Reposition Point Tool
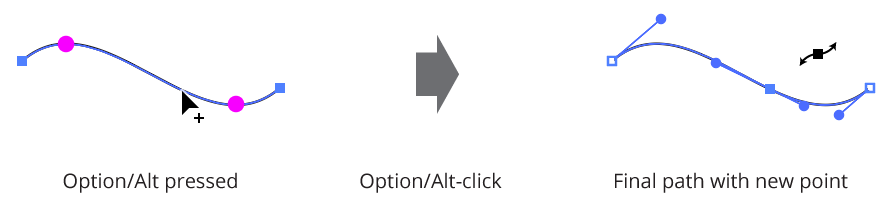
As a convenience, the Reposition Point tool can also add and remove points to a path by pressing the Option/Alt key when hovering over the path (to add) or an existing point (to remove). The cursor reflects the operation which will be carried out. When adding a point, tangency snapping is in effect.
Add points with reposition point tool
Fast and Accurate Modes
By default, the tool operates in “Accurate” mode, which keeps the path’s geometry as close as possible to the original while allowing for the new point position(s). For smoother drag action (but somewhat more inaccurate results), the A key may be pressed to switch to “fast” mode.