Randomize + Color Editing
 Randomino Panel
Color Randomizer Live Effect
 Randomini Tool
 Gradient Forge Panel
Illustrator Location:
Illustrator Main Menu > Window > Astute Graphics > Randomino
Changes the color(s) of the selected objects in a random way.
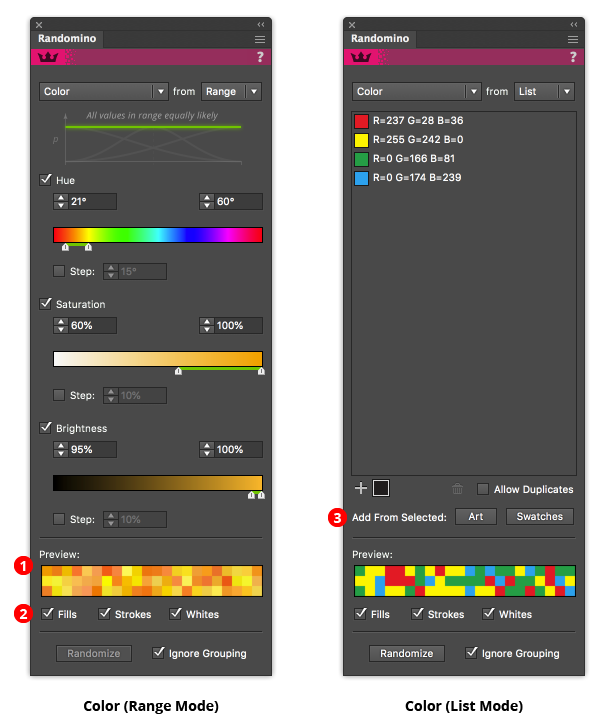
Randomino Panels Color Callouts
In Range mode, color is controlled using the Hue-Saturation-Brightness (HSB) model. Each of the three parameters may be independently controlled (or disabled entirely), with one restriction: all must use the same distribution model. Each parameter’s value may be entered in the numerical input boxes or adjusted by dragging the slider controls. Shift-clicking the thumb area resets the thumbs to the entire range of valid values.
1. Color Preview area
When all three color parameters are enabled, the preview area shows a random selection of colors which would be generated using the current settings. When only one or two of the three parameters are being changed, the preview area shows a selection of colors on top (a standard set if nothing is selected; otherwise colors from the selected art) and the same colors that would result from randomly changing their parameters.
2. Fills/Strokes/Whites checkboxes
You may choose to modify fill colors, stroke colors, or both. In addition, you can choose to affect white colors or not. Gradients (both standard and freeform) are modified on a stop-by-stop basis. Gradient meshes are modified on a selected node-by-node basis. Randomino does not change the colors of raster art.
Tip: If randomizing the colors of art seems to have no effect, check whether 1) the stroke or fill checkbox is disabled; or 2) you are attempting to modify the color of a group (which may not exist if the group does not have an independent fill or stroke) with the “Ignore Grouping” checkbox disabled.
3. Add From Selected buttons (list mode only)
While colors may be added to the list one by one using the color picker interface, it is often useful to add several colors at once, either from the currently selected artwork or from the currently selected swatches.
Illustrator Location:
Illustrator Main Menu > Effect > Randomino > Color Randomizer...
Color Randomizer is an Astute Graphics live effect for randomly and non-destructively varying the hue, saturation, and/or lightness of one or more objects. Both linear and Gaussian random distributions are supported, and the variation amounts can be quantized to a specific number of distinct values. Objects can be “filtered” so only some of them are affected, and, when applying the effect to nested groups, the depth at which it is applied can be specified.

Color Randomizer Example
As with most live effects, Color Randomizer appears in the main menu, under Effect > Randomino. It can also be applied directly from the Appearance panel using the “Add New Effect” button at the bottom of the panel.
Color Randomizer Parameters Dialog
After applying the live effect using the menu item (or when clicking on the existing effect in the Appearance panel to edit it), the parameters dialog will appear:
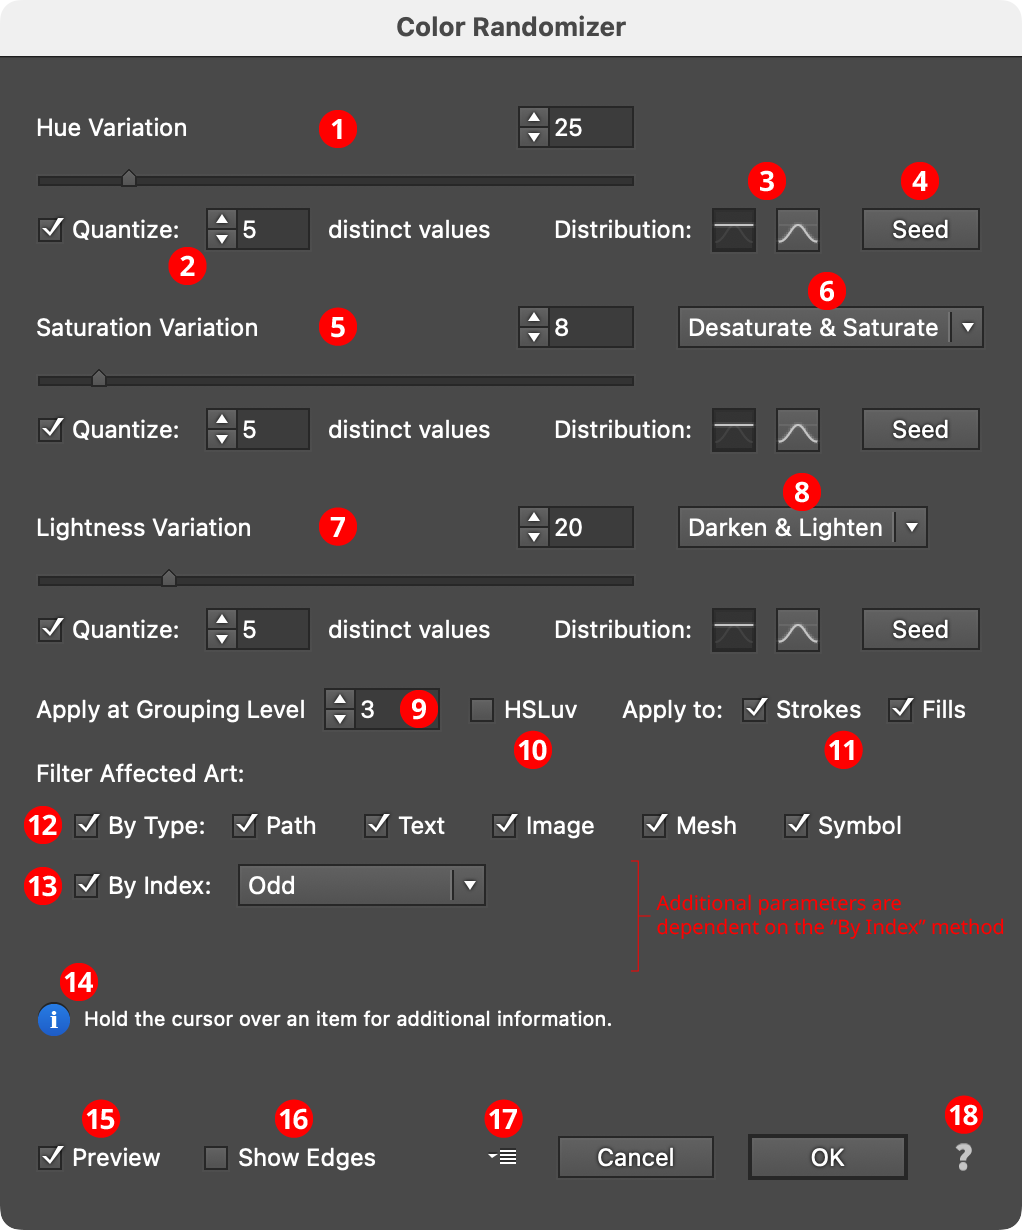
Color Randomizer Parameters Dialog
1. Hue Variation
The amount of variation in hue to apply, ranging from 0 (no variation) to 180 (maximum variation). The value can be changed with the slider or entered numerically in the text box.
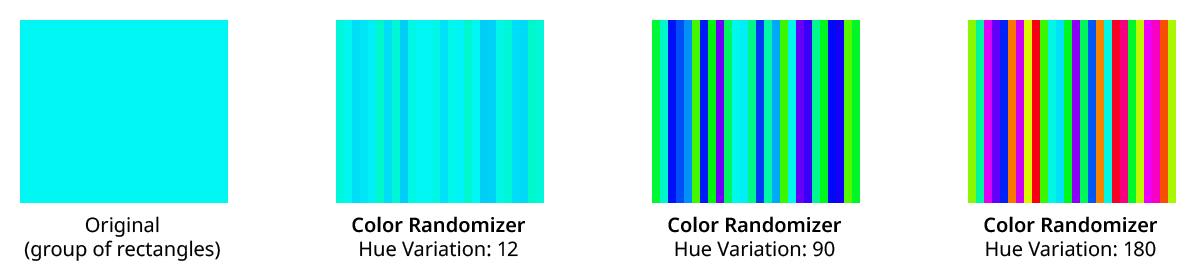
Color Randomizer Hue Variation Examples
Variation values are equivalent to moving in both directions the specified angle away from the original hue around the color wheel. The full wheel is 360°, so a variation of 90 would move 90° or one-quarter of the way, in each direction around the wheel. Any hue between these two end colors may be randomly picked.

Color Randomizer Hue Variation
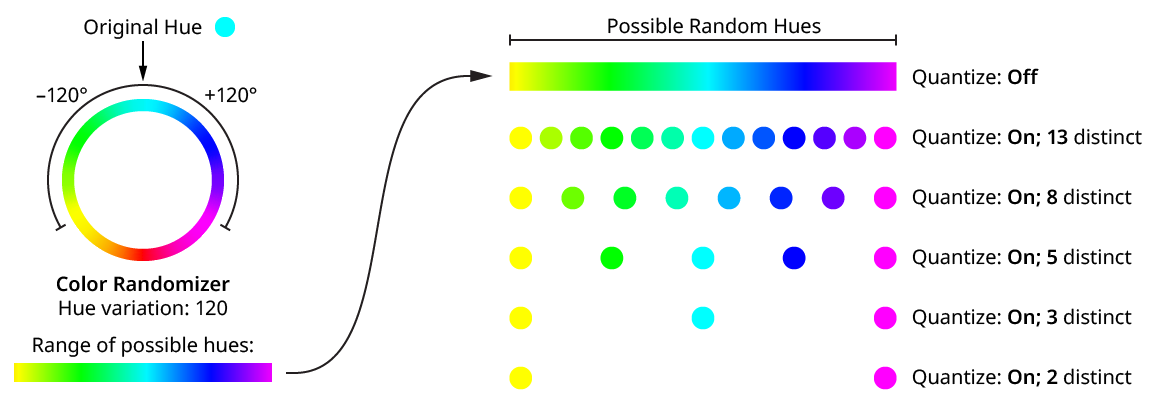
2. Quantize
Reduces the range of random variation values so only the specified number of distinct values are produced. For example, a hue variation of 45 would normally produce any value between –45 and 45 — say, 17.63. However, with Quantize turned on and 5 distinct values, the only values that will result are –45, –22.5, 0, 22.5, and 45. Quantized values always include the two end values with some number of evenly-spaced values in between.
Color Randomizer Hue Variation Quantize
Note that when using a variation of 180 or close to it, the two end values result in the same or roughly the same hue (since they are both halfway around the color wheel, though in opposite directions), so the number of distinct values will appear to be one fewer than specified.
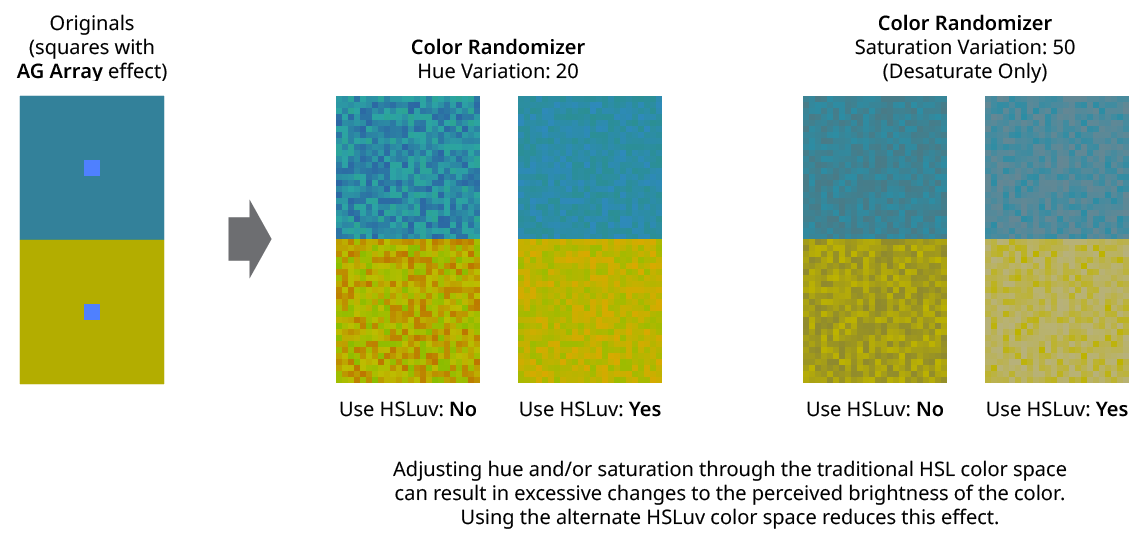
Using the HSLuv color space (see below) changes the way hue and saturation changes are made.
3. Distribution Curves
Specifies either a linear distribution in random values (all values in the range are equally likely to be chosen) or a Gaussian distribution (central values in the range are more likely to be chosen).
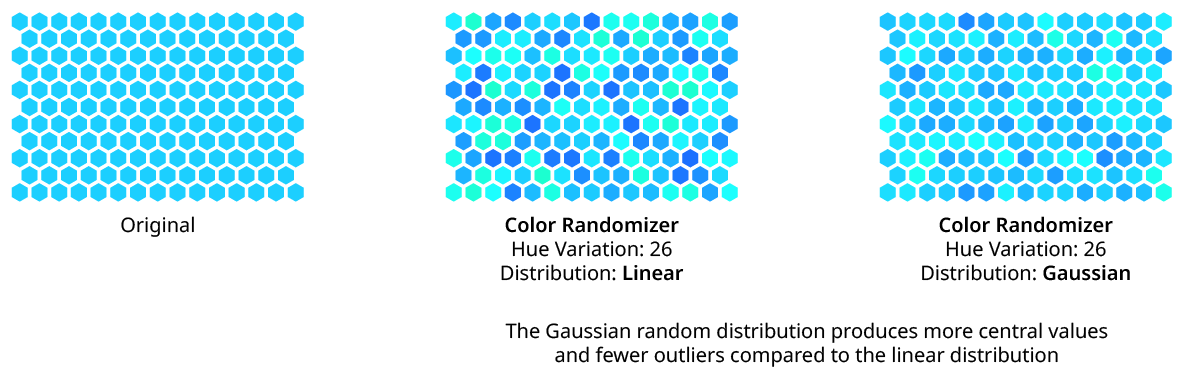
Color Randomizer Distribution
4. Seed
Each random seed number leads to a different sequence of random values. Clicking the button picks a new seed, thereby changing the look of the artwork. To view or specify the seed number directly, Option/Alt-click the button. This lets you recreate a previously-generated look.
5. Saturation Variation
The amount of variation in color saturation to apply, ranging from 0 (no variation) to 100 (maximum variation). Saturation changes are made in the same way that Photoshop and the Phantasm plugin calculates them (unless the HSLuv color space is being used; see below).
6. Saturation Direction
The dropdown menu specifies whether the saturation variation applies in both the negative and positive directions (Desaturate & Saturate), or in just one direction (Desaturate Only or Saturate Only).
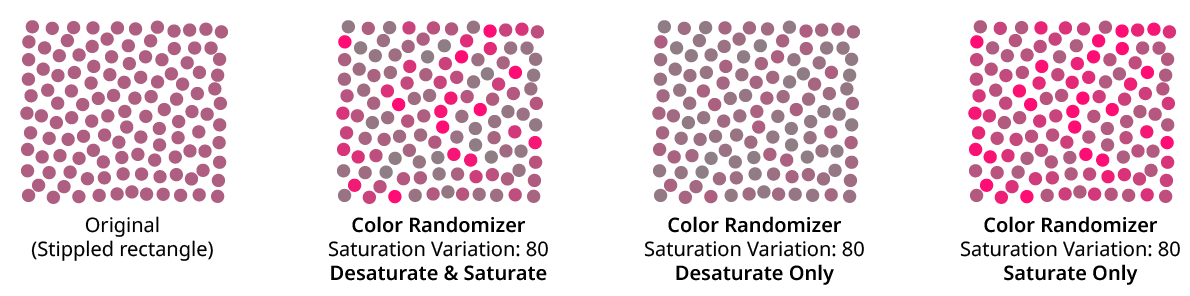
Color Randomizer Saturation Variation Examples
7. Lightness Variation
The amount of variation in lightness to apply, ranging from 0 (no variation) to 100 (maximum variation).
8. Lightness Direction
The dropdown menu specifies whether the lightness variation applies in both the negative and positive directions (Darken & Lighten), or in just one direction (Darken Only or Lighten Only).
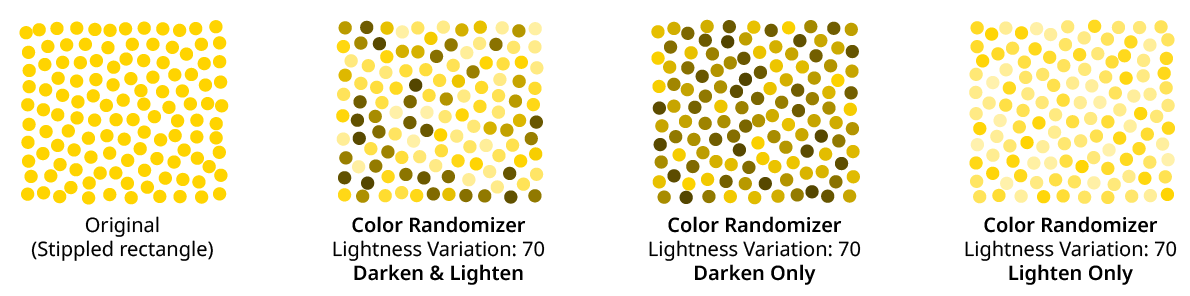
Color Randomizer Lightness Variation Examples
9. Apply at Grouping Level
Unless a live effect is applied above all strokes and fills (a “pre” effect), or inside a stroke or a fill and above other live effects, the art object internally passed to it is always a group. And this group may contain other groups, and so on. The Grouping Level controls the level at which the effect is applied, which affects what elements in the hierarchy get different random opacities. It can range from 0 (representing the top-level art) to 29 (the deepest level of group nesting allowed in Illustrator).
In the simplest case (when the effect is applied to a single stroked-and-filled path), the live effect mechanism separates the stroke from the fill, and passes a stroke-only path and a fill-only path to the live effect in a group. So while a Grouping Level of 0 would apply the same (random) hue change to the stroke and fill (because it is applied at the top grouping level), a Grouping Level of 1 would cause it to choose a different hue change for the fill than that of the stroke:
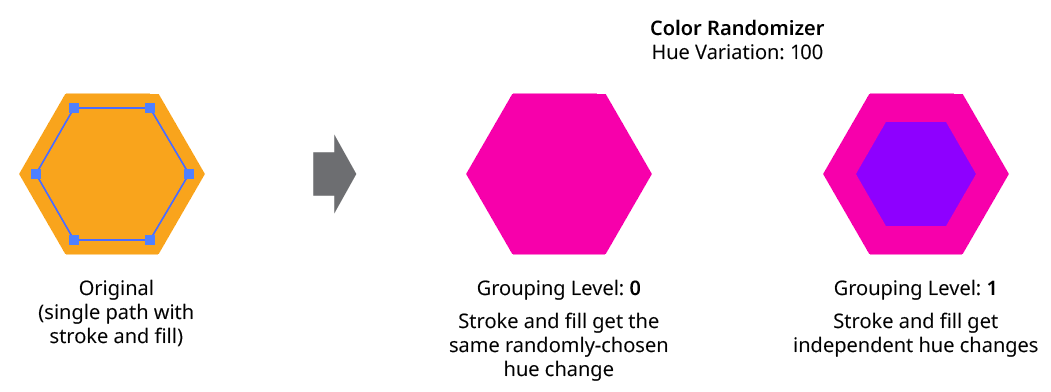
Color Randomizer Grouping Level on Simple Path
Next, consider the case of applying Color Randomizer to a group of stroked and filled paths. This top-level group may or may not have its own stroke and/or fill in its appearance. Here, the group passed to the effect has three groups inside it. One is composed of the paths with group level strokes (if there is no group level stroke, these would have no stroke or fill); another is composed of the paths with group level fills (similarly, if there is no group level fill, these would also have no stroke or fill); and the last is composed of the original paths in the group (and here, strokes and fills are not broken apart).
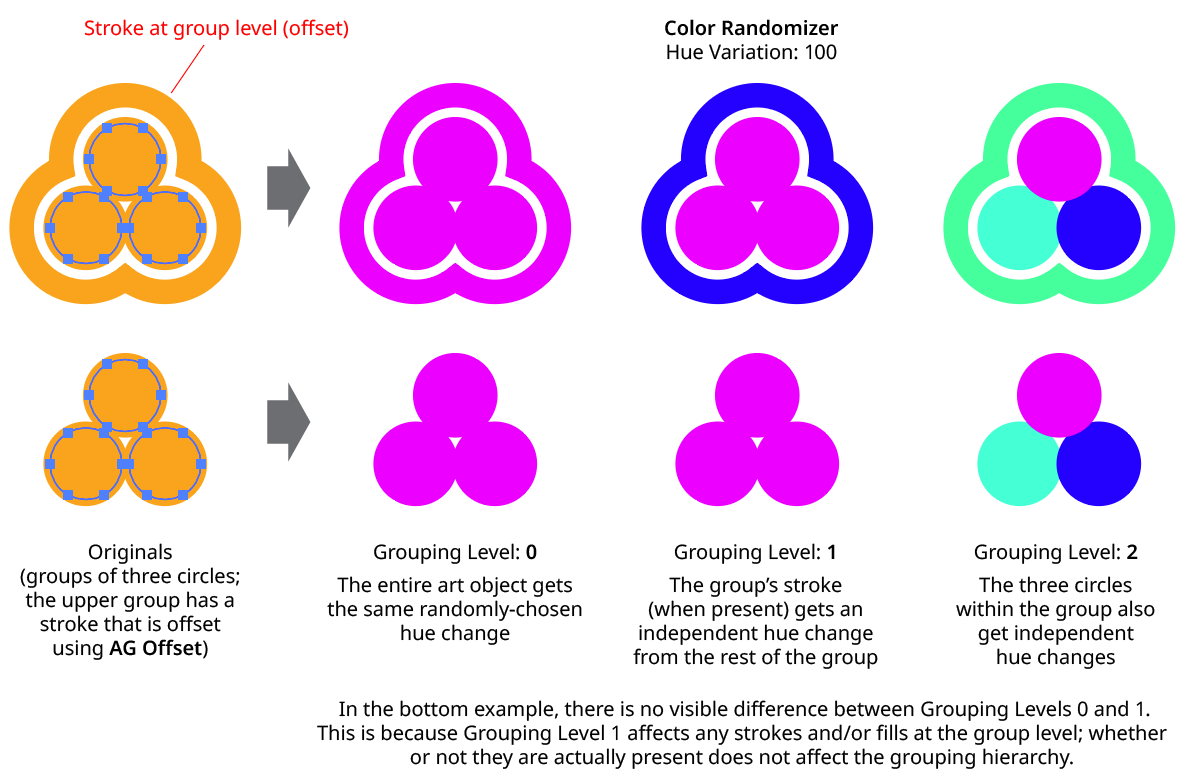
Color Randomizer Grouping Level on Group of Paths
In general, each nested group in the original art requires two Grouping Levels to “dig into,” due to the fact that a group stroke or fill can be present at each level. Because it can be difficult to anticipate what Grouping Level to use because the live effect mechanism can be complicated, it is recommended to simply increase the Grouping Level until the results are what is desired (changing the seed, if necessary, to see what is really changing independently). Setting the Grouping Level above the highest “valid” value will not cause a problem.
10. HSLuv
When enabled, the color changes are made using the HSLuv color space, which reduces perceived brightness changes when the hue and/or saturation is shifted.
Color Randomizer Use HSLuv
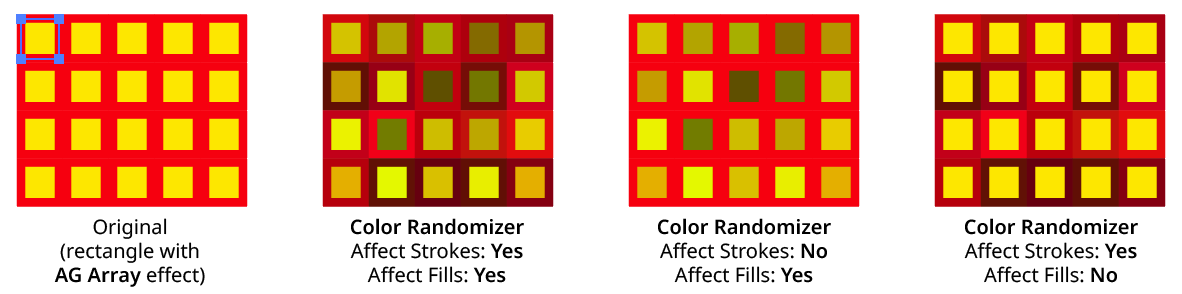
11. Apply To Strokes/Fills
Allows strokes and/or fills to be ignored by the effect. If both options are turned off, the effect would still apply to raster images.
Color Randomizer Apply to Strokes/Fills
12. Filter Affected Art By Type
When enabled, only the art types that have a checkmark next to them will have their colors randomly changed. For example, if many images are each grouped with a text caption, the colors of just the images could be randomized by turning off the “Text” checkbox:

Color Randomizer Filter by Type Example
13. Filter Affected Art By Index
When enabled, each art object’s index is used to determine whether it should have its color randomly changed, using one of seven different methods. The index is simply an integer sequentially assigned to each object at the specified Grouping Level in the order it is encountered, starting with zero for the first object. Generally, the index increases going downwards in the stacking order; however, other live effects present in the appearance stack may change this order, sometimes randomly (such as PathFinder effects). The available By Index methods are as follows:
a. First: Only the first n objects are affected, where n is the specified value.

Color Randomizer by Index First Controls

Color Randomizer Filter by Index - First
b. Last: Only the last n objects are affected, where n is the specified value.

Color Randomizer by Index Last Controls

Color Randomizer Filter by Index - Last
c. First or Last: Only the first and last objects are affected.
d. Odd: Only objects with an odd index (1, 3, 5, 7...) are affected.
e. Even: Only objects with an even index (0, 2, 4, 6...) are affected.

Color Randomizer Filter by Index - Odd & Even
f. Pattern: Creates a repeating pattern of matching indices based on the three pattern parameters.

Color Randomizer by Index Pattern Controls
Initial Skip specifies the number of indices to skip over at the start (art with these indices will not be affected). Then, Match specified the number of indices that will match and therefore be affected. Finally, Skip specifies the number of indices to skip over following the matching indices. When the total of the values in the three parameters is less than the number of eligible art objects, the pattern repeats, using the Match and Skip values in alternation.
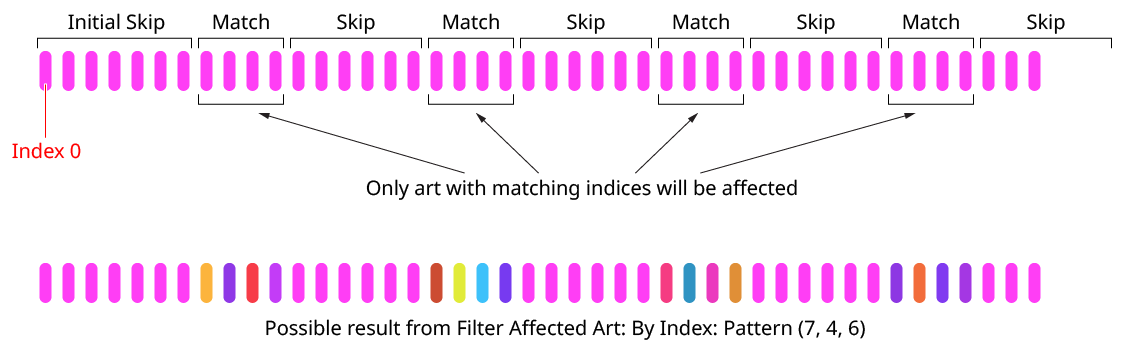
Color Randomizer Index by Pattern
g. Randomly: Each art object has the specified random chance (from 0% to 100%) of being affected. The parameter has a seed value that is independent from the hue/saturation/lightness seed values. Just as with those seed values, clicking the button picks a new seed, thereby changing the look of the artwork. To view or specify the seed number directly,
Option/Alt-clickthe button. This lets you recreate a previously-generated look.

Color Randomizer by Index Randomly Controls

14. Informational area
Shows a brief description of each control when the cursor is being hovered over it.
15. Preview
As with all live effects, when enabled, changing a parameter will immediately update the artwork while the dialog is still open.
16. Show Edges
By default, artwork selection edges are automatically hidden when the Color Randomizer parameters dialog is up, to make it easier to see color changes. However, by toggling the checkbox on, they may be shown again.
17. Defaults Popup Menu
Contains several functions concerning the default Color Randomizer settings. Default settings are those that initially appear in the parameters dialog whenever Color Randomizer is applied to art as a new effect (i.e., not when adjusting an existing instance of the effect).
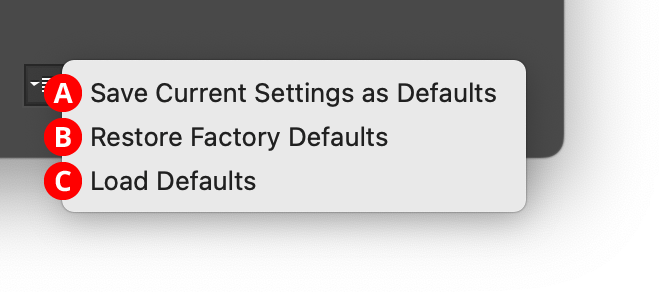
Color Randomizer Defaults Menu
A. Save Current Settings as Defaults: The settings that are currently displayed in the dialog will be saved and used as the defaults in the future.
B. Restore Factory Defaults: The default settings will be restored to those that were in place when the plugin was installed and run for the first time. They will also automatically be loaded into the dialog.
C. Load Defaults: All current settings will be replaced with the default settings (which may have been customized through the first menu item).
18. Help Button
Opens the help documentation in the Astute Manager. If this does not automatically appear, please ensure your Astute Manager is running first.
Illustrator Location:
Advanced Toolbar > Randomini Tool
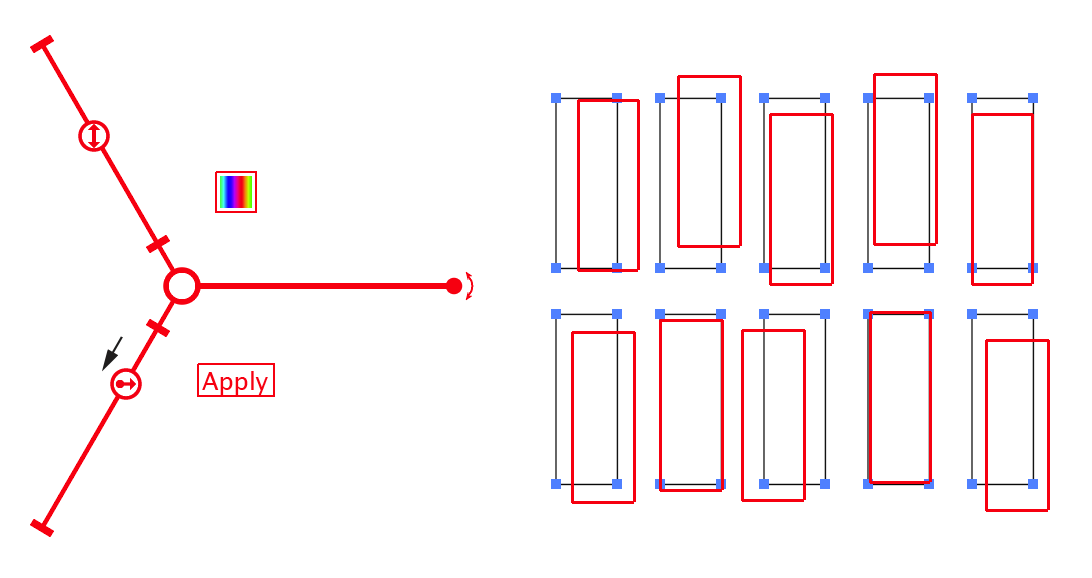
When one or more art objects are selected and the Randomini tool is in use, its widget will appear, initially centered over the bounds of the selected art (it may later be repositioned; see below). By using the cursor to click or drag parts of the widget, the artwork can be edited. Except for Hue, all changes are previewed using outlines and are not actually applied to the art until the Apply button is clicked or the Enter key is pressed. Therefore, if you change your mind and decide not to randomize the art, simply switch to another tool and the art will remain as it was. All parameters are retained between uses of the tool. When not over a widget control, the cursor for the Randomini tool has the shape of a die showing various random faces. When nothing is selected, the Randomini tool can be dragged to marquee-select artwork.
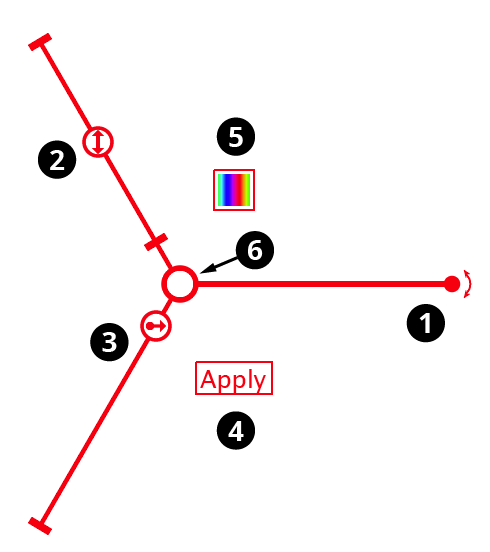
Randomino annotation widget
1. Rotation arm and control
Dragging the rotation control changes the angle up to which each piece of art will be randomly rotated around its bounding box center, in either a clockwise or counterclockwise direction. For example, setting the rotation arm at a 24° angle will cause the preview art to be rotated anywhere from -24° to 24°:
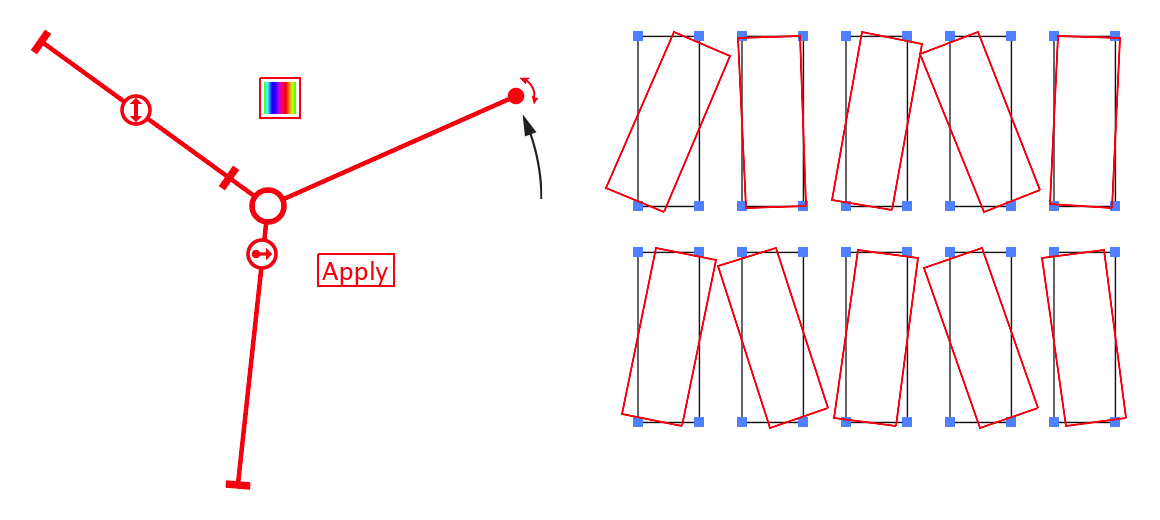
Randomino rotation arm preview
The rotation control may be double-clicked to set the rotation value numerically. Holding down the Shift key when dragging the control causes it to be constrained to steps of 10°. Holding down Command/Ctrl while dragging it enables “Slow-Drag,” which moves the control as if all cursor movements were reduced tenfold, allowing for fine-tuning.
2. Scale slider and thumb
Dragging the scale thumb changes the value up to which each piece of art will be randomly scaled from its bounding box center. For example, setting the scale value to 150% will cause the preview art to be scaled anywhere from 100% to 150%:
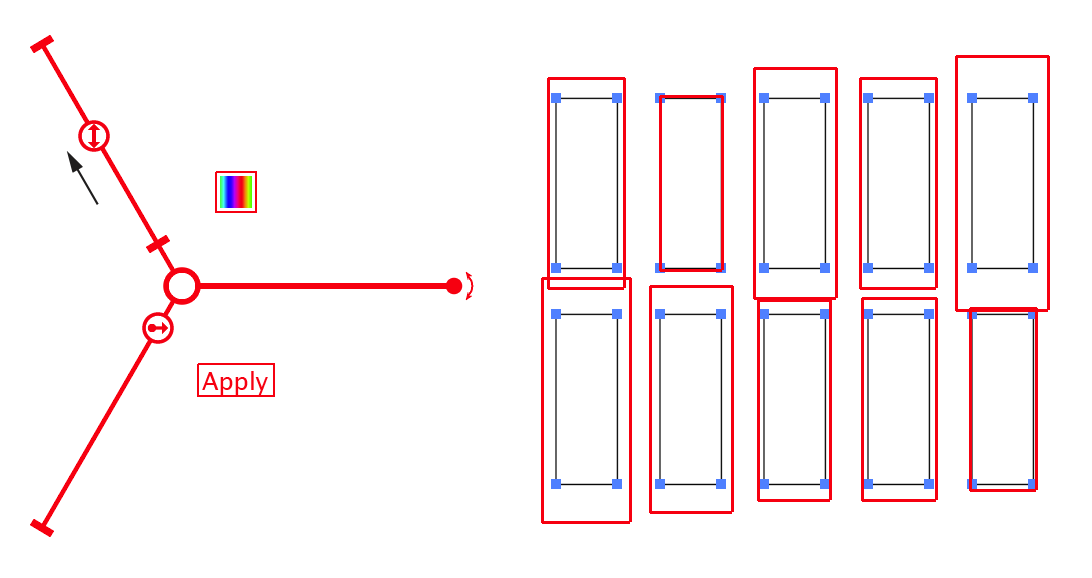
Randomini scaling control arm
The scale thumb may be double-clicked to set the scale value numerically. Holding down Shift while dragging the thumb causes the scale values to be constrained to integer values. Holding down Command/Ctrl enables “Slow-Drag”, as per the Rotation control.
3. Offset slider and thumb
Dragging the offset thumb changes the value up to which each piece of art will be randomly offset (shifted in position). For example, setting the offset value to 6pt will cause the preview art to be moved anywhere from 0 to 6 points. The offset direction is randomly chosen.
Randomini offset slider annotation
As with the scale thumb, the offset thumb may be doubleclicked to set the value numerically, Shift-dragged to constrain the value, or Command/Ctrl-dragged to enable “Slow-Drag.”
4. Apply button
Clicking the Apply button applies the currently displayed random rotation, scaling and offset to the selected art, as previewed. Immediately afterwards, since the art is still selected, new random parameters will be selected and previewed, allowing you to quickly apply multiple randomizations. To automatically deselect the art after applying the randomization, hold down Shift while clicking the Apply button. Pressing the Enter key has the same effect as clicking the Apply button unless no art is selected, in which case it opens the tool preferences dialog.
5. Hue button
Clicking the Hue button immediately randomizes the hues (strokes and fills) of the selected art. Note that black (which has zero brightness) and white (which has maximum brightness) are not affected by changing the hue. Also note that grouped objects are only affected if they have a stroke or fill applied in the Appearance panel at the group level, unless the “Ignore Grouping” preference is enabled (see Randomini: Preferences). Type objects are only affected if they have a stroke or fill applied in the Appearance panel above the Characters; to change the color of individual characters, use the Randomino panel.
6. Center control
The center control may be dragged to reposition the entire widget. Doubleclicking the center control resets all parameters to their default values (i.e., no rotation, no scaling, and no offset).
Illustrator Location:
Illustrator Main Menu > Window > Astute Graphics > Gradient Forge
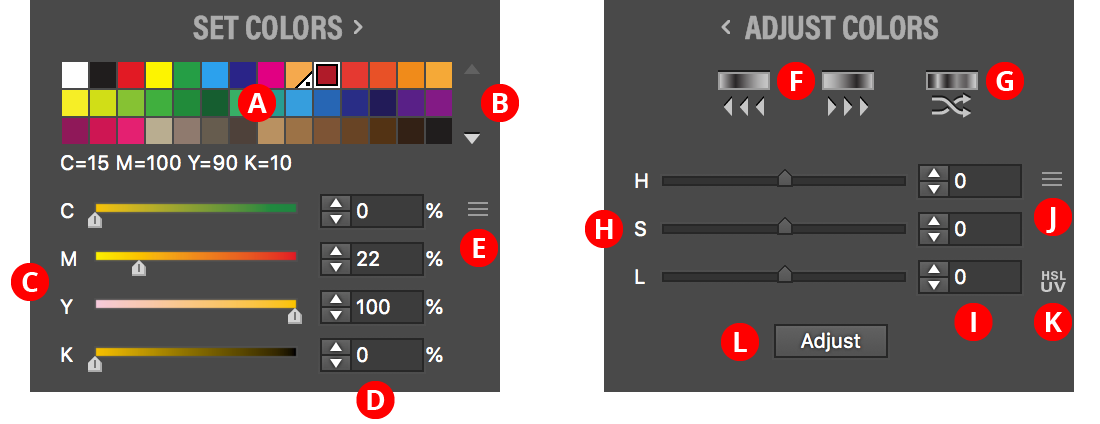
Contains controls which set or adjust the colors of selected stops. To switch between Set Colors and Adjust Colors, click the header text.
Gradient Forge Panel Set Adjust Colors Section
A. Swatch List
Shows all of the flat color swatches (i.e., no gradients or patterns) in the document. Each swatch’s name is shown below the grid when the cursor is hovered over it. Clicking on a swatch will change the color of the selected stop(s). Holding Option/Alt while clicking automatically advances the stop selection to the right after recoloring. A swatch may be dragged upwards into the Editing Area just below the gradient preview to add a new stop or recolor an existing stop without having to select it first.
B. Swatch Scroll Arrows
If more 42 swatches exist, these arrows are enabled, allowing you to scroll the list up or down to reveal additional rows of swatches.
C. Color Sliders
Similar to the native Color panel; display and allow editing of the color of the currently selected stop(s). When a global or spot color is being edited, the single slider specifies the tint of the color.
D. Color Value Inputs
Reflect the same color values as displayed in the sliders but allow precise numeric input of these values.
E. Color Model Popup Menu
Available when all selected stops have colors using the same color model; allows switching the color model for editing the color(s), choosing between Grayscale, RGB, HSB, HSLuv, and CMYK. Unlike the native Color panel, switching the color model will immediately convert the color(s) to the chosen model, which may change the color when the gamut of the new color model does not include the original color.
F. Rotate Colors Left/Right Button
Changes the colors of the selected stops (or all stops, if no stops are selected) so the color of each stop is moved one stop to the left/right (wrapping around for the end stops). This, therefore, has the effect of rotating the colors either to the left or right. The positions of the stops themselves are not changed.
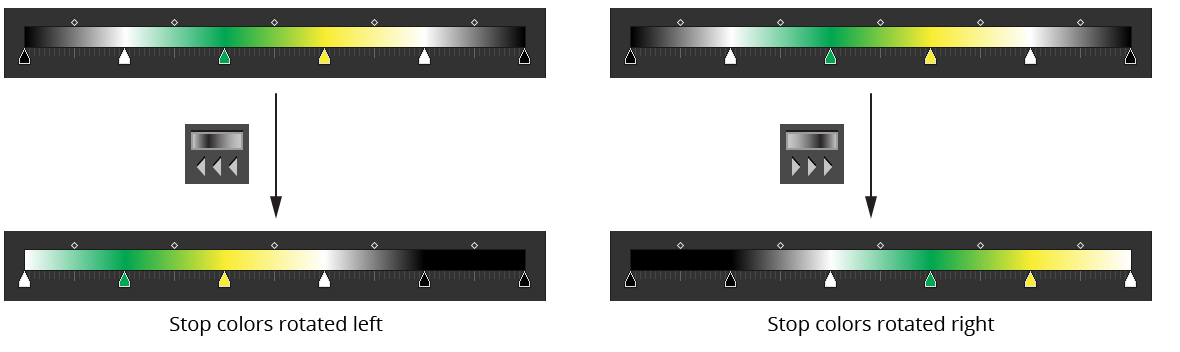
Gradient Forge Panel Rotate Example
G. Randomize Color Order Button
Randomizes the order of the colors of the selected stops (or all stops, if no stops are selected). The positions of the stops themselves are not changed. A new random seed is used on each press of the button, which usually results in a different look.
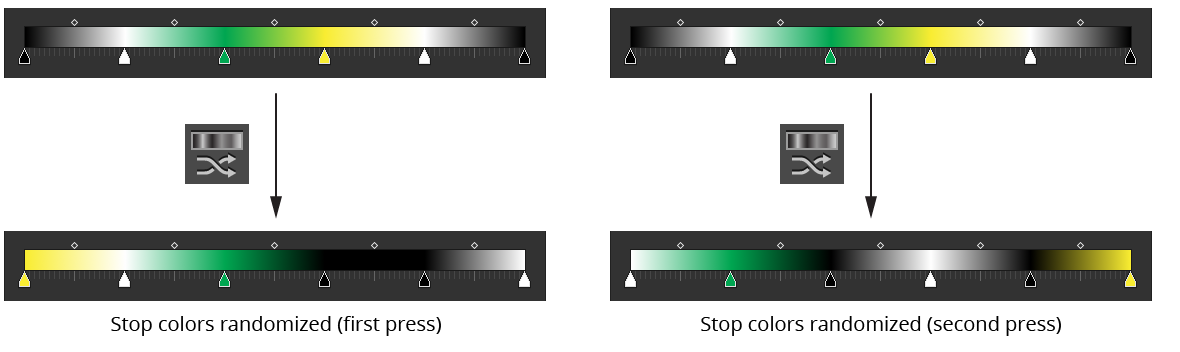
Gradient Forge Panel Randomize Example
H. HLS Sliders
Control the Hue, Lightness and Saturation values which modify the colors of the selected stops when the Adjust button is pressed. While the sliders are dragged, the gradient preview will change in real-time to show what the color would look like with the current adjustment. The H, S and L labels may be clicked to reset each corresponding value to zero.
I. HLS Value Inputs
Reflect the same values that are displayed in the HLS Sliders, but allow precise numeric input of these values. Hue change can vary from -180 to 180; Lightness and Saturation can vary from -100 to 100.
J. HLS Popup Menu
Allows you to use the HSLuv color space instead of the default HSL colorspace (see https://www.hsluv.org).
K. HLSuv Indicator
When visible, indicates that the HSLuv color space is being used.
L. Adjust Button
Applies the adjustment specified by the HSL values to the color(s) of the selected stop(s) (or all stops, if no stops are selected). Stops with spot colors are not affected. When the cursor is hovered over the button, the gradient preview will change to show what the color(s) would look like after adjustment with the current values, but the gradient will not actually be changed until the button is pressed.