Position
 Randomini Tool
 Randomino Panel
 Gradient Forge Panel
Illustrator Location:
Advanced Toolbar > Randomini Tool
When one or more art objects are selected and the Randomini tool is in use, its widget will appear, initially centered over the bounds of the selected art (it may later be repositioned; see below). By using the cursor to click or drag parts of the widget, the artwork can be edited. Except for Hue, all changes are previewed using outlines and are not actually applied to the art until the Apply button is clicked or the Enter key is pressed. Therefore, if you change your mind and decide not to randomize the art, simply switch to another tool and the art will remain as it was. All parameters are retained between uses of the tool. When not over a widget control, the cursor for the Randomini tool has the shape of a die showing various random faces. When nothing is selected, the Randomini tool can be dragged to marquee-select artwork.
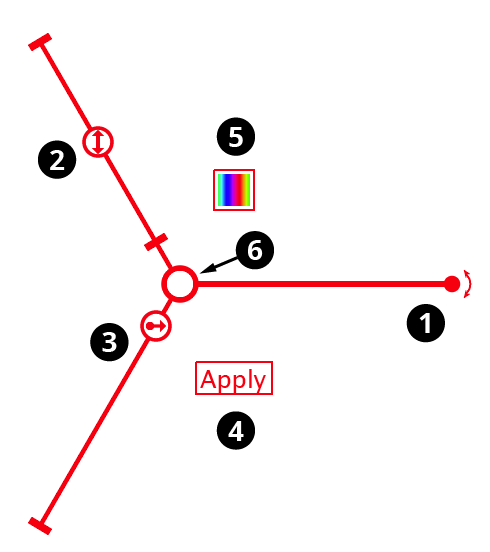
Randomino annotation widget
1. Rotation arm and control
Dragging the rotation control changes the angle up to which each piece of art will be randomly rotated around its bounding box center, in either a clockwise or counterclockwise direction. For example, setting the rotation arm at a 24° angle will cause the preview art to be rotated anywhere from -24° to 24°:
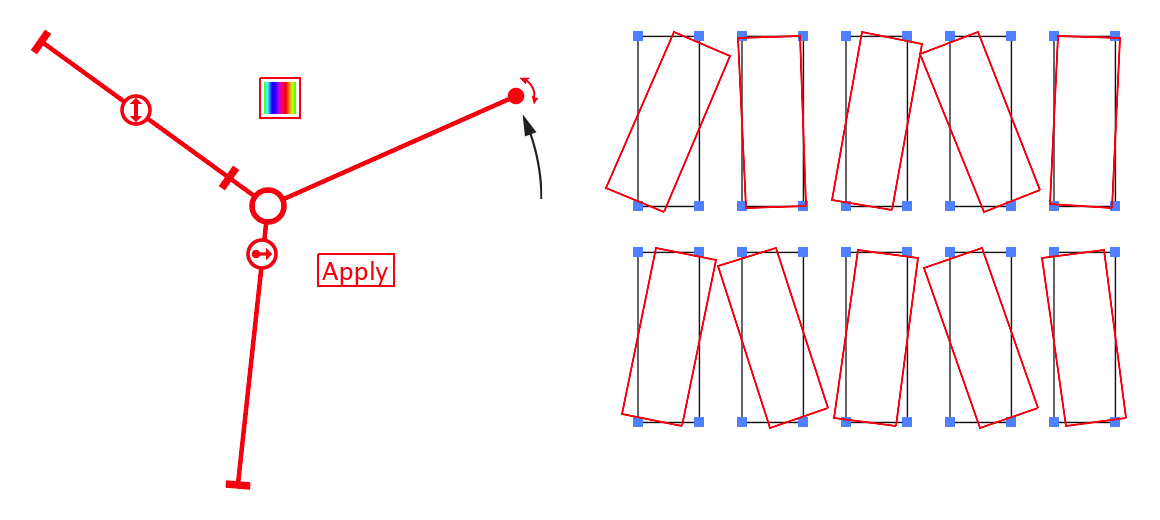
Randomino rotation arm preview
The rotation control may be double-clicked to set the rotation value numerically. Holding down the Shift key when dragging the control causes it to be constrained to steps of 10°. Holding down Command/Ctrl while dragging it enables “Slow-Drag,” which moves the control as if all cursor movements were reduced tenfold, allowing for fine-tuning.
2. Scale slider and thumb
Dragging the scale thumb changes the value up to which each piece of art will be randomly scaled from its bounding box center. For example, setting the scale value to 150% will cause the preview art to be scaled anywhere from 100% to 150%:
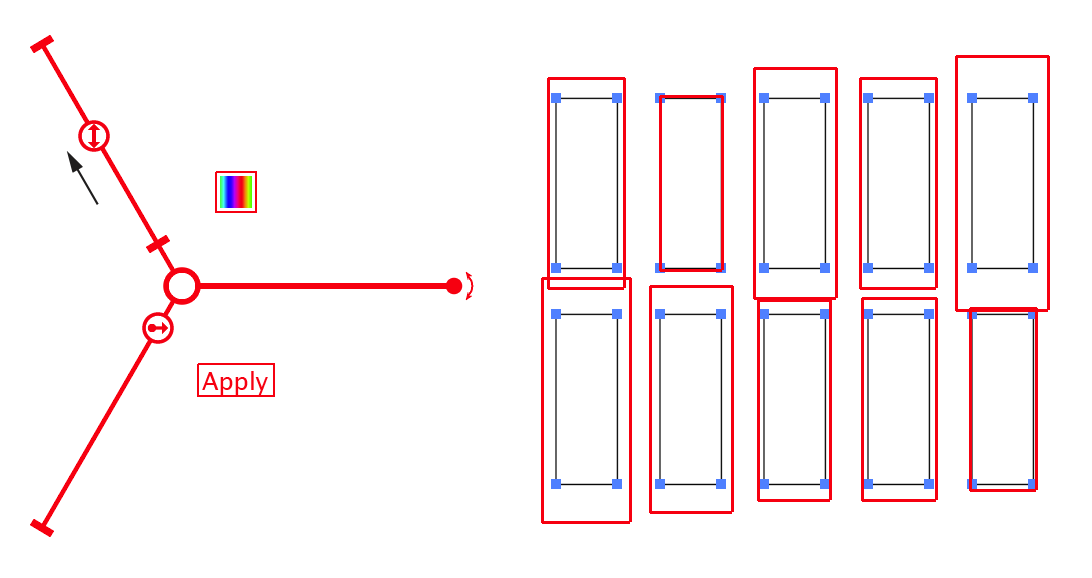
Randomini scaling control arm
The scale thumb may be double-clicked to set the scale value numerically. Holding down Shift while dragging the thumb causes the scale values to be constrained to integer values. Holding down Command/Ctrl enables “Slow-Drag”, as per the Rotation control.
3. Offset slider and thumb
Dragging the offset thumb changes the value up to which each piece of art will be randomly offset (shifted in position). For example, setting the offset value to 6pt will cause the preview art to be moved anywhere from 0 to 6 points. The offset direction is randomly chosen.
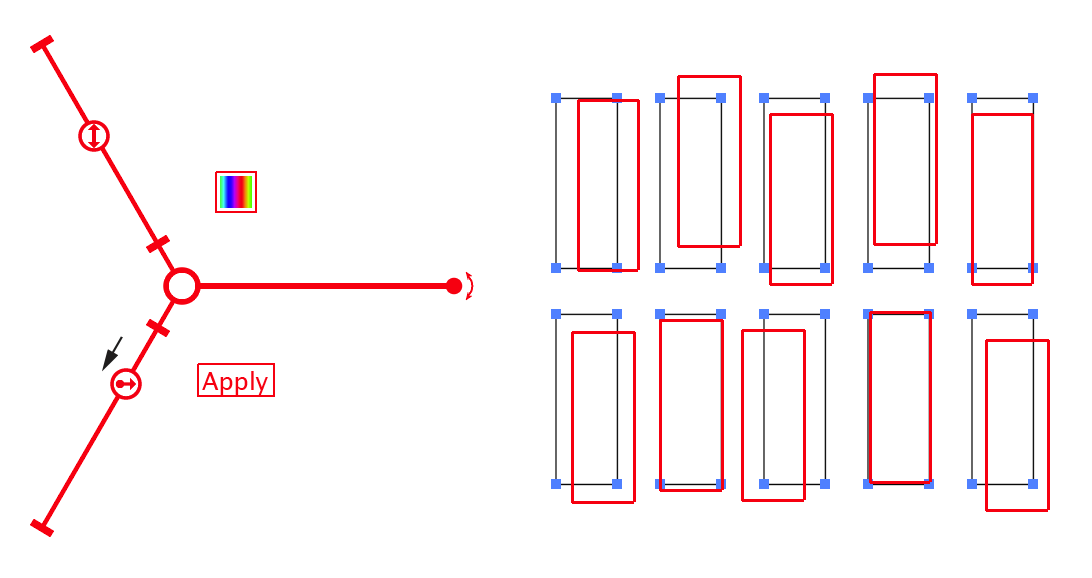
Randomini offset slider annotation
As with the scale thumb, the offset thumb may be doubleclicked to set the value numerically, Shift-dragged to constrain the value, or Command/Ctrl-dragged to enable “Slow-Drag.”
4. Apply button
Clicking the Apply button applies the currently displayed random rotation, scaling and offset to the selected art, as previewed. Immediately afterwards, since the art is still selected, new random parameters will be selected and previewed, allowing you to quickly apply multiple randomizations. To automatically deselect the art after applying the randomization, hold down Shift while clicking the Apply button. Pressing the Enter key has the same effect as clicking the Apply button unless no art is selected, in which case it opens the tool preferences dialog.
5. Hue button
Clicking the Hue button immediately randomizes the hues (strokes and fills) of the selected art. Note that black (which has zero brightness) and white (which has maximum brightness) are not affected by changing the hue. Also note that grouped objects are only affected if they have a stroke or fill applied in the Appearance panel at the group level, unless the “Ignore Grouping” preference is enabled (see Randomini: Preferences). Type objects are only affected if they have a stroke or fill applied in the Appearance panel above the Characters; to change the color of individual characters, use the Randomino panel.
6. Center control
The center control may be dragged to reposition the entire widget. Doubleclicking the center control resets all parameters to their default values (i.e., no rotation, no scaling, and no offset).
Illustrator Location:
Illustrator Main Menu > Window > Astute Graphics > Randomino
Moves, or offsets, the selected artwork in a random way. There are two different ways to specify movement: by distance and angle, or by horizontal and vertical components.
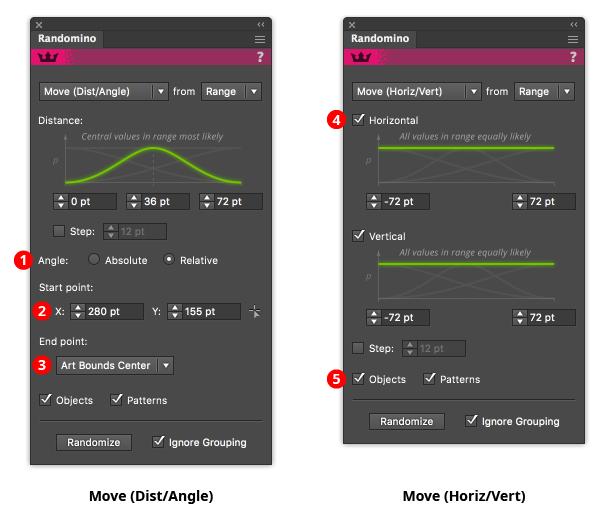
1. Angle type selector
When randomizing movement using distance and angle, the angle may be specified either as an absolute value or a value calculated by starting at a specific point and passing through a point relative to the art. When the angle is Absolute, all the objects will move in the same direction (though by differing amounts). When the angle is Relative, each object will, in general, move in a different direction. Relative angles are useful for causing art to appear to move towards or spread out from a certain spot.
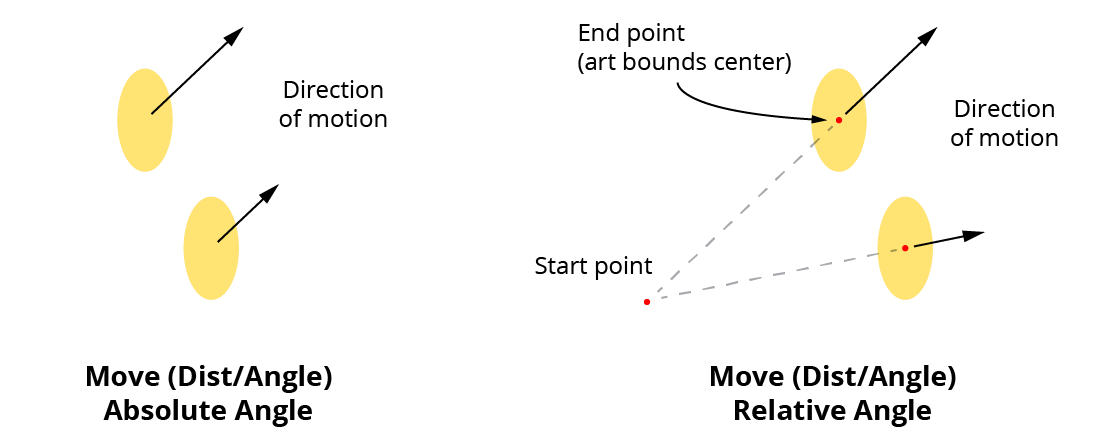
Randomino Move Relative Angles
2. Relative Angle start point
The coordinates may be entered manually, or specified by clicking the small point setter icon to the right of the coordinate inputs, which enables a tool that allows you to click at the point’s position.
3. Relative Angle end point
May be specified as either the art’s bounding box center, the art’s first anchor point (for paths only), or the art’s last anchor point (for paths only).
4. Parameter checkboxes
When randomizing movement using horizontal and vertical components, the components may be enabled independently by ticking or unticking the corresponding checkbox.
5. Objects/Patterns checkboxes
Similar to Illustrator’s native Move dialog, movement randomization can be independently applied to patterns within the objects.
Illustrator Location:
Illustrator Main Menu > Window > Astute Graphics > Gradient Forge
Contains controls which change the positions of one or more stops.
Gradient Forge Panel Adjust Positions Section
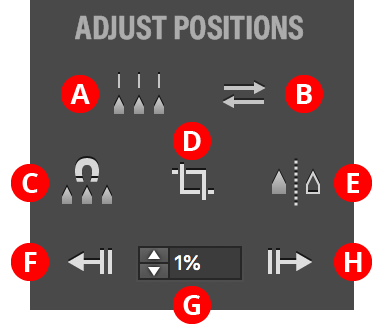
A. Distribute Button
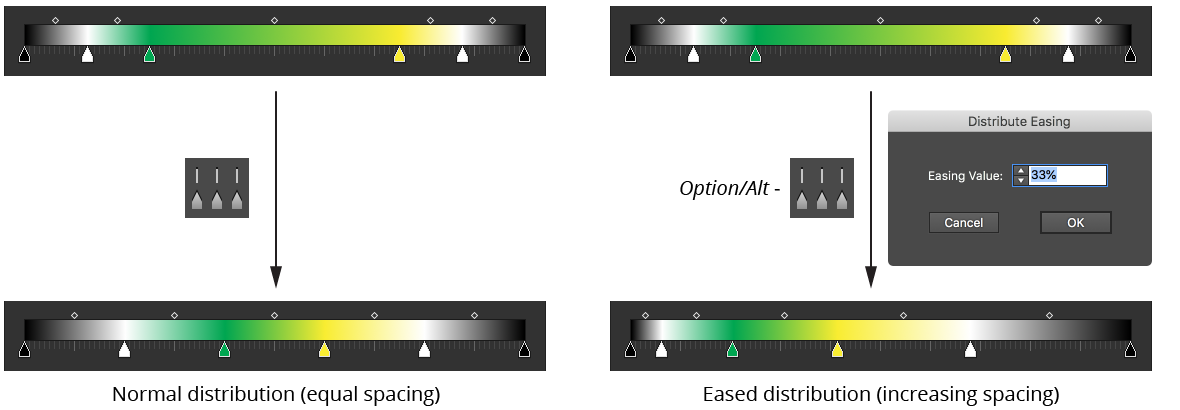
Available when three or more contiguous stops are selected (or when no stops are selected, in which case it acts as all stops are selected); distributes their positions equally. The first and last selected stops are not moved. If Option/Alt is held, a dialog is shown allowing you to specify an eased distribution. In this case the stops are not distributed evenly, but gradually get closer together or further apart.
Gradient Forge Panel Distribute Stops Example
B. Reverse Gradient Button
Available when two or more contiguous stops are selected (or when no stops are selected, in which case it acts as all stops are selected); reverse the order of the stops, as per the native Gradient panel Reverse Gradient button. Affected midpoints will have their locations inverted to keep the look of the gradient identical.
C. Snap Button
Snaps all selected stop locations to multiples of the Snap Value.
D. Crop Button
Available when the stop selection is contiguous (or, when no stops are selected, if the first stop is not at 0% or the last stop is not at 100%); removes all unselected stops and scales the remaining stops such that the gradient runs full-length (0% to 100%).
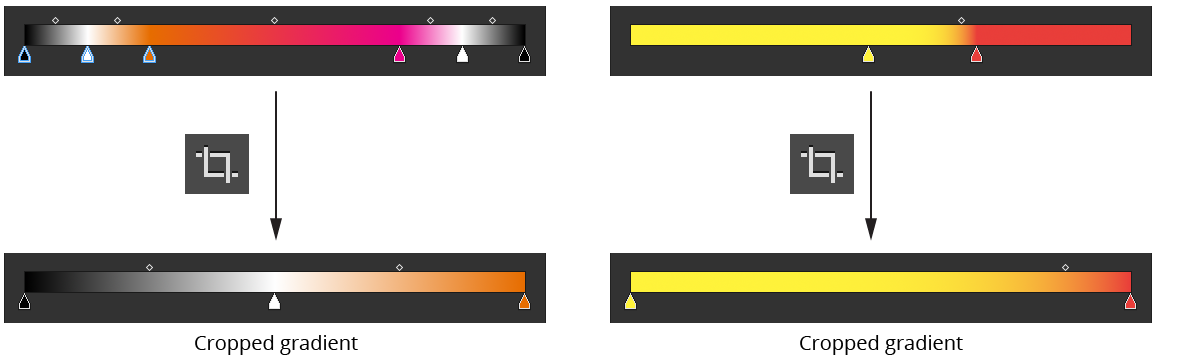
Gradient Forge Panel Crop Example
E. Mirror Button
Mirrors the entire gradient along its right-hand side. Stop selection is ignored.

Gradient Forge Panel Mirror Example
F. Move Left Button
Moves the selected stops’ locations to the left by the amount specified in the Move Value. Holding Shift moves them by ten times the specified value. Once a stop reaches the start of the gradient, it (and any additionally selected stops) cannot be moved any further left.
G. Move Value
The amount by which selected stops are moved using the Move Left and Move Right buttons.
H. Move Right Button
Moves the selected stops’ locations to the right by the amount specified in the Move Value. Holding Shift moves them by ten times the specified value. Once a stop reaches the end of the gradient, it (and any additionally selected stops) cannot be moved any further right.