Orient
 Orient Tool
 Quick Orient Tool
 Orient Transform Tool
Illustrator Location:
Advanced Toolbar > Orient Tool
The Orient tool works by first drawing a reference line, and then rotating one end of the reference line to the desired angle; any selected artwork will be rotated by the same amount.
To create the reference line, either click once at the start point and once at the end, or click and drag in one step. Even when Smart Guides are turned off, the cursor will snap to anchor points, image corners, and the ends of text baselines with a snapping ring. The reference line shows a small circle (red in color, by default) at its start and end.
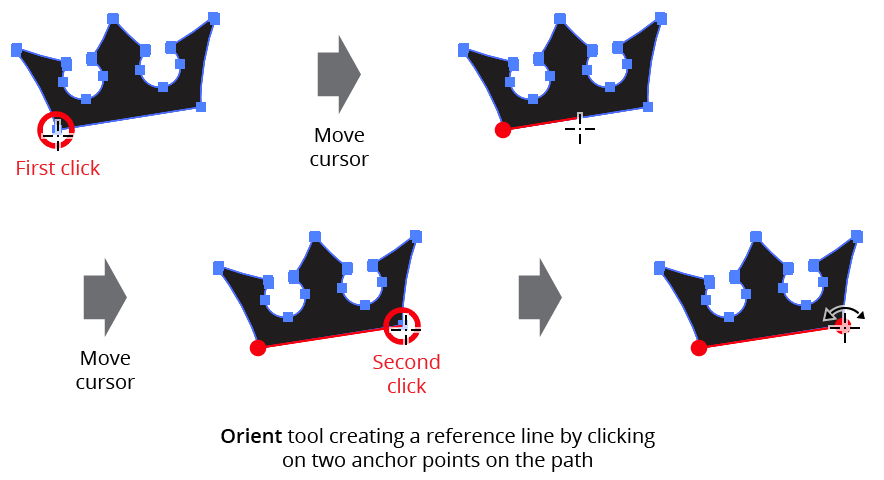
Orient Tool Setting Reference Line
After the reference line is set, clicking-and-dragging on either of its ends will rotate both the line and any selected art objects. By holding down Shift, the angle of the line can be constrained to 45° increments around the general constrain angle.

Orient Tool Rotating Art
Typically the reference line is made against the selected art, but this is not required. For example, to rotate selected horizontal artwork to be parallel to an angled straight path, one method would be to create the reference line horizontally starting from one end of the path and then (with Smart Guides enabled) rotate it until its endpoint snaps to the path.
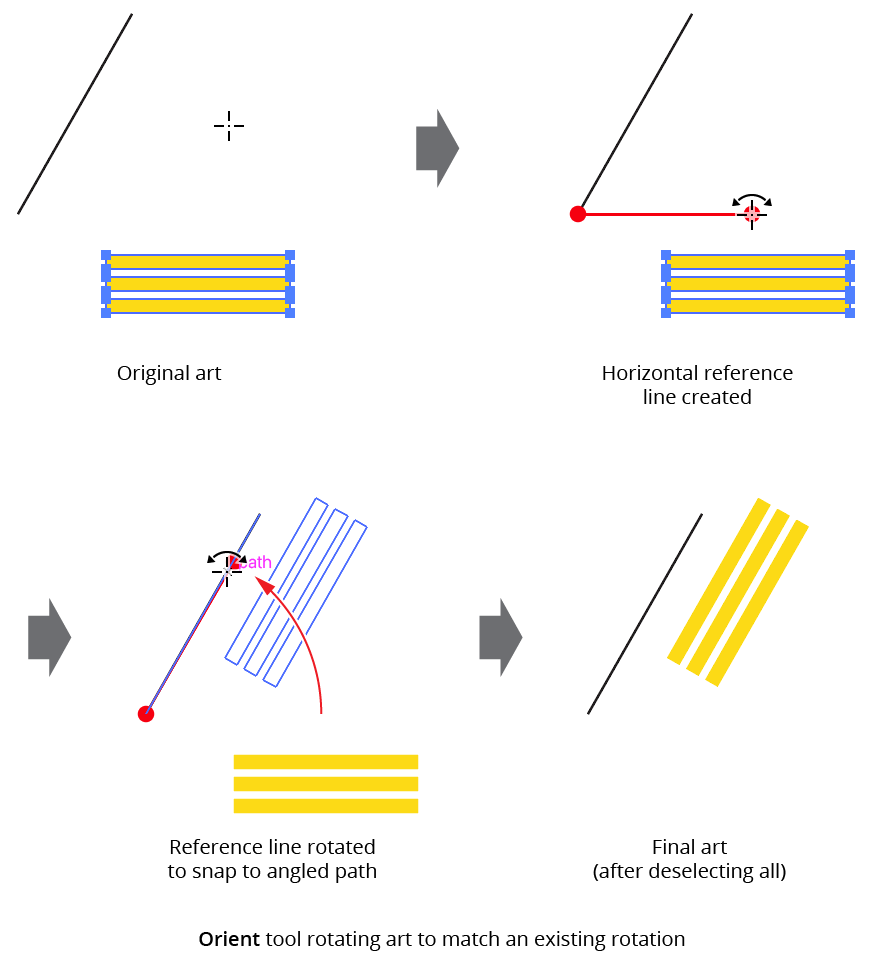
Orient Tool Rotating Art Example
If the Option/Alt key is pressed while the reference line is being rotated, the selected art will be duplicated into the new rotated position.
The reference line is retained until a new start point is clicked, or the Orient tool is deselected. Thus the selection can be changed without losing the current reference line position by temporarily switching to a selection tool by pressing Command/Ctrl.
Illustrator Location:
Advanced Toolbar > Orient Stack > Quick Orient Tool
The Quick Orient tool can be used in two ways: by simply clicking on art objects, or by drag-marqueeing over them. The artwork does not need to be selected. In either case, the default method for determining how much to rotate an object to “straighten” it is by looking at the rotation of the bounding box that Illustrator stores for each piece of art.
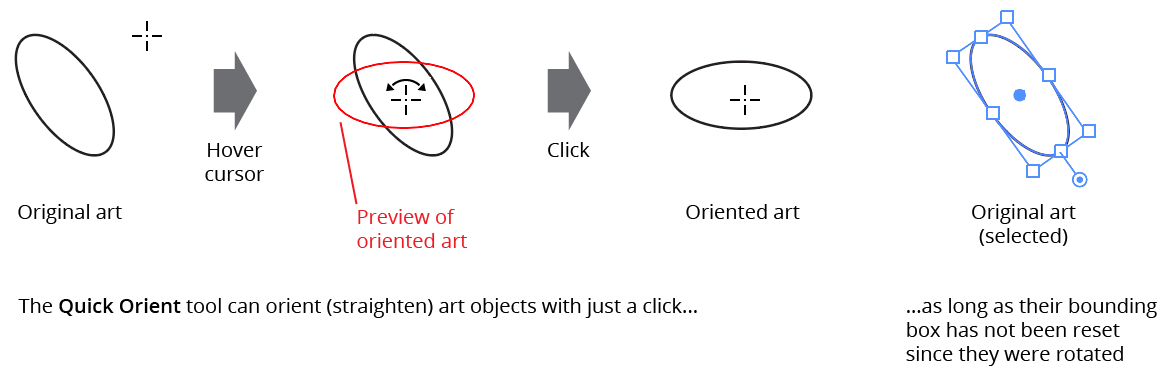
Quick Orient Tool Example
Therefore, if the art’s bounding box becomes reset (for example, by choosing Object > Transform > Reset Bounding Box), Quick Orient will not be able to automatically straighten the object except for certain types of art such as raster images, which keep rotation data in an additional location.
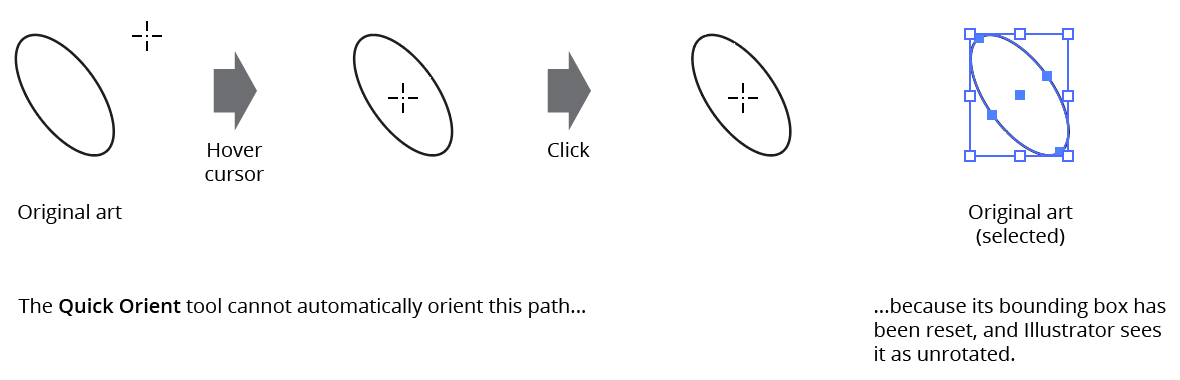
Quick Orient Rotated Bounding Box Example
However, for paths, Quick Orient can also use a path segment to rotate the path. To do this, hover the tool over a path segment and press the Option/Alt key. The path will be rotated such that the segment’s endpoints are horizontal (taking into account the general constrain angle), with the imaginary point halfway between the two endpoints acting as the center of rotation.
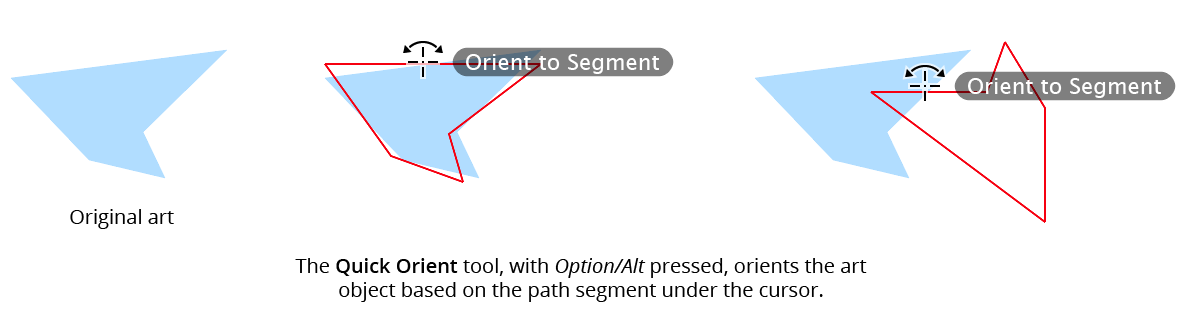
Quick Orient to Segment Example
Because the tool’s automatic orientation may not necessarily be the desired one, after clicking (and with the mouse button still down), the Space bar may be pressed to rotate the art repeatedly in 45° steps.
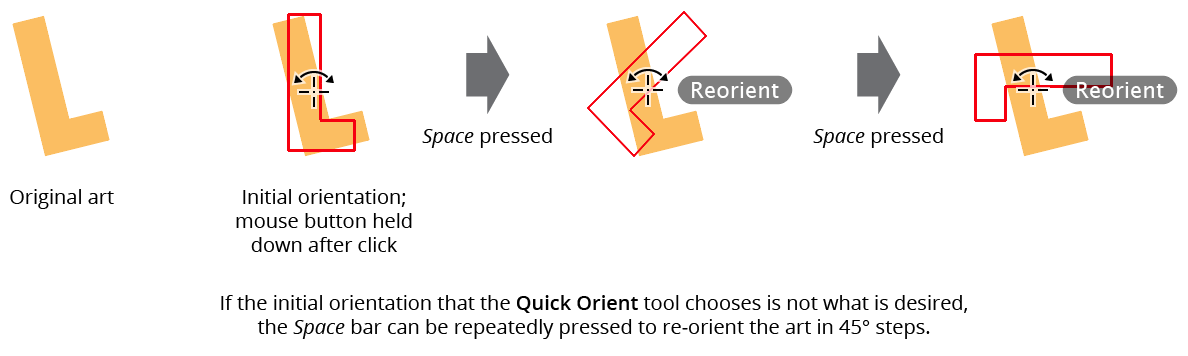
Quick Orient - Reorient Example
By default the Quick Orient tool acts on members of groups independently, but by holding Shift, all members of the top-most group to which the art under the cursor belongs (if any) will be rotated together.
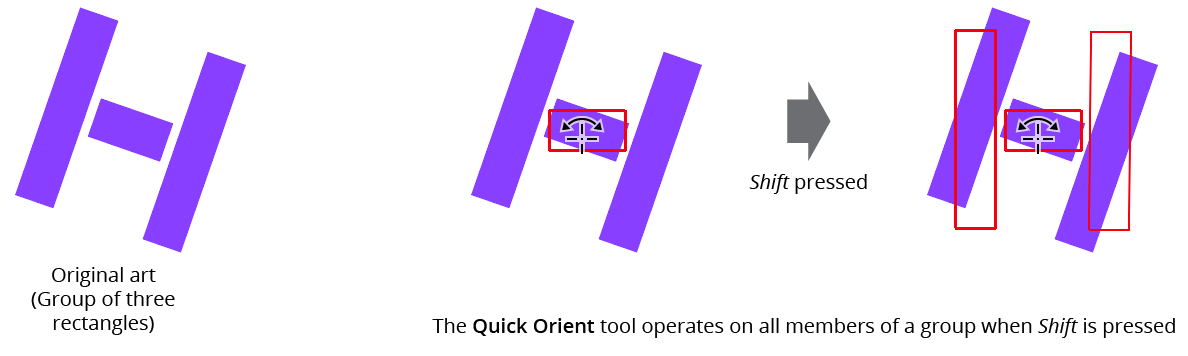
Quick Orient Whole Group Together
To orient multiple art objects in one step, drag a marquee over them:

Quick Orient Marqueeing Example
The Quick Orient tool has no preferences. The color of the annotation used to preview the oriented artwork is taken from the Orient tool’s preference.
Illustrator Location:
Advanced Toolbar > Orient Stack > Orient Transform Tool
As the Orient Transform tool has several keypresses which can add or change its functionality, we suggest installing the free Astute Graphics plugin Astute Buddy, which creates a panel that dynamically updates to inform you of the various keys which can be pressed in the tool’s current context.
To use the Orient Transform tool, two reference lines must be drawn: a source line and a destination line. This can be done by using one of two methods: by clicking once on each endpoint, or by clicking and dragging. The former method has the advantage of allowing you to scroll, zoom, change the view mode, etc. in the middle of the operation. However, to use several shortcut keypresses (detailed below), you must continue to hold the mouse button down after the second click used to define the second reference line.
Reference lines are annotated with small circles (red, by default) at each end; the source line is solid while the destination line is dotted. The cursor will snap to anchor points, raster image corners, and the ends of point text baselines even when Smart Guides are turned off.
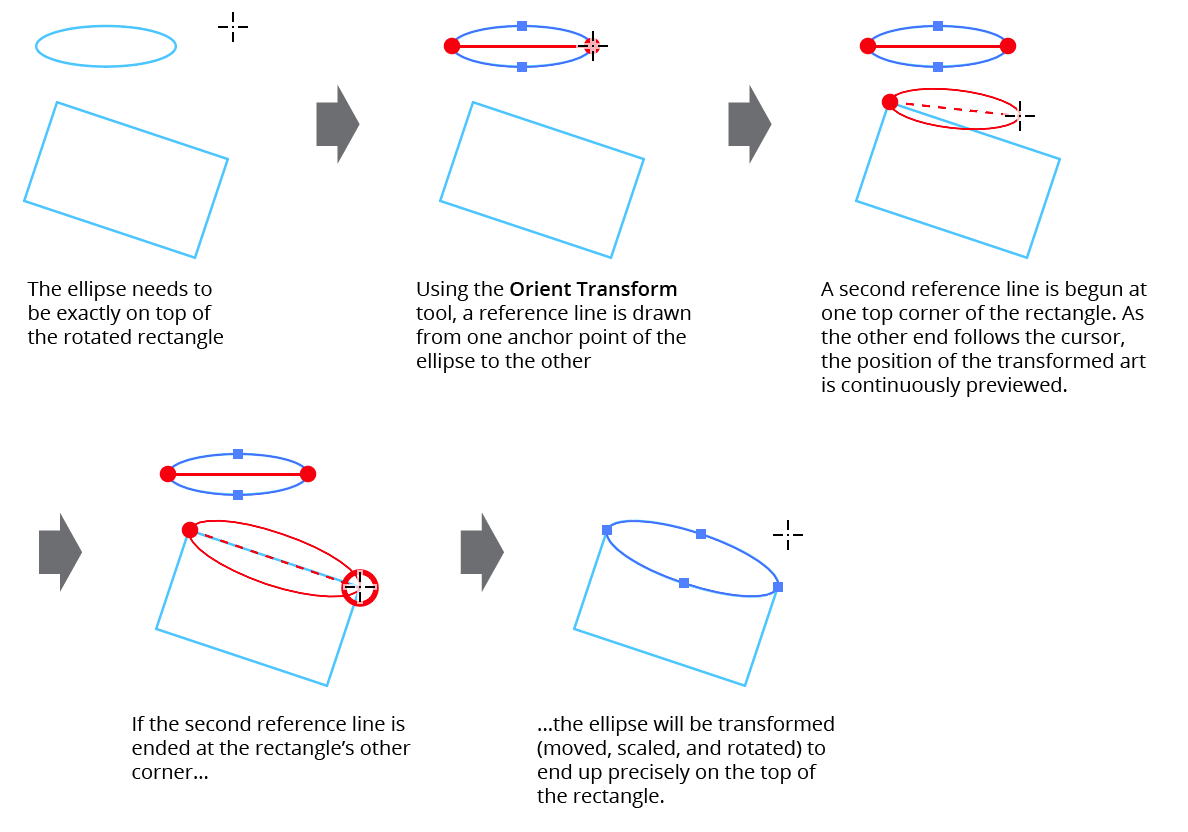
Orient Transform Tool Example
While the destination reference line is being drawn, all selected art objects will be previewed in red in the new position and size they would have after being linearly transformed such that the source reference line would be mapped onto the destination reference line. Releasing the mouse button after drawing the destination reference line finalizes the transformation. If Option/Alt is held down, the art is duplicated to its new position rather than being moved. Holding down the Shift key constrains either reference line to 45° increments around the general constrain angle.
If the destination reference line is being drawn by dragging, or if the mouse button is held down after the second click, several additional keypresses may be used to add or change functionality. As with all Astute tool keypresses, these will be indicated on the Astute Buddy panel.
Space: Flips the orientation of the transformed art, as if the destination reference line had been drawn in the opposite direction. This is faster than actually redrawing the line.
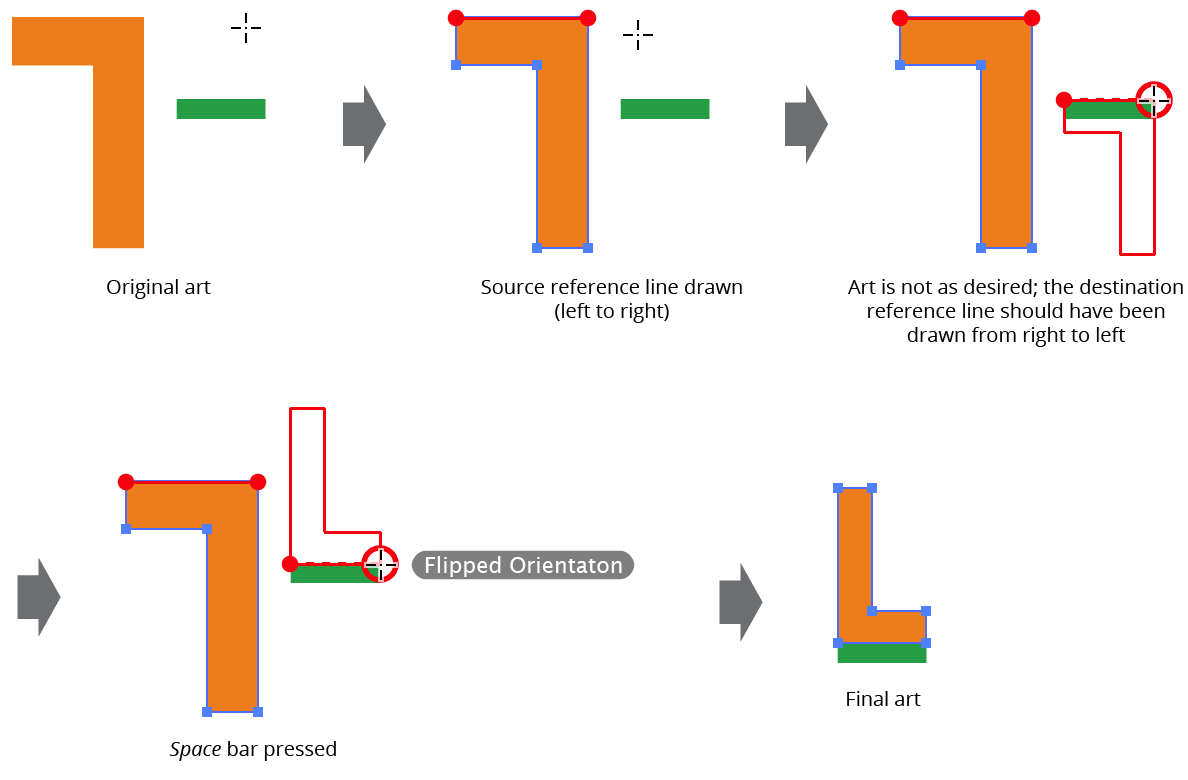
Orient Transform Flipped Orientation
A: Toggles mirroring. When mirroring is enabled, after being transformed, the artwork is additionally reflected across the destination reference line, which is drawn with a more widely-spaced dotted line.
Mirroring mode is retained across uses of the tool.
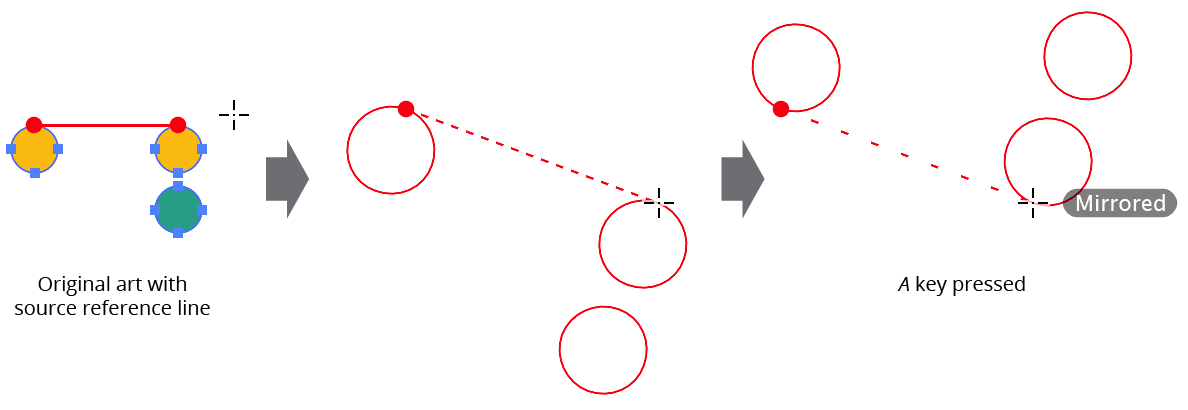
Orient Transform Mirrored Orientation
D: Toggles persistent duplicate, so the
Option/Altkey does not need to be held down to duplicate art. This can be useful when using the tool to make many successive copies of an art object. The mode is retained across uses of the tool.R: Toggles “retain selection” mode. Normally, after duplication, the selection is switched to the new transformed duplicate (and the source reference line is moved to the position of the destination reference line). However, when retain selection mode is enabled, the original art remains selected and the source reference line remains in its original position. Retain selection mode is always disabled to start.
S: Toggles size locking mode. When the size is locked, only the position and angle of the selected artwork will be modified.
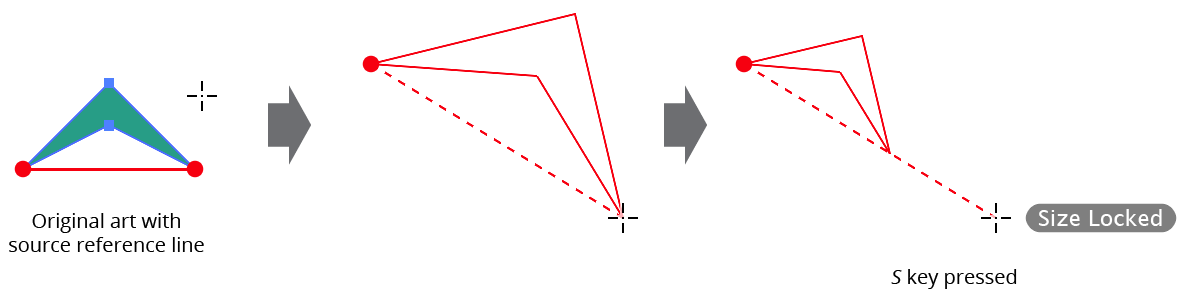
Orient Transform Size Locking
The Orient Transform tool honors the general preference Scale Stroke & Effects.