- Getting Started
- Training
- Features
- Effects
-
Plugins
- AG Core
- AstuteBuddy
- Autosaviour
- ColliderScribe
- DirectPrefs
- DynamicSketch
- FindReplace
- InkFlow
- InkQuest
- InkScribe
- MirrorMe
- Phantasm
- Randomino
- Rasterino
- Reform
- Stipplism
- Stylism
-
SubScribe
- Getting Started
- Circle by Points Tool
- Tangent Circle Tool
- Curvature Circle Tool
- Arc by Points Tool
- Tangent Line Tool
- Perpendicular Line Tool
- Connect Tool
- Straighten Tool
- Lock Unlock Tool
- Orient Tool
- Quick Orient Tool
- Orient Transform Tool
- AG Layer Comps Panel
- Art Switcher Panel
- Gradiator Panel
- Gradient Forge Panel
- AG Color Select Tool
- Color Stamp
- Gradient From Art
- Pixels to Vector
- QuickOps
- Texturino
- VectorFirstAid
- VectorScribe
- WidthScribe
- FAQs
- Updates
- Team Licensing
- Reseller Licensing
- Astute Manager
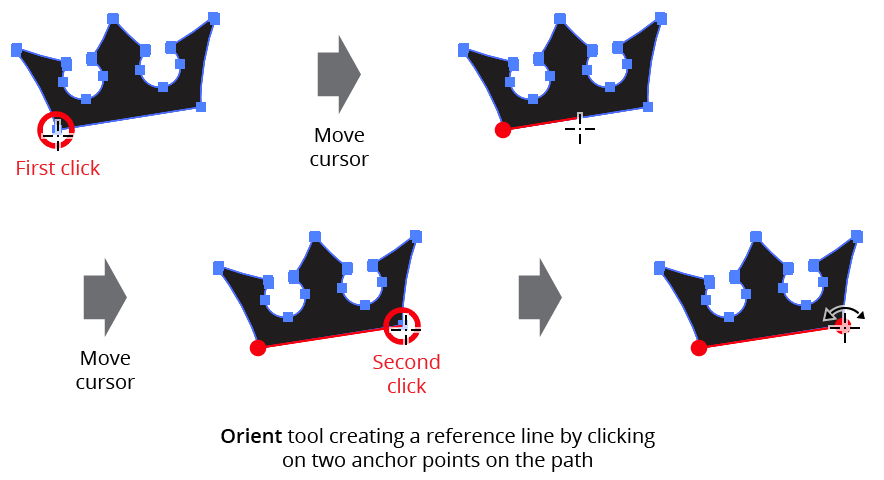
The Orient tool works by first drawing a reference line, and then rotating one end of the reference line to the desired angle; any selected artwork will be rotated by the same amount.
To create the reference line, either click once at the start point and once at the end, or click and drag in one step. Even when Smart Guides are turned off, the cursor will snap to anchor points, image corners, and the ends of text baselines with a snapping ring. The reference line shows a small circle (red in color, by default) at its start and end.
Orient Tool Setting Reference Line
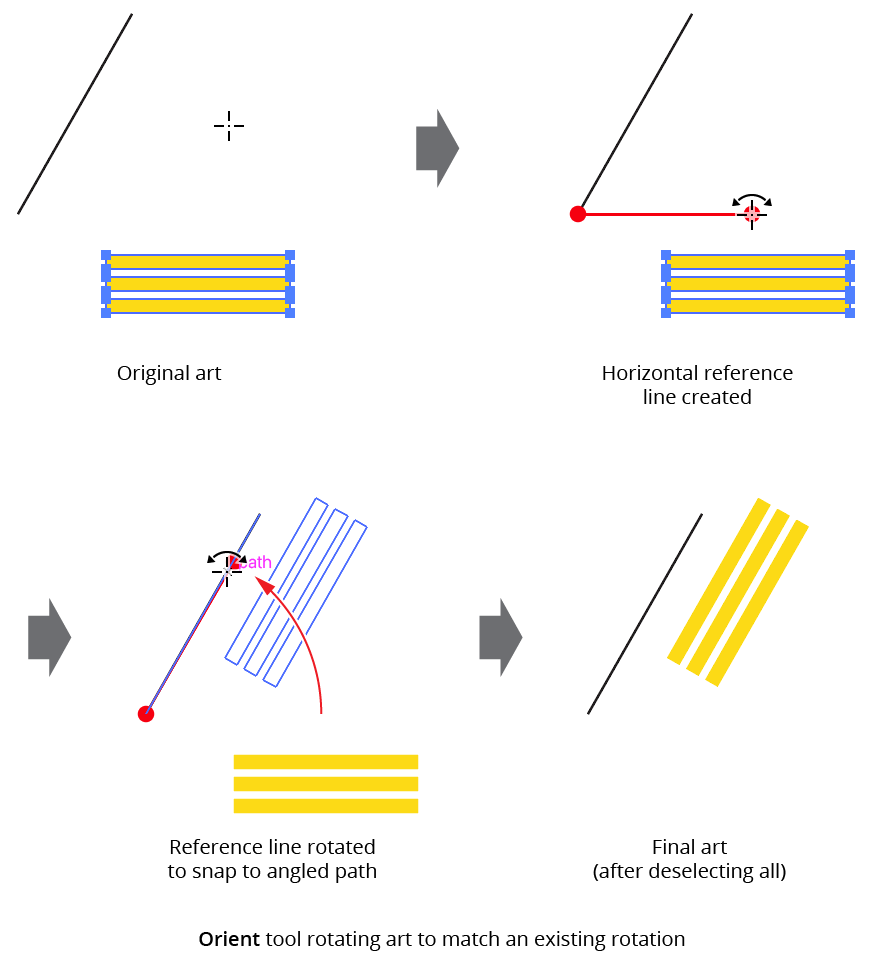
After the reference line is set, clicking-and-dragging on either of its ends will rotate both the line and any selected art objects. By holding down Shift, the angle of the line can be constrained to 45° increments around the general constrain angle.

Orient Tool Rotating Art
Typically the reference line is made against the selected art, but this is not required. For example, to rotate selected horizontal artwork to be parallel to an angled straight path, one method would be to create the reference line horizontally starting from one end of the path and then (with Smart Guides enabled) rotate it until its endpoint snaps to the path.
Orient Tool Rotating Art Example
If the Option/Alt key is pressed while the reference line is being rotated, the selected art will be duplicated into the new rotated position.
The reference line is retained until a new start point is clicked, or the Orient tool is deselected. Thus the selection can be changed without losing the current reference line position by temporarily switching to a selection tool by pressing Command/Ctrl.