Text
![]() VectorFirstAid Panel
VectorFirstAid Panel
 Finding Art Panel
 Reform Text
![]() Reform Text Panel
Reform Text Panel
 QuickOps Panel
Illustrator Location:
Illustrator Main Menu > Window > Astute Graphics > VectorFirstAid
Each convenience operation has various parameters, which are specified in the preferences dialog (see VectorFirstAid: Preferences). By holding down the Option/Alt key while clicking a convenience operation button, a small dialog will come up allowing those parameters to be changed before the operation is made. These new parameters apply to that single use of the operation only.
3. Super Smart Remove Points Button
Reduces the number of anchor points in the selected paths while attempting to maintain their shapes. There are two parameters.
VectorFirstAid Super Smart Remove Points Parameters
a. Super Smart Remove Tolerance: Ranges from 1 to 100. The higher the tolerance, the more anchor points are removed, but the more the geometry of the path may change.
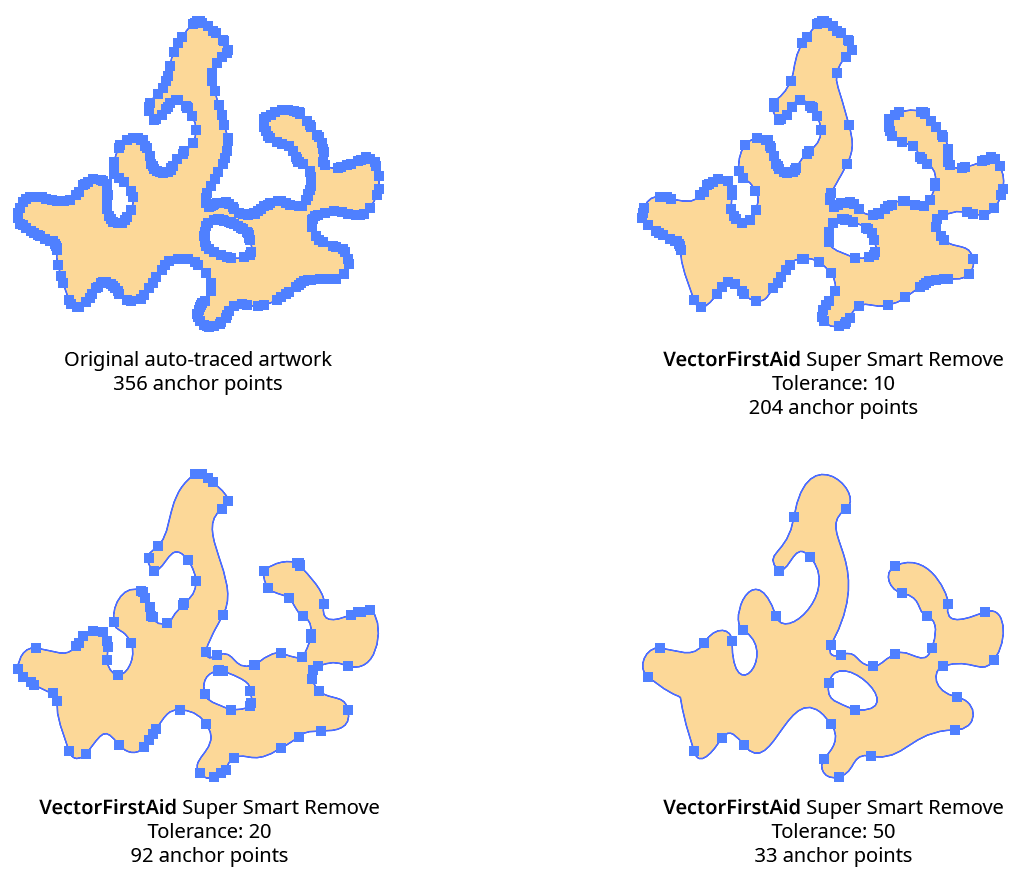
VectorFirstAid Super Smart Remove Example
b. Protect Sharp Corners: Determines whether corner type anchor points where the path has a sharp change in direction will be considered for removal. Enabling this setting lets you use a high tolerance to remove many anchor points without disturbing sharp corners, where the geometry of the path is usually more critical:
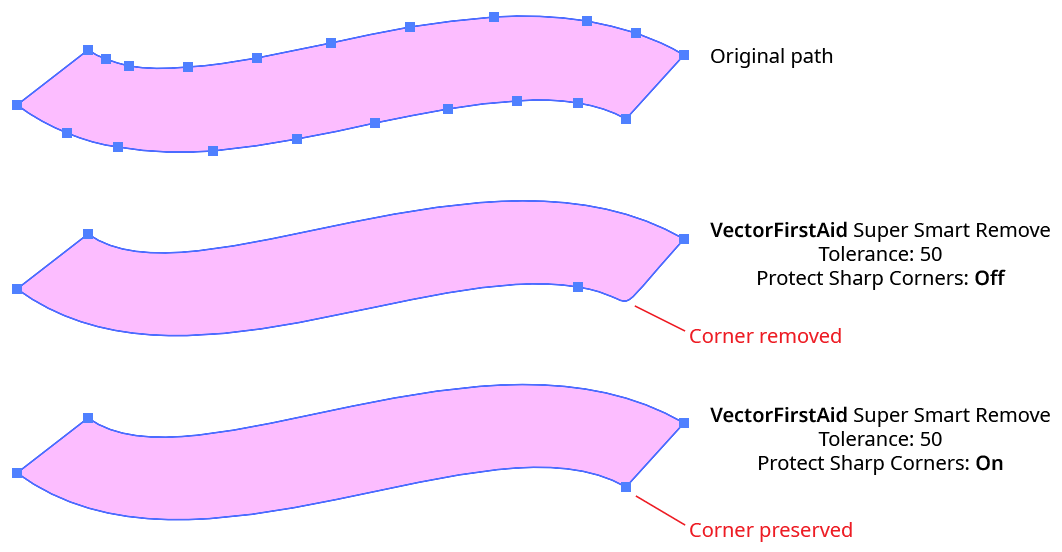
VectorFirstAid Super Smart Removal Protect Sharp Corners
4. Rejoin Paths Button
Rejoins paths which have been split apart into multiple segments back into a single path (or, if discontiguous, into multiple paths).
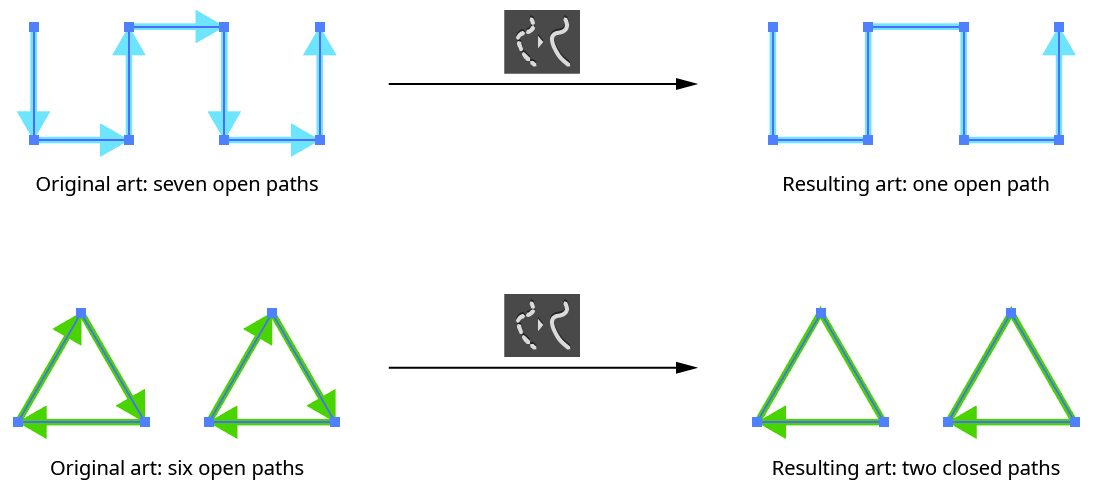
VectorFirstAid Rejoin Paths Example
The Rejoin Paths operation takes several parameters:
VectorFirstAid Rejoin Paths Parameters
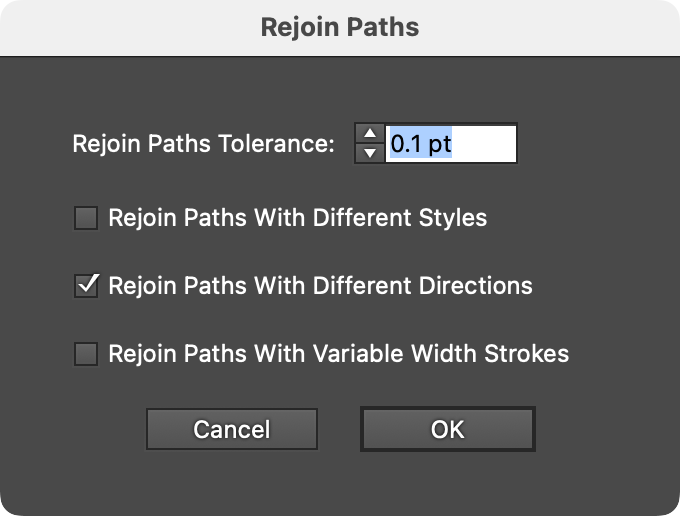
a. Tolerance: The maximum distance that the endpoints of each segment can be from each other and still be joined, ranging from 0 to 6 pt. The default is 0.1 pt.
b. Rejoin Paths With Different Styles: Whether paths with different styles are allowed to be rejoined. When enabled, the style of the final path is taken from the section which is highest in the stacking order.

VectorFirstAid Rejoin Paths with Different Styles
c. Rejoin Paths With Different Directions: Whether paths that touch head-to-head or tail-to-tail are allowed to be rejoined. When enabled, the direction of the final path is taken from the section which is highest in the stacking order.
d. Rejoin Paths With Variable Width Strokes: Whether paths stroked with a variable width stroke are allowed to be rejoined. When enabled, the variable width profile for the final path is taken from the section which is highest in the stacking order.
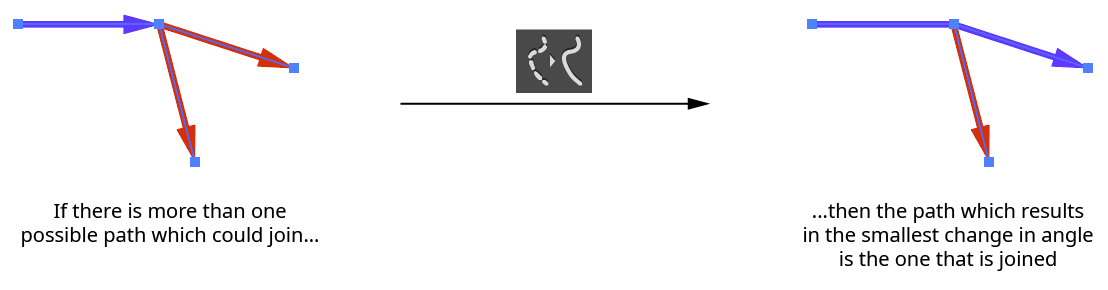
If multiple sections are eligible to be joined, VectorFirstAid uses the one that results in a path with the smallest change in angle:
VectorFirstAid Rejoin Paths Angle Selection
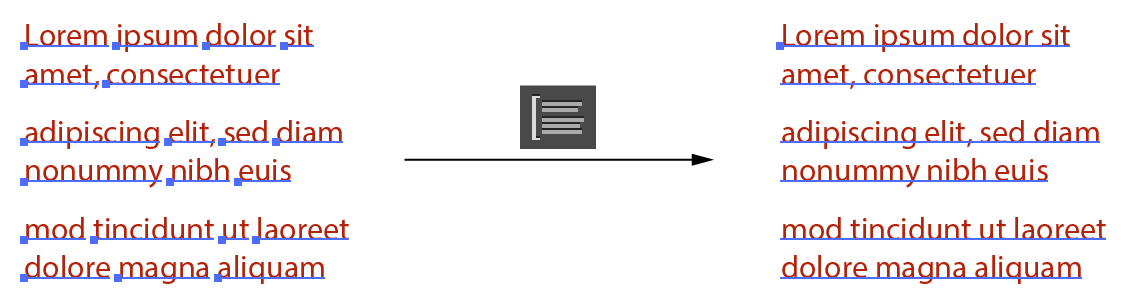
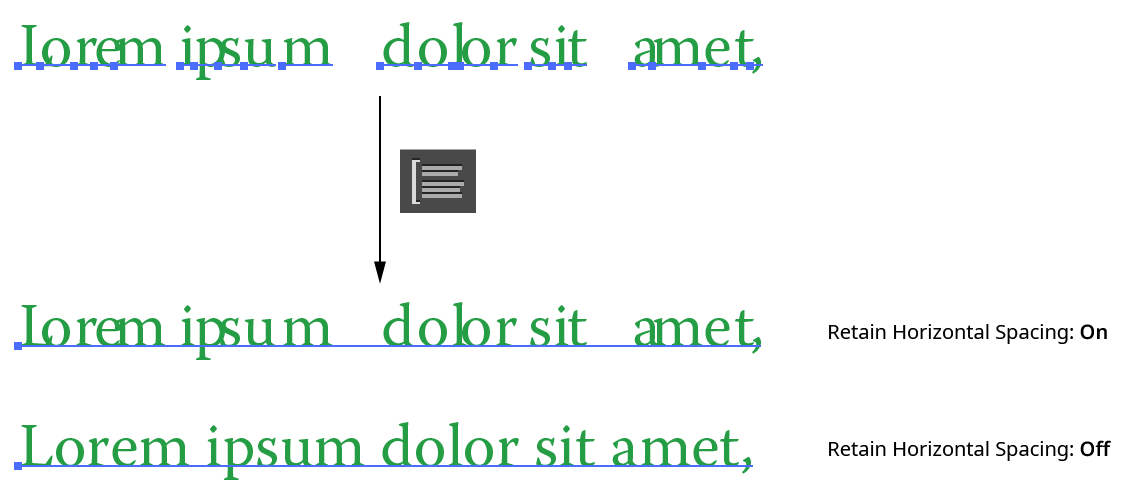
5. Combine Point Text Objects Button
Combines the selected point text objects into as few point text object as possible while maintaining the position of all characters. Text can be combined both horizontally and vertically, but must be at the same angle.
VectorFirstAid Combine Point Text Example
VectorFirstAid Combine Point Type Parameters
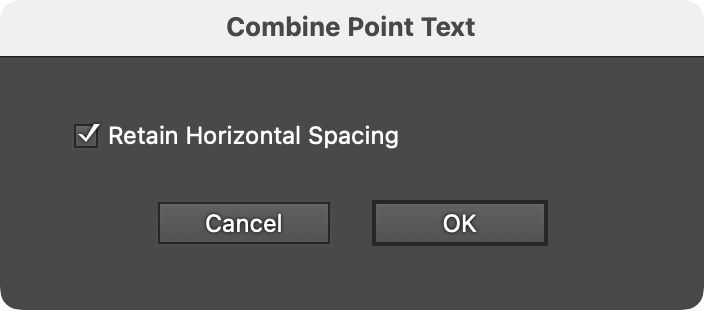
A single parameter, Retain Horizontal Spacing, controls how horizontal gaps between characters and words are handled. When enabled (the default), kerning is modified and/or space characters are added to precisely duplicate the original spacing of the text. When disabled, the spacing is normalized when possible, to give the text the look it would have if it were not tracked or kerned. Gaps wider than a single space character will still be retained as a single space. This setting can be useful when opening certain PDF files where the text has been broken into individual characters with corrupted spacing:
VectorFirstAid Combine Point Text - Retain Horizontal Spacing
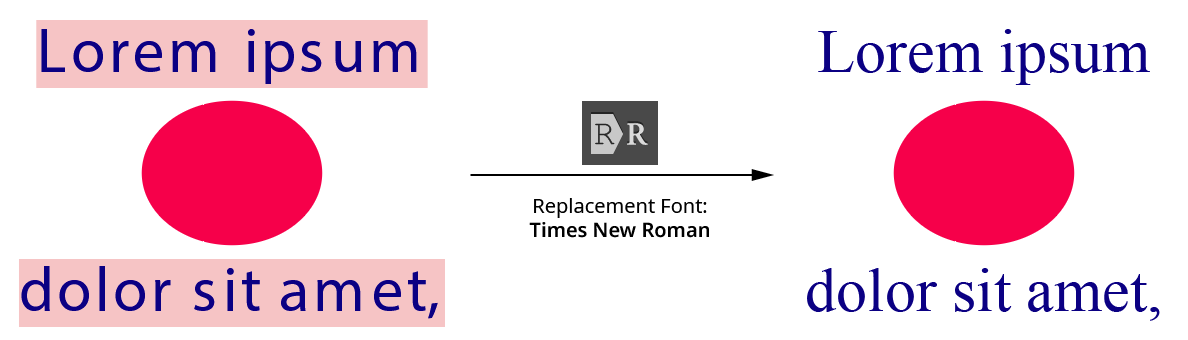
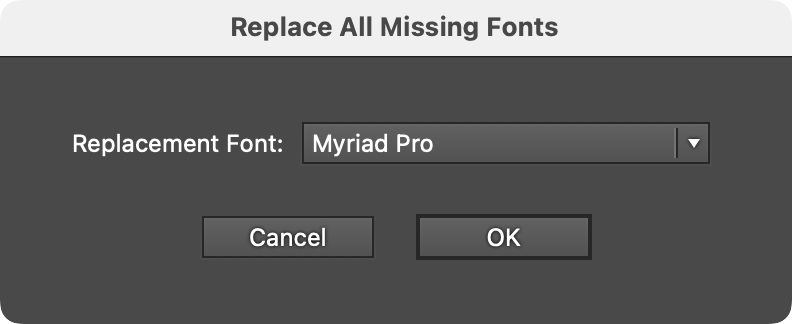
6. Replace All Missing Fonts Button
Replaces all missing fonts in the document with a specified font. Whether replacing a single missing font, or because the exact font is not critical because it will be changed later, this is much faster than going through the Find/Replace Font dialog.
VectorFirstAid Replace All Missing Fonts
The one parameter is the replacement font.
VectorFirstAid Replace Missing Fonts Parameters
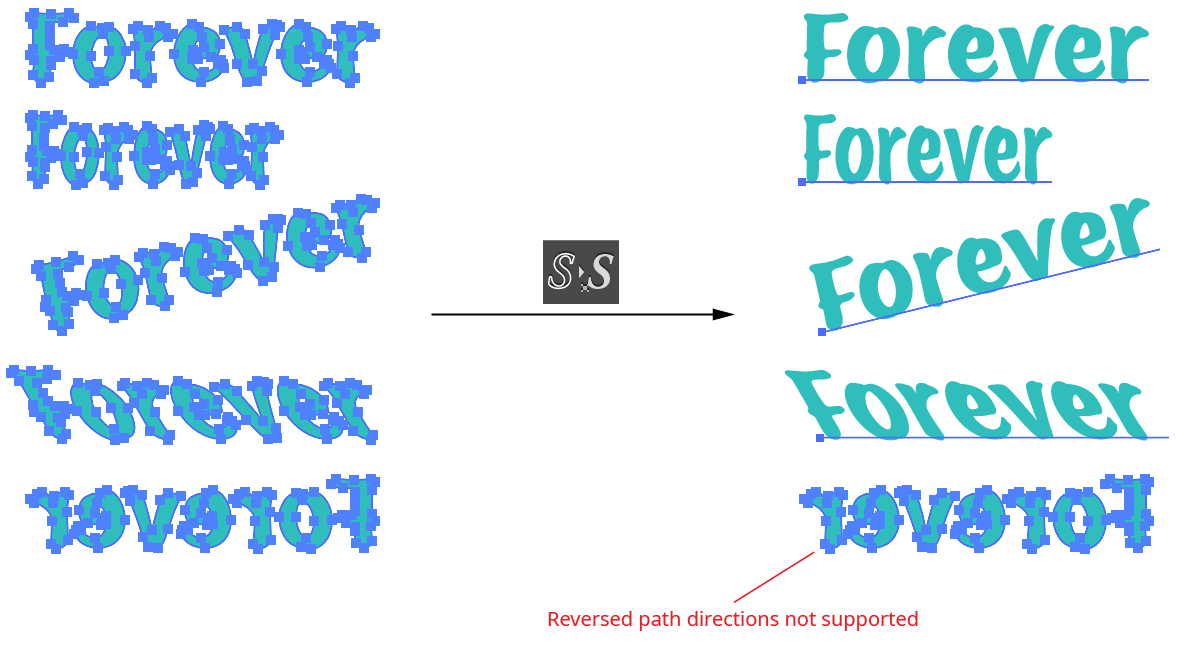
7. Unoutline Text Button
Converts the selected type that has been outlined (converted to paths) back into editable text, if possible. VectorFirstAid refers to this process as “Unoutlining.” The first time this operation is used after installing the plugin, VectorFirstAid will open a new, temporary document and scan the currently installed fonts to build an internal database of their glyphs. This may take 5 to 20 minutes or even longer, depending on how many fonts are installed and their types. In particular, the SF Pro font family contains very high numbers of glyphs and will slow down the operation. However, the data is saved out to files, so this process only needs to be done once.

VectorFirstAid Unoutline Text Example
The Unoutline Text operation can handle most linear transformations of the outlines, including scaling (except that which reverses path direction), rotation, and shearing.
VectorFirstAid Unoutline Text Example 2
If type cannot be unoutlined, it may be due to several reasons. First, the correct font may not be present on the system. Second, the path outlines may have been altered in some way, making them different from the original outlines. For example, the starting point of the paths may have changed, or individual points may have been deleted or moved slightly. Finally, the Unoutline Text operation is not supported for fonts which contain more than 7,500 glyphs, with the exception of the SF Pro family. However, support for the SF Pro family is limited to the first 14,000 glyphs for each font.
The Unoutline Text operation takes several parameters:
VectorFirstAid Unoutline Text Parameters
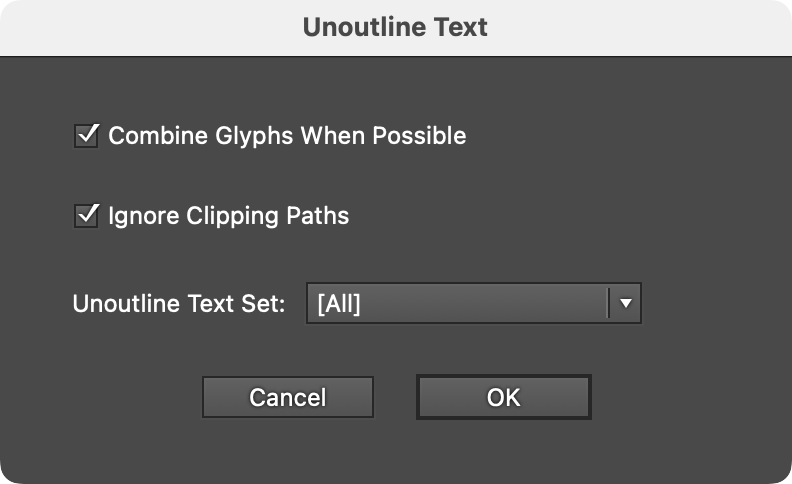
a. Combine Glyphs When Possible: Enabled by default, this option combines the individual glyphs which have been recognized into as few point text objects as possible. Otherwise, each glyph is left as a separate point text object.
b. Ignore Clipping Paths: Ignores paths which are set as clipping paths for the purposes of conversion.
c. Unoutline Text Set: Specifies a pre-configured set of fonts to use when recognizing the outlined paths. Checking these outlines against every possible font can take some time, and might result in the conversion to a different font than expected (due to the fact that some simple glyphs, such as lower case l’s, are identical across many sans serif fonts when linear transformations are allowed). For this reason, if the font of the outlined text is already known, VectorFirstAid can use this information to ignore other fonts and recognize the text more quickly and reliably. Unoutline Text Sets are configured through the Preferences dialog (see VectorFirstAid: Preferences). A quicker method is to simply some select live text along with the outlined text before using Unoutline Text. In this case, VectorFirstAid will only consider the fonts present in the selected live text, ignoring any specified Unoutline Text Set.
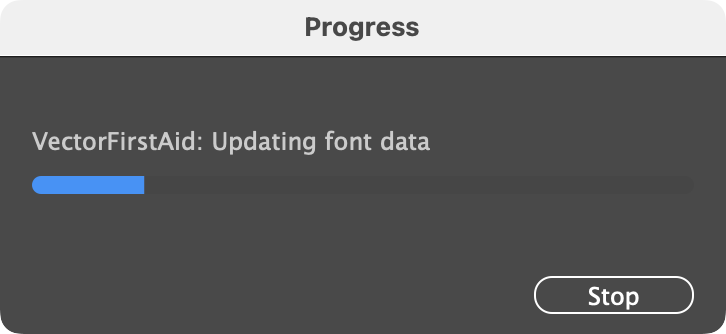
If new fonts are installed after VectorFirstAid has created its font database, the database will be updated after the button is clicked. A progress dialog will be shown.
VectorFirstAid Font Database Update
If artwork other than outlined text is selected when performing an Unoutline Text operation, it generally causes no harm, because most artwork paths are unlikely to match the shape of a glyph. However, this is not true for basic shapes such as rectangles and circles, which are used in hundreds of fonts for glyphs such as hyphens, dashes, bullets, and so on. Since text, when outlined, always results in compound paths, VectorFirstAid will display a warning if a non-compound simple shape exists in the selection:
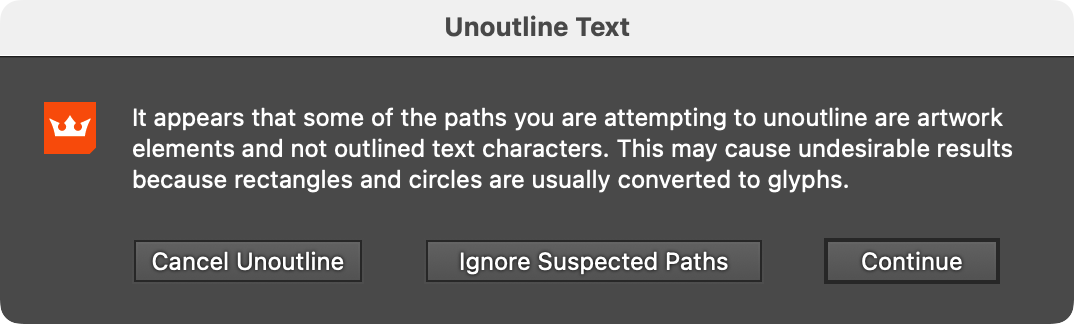
VectorFirstAid Unoutline Warning
Illustrator Location:
Illustrator Main Menu > Window > Astute Graphics > VectorFirstAid
8. Text Operations Buttons
This section is visible by default but may be hidden using the panel flyout menu item Hide Text Operation Buttons.
a. Align Left/Align Center/Align Right Buttons: Each changes the alignment of the selected point text objects while attempting to keep the text in the same position. When applied to single-line point text objects this is always possible; when applied to multi-line point text objects, it generally can only be done for the longest line.

VectorFirstAid Align Point Text Example
b. Break Into Lines/Break Into Words/Break Into Glyphs Buttons: Each breaks the selected text objects into multiple point text objects consisting of either the lines, words, or glyphs from the original text. The text is kept in the same position.

VectorFirstAid Break Text Example
If the Shift key is held down when clicking the Break Into Lines button, the text is broken into paragraphs rather than into lines:
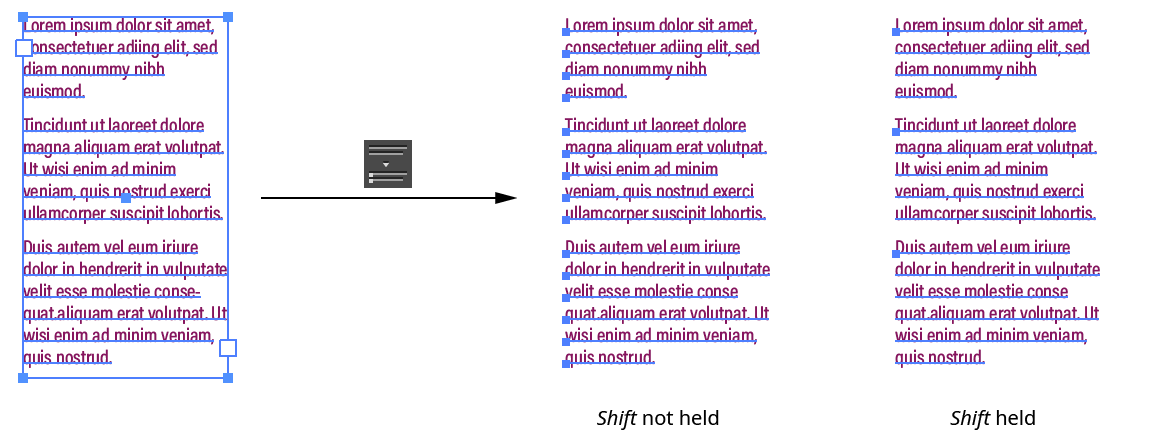
VectorFirstAid Break Text Example 2
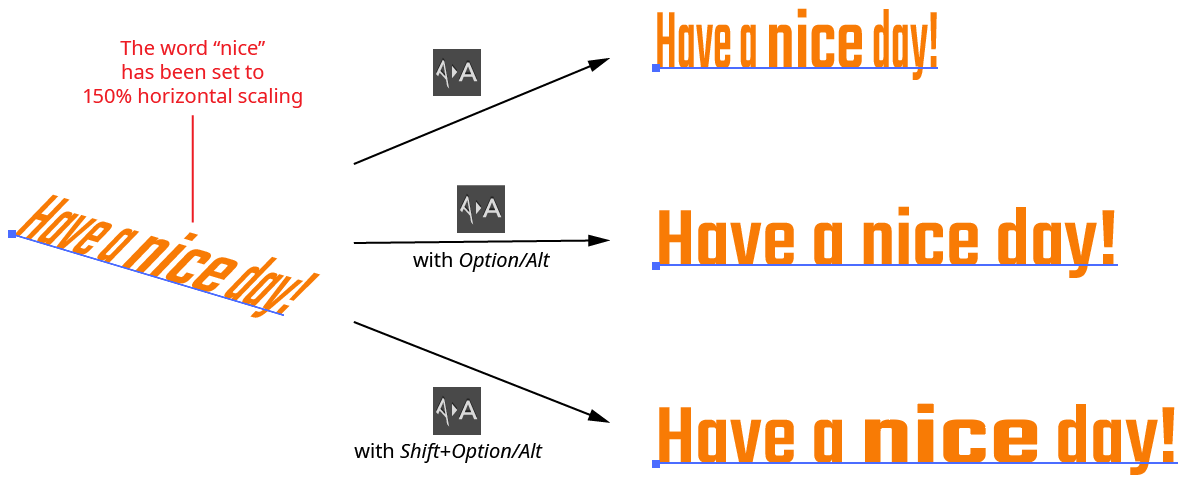
c. Remove Text Transforms Button: Removes any rotation and shear transforms from the selected text objects. If the Option/Alt key is held down when clicking the button, horizontal scaling is also removed. As this will remove any horizontal scaling that was manually added to individual characters in the text, a third method is offered. If Shift+Option/Alt is held down when clicking the button, horizontal scaling is “normalized.” That is, the scale value that is used on the majority of the text characters is set to be 100%, and other values are changed in proportion, thereby preserving multiple scaling values in the text.
VectorFirstAid Remove Text Transforms
Illustrator Location:
Illustrator Main Menu > Window > Astute Graphics > FindReplace Art
The following attribute can be specified in a search when the art kind is set to Text:
1. Type
The type of text object, either Point Text, Text In a Path, or Text Along a Path. The specified type can be matched using either is, or is not. FindReplace Art does not search within the text itself.

FindReplace Art Text Type Controls
Illustrator Location:
Illustrator Main Menu > Type > ...
VectorFirstAid adds two menu items to the top-level native Type menu:
VectorFirstAid Type Menu Additions
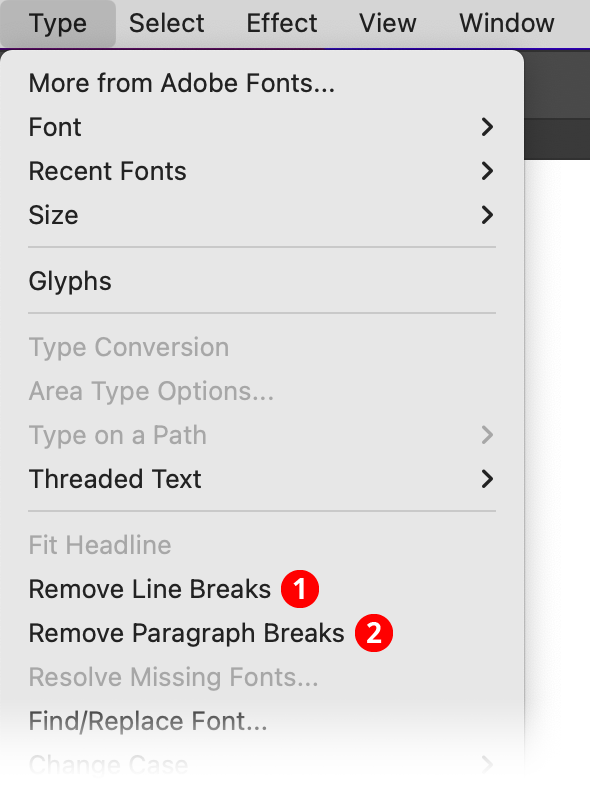
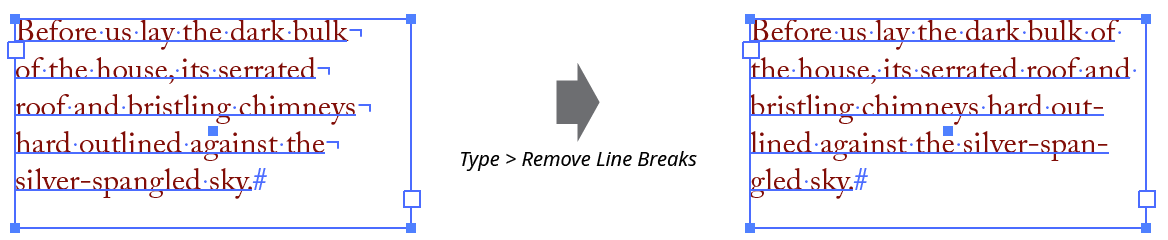
1. Remove Line Breaks
Strips all line breaks (created by pressing Shift+Enter) from the text selection, or, if there is no active text selection, from all selected text objects:
VectorFirstAid Remove Line Breaks
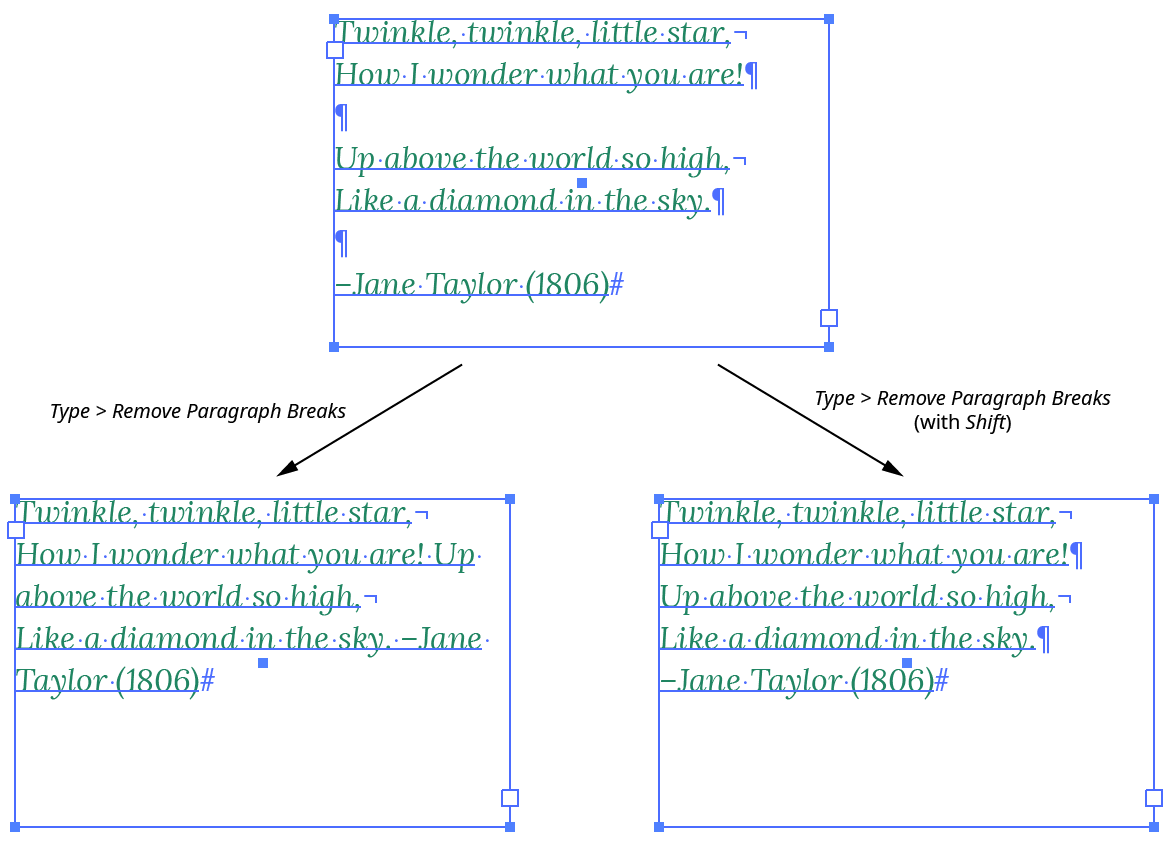
2. Remove Paragraph Breaks
Strips all paragraph breaks from the text selection, or, if there is no active text selection, from all selected text objects. If the Shift key is held down when choosing the menu item, only consecutive paragraph breaks are removed (i.e., each run of consecutive paragraph breaks is replaced with a single paragraph break). This menu item is especially useful because while line breaks can be specified in the native Find & Replace dialog, paragraph breaks cannot be.
VectorFirstAid Remove Paragraph Breaks
Illustrator Location:
Illustrator Main Menu > Window > Astute Graphics > Reform Text
Panel Settings and Operations
Reform Text Panel Settings
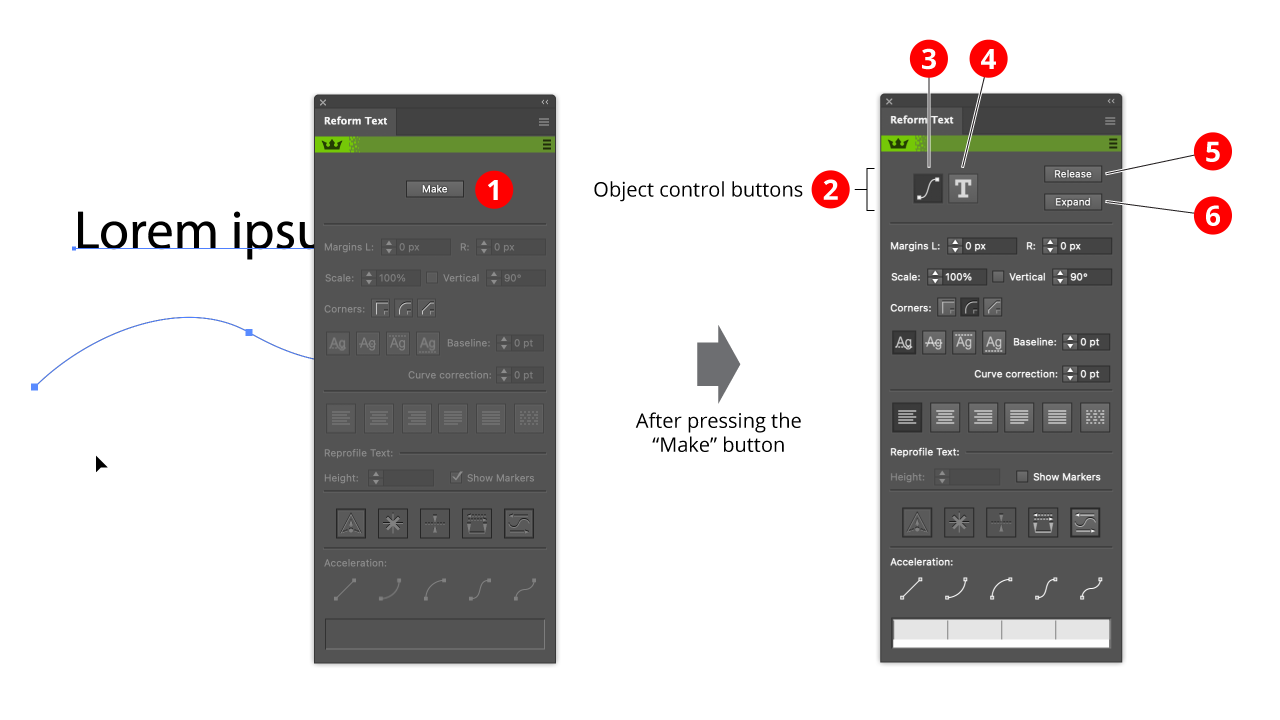
1. Make button
This is available when one Text Box object and one path is selected. It creates a Reform Text object from the two elements. The Text Box object and the Path object are not deleted, but they are moved under the control of the Reform Text object, and will not be rendered.
2. Object control buttons
When a Reform Text object is created and selected, the Make button disappears and the Reform text object control buttons appear.
3. Edit Path button
This radio button makes the path editable by standard Illustrator path editing tools. Reform is especially recommended as a powerful and intuitive path editor, but you can also use the native anchor point tool.
4. Edit text button
This radio button makes the text editable. The text will appear in a box. Click on the text box to obtain a caret, which can be used in conjunction with the other text entry tools to edit the text. It is not possible to edit the text in place on the path, but edits will be echoed to the text on the path interactively.
5. Release button
This deletes the Reform Text object, releasing the Text Box object and the path back to normal Illustrator control.
6. Expand button
This turns the Reform Text object into regular artwork. The Text Box object and the path will be deleted, and Illustrator no longer understands the artwork as text.
Illustrator Location:
Reform Text Editing Controls
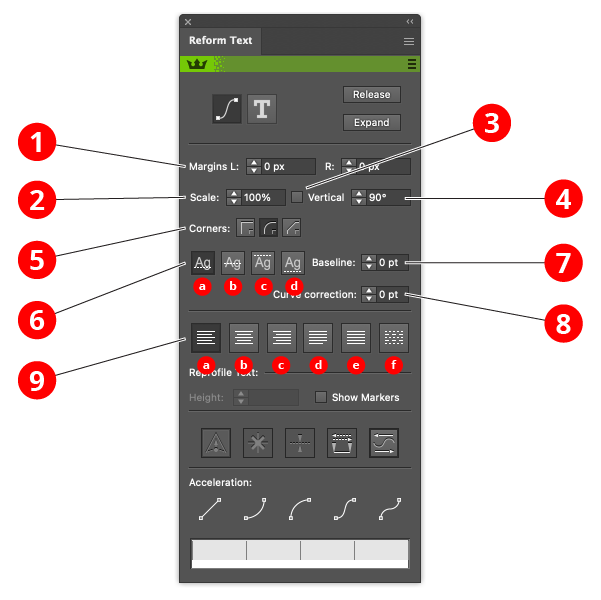
1. Left and Right margins controls
This is an alternative to dragging the delimiters. Enter a value or use the arrow keys to adjust the position.
2. Scale control
Resizes the text to a given percentage of its original size.
3. Vertical checkbox
When checked, the text is vertical rather than rotated in the direction of the path. This option is useful for curves which represent 3D transformations.
4. Vertical angle control
By default 90° is "vertical".
5. Corner buttons
Defines the behaviour when text goes around a corner. There is no good way of flowing text around a sharp corner other than adding spaces to ensure that glyphs do not break on the corner. However if text is in fact non-text symbols, corner behaviour might be crucial.
6. Baseline radio buttons
Text can be:
a: placed with its baseline on the path (normally what you want)
b: placed so that the path goes through the text midpoint
c: placed so that the path touches the top of the text
d: placed so that the path touches the bottom of the text
7. Baseline offset control
The text baseline can be further refined with the baseline control.
8. Curve correction control
Adjust how the text distorts when going round curves. The value represents the adjustment to the offset from the curve. If text is not distorted nicely around sharp curves, setting this value will change the distortion.
9. Justification radio buttons
a: align to left delimiter
b: align to the center of the delimiters
c: align to right delimiter
d: justify (reflow text and adjust spacing so that lines fit exactly in delimiters)
e: scale the text until it fits exactly within the delimiters
f: scale the text horizontally but not vertically until it fits exactly within the delimiters
Illustrator Location:
Illustrator Main Menu > Window > Astute Graphics > Reform Text
Reform Text Variable Height Controls
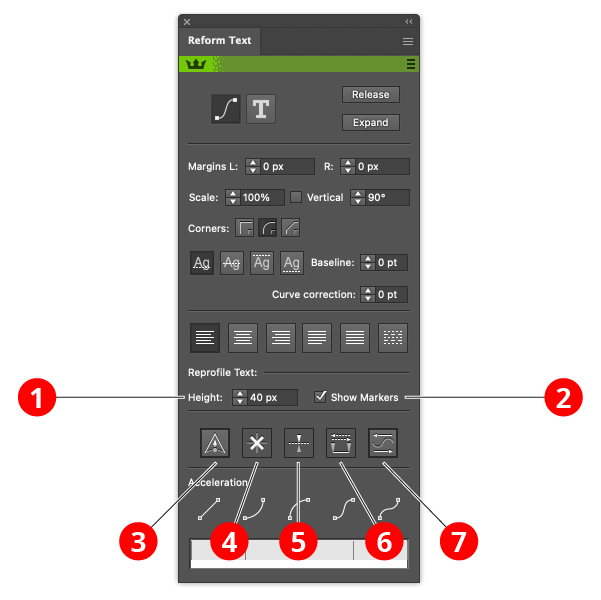
1. Height control
Set the height of a marker by entering a value.
2. Show markers checkbox
When unchecked, the tool is in basic mode. When checked, it is in variable height mode.
3. Sharp marker button
Toggles the selected markers between smooth and sharp (see above for explanation of different types). It also controls the type of any newly-created markers.
4. Delete marker button
Removes all selected markers.
5. Mirror offset button
Changes the direction of the offset of all selected markers. This is the same as changing the sign of the offset value.
6. Swap marker direction button
Changes the position of all markers (selected or not) along the reshape extent. If, for example, a marker is located 1/5 of the way from the start to the end delimiter, swapping the direction will change it to be 1/5 of the way from the end to the start delimiter. Offset values are not changed.
7. Reverse flow direction button
Reverses the direction of the text. Used in conjunction with the Mirror offset button it turns text upside down instead of reflecting it.
Illustrator Location:
Illustrator Main Menu > Window > Astute Graphics > Reform Text
Acceleration refers to distortion of the text in the horizontal direction. This is useful for 3 dimensional or other special effects. The buttons are control buttons and it is possible to further edit the acceleration in the Acceleration widget to have fine-grained custom control.

Reform Text Acceleration Controls
1. Linear acceleration button
The default. No acceleration or uniform acceleration.
2. Ease in acceleration
Text starts very stretched, then becomes very compressed.
3. Ease out acceleration
Text starts very stretched, then becomes very stretched.
4. Shallow sigmoid acceleration
Text starts very compressed, becomes very stretched, then ends very compressed. This one is set up to represent text printed on cylindrical object such as a can or a bottle.
5. Steep sigmoid acceleration [A misnomer]
Text is uniform, but here are two handles which you can use in the acceleration widget control to define your own sigmoid acceleration profile easily.
6. The acceleration widget
This displays the acceleration graphically, and allows for fine control or custom accelerations.
7. Acceleration widget control handles
With a linear acceleration you get no handles (no editing possible), with ease in or ease out one handle, and with the sigmoid controls, two handles. Grab and pull the handles, and the acceleration adjusts to reflect the new handle position. Note that sometimes the handles will appear to get stuck. This is to prevent the entering of extreme accelerations which would produce undesirable results.
Illustrator Location:
Illustrator Main Menu > Window > Astute Graphics > Reform Text > Panel Flyout Menu > Save/Manage Profiles...
"Height Markers" (sequences of offset markers along a delimited extent) may be saved and recalled, so that multiple paths may be reshaped in the same manner. To save a height marker profile, use the panel flyout menu when a Reform Text operation is in progress and choose Save Height Markers... and give the profile a name. To apply an existing height marker profile to a path, start editing the path with the Reform Text tool and (if necessary) move the delimiters to the desired positions. Then choose the desired saved option from the panel flyout menu.
Height Marker Profiles may be renamed or deleted by choosing Manage Height Markers... from the panel flyout menu.
Illustrator Location:
Illustrator Main Menu > Window > Astute Graphics > QuickOps
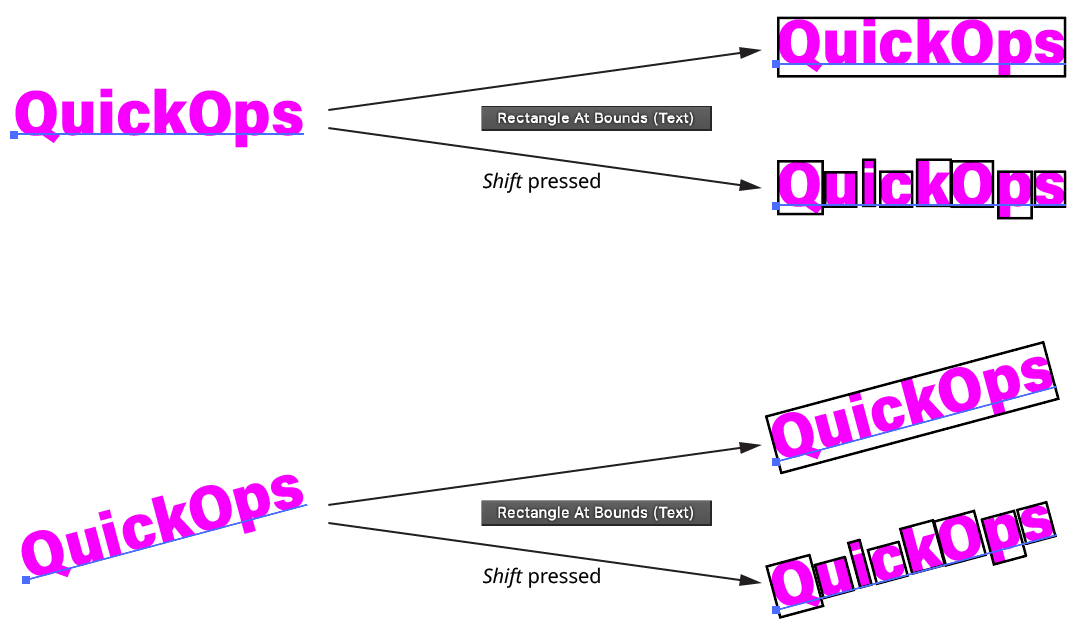
The Rectangle At Bounds (Text) operation creates a rectangular path around the bounds of each selected text object, treating it as if the text were outlined. The operation honors the general Illustrator preference Use Preview Bounds (although unless the text has live effects attached to it, this will generally not matter since text is not typically stroked). If the Shift key is held down when the button is clicked, then bounds rectangles are drawn around each glyph in the text object. If the text object is scaled, rotated, or sheared, the bounds rectangle(s) will reflect that transformation matrix.
QuickOps Rectangle at Bounds - Text
Clicking the icon to the right of the button will bring up the Rectangle At Bounds (Text) Preferences dialog:
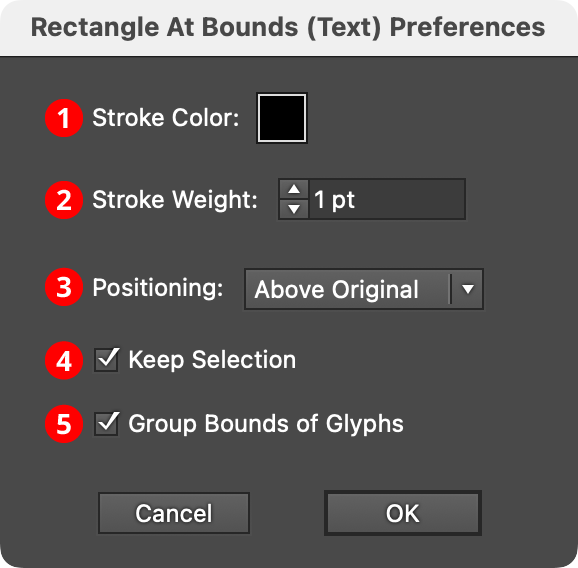
QuickOps Rectangle at Bounds - Text Preferences
1. Stroke Color
Specifies the color of the rectangles. Clicking the color chip brings up the standard color picker dialog. The default color is black.
2. Stroke Weight
Specifies the stroke weight of the rectangles. The default weight is 1 pt.
3. Positioning
Specifies whether the bounds rectangles are created above the original text art, below the original text art, or to replace the original text art.
4. Keep Selection
When enabled, the original art stays selected; otherwise the bounds rectangles become the new selection.
5. Group Bounds of Glyphs
When Shift is used to create multiple bounds rectangles for each glyph, these rectangles are also placed in a group when this preference is enabled.
Illustrator Location:
Illustrator Main Menu > Window > Astute Graphics > QuickOps
The Text-Aware Reflect operation reflects artwork either horizontally or vertically while keeping type objects (except text-on-a-path objects, which are not handled) unreflected and in the same relative position. The button is available when the selection contains at least one text object. This can be grouped with other art, but does not need to be. Clicking the button will reflect the selection horizontally (i.e., across the vertical axis); to reflect vertically, hold down Shift while clicking. Reflection is always through the center of the bounding box of the art.
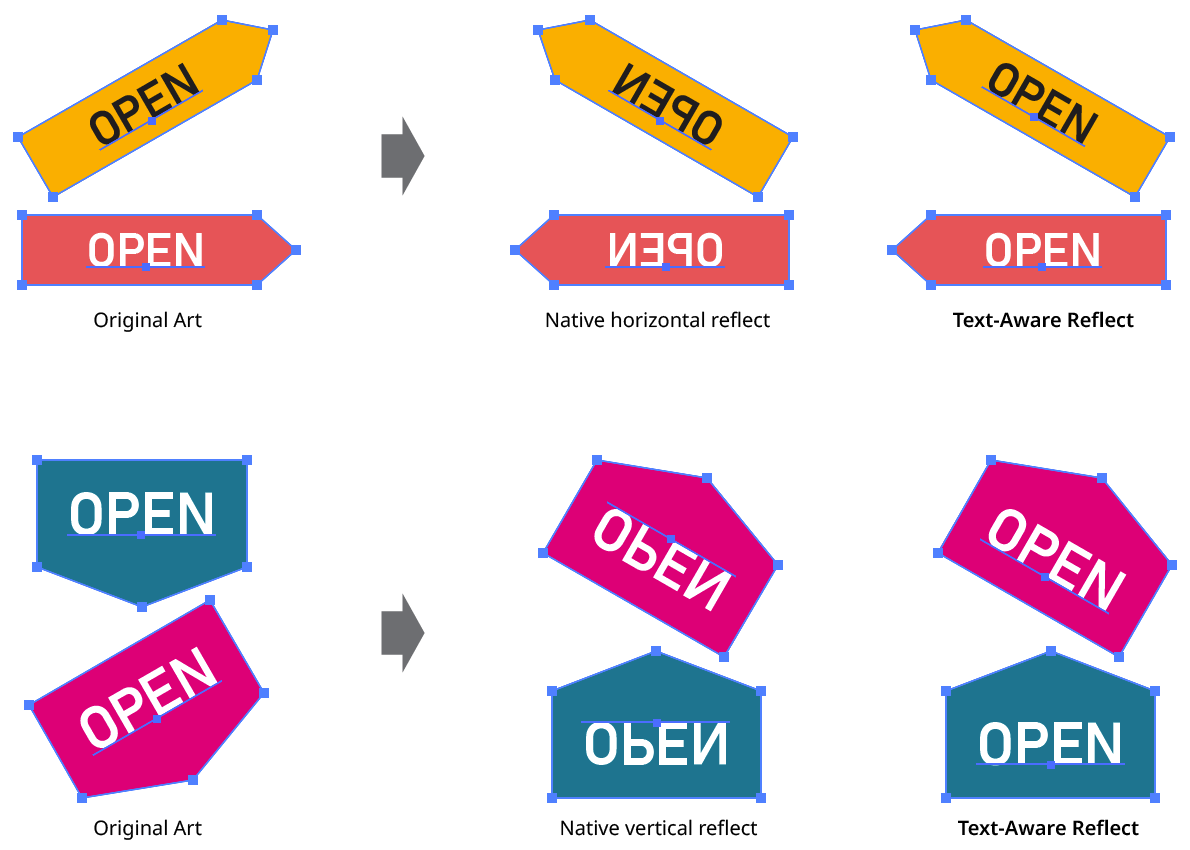
QuickOps Text Aware Reflect
Mixed case text with descenders may require minor adjustment of its vertical position after vertical reflection in order to keep it optically centered.
Illustrator Location:
Illustrator Main Menu > Window > Astute Graphics > QuickOps
The Scale Justify operation creates a single, justified column of text (sometimes known as “slab text”) from one or more selected text objects. Justification is done by scaling up each line of text to match the width of the longest line. Any text rotation is removed, and the top-to-bottom order of the text is retained.
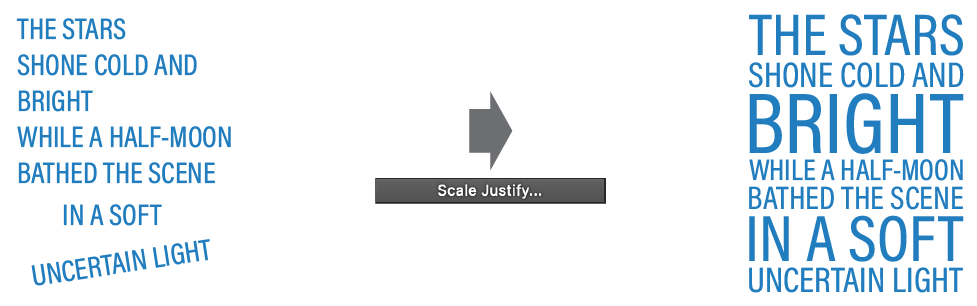
QuickOps Scale Justify Overview
With at least one text object selected (except text-on-a-path objects, which are not handled), clicking the button brings up the settings dialog:
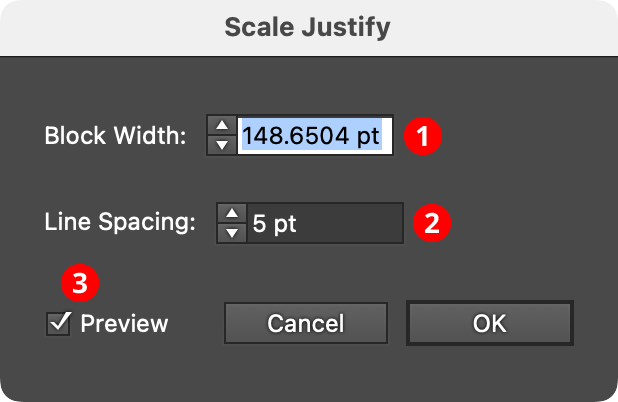
QuickOps Scale Justify Settings
1. Block Width
Specifies the width of the justified block of text. When the dialog is first brought up, the width will initially be set to that of the longest line of selected text, but it can be adjusted up or down as desired (from 1 pt to 4000 pt).
2. Line Spacing
Specifies the space between the lines of text, from –1000 pt to 1000 pt. When set to zero, the lines will just touch (remembering that glyphs with ascenders, descenders, serifs, or curves may make it appear as if there is still some space between the lines). Negative values can be used to create overlapping lines of type:

QuickOps Scale Justify Line Spacing
3. Preview
When Preview is enabled, the scale-justified text will be previewed on the artboard, and will update whenever the settings are changed. Turning Preview off will show the text in its original position.
Illustrator Location:
Illustrator Main Menu > Window > Astute Graphics > QuickOps
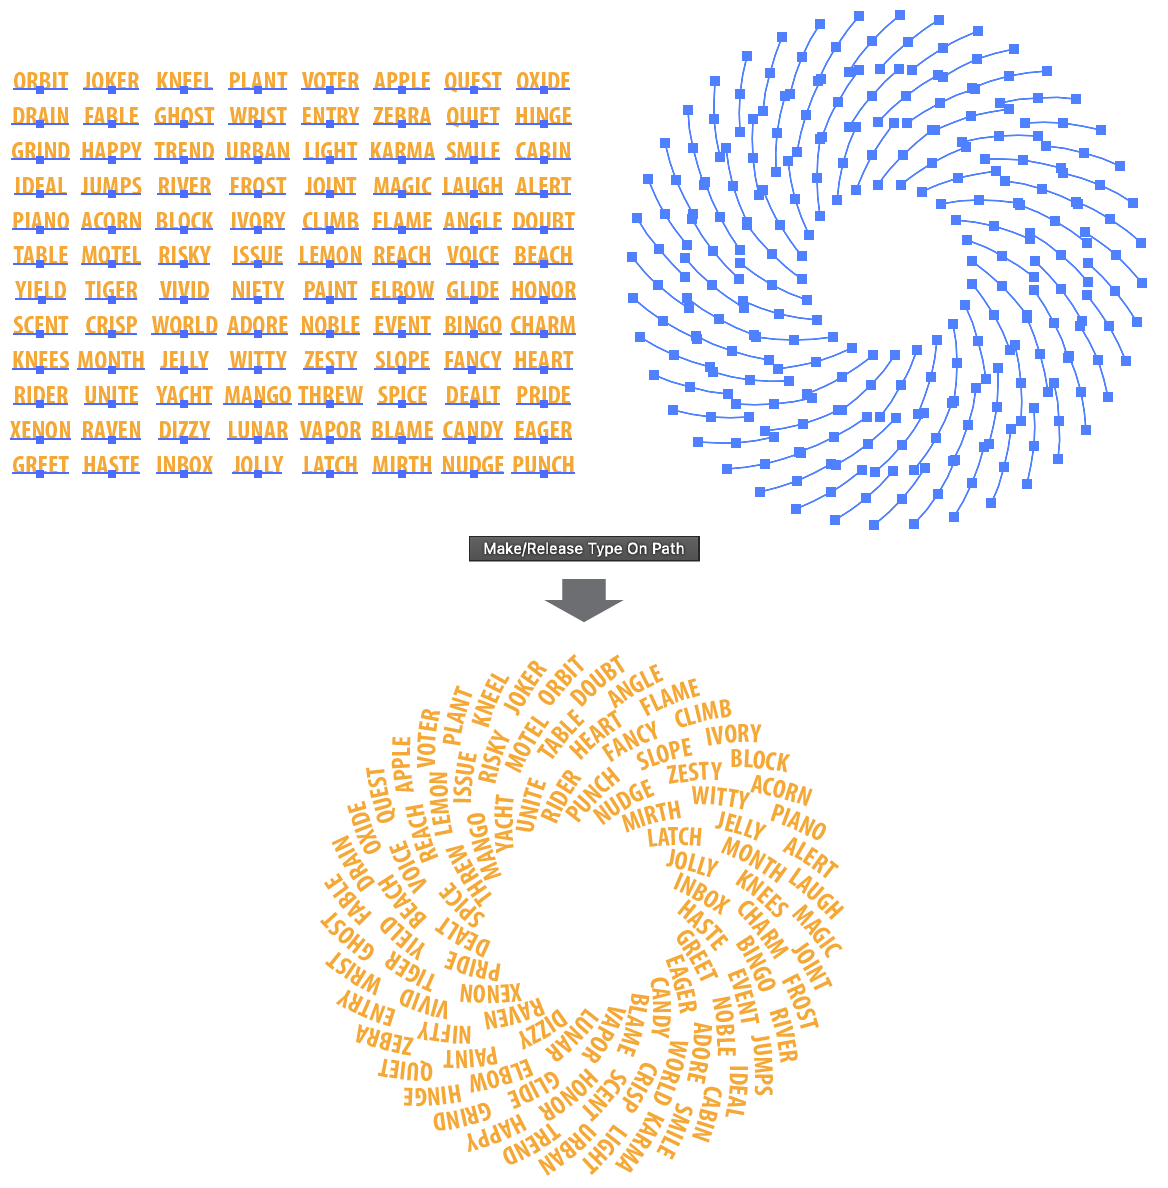
The Make/Release Type On Path operation performs two equal but opposite functions. First, it combines a selected point type object with a selected path object to create a type-on-a-path object, using the following criteria:
a. The path is not moved.
b. Any stroke or fill on the path is retained (unlike doing this natively by clicking on the path with the Type or Type on a Path tool).
c. The Type on a Path Options effect type is set to “Rainbow.”
d. The Type on a Path Options align type is set to “Baseline.”
e. The start and end markers are set to the start and end of the path.

QuickOps Make/Release Type on Path - Make
Second, if the selection consists of an existing type-on-a-path object, then that object is released back into its constituent parts (a point type object and a normal path). The point type is placed directly above the path object, centered on its bounding box. Overset text (if any) is retained.

QuickOps Make/Release Type on Path - Release
The Make/Release Type On Path operation can work on multiple objects simultaneously. When making multiple type-on-a-path objects, the point type objects and path objects are matched one by one using their stacking order to make pairs. In other words, the top-most type object is paired with the top-most path object, the next-lower type object is paired with the next-lower path object, and so on down the order, until one or both types of objects run out.
This ability to create multiple type-on-a-path objects with a single click makes possible some designs which would otherwise require an inordinate amount of manual copying and pasting (or custom scripting):
QuickOps Make/Release Type on Path - Multiple