Scaling
 Randomino Panel
![]() AG Transform Live Effect
AG Transform Live Effect
 QuickOps Panel
Illustrator Location:
Illustrator Main Menu > Window > Astute Graphics > Randomino
Scales the selected artwork in a random way. Note that the midpoint of the low and high scaling values is their geometric mean, not their arithmetic mean.
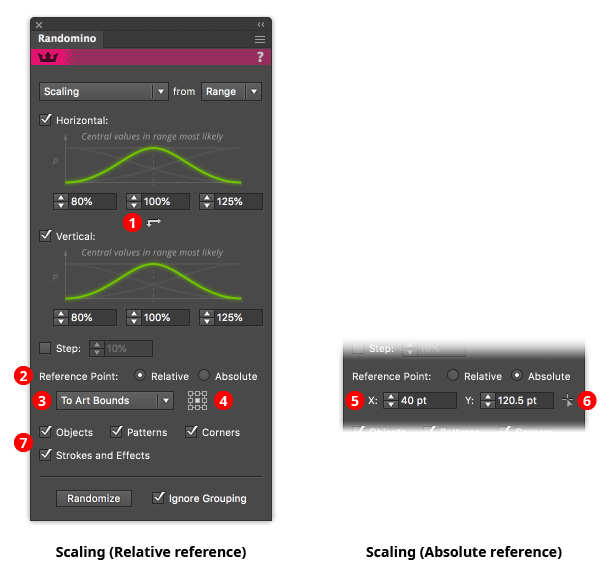
Randomino Panel Scaling Callouts
1. Uniform/non-uniform button
Click to switch between uniform scaling (same amount in both the horizontal and vertical directions) and non-uniform scaling.
2. Reference point selector
Determines whether the reference point (the point from which the scaling will occur) is relative to the position of the art, or at an absolute position.
3. Relative reference point type
Selects what the reference point is relative to: the art’s bounds; the art’s first anchor point (for paths only); the art’s last anchor point (for paths only); or the artboard.

Randomino Panel Scaled Lines Example
4. Relative reference point orientation
For Art Bounds and Artboard relative reference points, specifies the position of the reference point (top left, top, top right, middle left, etc).
5. Absolute reference point coordinates
The X and Y coordinates of the reference point.
6. Absolute reference point setter
Enables a tool that allows you to click at the reference point’s position.
7. Filter checkboxes
Scaling can be applied to only certain attributes of the selected art. You can choose to scale the art objects themselves, and any patterns found with the art. If the objects are scaled, you can choose whether or not to include any corners applied to the art, and strokes and effects that the art contains.
Illustrator Location:
The Scale section of the dialog has the following controls:
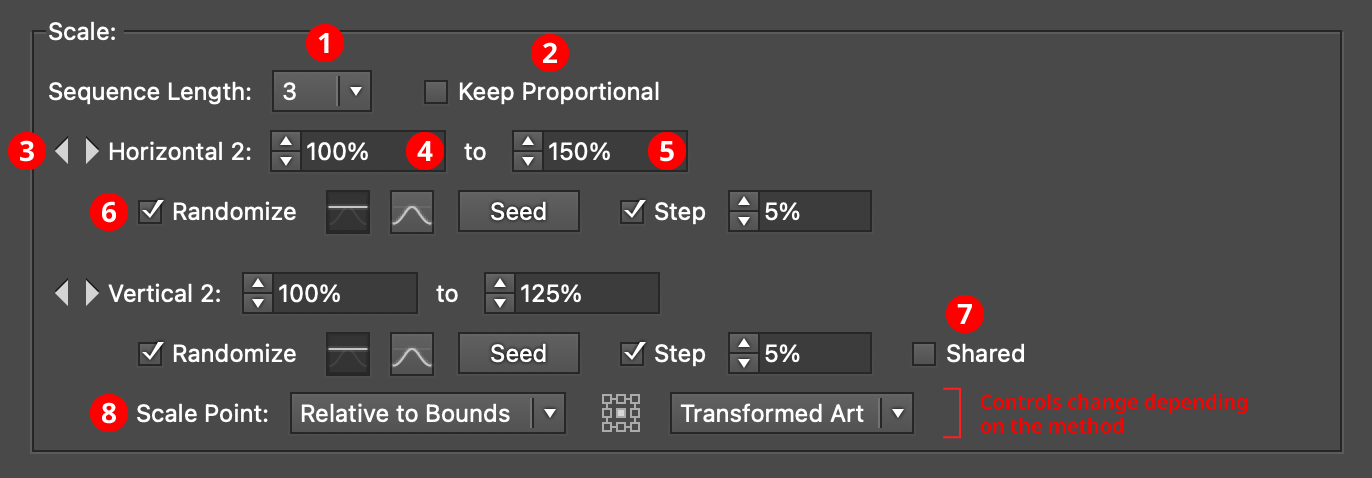
AG Transform Parameters Dialog - Scale Section
1. Rotation Sequence Length
By default (and ignoring randomization), each copy receives the same scaling value (as with the native Transform effect). However, AG Transform offers sequences, which allow up to 8 different scaling values. If the number of copies exceeds the length of the sequence, the values simply repeat in a cycle. Each member of a sequence shares the same randomization parameters.
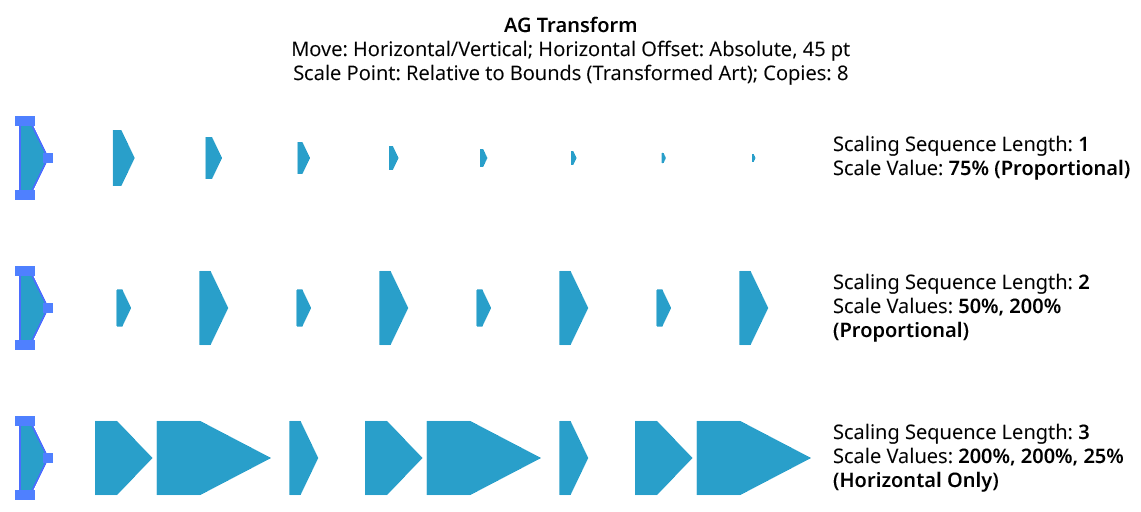
AG Transform Scaling Sequence Examples
2. Keep Proportional
When enabled, scaling will always be proportional (the vertical scaling values will be automatically set to match the horizontal scaling values).
3. Previous/Next Offset Buttons
Available when the sequence length is set to a value other than 1. Clicking either button will move between the sequence’s values, allowing any of them to be edited.
4. Value/Minimum Value
The horizontal (or vertical) scaling value for the current sequence index, from –10000% to 10000%. Negative values have the effect of flipping the object across the corresponding axis (the same as using the Reflect X or Reflect Y checkboxes in the native Transform dialog). When randomization is enabled, this value specifies the minimum value that may be randomly produced.
5. Maximum Value
Available when randomization is enabled; it specifies the maximum horizontal (or vertical) scaling value that may be randomly produced for the current sequence index.
6. Randomize
Randomization works the same way in the Scale section of the dialog as it does in the Move section. Both horizontal and vertical scaling can have independent randomization parameters.
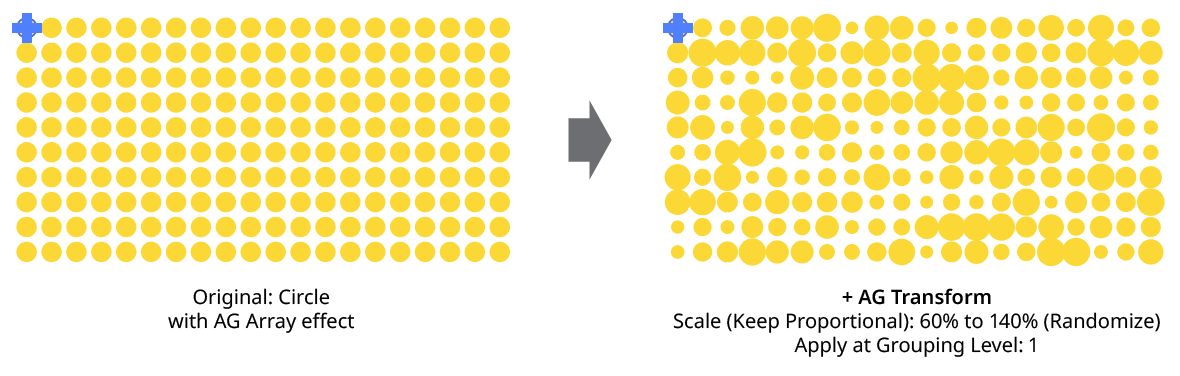
AG Transform Random Scale
7. Shared
When enabled, the random number for each copy (i.e., its random position between the specified minimum and maximum) will be the same for the vertical scaling as the horizontal scaling, allowing the transformed aspect ratio of each copy to be maintained.
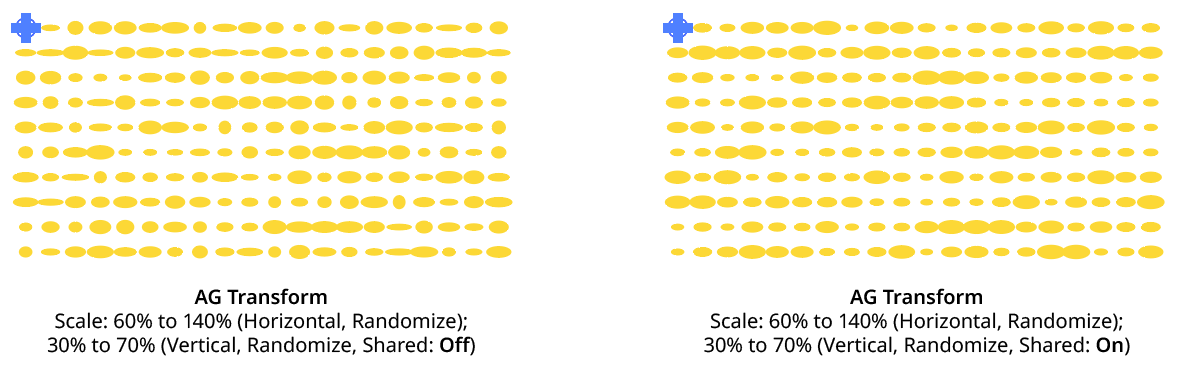
AG Transform Random Scale (Non-Shared Vs. Shared)
8. Scale Point
Just as with specifying the Center of Rotation, the dropdown menu allows the choice between six different methods of specifying the point through which the art is scaled: Fixed, Relative to Bounds, Anchor Point, Position Along Path, Tagged Path, or Along Line. See Center of Rotation in the Rotate section for an explanation of the methods.
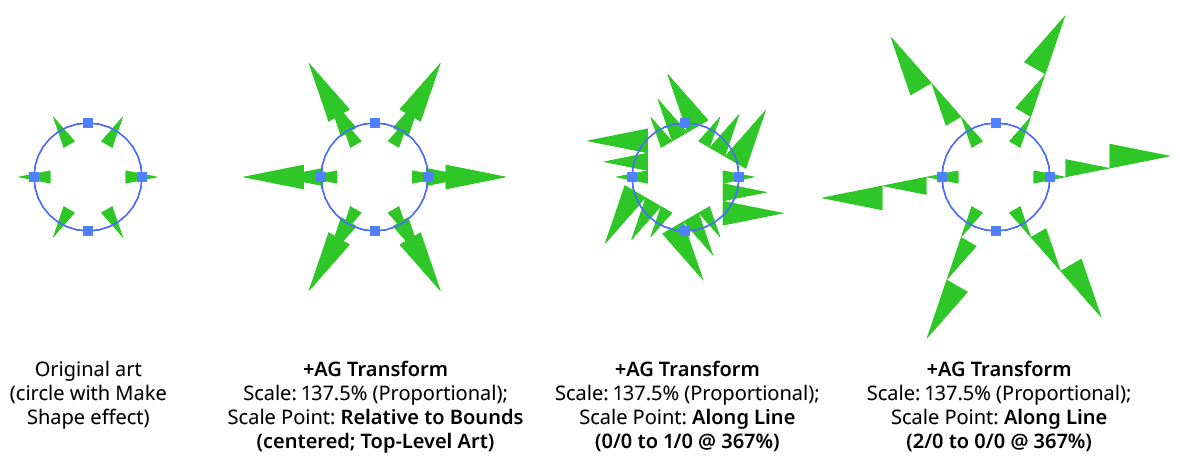
AG Transform Scale Point Examples
Illustrator Location:
Illustrator Main Menu > Window > Astute Graphics > QuickOps
The Scale Justify operation creates a single, justified column of text (sometimes known as “slab text”) from one or more selected text objects. Justification is done by scaling up each line of text to match the width of the longest line. Any text rotation is removed, and the top-to-bottom order of the text is retained.
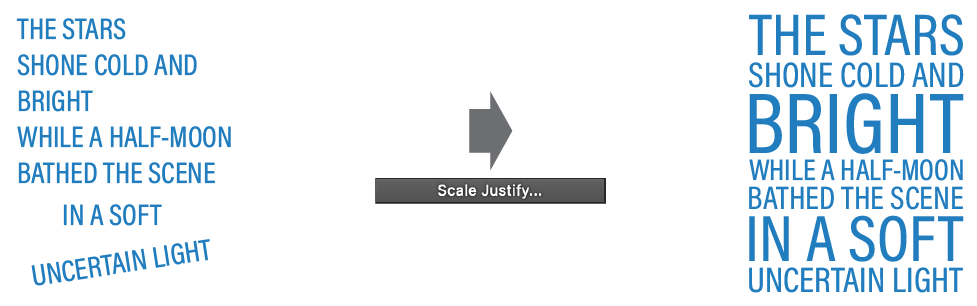
QuickOps Scale Justify Overview
With at least one text object selected (except text-on-a-path objects, which are not handled), clicking the button brings up the settings dialog:
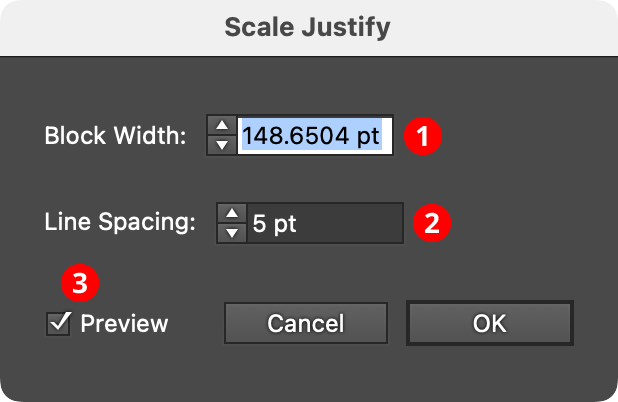
QuickOps Scale Justify Settings
1. Block Width
Specifies the width of the justified block of text. When the dialog is first brought up, the width will initially be set to that of the longest line of selected text, but it can be adjusted up or down as desired (from 1 pt to 4000 pt).
2. Line Spacing
Specifies the space between the lines of text, from –1000 pt to 1000 pt. When set to zero, the lines will just touch (remembering that glyphs with ascenders, descenders, serifs, or curves may make it appear as if there is still some space between the lines). Negative values can be used to create overlapping lines of type:
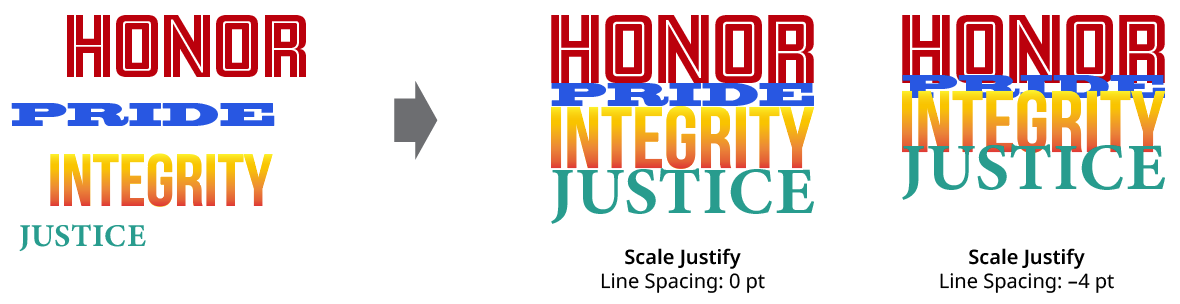
QuickOps Scale Justify Line Spacing
3. Preview
When Preview is enabled, the scale-justified text will be previewed on the artboard, and will update whenever the settings are changed. Turning Preview off will show the text in its original position.
Illustrator Location:
The Scale Strokes operation allows the stroke weights of the selected art (but not the art itself) to be scaled up or down, in either an absolute or relative manner. A minimum weight can be specified, and final stroke weights can be rounded to a specified precision. Additionally, dashes, brushed strokes, and variable weight strokes can be selectively excluded from the scaling operation.
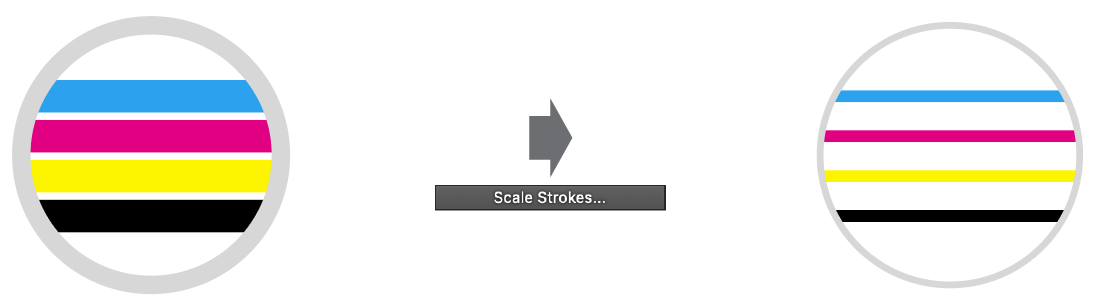
QuickOps Scale Strokes Overview
Clicking the button brings up the settings dialog:
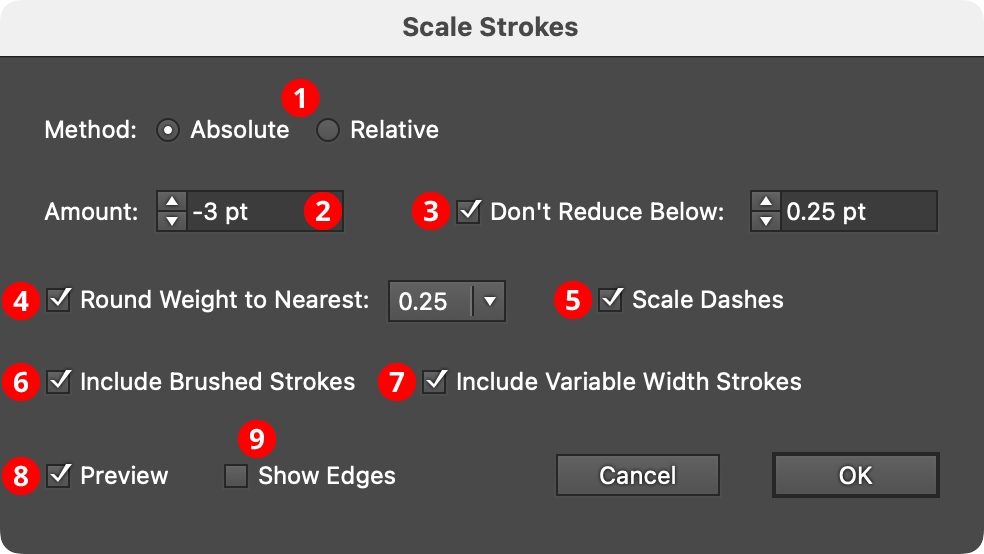
QuickOps Scale Strokes Settings
Note that stroke weight units are set independently from “general” units in Illustrator’s preferences dialog. Changing the unit of measurement for the document by right-clicking on a ruler will only change the general units, not the stroke weight units.
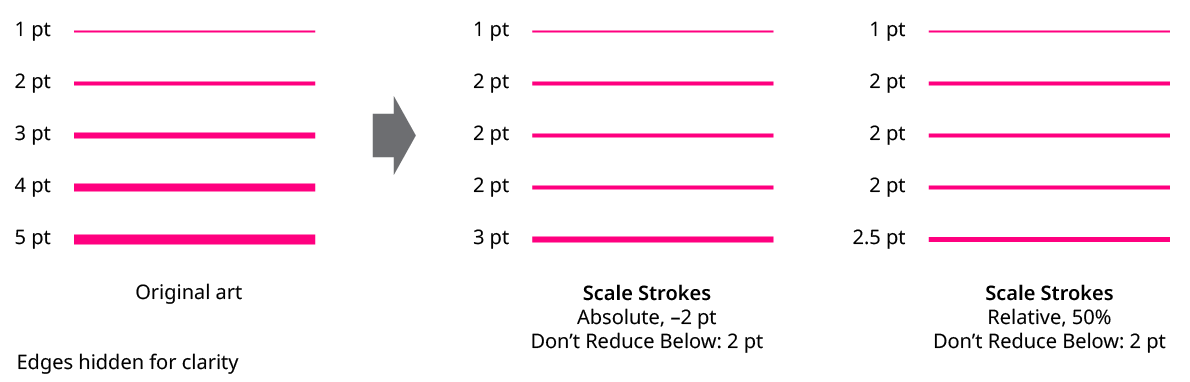
1. Method
With the Absolute method, each stroke weight is modified by adding a fixed amount to it; this amount can be positive or negative. Weights that end up at 0 pt or less will result in the stroke being removed (unless the Don’t Reduce Below setting is used). With the Relative method, each stroke weight is modified by multiplying it by a specified percentage.
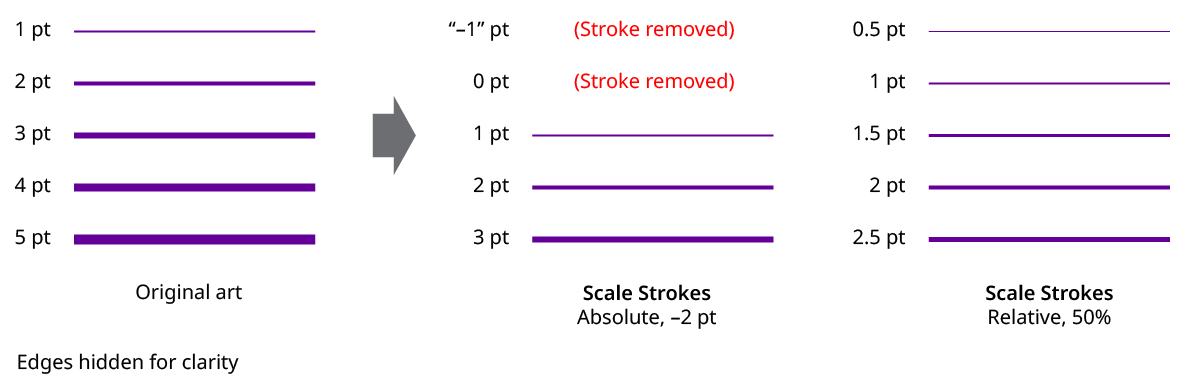
QuickOps Scale Strokes Absolute Vs. Relative
2. Amount
The amount to change the stroke weight(s), either as an absolute amount, like “–2 pt” or “3.5 mm”, or a relative amount, like 75%. Absolute amounts can range from –1000 to 1000 pt. Relative amounts can range from 0.01% to 10000%. When a negative absolute amount causes at least one stroke to end up with a weight of zero or less, and therefore be removed, a small warning icon will appear on the dialog.
While an Absolute value of zero (or a Relative value of 100%) does not directly change any stroke weights, it can still be useful when used with the Round Weights function (see below).
3. Don’t Reduce Below
When enabled, and the Absolute value is negative or the Relative value is less than 100%, strokes will never be made thinner than the specified value. Strokes that originally had weights below that minimum value will remain unchanged.
QuickOps Scale Strokes Don't Reduce Below
4. Round Weight to Nearest
When enabled, all stroke weights will be rounded to the nearest specified fraction, using the current stroke units of measurement. Available fractional rounding amounts are 1.0 (in other words, the nearest integer), 0.5, 0.25, 0.1, 0.05, and 0.01.
For example, a 2.38 mm stroke would be rounded down to 2 mm when the rounding fraction is 1.0, up to 2.5 mm when the rounding fraction is 0.5, and up to 2.4 mm when the rounding fraction is 0.1. Weights that would normally be rounded down to zero are instead rounded up. Similarly, if Don’t Reduce Below is enabled, and a weight would be rounded down below the threshold, then it is instead rounded up.
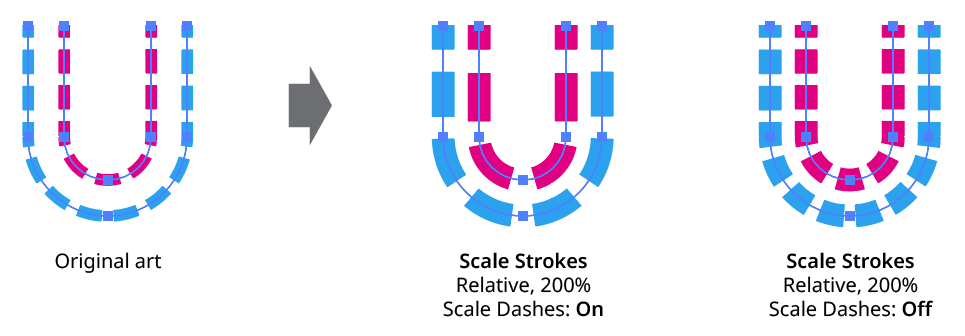
5. Scale Dashes
When enabled, dash and gap lengths are scaled up or down with the stroke.
QuickOps Scale Strokes Scale Dashes
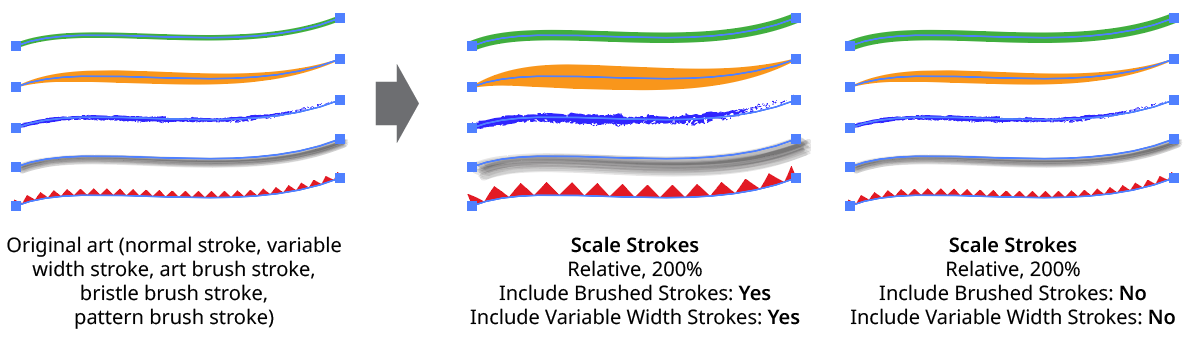
6. Include Brushed Strokes
The Include Brushed Strokes setting can be turned off to exclude strokes that have a brush applied from being scaled. This applies to all types of brushes (Calligraphic, Scatter, Art, Bristle, and Pattern).
7. Include Variable Width Strokes
The Include Variable Width Strokes setting can be turned off to exclude strokes that have a variable width profile applied from being scaled.
QuickOps Scale Strokes - Include Brushed and Variable Width Strokes
8. Preview
When Preview is enabled, the artwork’s new appearance with its scaled strokes is shown on the artboard, and will update whenever the settings are changed. Turning Preview off will show the artwork with its original stroke weights, allowing you to toggle to quickly see “before and after.”
9. Show Edges
By default, artwork selection edges are automatically hidden when the Scale Strokes settings dialog is up, to make it easier to see stroke weight changes. However, by toggling the checkbox on, they may be shown again.
Scale Strokes: Other Considerations
a. Strokes which are hidden in the Appearance panel are scaled as normal.
b. If an object contains multiple strokes, they are all scaled.
c. If some stroked items are grouped and a stroke is added at the group level, then when the entire group is selected, both the group-level stroke and the group member strokes are scaled.
d. If the type tool has been used to select some text, only the selected characters will be affected.
e. InkFlow strokes do not use the native stroke weight for their appearance, but can be scaled using the Live Effect Parameter Editor.