 Randomino Panel
The Randomino panel allows precise randomization of selected artwork with finer control and more options than the Randomini tool. Additionally, it allows you to operate on text characters and to save and recall your favorite randomization settings. The panel will configure itself differently depending on the attribute you are randomizing and whether you are picking random values from a range of values or from a list of discrete values.
The Randomino panel will appear in the main menu under Window > Astute Graphics > Randomino. It is shown here with default settings:
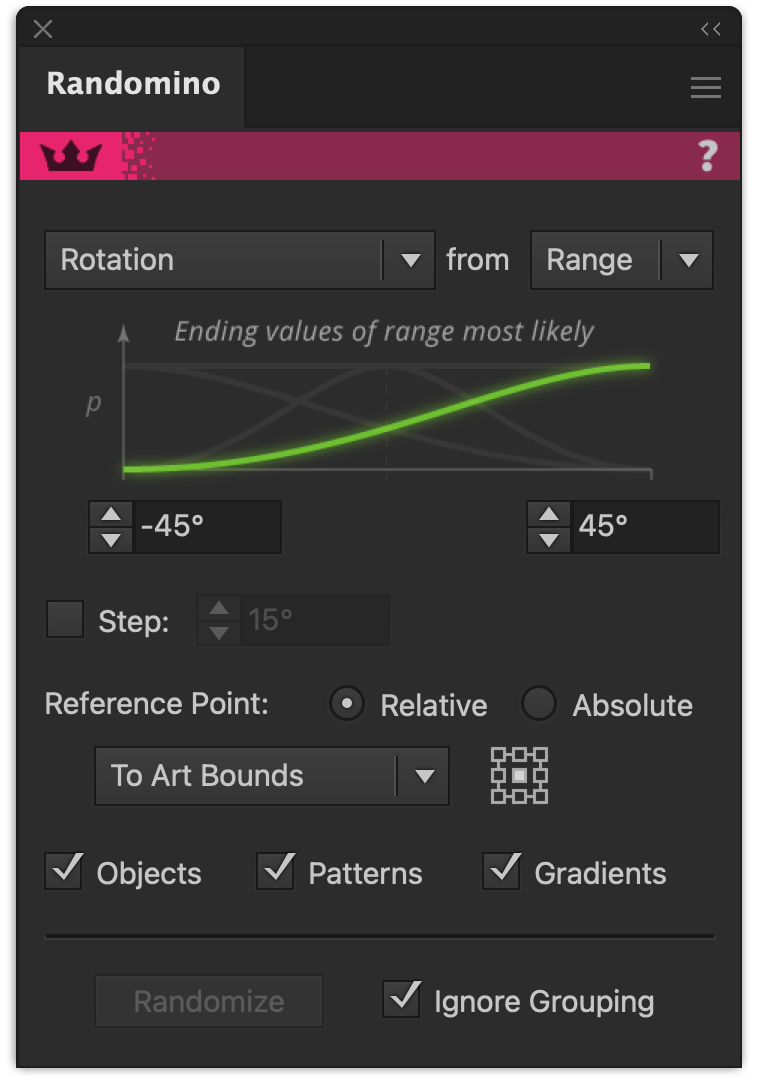
Randomino Default Panel
Common Panel Controls
Most kinds of randomizable attributes are controlled using numerical parameters. Opacity is one such attribute, and the panel, when set to Opacity kind, demonstrates controls common to most of the other kinds.
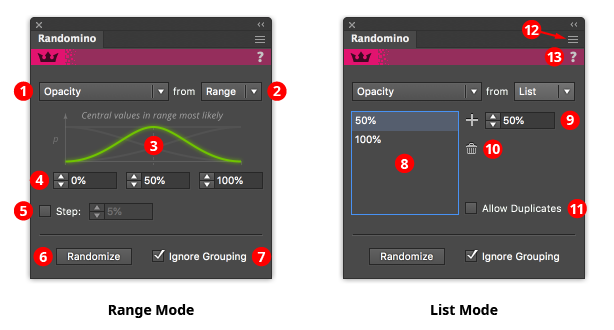
Randomino Panel Common Panel Callouts
1. Kind popup menu
Chooses the attribute to be randomized, from among: Color, Live Effects, Movement, Opacity, Rotation, Scaling, Stacking Order, and Stroke Weight.
2. Range/List popup menu
Selects which method of choosing values to use. In Range mode, values are randomly chosen from anywhere within a continuous range of values (as shown, 0% to 100%). In List mode, values are randomly chosen from among a list of discrete values (as shown, 50%, and 100%).
3. Distribution curve (range mode only)
Selects (among four models) how values are randomly chosen from a range. The green curve represents the probability of choosing a value from a given location in the range, with zero being the bottom x-axis.
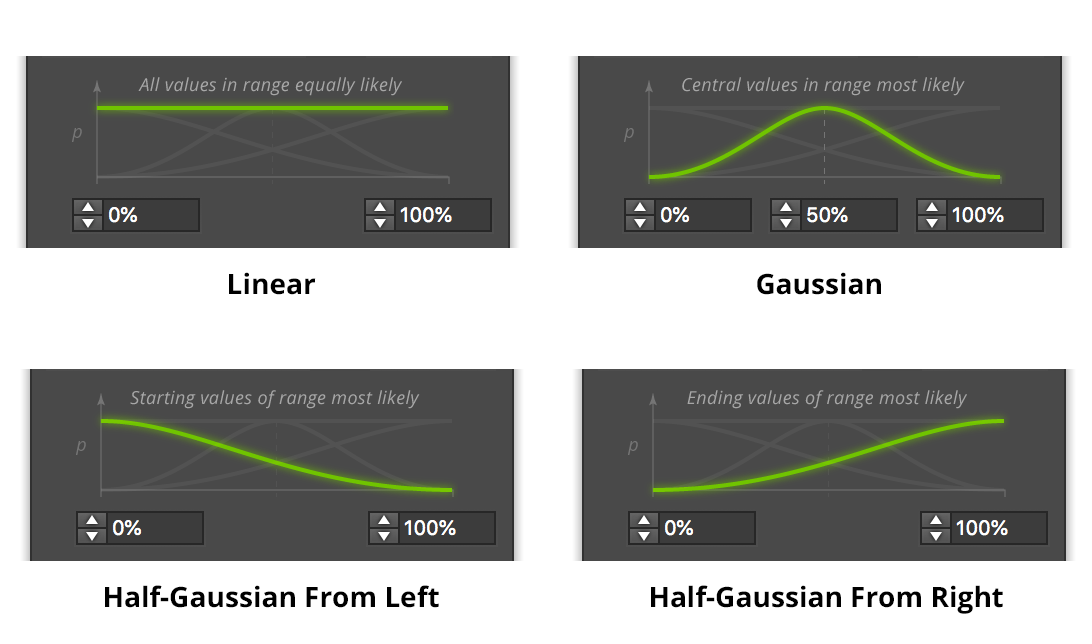
Randomino Distribution Curves
a) Linear distribution: all values within the range are equally likely to be chosen.
b) Bell curve (Gaussian) distribution: values at the center of the range are most likely to be chosen, with values becoming less likely the further they are from the midpoint (“outliers”). This is also known as a “Normal” distribution, and is prevalent in the natural world.
c) Half-Bell curve (Half-Gaussian) From Left distribution: values at the start of the range are most likely to be chosen, with values becoming less likely moving towards the end of the range.
d) Half-Bell curve (Half-Gaussian) From Right distribution: values at the end of the range are most likely to be chosen, with values becoming less likely moving towards the start of the range.
4. Value input boxes (range mode only)
The values between which the random value will be chosen according to the specified distribution. The mid-value is only displayed when the Bell curve (Gaussian) distribution is active.
5. Step checkbox and value (range mode only)
When enabled, whatever random values are chosen will be rounded to be multiples of the specified step. Note that this may cause the final value to lie outside the specified range. For example, if the range is 0 to 14, and the step is 5, the only values that will be chosen are 0, 5, 10, and 15.
6. Randomize button
Clicking the button randomizes the art using the parameters currently displayed on the panel.
7. Ignore Grouping checkbox
Acts the same as in the Randomini tool; when enabled, grouped items will be treated as if they were ungrouped. For example, consider a group of 10 squares. Applying a random rotation to the group would normally rotate the ten squares together, as a group. But when the preference is enabled, each square is independently rotated by a different amount, as if the squares were not grouped.
8. Value list (list mode only)
The values from which one will be randomly chosen. Duplicates are allowed if the Allow Duplicates checkbox is enabled (see below).
9. Add button and input (list mode only)
Adds the specified value to the list.
10. Delete button (list mode only)
Deletes one or more selected values from the list.
11. Allow Duplicates checkbox (list mode only)
When enabled, allows the same value to be added to the list more than once. This can be useful for modifying the frequency of each item. For example, if the list were to contain 0, 0, 0, and 90, then roughly three-quarters of the returned values would be zero and one-quarter would be 90. If duplicates exist in the list and the checkbox is changed from ticked to unticked, those duplicates are immediately removed.
12. Flyout menu
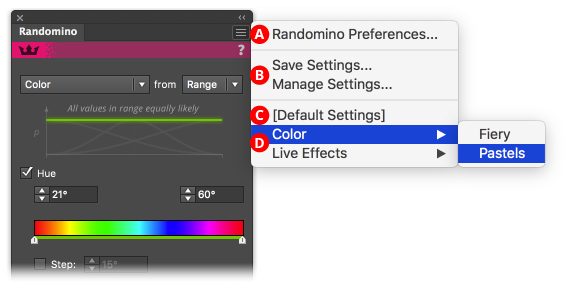
Randomino Panel Flyout Menu Callouts
A. Access to preferences dialog
B. Saving and managing settings: Saving a setting lets you store the set of panel options and settings that are currently being displayed in the panel, which can then be instantly recalled later. Saved settings can also be applied through an action.
C. Default settings: Restores the panel to its default values, retaining the randomization kind that is currently active.
D. Settings access: For organization and ease of access, each saved setting is found under a submenu according to kind. Picking the menu item loads that setting into the Randomino panel. If the preference “Apply Loaded Settings Immediately” is enabled, the setting is then applied to any selected art.
13. Panel banner
The help button on the right opens the help documentation in the Astute Manager. If this does not automatically appear, please ensure your Astute Manager is running first.
Color Randomization
Changes the color(s) of the selected objects in a random way.
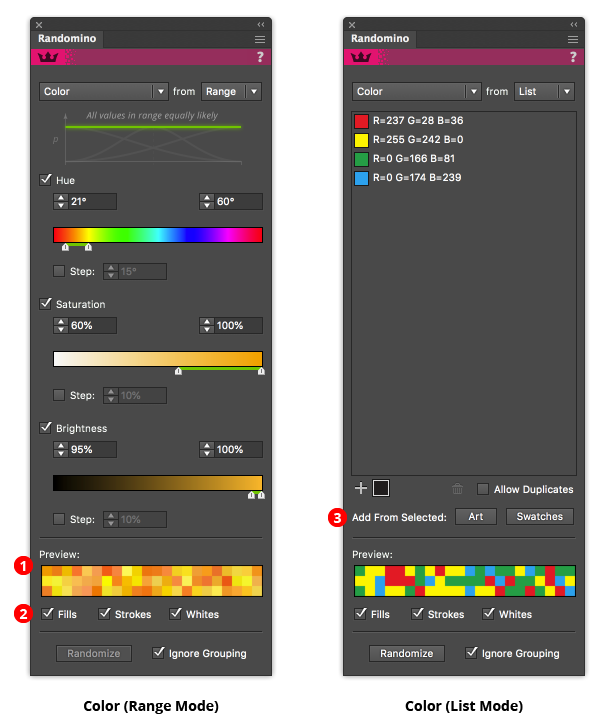
Randomino Panels Color Callouts
In Range mode, color is controlled using the Hue-Saturation-Brightness (HSB) model. Each of the three parameters may be independently controlled (or disabled entirely), with one restriction: all must use the same distribution model. Each parameter’s value may be entered in the numerical input boxes or adjusted by dragging the slider controls. Shift-clicking the thumb area resets the thumbs to the entire range of valid values.
1. Color Preview area
When all three color parameters are enabled, the preview area shows a random selection of colors which would be generated using the current settings. When only one or two of the three parameters are being changed, the preview area shows a selection of colors on top (a standard set if nothing is selected; otherwise colors from the selected art) and the same colors that would result from randomly changing their parameters.
2. Fills/Strokes/Whites checkboxes
You may choose to modify fill colors, stroke colors, or both. In addition, you can choose to affect white colors or not. Gradients (both standard and freeform) are modified on a stop-by-stop basis. Gradient meshes are modified on a selected node-by-node basis. Randomino does not change the colors of raster art.
Tip: If randomizing the colors of art seems to have no effect, check whether 1) the stroke or fill checkbox is disabled; or 2) you are attempting to modify the color of a group (which may not exist if the group does not have an independent fill or stroke) with the “Ignore Grouping” checkbox disabled.
3. Add From Selected buttons (list mode only)
While colors may be added to the list one by one using the color picker interface, it is often useful to add several colors at once, either from the currently selected artwork or from the currently selected swatches.
Live Effect Parameter Randomization
It is often desirable to have the same live effect applied to a number of objects but with different parameters. For example, you might want to apply an AG Offset to many objects with different distance values:
Different AG Offsets Example
Unfortunately, modifying each object one by one is time-consuming and tedious. However, using Randomino, you can instantly assign a random value across multiple objects to many different parameters from a number of common live effects, both native and from Astute Graphics:
Add Points: Seed
AG Block Shadow: Position
AG Offset: Distance
Color Randomizer: Hue Seed, Saturation Seed, Lightness Seed, Filter Seed
Dashify: Seed
Drop Shadow: Blur, Opacity, Position
Extend Path: Seed
Feather: Radius
InkFlow: Size
Inner Glow: Blur, Opacity
Make Shape: Seed
Opacity Randomizer: Variation Seed, Filter Seed
Outer Glow: Blur, Opacity
Path Removal: Seed
Point Removal: Seed
Phantasm: Brightness, Contrast, Hue, Hue (Colorizing), Saturation, Saturation (Colorizing), Lightness
Pucker & Bloat: Strength
Roughen: Size (Absolute), Size (Relative), Detail
Segment Removal: Seed
Stroke Attributes: Seed
When the Randomino panel kind is set to Live Effects, one, and possibly two, additional popup menus will appear on the panel:
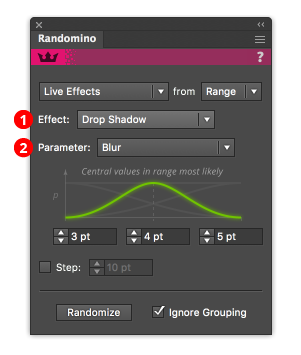
Randomino Panel Live Effect Callouts
1. Effect menu
Selects the live effect or family of effects to randomize.
2. Parameter menu
Appears if there are multiple parameters available within the live effect or family and allows you to select the parameter.
Tip: Artwork that does not have the specified live effect applied to it will not be changed; i.e., the live effect is not automatically added.
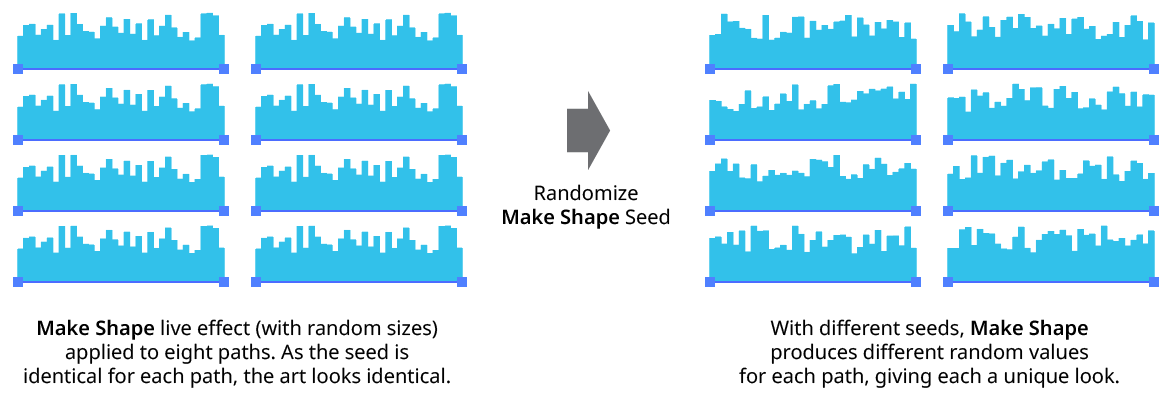
Randomino Randomize Seed
Move Randomizaton
Moves, or offsets, the selected artwork in a random way. There are two different ways to specify movement: by distance and angle, or by horizontal and vertical components.
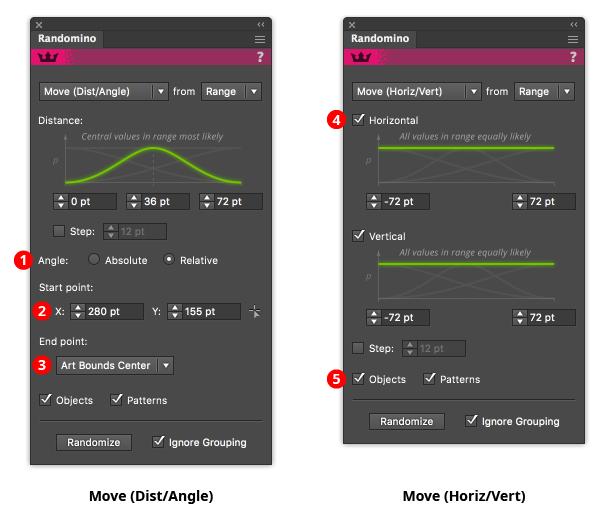
1. Angle type selector
When randomizing movement using distance and angle, the angle may be specified either as an absolute value or a value calculated by starting at a specific point and passing through a point relative to the art. When the angle is Absolute, all the objects will move in the same direction (though by differing amounts). When the angle is Relative, each object will, in general, move in a different direction. Relative angles are useful for causing art to appear to move towards or spread out from a certain spot.
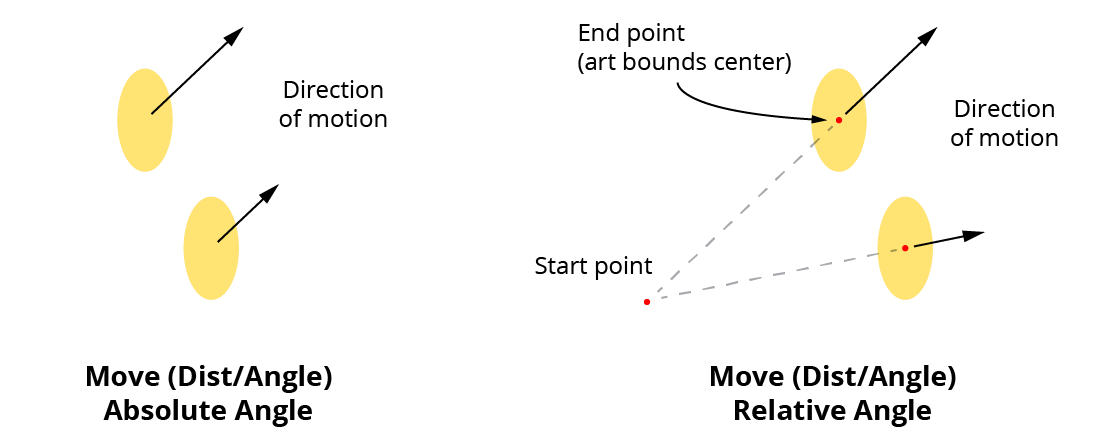
Randomino Move Relative Angles
2. Relative Angle start point
The coordinates may be entered manually, or specified by clicking the small point setter icon to the right of the coordinate inputs, which enables a tool that allows you to click at the point’s position.
3. Relative Angle end point
May be specified as either the art’s bounding box center, the art’s first anchor point (for paths only), or the art’s last anchor point (for paths only).
4. Parameter checkboxes
When randomizing movement using horizontal and vertical components, the components may be enabled independently by ticking or unticking the corresponding checkbox.
5. Objects/Patterns checkboxes
Similar to Illustrator’s native Move dialog, movement randomization can be independently applied to patterns within the objects.
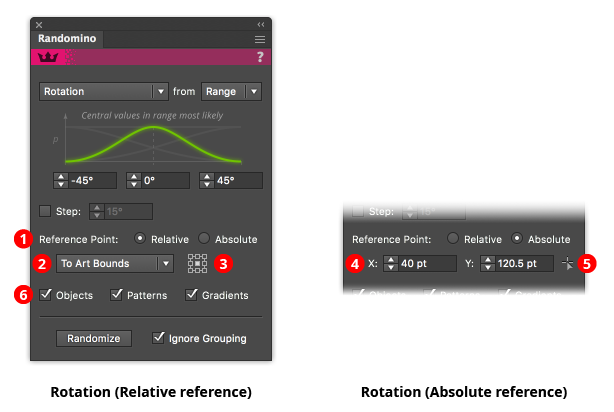
Rotation Randomization
Rotates the selected artwork in a random way. Note that each rotation value is applied to the artwork in its current orientation; it does not set an absolute amount of rotation (as only certain objects in Illustrator have absolute rotations).
Randomino Panel Rotation Callouts
1. Reference point selector
Determines whether the reference point (the point about which the rotation will occur) is relative to the position of the art, or at an absolute position.
2. Relative reference point type
Selects what the reference point is relative to: the art’s bounds; the art’s first anchor point (for paths only); the art’s last anchor point (for paths only); or the artboard.
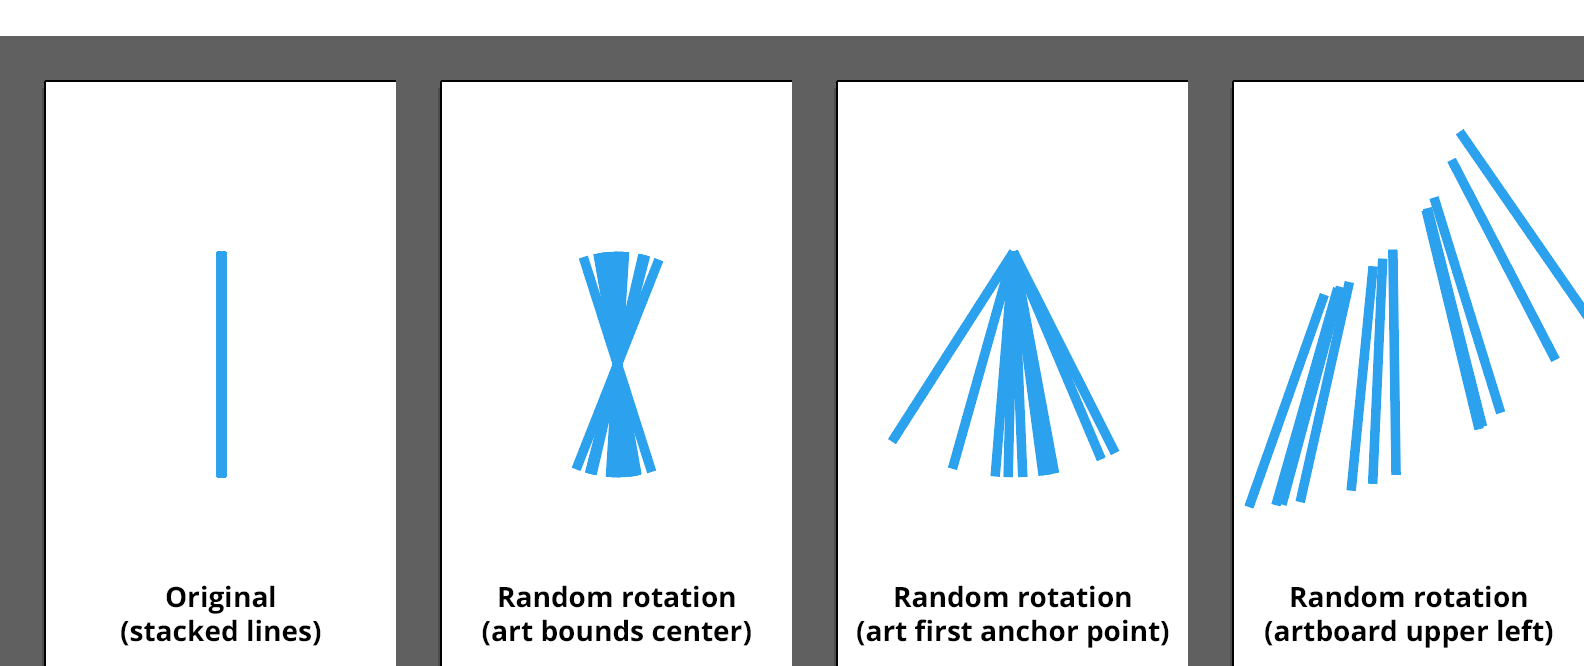
Randomino Rotated Lines
3. Relative reference point orientation
For Art Bounds and Artboard relative reference points, specifies the position of the reference point (top left, top, top right, middle left, etc).
4. Absolute reference point coordinates
The X and Y coordinates of the reference point.
5. Absolute reference point setter
Enables a tool that allows you to click at the reference point’s position.
6. Objects/Patterns/Gradients checkboxes
Rotation can be applied to only certain attributes of the selected art. You can choose to rotate the art objects themselves, any patterns found within the art, or any gradients found within the art.
Scaling Randomization
Scales the selected artwork in a random way. Note that the midpoint of the low and high scaling values is their geometric mean, not their arithmetic mean.
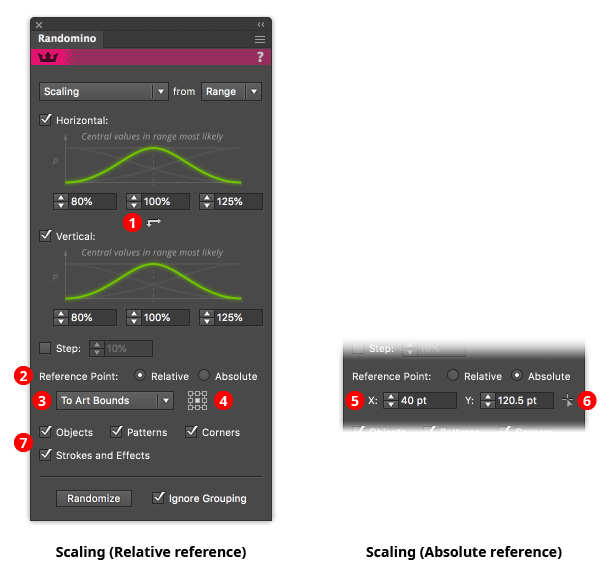
Randomino Panel Scaling Callouts
1. Uniform/non-uniform button
Click to switch between uniform scaling (same amount in both the horizontal and vertical directions) and non-uniform scaling.
2. Reference point selector
Determines whether the reference point (the point from which the scaling will occur) is relative to the position of the art, or at an absolute position.
3. Relative reference point type
Selects what the reference point is relative to: the art’s bounds; the art’s first anchor point (for paths only); the art’s last anchor point (for paths only); or the artboard.

Randomino Panel Scaled Lines Example
4. Relative reference point orientation
For Art Bounds and Artboard relative reference points, specifies the position of the reference point (top left, top, top right, middle left, etc).
5. Absolute reference point coordinates
The X and Y coordinates of the reference point.
6. Absolute reference point setter
Enables a tool that allows you to click at the reference point’s position.
7. Filter checkboxes
Scaling can be applied to only certain attributes of the selected art. You can choose to scale the art objects themselves, and any patterns found with the art. If the objects are scaled, you can choose whether or not to include any corners applied to the art, and strokes and effects that the art contains.
Stacking Order Randomization
Randomly changes the stacking (top-to-bottom) order of the selected objects.
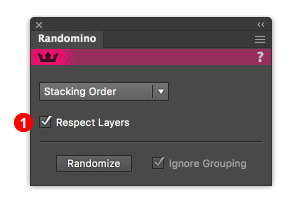
Randomino Panel Stacking Order Callouts
1. Respect layers checkbox
When enabled, the restacked art will always remain within its current layer or sublayer (each layer or sublayer with selected art will be restacked independently).
Randomino Panel Preferences
Choosing “Randomino Preferences...” from the Randomino panel flyout menu will bring up the Randomino preferences dialog:

Randomino Preferences
1. Always Affect Text Objects at Character Level
When enabled, all selected text objects will be treated as if their contents were highlighted with the Text Tool. This affects their contents at the character level rather than the text object as a whole; for example, you can change the color of each character. The preference has no effect when randomizing Stacking Order. When randomizing using Move (Dist/Angle) or Move (Horiz/Vert), only the vertical component of the movement is taken into consideration (as movement is produced through baseline shifting of the text).
2. Apply Loaded Settings Immediately
When enabled, loading a saved setting through the panel flyout menu will immediately apply that setting to any selected art. You can always hold down the Shift key when selecting the setting to invert this behavior. To record applying a Randomino setting as an action, you must apply the setting when loading it, either by enabling this preference or by holding down Shift when choosing the setting.
3. Informational text area
Gives a brief description of each preference setting as the cursor is held over it.
4. Help Button
Opens the help documentation in the Astute Manager. If this does not automatically appear, please ensure your Astute Manager is running first.