Swatches
 Gradient Forge Panel
Gradient Forge Panel Flyout Menu
![]() AG Color Select Tool
AG Color Select Tool
 Gradient From Art
 QuickOps Panel
Illustrator Location:
Illustrator Main Menu > Window > Astute Graphics > Gradient Forge
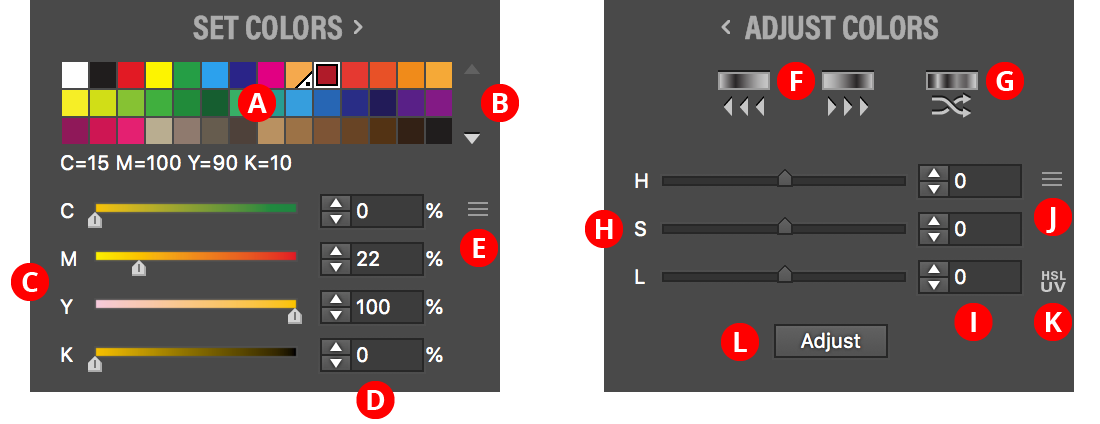
Contains controls which set or adjust the colors of selected stops. To switch between Set Colors and Adjust Colors, click the header text.
Gradient Forge Panel Set Adjust Colors Section
A. Swatch List
Shows all of the flat color swatches (i.e., no gradients or patterns) in the document. Each swatch’s name is shown below the grid when the cursor is hovered over it. Clicking on a swatch will change the color of the selected stop(s). Holding Option/Alt while clicking automatically advances the stop selection to the right after recoloring. A swatch may be dragged upwards into the Editing Area just below the gradient preview to add a new stop or recolor an existing stop without having to select it first.
B. Swatch Scroll Arrows
If more 42 swatches exist, these arrows are enabled, allowing you to scroll the list up or down to reveal additional rows of swatches.
C. Color Sliders
Similar to the native Color panel; display and allow editing of the color of the currently selected stop(s). When a global or spot color is being edited, the single slider specifies the tint of the color.
D. Color Value Inputs
Reflect the same color values as displayed in the sliders but allow precise numeric input of these values.
E. Color Model Popup Menu
Available when all selected stops have colors using the same color model; allows switching the color model for editing the color(s), choosing between Grayscale, RGB, HSB, HSLuv, and CMYK. Unlike the native Color panel, switching the color model will immediately convert the color(s) to the chosen model, which may change the color when the gamut of the new color model does not include the original color.
F. Rotate Colors Left/Right Button
Changes the colors of the selected stops (or all stops, if no stops are selected) so the color of each stop is moved one stop to the left/right (wrapping around for the end stops). This, therefore, has the effect of rotating the colors either to the left or right. The positions of the stops themselves are not changed.
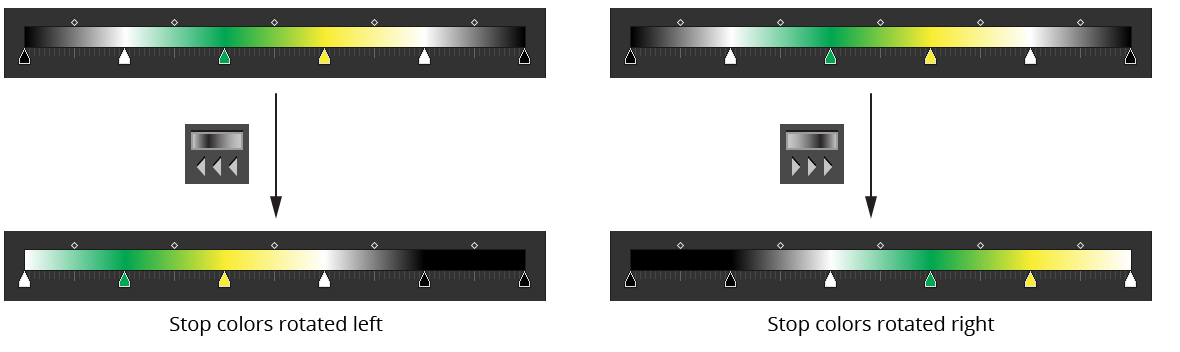
Gradient Forge Panel Rotate Example
G. Randomize Color Order Button
Randomizes the order of the colors of the selected stops (or all stops, if no stops are selected). The positions of the stops themselves are not changed. A new random seed is used on each press of the button, which usually results in a different look.
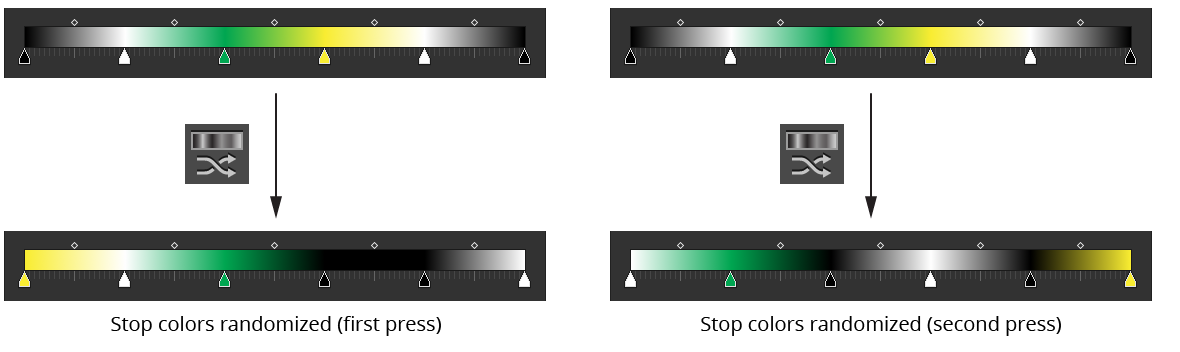
Gradient Forge Panel Randomize Example
H. HLS Sliders
Control the Hue, Lightness and Saturation values which modify the colors of the selected stops when the Adjust button is pressed. While the sliders are dragged, the gradient preview will change in real-time to show what the color would look like with the current adjustment. The H, S and L labels may be clicked to reset each corresponding value to zero.
I. HLS Value Inputs
Reflect the same values that are displayed in the HLS Sliders, but allow precise numeric input of these values. Hue change can vary from -180 to 180; Lightness and Saturation can vary from -100 to 100.
J. HLS Popup Menu
Allows you to use the HSLuv color space instead of the default HSL colorspace (see https://www.hsluv.org).
K. HLSuv Indicator
When visible, indicates that the HSLuv color space is being used.
L. Adjust Button
Applies the adjustment specified by the HSL values to the color(s) of the selected stop(s) (or all stops, if no stops are selected). Stops with spot colors are not affected. When the cursor is hovered over the button, the gradient preview will change to show what the color(s) would look like after adjustment with the current values, but the gradient will not actually be changed until the button is pressed.
Illustrator Location:
Illustrator Main Menu > Window > Astute Graphics > Gradient Forge > Panel Flyout Menu
Available when one or more swatches are selected in the native Swatches panel (and no gradient artwork is selected). The menu item brings up a dialog showing the gradient that would be created with equally-spaced stops from each selected flat-color or gradient swatch:
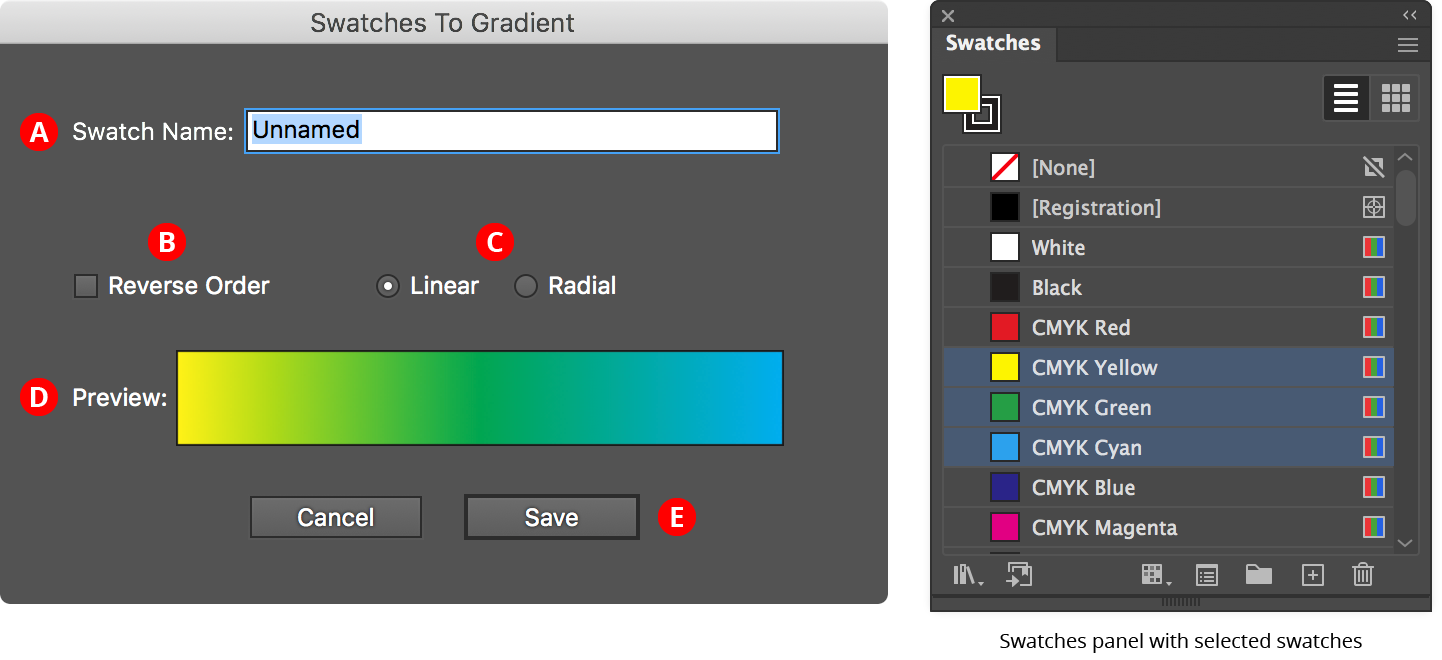
Gradient Forge Panel Swatches to Gradient
A. Swatch Name
The user-specified name of the new gradient swatch.
B. Reverse Order Checkbox
Reverses the order of the stops.
C. Linear/Radial Buttons
Specify whether the new gradient will be linear or radial.
D. Preview Area
Previews the new gradient with the current settings.
E. Save Button
Saves the new gradient as a swatch when clicked; the new swatch is automatically selected and displayed in the Gradient Forge panel, and can be edited further.
Illustrator Location:
As the AG Color Select tool has several keypresses which can add or change its functionality, we suggest installing the free Astute Graphics plugin Astute Buddy, which creates a panel that dynamically updates to inform you of the various keys which can be pressed in the tool’s current context.
To use the AG Color Select tool, simply position it over an art object whose color you want to pick up. By default, the tool continually shows a large preview of the current color in the center of the cursor using an annotated “chip” next to the cursor:
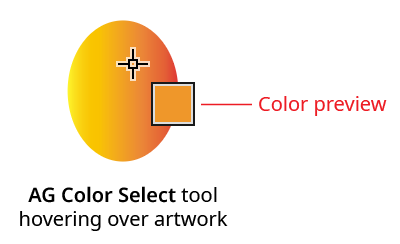
AG Color Select Example
When the previewed color is the desired one, clicking with the tool assigns it to the current fill or stroke, whichever is active. If one or more artwork objects are selected, the color is also assigned to that art’s fill or stroke, if they exist, just as with the native Eyedropper tool when pressing the Shift key (which forces color-only mode). However, unlike the eyedropper, the AG Color Select tool will work with live effects:

AG Color Select Vs. Native Eyedropper
When a semi-transparent object is sampled with the native Eyedropper in color mode, it does not “see” the transparency and instead picks up the full-strength color. However, AG Color Select gives you a choice of how to handle semi-transparent objects. When saving a color to a swatch, or if no objects are selected, transparency can’t be retained, so AG Color Select will flatten the transparency and pick up the reduced strength color. But when assigning the color to the fill or stroke of selected objects and the Shift key is held down, the objects(s) are given the full-strength color but have their stroke or fill opacity changed to match the original color:
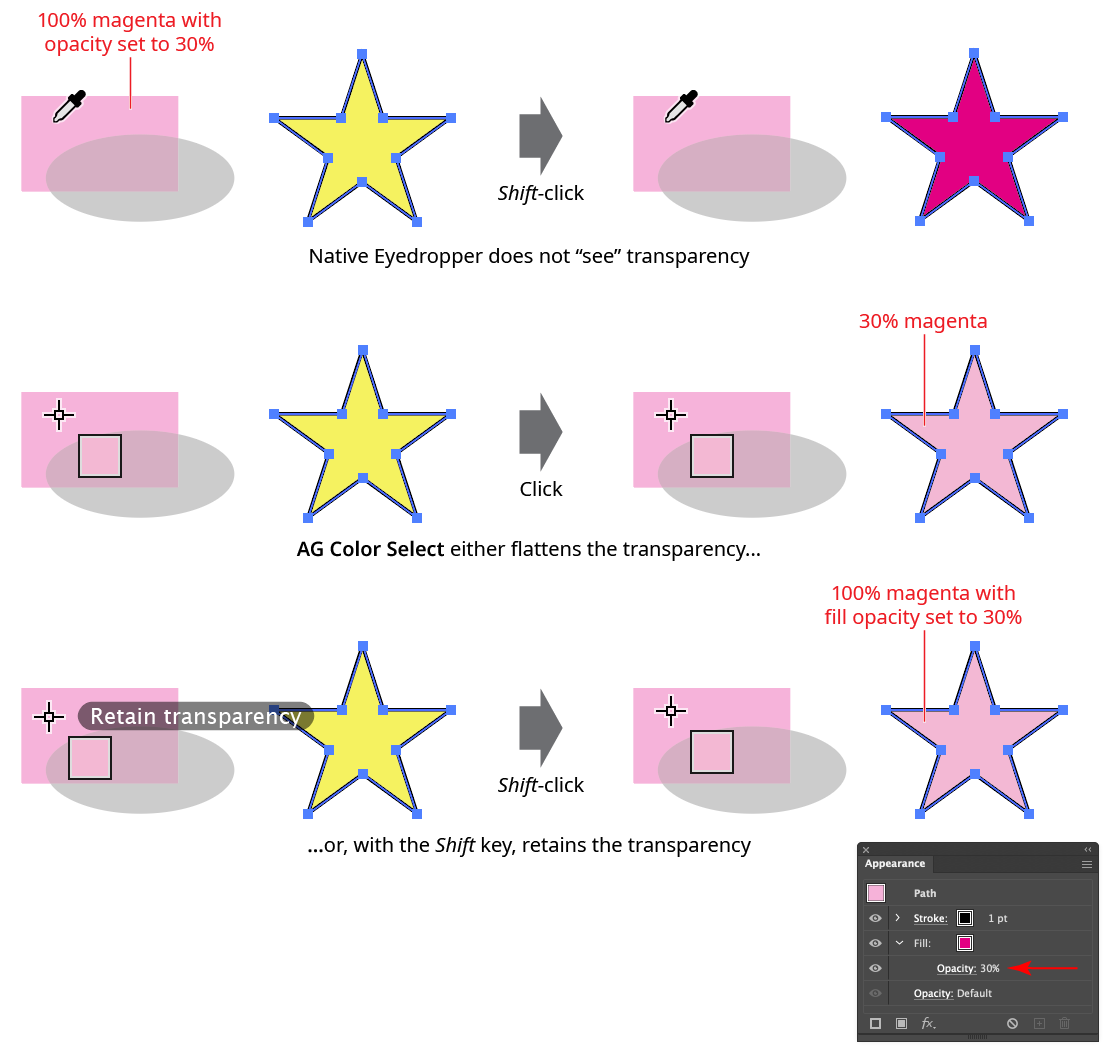
AG Color Select Vs. Native Eyedropper Example
To save the selected color directly to a swatch, hold down the Option/Alt key when clicking:
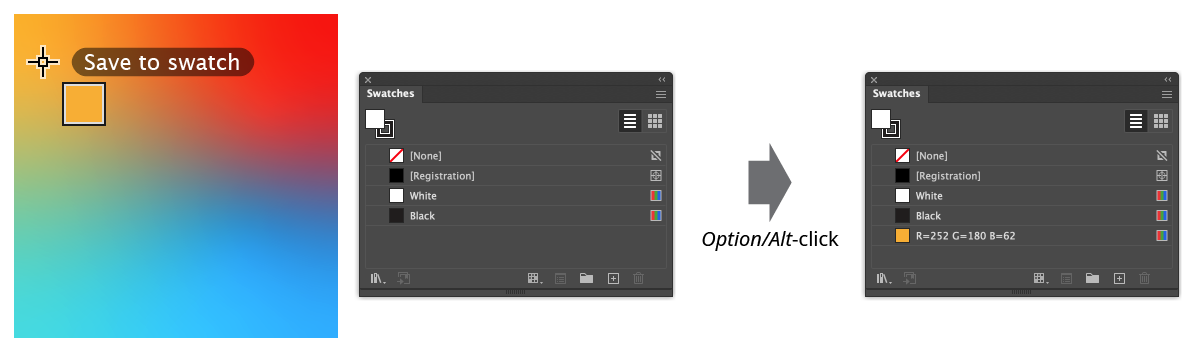
AG Color Select Save to Swatch
To save as a global swatch, hold down Shift in addition to Option/Alt:
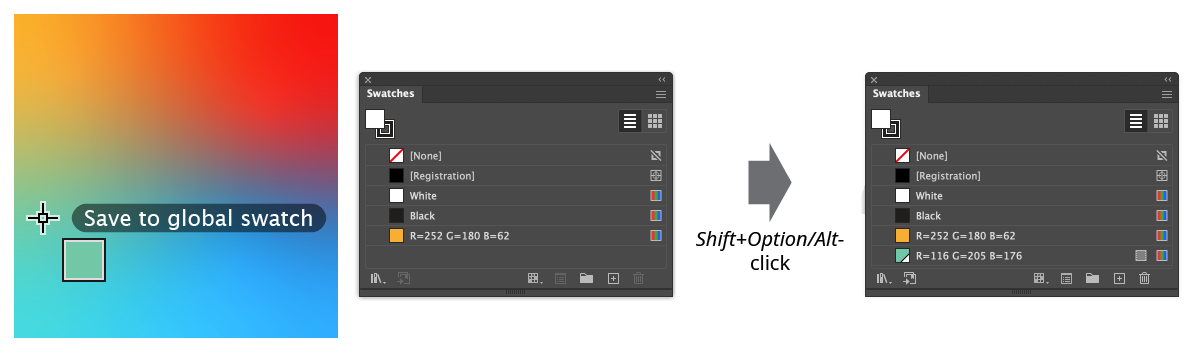
AG Color Select Save to Global Swatch
The AG Color Select tool internally rasterized artwork to merge arbitrarily complex blend modes and opacities to a single one. As Illustrator only rasterizes at 8-bits/channel (i.e., integers between 0 and 255), small changes in the sampled color compared to the original can occur. For example, a 70% cyan color would be rasterized with a cyan pixel value of 178, which, when converted back to an Illustrator color, produces a cyan value of 178/255 = 0.69804 or 69.8%. Although this color would not not distinguishable from the original if the document were printed or exported as an image, Illustrator would still see them as different colors (for example, by the Select Same Fill Color function).
For this reason, and because the AG Color Select tool does not work with spot colors, and does not pick up art styles, it should not be viewed as a replacement for the Eyedropper tool. Instead, it complements the native tool when working with live effects, transparent colors, and other situations where the Eyedropper gives an undesirable result.
Illustrator Location:
Illustrator Main Menu > Window > Astute Graphics > Gradient From Art
The menu item to show and hide the Gradient From Art panel can be found in the main menu under Window > Astute Graphics > Gradient From Art. When the Gradient From Art tool is not in use, the panel displays only a “Click to select” message; clicking anywhere on the panel selects the tool and displays all the controls.
Gradient From Art Panel
1. Flyout menu
Contains a single menu item which brings up the Preferences dialog (see Gradient From Art: Preferences).
2. Panel banner
The Gradient From Art panel banner has a help button on the right which opens the help documentation in the Astute Manager. If this does not automatically appear, please ensure your Astute Manager is running first.
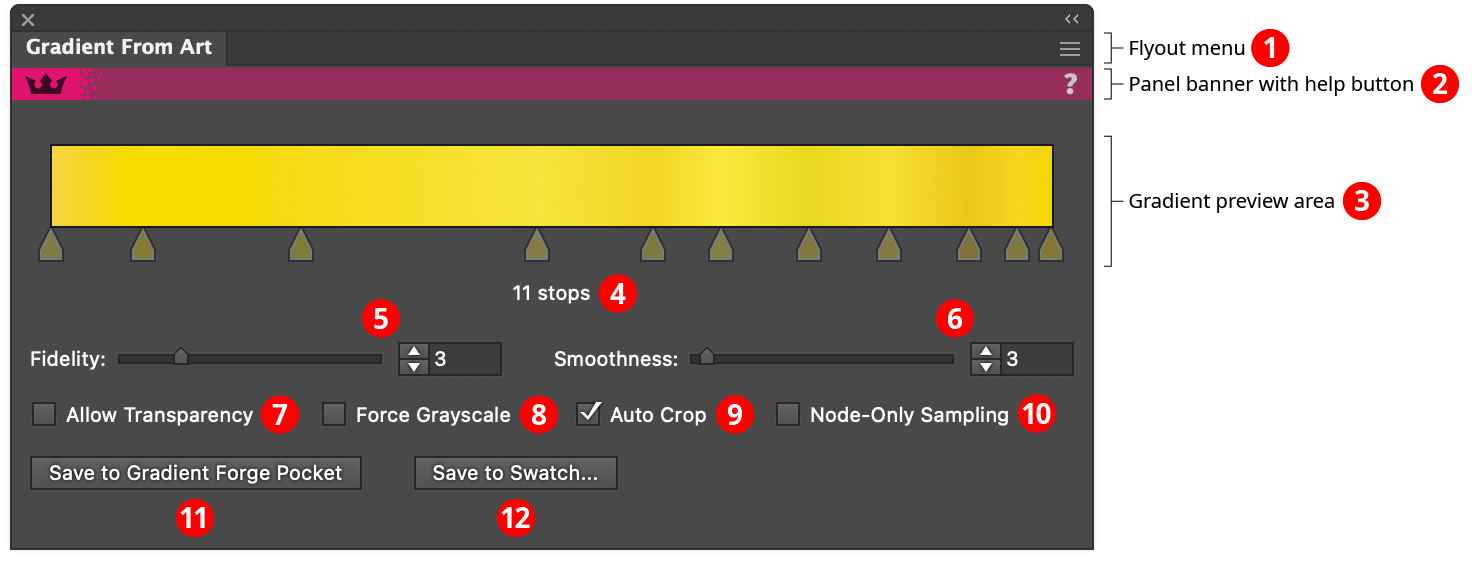
3. Gradient Preview Area
Shows the gradient that would result from using the sampling line with the current settings. If the sampling line is edited, or a parameter is changed, or the artwork is changed, then the gradient is automatically recalculated. The gradient’s stops are displayed for reference, but are not directly editable. If no sampling line exists, the preview area will display “No Sampling Line”, and if the gradient is incomplete or in the process of being calculated, the preview area will display “Calculating...”.
4. Stop Count
Shows the current number of stops in the gradient. A warning symbol will be displayed next to the stop count when it exceeds 256 stops, because Illustrator does not render stops past that limit.
5. Fidelity
Not available when Node-Only Sampling is enabled. Fidelity determines how closely the gradient matches the original sampled colors. It can range from 1 to 10, with a default of 3. Higher fidelity values retain subtle color changes at the expense of creating a gradient with more stops, which generally makes it more difficult to manually tweak later.
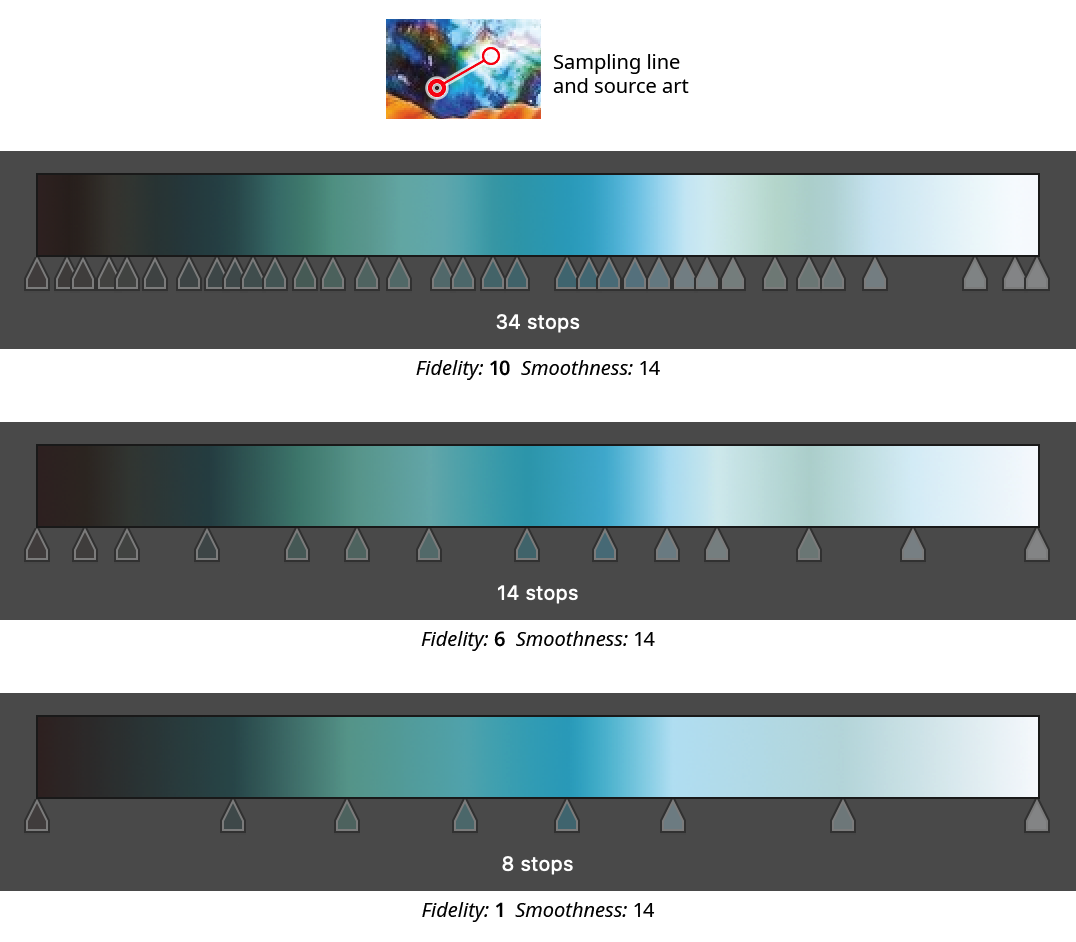
Gradient From Art Panel Fidelity Examples
6. Smoothness
Not available when Node-Only Sampling is enabled. Smoothness controls how gradually transitions from one color to another are made; it is essentially a kind of Gaussian blur for stop colors. This is most evident when sampling from source art that has sharp transitions. The setting can range from 0 to 100, with a default of 3. The lowest value will produce very sharp transitions, but it does not produce stacked gradient stops, which are not recommended due to these types of gradient’s poor rendering. (They can, however, be created using the Gradient Forge panel).

Gradient From Art Panel Smoothness Examples
7. Allow Transparency
When enabled, transparency in the sampled art will be retained in the gradient stops. If there is no artwork under a sampling location, the color will be set to 100% transparent.
8. Force Grayscale
When enabled, all sampled colors will be converted to their grayscale equivalent.
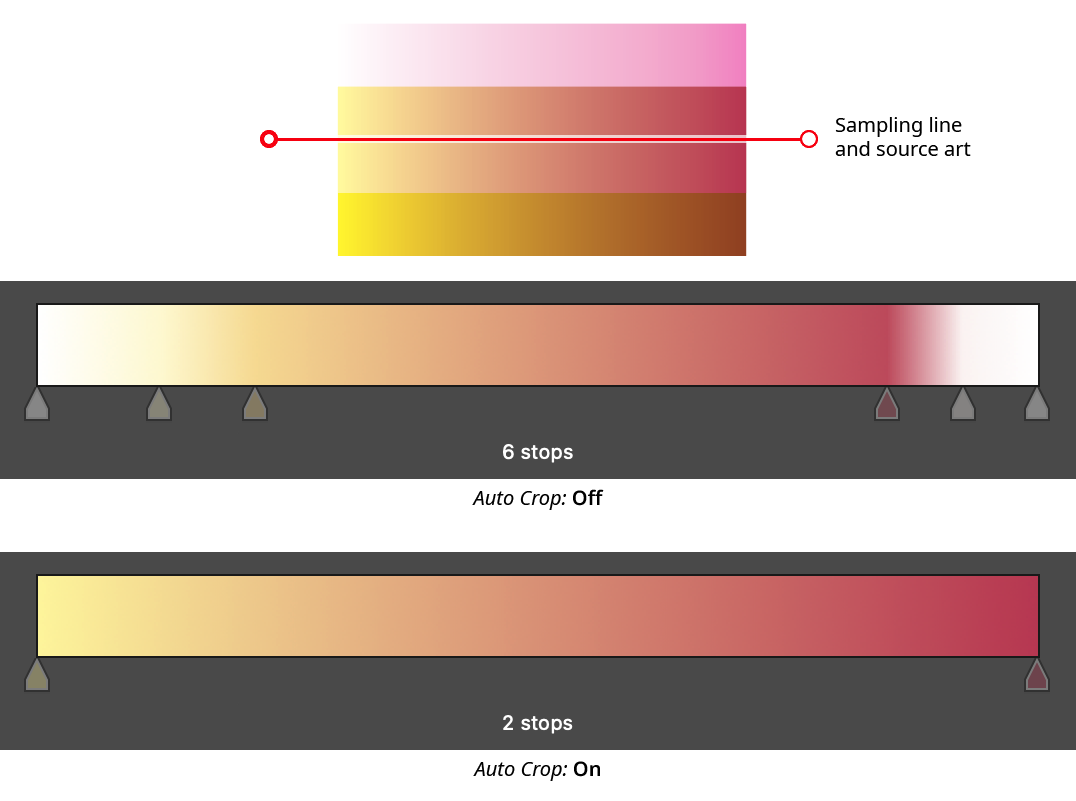
9. Auto Crop
Not available when Node-Only Sampling is enabled. When Auto Crop is enabled, white or partially transparent stops are trimmed off the ends of the gradient (unless the gradient only has two stops). This makes it possible to sample artwork from end to end without having to place the sampling line end nodes exactly on the edges of the object(s):
Gradient From Art Panel Auto Crop
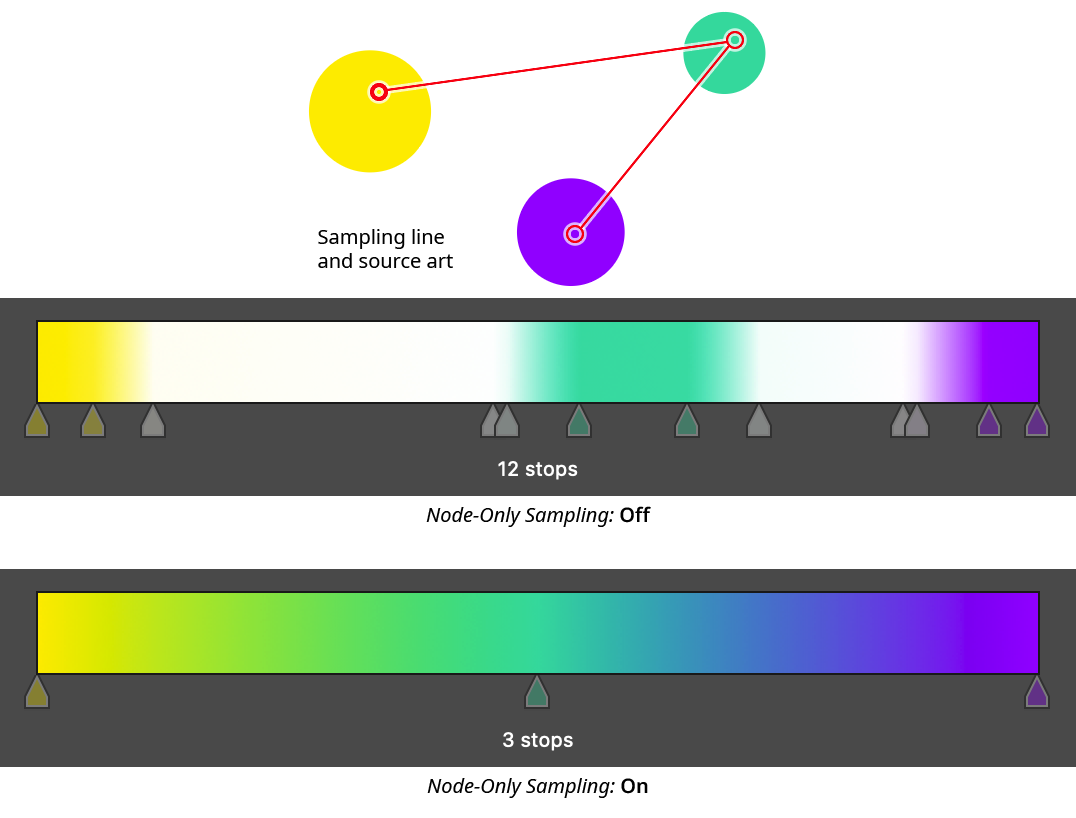
10. Node-Only Sampling
When enabled, colors for the gradient stops are not sampled continuously along the sampling line, but rather only at the nodes. Each node corresponds to exactly one stop, which will be evenly spaced along the gradient.
Gradient From Art Panel Node Only Sampling
11. Save to Gradient Forge Pocket Button
Saves the previewed gradient into a pocket on the Gradient Forge panel. The gradient will be put into the first empty pocket. If there are no empty pockets, a warning dialog will appear, allowing you to overwrite the last pocket.
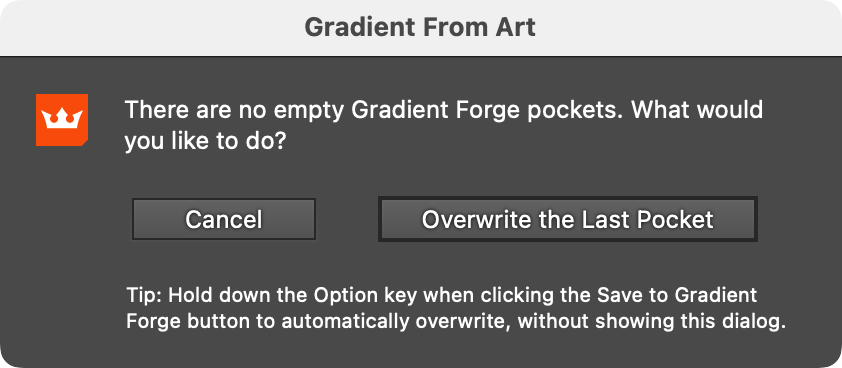
Gradient From Art No Free Pockets Warning
As noted at the bottom of the warning dialog, holding Option/Alt when clicking the Save to Gradient Forge Pocket button will automatically overwrite the last pocket if there are no free pockets.
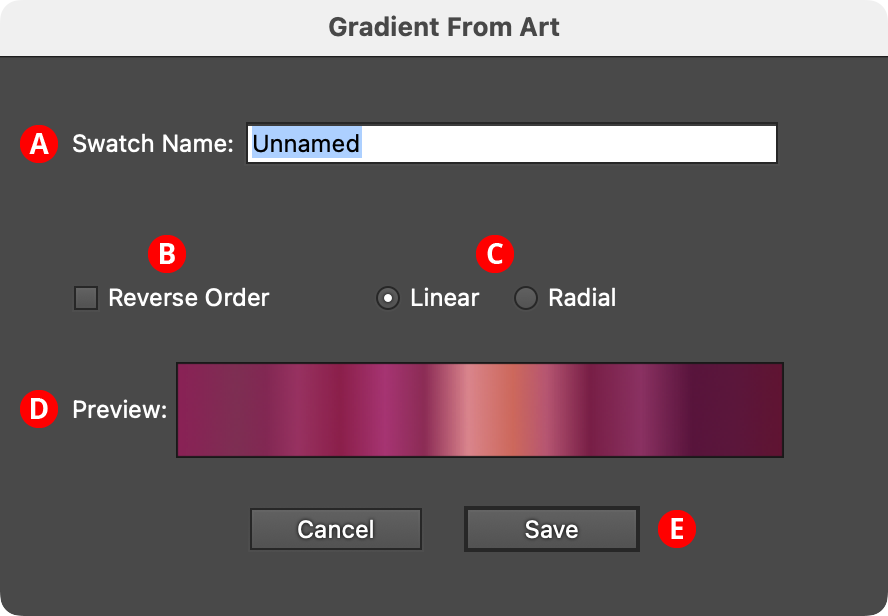
12. Save to Swatch... Button
Saves the previewed gradient into a swatch. The button brings up a dialog allowing the gradient to be named, and its direction and type changed, before it is saved:
Gradient From Art Save to Swatch Dialog
A. Swatch Name: The user-specified name of the new gradient swatch.
B. Reverse Order Checkbox: Reverses the order of the stops.
C. Linear/Radial Buttons: Specify whether the new gradient will be linear or radial.
D. Preview Area: Previews the gradient with the current settings.
E. Save Button: Saves the gradient as a swatch when clicked; the new swatch is automatically selected and displayed in the Gradient Forge panel, where it can be edited further.
If a sampling line is present (i.e., a gradient is being previewed in the panel), pressing the Enter key will have the same effect as clicking the Save to Swatch... button.
Illustrator Location:
Illustrator Main Menu > Window > Astute Graphics > QuickOps
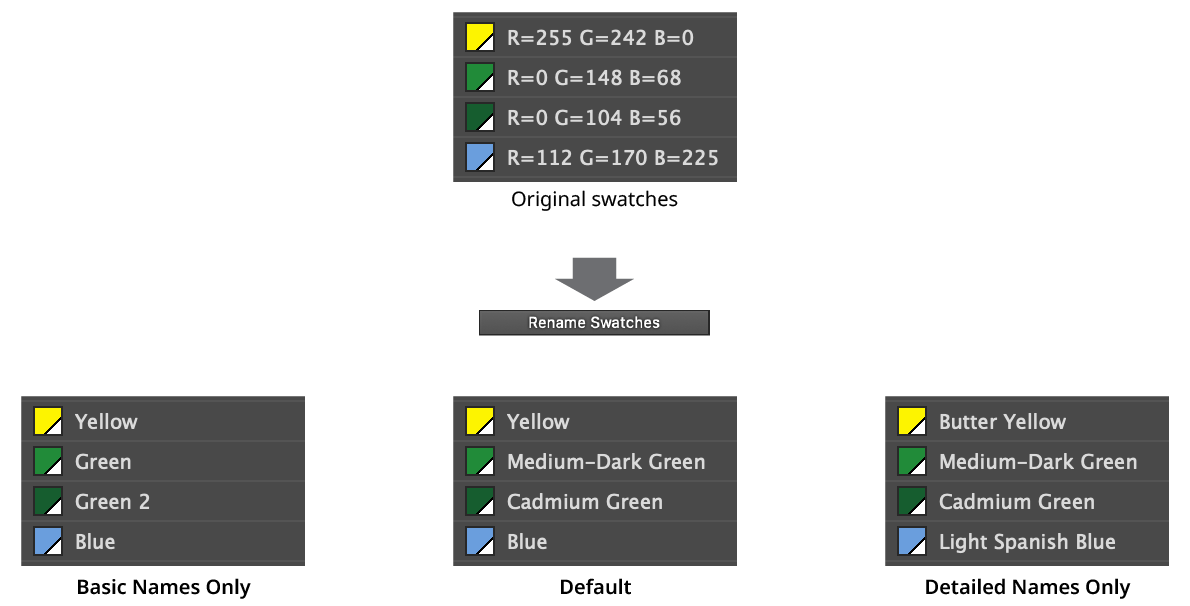
The Rename Swatches operation renames selected flat-color swatches (including global and spot colors) with human-friendly color names, using an internal database of over two thousand names.
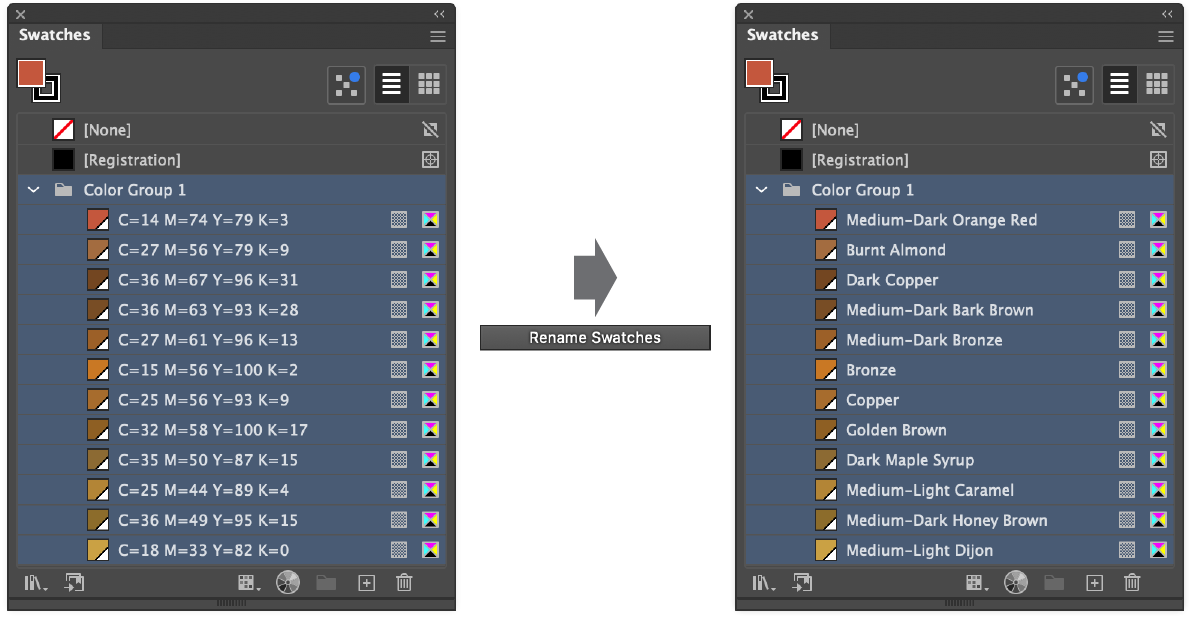
QuickOps Rename Swatches Example
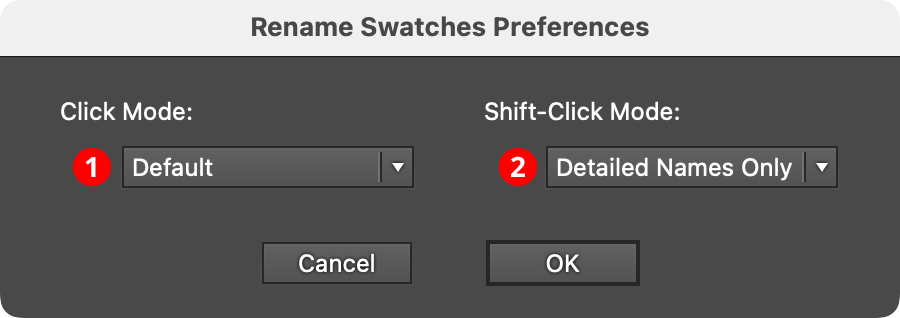
Holding down Shift when clicking the button can use a different naming mode, if the settings are so configured. To configure the settings, click the small icon to the right of the button, which will bring up the settings dialog:
QuickOps Rename Swatches Preferences
1. Click Mode
Specifies which naming mode (see below) to use when the button is clicked with no modifier keys pressed.
2. Shift-Click Mode
Specifies which naming mode to use when the button is clicked with the Shift key pressed.
There are three different naming modes:
Basic Names Only: Only simple names like “Purple”, “Yellow”, and “Red-Orange” are used, possibly modified by “Light”, “Dark”, or “Dull”.
Default: Simple names are used, except when two or more colors would be given the same simple name, in which case more detailed names are used to distinguish them, such as “Canary Yellow” and “Cobalt Yellow”.
Detailed Names Only: Detailed names are always used.
In all modes, if two colors are so similar that they would be given the same name, then integers are appended as needed to distinguish them, for example “Candy Pink” and “Candy Pink 2”.
QuickOps Rename Swatches Naming Modes