Circles
 Circle by Points Tool
 Tangent Circle Tool
 Curvature Circle Tool
Illustrator Location:
Advanced Toolbar > Circle by Points Tool
As the Circle by Points tool has several keypresses which can add or change its functionality, we suggest installing the free Astute Graphics plugin Astute Buddy, which creates a panel that dynamically updates to inform you of the various keys which can be pressed in the tool’s current context.
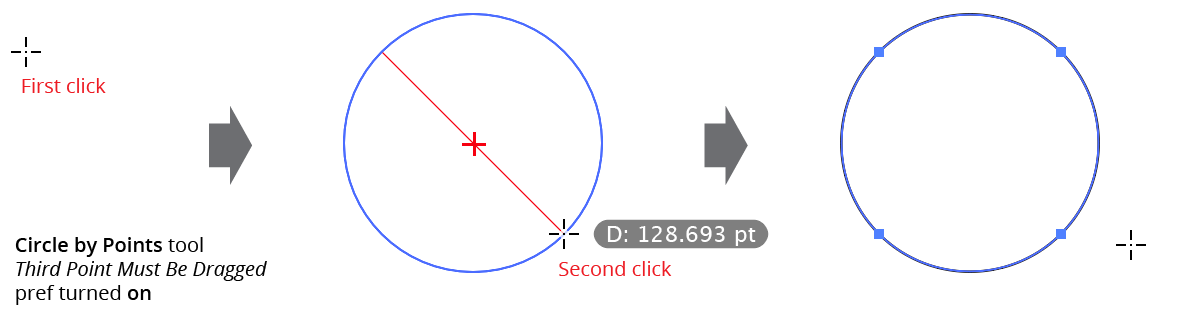
There are several methods of creating circles, depending on the Third Point Must Be Dragged tool preference (see Circle by Points: Preferences).
When the preference is enabled (the default), circles can be created from two points simply by clicking twice (allowing you to scroll, zoom, change the view mode, etc. in the middle of the operation), although they can also be created by clicking-and-dragging. The two points always define the diameter of the circle.
Circle by Points 2 Click Operation
To create a circle from three points, you must not release the mouse button after clicking to create the second point; instead you must start dragging, which positions the third point.
When the preference is disabled, circles can be created from three points by clicking three times. However, to create a circle from two points you must either click-and-drag from the first point, or doubleclick on the second point instead of single click.
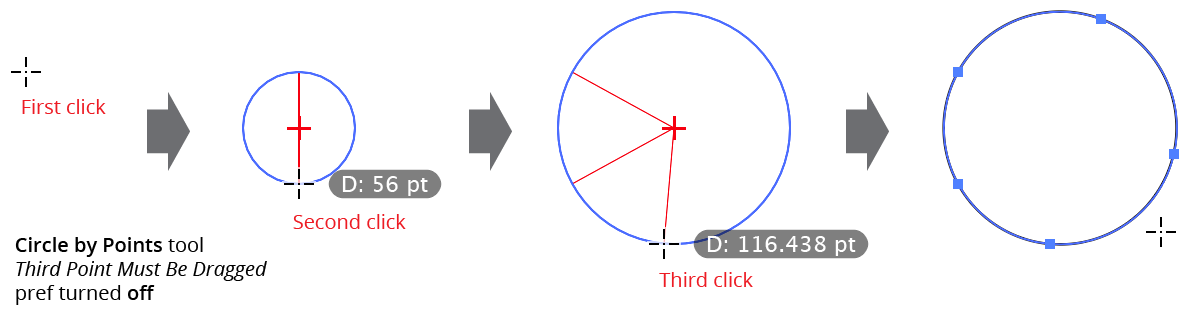
Circle by Points Tool 3 Click Operation
By default, the circle’s center, radii, and diameter value will be displayed while creating the circle, but these can be turned on and off independently through the preferences, as can the color of the annotation lines.
While creating a circle using two points, two modifier keys can be used with the Circle by Points tool:
Shift: Constrains the angle between the first point and the second point to increments of 45° around the constrain angle.
Option/Alt: Constrains the diameter of the circle to “nice” values, dependent on the current zoom level and units. For example, at 200% zoom, the diameter is constrained to multiples of 2 pt or 0.5 mm.
While creating a circle using three points, as the third point approaches the imaginary line formed by the first two points, the resulting circle approaches infinite size. When its size becomes larger than Illustrator could accommodate, the tool will no longer create artwork but will instead display “Circle too large” by the cursor. In this case, the third point must be moved to a different position.
The Circle by Points tool honors Smart Guides.
Illustrator Location:
Advanced Toolbar > Circle By Points Stack > Tangent Circle Tool
As the Tangent Circle tool has several keypresses which can add or change its functionality, we suggest installing the free Astute Graphics plugin Astute Buddy, which creates a panel that dynamically updates to inform you of the various keys which can be pressed in the tool’s current context.
In the general case, there are an infinite number of circles which could be drawn tangent to two path segments, differing in their location and radii. Therefore, some method must be used to locate the desired circle. The Tangent Circle tool has two different locate modes. In “Anchored Locate Mode,” the circle is constrained to pass through the point at which the first path segment is clicked. In “Radius Locate Mode,” the circle is constrained to a specific radius. In either mode, Tangent Circle provides an option to adjust the radius of the circle after its creation.
Anchored Locate Mode
In this mode, the tool is used by clicking on one path segment, and then clicking on a second. The paths on which the segments lie do not need to be selected. A circle is then created (when possible) that passes through the first point (and is tangent to the first path segment at that point) and also is tangent to the second path segment.
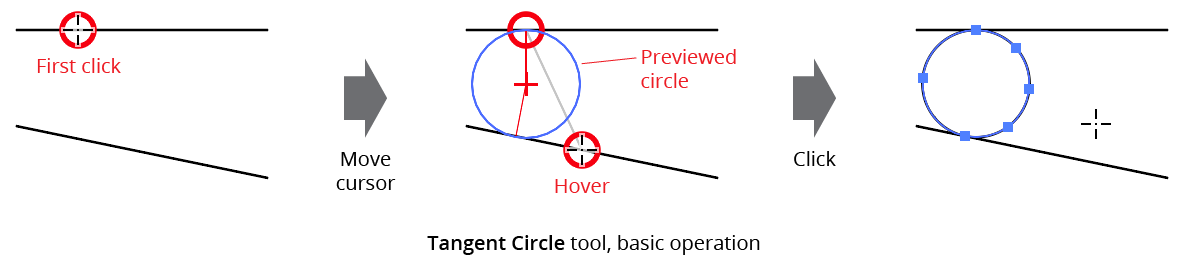
Tangent Circle Tool Basic Example
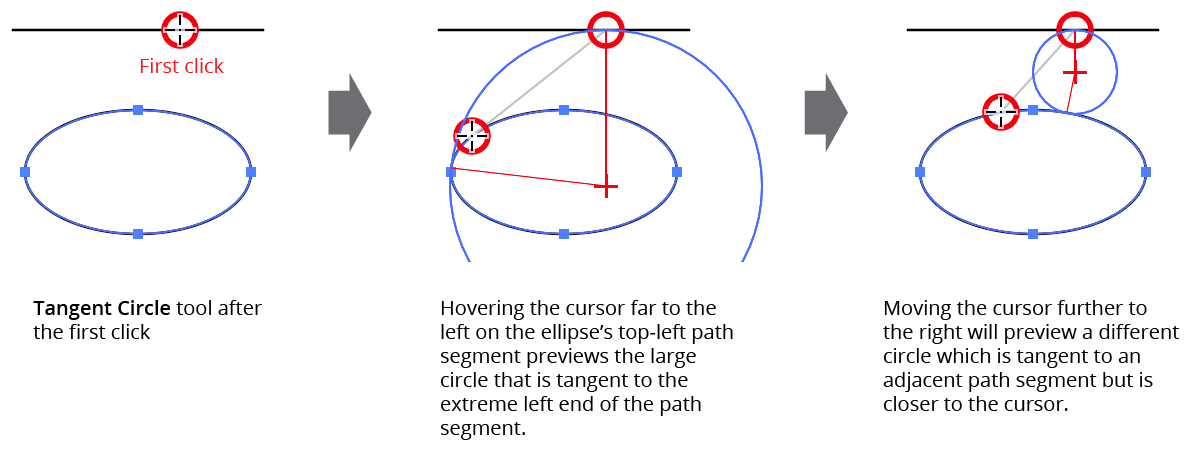
The Tangent Circle tool will actually also consider path segments that are adjacent to the second one, and will prefer circles that touch them if their tangent point is closer to the cursor than those that touch the actual segment that the cursor is over:
Tangent Circle Tool Closest Example
The second segment may be on the same path as the first segment:
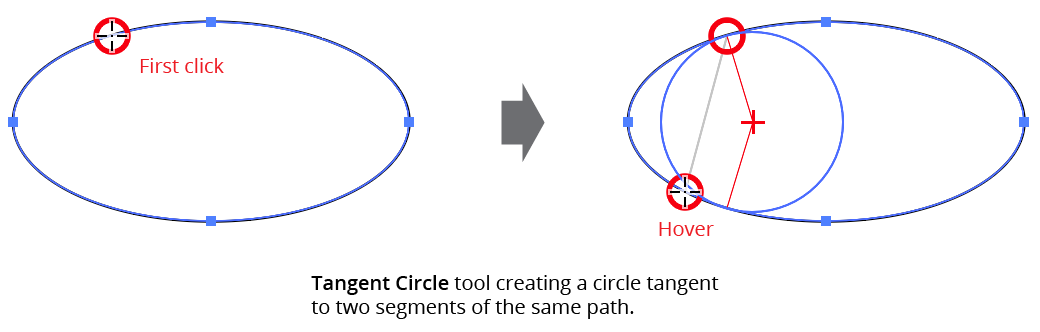
Tangent Circle Tool Same Path Example
If no anchored circle can be located, annotation text adjacent to the cursor will indicate this.
Radius Locate Mode
By holding down Shift when hovering over and clicking on the second path segment, Radius Locate Mode is used, whereby the tool locates the doubly-tangent circle closest to the clicked point anywhere along the path(s) with the default radius specified in the preferences.
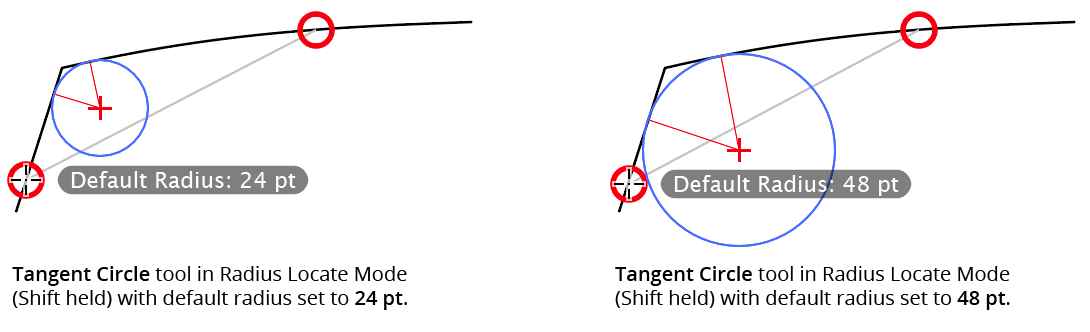
Tangent Circle Tool Radius Locate Mode
If no circle with the specified radius can be located, annotation text adjacent to the cursor will indicate this.
Adjusting Circle Radius Numerically
If the tool preference Ask For Circle Radius is enabled, then regardless of which mode was used to create the circle, a dialog will be shown after the mouse button is released allowing you to change the radius. However, if the radius was adjusted by dragging (see below), then the dialog will not be shown.
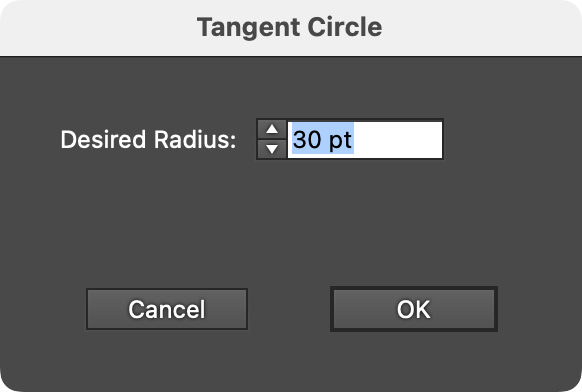
Tangent Circle Tool Radius Dialog
While the dialog is up, each change to the radius value will re-preview the circle in its new position. If the radius is changed to a value for which no circle can be found, an alert message will be displayed. If the dialog is cancelled, no circle will be created.
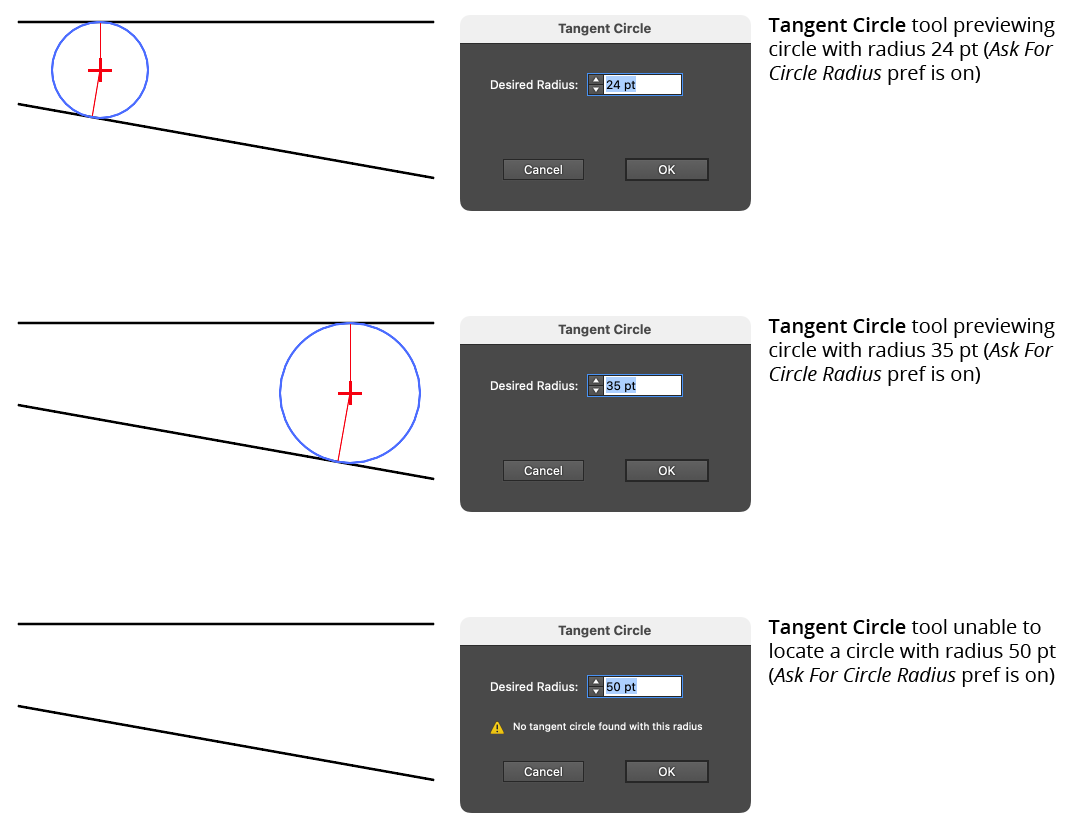
Tangent Circle Tool Numerically Adjusting Radius
Adjusting Circle Radius by Dragging
If, after clicking on the second path segment, the mouse button is not immediately released but a drag is started instead, then the Tangent Circle tool will dynamically attempt to locate a circle with a radius equal to the current distance between the start of the drag and the end of the drag (visualized as a gray line and numerically annotated next to the cursor). Releasing the mouse button creates the circle, if found.

Tangent Circle Tool Adjust Radius by Dragging
Several modifier keys may be pressed while dragging to adjust the circle radius:
Shift: Constrains the radius value to “nice” values, dependent on the current zoom level and units. For example, at 200% zoom, the radius is constrained to multiples of 2 pt or 0.5 mm.
Option/Alt: Toggles the tool preference Add Points to Existing Paths (see Tangent Circle: Preferences).
Command/Ctrl: Enables Slow-Drag, in which the cursor movement is “geared down” by a factor of ten for more precise control of the radius change.
Illustrator Location:
Advanced Toolbar > Circle by Points Stack > Curvature Circle Tool
Use of the Curvature Circle tool is very simple: the cursor is hovered over a path at the desired position (by default it will snap to the path, and the current radius will be displayed); clicking the mouse button creates the curvature-matched circle.
Rotate at Collisions Tool Snapping Rings
By default, the circle is created on the concave side of the curve, but it may be flipped so it is created on the convex side by holding down the Shift key before clicking.
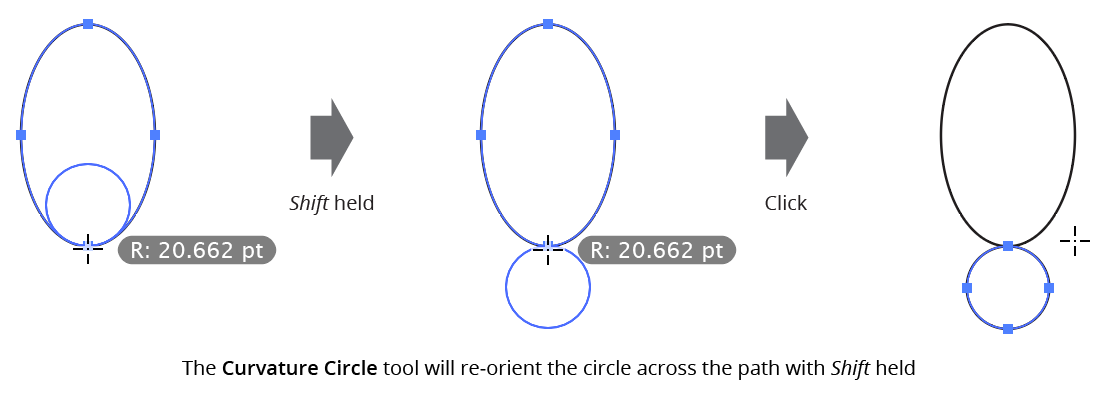
Curvature Circle Tool Shift Key Modifier
Circles will not be created along straight path segments (as they have infinite radius), or at spots along the path where the radius exceeds 8192.0 pt; a text annotation by the cursor will indicate if either of these situations exist.
Paths in Illustrator, including circular arcs, are composed of cubic beziers, which can actually never attain a truly constant radius. For example, an Illustrator circle of four anchor points with a nominal 100 pt radius will actually vary in radius mathematically along the path from about 99.2 pt to 102.2 pt. Because creating multiple circles adjacent to other circles using the tool might create circles with different radii, by default the tool preference Treat Bezier Circular Arcs As Constant Radius is enabled. In this case, when the Curvature Circle tool is used on an arc of less than 90 degrees which is mathematically as close to a true circle as possible, the created circle will always match the nominal radius value of the arc; an asterisk is appended to the displayed radius to indicate this.

Curvature Circle Tool Circular Arcs