 Width Selector Tool
The Width Selector tool appears in Illustrator’s main toolbar (which must be in Advanced mode: View > Toolbars > Advanced), stacked under the Width Gradient tool. As with other stacked tools, click and hold on the top tool icon to display the tools stacked under it.

Width Selector Tool Location
The Width Selector tool’s cursor looks like an inverted “V,” similar to the Astute Graphics PathScribe tool, but with its opposite leg thicker, so as to distinguish it. Badges may be added when marquee selecting:

Width Selector Cursors
Width Selector Tool Operation
As the Width Selector tool has several keypresses for certain operations, we suggest installing the free Astute Graphics plugin Astute Buddy, which creates a panel that dynamically updates to inform you of the various keys which can be pressed in the tool’s current context.
The Width Selector tool works largely in conjunction with the associated Width Selector panel, which should be open and accessible. If you are using the free Astute Graphics plugin DirectPrefs, you can have the Width Selector panel automatically be shown when the Width Selector tool is selected.
Width Marker Visualization
When the Width Selector tool is in use, width markers on the focal strokes of all unlocked paths (selected or unselected, unless the tool preference Show Markers on Selected Paths Only is enabled) are annotated using small red (by default) “bow-tie” shapes lying perpendicular to the path. Markers drawn in a lighter tint are unselected, while those in a darker tint are selected:

Width Selector Marker Annotations
Width Marker Selection
The Width Selector tool can select width markers on one or more paths by either clicking on them or by dragging a marquee over them. Holding the Shift key down while doing so adds markers to the current selection, while holding Option/Alt down subtracts them from the current selection. The current marker selection is retained across uses of the tool.

Width Selector Marquee Select
Width Marker Operations
After one or more width markers are selected, the tool can perform several operations on them:
Width Adjustment
While the tool does not support dragging to change the width of a marker (the native Width tool can still be used for this purpose), it can adjust the widths of one or more markers simultaneously if the preference Use Increase/Decrease Diameter Keys is set to Change Stroke Width. In this case the keys assigned to Decrease Diameter and Increase Diameter in the native Keyboard Shortcuts dialog (the left and right square bracket keys respectively, by default, for English language keyboards) will decrease or increase their widths, using the numerical Change Width value set on the Width Selector panel.
Moving Markers
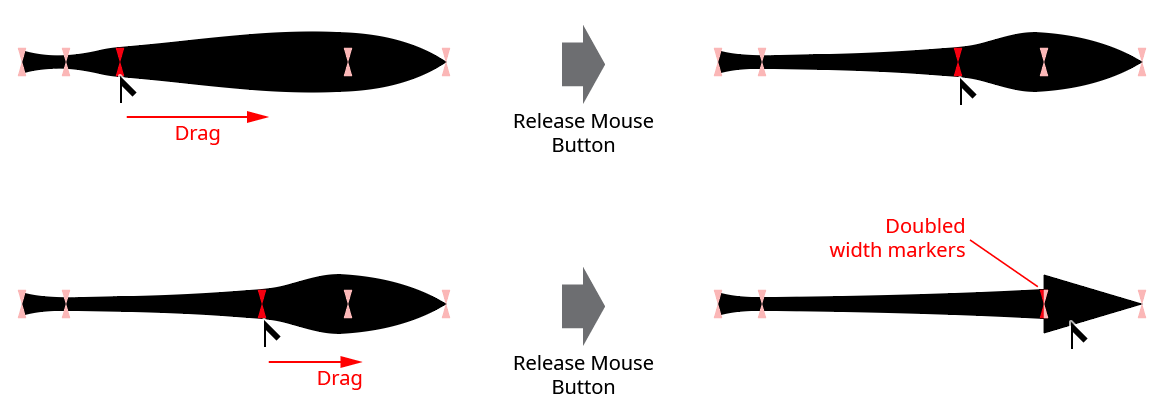
Dragging one or more selected width markers will move them along the path. A width marker may not be moved past the previous or next unselected marker, and the markers at the start and end of the path cannot be moved at all (therefore, if the selection includes either the end or start marker, it won’t be able to be moved either). Dragging a marker until it contacts another marker and releasing the mouse button will create a doubled marker, which may be used to produce an abrupt change in stroke width:

Width Selector Dragging Markers
To “stretch” markers (move a contiguous selection of one or more markers as a group while proportionally shifting all the other markers on the path, except those at the start and end of the path), hold down Shift while dragging them:

Width Selector Stretching Markers
Duplicating Markers
To duplicate one or more selected width markers, hold down the Option/Alt key after starting to drag them:

Width Selector Duplicating Markers
Adding Width Markers
The Width Selector tool can add a new width marker to a stroke by holding down Option/Alt and then clicking along the path. The new marker’s initial width will be equal to the current width of the stroke at that point.

Width Selector Adding Marker
When a variable width stroke is used on a compound path, all of the subpaths must share the same width profile. So selecting one or more width markers on one subpath with the Width Selector tool will automatically select the same markers on all of the subpaths:

Width Selector and Compound Paths
