- Getting Started
- Training
- Features
- Effects
-
Plugins
- AG Core
- AstuteBuddy
- Autosaviour
- ColliderScribe
- DirectPrefs
- DynamicSketch
- FindReplace
- InkFlow
- InkQuest
- InkScribe
- MirrorMe
- Phantasm
- Randomino
- Rasterino
- Reform
- Stipplism
- Stylism
-
SubScribe
- Getting Started
- Circle by Points Tool
- Tangent Circle Tool
- Curvature Circle Tool
- Arc by Points Tool
- Tangent Line Tool
- Perpendicular Line Tool
- Connect Tool
- Straighten Tool
- Lock Unlock Tool
- Orient Tool
- Quick Orient Tool
- Orient Transform Tool
- AG Layer Comps Panel
- Art Switcher Panel
- Gradiator Panel
- Gradient Forge Panel
- AG Color Select Tool
- Color Stamp
- Gradient From Art
- Pixels to Vector
- QuickOps
- Texturino
- VectorFirstAid
- VectorScribe
- WidthScribe
- FAQs
- Updates
- Team Licensing
- Reseller Licensing
- Astute Manager
The Crop Image tool is simple to operate. If one or more embedded images are selected when the tool is selected, then the tool’s annotated controls are immediately displayed for the topmost image, starting at its original (uncropped) bounds. Otherwise, an image may be clicked or marqueed with the tool to make it the active image (Crop Image only crops a single image at a time). By default, the cropping controls are accompanied at their lower right by a small red annotated panel which displays the image’s original size (in pixels) and its current cropped size; it also has a Close button, a Reset button, and an Apply button. The annotated panel may be repositioned by dragging on either its top bar or its informational area.
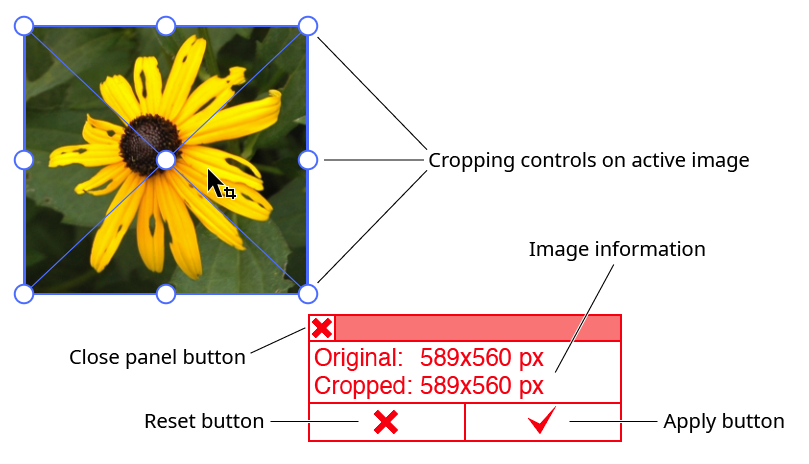
Rasterino Crop Image Controls
The cropping controls consist of nine small hollow circles, which specify the corners, mid-edges, and center of the crop box. Dragging any of the outer circles resizes the crop box, with the opposite circle as the anchor. Dragging the central circle repositions the entire crop box. Holding down Shift while dragging one of the outer circles will resize the crop box in a proportional manner. Holding down Shift while dragging the center circles constrains movement to the horizontal or vertical direction. Holding down Option/Alt while dragging an outer circle will resize the crop box from the center.
By default, the portions of the image which will be cropped off are darkened, to make the retained area easier to visualize. Cropping can only be done inwards (making the image smaller).

Rasterino Crop Image in Action
Images which have rotational and/or shear transformations applied may still be cropped with the tool:

Rasterino Crop Image with Sheared Image
If a cropping operation is started but not applied, and a different image selected or the tool deselected, then the next time the tool and the image are selected, the previous crop data will be restored.
The Reset button on the annotated panel resets the crop box to the original image’s bounds. The Apply button (or pressing the Enter key) finalizes the crop.