 PathScribe Preferences
The PathScribe preferences dialog can be brought up in three ways: by choosing PathScribe Preferences... in the flyout menu of the panel; by double-clicking on the PathScribe tool icon in the toolbar; or by pressing the Return/Enter key when the PathScribe tool is selected.

PathScribe Preferences
1. Precision
Changes the number of digits displayed in the numerical point editor section of the panel, from 2 to 6; the default is 3.
2. Shift Multiplier
Sets the amount by which the value is multiplied when holding down Shift while clicking a Multiple Handle edit button (see PathScribe Panel: Multi-Handle Mode). Allowed values range from 1 to 100; the default value is 5.
3. Highlight Panel-Selected Points
When enabled, points which are selected using the Select Point 0, Previous Point, or Next Point buttons will be briefly highlighted with a small magenta dot for ease in locating them.
4. Show Anchor Point Coordinate Ranges
Changes the way multiple values are displayed in the anchor point X: and Y: coordinate fields in the panel’s Numeric Values section (see PathScribe Panel: Point Mode - Numeric Value Fields).
5. Keep Paths Selected
When enabled, clicking on a path segment or anchor point retains the selection status of other paths, rather than deselecting them.
6. Shift-Clicking Equalizes Handle Lengths
Changes functionality when clicking with the Shift key held down on anchor points and path segments (see PathScribe Tool: Point Operations).
7. Option/Alt Clicking Adds New Point to Path
Determines the behavior of Option/Alt-clicking on a path segment; when enabled (the default), this results in a new anchor point being added to the path. See PathScribe Tool: Path Segment Operations.
8. Snap to Tangencies
9. Highlight Tangencies
Applicable when the Option/Alt Clicking Adds New Point to Path preference is enabled. They control whether the cursor snaps to tangencies along the path segment and whether all such tangencies are highlighted on the path segment. See PathScribe Tool: Path Segment Operations.
10. Show All Handles on Selected Paths
When enabled, selecting one path segment will cause all path segments to become selected (as if Option/Alt had been held down when marqueeing over a segment), thereby making their handles visible.
11. Don’t Extend Multi-Handles Proportionally
When enabled, multiple handles are extended using the absolute method instead of the proportional method (see PathScribe Tool: Multiple Handle Operations).
12. Handles Stop at Zero Length
When enabled, handles shortened using the absolute method will disappear when they reach zero-length, rather than flipping to the other side (see PathScribe Tool: Multiple Handle Operations).
13. Convert Smooth Points to Corner Points When Dragging Path Segments
When enabled, ensures that dragging a path segment will only affect that segment by changing any smooth points to corner points to unlink the handles and isolate the segment. The preference can be temporarily toggled during a drag by pressing the D key.
14. Keep Path Under Cursor When Dragging
When enabled, the PathScribe tool reshapes path segments much like the Direct Selection tool (the path is adjusted so it passes through the cursor position). For more control, especially when the initial click point is close to one of the path segment’s anchor points, the preference can be disabled.
15. Show Ghost Handles
16. On Current Segment Only
“Ghost handles” are virtual handles that can be converted to real handles by simply dragging them. They appear as small dim circles along the path. Dragging a ghost handle is often the easiest way to extend a single handle from an anchor point. For example, suppose you wanted to change the second point of this path into a connector point, with a single handle:
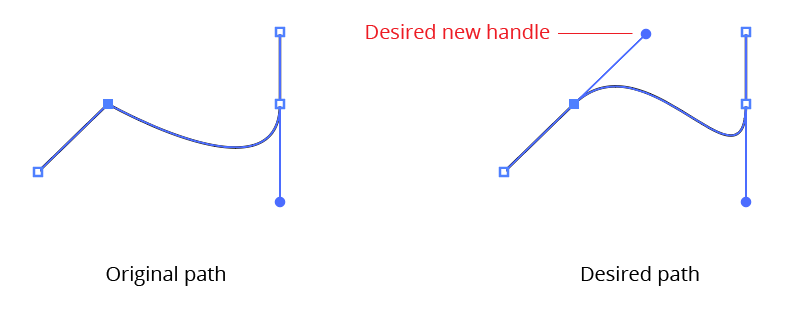
PathScribe Preference Ghost Handles part 1
Dragging the middle path segment would create the handle, but would also move the existing handle. Dragging the selected point with the native Convert Anchor Point tool or Option/Alt-dragging it with the PathScribe tool would create two new handles, so one of them would subsequently need to be deleted. You could use the numeric value fields of the PathScribe panel to extend a single new handle and then use the PathScribe tool to adjust its position, but using ghost handles, a single click-and-drag with the tool is all that is required:

PathScribe Preference Ghost Handles part 2
When On Current Segment Only is disabled, ghost handles will appear on all segments of the selected path(s) where they are available instead of just the selected segments.
17. Highlight Redundant Points
If enabled, redundant points will be indicated by a triangular annotation when using the PathScribe tool. Those redundant points may then be removed by clicking the button on the panel (see PathScribe Panel: Point Mode - Remove Redundant Points Button).

PathScribe Preferences Highlight redundant points
18. Automatically Remove Redundant Points from Selected Paths
If enabled, whenever a path is selected it is scanned for redundant points, and if any are found, they are automatically removed. The PathScribe tool does not need to be active. Caution: this may sometimes cause unexpected results. For example, if one side of a rectangle is momentarily dragged over the opposite side (with the intention of then moving it back a specific distance), the “zero-width” rectangle will be immediately converted into a two-point line.
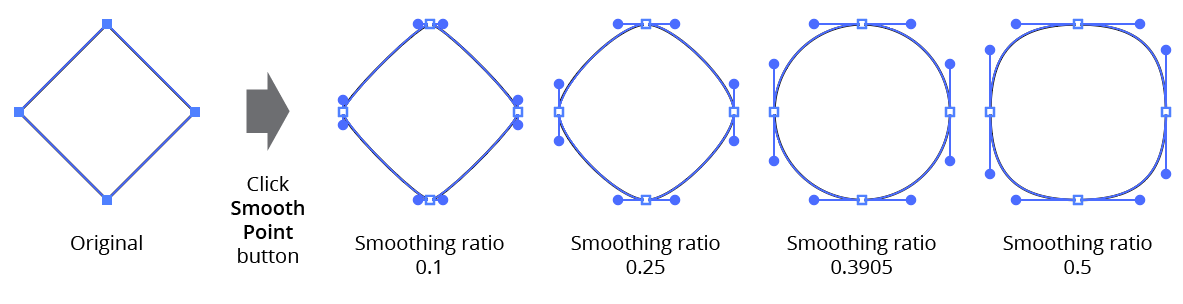
19. Smoothing Ratio
Sets the length of automatically-generated handles, as a fraction of the smaller of the distances from the anchor point to adjacent points. The smoothing ratio can range from 0.1 to 0.5, with middle values generally give the smoothest looking curves; the default value of 0.3905 will convert a square to a circle.
PathScribe smoothing ratio
20. Slow-Drag is Default
When enabled, all drags start in slow-drag mode but can be changed to normal drags by holding down the Control key on Mac; on Windows, the Ctrl key can be used if the following preference is enabled.
21. Use Ctrl Key to Toggle Slow-Drag [Windows only]
On Mac keyboards, there are two modifier keys in addition to Shift and Option/Alt (Control and Command), so Control is dedicated to toggling slow-dragging and Command is dedicated to hiding handles during tool drags. Windows machines only have one additional modifier key (Ctrl), so this preference is used to assign it to either the first or second function.
22. Slow-Drag Divider
The amount to “gear down” the cursor movement when a slow-drag is being performed. It can range from 1.0 (which results in no reduction in speed) to 100.0 (extreme reduction), with a default of 5.0. See PathScribe Tool: Overview, Cursor Snapping, and Slow-Drag.
23. Highlight Cursor When Snapping
When enabled (the default), a red ring will appear around the cursor (in addition to the small symbols that appear next to the cursor) when it is over an anchor point or handle (see PathScribe Tool: Overview, Cursor Snapping, and Slow-Drag). If you don’t use Smart Guides, this added visibility generally results in fewer “missed” drags.
24. Highlight Over Path Segments Too
When highlighting is enabled, the ring also will appear when the cursor is over a path segment in addition to anchor points and handles.
25. Show Text Annotations
When highlighting is enabled, a text annotation will appear in addition to the red ring, indicating the type of snap (In handle, Out handle, Corner point, Smooth point, Open path, or Closed path).
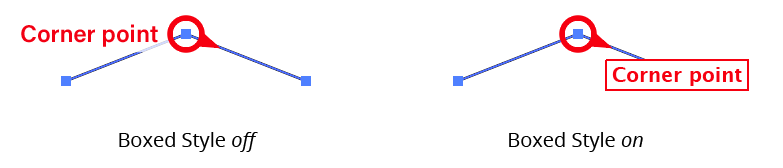
26. Boxed Style
When text annotations are enabled, changes their style so they appear in a box below and to the right of the cursor, rather than to its left.
PathScribe Preferences Boxed Style
27. Connector Threshold
Specifies the number of degrees that the angle of a potential connector point can deviate from the ideal and still be recognized as a connector point. Allowed values range from 1° to 180°; the default is 5°.
28. Enable Smart Smooth
Turns the Smart Smooth feature on and off. See PathScribe Panel: Point Mode - Point and Path Buttons.
29. Smart Smooth Threshold
Specifies the number of degrees that the angle of a handle can deviate from the ideal (180° opposed from the other handle) and still be considered for smart smoothing.
30. AutoGlue Tolerance
Specifies the maximum distance apart that two anchor points (or handles) must be to automatically be glued together when using AutoGlue. The default is 0.002 pt. Setting the tolerance too high may result in anchor points being glued when they shouldn’t be.
31. Help Button
Opens the help documentation in the Astute Manager. If this does not automatically appear, please ensure your Astute Manager is running first.
32. Settings Manager
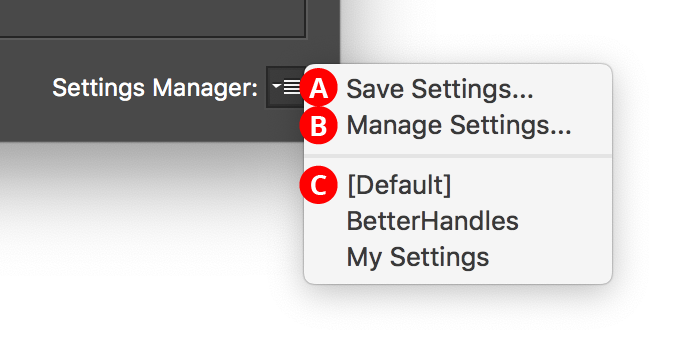
The Settings Manager popup menu provides access to saving, managing, and applying preference settings.
PathScribe Settings Manager Menu
A. Save Settings...
When you save the preference settings, all of the current settings in the preferences dialog are captured in a file which can be recalled later.
B. Manage Settings...
Brings up the Manage Settings dialog, which lets you rename or delete existing settings files:
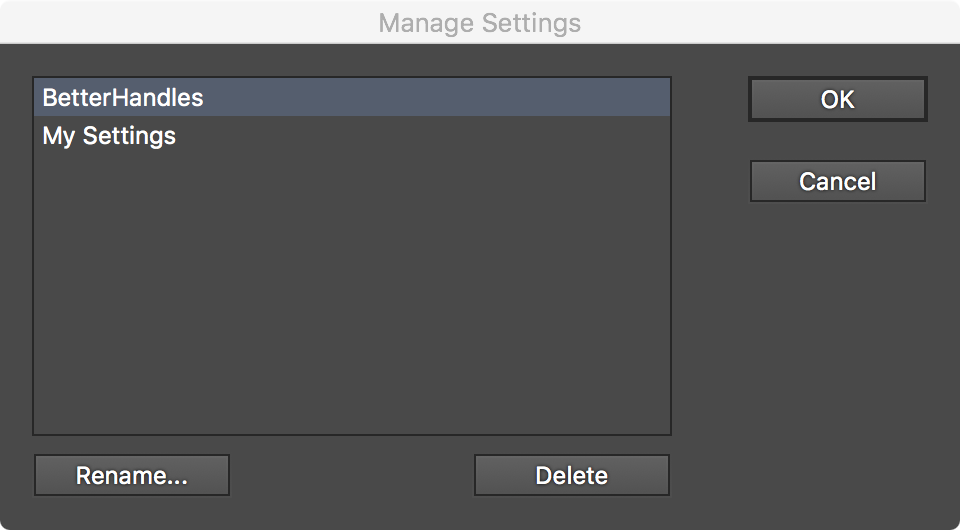
PathScribe Preferences manage settings
C. Settings List
Choosing a settings file from this list will change the preference settings to match the state of the panel when the settings file was saved (or, the case of “[Default]”, to the default values).