 InkScribe Tool
The InkScribe tool appears in Illustrator’s main toolbar (which must be in Advanced mode: View > Toolbars > Advanced), stacked under the native Pen tool. As with other stacked tools, click and hold on the top tool icon to display the tools stacked under it.
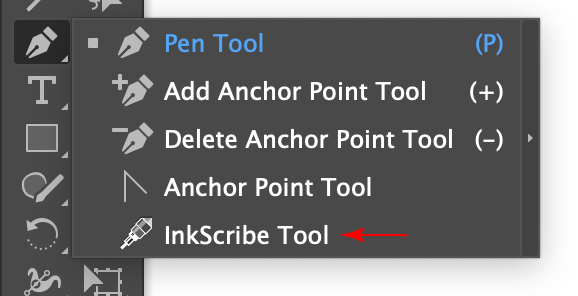
InkScribe Tool Location
The InkScribe tool’s primary cursor looks like the end of a technical pen, and can have badges and additional forms:

InkScribe Tool Cursors
InkScribe Tool Operation
As the InkScribe tool has several keypresses which can add or change its functionality, we suggest installing the free Astute Graphics plugin Astute Buddy, which creates a panel that dynamically updates to inform you of the various keys which can be pressed in the tool’s current context.
The InkScribe tool is works in conjunction with the associated InkScribe panel, which should be open and accessible. If you are using the free Astute Graphics plugin DirectPrefs, you can have the InkScribe panel automatically be shown when the InkScribe tool is selected.
At its most basic, the InkScribe tool is a direct replacement for the native Pen tool. By default, clicking creates an anchor point with no handles, while clicking and dragging creates an anchor point with two handles. If nothing was originally selected and the tool was clicked away from any existing paths, a new path will be started. If a path was already in the process of being drawn, then it will be continued, adding another point to it. By default, a “rubber band” annotation shows a preview of the new path segment before the mouse button is clicked.
Although the InkScribe settings can be changed to make it quite similar in feel to the native Pen tool, with its default settings there are several differences. First, a small annotated “virtual panel” is drawn after the anchor point is created (nearby, “attached” to the point with a leader line, and with virtual buttons similar to those on the InkScribe panel), which allows common actions such as changing the anchor point between corner and smooth type as well as specifying the properties for the next-drawn path segment and point. Second, when the InkScribe cursor is hovered over an anchor point or handle, it changes to an arrowhead to indicate that the point/handle can be moved by simply dragging it; a ring indicates that the cursor is snapping to that point/handle; and the type of point (corner or smooth) is also displayed.
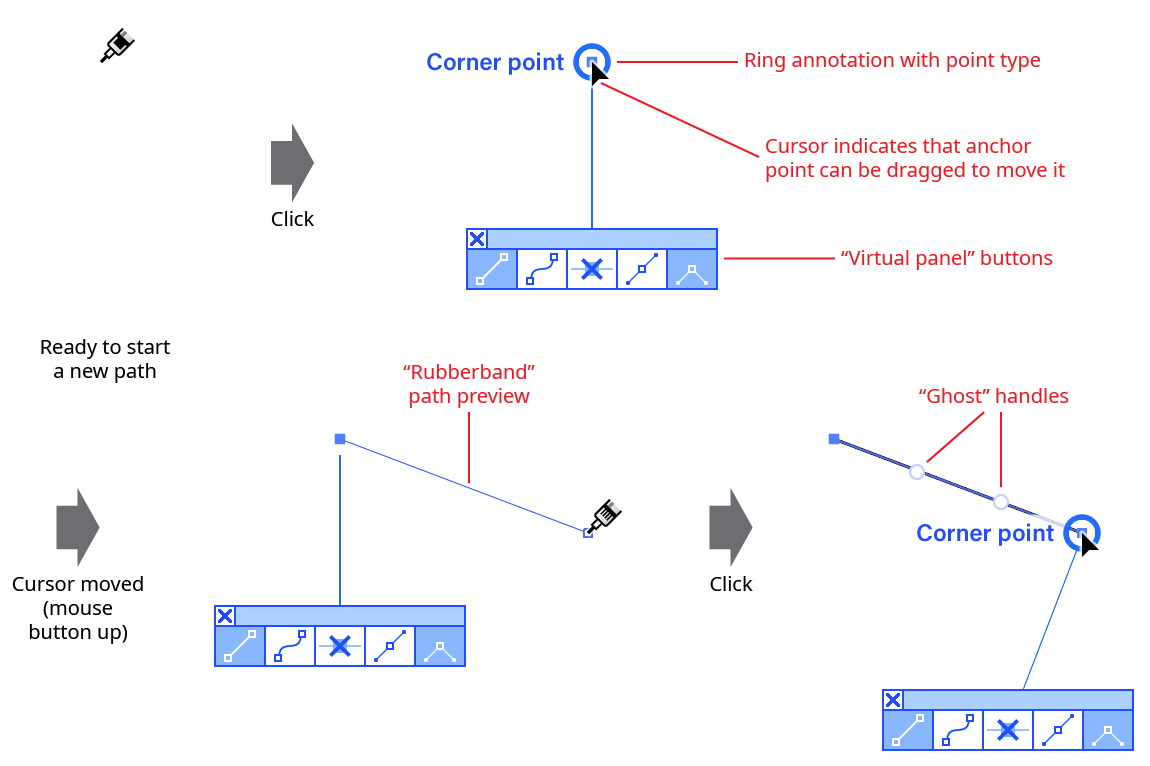
InkScribe New Path Example
If a segment was created that does not have two handles, “ghost” handles (virtual handles which may be dragged to create real handles for the segment) are annotated along the path:
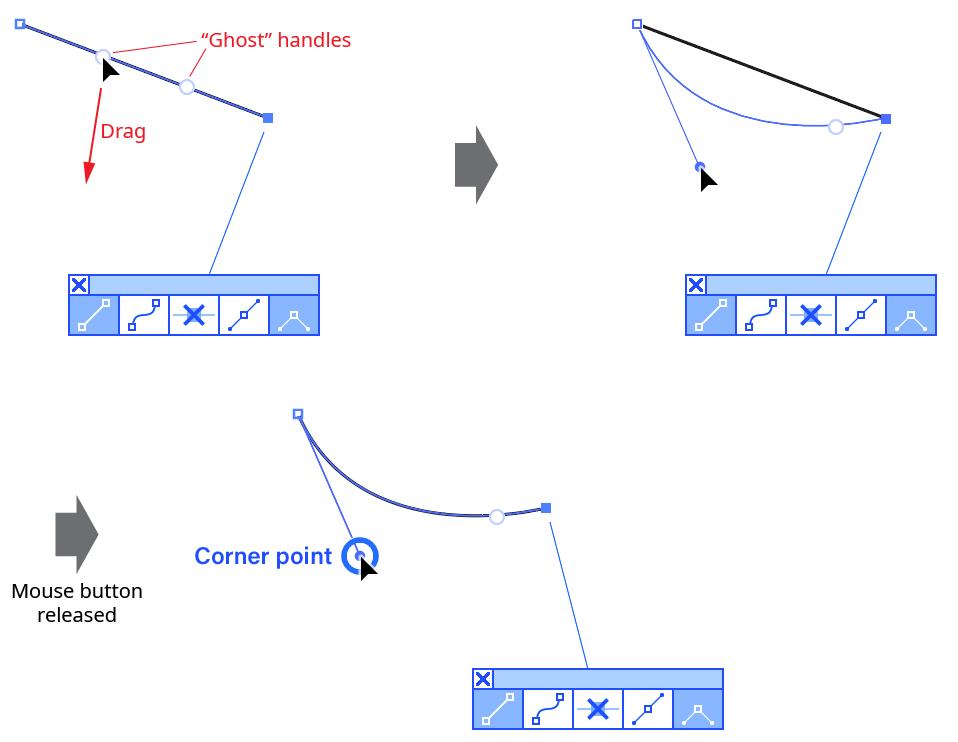
InkScribe Ghost Handle Example
Unless the tool preference Click-Drag Segments to Reshape is disabled, the InkScribe tool can also directly reshape the segments of selected paths by clicking-and-dragging on them.
New Point Operations
Whether starting a new path or continuing an existing path, the type of anchor point (corner or smooth) that the InkScribe tool creates depends on several factors. If the new point is simply created through a click (with no drag), then the point’s type is determined by the button which was selected in the InkScribe panel or virtual panel:
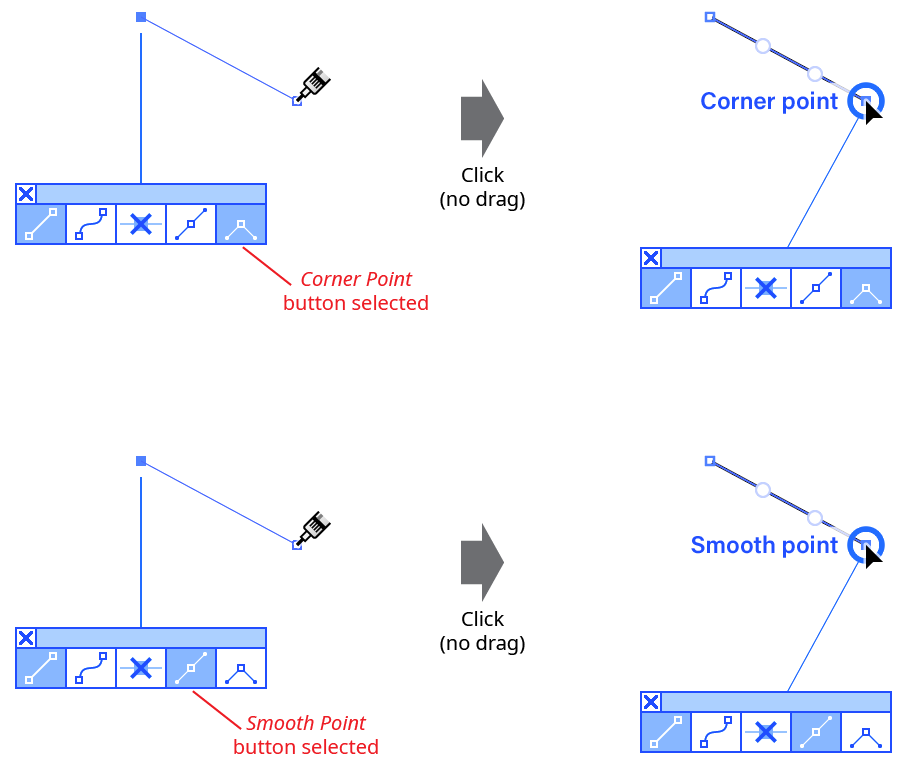
InkScribe New Point Type
If the point is created by dragging, then it will always be made smooth type, unless the Option/Alt key is pressed and the tool preference Option/Alt-Drag a Point to is set to Define Out Handle (the default); then the resulting point will always be made corner type.
When dragging to create a new point, and thereby creating two handles, several keys can be pressed:
Shift: Constrains handle angles to 45° increments around the general constrain angle.
Option/Alt: Defines the Out handle (if the tool preference Option/Alt-Drag a Point to is set to Define Out Handle; or constrains the handle lengths to multiples of the Distance Factor (if the tool preference Option-Alt-Drag a Point to is set to Constrain Distance by Factor). When defining the Out handle, if the
Option/Altkey is released and the cursor moved again, the handles will be made 180° opposed again.Command/Ctrl: Locks the In handle length to the value it had when the key was first pressed.
Space: Moves both the handles and anchor point as one.
Tab: Switches the last segment between curved and straight.
Existing Point Operations
When a path is at least partly-selected, its existing anchor points may be selected, moved, modified, or removed. As some keypresses can change depending on the way the InkScribe preferences are set, the Astute Buddy panel is the best reference, as it shows current keypresses taking into account the current preference settings.
Clicking on an anchor point selects that point; the virtual panel annotation (if enabled) is moved to that point. If the point is at one end of an open path, then the path becomes the active path and can have additional points added to it. Shift-clicking has the same effect unless the preference Option/Alt-Click On Point to is set to Select. (In that case, Shift-clicking removes the point without adjusting handles to keep the curve shape).
Option/Alt-clicking on an anchor point Smart Removes the point (unless the preference Option/Alt-Click On Point to is set to Select). When a point is Smart Removed, the handles of the adjacent anchor points are extended or retracted so the resulting path shape is as close to the original as possible. To remove a point without adjusting any handles, Shift+Option/Alt-clicking may be used. The Smart Remove button on the panel or virtual panel can also be used to remove a point.
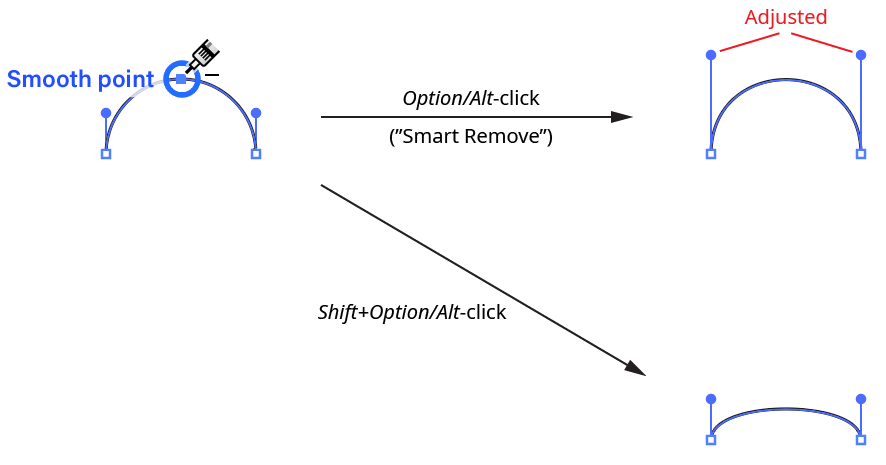
InkScribe Point Removal
Doubleclicking an anchor point (or one of its handles) on a selected path converts the point’s type from corner to smooth or vice versa. When a smooth point is converted to a corner point, handles (if any) are not moved. When a corner point is converted to a smooth point, and both handles exist, each handle swings away from the other in equal amounts until they are 180° apart (unless a handle was clicked, in which case only the clicked handle moves):
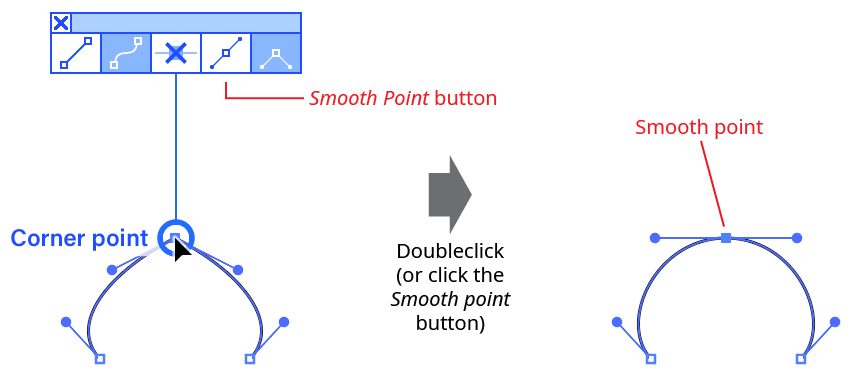
InkScribe Point Type Change
If the point did not have two handles originally, new handles are added. The Smooth Point or Corner Point buttons on the panel or virtual panel can also be used to change a point’s type.
Dragging an anchor point on a selected path moves it. InkScribe only moves a single anchor point at a time (to move multiple points, Astute Graphics’ PathScribe tool may be used). To move the point in a direction constrained to 45° increments around the general constrain angle from its original position, hold down the Shift key. If at least one of the point’s adjacent segments is straight, press the L key during the drag to toggle linear constrain mode, in which the point’s movement is constrained to the line formed by the straight segment(s).
Option/Alt-dragging an anchor point on a selected path, by default, defines the Out handle (as per the native Pen tool). If the point is a smooth point, the In handle will also move to remain opposite it. To define the Out handle on an existing point, Option/Alt must be held down before the drag starts. If the tool preference Option-Alt-Drag a Point to is set to Constrain Distance by Factor, then Option/Alt-dragging instead moves the anchor point from its original location by a multiple of the Distance Factor. For example, if the Distance Factor is set to 10 px, then the point will be moved 10 px, 20 px, 30 px, etc., but not in-between values. Distance constraining works only if the Option/Alt key is held down after the drag has started.
Handle Operations
Visible handles may be edited directly with the InkScribe tool:
Doubleclicking a handle changes the anchor point associated with the handle from corner type to smooth type and vice versa. The handle may move when the point is changed to smooth. Shift-doubleclicking a handle removes it.
Dragging a handle will move it in the same manner as the Direct Selection tool (unless connector point recognition is enabled and the point is a connector point; see Connector Points). While dragging, pressing Shift constrains the angle of the handle to 45° increments around the general constrain angle; pressing Option/Alt constrains the angle of the handle to its original angle; and pressing Space moves the associated anchor point. If the handle is one of a pair, pressing the T key toggles a mode where the handles are kept exactly 90° apart.
Path Segment Operations
When a path is at least partly-selected, its segments may be edited in several ways:
Clicking a path segment does nothing unless the tool preference Click-Drag Segments to Reshape has been disabled (in that case, clicking adds an anchor point to the path segment at the clicked location).
Option/Alt-clicking will add an anchor point to the path segment, as long as the tool preference Option/Alt-Clicking Inserts New Point in Path has not been disabled. The cursor shows a “+” sign when an anchor point will be added. If the sub-preference Snap to Tangencies is enabled, the cursor will snap to vertical, horizontal and diagonal tangencies on the path segment (taking into account the general constrain angle). A red guide will appear when the cursor is snapping, indicating the tangent direction:

InkScribe Add Point Example
Additionally, you can choose to highlight all of the tangencies on the current path segment with a small magenta dot by enabling the Highlight Tangencies sub-preference:
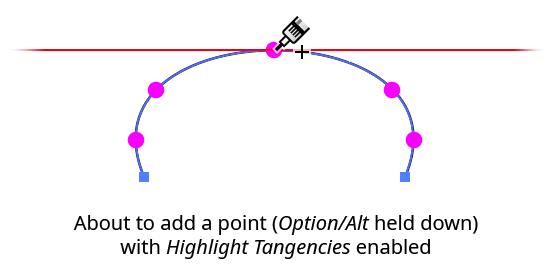
InkScribe Add Point Highlight Tangencies
Dragging a path segment reshapes it, similarly to the Direct Selection tool (unless the tool preference Click-Drag Segments to Reshape is disabled). The closer the initial mouse-down is to one anchor point, the more that point’s handle movement is affected by the cursor movement and the less the other handle is affected. Starting the drag midway along the path between the points affects both handles equally. If the Keep Path Under Cursor When Dragging sub-preference is disabled, handles are still moved relative to the initial click location, but the path will not necessarily pass through the cursor position. If either of the segment’s handles does not exist at the start of the drag, new ones will be created. Adjacent segments will also be affected when you drag a segment if its endpoints are smooth points, since the opposing handles must change angles to remain 180° away from the moved handles.
Note: When you are using Recognize Connector Points, segments with connector points at one or both ends are affected differently by drags, since a connector point can have only one handle at a fixed angle; see Connector Points.
While dragging a segment, there are various keys which can be pressed to perform additional functions:
Shift: Reshapes the path segment while keeping it symmetric. Symmetric means that both handles are of the same length and are at the same angle to the imaginary line running through the endpoints of the path segment.
Shift-draggingfrom the middle third of a path segment will additionally constrain the handle angle to be perpendicular to this imaginary line:

InkScribe Path Drag Symmetrical Handles
Except for middle-third Shift-dragging, if you release the Shift key (or if you started dragging without it) and later hold it down, the curve will become symmetric using the lengths and angles of the handles as they exist at that moment.
Option/Alt: Constrains the angles of the handles to their original values (±180°). If you have the Option/ Alt-Clicking Inserts New Point in Path preference enabled, you must press the key after you hold down the mouse button, or you will inadvertently add a point to the path. But even if you begin to drag without
Option/Alt, holding it down afterwards will reset the angles of the handles to the angles they had when you originally moused down on the path. Note: If the initial mouse-down was close to one of the ends of the segment, the segment shape will probably be very sensitive to movement of the cursor.Shift+Option/Alt:
Shift+Option/Alt-dragginga path segment reshapes it with the following constraints: the handle lengths are kept equalized, and the handle angles are constrained to their original values. As withOption/Alt-dragging, handle angles will be set to the original angles unlessShiftwas held down by itself first (which will have made the curve symmetric). This allows you to first symmetrize a curve until the handles are at the angle you like, and then lengthen or shorten them without losing the symmetry.R: Retracts the handles of the path segment being dragged, making it straight.
Marqueeing Operations
As long as a path is not being continued and the cursor is not over a selected path, the Option/Alt key may be held down to put InkScribe into marqueeing mode. In this mode, you can click-and-drag with the InkScribe tool (“marqueeing”) to draw out a rectangle that selects anchor points and path segments that fall within or intersect it, like the Direct Selection tool.
Adding the Shift key when marquee selecting has the same effect as when selecting with the native selection tools: if whatever would be selected is not yet selected, it is added to the current selection, otherwise it is subtracted from the current selection.
If, after the marqueeing operation, the selection consists of a single anchor point, then it becomes active and the virtual panel (if enabled) is moved to that point. If the point is at one end of an open path, then the path becomes the active path and can have additional points added to it.
Connector Points
When the Recognize Connector Point button is enabled, InkScribe can recognize and work with connector points: points that act as transitions between straight segments and curved segments.
A connector point:
1. Can be either a smooth or corner point, but not an endpoint of an open path;
2. Must have a single handle that faces directly away from another point (the base point);
3. Must be adjacent (on its non-handle side) to a segment with no handles
Additionally, for InkScribe to recognize a point as a connector, its handle must be lined up with the straight segment. The amount that its handle can be off and still qualify as a connector is called the angle threshold. It has a default value is 5° but can be set in the preferences dialog.
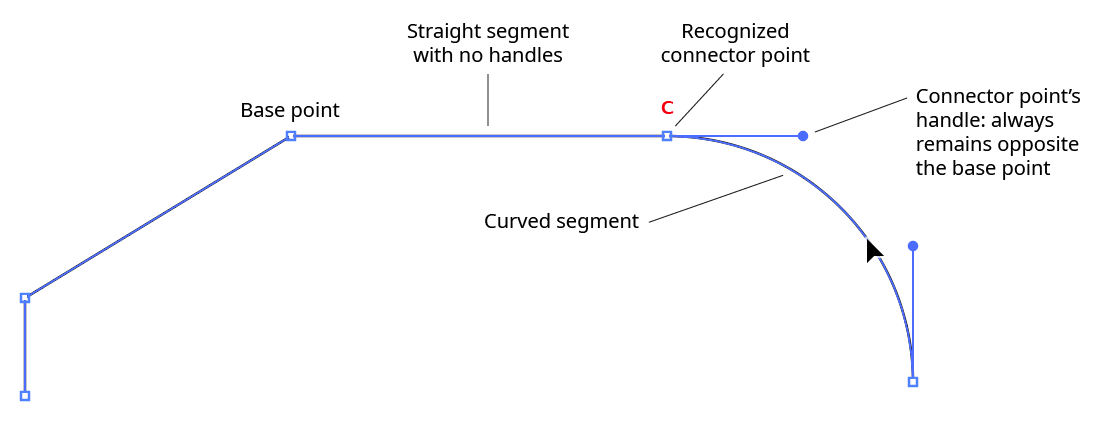
InkScribe Connector Point Description
Hovering the InkScribe cursor over a path will identify all of the path’s recognized connector points by drawing a small “C” above them. The color of the “C” indicates whether a connector is within the angle threshold but not perfectly lined up (gray) or aligned precisely (red):
InkScribe Connector Point Icons
Nearly all clicks and drags with the InkScribe tool on a connector point, its handle, the segments next to it, or the points adjacent to it, will automatically align (if not already), and keep aligned, the connector point’s handle. When a connector point is being automatically aligned during an edit, a red “C” will appear above it. If the edit removes the connector’s points handle (such as dragging its handle back until it is of zero length), the “C” will disappear.
Since other native Illustrator tools will not see connector points any differently from non-connector points, any geometry edits other than those that affect the entire path (such as moving, rotating, and scaling) should only be done using the InkScribe tool (or Astute Graphics’ PathScribe tool, which also supports connector points), otherwise any connector point’s handles may be disturbed.
