 InkScribe Panel
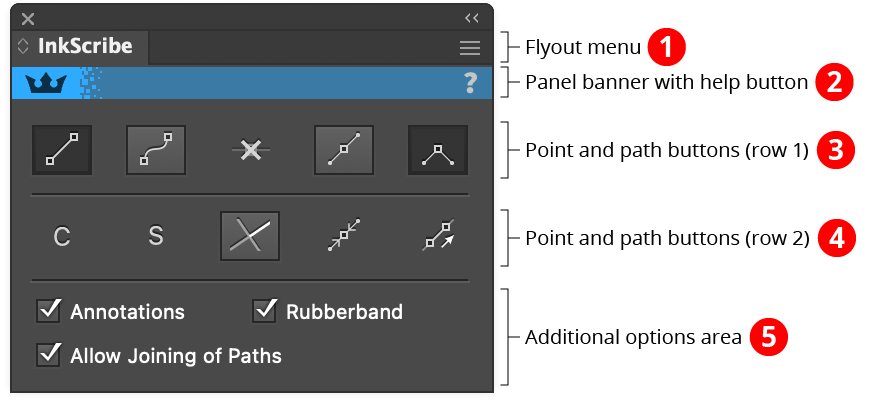
The menu item to show and hide the InkScribe panel can be found in the main menu under Window > Astute Graphics > InkScribe. The InkScribe panel contains the same ten point and path buttons that can appear on the virtual panel. It also allows control over various options that affect the InkScribe tool, such as whether connector recognition is on or off, or whether paths can be joined together.
InkScribe Panel
1. Flyout menu
See InkScribe Panel: Flyout Menu.
2. Panel banner
The InkScribe panel banner has a help button on the right which opens the help documentation in the Astute Manager. If this does not automatically appear, please ensure your Astute Manager is running first.
3. Point and Path Buttons (row 1)
a. Straight Segment Button: When continuing a path, and the cursor is clicked (without dragging) to create a new anchor point, if the straight segment button is in its enabled state (shaded), then the segment created will be straight, with no handles (any Out handle on the previous anchor point will automatically be removed).
b. Curved Segment Button: When continuing a path, and the cursor is clicked (without dragging) to create a new anchor point, if the curved segment button is in its enabled state (shaded), then the segment created will be curved, with a new Out handle automatically added to the previous anchor point. The exception is when the previous segment was straight, and the tool preference Continuing From Straight to Curve is set to Keep Handle Retracted, in which case the segment remains straight.
c. Smart Remove Point Button: Removes the selected anchor point(s) and adjusts the handles of the points on either side of the removed point(s) so the resulting path shape is as close to the original as possible (see example in InkScribe Tool: Existing Point Operations). To remove one or more anchor points without adjusting handles, hold down Option/Alt when clicking the button.
d. Smooth Point Button: Changes all selected anchor points to smooth points. By default, this also adds new handles to these points so they all have two opposed handles. This is useful for creating a path that runs smoothly through the points:

InkScribe Panel - Smoothing Example
The algorithm that InkScribe uses to create new handles is as follows: If a point already has one handle, its second handle is created by mirroring the existing handle. If a point has no handles, the new handle angle is calculated by bisecting the angle formed by the previous point, the point in question, and the next point, and taking its perpendicular. The new handle length is calculated by taking the lesser of the distances from the point in question to the previous and next points, and multiplying by 0.3905. This ratio causes a square to be turned into a circle when its points are smoothed. Handles of endpoints of open paths, if created, are adjusted to aim towards the next/previous handle.
e. Corner Point Button: Changes all selected anchor points to corner points. No handles are created or changed.
4. Point and Path Buttons (row 2)
a. Connector Point Recognition Button: Enables or disables Connector Point recognition. When the “C” symbol is dim, connector point recognition is off and the InkScribe tool will not afford any special handling to points which qualify as connectors. See InkScribe Tool: Connector Points.
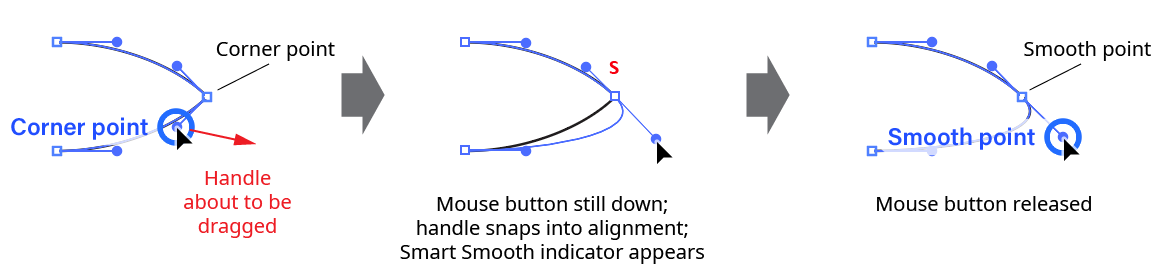
b. Smart Smooth Button: Enables or disables “Smart Smooth”, a feature of the InkScribe tool which allows you to convert a corner point into a smooth point simply by dragging one of the point’s handles to be opposite the other (within a certain tolerance). A small red “S” annotation is drawn over points which are being aligned this way. The threshold angle value can be specified in the Preferences dialog.
InkScribe Panel - Smart Smooth
c. Constrain Angle Button: When this button is in its enabled state (shaded), new points can only
be created at 45° angle increments from the previous point (honoring the constrain angle). Existing points that are moved can only be moved along these same angles. New handles and handles which are edited must also have these same angles.
d. Retract Handles Button: Retracts all of the handles on the selected anchor point(s). Point types are not changed. Holding down Option/Alt while clicking the button activates an alternate function: it swaps the positions of the In and Out handles on each selected point.
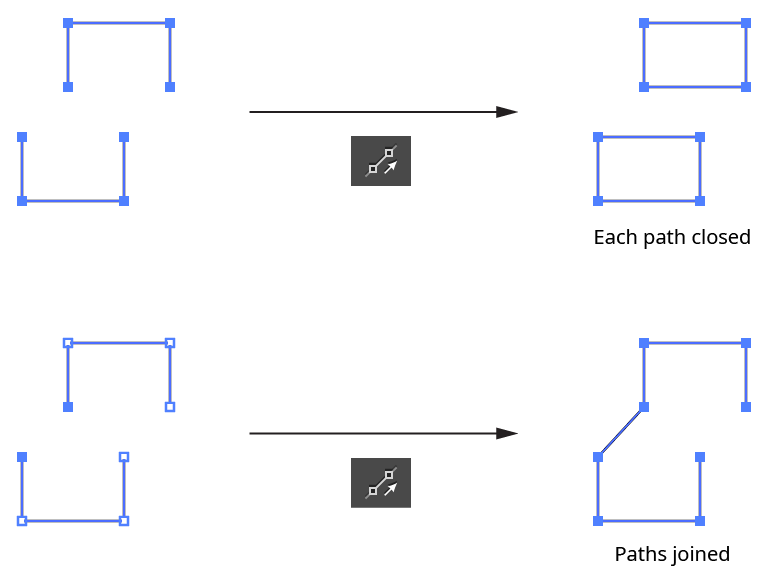
e. Close/Join Paths Button: Closes one or more open paths that are at least partially-selected, honoring any out-facing handles which may exist on the path’s endpoints. But if the selection consists of exactly two endpoints on two open paths, then the two paths are instead joined together.
InkScribe - Close Join Path Example
5. Additional Options Area
a. Annotations: Enables or disables the virtual panel annotation which appears when a single anchor point is selected.
b. Rubberband: Enables or disables the “rubberband” preview of the segment about to be drawn.
c. Allow Joining of Paths: When disabled, continuing one path onto the endpoint of another path will not automatically join the first path to the second (however, open paths can still be closed).
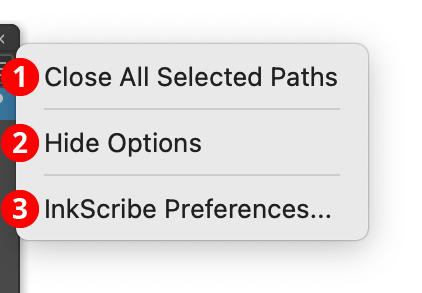
InkScribe Panel Flyout Menu
InkScribe Panel Flyout Menu
1. Close All Selected Paths
Available when one or more open paths are selected. Closes all such paths, retaining any out-facing handles that may exist on the endpoints.
2. Hide Options
The three checkbox controls that make up the options area at the bottom of the panel can be shown or hidden using this menu item. When the controls are hidden, the menu item will change to Show Options.
3. InkScribe Preferences...
Brings up the Preferences dialog.