 Editing Area
This is the main area, which displays the active gradient and allows you to manipulate its stops and midpoints as with the native Gradient panel. However, unlike the native panel, you can select and operate on multiple stops or midpoints.
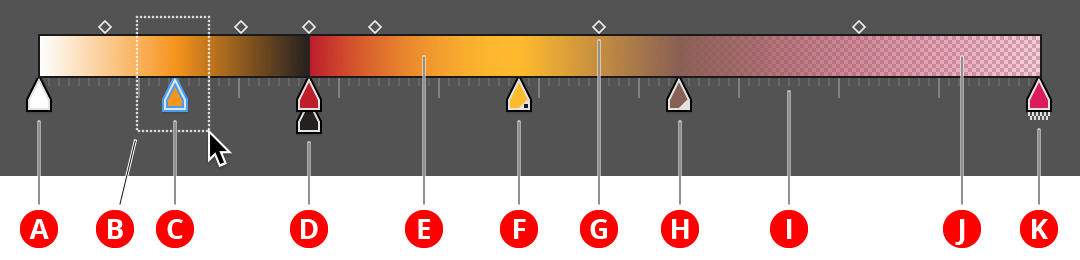
Gradient Forge Panel Editing Area
A. Unselected Stop
Can be made selected by dragging the marquee over it, or clicking on it. Shift-clicking or dragging inverts the selection, as per the Illustrator artboard.
B. Marquee
Dragging the cursor starting from an empty spot in the editing area creates a marquee which is used to select either midpoints or stops.
C. Selected Stop
Distinguished by a hollow blue highlight around it. While some of the function buttons will work with no stops selected (and, in general, then act as if all the stops were selected), other functions, such as setting the location/opacity value or the delete button, require there to be a stop selection.
D. Stacked Stops
Unlike the native Gradient panel, Gradient Forge lets you see stops which are “on top of each other”, i.e., have the same location value. Stacked stops create a hard edge in the gradient, and can be used to create stripes. Stops can be stacked to any depth, but only the first and last contribute to changing the color. Just as stop order proceeds from left to right, stacked stops should be read from bottom to top. In the example shown, the second, orange stop blends to the black stop; the color then changes abruptly to dark red, and then blends to the lighter orange of the right-hand stop.
E. Gradient Preview
F. Spot Color Stop
Stops with spot colors are indicated by the small triangular badge at lower right with a dot (similar to swatches).
G. Midpoint
As per the native Gradient panel; indicates the midpoint of the gradient between stops to its left and right. Selected midpoints are solid while unselected ones are hollow.
H. Global Color Stop
Stops with global colors are indicated by the small triangular badge at lower right (similar to swatches).
I. Ruler
Indicates the positions to which stops are snapped when snapping is enabled (up to 1.0% snapping increments; 0.5% increments are not shown).
J. Opacity Grid
Per the native Gradient panel; the opacity grid is drawn below the gradient, and therefore shows areas where the gradient’s color is not fully opaque.
K. Stop With Opacity
Stops with non-100% opacity are indicated by a small checkered badge below. This is useful for spotting opacities that close to but not exactly 100% (and would therefore leave the opacity grid almost invisible).
Editing Area: Midpoint Operations
Midpoints may be repositioned by dragging them. When a single midpoint is selected, it may be reset to its default 50% location by doubleclicking it.
Editing Area: Stop Operations
Stops may be repositioned by dragging them. If the stops are dragged far enough below the gradient preview, they will deleted when the mouse button is released (as per the native Gradient panel). Various modifier keys can by used when dragging stops to change functionality:
Shift: “Ripples” the locations of unselected stops, i.e. moves them proportionally in the drag direction. This essentially stretches the gradient around the selected stops, retaining stop order:
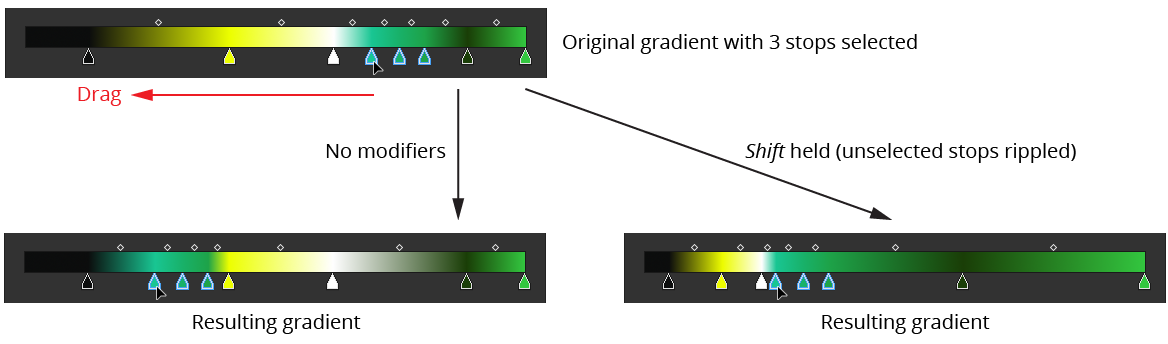
Gradient Forge Panel Stop Drag Modifiers Example 1
Option/Alt: Duplicates the dragged stop(s), as per the native Gradient panel.
Command/Ctrl: Temporarily disables snapping, if enabled (see below).
Space: Applicable only when a contiguous selection of two or more stops is being dragged by either the first or last stop in the selection; scales the selected stops proportionally (in effect, stretching them out or together). Can be combined with
Shiftto ripple the other stops.
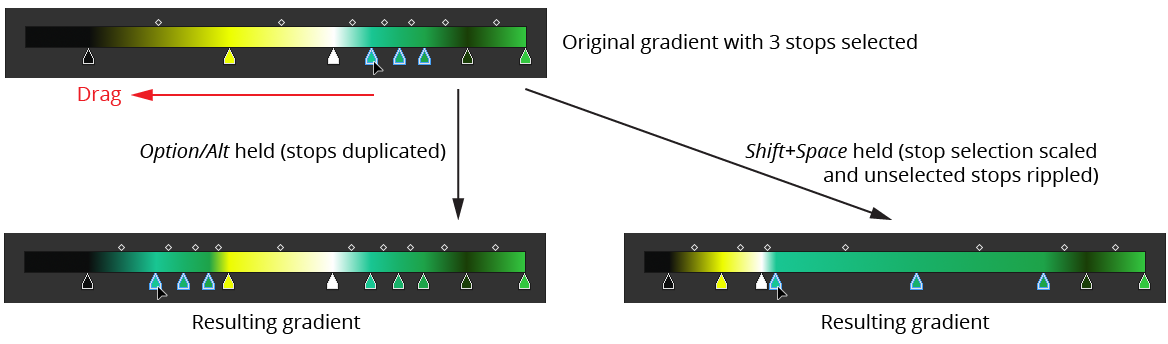
Gradient Forge Panel Stop Drag Modifiers Example 2
By default, clicking just below the gradient preview will add a new stop at the clicked position, with its color and opacity automatically set to match that of the gradient at that position (interpolating adjacent stops). If you find yourself accidentally adding stops, you may enable the preference Require Option/Alt to Add New Stop (see Gradient Forge: Preferences). In that case, you must hold down Option/Alt when clicking in order to add a new stop. After the stop is added it may immediately be dragged.