Stipples
Stipple Live Effect
Symbol Stipple Live Effect
 Symbol Stipple Live Effect
Illustrator Location:
Illustrator Main Menu > Effect > Stipplism > Stipple...
As with most live effects, Stipple appears in the main menu, at Effect > Stipplism > Stipple. It can also be applied directly from the Appearance panel using the “Add New Effect” button at the bottom of the panel.
Stipple Parameters Dialog
After applying the live effect using the menu item (or when clicking on the existing effect in the Appearance panel to edit it), the parameters dialog will appear:

Stipple Parameters Dialog
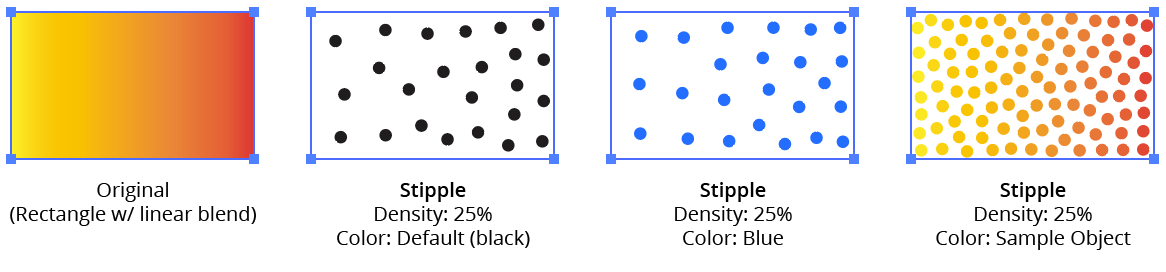
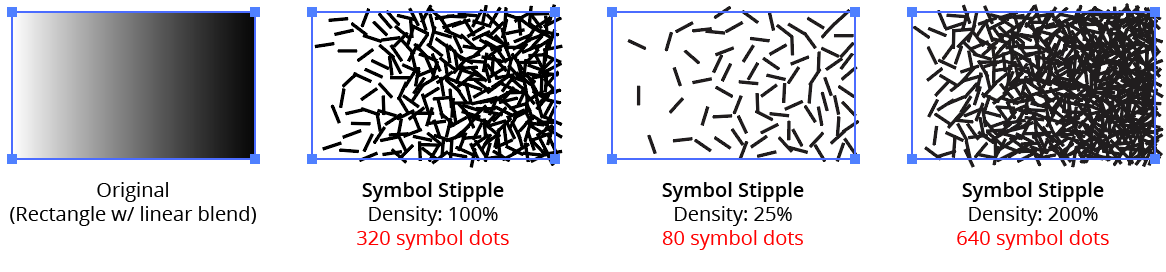
1. Density
Controls the overall density of the stipple dots (as a percentage of its full-strength value). The default value is 100%, but can vary between 0.01% and 1000%. Lower densities will result in fewer dots. If the Preview option at the bottom is enabled, the number of dots will be displayed.
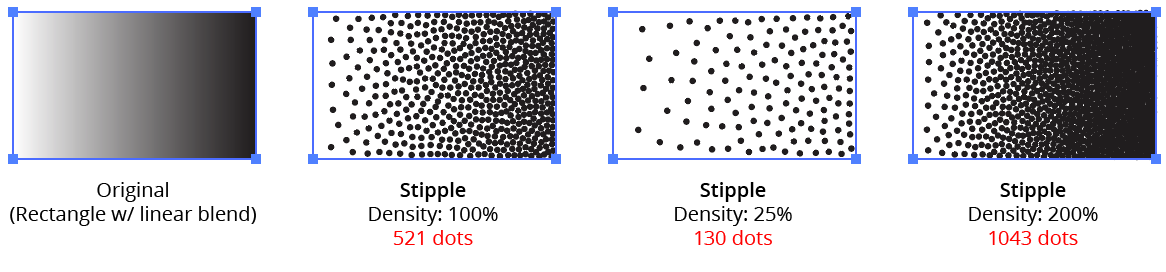
Stipplism Density Example
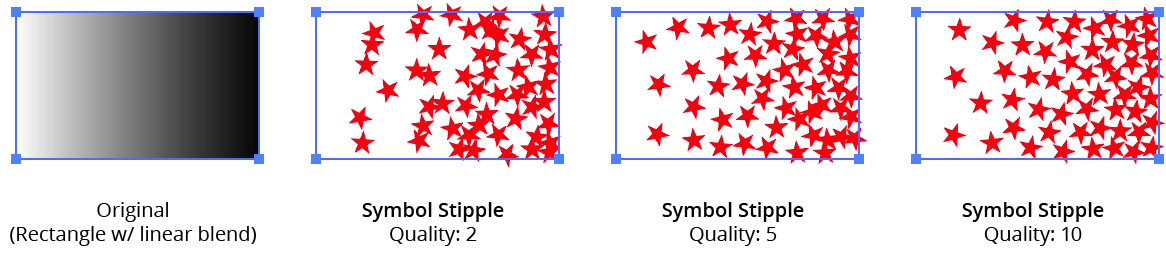
2. Quality
Controls the uniformity of the stipple dots. Values can range between 1 and 11, with a default of 3. Higher values result in more uniform patterns (and take longer to calculate).
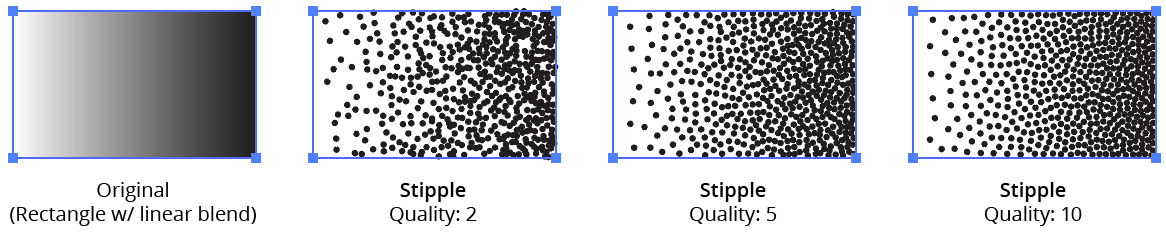
Stipplism Quality Example
The range is not linear, but is based on a logarithmic scale. Each step up in Quality roughly doubles (or more) the amount of time required to create the dots. For example, 10,000 dots typically take less than 2 seconds to create at qualities of 4 or less, but 5 seconds at quality 6, 30 seconds at quality 9, and about 300 seconds at quality 11. Therefore, for Stipples with large numbers of dots, it’s recommended to start with a low Quality value and increase it later when the design is nearly finalized. If there are many Stipples in the document, creating Graphic Styles may be useful.
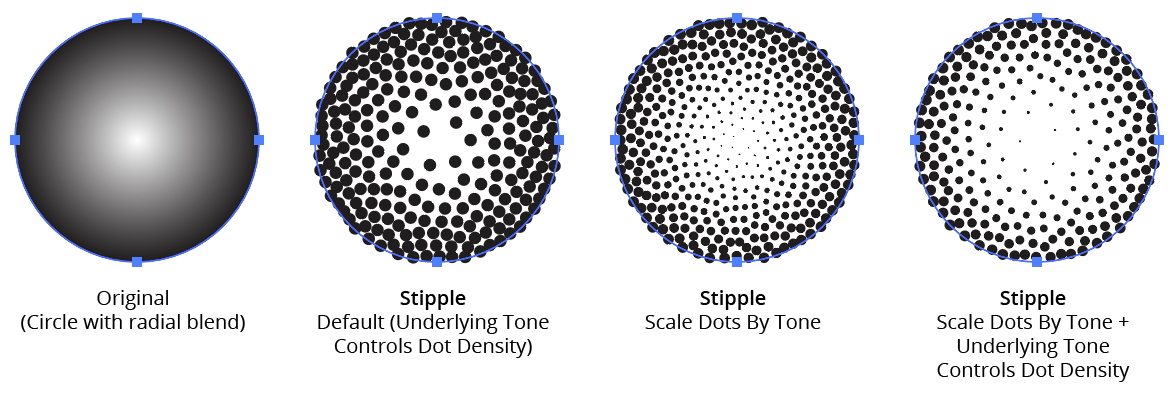
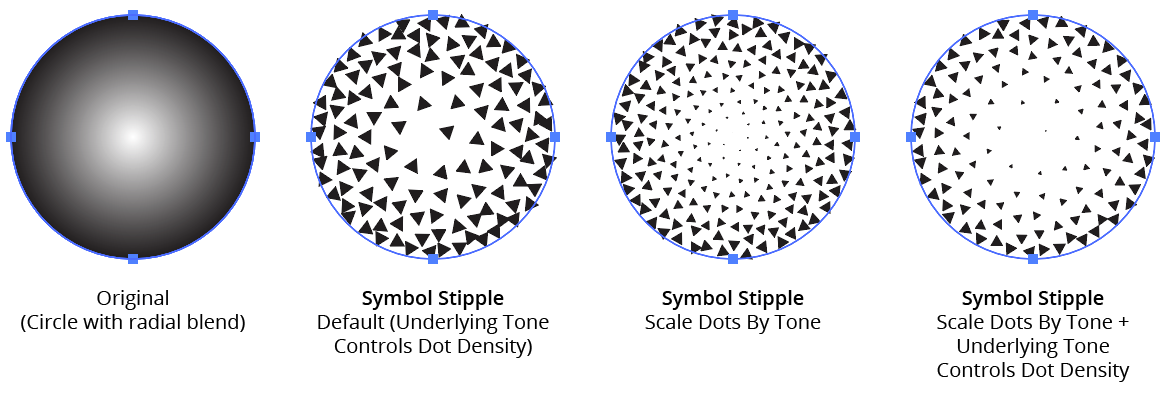
3. Underlying Tone Controls Dot Density
When enabled, the default, the lightness (tone) of the selected artwork controls the density of the generated dots, with lighter areas getting fewer dots. This underlying tone must control either the density of the dots or their size (or both), so when this setting is disabled, the Scale Dots By Tone setting will automatically be enabled.
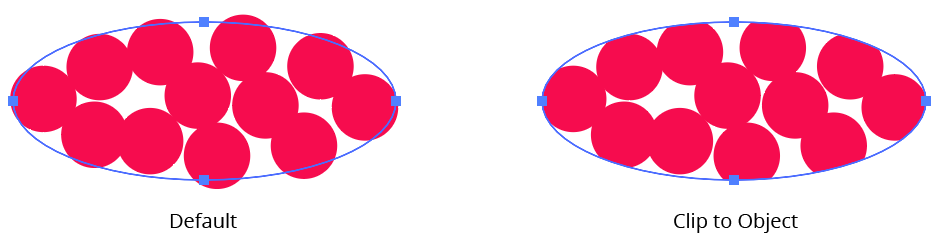
4. Clip to Object
When enabled, the outlines of the selected artwork (including those of strokes and prior effects) are used as a clipping mask for the generated dots, ensuring they do not protrude beyond these outlines.
Stipplism Clip to Object Example
5. Size
Controls the size (diameter) of the stipple dots; the default size is 6 pt / 2 mm. If Scale Dots by Tone is enabled, each dot’s size will be further modified by the curve applied.
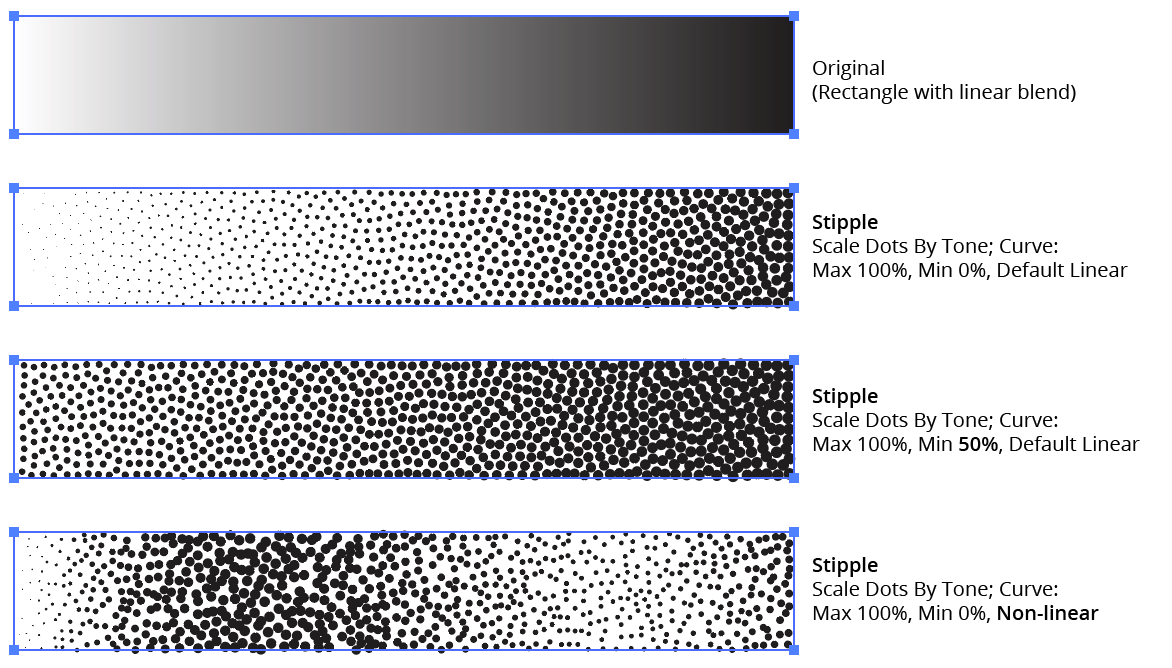
6. Scale Dots By Tone
Traditionally, stippling is made using dots which are the same size, with only the number of dots in any area (dot density) used to produce different gray levels. However, when this setting is enabled, Stipple will use the lightness (tone) of the artwork to control the size of the dots (relative to the specified Size), with a graph specifying the relationship between size and tone. Underlying Tone Controls Dot Density can enabled as well, in which case the tone will control both dot size and dot density. When this setting is disabled, the Underlying Tone Controls Dot Density setting will automatically be enabled, as the tone must control at least one or the other.
Stipplism Scale by Tone Example
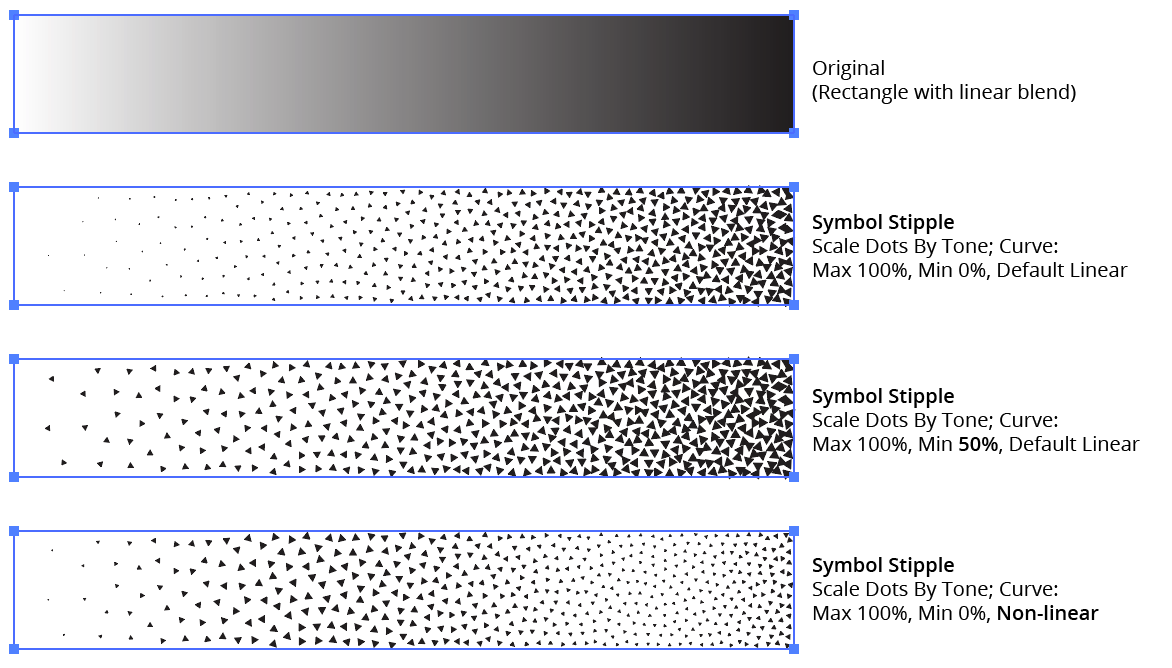
7. Graph Maximum Value
The factor by which the base Size is multiplied (from 0 to 1000%) to calculate the dot size for tone values where the graph curve is at the top.
8. Graph Minimum Value
The factor by which the base Size is multiplied (from 0 to 1000%) to calculate the dot size for tone values where the graph curve is at the bottom. This allows, for example, the ability to keep the dots from becoming too small by forcing them to start at a certain percentage of the base size.
9. Graph
Available when the Scale Dots By Tone setting is enabled. The graph controls the relationship of the scale of the dots (on the vertical axis) to the tone (the horizontal gradient ramp at the bottom of the graph). In its default state, a diagonal line represents a linear relationship. Points can be added along the line and freely moved on the grid. To delete a point, drag it outside of the grid. Clicking the gradient ramp under the graph with Shift held will reset the graph to the default linear type.
Stipplism Curve Examples
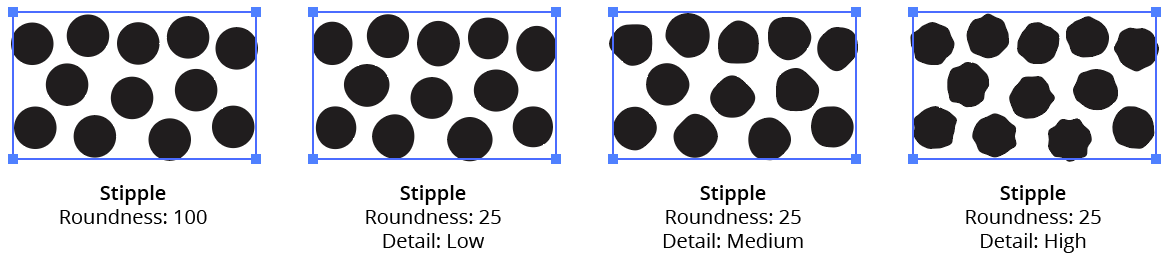
10. Roundness
By default, each stipple dot is a perfect circle, but the Roundness value can be lowered (with a minimum of zero) to make them more irregular. The smaller the Roundness value, the larger the displacement of each dot’s path will be from a true circle.
11. Detail
When Roundness is anything other than 100, the Detail dropdown menu is available. It allows a choice of four options: Low (the default), Medium, High, and Very High. Higher Detail creates more anchor points around the dot’s edge.
Stipplism Roundness and Details Example
12. Color
Specifies the color of the stipple dots. By default, this is set to a fixed value: black. Clicking the color chip will bring up the native Color Picker dialog, allowing a different color to be used.
13. Sample Object
When selected, the stipple dots will automatically pick up the underlying colors of the original artwork at each dot location. Because colors are sampled uniformly without regard to their lightness, the base density of the Stipple is calculated as if the object were totally black.
Stipplism Color Examples
14. Overprint
Specifies whether the stipple dots should be overprinted — that is, if Illustrator should still print all the non-shared inks behind the dots rather than cut holes under them (knockout). This is useful mainly in CMYK documents destined for print. The default value is enabled. Pure white dots will never be set to overprint, regardless of the setting.
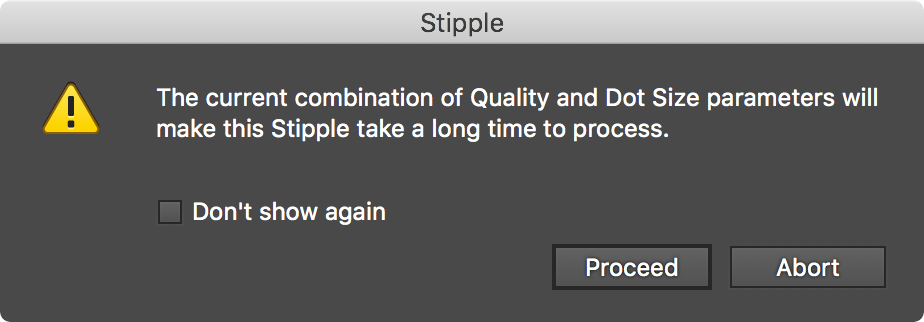
15. Ignore Slow Processing Warning
Using the effect with a small Size value and/or a high Density (i.e., high dot counts), especially combined with higher Quality values, will require long periods of time to calculate. When this is the case, by default a warning dialog will be displayed asking for confirmation to proceed. By enabling this setting, the specific Stipple to which it is applied will never show the warning dialog.
Stipplism Warning Dialog
16. Reset Warning button
The Slow Processing Warning dialog can be kept from being displayed again by enabling its Don’t show again checkbox. Thereafter, to re-enable the warning, use the Reset Warning button.
17. Preview
By default this option is disabled and not sticky, since the calculation of the Stipple effect can be slow when its settings are high. However, it can be made sticky by clicking with Option/Alt held down.
18. Dot Count
Available when Preview is enabled; shows the number of stipple dots that were generated with the current settings.
19. Help Button
Opens the help documentation in the Astute Manager. If this does not automatically appear, please ensure your Astute Manager is running first.
Illustrator Location:
Illustrator Main Menu > Effect > Stipplism > Symbol Stipple...
As with most live effects, Symbol Stipple appears in the main menu, at Effect > Stipplism > Symbol Stipple. It can also be applied directly from the Appearance panel using the “Add New Effect” button at the bottom of the panel.
Symbol Stipple Parameters Dialog
After applying the live effect using the menu item (or when clicking on the existing effect in the Appearance panel to edit it), the parameters dialog will appear:

Symbol Stipple Parameters Dialog
1. Seed
When dealing with symbols instead of simple round dots like the Stipple effect, positioning can matter more for the final look of the artwork. Each seed number leads to a different sequence of random values used to position the dots, some of which may produce nicer-looking results than others.
2. Randomize button
Each press of the Randomize button generates a new seed value, chosen at random.
3. Store/Recall buttons
The Store button records the current seed value; the Recall button will load the stored value back into the Seed field. When the dialog is first opened, the stored value is automatically set to the current seed.
4. Previous/Next Seed buttons
The dialog keeps track of all entered or generated seed values for the current session, and these buttons can be used to step through the history, both forwards and backwards. Once the dialog is OK’d or canceled, this history is cleared.
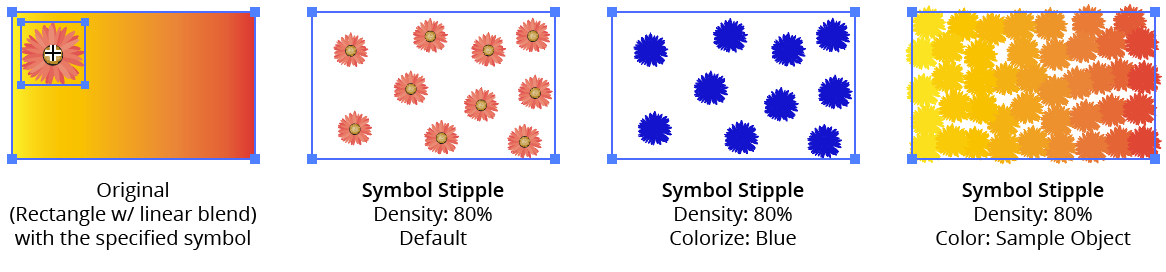
5. Density
Controls the overall density of the symbol dots (as a percentage of its full-strength value). The default value is 100%, but can vary between 0.01% and 10000%. Lower densities will result in fewer symbol dots. If the Preview option at the bottom is enabled, the number of dots will be displayed.
Symbol Stipple Density Example
6. Quality
Controls the uniformity of the stipple dots. Values can range between 1 and 11, with a default of 3. Higher values result in more uniform patterns (and take longer to calculate).
Symbol Stipple Quality Example
The range is not linear, but is based on a logarithmic scale. Each step up in Quality roughly doubles (or more) the amount of time required to create the dots. For example, 10,000 dots typically take less than 2 seconds to create at qualities of 4 or less, but 5 seconds at quality 6, 30 seconds at quality 9, and about 300 seconds at quality 11. Therefore, for Symbol Stipples with large numbers of dots, it’s recommended to start with a low Quality value and increase it later when the design is nearly finalized. If there are many Symbol Stipples in the document, creating Graphic Styles may be useful.
7. Underlying Tone Controls Dot Density
When enabled, the default, the lightness (tone) of the selected artwork controls the density of the generated dots, with lighter areas getting fewer dots. This underlying tone must control either the density of the dots or their size (or both), so when this setting is disabled, the Scale Dots By Tone setting will automatically be enabled.
8. Clip to Object
When enabled, the outlines of the selected artwork (including those of strokes and prior effects) are used as a clipping mask for the generated dots, ensuring they do not protrude beyond these outlines.
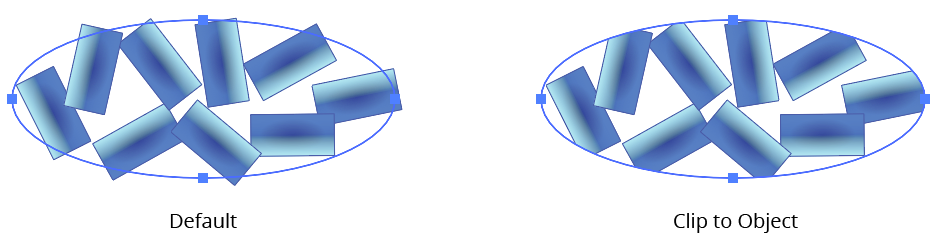
Symbol Stipple Clip to Object
9. Symbol
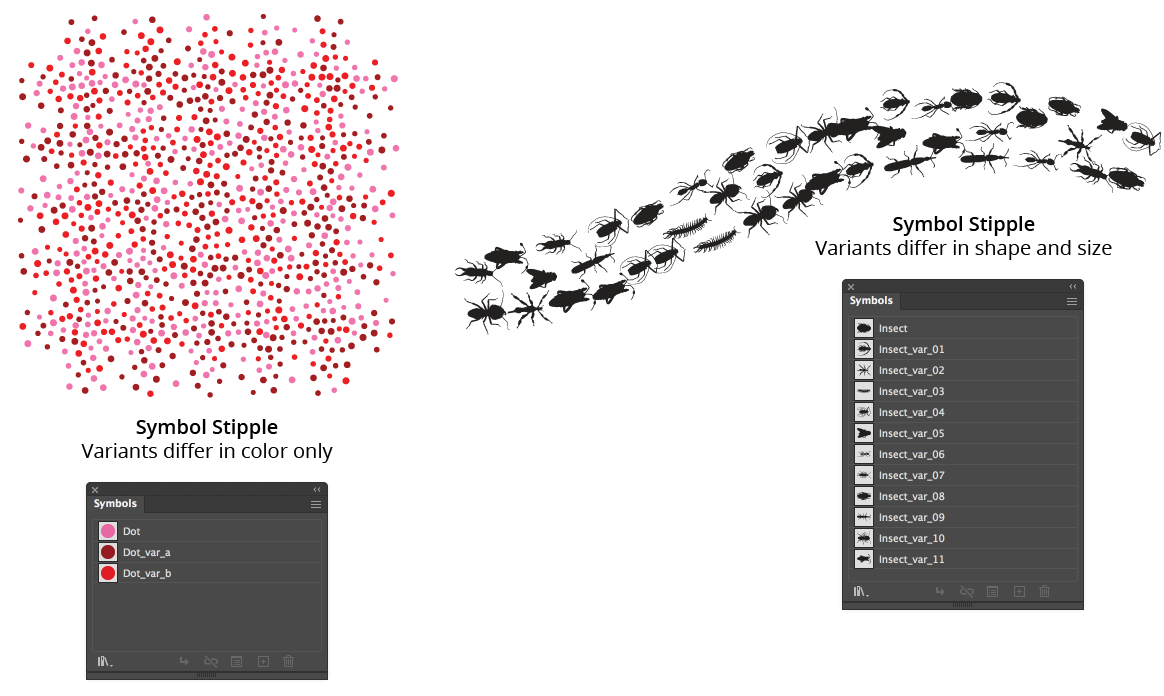
Specifies the symbol to be used as the stippling dot, from all the symbols available in the native Symbols panel. By default, the first symbol in the panel is used. If a document has no symbols at all, applying the effect won’t produce visible results, so at least one symbol should be created beforehand.
10. Include Variants
If the chosen symbol from the Symbol dropdown list has “variants,” this setting (enabled by default) allows them to be used in addition to the base symbol. The variants must have been created before applying the Symbol Stipple effect to the artwork. See below for information on variants and how to create them. The number of variants found will be displayed in parentheses.
11. Use Registration Point
When creating a symbol, Illustrator allows a registration point to be set for it, using a standard nine-block grid control. It can be treated as a pivot used for rotating a symbol and as the center of its coordinates. When Use Registration Point is disabled, Symbol Stipple assumes the pivot of the symbol is at its geometric center. When enabled, the effect treats the registration point as the pivot.
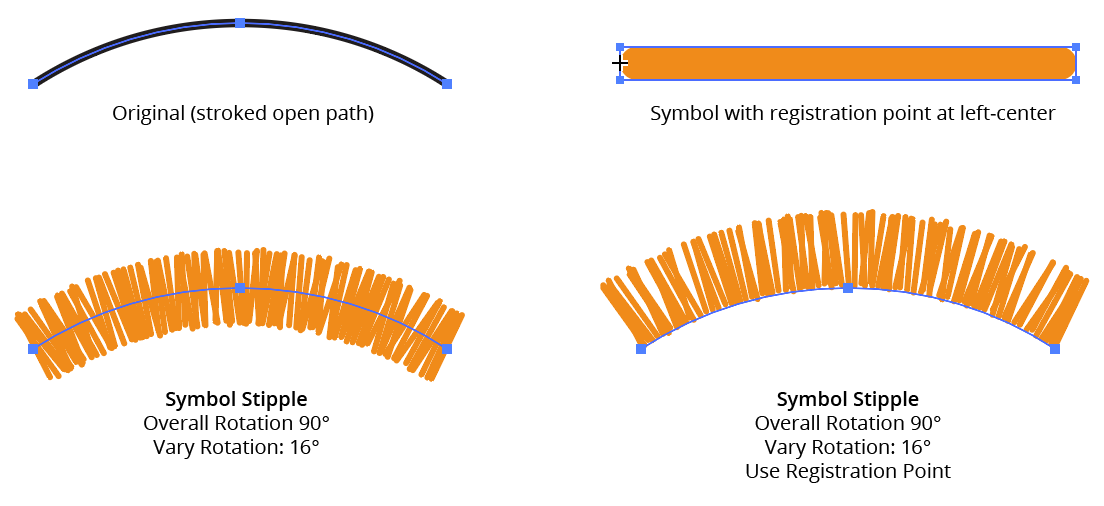
Symbol Stipple Use Registration Point
12. Overall Scale
Specifies the scale value for all of the symbol dots, relative to the original size of the chosen symbol (or its variants). The default value is 100%. If Scale Dots by Tone is enabled, each dot’s size will be further modified by the curve applied.
13. Vary Scale
When enabled, the Vary Scale value sets the factor which will be used to randomly scale each symbol dot in either the up or down direction. For example, if it is set to 4, each symbol dot will be randomly scaled in the range of 25% (one-quarter) to 400% (four times) the Overall Scale value.
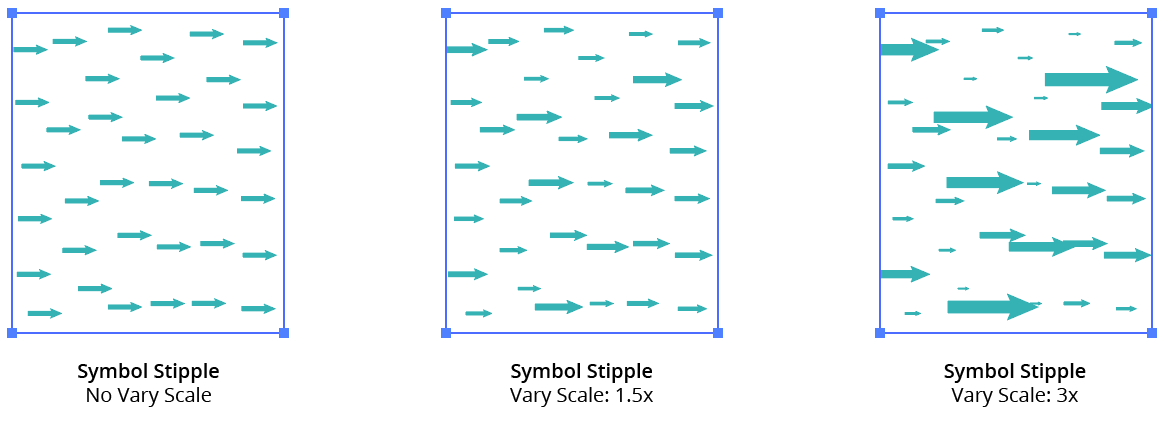
Symbol Stipple Vary Scale
14. Overall Rotation
Specifies the angle to which all the symbol dots are rotated. The default value is 0° (no rotation).
15. Vary Rotation
When enabled, the Vary Rotation value defines a range through which the symbol dots will be randomly rotated, in addition to the base Overall Rotation value. For example, if set to 90°, each symbol dot will be rotated to the Overall Rotation value, and then randomly rotated an additional amount from –45° to +45°. The default value is 360°, which means symbol dots would be rotated randomly to any angle.
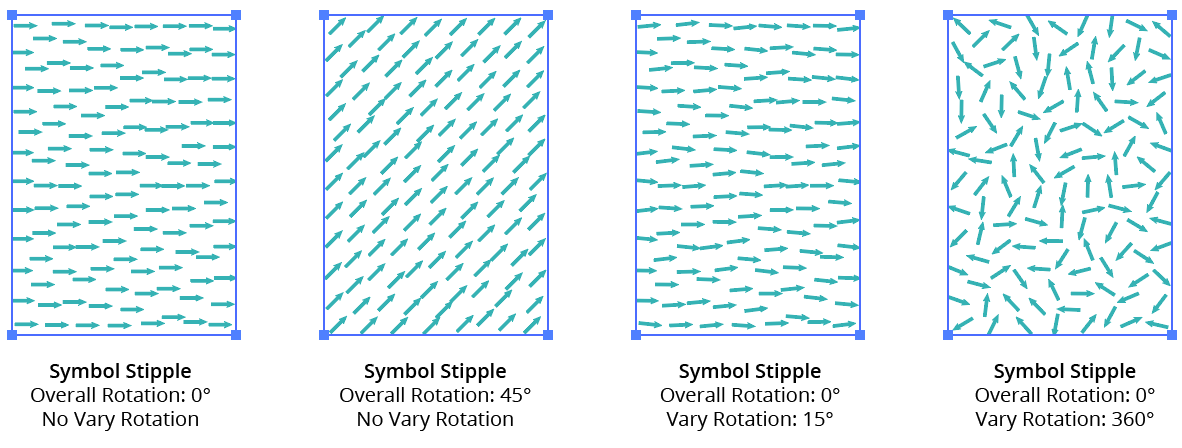
Symbol Stipple Vary Rotation
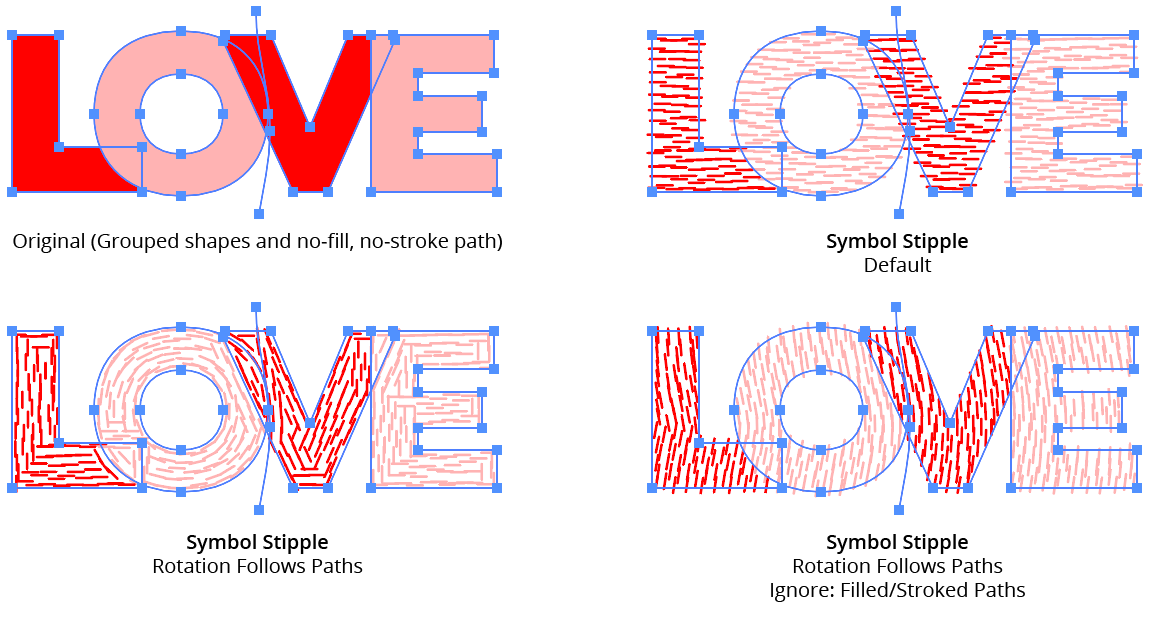
16. Rotation Follows Paths
When enabled, the effect rotates each symbol dot to the tangent angle of the nearest spot on the nearest path in the artwork (when possible) before adding the Overall Rotation and Vary Rotation values. The absolute distance from the artwork to the path is not important.
17. Ignore
When Rotation Follows Paths is enabled, this setting allows certain paths to be ignored when determining the rotation. The two options are Ignore Largest Path (valid when there is more than one path, and measured using bounding box area) and Ignore Filled/Stroked Paths. The latter is useful when applying Symbol Stipple to a group of multiple paths because the symbols’ rotation can be controlled by putting no-stroke, no-fill paths anywhere in the group.
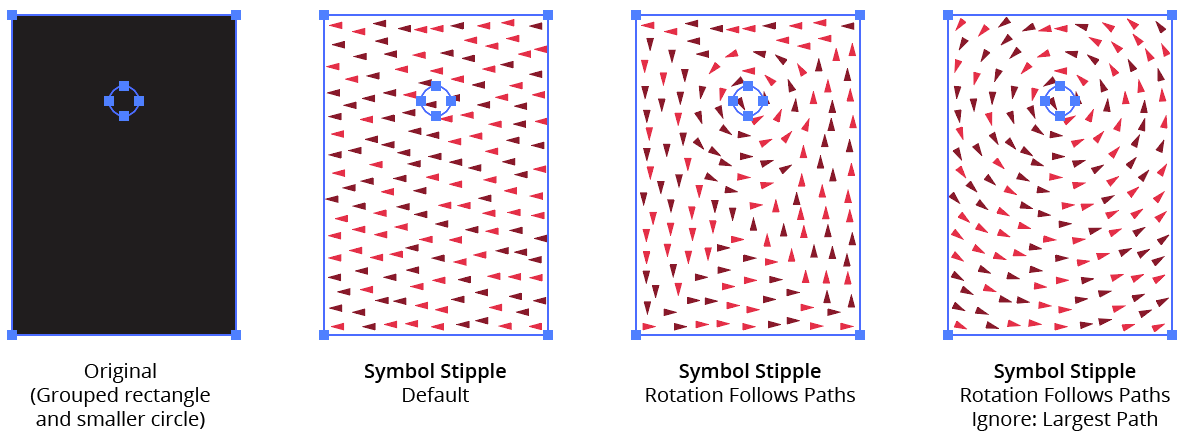
Symbol Stipple Follows Example 1
Symbol Stipple Follow Paths Example 2
18. Colorize
Allows the color of the generated symbol dots to be changed. When enabled and set to the color chip (which can be clicked to bring up the native Color Picker dialog), the specified color is used, replacing those used in all fills and strokes inside the chosen symbol (and, when applicable, its variants). If Sample Object is instead enabled, the symbol dots will automatically pick up the underlying colors of the original artwork at each dot location, again replacing those used in all fills and strokes inside the chosen symbol and variants. Because colors are sampled uniformly without regard to their lightness, when using Sample Object the base density of the Symbol Stipple is calculated as if the object were totally black.
Symbol Stipple Colorize Example
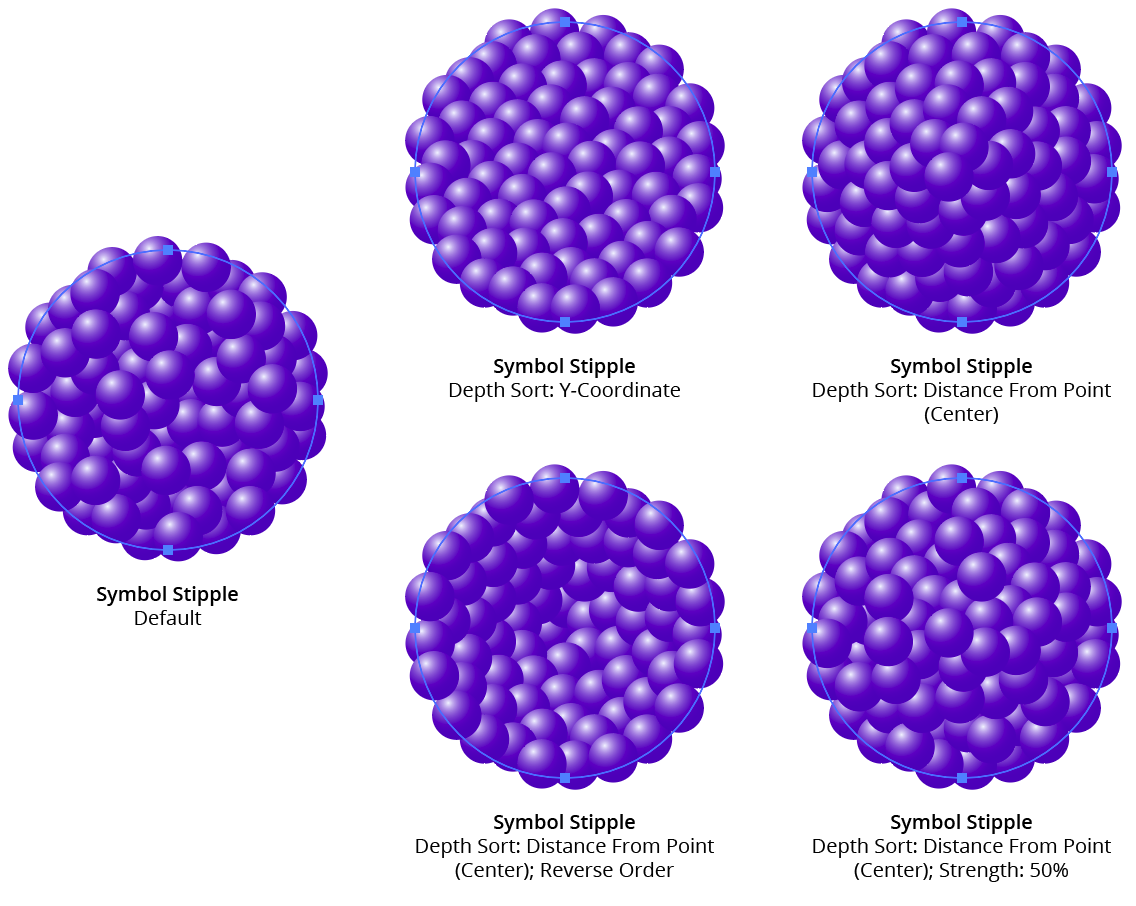
19. Depth Sort
When enabled, changes the stacking order of the generated symbol dots. Dots can be sorted by their X-coordinate, their Y-coordinate, or their distance from a certain point on the artwork bounds. The last option uses the standard nine-point grid control to pick the point location.
20. Strength
Available when Depth Sort is enabled. The lower the Strength value, the less strict is the sorting, and the more randomness is introduced into the stacking order.
21. Reverse Order
Available when Depth Sort is enabled; it reverses the normal stacking order.
Symbol Stipple Available when Depth Sort is enabled
22. Scale Dots By Tone
Traditionally, stippling is made using dots which are the same size, with only the number of dots in any area (dot density) used to produce different gray levels. However, when this setting is enabled, Symbol Stipple will use the lightness (tone) of the artwork to control the size of the dots (relative to the specified Size), with a graph specifying the relationship between size and tone. Underlying Tone Controls Dot Density can enabled as well, in which case the tone will control both dot size and dot density. When this setting is disabled, the Underlying Tone Controls Dot Density setting will automatically be enabled, as the tone must control at least one or the other.
Symbol Stipple Scale by Tone Example
23. Graph Maximum Value
The factor by which the base Size is multiplied (from 0 to 1000%) to calculate the dot size for tone values where the graph curve is at the top.
24. Graph Minimum Value
The factor by which the base Size is multiplied (from 0 to 1000%) to calculate the dot size for tone values where the graph curve is at the bottom. This allows, for example, the ability to keep the dots from becoming too small by forcing them to start at a certain percentage of the base size.
25. Graph
Available when the Scale Dots By Tone setting is enabled. The graph controls the relationship of the scale of the dots (on the vertical axis) to the tone (the horizontal gradient ramp at the bottom of the graph). In its default state, a diagonal line represents a linear relationship. Points can be added along the line and freely moved on the grid. To delete a point, drag it outside of the grid. Clicking the gradient ramp under the graph with Shift held will reset the graph to the default linear type.
Symbol Stipple Curve Examples
26. Ignore Slow Processing Warning
Using the effect with a small Size value and/or a high Density (i.e., high dot counts), especially combined with higher Quality values, will require long periods of time to calculate. When this is the case, by default a warning dialog will be displayed asking for confirmation to proceed. By enabling this setting, the specific Symbol Stipple to which it is applied will never show the warning dialog.

Symbol Stipple - Ignore Slow Processor Warning
27. Reset Warning button
The Slow Processing Warning dialog can be kept from being displayed again by enabling its Don’t show again checkbox. Thereafter, to re-enable the warning, use the Reset Warning button.
28. Preview
By default this option is disabled and not sticky, since the calculation of the Symbol Stipple effect can be slow when its settings are high. However, it can be made sticky by clicking with Option/Alt held down.
29. Dot Count
Available when Preview is enabled; shows the number of symbol dots that were generated with the current settings.
30. Tips Button
Displays a dialog summarizing how to use symbol variants, including an explanation of naming conventions (see Symbol Stipple Symbol Variants).
31. Help Button
Opens the help documentation in the Astute Manager. If this does not automatically appear, please ensure your Astute Manager is running first.
Illustrator Location:
Illustrator Main Menu > Effect > Stipplism > Symbol Stipple...
Symbol Variants: Automated creation
1. Create the base symbol first. Due to internal limitations, automatically-created variants are always created as Static Type symbols, so it is best to also use the Static Type symbol when creating the base symbol, because otherwise they may react differently to scaling when the general preference Scale Strokes & Effects is disabled.
2. Create other artwork which will be used as the variants. These may be similar to the base symbol (such as just having a different color), but they may also be completely different. If a variant is composed of more than one object, the objects need to be grouped.
3. With the artwork selected, choose Object > Create Symbol Variants... from the main menu to display the Create Symbol Variants dialog.
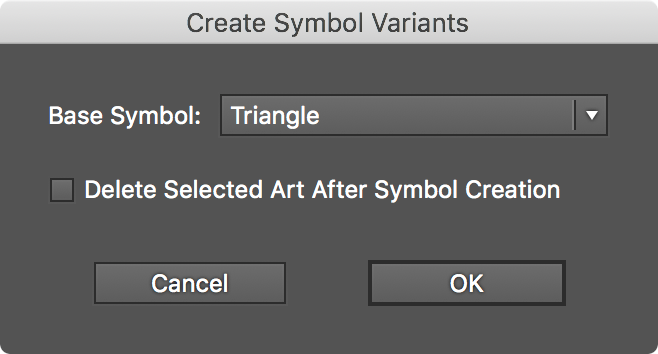
Symbol Stipple Create symbol variants
4. Pick a symbol to use as the base symbol from the dropdown list.
5. Enable Delete Selected Art After Symbol Creation if you don’t want the original objects to be retained on the artboard. Note that the retained artwork won’t be replaced with their respective newly-created symbols they way Illustrator does when a symbol is created manually.
6. Click OK to finish.
To see the result, open the native Symbols panel. If the symbol names are not visible, from its flyout menu choose either the Small List View or Large List View menu item.
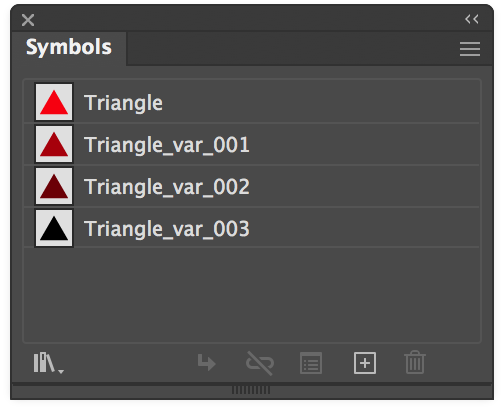
Symbol Stipple Variant Examples
The chosen objects are added as symbols, but with special names assigned. For example, given a base symbol name of Triangle, its symbol variants would have names like these:
Triangle_var_001Triangle_var_002Triangle_var_003
Symbol Variants: Manual creation
The special _var[string]_ suffix, added to the base name, is the sole determinant of whether a symbol is considered a variant or not. Therefore, symbols can be named manually using this pattern to turn them into variants. The Tab key can be used to quickly rename symbols in succession. While the automated method of variant creation uses a three-digit number that increments as the string following the _var_ suffix, it need not be a number; it can be any unique identifying name. So the following names would also be equally valid:
Triangle_var_darkerTriangle_var_verydarkTriangle_var_black
Symbol Variants: Usage
To use symbol variants in addition to the base symbol in Symbol Stipple, simply enable the Use Variants checkbox in the parameters dialog. Note that only base symbols will appear in the list of available symbols, so variants can’t be used independently. If a symbol has no detected variants, the checkbox will not be available. For each symbol dot, either the base symbol or one of its variants are chosen at random with equal frequency, unless additional naming options have been used to specify the frequency (see below).
Symbol Stipple Variant Examples Follow Path
Symbol Variants: Additional Options
Additional naming syntax allows more control over the look and distribution of symbol variants when used within Symbol Stipple. Each of the suffixes below can be added to a variant symbol’s name to achieve the corresponding result.
=ns means the variant should not be scaled (by either the Overall Scale or Vary Scale values).
=nr means the variant should not be rotated (by either the Overall Rotation or Vary Rotation values, or through the Rotation Follows Paths option).
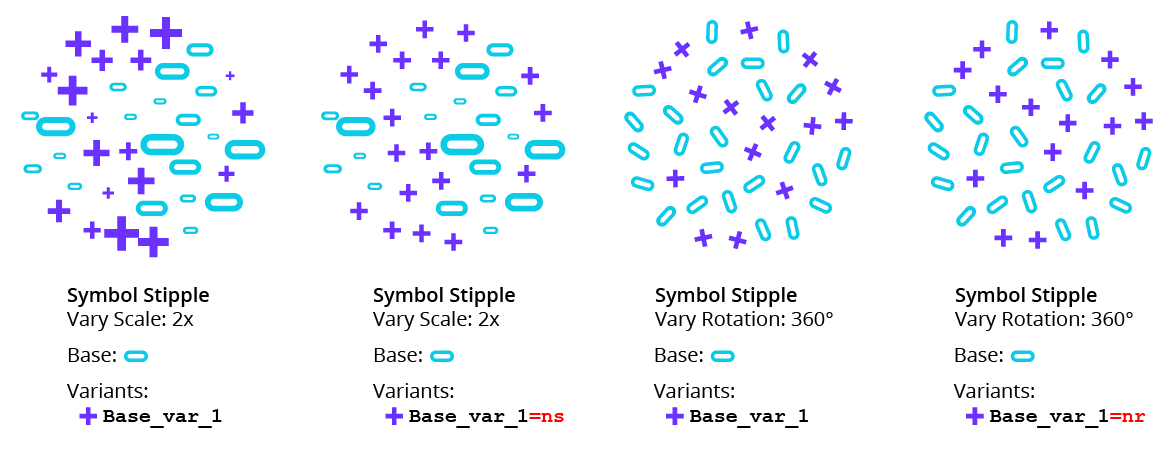
Symbol Stipple No Scale and No Rotate Variant Options Example
=u marks the variant as unique, meaning it can be used once, at most. More than one variant can be marked as unique.
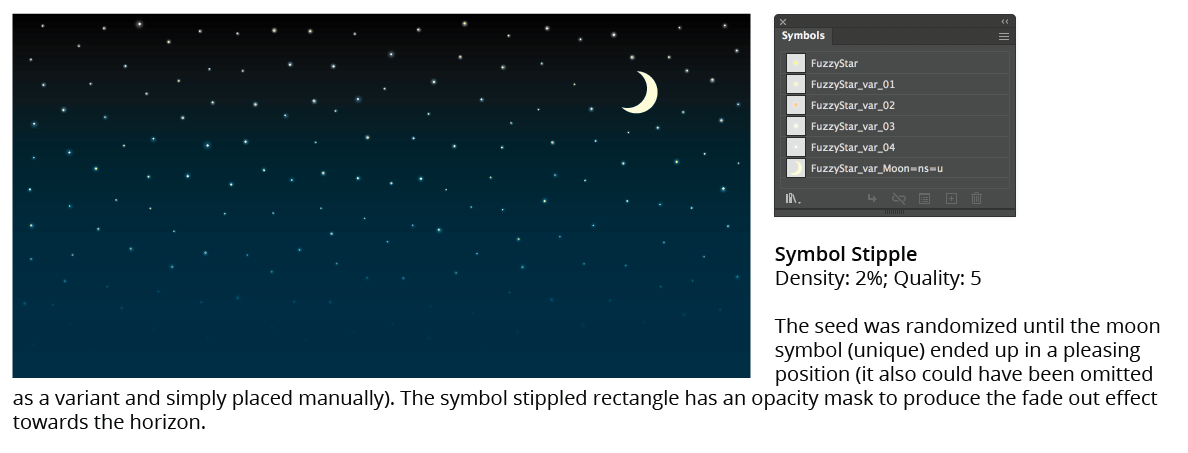
Symbol Stipple Unique Variant Examples
=xx (where xx is a two-digit number between 01 and 99) means the variant will be used with this specified frequency, represented as a percentage (normally, each variant along with the base symbol is used with equal frequency). The sum of the frequencies of all such specified variants cannot exceed 99, with the base symbol and non-frequency-specified variants sharing the balance of the frequency value to bring it to 100%. Note that just as flipping a fair coin one hundred times does not always result in exactly fifty heads and fifty tails, a specific frequency value does not guarantee that the variant will be represented with that exact value in the final dot distribution, especially if the number of dots is low.
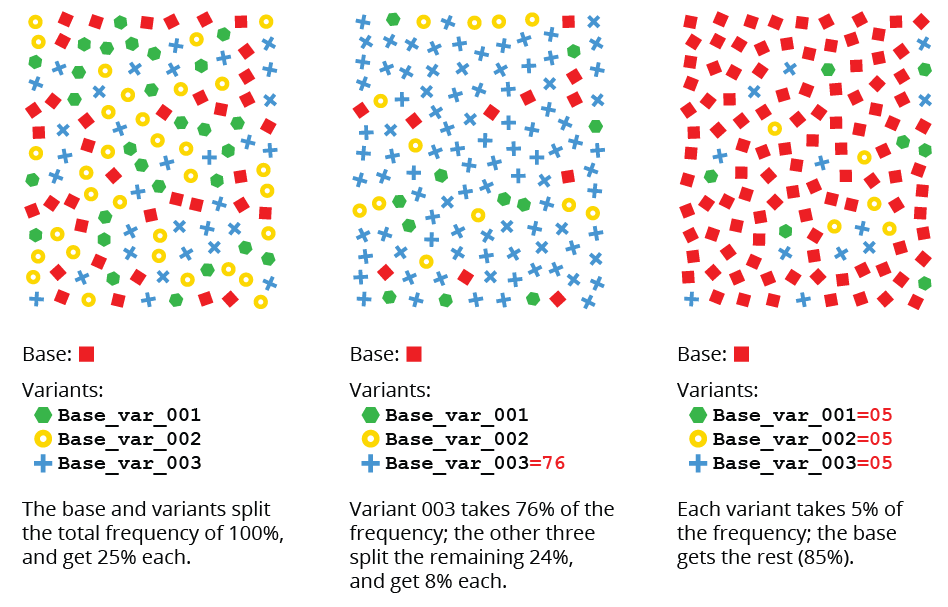
Symbol Variant Frequency Examples
If a variant name is changed after the Symbol Stipple is created, the live effect will not be updated until its parameters dialog is opened.