 AG Block Shadow Tool
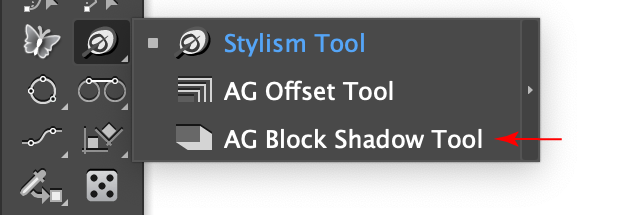
The AG Block Shadow tool appears in Illustrator’s main toolbar (which must be in Advanced mode: View > Toolbars > Advanced), stacked under the Stylism tool. As with other stacked tools, click and hold on the top tool icon to display the tools stacked under it.

AG Block Shadow Tool Location
The AG Block Shadow tool’s cursor is a crosshair, except when previewing a new shadow or adjusting an existing shadow, in which case it appears as an arrowhead with a shadow:

AG Block Shadow Tool Cursors
AG Block Shadow Tool Operations
As the AG Block Shadow tool has several keypresses for certain operations, we suggest installing the free Astute Graphics plugin Astute Buddy, which creates a panel that dynamically updates to inform you of the various keys which can be pressed in the tool’s current context.
The AG Block Shadow tool is works in conjunction with the associated AG Block Shadow panel, which generally should be open and accessible. If you are using the free Astute Graphics plugin DirectPrefs, you can have the AG Block Shadow panel automatically be shown when the AG Block Shadow tool is selected.
The AG Block Shadow tool offers a graphical method for both adding and editing AG Block Shadow live effects.
Adding New Block Shadows
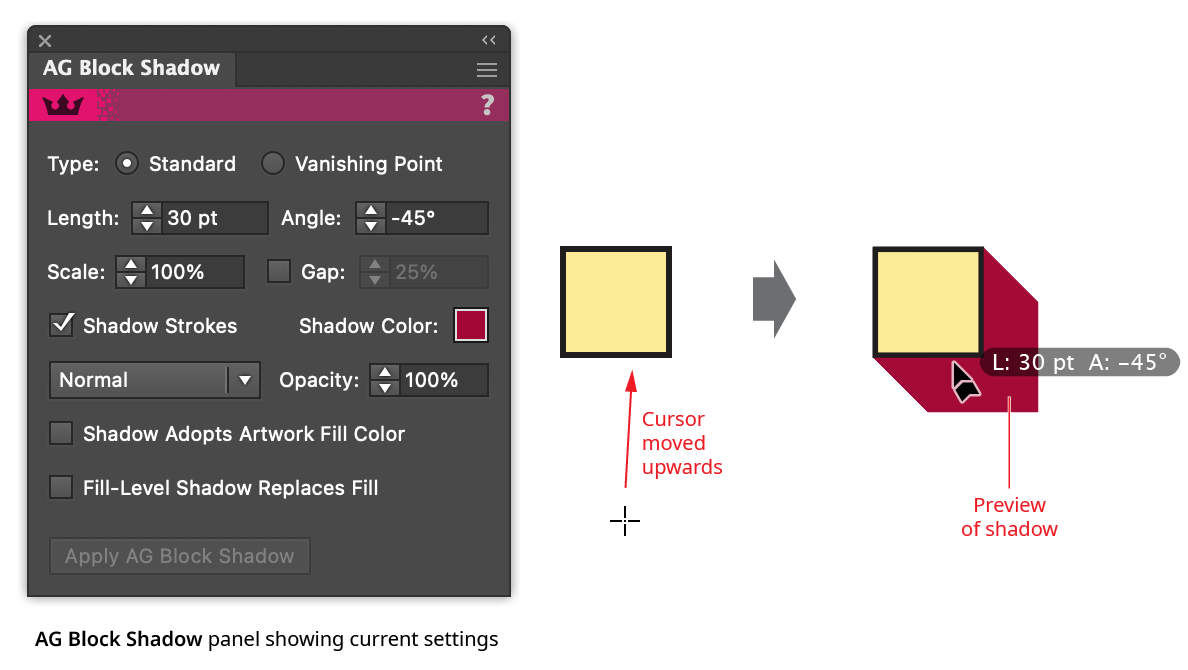
When the tool is hovered close to or over an art object that can accept an AG Block Shadow effect (but does not currently have one), it will automatically preview the shadow as it would generally appear using the current panel parameters. The art does not need to be selected. The type of preview depends on the tool preference settings. The default preview is a full one, showing the solid fill of the shadow in the specified color (however, the preview will not show gradients or patterns when the object has such a fill and the preference Shadow Adopts Artwork Fill Color is enabled). Previews are based on the shape of the base artwork, and will not reflect any existing live effects that might change that shape.

AG Block Shadow Tool Preview
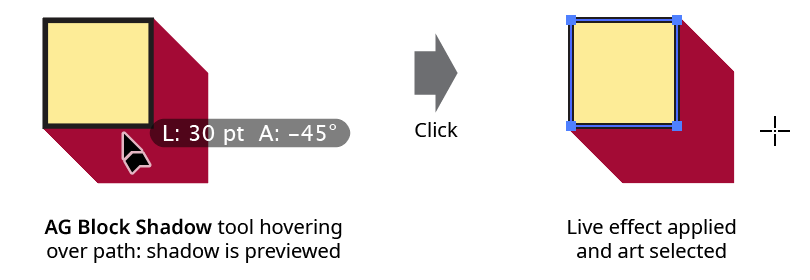
By default, annotated text by the cursor will show the shadow’s length (abbreviated as “L:”), angle (as “A:”), and scale (as “S:”; omitted if it is set to the default 100%); if the shadow is a Vanishing Point type shadow, the vanishing point’s coordinates are annotated in place of its length and angle. These annotations can be temporarily hidden by holding down the Option/Alt key. Clicking will add the block shadow to the art object (always placing the live effect below all strokes and fills in the object’s appearance), or the shadow can be dragged first to adjust it in the same way an existing block shadow would be edited (see Editing Existing Block Shadows).

AG Block Shadow Tool Click Apply
Because the AG Block Shadow tool creates previews of shadows for any artwork it is over, selected or not, care should be taken not to pass it inadvertently over unlocked artwork with high numbers of path segments, such as large blocks of text or objects with Phantasm Halftone or Stipple effects, because calculating the shadow for these objects can take some time. In addition to keeping such art on locked layers, the preference Auto Switch To Fast Preview can help (see AG Block Shadow: Preferences).
Editing Existing Block Shadows
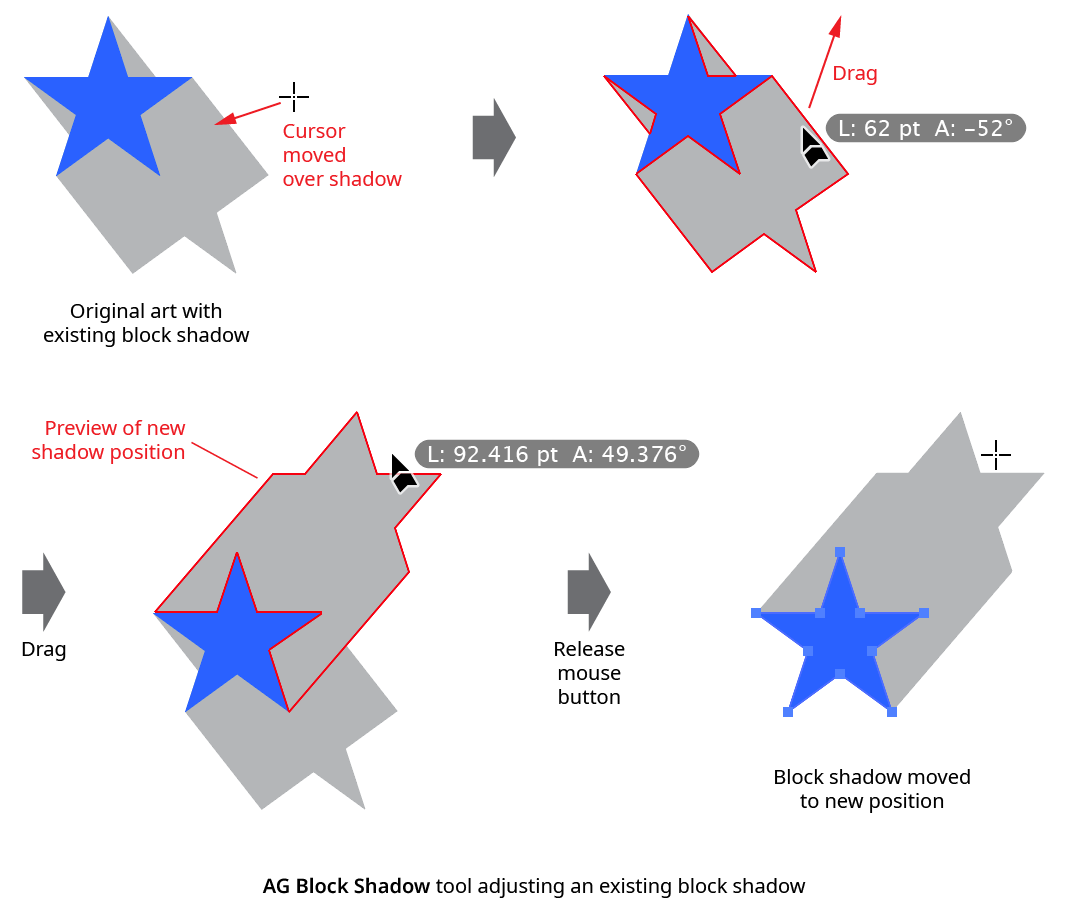
When the tool is hovered close to or over an existing block shadow, it can be edited with the tool. By default, a wireframe preview of the shadow will be added when the cursor is above it (and the cursor will show the length/angle/scale annotations, unless these have been disabled). Dragging the shadow will allow its length and angle to be changed.
If the shadow is of Vanishing Point type, the vanishing point will be annotated by a crosshair icon, which can be repositioned by dragging it (dragging the shadow itself also moves the vanishing point, and the shadow’s movement may not match the cursor’s). If at least one object with a Vanishing Point type shadow is selected, the tool may be Shift+Option/Alt-clicked to immediately move the vanishing point(s) to the clicked location. If multiple Vanishing Point type shadows are selected, the new location applies to all the shadows, regardless of the state of the Link Shadow Vanishing Points preference.

AG Block Shadow Tool Drag Edit
When the preference Edit Existing Shadows Using Original Position is enabled (the default), then a Standard type shadow is moved relative to its original position rather than being reset to zero length before being dragged.
While dragging to edit a shadow, a number of keypresses may be used:
Shift: Constrains the angle of the shadow to 45° increments around the general constrain angle (for Standard type shadows); or constrains the movement of the vanishing point to 45° increments around the general constrain angle (for Vanishing Point type shadows).
Option/Alt: For Standard type shadows, constrains the length to integer values.
Up Arrow/Down Arrow: Changes the Scale parameter by the increment value specified in the preferences (1%, by default).
Left Arrow/Right Arrow: Changes the Gap parameter by the increment value specified in the preferences (1%, by default).
1: Sets the scale to 100%.
2: Sets the scale to 200%.
5: Sets the scale to 50%.
7: Sets the scale to 75%.
0: Sets the scale to 0%.
A: Toggles on and off the tool’s cursor annotation (length, angle, and scale values).
C: Changes the wireframe color, cycling through red, blue, magenta, green, black and grey.
D: Sets the shadow to its default parameters (Standard type, 100% scale, no gap, black color, Shadow Strokes enabled; the length and angle are dependent on where the cursor is located).
G: Toggles the Gap parameter on and off.
Q: Switches the shadow preview type between Full, Wireframe, and Fast Wireframe (see AG Block Shadow: Preferences).
S: Toggles the Shadow Strokes parameter.
U: Temporarily disables Smart Guides, if they were enabled when the drag started.
X: Toggles detach mode. When true, the cursor shows a dotted line between the arrowhead and the shadow, and the shadow will be added but then immediately detached after the mouse button is released, essentially creating it as editable artwork rather than as a live effect.
The AG Block Shadow tool works on a single shadow at a time (except potentially when moving a vanishing point and the preference Link Shadow Vanishing Points is enabled), and at the highest group level. In other words, if an object is given a block shadow, and then grouped with another object, then normally the tool will not be able to edit the block shadow that is inside the group, but will instead offer to add a new block shadow at the group level. To edit the inner shadow, either isolate the grouped object (in which case the tool can be used) or edit the shadow numerically using the panel. To edit multiple shadows simultaneously, use the panel.
