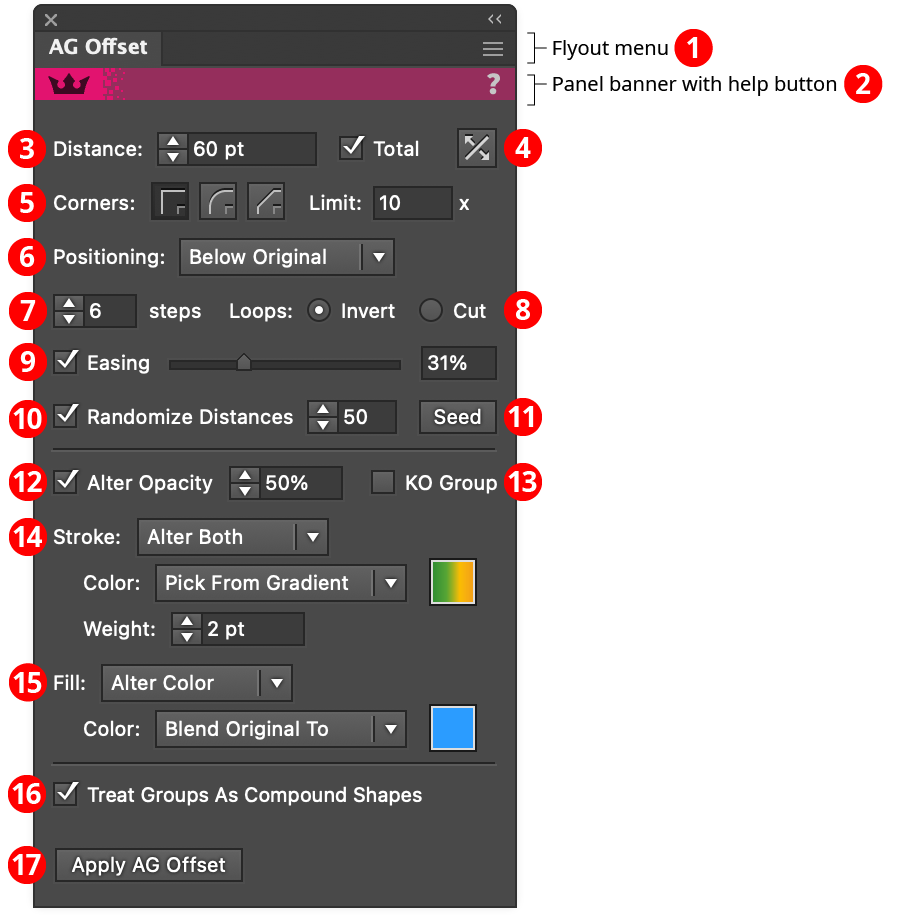
 AG Offset Panel
The AG Offset live effect does not have a modal parameters dialog, but is instead edited using either the AG Offset tool (for many parameters) or its panel (for complete control over all its parameters). The AG Offset panel can be shown and hidden using the menu item found in the main menu at Window > Astute Graphics > AG Offset. When at least one selected object has the AG Offset live effect applied, the panel controls will update to reflect the parameters of those effects, which can then be edited. A value field which is blank or (for checkboxes) with a dash indicates that the parameter has different values in the selection. These can be unified (made the same) by entering a new value.
AG Offset Panel
1. Flyout menu
See AG Offset Panel: Flyout Menu.
2. Panel banner
The help button on the right opens the help documentation in the Astute Manager. If this does not automatically appear, please ensure your Astute Manager is running first.
3. Distance
Specifies the base offset distance. When more than one offset is being created (i.e., the number of Steps is set to 2 or higher), the Total checkbox controls whether the value represents the total of all offsets or the value of each offset. Easing and Randomize Distance, if enabled, will affect the final actual offset distances. Positive values represent outwards offsets (for closed paths); or offsets to the righthand side of the path (for open paths, in relation to the direction of the path).
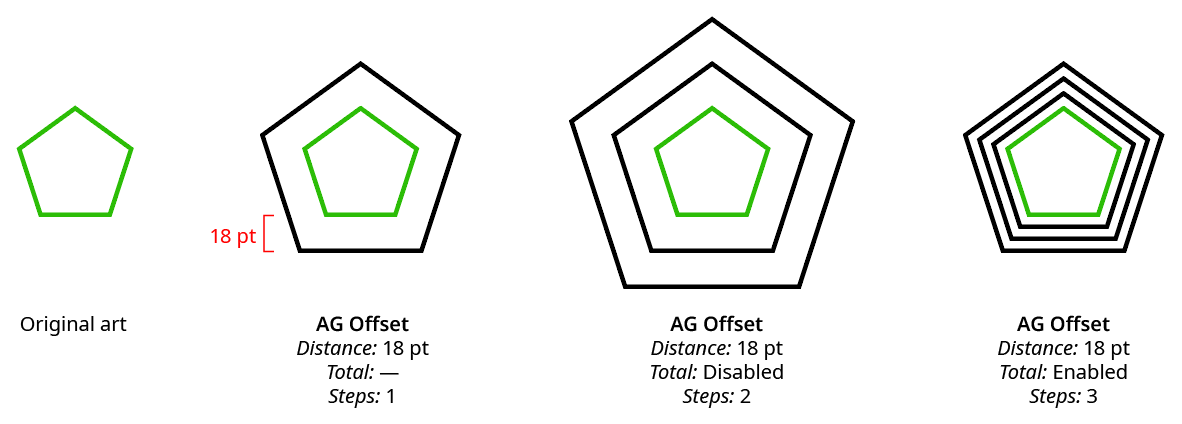
AG Offset Distance Example
4. Both Sides Button
When toggled to the enabled state (dark), the path(s) will be offset both inwards and outwards.
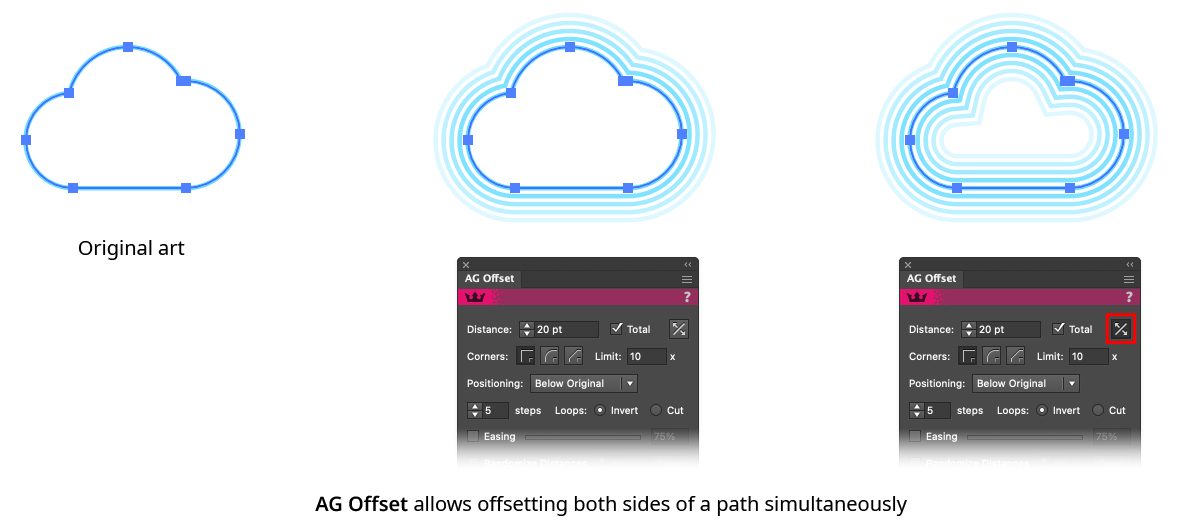
AG Offset Both Sides Example
5. Corner Type
The type of corner to use when offset outwards from a sharp corner on a path, from among the three standard Illustrator corner types (Mitered, Rounded, and Beveled). When set to Mitered, the Miter Limit may be specified.
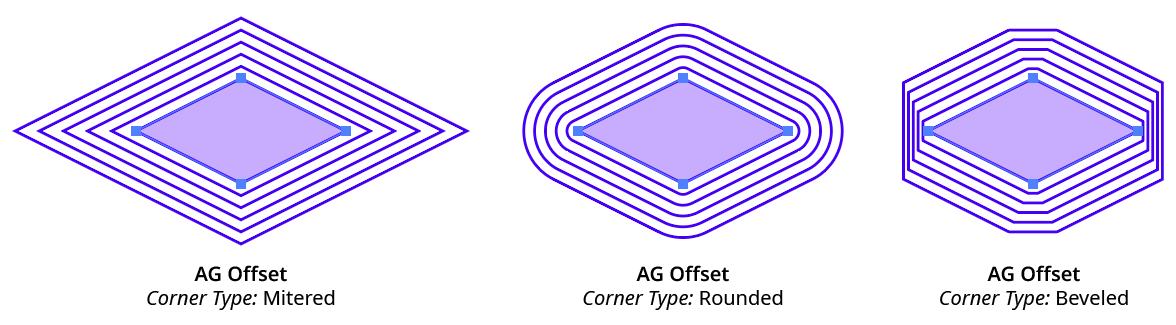
AG Offset Corner Types
6. Positioning
Specifies the position of the offset paths in relation to the original path, from among Above Original, Replace Original, or Below Original.
7. Steps
The number of offsets to make, from 1 to 999 (if the Both Sides setting is enabled, the value applies to each side independently).
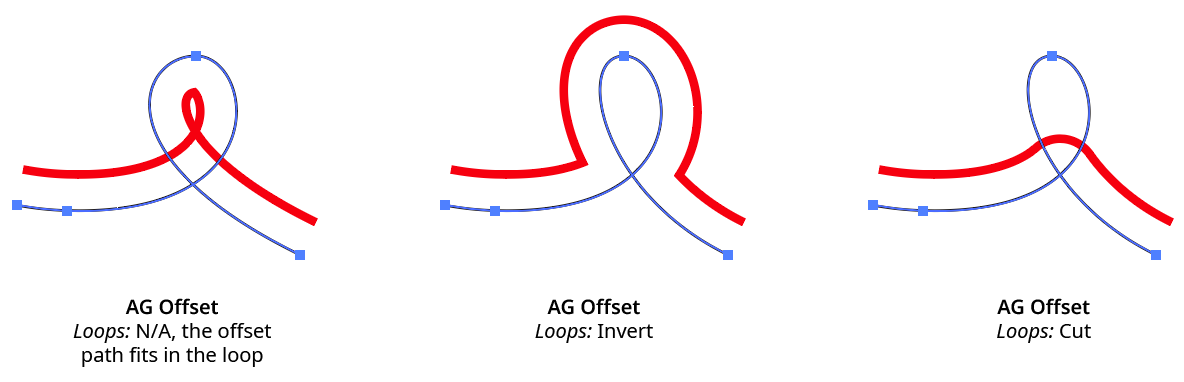
8. Loops
This setting is only applicable when there are loops in open paths into which the offset path cannot fit. It specifies the method used to deal with such loops. The default value is Invert, where the offset path runs on the opposite side of the loop, but can be changed to Cut, in which case the loop is “cut” from the path, essentially ignoring it.
AG Offset Loop Handling
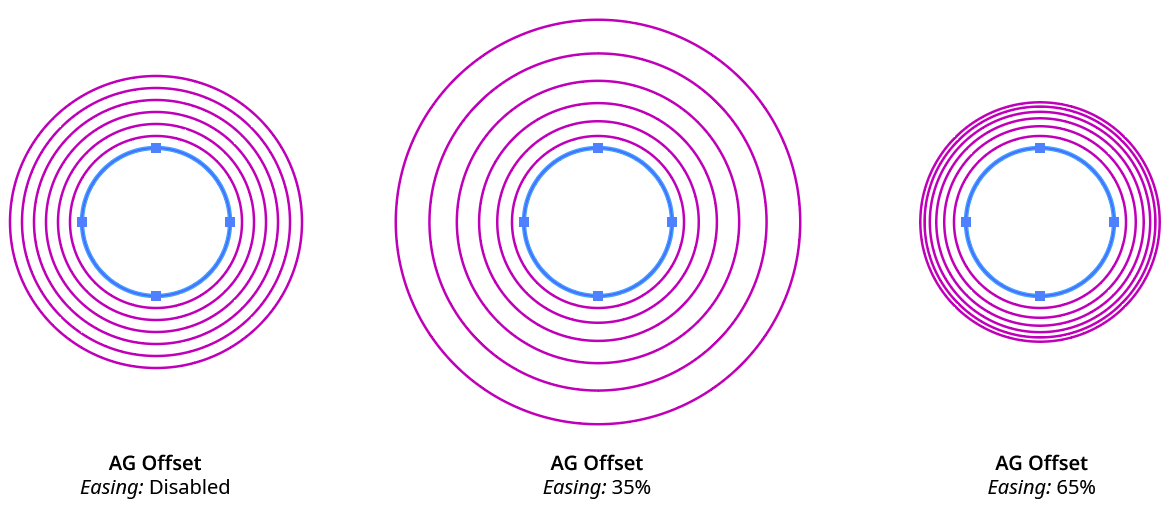
9. Easing
When multiple steps are used, Easing causes them to become progressively larger (for values less than 50%) or progressively smaller (for values larger than 50%). In both cases, the Distance value applies to the first offset only.
AG Offset Easing Example
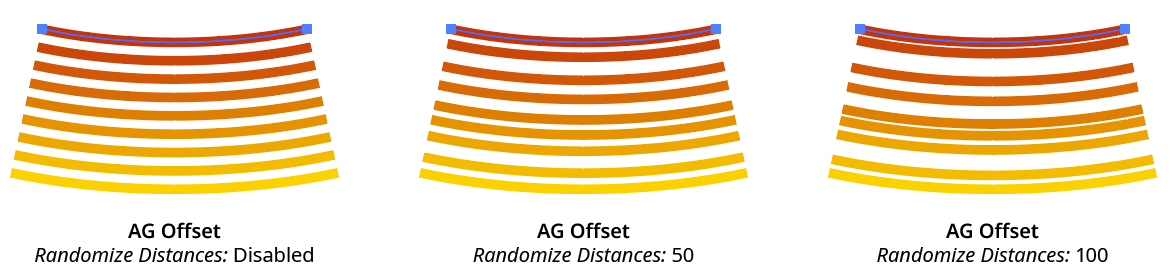
10. Randomize Distances
When enabled, distances between multiple offsets are randomly changed. The specified value (from 1 to 100) controls how much variation is allowed, where 100 is maximum variation.
AG Offset Randomize Example
11. Seed
Each random seed number leads to a different sequence of random values. Clicking the button picks a new seed, thereby changing the look of the artwork. To view or specify the seed number directly, Option/Alt-click the button. This lets you recreate a previously-generated look.
12. Alter Opacity
When enabled, the opacity of the offset path is changed to the specified value. If multiple offsets are being used, their opacities are linearly blended between the opacity of the original art and the specified value. For example, if the original art had 100% opacity and the Alter Opacity value was set to 50%, and Steps was set to 4, then the offset paths would have opacities of 88%, 75%, 63%, and 50%.
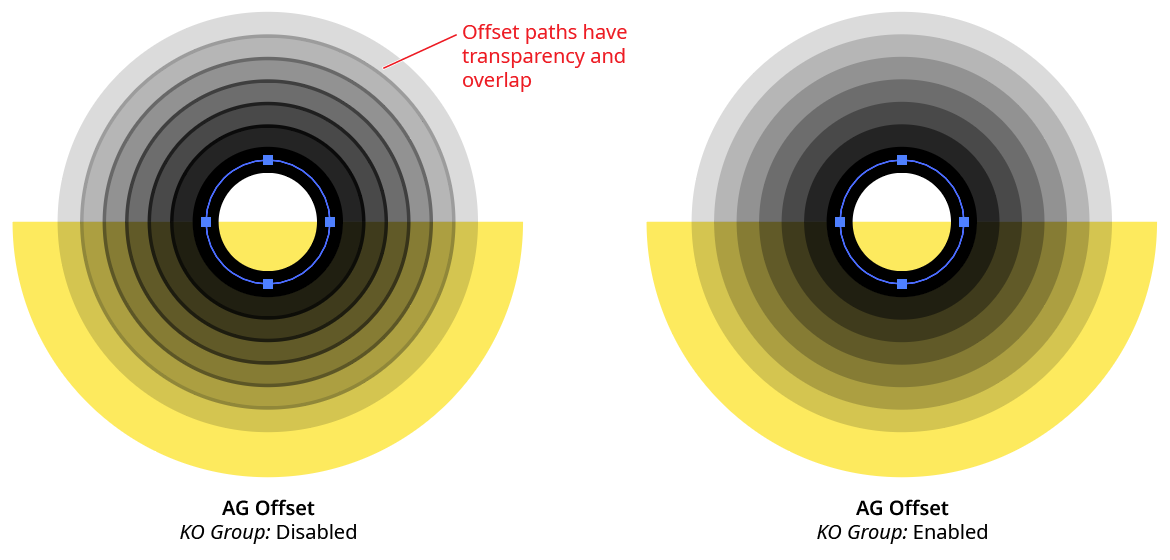
13. KO [Knockout] Group
When enabled, this setting keeps multiple, partially-transparent offset paths from being transparent to each other, just as the Knockout Group setting on the native Transparency panel does.
AG Offset Knockout Group Example
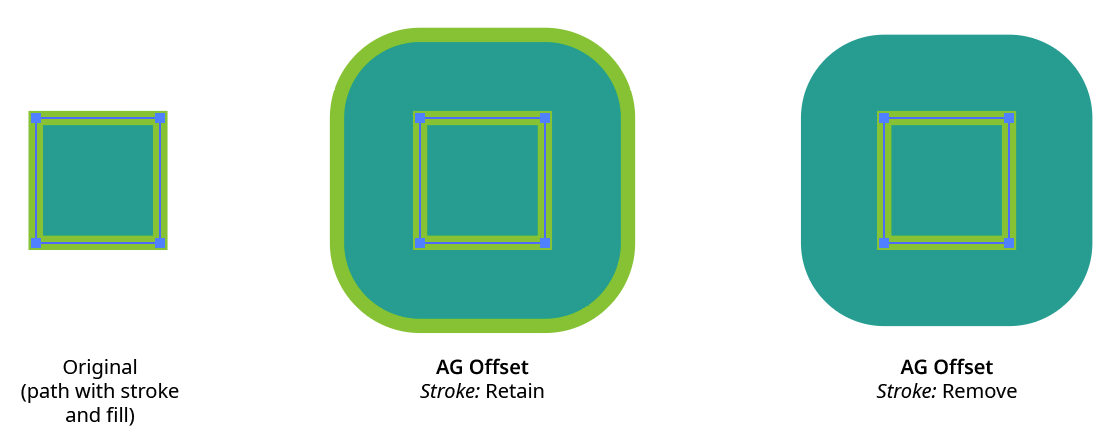
14. Stroke
When the AG Offset live effect is located below the fill and strokes of the artwork in the Appearance panel, this pulldown menu specifies how the stroke of the offset path should be handled:
Retain means the stroke (if any) will be simply be taken from the original path.
Remove means the offset paths will have no stroke, even if the original path had one.
AG Offset Stroke Retain and Remove
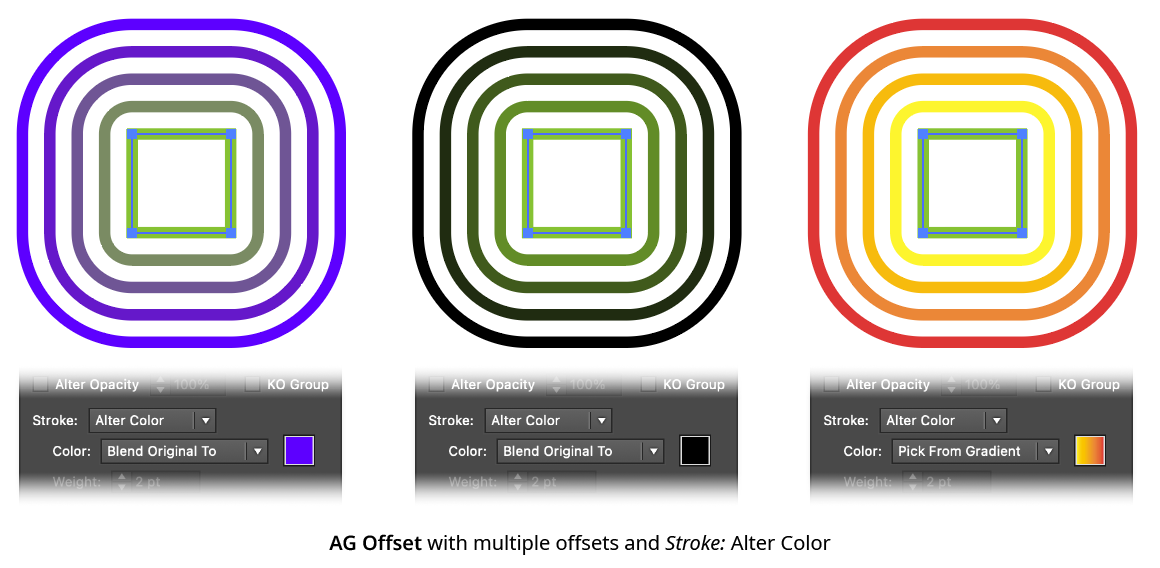
Alter Color means the offset path (if it has a stroke), will have its stroke color changed. There are two methods for doing so, specified by the pulldown menu that will become active. When set to Blend Original To, the last offset will have its color changed to the specified color (clicking the color chip allows changing the color using the standard Color Picker); if there are multiple offset paths, the paths will take colors which blend from the original stroke color to the specified color. When set to Pick From Gradient, the stroke colors of the offset paths will be taken from the specified gradient, with the first path corresponding to the color at the start of the gradient and the last offset path corresponding to the color at the end of the gradient.
AG Offset Stroke Alter Color
Alter Weight means the offset path (if it has a stroke), will have its stroke weight changed to the specified value. If there are multiple offset paths, the paths’ strokes will be assigned weights which blend from the original stroke weight to the specified weight.
Alter Both allows changing both the color (as per Alter Color) and weight (as per Alter Weight) of the offset paths’ strokes.
Force means the color and weight of the offset path’s stroke will be set to whatever is specified, regardless of the original path’s style. This is useful for adding a stroked outline to fill-only art without having to add a stroke to the art and moving the AG Offset live effect inside the stroke with the Positioning set to Replace Original.
15. Fill
When the AG Offset live effect is located below the fill and strokes of the artwork in the Appearance panel, this pulldown menu specifies how the fill of the offset path should be handled:
Retain means the fill (if any) will be simply be taken from the original path.
Remove means the offset paths will have no fill, even if the original path had one.
Alter Color means the offset path (if it has a fill), will have its fill color changed. There are two methods for doing so, specified by the pulldown menu that will become active. When set to Blend Original To, the last offset will have its color changed to the specified color (clicking the color chip allows changing the color using the standard Color Picker); if there are multiple offset paths, the paths will take colors which blend from the original fill color to the specified color. When set to Pick From Gradient, the fill colors of the offset paths will be taken from the specified gradient, with the first path corresponding to the color at the start of the gradient and the last offset path corresponding to the color at the end of the gradient.
Force means the color of the offset path’s fill color will be set to whatever is specified, regardless of the original path’s style.

AG Offset Fill Options
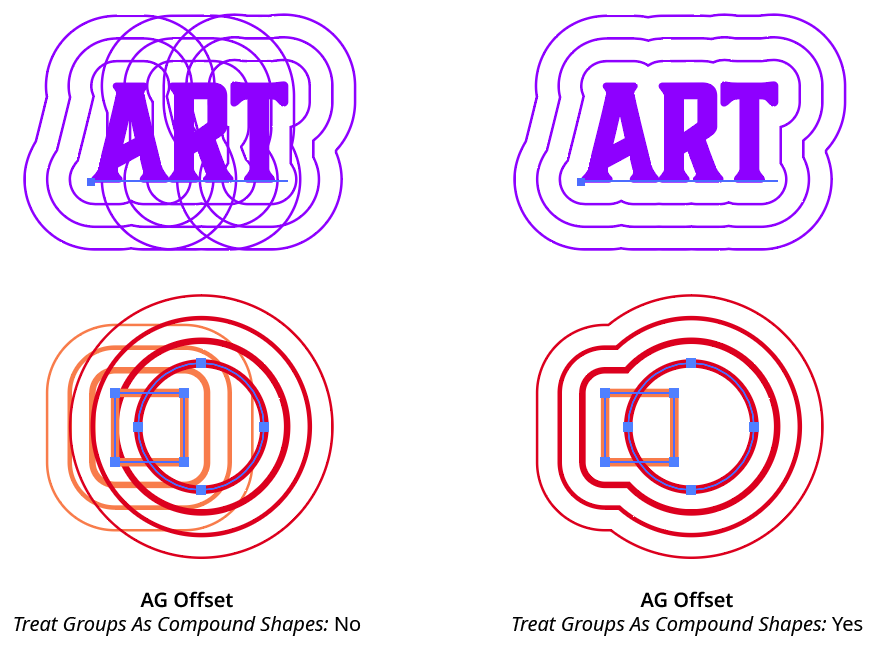
16. Treat Groups As Compound Shapes
When enabled, and the effect is applied to a group (or art that is internally expanded into a group within the effect stack, such as live text), the offset paths are created as if the members of the group were united into a single compound shape:
AG Offset Treat Groups as Compound Shapes
17. Apply Button
Click to apply the AG Offset live effect to the selected artwork, with the parameters set as they currently exist in the panel. If the button is not available, then either nothing is selected or the selection already contains at least one object with an AG Offset effect. If the button is clicked with Shift pressed, the offset paths will be added and immediately detached, essentially creating them as editable artwork rather than as a live effect. However, this loses the ability to preview the effect first.
AG Offset Panel Flyout Menu
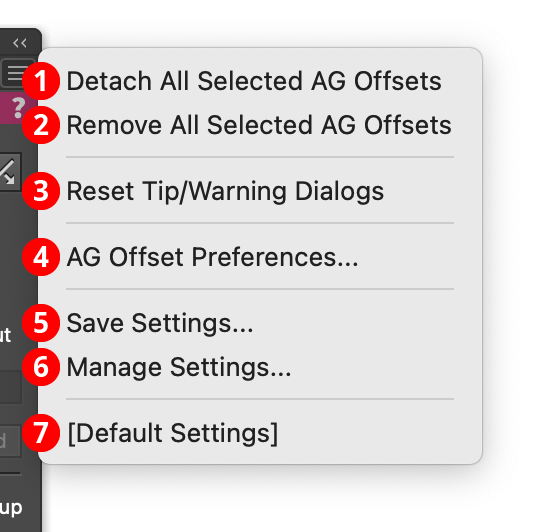
The AG Offset panel flyout menu items are contextually sensitive and all items may not be available, depending on the current selection.
AG Offset Panel Flyout Menu
1. Detach All Selected AG Offsets
Changes the offset paths created by all AG Offset live effects in the selection into editable artwork, and removes the effect from the appearance(s). This is similar to using the native menu command Object > Expand Appearance, but is more flexible because it leaves the existing artwork (and other live effects which may be present) intact.
2. Remove All Selected AG Offsets
Removes any AG Offset live effects from the selection. (This can be done from the Appearance panel as well, but not if multiple AG Offset effects are present with different parameters. In that case, the Appearance panel will simply display “Mixed Appearances” and the ability to select the live effect and delete it will no longer be available.)
3. Reset Tip/Warning Dialogs
If one or more of AG Offset’s tip or warning dialogs (for example, the one shown when trying to use the AG Offset tool in Pattern Editing Mode) have been suppressed using the Don’t show again checkbox, clicking this button will re-enable them.
4. AG Offset Preferences...
Brings up the preference dialog (see AG Offset: Preferences).
5. Save Settings...
Captures all of the current parameter settings on the panel to a file, which can be instantly recalled later (either in the current file session or a later one). A dialog will appear through which the file name may be specified.
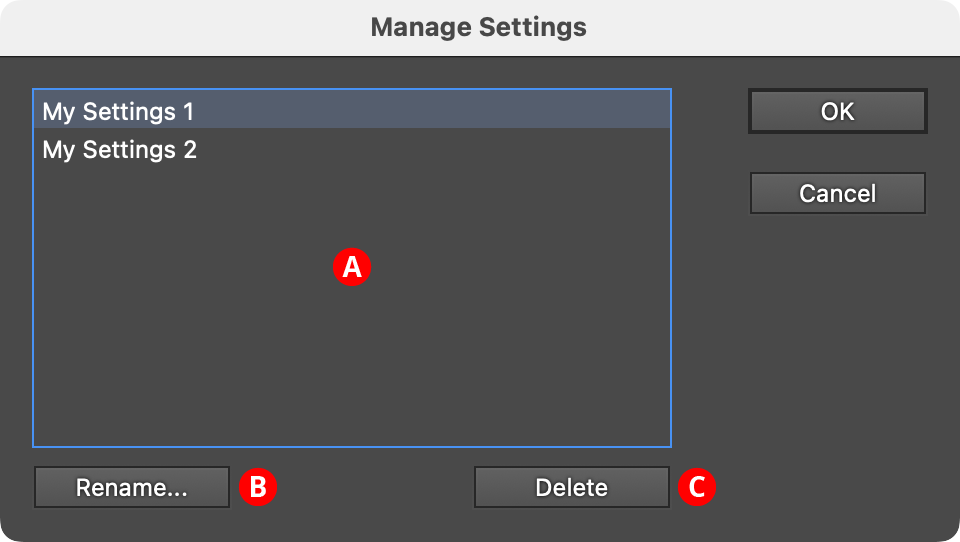
6. Manage Settings...
Brings up a dialog through which existing settings files may be renamed or deleted:
AG Offset Manage Settings Dialog
A. Settings List: Shows all user-saved settings. One or more settings files can be selected for use with the buttons at the bottom of the dialog by clicking on them in the list, with Shift pressed to select contiguously or Command/Ctrl pressed to select discontiguously, as normal.
B. Rename Button: If a single settings file is selected, allows it to be renamed, through a separate dialog. If the Cancel button is used, the original names will be restored.
C. Delete Button: Removes the selected settings file(s). The files are not permanently deleted until the OK button is clicked.
7. Settings Files
User-defined settings will appear below the built-in [Default Settings] menu item. Choosing a settings menu item will load the panel with the settings it had when the file was saved; the AG Offset effects in any selected art will be updated to match.