 Profile Attributes Editor
The Profile Attributes Editor allows editing of the metadata associated with the profile. It will not allow editing of the geometry itself (dump the profile to the artboard, edit it in Illustrator, and re-grab it to alter profile geometry). Not all artwork is suitable for use as a profile. If artwork is unsuitable, the editor will come up, but it will be impossible to accept the profile and the OK button will be greyed out. A diagnostic message will be shown explaining why the artwork cannot be accepted.
The Profile Attributes Editor comes up when a new profile is created by pressing the Grab button in the main tool panel (see above). Aside from giving the profile a name and setting the category, another important operation is setting the key path. The key path is used to replace the original path in the target art. The key path must be an open path, and it cannot be overhung by any other artwork. However it is possible to create artwork with more than one valid key path. A profile must be given a valid key path to be created.
The Profile Attributes Editor can be invoked from the Grab button or the Profile Edit button in the main tool panel.
Reprofile Attributes and Captions
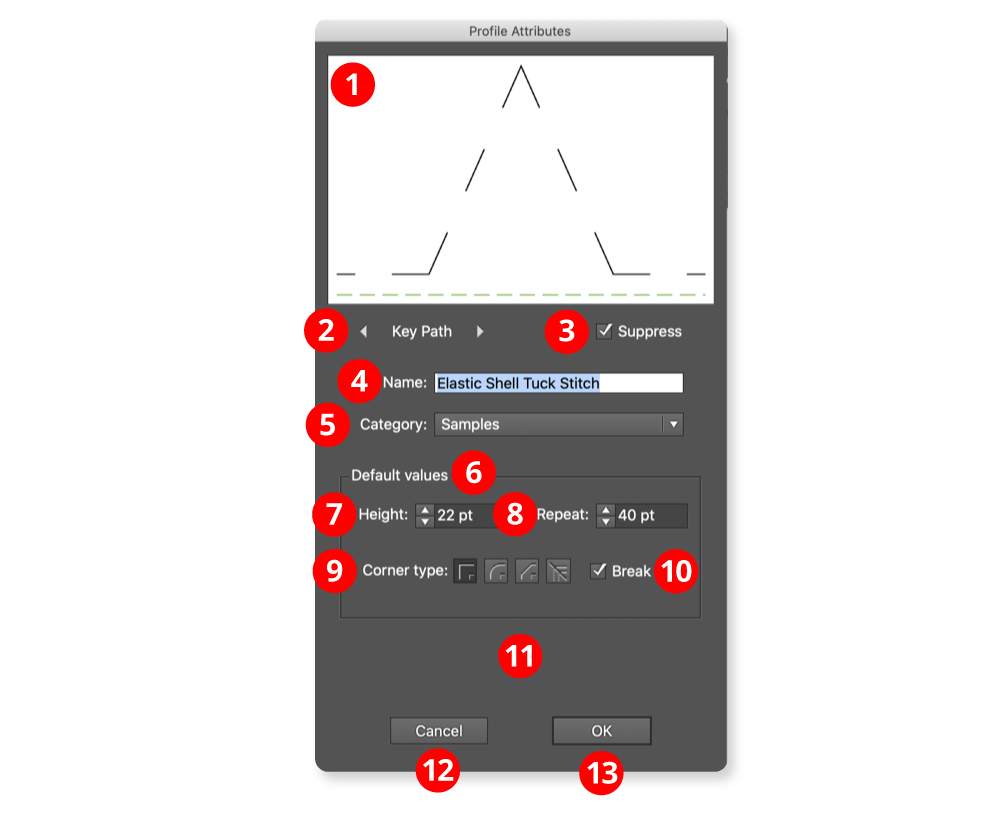
1. The Profile thumbnail
Profiles use rubber sheet geometry, so the aspect ratio of the artwork selected in Illustrator will not be preserved. The key path is shown in red, or in a dotted green line if it is suppressed. It is possible to interact with the thumbnail using the mouse to select the key path. The thumbnail will then rotate to show the new key path in the horizontal position.
2. Key path cycle buttons
If the artwork has only a few open paths, it may be more convenient to select the key path using the buttons. If the artwork has only one open path, they will be disabled. It is possible to select an invalid path as the key path, but not to accept the resulting profile (OK button is greyed out).
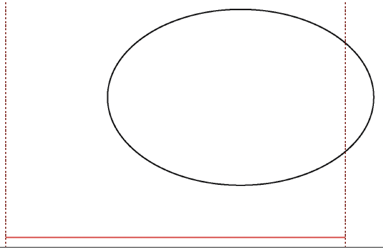
Reprofile Invalid Paths
An invalid key path has been selected. The dotted lines show where artwork is overhanging. Note: Sometimes the overhang can be very small.
3. Suppress key path checkbox
If the key path is suppressed, it is shown as a dotted green line. The key path is used to align the profile to the target art, but doesn’t appear when the reprofile is applied. If only part of the target path is selected, a closed path will become an open path and an open path will be broken into two.
4. Name edit box
The name of the profile. Names are also used as filenames, so currently only Latin names that do not contain special characters are supported.
5. Category dropdown
Set the category of the profile. It is also possible to create a new category. Manage categories using the Profile Manger.
6. Default values
These are the settings for the profiles which are set when pressing the Use Defaults button in the main tool panel.
7. Height control
Default height of the profile, usually overridden by editing with the tool, but useful for preserving aspect ratio.
8. Repeat control
Default repeat width of the profile. Use with the height setting to preserve aspect ratio. Unlike height, repeat is not affected by editing with the tool.
9. Corner type buttons
When reprofiling a path with an abrupt change in path direction, the corner type specifies how the reprofiled path bends around the original corner.
10. Break checkbox
Forces a whole number of repeats for each section of the path without corners. This option is always enabled for mirrored corners.
11. Information area
If the profile cannot be accepted, explanatory text appears here and the OK button is greyed out.
12. Cancel button
Cancels the profile edit, or cancels the profile creation if dialog invoked from the Grab button.
13. OK button
Accepts the edits or the new profile and saves it in the library. Note: that if creating a new profile it may not be possible to accept it and the OK button will always be greyed out. This is so it is possible to examine the profile to find the problem, which will usually be artwork overhanging the key path.