 Operation
To use Roulette, make sure the document’s current layer is unlocked and choose the Create Roulette... menu item. This will bring up the settings dialog and preview the roulette(s) created with those settings. The initial settings will be those that were last used to create a roulette. If any of the settings other than the accuracy are changed, the preview will automatically update. Clicking OK will create the roulette(s) as one or more art paths on the artboard and leave them selected.
If a series of roulettes is created, they are automatically grouped. Either way, the parameters that were used to create the roulette(s) will be recorded in the art’s note field (accessible through the native Attributes panel), assisting you in recreating the artwork later on, even if its settings were not saved.
Roulette Settings Dialog
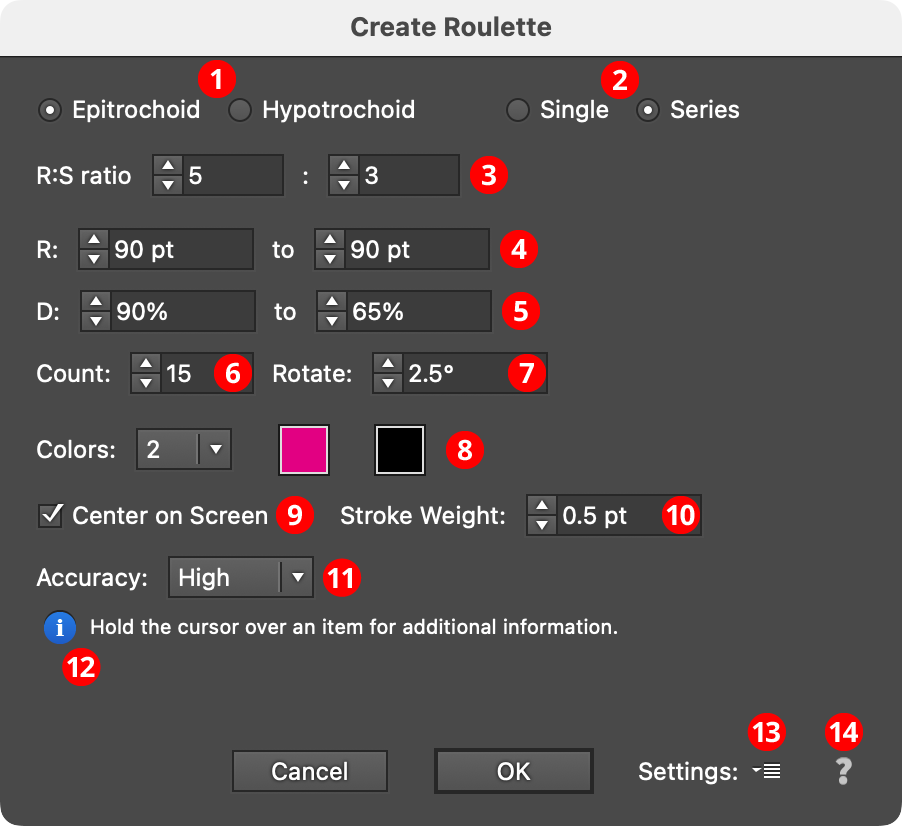
Make Roulette Dialog
1. Roulette Type
There are two types of roulette curves which can be created. Epitrochoids are roulettes traced by a point attached to a moving circle which rolls around the outside of a fixed circle (generally larger, but not required to be). Hypotrochoids are similar, but the moving circle rotates around the inside of the fixed circle. In both cases, it is helpful to think of the circles as gears with teeth; i.e., the moving circle rotates without slipping. In either case, the moving circle moves around the fixed circle in a counterclockwise direction.
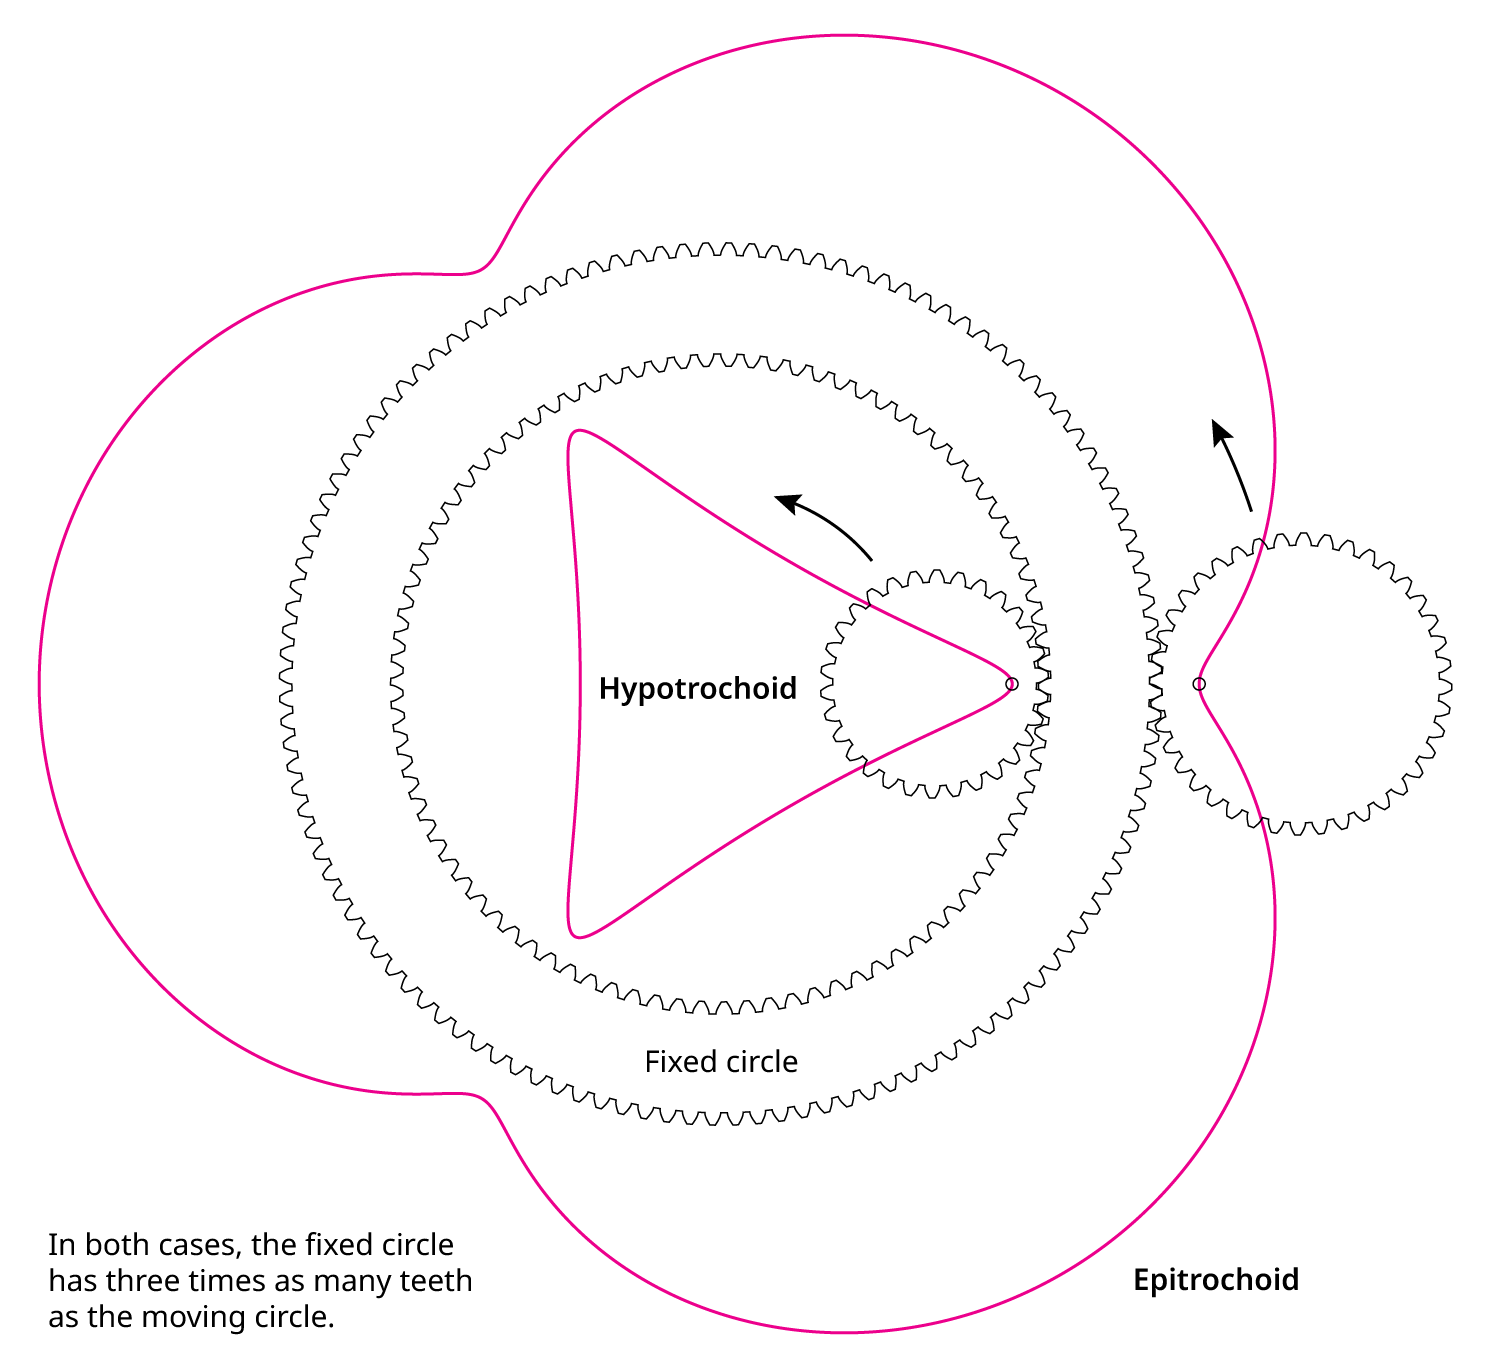
Roulette Construction
The Wikipedia articles on epitrochoids and hypotrochoids provide more information and include animations that help in visualizing the curve construction process.
2. Single/Series
When set to single, just one roulette curve will be created. When set to series, more than one curve will be created (the number being specified in the Count field). For series, the R and D parameters are linearly varied from the first roulette to the last. Each roulette is rotated around the center point by the amount specified in the Rotate field. Finally, the stroke color is also linearly changed from the first color to the last color specified, moving through the intermediate colors, if present.
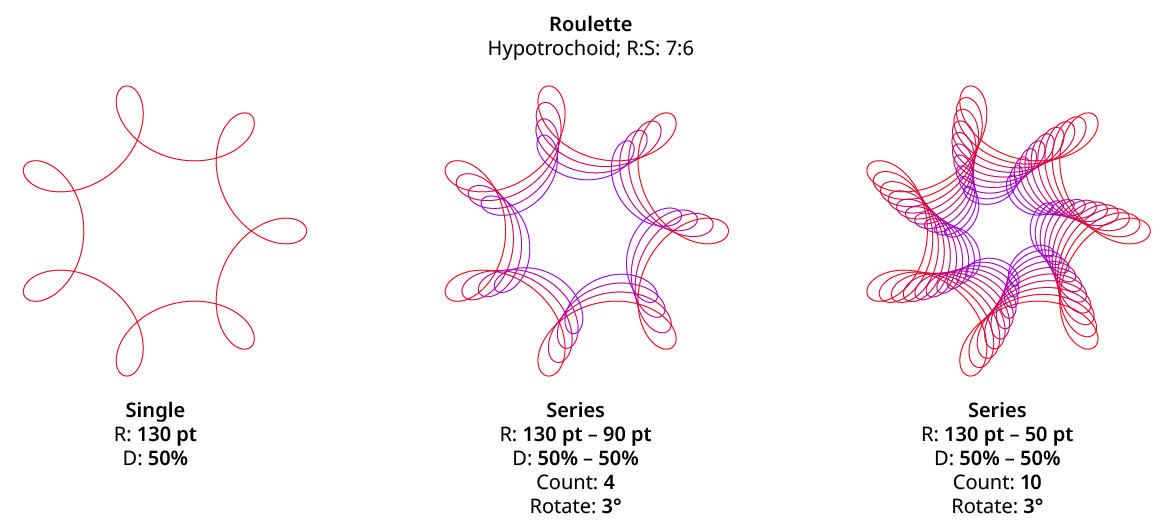
Roulette Single Vs. Series
3. R:S Ratio
Specifies the ratio of the radius of the fixed circle (R) to the radius of the moving circle (S). Each value must be an integer between 1 and 200. For example, if the R:S ratio is set to 10:3 and the R value is 200 pt, then the S value (internally) would be set to 60 pt. Ratios which are multiples of each other (for example, 4:1 and 16:4) are treated identically. In “Spirographic” terms, the values can also be thought of as the ratio between the number of teeth on the fixed gear and the number of teeth on the moving gear.
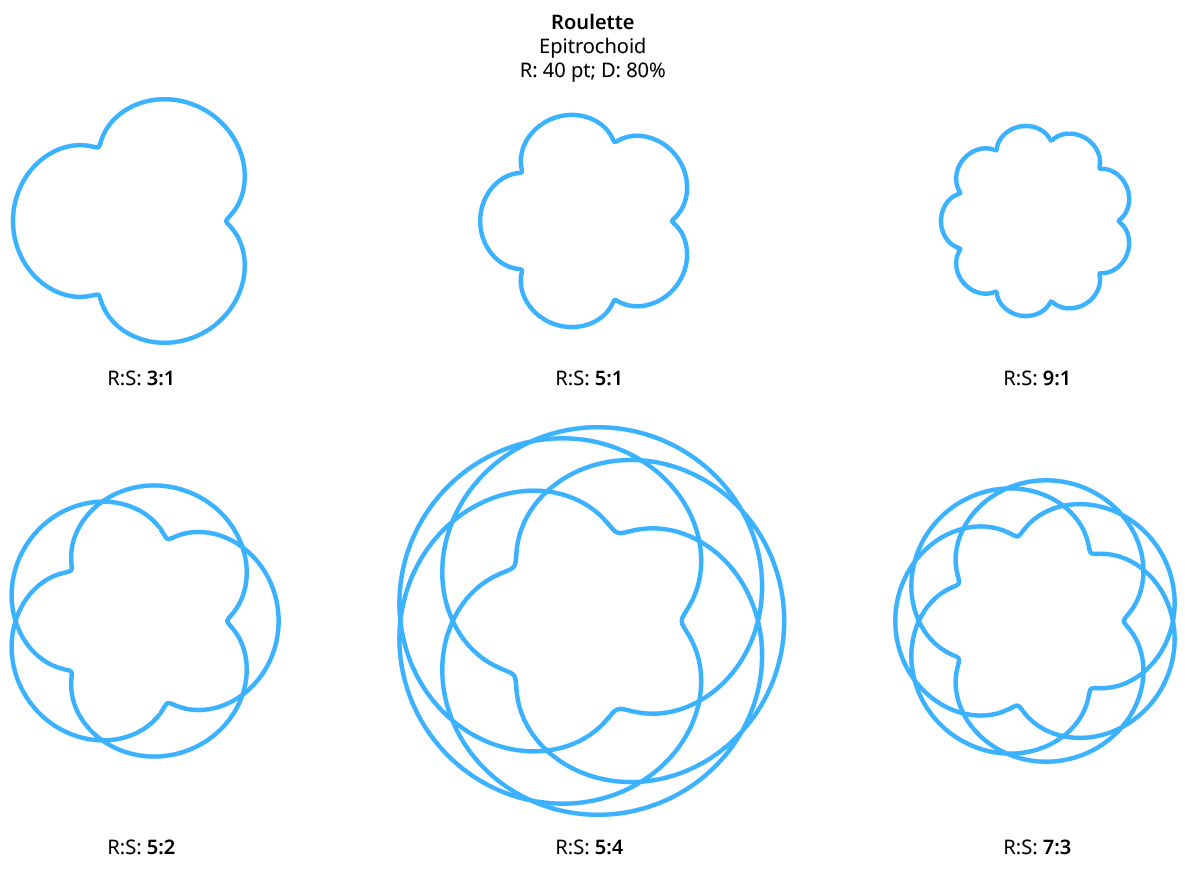
Roulette R:S Ratio
Because the values can interact in unexpected ways depending on the D value, finding the desired R:S ratio is often just a matter of experimentation.
4. R Value(s)
Specifies the radius of the fixed circle, from 1 pt to 8000 pt. When a series is being used, both the starting and ending R values are specified. The S value (radius of the moving circle) is not specified explicitly, but is instead calculated using the R:S ratio.
5. D Value(s)
Specifies the position of the drawing point, as a percentage along an imaginary line from the center of the moving circle to its edge. The value can range from 0% to 10000%. When the R:S ratio is greater than 1, low D values create smoother curves with no loops. When a series is being used, both the starting and ending D values are specified.
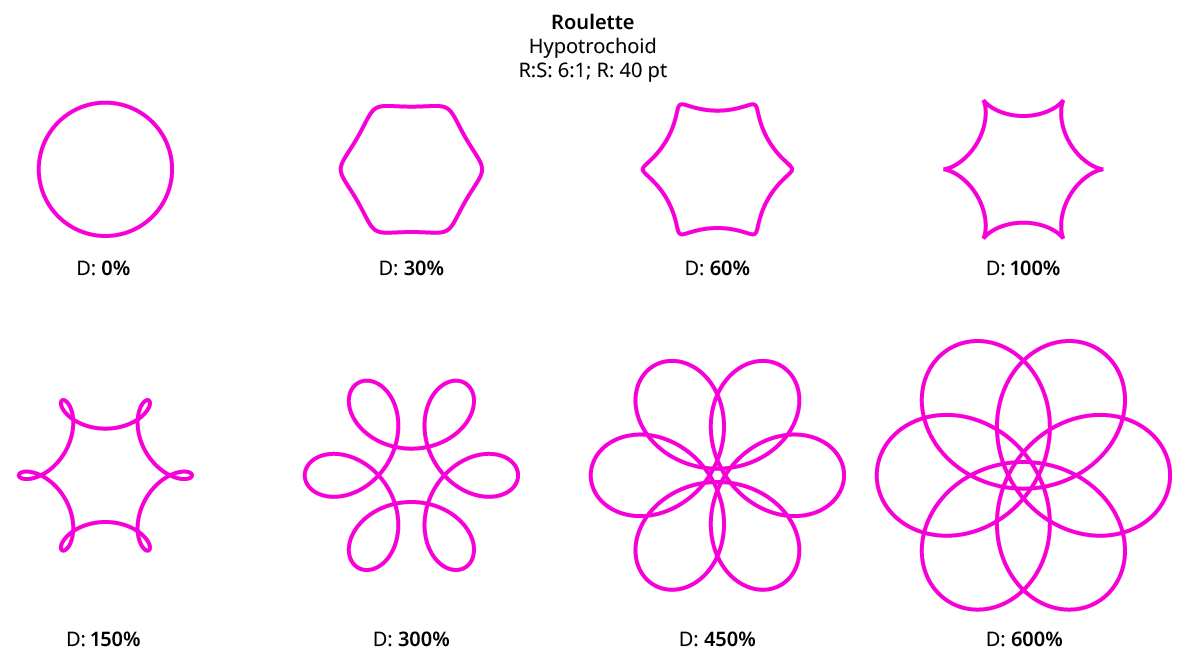
Roulette D: Value
6. Count
Available when a series is being used; it specifies the number of roulette curves in the series (from 2 to 2000). Because each roulette path has its anchor points optimized after clicking OK, high counts may take a while to process. A progress bar will be displayed and allow the operation to be aborted.
7. Rotate
Available when a series is being used; it specifies the angle to rotate each successive roulette. Rotation is always around the center point which is shared by all roulettes. When rotating, small angles (on the order of 0.5° to 3°) generally work better than larger angles. When combined with a fairly high count and thick stroke, this can create the appearance of a blended fill:
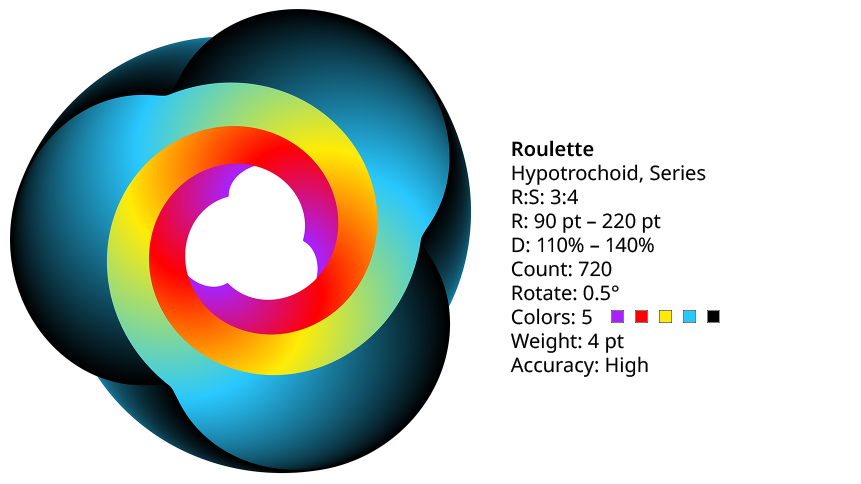
Roulette High Count Example
8. Color(s)
Specifies the color of the stroke on the roulette path. When a series is being used, multiple colors (up to 5) may be specified. If the number of colors does not match the Count, the colors are linearly interpolated. If a fill is desired on the roulette, it can be added after the path has been created.
9. Center on Screen
When enabled, the roulette artwork is drawn with its center at the center of the document’s window. Otherwise, it is drawn centered at the origin (the zero, zero point) of the global rulers.
10. Stroke Weight
The stroke weight of the roulette path. When a series is used, this applies to all paths in the series. The stroke uses a Round join.
11. Accuracy
Specifies how closely the final path(s) will follow the true, mathematical roulette curves (which can only ever be approximated with the cubic beziers that Illustrator uses to represent all paths). The higher the accuracy, the more anchor points will be required to create the roulette. The accuracy setting is not actually reflected in the roulette’s preview in order to keep the preview responsive.
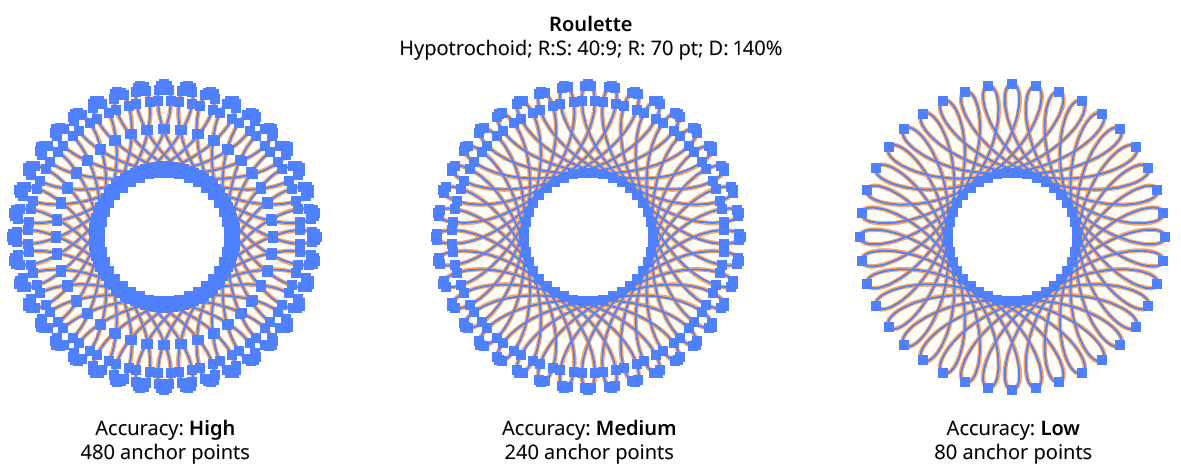
Roulette Accuracy
In practice, the difference between high accuracy and low accuracy is generally subtle.
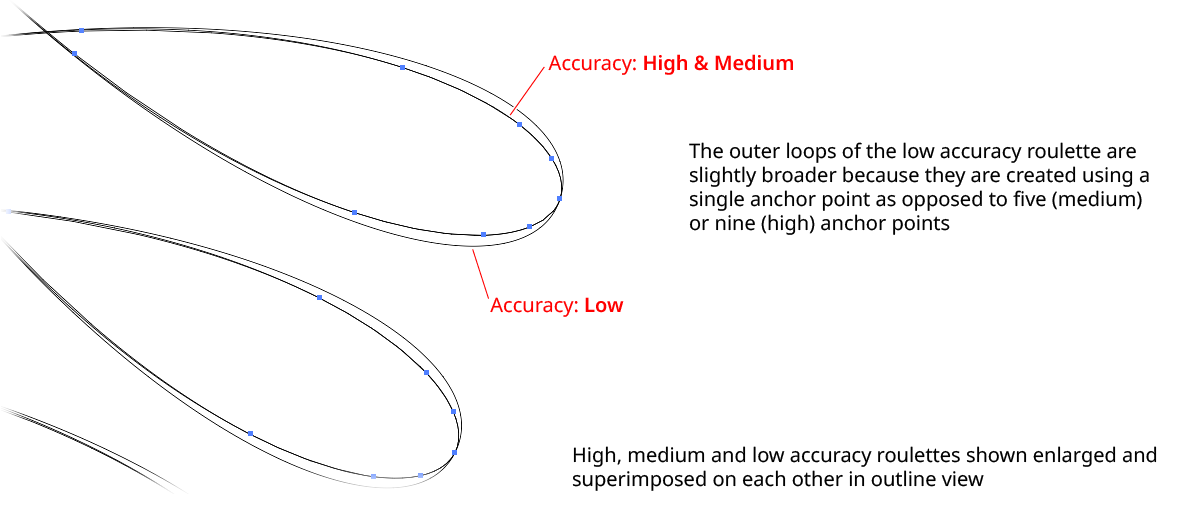
Roulette Accuracy Comparison
Because Roulette always maintains rotational symmetry in the paths’ final anchor point positions, it is often possible to reduce the number of anchor points even further by using the Super Smart Remove Points function (found in the VectorFirstAid plugin) on the completed roulette(s). However, this comes at the cost of usually losing symmetry.
12. Informational area
Shows a brief description of each control when the cursor is being hovered over it.
13. Settings
The Settings popup menu provides access to saving, managing, and applying Roulette settings.
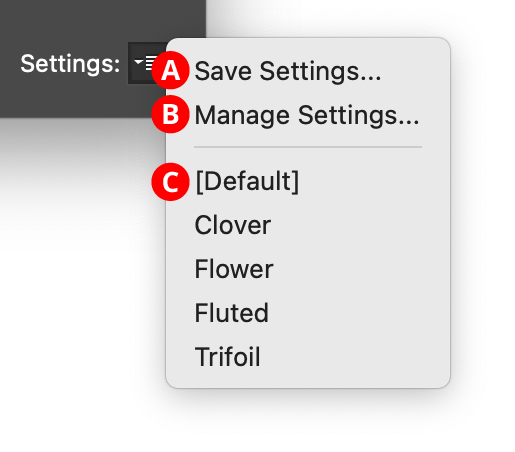
Roulette Settings Menu
A. Save Settings…: Captures all of the current parameter settings on the dialog to a file, which can be instantly recalled later (either in the current file session or a later one). A small dialog will appear through which the settings name may be specified.
B. Manage Settings...: Brings up a dialog through which existing settings files may be renamed, deleted, imported, or exported:
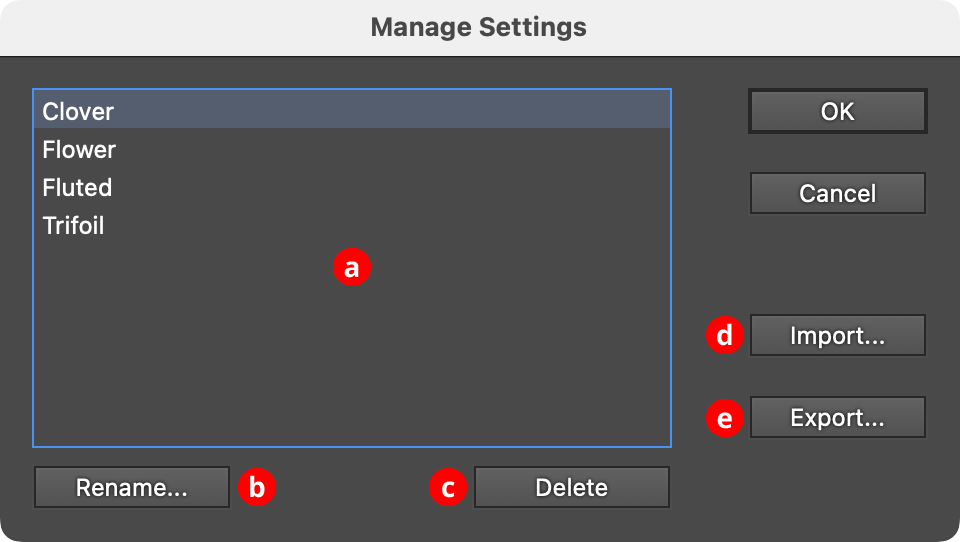
Roulette Manage Settings Dialog
a. Settings List: Shows all user-saved settings. One or more settings files can be selected for use with the buttons at the bottom of the dialog by clicking on them in the list, with Shift pressed to select contiguously or Command/Ctrl pressed to select discontiguously, as normal.
b. Rename Button: If a single settings file is selected, allows it to be renamed, through a separate dialog. If the Cancel button is used, the original names will be restored.
c. Delete Button: Removes the selected settings file(s). The files are not permanently deleted until the OK button is clicked.
d. Import...: Imports a previously-exported settings package file of type “.crs” using the standard operating system open file dialog.
e. Export...: Exports the selected setting(s) into a settings package file of type “.crs” using the standard operating system save file dialog. This file could be used as a backup or passed to another user.
C. Settings List: Choosing a settings file from this list will change the settings to match the state of the dialog when the settings file was saved (or, the case of [Default], to their default values).
14. Help Button
Opens the help documentation in the Astute Manager. If this does not automatically appear, please ensure your Astute Manager is running first.