 Distribute to Grid
The Distribute to Grid operation moves the selected artwork into a rectangular grid formation. The center of the grid is placed at the center of the bounds of the original selected art.
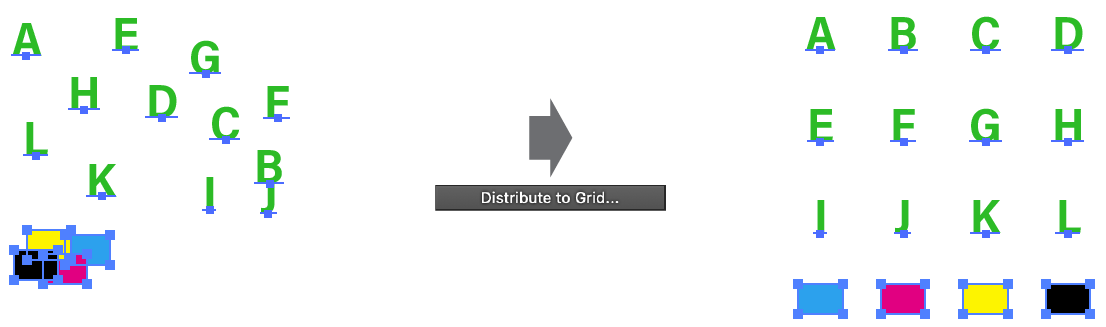
QuickOps Distribute to Grid Overview
Clicking the button brings up the settings dialog:
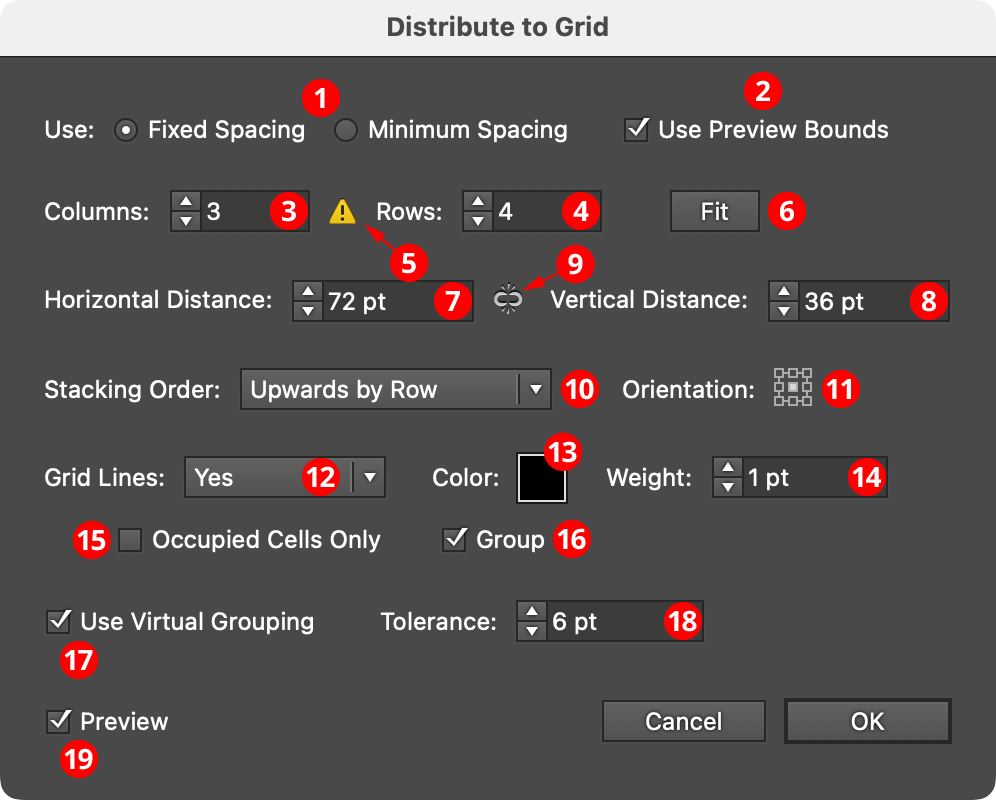
QuickOps Distribute to Grid Settings
1. Spacing
The two grid spacing options are Fixed Spacing and Minimum Spacing.
In Fixed Spacing, the centers of the grid cells are placed a fixed distance apart, and therefore all of the cells are squares of the same size. If this distance (specified further down in the dialog) is less than the size of any of the pieces of filling art, that art will simply extend beyond the grid boundaries, and may overlap with the art in adjacent cells.
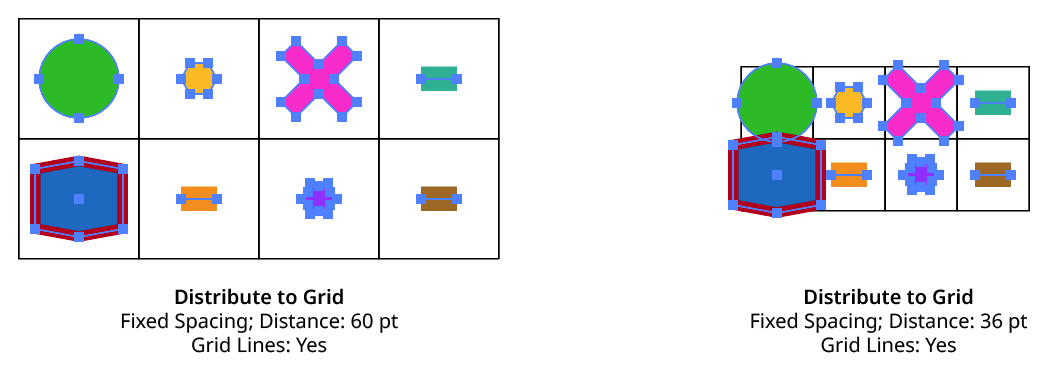
QuickOps Distribute to Grid Fixed Spacing
In Minimum Spacing, each grid cell is only as wide as the widest piece of art in its column (and only as tall as the tallest piece of art in its row) plus the distance value specified further down in the dialog. If all the art were the same size, this distance value would be equivalent to a gutter width/height.
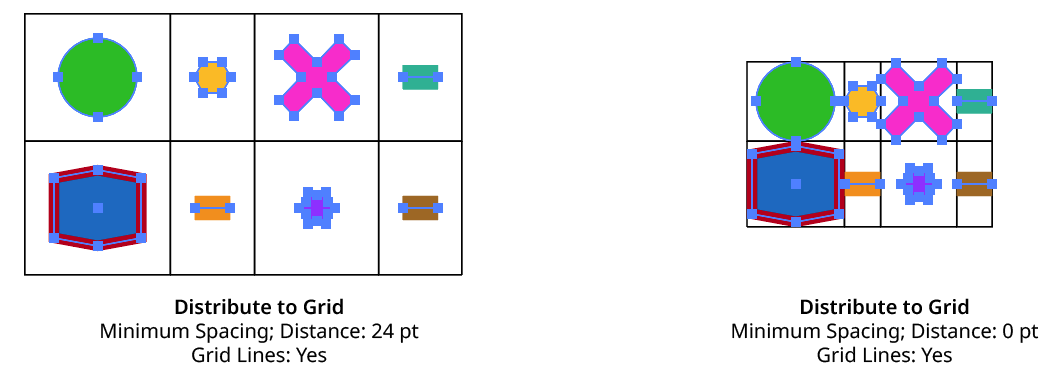
QuickOps Distribute to Grid Minimum Spacing
Bounding boxes of clip groups are calculated using the clipping paths only, ignoring the clipped content.
2. Use Preview Bounds
Overrides the general preference of the same name. When enabled, the strokes and live effects of the artwork are included in its bounding box, which affects the cell size (when spacing is set to Minimum Spacing) and the position of the art within the cell based on the orientation setting.
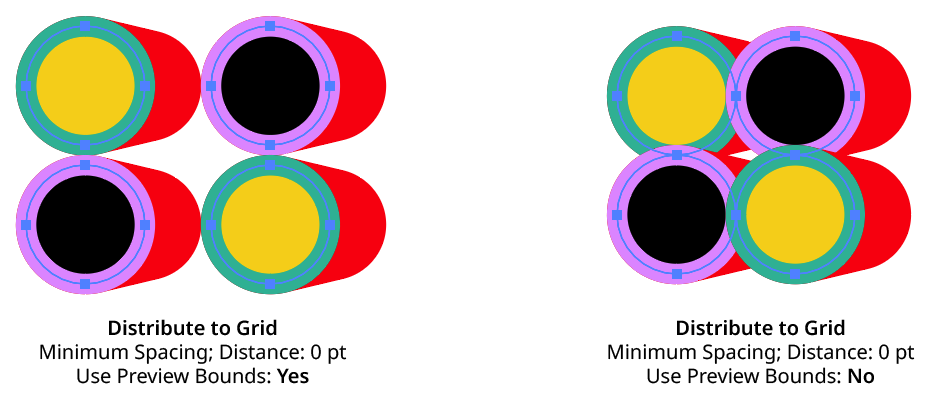
QuickOps Distribute to Grid Use Preview Bounds
3. Columns
Specifies the number of columns in the grid, from 1 to 1000.
4. Rows
Specifies the number of rows in the grid, from 1 to 1000.
5. Underflow Warning
If one or more of the selected art objects will fit into the grid (because the number of cells in the grid is less than the number of objects), the warning icon will be displayed and the Fit button will become available. If the dialog is OK’d regardless, the objects which did not fit are simply left at their original positions.
6. Fit
Available when the grid size is too small to contain all of the selected art objects. Clicking the button will automatically adjust the column and row counts to accommodate all of the objects. Holding down Option/Alt while clicking will only adjust the column count, while holding down Shift will only adjust the row count.
7. Horizontal Distance
When using Fixed Spacing, the horizontal distance value specifies the distance between the horizontal centers of each cell in the grid (i.e., the cell width). When using Minimum Spacing, the distance value specifies the extra space added (or removed) between columns after they have been adjusted to the minimum size needed to fit all the art. If all the art were the same size, this distance value would therefore be equivalent to a gutter width.
8. Vertical Distance
When using Fixed Spacing, the vertical distance value specifies the distance between the vertical centers of each cell in the grid (i.e., the cell height). When using Minimum Spacing, the distance value specifies the extra space added (or removed) between rows after they have been adjusted to the minimum size needed to fit all the art. If all the art were the same size, this distance value would therefore be equivalent to a gutter height.
9. Distance Link
When enabled (the link icon is unbroken), changing one distance value will automatically adjust the other in proportion. When disabled (the link icon is broken), each distance value can be adjusted independently.
10. Stacking Order
Specifies how the art should be placed into the grid, based on its original stacking order:
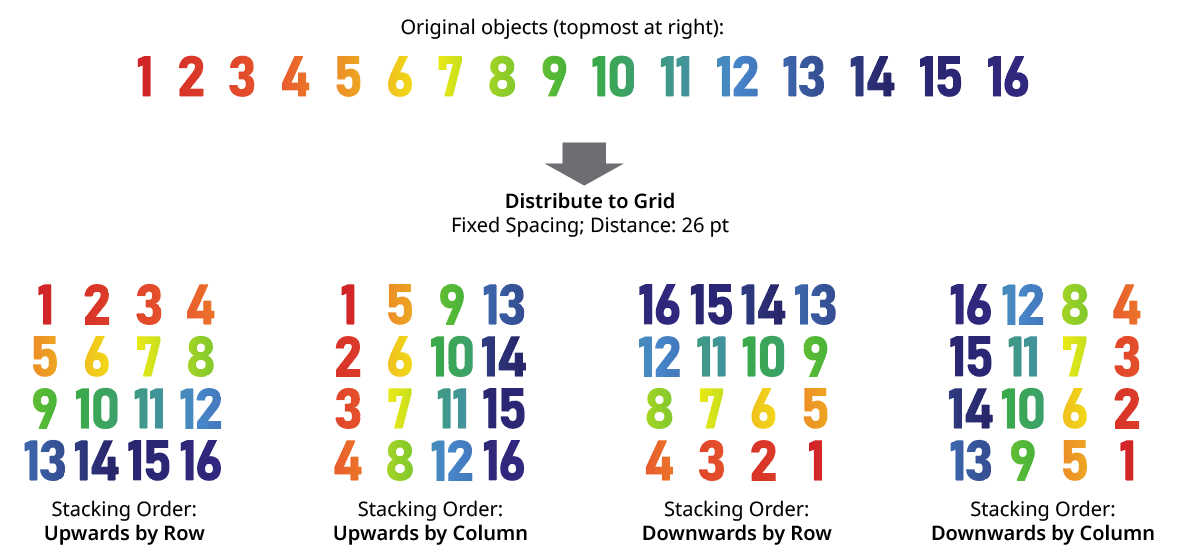
QuickOps Distribute to Grid Stacking Order
11. Orientation
The Orientation setting, specified using the standard “nine-block” control, indicates where in each cell the art will be positioned. When all the art is the same size, this generally does not produce any visible difference unless the grid lines are turned on.
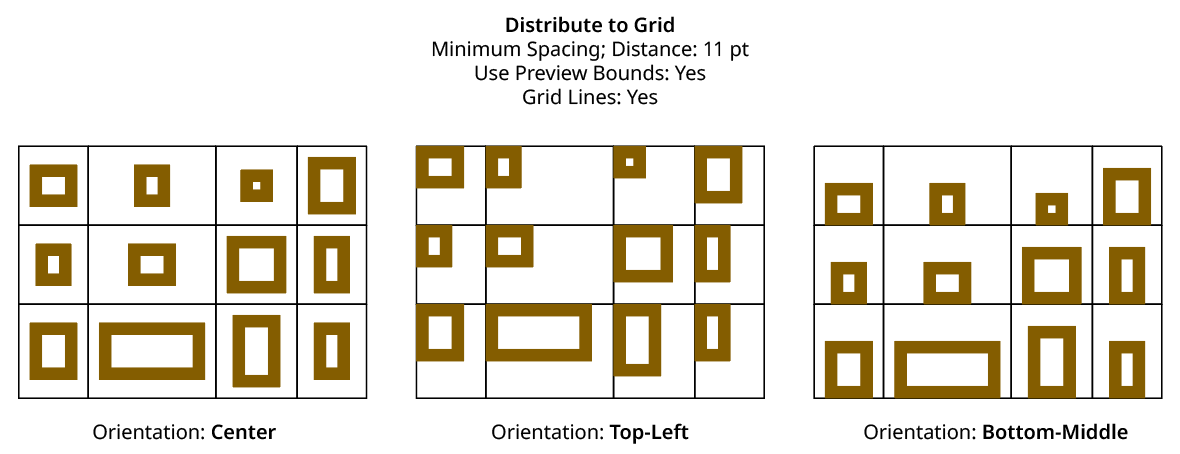
QuickOps Distribute to Grid Orientation
12. Grid Lines
There are three options for grid lines (stroked rectangles around each cell in the grid). When set to No, they are never created. When set to Preview Only, they are visible while the settings dialog is open, but are not actually created as artwork afterwards. When set to Yes, they are both previewed and left as artwork after the grid is created. Grid lines are always placed behind the artwork that forms the grid.
13. Color
Available unless Grid Lines are set to No. Specifies the color of the grid lines. Clicking the color chip brings up the standard color picker dialog. The default color is black.
14. Weight
Available unless Grid Lines are set to No. Specifies the stroke weight of the grid lines. The default is 1 pt.
15. Occupied Cells Only
Available unless Grid Lines are set to No. When enabled, only cells which contain art will have lines constructed.
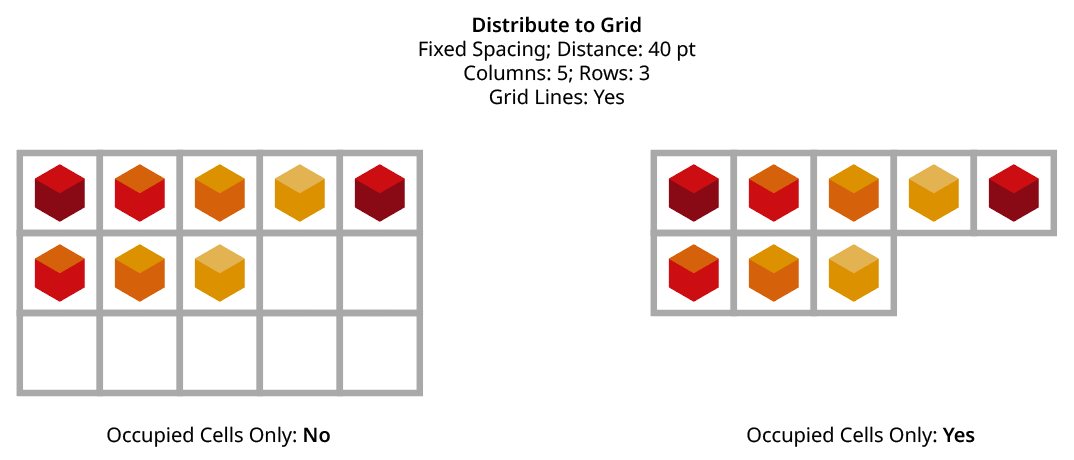
QuickOps Distribute to Grid - Grid Lines on Occupied Cells Only
16. Group
Available unless Grid Lines are set to No. When enabled, the rectangles which form the grid lines are placed into one group.
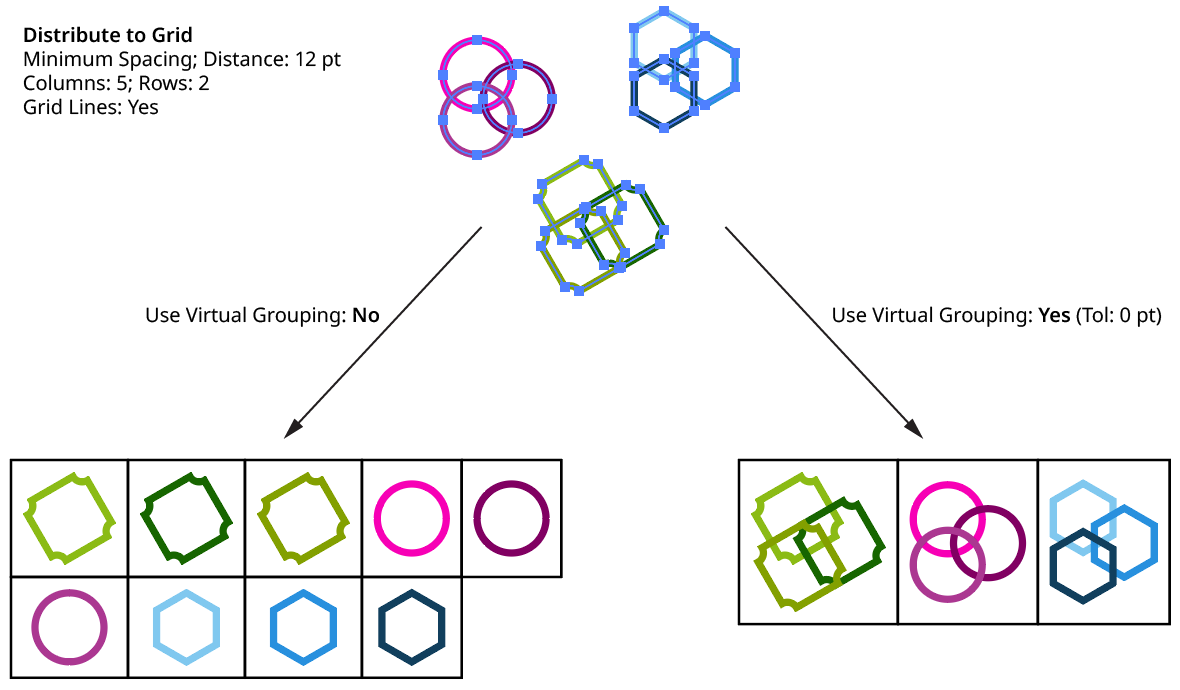
17. Use Virtual Grouping
When enabled, art objects are treated as if they had been Grouped By Proximity before being arranged into a grid (see Group By Proximity for details about the algorithm used). But, importantly, the grouping is not actually made, ensuring that items on different layers remain on those layers after being arranged into a grid.
QuickOps Distribute to Grid Use Virtual Grouping
18. Tolerance
Available when Use Virtual Grouping is enabled. It controls how close together art objects must be before they are put into a virtual group. Larger values mean that objects that are further apart will still be considered “grouped.” See Group By Proximity for additional details.
19. Preview
When Preview is enabled, both the art objects’ final positioning and the grid lines (unless turned off) are shown on the artboard and will update whenever the settings are changed. Turning Preview off will show the objects in their original positions.